
One of the challenges of working with large-scale web apps turns out to be just the organization of code. When apps get sufficiently large, it actually becomes a lot of work just finding where things are and knowing where to put new code. We already went over the standard directory structure for an app in Chapter 1, Introducing SproutCore, and by sticking to that structure you will have a much easier time organizing the code within your apps. Next though, let's look at ways to split the project into larger components for sharing and optimized delivery.
The first approach is for sharing large components of code between apps by creating frameworks. Frameworks are simply collections of code placed in a folder within the frameworks' directory of the project. In the previous section, you noticed the my_framework framework appeared in the unit tests that was achieved simply by changing into the project directory and typing the following command:
$ mkdir frameworks
$ cd frameworks
$ mkdir my_framework
Once you have the framework directory, you can work with it much like you would in an app directory. For example, you may want to add a views folder and place some custom views that you've made that you want to share between apps or you may want to add a resources folder and add a shared log in pane that multiple apps will use. In this way, you can pull the larger architectural pieces out of the app code and into a framework so that you don't end up duplicating the code across every app.
To include the framework in the app, you add it to the list of required frameworks in the Buildfile. For example, to include a framework of custom view components called my_views to the contacts app, we would modify the Buildfile in apps/contacts shown as follows:
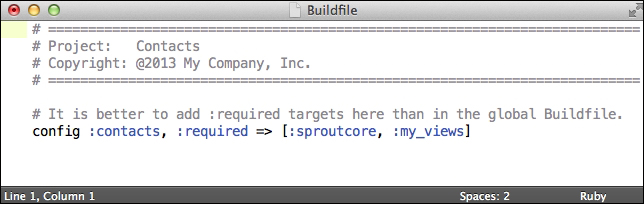
In this example, when the application is built the sproutcore framework will be included first, followed by the my_views framework, and then the contacts app code. Since frameworks can also include their own Buildfiles, you could actually ensure that the correct order is always followed by adding a Buildfile to the framework.
For example, we can ensure that the my_views framework always has the sproutcore framework that it depends on shown as follows:
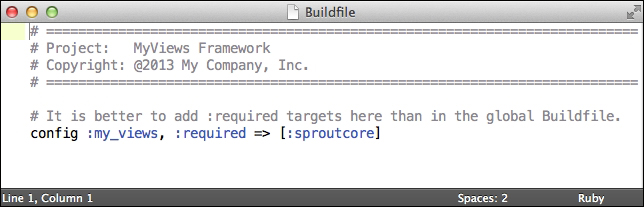
By setting the requirement for the supporting framework, we are safe if someone were to use that framework later and fail to require sproutcore first.
By the way, a possible optimization that you can make for your app load time is to exclude any SproutCore frameworks that you are not using. By default, requiring sproutcore in the Buildfile is the same as requiring the following code:
config :my_app, :required => [
  :'sproutcore/desktop',
  :'sproutcore/datastore',
  :'sproutcore/statechart'
]
Typically, you will end up using almost all the code available in these sub-frameworks, but if you were writing a very simple app and found you weren't using one or more of them, you can exclude it to reduce the amount of code to deliver to the client. For example, you could exclude the desktop framework with the following code:
config :my_app, :required => [
  :'sproutcore/datastore',
  :'sproutcore/statechart'
]
Again though, this removes several important SproutCore views that you probably won't be able to function without in any decently sized application. A better option then is to load code through modules.
Modules are very similar to frameworks, they are just bundles of code that provide a specific purpose, but they have one distinct advantage over frameworks and that is modules can be deferred until they are actually needed.
Take the Contacts app for example. Imagine if we had a complex account administration pane for the user's account, but that we expected them to rarely open it. In that case, we wouldn't benefit by including the code and styling for the account pane along with the regular app, since there was little chance that it would be used. Instead, we would be better off loading it but not passing it until later or not even loading it at all unless the user wants to open the pane.
This is what modules provide us. We can package a section of the app into a module and either load it as a string in the initial app code, as a string in a separate file slightly after launching, or not load it at all until required.
To create a module, simply add a modules directory to an app or a framework. Within that modules directory, you can then add multiple modules just like you would add frameworks. For example, to add an account_mgmt module to the MyApp app, I would change to the app directory and type the following command:
$ cd apps/my_app
$ mkdir modules
$ cd modules
$ mkdir modules/account_mgmt
Within the account_mgmt module, we can add views, resources, and even stylesheets that will be loaded on demand when needed.
Once we've created the module, we simply need to indicate how to load it via the app's Buildfile. For example, here is a sample app with three different load styles of modules:
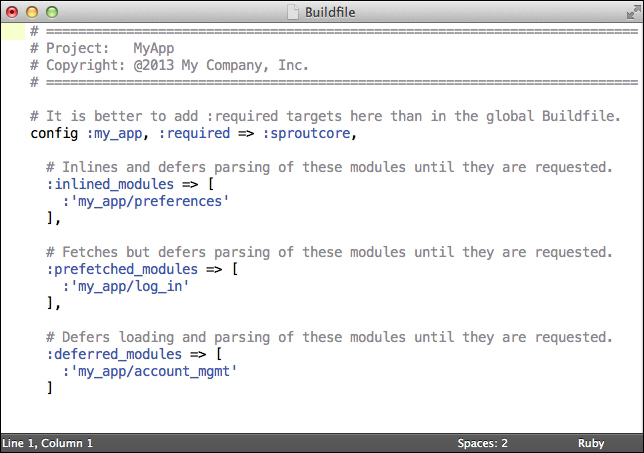
The following is a more complete description of each module option:
- Inlined: These modules are embedded as strings into the app code, so there isn't a separate file request required. An inlined module will always be available in the app, which makes them suitable for offline apps.
- Prefetched: These modules are embedded as strings in separate files that will be loaded after the application has launched and user activity is idle for one second. This makes prefetched modules better for improving initial load times than inlined modules, but a prefetched requires running the app online for a bit before being able to safely go offline.
- Deferred: These modules are not loaded at all in the app unless requested. This makes deferred modules the best for improving initial load times and runtime memory usage, but they cannot be used for code required in offline mode. They also have a longer initial use delay, since the code needs to be downloaded right before being used.
Once you have determined how you want your modules included, you can use them in your app very easily. To load a module, simply call SC.Module.loadModule with the name of the module and a target and method to call when it is loaded. Best of all, if the module is already loaded, you can still call SC.Module.loadModule at any time and the target/method will simply run immediately, so you don't need to check if a module is loaded yet or not.
For example, to load the log_in module from the preceding example, we would use the following code:
SC.Module.loadModule('my_app/log_in', targetObject, targetObject.logInModuleDidLoad);The targetObject.logInModuleDidLoad() function would then proceed to use the code included in the module. As you can probably guess, this works exceptionally well with the application statechart. We can create a state around a module's code and call loadModule whenever we enter the state.