This brings us to the last type of attribute we will use: the relationship attribute. Records are often related to each other as one-to-one, one-to-many, or many-to-many and we can encode this hierarchy in our SproutCore data model as well. To indicate a relationship, we use one of either SC.SingleAttribute (that is, to one) or SC.ManyAttribute (that is, to many), which is done just like we did with SC.RecordAttribute by using SC.Record helper methods. In this case, the helpers are toOne and toMany to be exact.
For example, if you recall from our simple data model example of Calendar and Event records, we indicated a relationship between the two. This relationship will exist in the raw data on the server, such that Calendar records will contain an array of Event record IDs and Event records will contain a single Calendar ID. To add this relationship to our classes, we would update the records as follows:
MyApp.Calendar = SC.Record.extend({

  // This calendar's events.
  events: SC.Record.toMany('MyApp.Event')

});

MyApp.Event = SC.Record.extend({

  // This event's calendar.
  calendar: SC.Record.toOne('MyApp.Calendar')

});Just like with the attr helper method, we can pass options to toOne and toMany. Since SC.SingleAttribute and SC.ManyAttribute inherit from SC.RecordAttribute, we can use the isEditable and key options just the same, but there are two other options specific to relationship attributes: inverse and isMaster.
The inverse option is the name of the property on the other side of the relationship, which, when set, will modify the other side of the relationship when this side changes. This sounds a bit tricky, but it's quite simple once you get it.
Let's look at what happens when we modify the relationship without the inverse option declared. To show this, I've mocked up a few sample records. There are two Calendar records with the guid 'calendar1' and 'calendar2' respectively and there are three Event records with the guid 'event1', 'event2', and 'event3' respectively. For this demo, all of the three events originally belong to 'calendar1'.
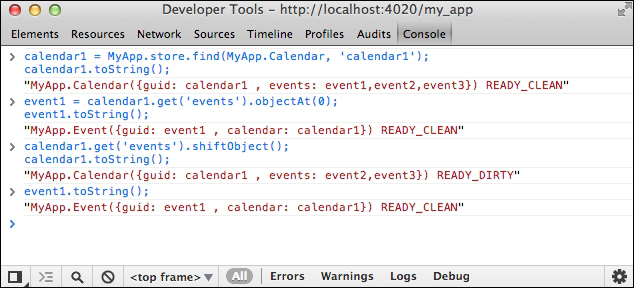
This simulation shows a couple of things we're not familiar with yet, but let me walk you through it. The basics of what I did are that I retrieved a calendar record as well as the first event related to that calendar. By using the toString method of each of these records, I was able to see that calendar1's events attribute includes 'event1' and event1's calendar attribute was 'calendar1'. But see what happened after I shifted the first record out of calendar1? While calendar1 now showed two events correctly, event1 still believed that it was related to calendar1. If we neglected to fix this up, we could have a serious data inconsistency problem later on.
But do we need to manually fix up both sides of a relationship? Why don't we add inverse options to our models and try again.
First, I will add the inverse to each of the relationship as shown in the following code:
MyApp.Calendar = SC.Record.extend({

  // This calendar's events.
  events: SC.Record.toMany('MyApp.Event', {
    inverse: 'calendar'  // The attribute name on the other side of the relationship.
  })

});

MyApp.Event = SC.Record.extend({

  // This event's calendar.
  calendar: SC.Record.toOne('MyApp.Calendar', {
    inverse: 'events'   // The attribute name on the other side of the relationship.
  })

});
Next, I will run the mock example again in the console as shown in the following screenshot:
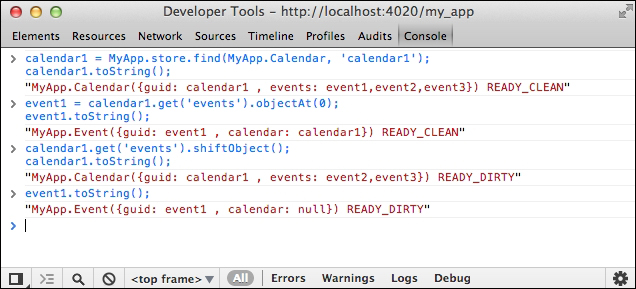
Wonderful! Now, when we inspect the event1 record after altering the relationship on the calendar side, we see that its relationship has also been modified, which is exactly what we want. Please note that since we specified the inverse of calendar in MyApp.Event as well, the same rule would have applied had we changed event1's calendar attribute instead of calendar1's events attribute.
Now, we'll look at the isMaster option for relationship attributes. It's actually important to have a good understanding of the inverse option in hand because the isMaster option is directly related to it. To be clear, the first thing to remember is that isMaster is only used along with inverse. To describe what isMaster does, we have to skip ahead a bit and pay attention to how the status of the records changed from READY_CLEAN to READY_DIRTY when we modified the relationships in the previous examples.
All you need to know right now is that the READY_CLEAN state is the state of a record when it has no changes and the READY_DIRTY state is the state of a record that has changes. If a record is dirty, we expect to commit the changes back to a remote data source so that our data between the client and server is synchronized. However, it is likely that we only need to commit changes to one side of a relationship and the remote data source will understand that the other side has changed as well.
For example, if we moved event1 from calendar1 to calendar2, we would dirty three records, which could become three commits back to the server. But every API can recognize that if event1 has changed its relationship with calendar2, it also has to update calendar1 and calendar2. Therefore, we only need to dirty the Event record when the event to calendar relationship changes. This is what isMaster does for us in a record relationship. If we set isMaster to false, changes in the relationship will not dirty the record.
Here's an example to help make this clear. First, we indicate that Calendars are not the master of the relationship and need not be dirtied when the events relationship changes.
MyApp.Calendar = SC.Record.extend({

  events: SC.Record.toMany('MyApp.Event', {
    inverse: 'calendar',
    isMaster: false  // Changes to this relationship only dirty the event record
  })

});
Next, we go back to the Console to see it in action:
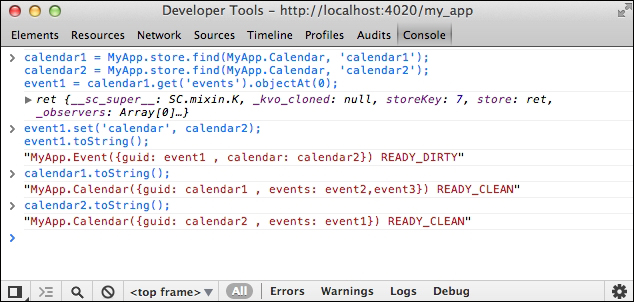
Can you spot the difference? This time once the relationship is altered, only the Event record is placed in a dirty state, which means only it will be committed back to the server.
Now, I realize that these examples have stepped well into the realm of the SC.Record life cycle and so, let's continue on that path and look at it all in the next section.
Tip
At some point, you will undoubtedly come across nested record relationships. These seem like the normal relationship attributes, but are actually quite different. Nested relationships transform embedded JavaScript objects in the data hash into SC.Record instances. This allows you to use the objects like any other SC.Object/SC.Record object, including binding to properties, adding computed properties, and so forth. However, up to Version 1.10, nested records have remained somewhat temperamental and it's best to avoid using them until such time that the code has been refactored. In the meantime, it is safer to stick to a normal JavaScript object as the attribute type.