
Now that we have our views organized, let's look at the layout of each of them. SproutCore views are absolutely positioned by default, which is easiest to work with for full-screen applications and also faster due to the fact that the browser doesn't need to reflow the entire page when a portion changes.
To position and size our views, we use the layout property. This property is used by SproutCore to assign a layout style to a view's element when it is rendered. While we could lay out everything with CSS, this requires more back and forth movement in between files and would separate our view code from the size and position information. Instead, by programmatically defining the layout, we keep the truth about our view's layout inside the code, which allows us to avoid going to the DOM to measure elements when we need to adjust or animate them. Remember, in order to keep our web application fast, we need to avoid touching the DOM unless absolutely necessary.
The following are all the possible layout attributes we can use: top, left, bottom, right, centerX, centerY, width, height, minWidth, maxWidth, minHeight, maxHeight, border, borderTop, borderLeft, borderBottom, borderRight, opacity, and zIndex. Obviously, we can't use all of these attributes at the same time because some of them would conflict with each other. For example, you can't use width at the same time with both left and right because that doesn't make logical sense. SproutCore will warn us if we try to do something improper like this.
To define a layout, simply set the property to a regular JavaScript object. The default layout is { top: 0, left: 0, bottom: 0, right: 0 } and SproutCore is smart about implied layouts. So, you don't need to define each property every time.
Following are a few example layouts to get you started. The resulting layout style is shown in the comment before the property.
a: SC.LabelView.extend({
  // style="height: 150px; right: 0px; left: 0px; top: 0px;"
  layout: { height: 150 },
  value: 'A'
})
b: SC.LabelView.extend({
  // style="right: 0px; width: 240px; top: 0px; bottom: 0px;"
  layout: { right: 0, width: 240 },
  value: 'B'
})

c: SC.LabelView.extend({
  // style="left: 50%; margin-left: -100px; top: 50%; margin-top: -100px; height: 200px; width: 200px; "
  layout: { centerX: 0, centerY: 0, height: 200, width: 200 },
  value: 'C'
})

d: SC.LabelView.extend({
  // style="bottom: 20px; left: 50%; margin-left: -38%; height: 40%; width: 75%; min-width: 200px;"
  layout: { bottom: 20, centerX: 0, height: 0.4, width: 0.75, minWidth: 200 },
  value: 'D'
})
You should notice from the resulting styles that layouts have an added benefit of being more compact to write over raw CSS. In the next collection of screenshots, we can see how each of these layouts appears on the page:
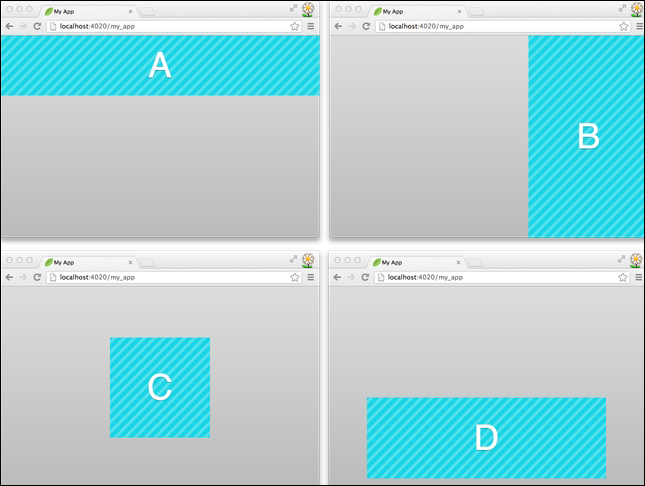
As you can see, we are able to create fairly complex layouts with little typing and these layouts are quite flexible too. For instance, as the window size changes, view B will remain anchored to the right, view C will remain centered, and view D will stay near the bottom and change the width and height.
Speaking of view D, did you notice that its layout specified percentages for width and height? With the layout property, any value between 0.01 and 0.99 will result in a style between 1% and 99% accordingly. There is no need for a 0% or 100% style, because a height or width of 0 is 0%, a top and bottom of 0 is a height of 100%, and a left and right of 0 is a width of 100%.
Before we move on, we should discuss the other layout properties. First, since borders are added by the browser outside the element's content frame, if an element has a layout height of 100 pixels (px) and a 1px top and bottom border in CSS, the actual height of the element would become 102px. By not accounting for borders in layout, we would find our views to be slightly of the wrong size and position. Instead, by setting the border layout attributes, SproutCore will ensure that the position and size of the view is exactly what you specify. Here's view C with a left and right border:
c: SC.LabelView.extend({
  // style="border-left-width: 1px; border-right-width: 3px; left: 50%; margin-left: -98px; top: 50%; margin-top: -100px; height: 200px; width: 196px; "
  layout: { borderLeft: 1, borderRight: 3, centerX: 0, centerY: 0, height: 200, width: 200 },
  value: 'C'
})
As you can see from the resulting layout style comment, the borderLeft and borderRight attributes added border width styles to our element and also adjusted the left margin and width of the element to compensate for the borders, so that the element's position will be exactly in the center and its width will still be 200px total.
The final two attributes, zIndex
and opacity do not involve any special computation by SproutCore to translate into appropriate layout styles. They are likely included as layout properties more for convenience and due to their relationship with the positioning of views. The zIndex attribute is obviously important when positioning views that occupy the same space in the page and we want one to be above or below the other. Having programmatic access to zIndex allows us to easily shuffle views on the fly. Likewise, the opacity attribute is also relevant to views that are overlapping and it's easier to adjust by being in the layout.
Finally, you can always let the browser flow the view elements by setting useStaticLayout to true on the view. If useStaticLayout is true, the view will not receive the position: absolute; style making it easier to position and size through a CSS layout. While not recommended because of the performance implications, this is useful for the kind of content that needs to flow naturally such as long form text.
Tip
Once you switch to relative positioning for a view's layout, you can't switch back to absolute positioning for any of its child views and may find yourself spending a lot of energy updating style sheets and measuring elements. Therefore, you should try to only use static layout on views at the bottom of the view hierarchy which don't have any child views.
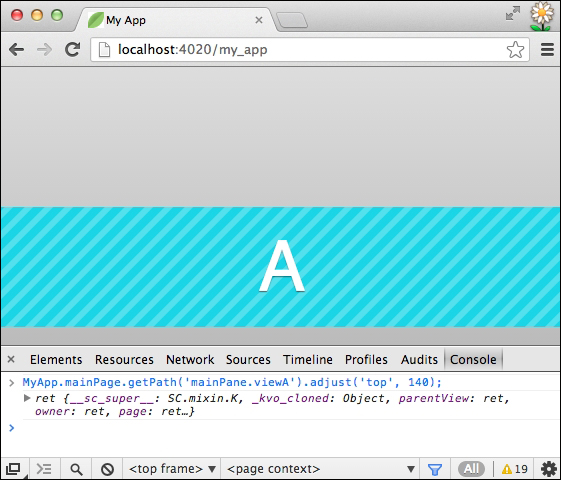
After the layout of a view is set, you can still very easily adjust it programmatically using the adjust method.
For example, calling adjust('top', 140) on view A from the previous diagram would move it instantly as shown in the following screenshot:
Often, it's a nicer visual experience to animate a change rather than instantly update it. In SproutCore, we can very easily animate the layout adjustments using the animate method. For example, the same adjustment from the previous one could be carried out smoothly through the following code line:
MyApp.mainPage.getPath('mainPane.viewA').animate('top', 140, { duration: 0.3 });In order to use animate, we have to provide an optional object to specify how the animation should occur. You must always provide the duration value in seconds and can optionally include the timing function, timing, or the delay value, delay. You can also animate multiple layout properties at the same time, by passing a hash of key value pairs.
For example:
myView.animate({ 'top': 100, 'height': 200 }, { duration: 0.7 });You can also include a callback for when the animation completes, by passing a function or a target and method as the final arguments to animate.
For example:
aView.animate('left', -200, { duration: 0.5 }, function () {
  // Do something when the view is done animating.
});
Note
SproutCore will try to use hardware-accelerated CSS transforms for animation whenever possible. Assuming that the browser supports CSS transforms, you can ensure that your animations are hardware-accelerated by only animating the top and left layout properties of fixed height and width views that have wantsAcceleratedLayer set to true.