
Internet Protocol Security
(IPSEC) is a protocol suite developed to encapsulate security using encryption, integrity, and authentication for Internet Protocol. It operates at the Internet layer of the IP protocol and is currently supported by all major operating systems. IPSEC implementation is suitable from small to large enterprise networks and can be used as an alternative to Oracle Advanced Security encryption. In this recipe we will show how to establish an IPSEC connection between nodeorcl5 and a Windows client. On Red Hat
we will use freeswan IPSEC implementation and will configure a test-like setup using prehashed keys.
As a prerequisite, create a new virtual machine and install Windows 7 and Oracle Client 11.2.0.3 on it.
We will start this recipe with the Linux IPSEC freeswan configuration.
- First, we will configure the participant hosts, encryption algorithms, and the checksum algorithm. Open the freeswan configuration file
/etc/ipsec.confand add the following parameters:/etc/ipsec.conf - Openswan IPsec configuration file # # Manual: ipsec.conf.5 # # Please place your own config files in /etc/ipsec.d/ ending in .conf Ipsec.conf version 2.0 # conforms to second version of ipsec.conf specification config setup # if eth0 is connected to lan klipsdebug=none plutodebug=none protostack=netkey conn oraclient-oraserver authby=secret auto=add type=tunnel left=10.241.132.218 right=10.241.132.2 keyingtries=0 keyexchange=ike keylife=8h pfs=yes ike=3des-sha1;modp1024
Where left represents nodeorcl1 IP address and right the Windows client IP address, keyexchange will use ike type using prehashed keys; ike represents the encryption algorithm and hash function plus the exchange mode.
- Generate a random prehashed 128-bit long key (your key will certainly have a different sequence) for pair authentication by using the following command:
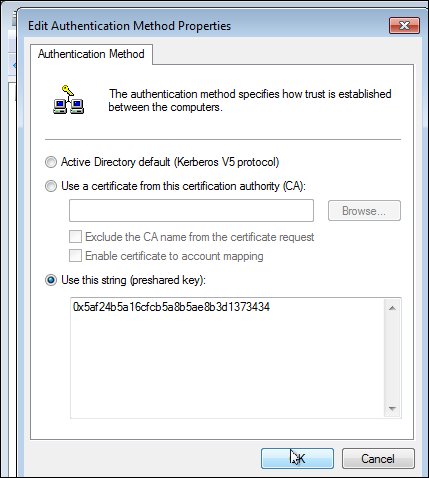
[root@nodeorcl1 ~]# ipsec ranbits --continuous 128
0x5af24b5a16cfcb5a8b5ae8b3d1373434
[root@nodeorcl1 ~]#
- Next, add the host pairs and the prehashed key used at authentication in the
/etc/ipsec.secretsfile as follows:10.241.132.218 10.241.132.2: PSK "0x5af24b5a16cfcb5a8b5ae8b3d1373434" - Next start the
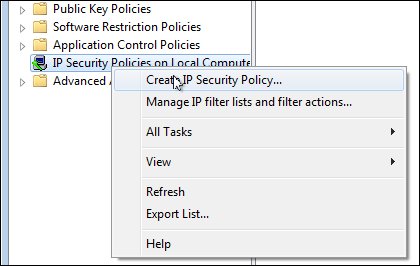
ipsec serviceas follows:[root@nodeorcl1 etc]# service ipsec start - Next we will configure the Windows part. As administrator open Local Security Policy, then right-click on Create IP Security Policy....
- Next the IP security policy Wizard will be launched, click on Next.
- Name the IP security policy
oraipsecand click on Next. - At the next step, Request for Network Communication, let the Activate the response rule (earlier version of Windows only) remain unchecked and click on Next.
- At the last step, Completing the IP Security Wizard, uncheck the Edit properties checkbox and click on Finish.
- Next we will proceed to configure the IP Filtering Rules. In the left-hand side pane right-click on
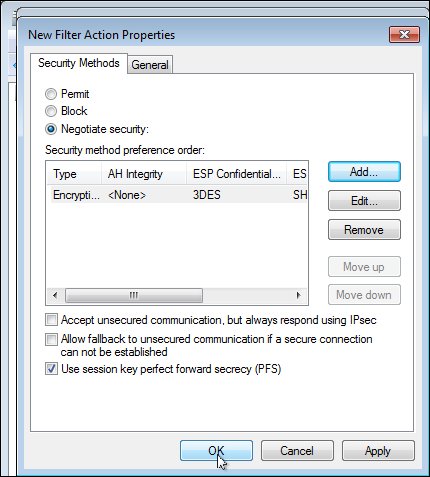
oraipsecand click on Properties. In the IP Filtering Rules click on the Add button and name itoraipfilterrulesand click on OK. - In the same New Rule Properties window, click on Filter Action, uncheck Add Use Wizard, click on the Add button, check Encryption and Integrity, and click on OK. Next check Use session key perfect forward secrecy (PFS) and click on OK. At this step you should choose the same encryption and integrity algorithm as configured on the other host. In our case encryption algorithm is 3DES and cryptographic checksum is SHA1.
- Next we will configure the authentication mode to use preshared keys as we have configured on Linux. In the New Rule Properties window, click on Authentication Method, select Use this string (preshared key), type the key generated on Linux in step 3, and click on OK.
- At this step we have finished configuring the IPSEC policy, so the last thing to do is to assign the policy to network cards. Right-click on the
oraipsecpolicy and click on Assign. - Next try to connect to the
HACKDBdatabase. - If we start to capture the network packets, we will see ESP=type packets which means that IPSEC is enabled:
19:30:38.912592 IP 10.241.132.2 > nodeorcl1: ESP(spi=0xc006149b,seq=0x1d), length 68
19:30:38.912699 IP nodeorcl1 > 10.241.132.2: ESP(spi=0x5dc407c7,seq=0x1f), length 68
19:30:38.913346 IP 10.241.132.2 > nodeorcl1: ESP(spi=0xc006149b,seq=0x1e), length 52
The inner functionality of IPSEC and specification is presented in RFC2401 (http://www.ietf.org/rfc/rfc2401.txt)
For more information about IPSEC Openswan implementation for small and large networks I recommend a detailed book entitled Openswan: Building and Integrating Virtual Private Networks (http://www.packtpub.com/openswan/book).