Appendix A. Creating projects with SWT/JFace
Before you can begin coding with SWT and JFace, you need to prepare the Eclipse development environment to include the two
libraries. This appendix focuses on the steps needed to ensure that your GUI code will compile and execute properly.
We hold Eclipse in the highest esteem, but if you intend to market your own SWT/JFace applications, you’ll need to know how
to build GUIs that can run without the Workbench. Therefore, this appendix is divided into two parts. The first outlines the
steps needed to set up an SWT/JFace project in Eclipse. The second shows how to accomplish the same purpose using the Java
SDK (Java, Javac, and so on).
A.1. Eclipse-based SWT/JFace development
All the code samples in this book are part of one large project, WidgetWindow, and each chapter adds classes in a separate package. Therefore, for this book, you need to perform the process outlined
here only once.
A.1.1. SWT and JFace projects in Windows
In writing this book, we have assumed that you’re already familiar with Eclipse. But a brief review of creating projects will
be helpful if you are out of practice. In particular, this section outlines the process of setting up the WidgetWindow project in Eclipse. For a full description of Eclipse projects, we recommend Eclipse in Action by David Gallardo, Ed Burnette, and Robert McGovern (Manning, 2003).
The steps for setting up an SWT/JFace Eclipse project in Windows are listed in table A.1.
Table A.1. Preparing an SWT/JFace application in Eclipse for Windows
| |
Goal
|
Procedure
|
|---|
| 1 |
Acquire the necessary software tools. |
- If it isn’t already available, download the Java SDK (ver. 1.2.2 or later) from http://java.sun.com. Install the SDK in your operating system.
- Download the Eclipse SDK (ver. 2.0 or later) from Eclipse.org at www.eclipse.org/downloads/index.php. No installation is necessary.
- If you’re interested, download the source code for SWT from Eclipse.org by scrolling down the same page in the Eclipse.org
site.
|
| 2 |
Create the Widget-Window project. |
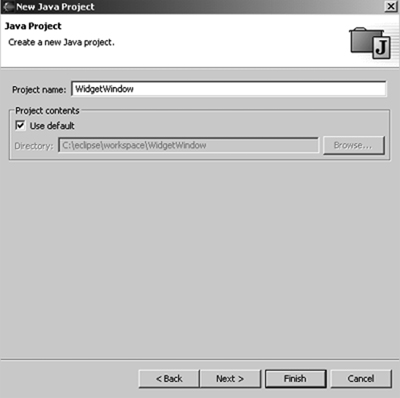
- Start the Eclipse IDE, click the File option in the main menu, and select New->Project from the drop-down menus that appear.
- In the first page of the New Project Wizard, click Java in the left pane and Java Project in the right pane. Click Next.
- Enter WidgetWindow as the project name and leave the default option checked. Click Finish. Doing so creates a WidgetWindow
project and places it in the WidgetWindow directory.
- In the Workbench, right-click the new project and select the New->Package option from the drop-down menu. Enter a package
name such as com.swtjface.Ch2. Click Finish.
|
| 3 |
Start the process of creating classpath variables for the SWT/JFace libraries. |
- Right-click the WidgetWindow project and choose Properties, the final option in the pull-down menu. Click the Java Build Path
option at left on the screen. You’ll now tell the Java compiler where to find the necessary SWT/JFace files.
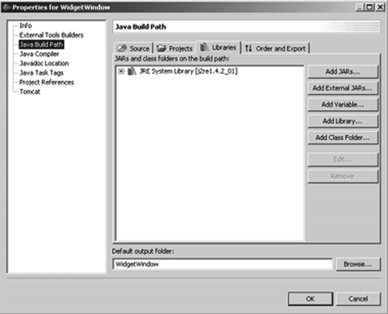
- Click the Libraries tab just below the Java Build Path title. Click the Add Variable button. These variables will represent
the libraries (*.jar) you need for compilation. In the New Variable Classpath Entry dialog, click the Configure Variables
button.
- When the Preferences window appears, click New. Ente SWT_LIB as the variable name, and click File to search for its corresponding
library.

- In the dialog that appears, search the directory to find $ECLIPSE/plugins/ org.eclipse.swt.win32_x.y.z/ws/win32/swt.jar. Select
this file and click Open. Click OK in the New Variable Entry dialog, and the SWT_LIB variable will join the list of classpath
variables.
|
| 4 |
Create variables for the libraries needed for JFace. |
- Use the procedure described previously to create a variable named JFACE_LIB for the jface.jar (or jface_new.jar) file at $ECLIPSE/plugins/
org.eclipse.jface_x.y.z/.
- Create a variable named BOOT_LIB for the runtime.jar file located at $ECLIPSE/plugins/org.eclipse.core.boot_x.y.z/.
- Create a variable named RUNTIME_LIB for the runtime.jar file located at $ECLIPSE/plugins/org.eclipse.core.runtime_x.y.z/.
- Create a variable named WORKBENCH_LIB for the workbench.jar (or workbench_new.jar) file at $ECLIPSE/plugins/org.eclipse.ui.workbench_x.y.z/.
- Click OK in the Preferences window.
|
| 5 |
Add these variables to the Widget-Window project. |
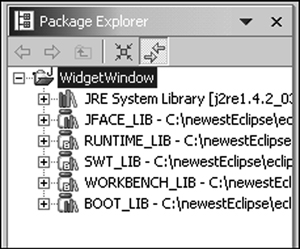
- In the Workbench, right-click on the WidgetWindow project, and select the Properties option.
- Select the Java Build Path option in the left pane, and click the Libraries tab on the right pane.
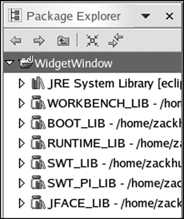
- Click the Add Variable button. In the New Variable Classpath Entry box, select the JFACE_LIB, BOOT_LIB, RUNTIME_LIB, and WORKBENCH_LIB
variables. Click OK after each.
- Use the procedure described previously to create a variable named JFACE_LIB for the jface.jar (or jface_new.jar) file at $ECLIPSEpluginorg.eclipse.jface_x.y.z.
- Create a variable named BOOT_LIB for the runtime.jar file located at $ECLIPSEpluginsorg.eclipse.core.boot_x.y.z.
- Create a variable named RUNTIME_LIB for the runtime.jar file located at $ECLIPSEpluginsorg.eclipse.core.runtime_x.y.z.
- Create a variable named WORKBENCH_LIB for the workbench.jar (or workbench_new.jar) file at $ECLIPSEpluginsorg.eclipse.ui.workbench_x.y.z.
- Click OK in the Preferences window.
 |
| 6 |
Add the native graphics library to the project. |
- To enable communication between SWT/JFace commands and the operating system calls, you need to make the SWT native graphics
file available. It’s called swt-win-nnnn.dll, and it’s located at $ECLIPSE/plugins/ org.eclipse.swt.win32_x.y.z/os/win32/x86.
- Once you’ve found the graphics library, you need to make sure the application launcher can use it. The documentation lists
a number of ways to do this, but we’ve found that adding a copy to the $JAVA/jre/bin directory works best.
Other methods, which can be less reliable, include the following:
Option 1: Copy and paste these files directly in the WidgetWindow project.
Option 2: Include the native library in any directory pointed to by the java.library.path variable. This variable, among others,
can be seen by clicking Help->About Eclipse Platform->Configuration Details.
Option 3: Go to Control Panel->System->Advanced->Environmental Variables and update the PATH variable with the directory containing
the library file.
|
A.1.2. SWT and JFace projects in *nix
Table A.2 shows the steps needed to prepare a project to use the SWT/JFace toolset. Although they’re geared for Linux and GTK, the
procedures should be similar for any *nix platform and windowing system.
Table A.2. Preparing an SWT/JFace application in Eclipse for *nix
| |
Goal
|
Procedure
|
|---|
| 1 |
Acquire the necessary software tools. |
- If it isn’t already available, download the Java SDK (ver. 1.2.2 or later) from http://java.sun.com. Install the SDK in your operating system.
- Download the Eclipse SDK (ver. 2.0 or later) from Eclipse.org at www.eclipse.org/downloads/index.php.
- Unzip the file. The resulting directory will be called $ECLIPSE.
- If you’re interested, download the source code for SWT from Eclipse.org by scrolling down the same page in the Eclipse.org
site.
|
| 2 |
Create the WidgetWind ow project. |
- Start the Eclipse IDE, click the File option in the main menu, and select New->Project from the drop-down menus that appear.
- In the first page of the New Project Wizard, click Java in the left pane and Java Project in the right pane. Click Next.
- Enter WidgetWindow as the project name and leave the default options checked. Click Finish. Eclipse will create a WidgetWindow
project and add it to the WidgetWindow directory.
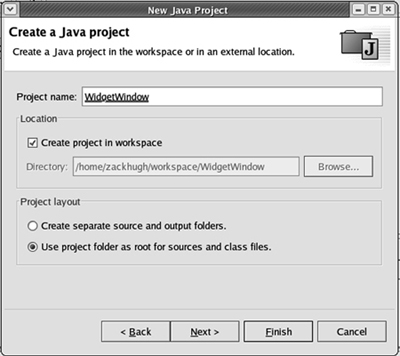
- In the Workbench, right-click the new project and select the New->Package option from the drop-down menu. Enter a name for
your package, such as com.swtjface.Ch2. Click Finish.
|
| 3 |
Start the process of creating classpath variables for the SWT/JFace libraries. |
- Right-click the WidgetWindow project and choose Properties. Click the Java Build Path option at the left of the screen. You’ll
now tell the Java compiler where to find the necessary SWT/JFace files.

- Click the Libraries tab just below the Java Build Path title. Click Add Variable. These variables will represent the libraries
(*.jar) you need for compilation. In the New Variable Classpath Entry dialog, click the Configure Variables button.
- When the Preferences window appears, click New button. Enter SWT_LIB as the variable name, and click File to search for its
corresponding library.
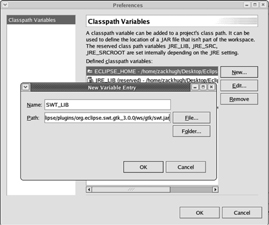
- In the dialog that appears, search the directory to find $ECLIPSE/plugins/ org.eclipse.swt.gtk_x.y.z/ws/gtk/swt.jar. Select
this file and click OK. Click OK in the New Variable Entry dialog, and the SWT_LIB variable will be added to the list of classpath
variables.
- For Linux/GTK, repeat steps 3 and 4 to add the SWT_PI variable, whose swt_pi.jar file is located at $ECLIPSE/plugins/org.eclipse.swt.gtk_x.y.z/ws/
gtk/swt_pi.jar.
For Linux/Motif, repeat steps 3 and 4 to add the SWT_GTK variable, whose swtgtk.jar file is located at $ECLIPSE/plugins/org.eclipse.swt.motif_x.y.z/ws/gtk/swt_gtk.jar.
|
| 4 |
Create additional variables for the libraries needed for JFace. |
- Use the procedure described earlier to create a variable named JFACE_LIB for the jface.jar (or jface_new.jar) file at $ECLIPSE/plugins/org.eclipse.jface_x.y.z/.
- Create a variable named BOOT_LIB for the runtime.jar file located at$ECLIPSE/plugins/org.eclipse.core.boot_x.y.z/.
- Create a variable named RUNTIME_LIB for the runtime.jar file located at $ECLIPSE/plugins/org.eclipse.core.runtime_x.y.z/.
- Create a variable named WORKBENCH_LIB for the workbench.jar (or workbench_new.jar) file at $ECLIPSE/plugins/org.eclipse.ui.workbench_x.y.z/.
- Once finished, click OK in the Preferences window.
|
| 5 |
Add these variables to the Widget-Window project. |
- In the New Variable Classpath Entry dialog, select each of the variables you’ve created—SWT_LIB, SWT_PI_LIB (or SWT_GTK),
JFACE_LIB, BOOT_LIB, RUNTIME_LIB, and WORKBENCH_LIB—and click OK.
- Click OK to return to the Workbench.
 |
| 6 |
Add the native graphics file (files) to the project. |
- To provide communication between the SWT/JFace commands and the operating system calls, you need to make the SWT native graphics
files available. The first step involves finding them. The locations for these files are as follows:
Platform
Native library file
Library pathname
Linux GTK
libswt-gtk-nnnn.so
libswt-gtk-pi.nnnn.so
libswt-gnome-gtk-nnnn.so
org.eclipse.swt.gtk_x.y.z/os/linux/x86
Linux Motif
libswt-motif-nnnn.so
libswt-gtk-motif.nnnn.so
libswt-gnome-gtk-nnnn.so
libswt-motif-nnnn.so
libswt-kde-motif.nnnn.so
org.eclipse.swt.motif_x.y.z/os/linux/x86
Solaris
libswt-cde-motif-nnnn.so
org.eclipse.swt.photon_x.y.z/os/qnx/x86
AIX Motif
libswt-motif-nnnn.so
org.eclipse.swt.motif_x.y.z/os/ppc
PhotonQNX
libswt-photon-nnnn.so
org.eclipse.swt.photon_x.y.z/os/qnx/x86
- Once you’ve found the necessary file or files, you need to make sure the application launcher can find them. The documentation
lists a number of ways to do this, but we’ve found that adding the files to the /usr/lib directory works best. This isn’t
the safest thing to do, but it’s reliable.
Other methods, which can be less reliable, include the following:
Option 1: Copy and paste these files directly in the WidgetWindow project.
Option 2: Include the native library in any directory pointed to by the java.library.path variable. This variable, among others,
can be seen by clicking Help->About Eclipse Platform->Configuration Details.
Option 3: Make sure the LD_LIBRARY_PATH environmental variable contains the directory in which these library files are located.
|
A.1.3. SWT in OS X
Since the advent of OS X, the Macintosh has become popular as a platform for Java development. In fact, much of this book
and many of the examples were originally developed on OS X. However, due to SWT’s use of native libraries, running an SWT
application on OS X is more complicated than the instructions for Windows and Linux described in the previous sections. This
section addresses the steps necessary to get an SWT application running on OS X; the rest of this section assumes that you’re
using a Mac.
If you examine your Eclipse installation, you’ll notice that instead of the single executable file that is found on Windows
or Linux, there is a directory called Eclipse.app. Naming the directory with an .app extension and conforming to a certain
specification causes the operating system to treat the directory as an application to be launched when double-clicked. To
run your own SWT application, you’ll need to set up the same directory structure. We recommend using Ant or some other tool
to perform this step as part of your standard build process.
Although OS X supports launching Java applications by double-clicking a .jar file, in order to properly hook an SWT application
into the native event queue you need to launch your code through a small wrapper program. This executable file is called java_swt,
and it can be found at $ECLIPSE_HOME/Eclipse.app/Contents/ MacOS/java_swt. This program will launch first and will load your
application’s .class files after it has set things up for you.
We’ll assume you’re assembling an application named Foo. Follow these steps:
1. Create a directory called Foo.app, which will eventually hold your complete application.
2. After you’ve built a .jar containing your application’s files as usual, copy it, along with the SWT/JFace .jar files and
any other necessary third-party libraries, to Foo.app/Contents/Resources/Java. The SWT native libraries (files ending in .jnilib)
should be put in Foo.app/Contents/Resources/Java/dll. Finally, copy the java_swt executable to Foo.app/Contents/MacOS.
3. Once the file is copied, you must also make sure the executable permission is set on the file. If you’re using Ant, remember
that the copy task doesn’t preserve file permissions. If your application doesn’t launch when clicked, and there are no error messages,
check that the permissions are set correctly.
4. Once you’ve placed your application’s files, you need to create couple of additional files describing your application to
the operating system. Both files belong in Foo.app/Contents:
- The file PkgInfo should contain a single line of text. If you’ve registered as an Apple developer and received a creator code
for your application, use it.
- A bit more complicated is the Info.plist file, which contains XML describing various aspects of your application. We don’t
have space to discuss the format of this file in detail here; a working version is available from this book’s website, and
you can easily customize it for your needs. Of particular note are the CFBundleExecutable entry, which tells the OS to execute java_swt when the application is clicked, and an entry allowing you to specify a file
containing the icon that should be displayed for your application. At the bottom of the file is an entry that describes the
environment to be used when the JVM is launched. Change the ClassPath attribute to name the .jar files used by your own application, and change the MainClass attribute so it names the class containing your application’s main() method.
These instructions seem complicated, but it’s fairly simple to get things up and running, especially if you look at a working
example. Additionally, these tasks are all easily scriptable using Ant, so they can be automated.
A.2. SWT/JFace in standalone applications
Even without the Eclipse platform, the process of building an SWT/JFace project is straightforward. The only real work involves
telling the Java compiler where to find the libraries. The steps are listed in table A.3.
Table A.3. Preparing an SWT/JFace application for standalone development
| |
Goal
|
Procedure
|
|---|
| 1 |
Add the necessary SWT/JFace library files to the Java class-path. |
- Add the SWT library or libraries (described earlier) to your compilation path. Then, add the library files needed for JFace.
- Add the -Djava.library.path= option to the compiler command followed by the directory containing the native graphics library.
The path to this library was described earlier.
- As a Windows example, the compiler command would have the following option: –Djava.library.path=
C:eclipsepluginsorg.eclipse.swt.win32
3.0.0oswin32x86.
|
With the WidgetWindow project set up, you can begin building classes and displaying their GUIs. Fortunately, programming with the SWT and JFace
libraries is simpler than preparing the Workbench to compile their applications.
