7 Enhancing Microcontrast
Even the most impressive, well-composed and correctly exposed digital image can still be improved by increasing microcontrast at the post-processing stage. This is especially true of stitched panoramas or super-resolution images. The term “microcontrast” (or “local contrast”, as it is also known), refers to the contrast between two neighboring pixels with different brightness or color values. Microcontrast can be increased using a technique similar to image sharpening, and can make your images significantly more vivid and vibrant. This particularly applies to images containing delicate structures, such as leaves or grass (shot from a distance), or the textures found on wood or stone surfaces. The trick here is to preserve the subtle transitions of the original image while accentuating the visible structures and textures. All of the filters we will be describing in this chapter affect the whole image, so we will once more be using layer masks to help us apply the effects selectively.
We will be introducing various microcontrast-enhancing tools within this chapter, but our primary tool remains “DOP Detail Extractor,” which is our favorite amongst all those currently available.
7.1 Tools for Enhancing Microcontrast
![]() Because increasing microcontrast has a similar effect to sharpening, you should only sharpen your images slightly (if at all) before making any enhancements. This will also help to avoid unwanted halo effects.
Because increasing microcontrast has a similar effect to sharpening, you should only sharpen your images slightly (if at all) before making any enhancements. This will also help to avoid unwanted halo effects.
Tools used to enhance microcontrast are currently “in”, and are included in almost all newer versions of good image processors. These include Adobe Photoshop Lightroom and Adobe Camera RAW (use the Clarity slider in the Presence area of the basic panel), Apple Aperture, LightZone, Capture NX, as well as a number of other programs.
Enhancing Microcontrast Using a USM Filter or a RAW Converter
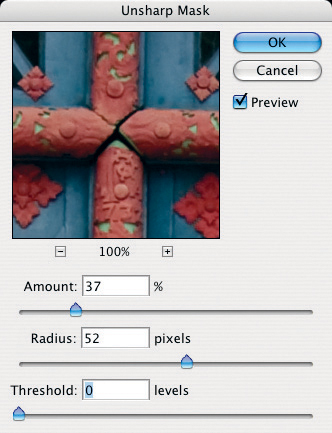
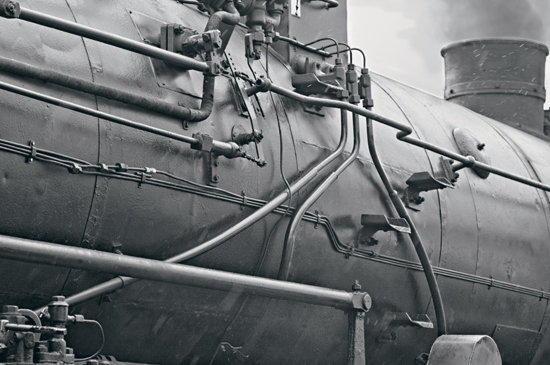
Figure 7-1: You can use Photoshop’s USM filter for local contrast enhancement.
A proven but less well-known way to enhance microcontrast is using the Photoshop Unsharp Mask (USM) filter, which can be found under Filter ▸ Sharpen ▸ Unsharp Mask. If you apply the filter using a low amount setting (20-40%) and a large radius (40-80 pixels) you will achieve an acceptable effect. If you use this method, it is important to adjust the radius setting according to the resolution of the image you are manipulating.
The degree to which you increase microcontrast will depend on the nature of your image, and it will often be necessary to mask the parts of your image that you don’t want to change. Increasing microcontrast in a portrait could, for instance, increase the presence of the subject’s hair, but also make skin blemishes more obvious. The solution to such dilemmas lies in the use of layer masks.
Our experience has shown that just about all digital images can be improved by a slight increase in microcontrast.
Some newer RAW converters also include direct microcontrast adjustment for RAW image files.
Figure 7-2: Detail of a church door. The version on the left has not been sharpened. On the right is the result of applying the Photoshop USM filter with a strength setting of 37 and the radius set to 52.
Apple Aperture, Adobe Photoshop Lightroom, and Adobe Camera Raw (ACR) all have appropriate tools built in. We often use the Lightroom or Adobe Camera Raw Clarity slider set to a value between 20 and 50 if we are not planning to use any other microcontrast enhancement tools. The Clarity slider can be found in the Presence section of the Develop toolbar (see figure 7-3). Try not to overdo the mixture of RAW sharpening and Clarity, especially if you plan to increase contrast later at the post-processing stage.
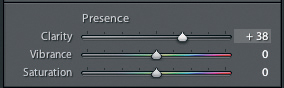
Figure 7-3: The Adobe Lightroom Clarity slider also increases microcontrast.
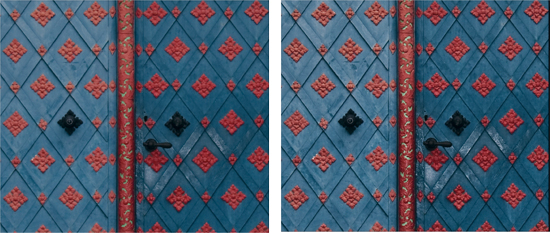
Figure 7-4: The same detail of a church door. The version on the left is displayed in Lightroom using no additional enhancements. The version on the right has the “Clarity” slider set to 100%.
Specialized tone mapping tools are, however, more effective with regard to fine-tuning and selective application. It is, for example, all too easy to increase general image noise while enhancing shadow detail. A high-quality tool will also allow you to increase detail by using a dedicated slider to darken your highlights selectively.
Increasing Microcontrast Using Akvis Enhancer
Enhancer is a relatively new Photoshop plug-in created by the Akvis company [18], and is available for both Windows and Mac OS X. It is a very effective tool, but uses a lot of processing power and main memory, so you will need to be patient when using it.*
Once installed, the plug-in is available under Filters ▸ Akvis. As is the case with most filters, Enhancer can only be applied to a regular pixel layer. If you have carried out corrections to an image using adjustment layers, you will need to construct an intermediate pixel layer that merges all the individual layers below into a single layer (still retaining the layers below). If the uppermost layer is already a regular layer, you can simply duplicate it by dragging the layer entry to the ![]() icon in your Layers palette.
icon in your Layers palette.
![]() This process of creating combined layers can also be used for many other filters. We also use it before applying the USM or other sharpening filters.
This process of creating combined layers can also be used for many other filters. We also use it before applying the USM or other sharpening filters.
Working with Merged Layers
Since Photoshop CS2, it has been possible to merge the active layer and all other visible layers below it into a new, regular layer by selecting the uppermost layer and pressing ![]() (Mac:
(Mac: ![]() ). Filters can then be applied to the resulting layer – in this case, we will use Enhancer.
). Filters can then be applied to the resulting layer – in this case, we will use Enhancer.
This technique is also helpful when using other filters (such as the Photoshop USM filter), and we will go into more detail on the subject later. In older Photoshop versions (i.e., pre-CS2), two keystrokes are necessary to perform the same function: first use ![]() (Mac:
(Mac: ![]() ) to create a new layer and then hold down the
) to create a new layer and then hold down the ![]() - or
- or ![]() key while clicking Layers ▸ Merge Visible to merge the layers into a new one.
key while clicking Layers ▸ Merge Visible to merge the layers into a new one.
Enhancer Dialog
Once started, the Enhancer window can take a minute or two to appear. Once it does, we suggest you drag it to its maximum size on your monitor, in order to help you best judge the results of the filter’s effects before you apply them to the actual image file.
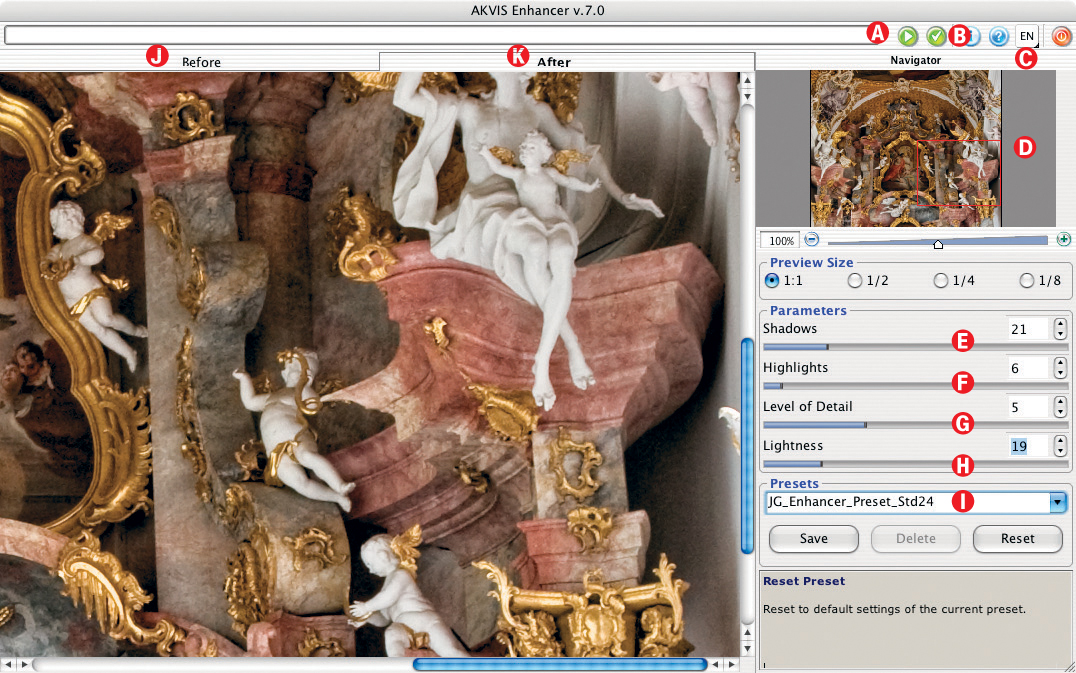
Figure 7-5: The Akvis Enhancer program window. Menu © changes the interface language (for Mac). Windows users have to use the Setup dialog.
The program’s sliders function as follows:
Shadows |
determines to what degree local contrast should be increased in the darker areas of the image. Values that are too high (generally above 35) can cause additional image noise. |
Highlights |
determines to what degree local contrast should be increased in the brighter areas of the image. This value should also be set carefully to between about 3 and 15 to avoid generating additional noise. |
Level of Detail |
is the master strength parameter. Although you can set it between 0 and 15, most images will look best at settings between 5 and 10. |
Lightness |
allows you to increase shadow brightness while leaving mid-tones and highlights generally unchanged. This parameter is similar to the Photoshop Shadows/Highlights command. You need to be cautious here too, as even the default setting (50) brightens shadows considerably. We have reduced our standard value to 19, which brightens images slightly but not overpoweringly. |
These parameters can be adjusted either by moving the appropriate slider, by entering values directly in the value box, or by clicking the increase/decrease arrows ![]() next to the individual values.
next to the individual values.
In order to conserve processing power, Enhancer does not make real-time changes to the preview image. You have to click ![]()
![]() to generate a new preview of any changes you have made. Because even preview generation demands a lot of processor power, the plug-in shows a progress bar in the window’s title bar during processing. Once processing is complete, the preview window is updated, and you can toggle (with a slight delay) between your original and the processed version of your image using Before and After (see figure 7-5
to generate a new preview of any changes you have made. Because even preview generation demands a lot of processor power, the plug-in shows a progress bar in the window’s title bar during processing. Once processing is complete, the preview window is updated, and you can toggle (with a slight delay) between your original and the processed version of your image using Before and After (see figure 7-5 ![]() and
and ![]() ).
).
To best judge the effects of your enhancement you should (as when sharpening) select the 1:1 preview image size and use the detail navigator to focus on the relevant part of your image.
You can save your current settings using Save. Once saved, configurations can be loaded from the Presets dropdown menu ![]() . Reset does exactly what it says, and resets Enhancer to its default values.
. Reset does exactly what it says, and resets Enhancer to its default values.
Instead of the usual OK button, you apply your effect by clicking ![]() (figure 7-6
(figure 7-6 ![]() ).
). ![]() cancels the process and returns you to the active layer without making any changes.
cancels the process and returns you to the active layer without making any changes.
Enhancer’s functionality overlaps to a degree with that of Detail Extractor, which we will describe next. Both plug-ins have their uses, and we recommend both (if, of course, you are willing to pay for two licenses). Occasionally, we combine the two plug-ins, using moderate Enhancer values for a first run, and using Detail Extractor for a fine-tuning second run over our image. Detail Extractor has dedicated options for avoiding sharpening artifacts and tone clipping – effects that higher Enhancer values cannot avoid producing.
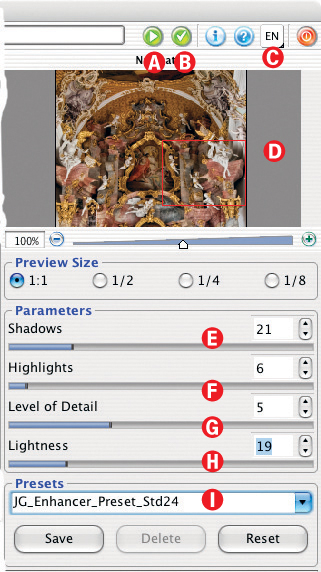
Figure 7-6: Enhancer adjustment parameters.
Because both filters lack a real-time preview feature, it may take a number of attempts to find the optimum settings for your image. This is another reason why you should apply Enhancer corrections to a duplicate experimental layer before committing them to your actual image file.
If you are using a separate layer, and if the Enhancer effect is too strong at first, you can decrease the strength of the Enhancer effect simply by reducing the opacity of your adjustment layer. (See also the description of this technique on page 208.)
Once you have established the right values for your image, you should save them as a preset with an appropriate name.
Here is an example of the effects you can achieve using Enhancer. The left-hand image of a rose bloom is fairly well exposed, but the detail in the individual petals is almost entirely lost (see figure 7-7).
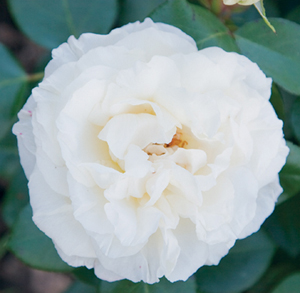
Figure 7-7: The source image: The individual petals are hardly discernible.
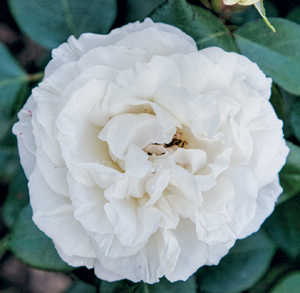
Figure 7-8: The image after processing using the settings shown in figure 7-9 and “Normal” blending mode.
Because the highlights are more important than the rest of the image, we adjust the Highlights value to 26 and reduce the standard Lightness value to 19, as we do not wish to increase the overall brightness of our image.
Because the initial result (generated with blending mode set to Normal) has drained too much color from the center of the rose (see figure 7-8), we switch to Luminosity blending mode. The new result is shown in figure 7-10. The contrast becomes even more pronounced if we use the Multiply blending mode. This approach, however, makes the image generally too dark, so we also apply a Levels correction to brighten things up a little (see figure 7-12).
The fact that the leaves in the background remain dark doesn’t bother us, especially as this reduces the noise effects that Enhancer produces in the green elements of the image. Figure 7-11 shows the final result.
The noise which became visible in figures 7-8 and 7-10 demonstrates a potential problem with this type of correction – namely, noise which is present but barely visible in the source image can become much more pronounced during processing.
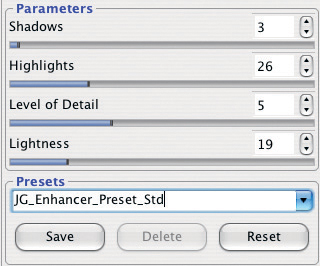
Figure 7-9: The Enhancer settings used for the image shown in figure 7-8.
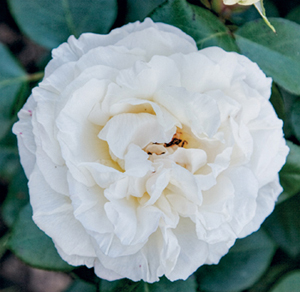
Figure 7-10: Our rose processed in “Luminance” blending mode. The yellow in the center of the bloom is accentuated.
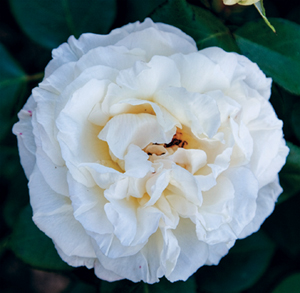
Figure 7-11: Here, we used “Multiply” blending mode, and the entire image was brightened using an adjustment layer.
For Enhancer, we can try to combat this effect by setting the Lightness value to below 50%.
However, as the example above shows, this is not always sufficient. Other solutions include either reducing noise before enhancing microcontrast, or simply shooting the source images using a lower ISO speed setting – which is, of course, not always possible in low light or for moving subjects.
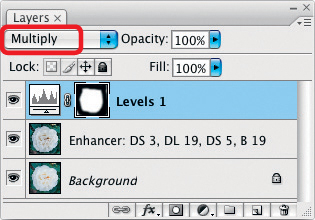
Figure 7-12: The Enhancer effect is increased by using “Multiply” blending mode.
Enhancing Microcontrast Using DOP Detail Extractor
Uwe Steinmueller, co-author and occasional lead author of many Rocky Nook books, is well-known through his Outbackphoto web site (www.outbackphoto.com). He is also the creator of the DOP Detail Extractor* Photoshop plug-in – a tool for enhancing microcontrast. Once installed, the plug-in is made available under File ▸ Scripts.
Unlike the other filters we’ve worked with, Detail Extractor doesn’t require you to create a duplicate layer manually – the plug-in automatically creates one and gives it a name which describes exactly the settings used for the layer in question (see figure 7-14). This new layer also appears automatically in the Layers palette. By default, Detail Extractor sets blending mode to Luminosity (see figure 7-19), in order to prevent image saturation from being affected by the process.
The plug-in’s individual parameter settings function as follows:
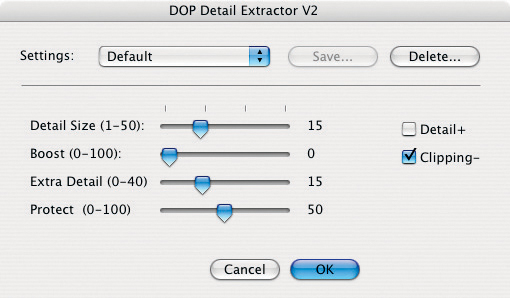
Figure 7-13: The DOP Detail Extractor main dialog.
Detail Size controls the pixel radius within which differences in contrast should be accentuated. You should set this value according to your subject, image resolution, and the size of your planned display format. Higher image resolution will require a slightly higher Detail Size value. The default value is 15 for images with a resolution of 8-12 megapixels. Smaller values will result in softer images, which can be an advantage for images with finely structured transitions (as long as you are not working with additional layer masks).
Boost |
is best described as a kind of “strength” setting, and should be used sparingly (usually with values between zero and 15). Any value above 50 will produce grunging- type effects. (There is an example of this type of effect later in the chapter.) |
Extra Detail |
strengthens local contrast enhancement, especially in shadow areas. |
Protect |
sets the degree to which shadows and highlights will be protected from being clipped. The default value is 50 – lower values increase detail contrast, but can lead to blocked-out shadows and washed-out highlights. Values above 50 protect shadows and highlights but can reduce highlight and shadow microcontrast. |
Detail+ |
increases the detail enhancement, and has a similar effect to additional sharpening. |
Clipping- |
Activating this option limits the dynamic range to between 10 and 245 (referring to the RGB luminance scale of 0-255). The image will no longer include any absolute white or black pixels, and will appear to have slightly less contrast when viewed on a monitor. This effect helps in printing situations, as dark areas (with values below 10) usually block out, and it is generally not possible to differentiate visually between tonal values above 245 and virgin white paper (255) anyway. |
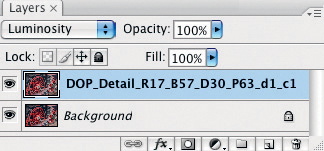
Figure 7-14: DOP Detail Extractor automatically generates a new layer, where it places the processing results. The settings used are reflected in the name of the new layer.
The filter’s default settings produce low-key but recognizable effects. In most images, the differences remain subtle.
Once you have found settings which work for your type of image and suit your personal style, you can save them by clicking Save, and recall them through the Settings menu. This is important, because Detail Extractor doesn’t have a preview mode. It is only possible to make judgments about the effects of your settings once they have been applied to your image. Detail Extractor does, however, save the settings that are active at shutdown, and loads these automatically when the plug-in is restarted.
Remember to give your settings profiles names that describe precisely the settings you used. Older profiles that you no longer require can be deleted by selecting them (Settings) and clicking Delete. Figure figure 7-15 shows our initial image, which has already been slightly retouched and optimized. Although the blacks and the slight shimmer of oil contrast well with the dark red wheels, and although the steam escaping from the valve gives the image an air of authenticity, we still think our image could bear a little enhancement using Detail Extractor.
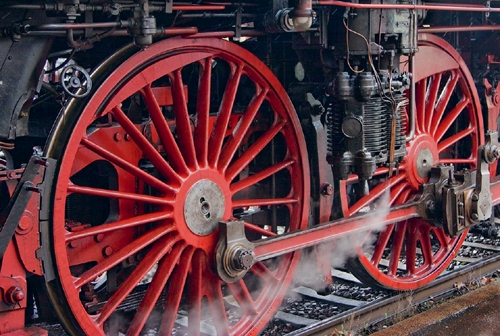
Figure 7-15: This technology is more than 50 years old and is still truly impressive.
We set the Detail Size value to 17 pixels. This parameter should be set based on the resolution of your image – images with higher resolutions will sometimes need a higher value. For our image, we used a solid Boost factor of 57, which is close to the upper limit of values that can be usefully applied to normal images. Anything more would bring us into grunge territory, which is simply not suitable for use with this subject.
We set Extra Detail to its maximum justifiable limit of 30, which is why we also set Protect to 63 in order to prevent the highlights already present in the image from washing out, and the shadows from blocking. Because we were processing this image for use with the offset printing process used for this book, we also activated the Clipping option to reduce the overall dynamic range, thus preserving shadow and highlight detail at the print stage.

Figure 7-16: The source image once again for reference.
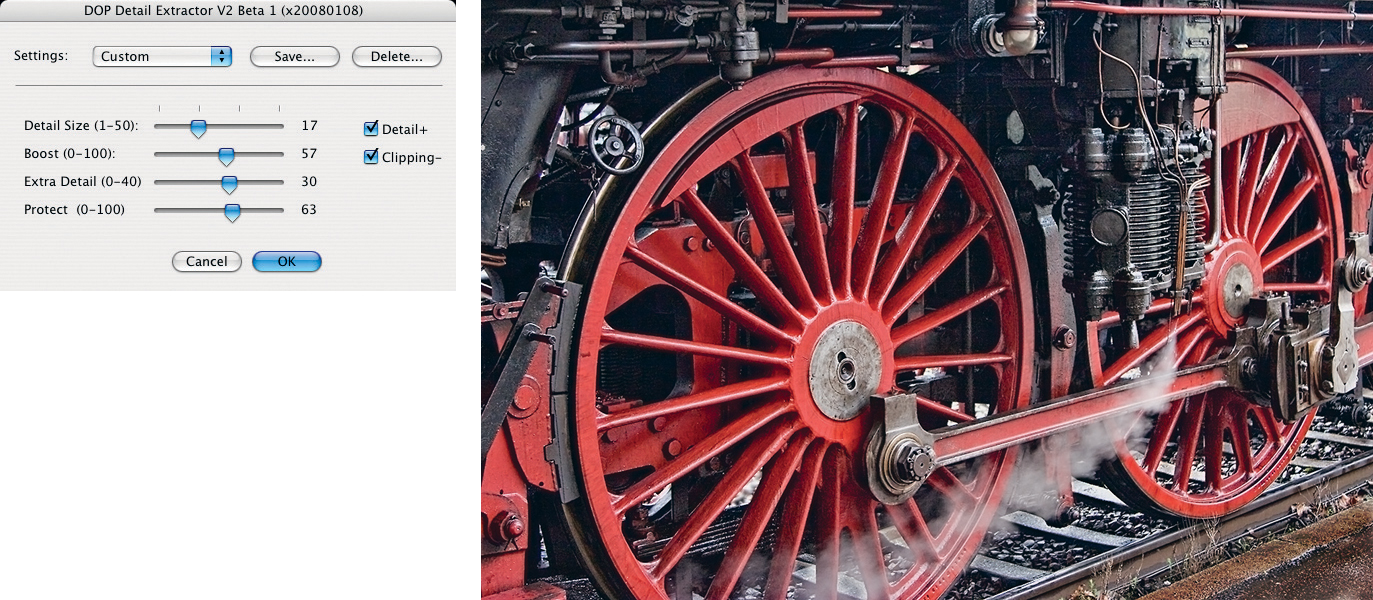
Figure 7-17: Our image after processing with Detail Extractor using the settings shown above.
Increasing microcontrast would have further accentuated some of the detail visible behind the locomotive, so we deliberately blurred those areas in advance using Photoshop’s Gaussian blur filter (Filters ▸ Gaussian Blur) and a layer mask. Enhancing microcontrast without this initial background softening made some of the brighter details in the image overbearing and distracting.
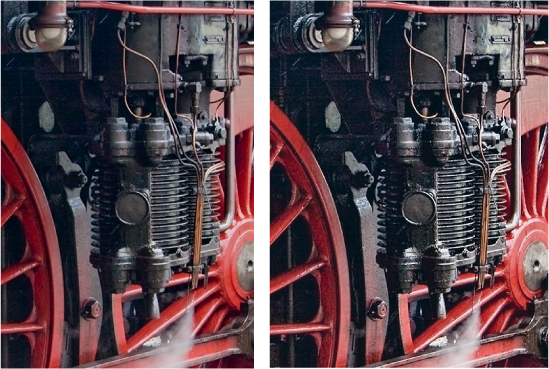
Figure 7-18: The detail on the left is taken from the original image, while the detail on the right has been processed using “Detail Extractor”. A close look at the details reveals that a “halo” effect is already visible in the form of individual white pixels and some white fringing.
Figure 7-18 shows an enlarged detail before and after Detail Extractor was applied. The processed version has a much more three-dimensional look and a crisp flair.
All of these new types of tools are still relatively sparsely documented, and DOP Extractor is no exception. You will need to experiment to develop a feel for the way the plug-in functions, and if and how to apply it to your particular type of image. The strength of the filters you apply remains a matter of personal taste, and is always a source of lively debate.
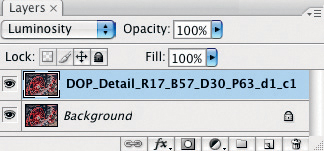
Figure 7-19: The Layers palette for our image. The filter automatically embeds abbreviated information about the settings used into the layer name.
“Grunging”
The term “grunging” is derived from the “grunge” rock music style. In the world of digital photography, it is used to describe an effect which sharpens tonal values in an image to a point where contrast is highly exaggerated and the entire image begins to look “super-real” and generally over-the-top. Detail Extractor can be effectively used to create this kind of effect by setting the base parameters to extremely high values. If a single application doesn’t achieve the effect you are looking for, you can simply run your already-filtered image through the filter again. We have found that more than three consecutive runs produce results that are no longer usable.
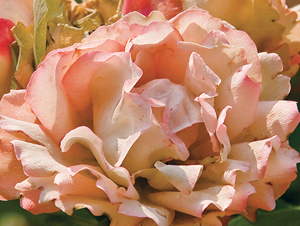
Figure 7-20: The source picture to be “grunged” already has fairly good microcontrast.
Grunging is a specialized image effect which isn’t suitable for all subjects or image types. Occasionally, however, it can turn a normal image into a real eye-catcher. Here is an example.
The source image is our simple rose from figure 7-20. The image already has fairly good texture, with a few bright spots caused by the original exposure being made in direct sunlight.
To create our grunge effect we run Detail Extractor twice, using high parameter values both times. Figure 7-22 shows the original image, in which we have already darkened the highlights to prevent them being washed out by the contrast enhancement process. Figure 7-23 shows the image after the first run and 7-24 after the second. Even with the Protect parameter set to 77, our highlights were further brightened and are almost burnt out.
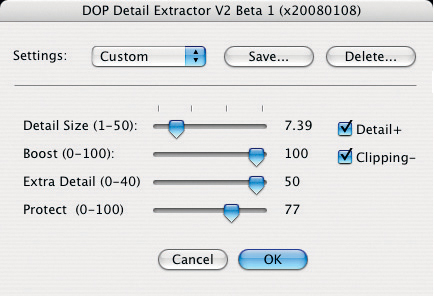
Figure 7-21: Our “grunging” source image, already showing strong microcontrast.
To combat this, we used a 50% gray layer (in Overlay blending mode) to darken these sections using a soft, black brush. Figure 7-24 shows this gray layer.

Figure 7-22: The original pictures with slightly dodged highlights.
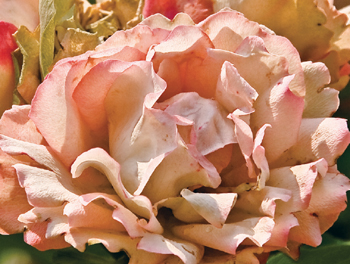
Figure 7-23: The rose after the first Detail Extractor run using the settings seen in figure 7-21.
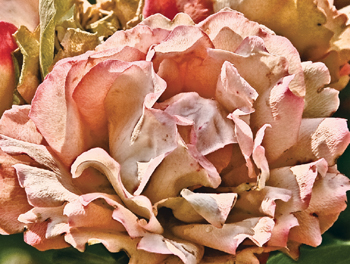
Figure 7-24: The rose after the second Detail Extractor run, now showing a strong grunge effect.
The gray layer (in “Overlay” blending mode) used to darken the nearly washed-out image areas between runs.
Enhancing Microcontrast in Monochrome Images
Appealing tones and the contrast and transitions between them are the factors that bring monochrome (black-and-white) images to life. The techniques described above are therefore also highly applicable for monochrome images. If you are creating monochrome images by converting color originals, the tones in your monochrome image will only really become recognizable after conversion. For this reason, we recommend that you apply any global contrast adjustments (for example, using Curves), or local tonal value adjustments after you convert your image to black-and-white. You can make local corrections to tonal values using a gray layer set to Overlay blending mode. Use this layer to color in the areas you want to darken using a soft,* translucent black brush, and the areas you want to brighten using a white brush. As an alternative to the brush tools, you can also use Photoshop’s Burn (![]() ) and Dodge (
) and Dodge (![]() ) tools to achieve the same effects.
) tools to achieve the same effects.
![]() As a rule, we use a brush with an opacity of 15-20%. This means we have to cover some areas multiple times, but it gives us more precise control over the final effect.
As a rule, we use a brush with an opacity of 15-20%. This means we have to cover some areas multiple times, but it gives us more precise control over the final effect.
Microcontrast correction is almost the last stage in the image correction process, but should take place before the post-processing steps described below. All three of the tools we have described work well in monochrome situations. For our example (an old steam engine) we will use DOP Detail Extractor. Figure 7-25 shows our source image.
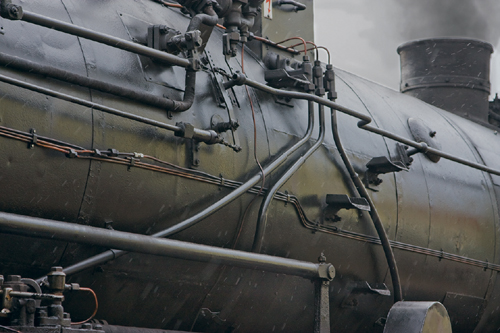
Figure 7-25: Our source image of a steam locomotive. It has been lovingly restored and cared for.
We remove the colors from the image using the Photoshop Black & White command.** Because the source image is already nearly monochrome, we do not need to perform much optimization in the Black & White dialog box. The result of the conversion (shown in figure 7-27) is still an RGB image, which can be converted to grayscale via Image ▸ Mode ▸ Grayscale without any adverse effects. Conversion will also save some disk space. We tend to leave our monochrome images in RGB format so that we can tint or manipulate them more easily later (some Photoshop filters cannot be applied to grayscale images).
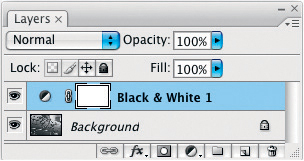
Figure 7-26: The Layers palette after we converted the picture to black and white.
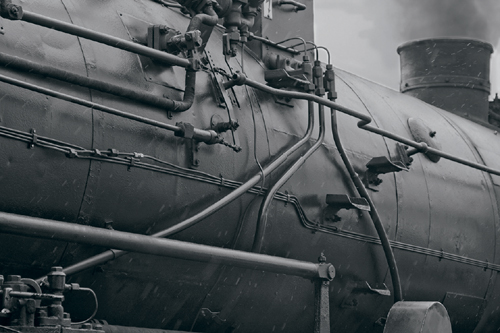
Figure 7-27: The locomotive after conversion to black & white using the Photoshop CS3 function. The image is slightly dark and the near-white areas are almost completely missing.
We use Levels to brighten the image a little, which uses some of the reserve tonal range that is present in the image highlights (see figure 7-28). In our next step, we slightly increase the mid-tone contrast using a classic s-formed Curve, as illustrated in figure 7-29.
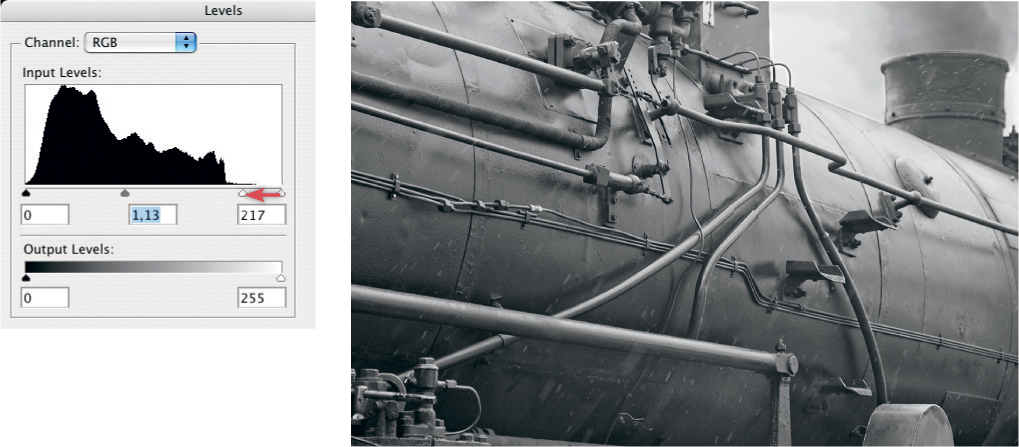
Figure 7-28: We were able to brighten the image by adjusting the white point.
Wherever possible (using Curves, for instance), we use an adjustment layer for this type of correction. This allows us to fine-tune our image later without having to restart the entire correction process from scratch.
The final step in this workflow is to increase microcontrast using DOP Detail Extractor (File ▸ Scripts ▸ Detail Extractor). As we have already reached the practicable upper limits in the levels adjustment for the highlights, we activate the Clipping option and increase the Protect value to 65.

Figure 7-29: After making the Curves correction shown above, the mid-tones have more contrast.
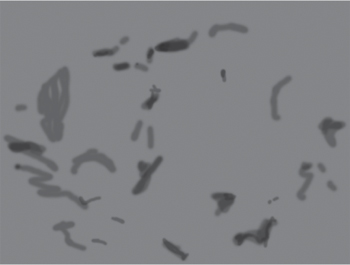
Otherwise, we use strong, but not overpowering settings (see figure 7-30). The result is a more vivid-looking locomotive, but the ash coming from the smokestack has also become more accentuated, especially around the boiler and its pipes.
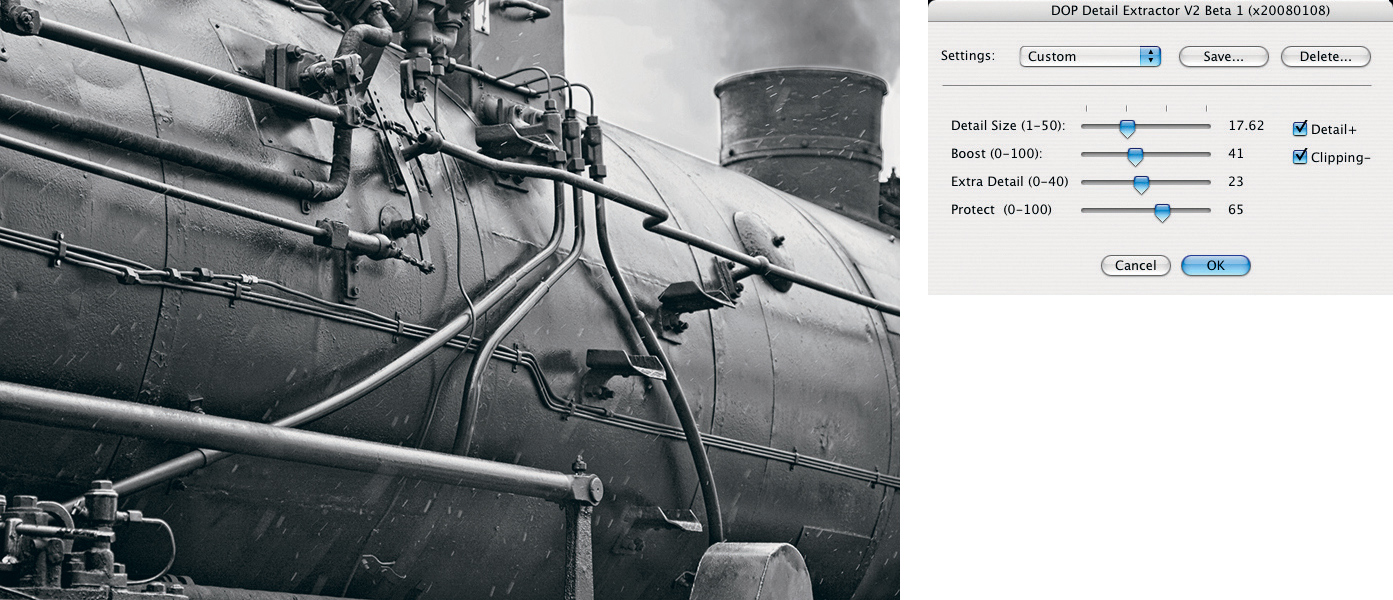
Figure 7-30: Our image after running the Detail Extractor script with the settings shown above. Some particles of ash are still too prominent.
There are two possible solutions to this effect:
A. Use the Clone Stamp tool ![]() or the Healing Brush tool
or the Healing Brush tool ![]() on the uppermost layer. Under such circumstances, we always create a new layer and set the tool settings to Sample All Layers.
on the uppermost layer. Under such circumstances, we always create a new layer and set the tool settings to Sample All Layers.
B. Create an adjustment layer directly above the background layer and make your corrections there using ![]() or
or ![]() .
.
Experience has shown this to be the better solution. It is also clear at this point that using adjustment layers is always preferable to making changes directly in the image layer. Because the corrections we have made are documented in the individual layers, we can note the settings before deleting or simply hiding the layers we do not currently need.
The question of how much ash to remove is again a matter of taste and authenticity. We have taken a middle route by removing the ash where the well-defined pipes themselves are the subject, and where they appear in too stark a contrast against the darker parts of the boiler. Some of the more blurred particles were simply left as they were. Before starting Detail Extractor again, we need to reactivate the uppermost layer (by clicking on it) so that the plug-in’s effect is applied to all layers.
Figure 7-32 shows the final image and figure 7-31 shows the Layers palette associated with it – the individual correction steps are clearly visible. We generally name our layers according to correction type, so we don’t have to open each layer individually (by double clicking the ![]() icon) to see what corrections they contain.
icon) to see what corrections they contain.
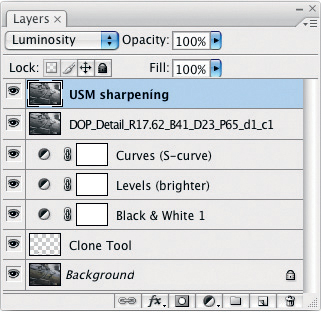
Figure 7-31: The Layers palette documents the individual steps we have taken. The second layer from the bottom is the clone stamp layer which we used to retouch some of the particles of ash.

Figure 7-32: The final image with some of the ash particles removed.
Although this is a complex workflow, it is nevertheless fairly typical. Additional dodging & burning or selective tonal correction are often necessary. We can’t overemphasize the value of using adjustment layers and other duplicate layers for the individual processing steps. We usually keep all our layers separate (even if there are ten or more), as experience has shown that we return time and again to our individual layers for that “little extra” fine-tuning.
7.2 Post-Processing
All of the filters demonstrated here (Unsharp Mask, Enhancer, and Detail Extractor) should be applied exclusively to separate layers. The Unsharp Mask and Enhancer filters require the user to create the layer themselves, while Detail Extractor creates a new layer automatically. This way, Photoshop filter effects can be elegantly controlled in one of two separate ways.
Controlling Effect Strength
The Opacity slider in the Layers palette (see figure 7-33 ![]() ) lets you set the strength of your chosen effect – 100% opacity means that your effect is completely visible, and 0% makes it entirely invisible. As a rule, we work with slightly over-strong effects and reduce the opacity of the effect layer later, if necessary. This often allows us to control the strength of our effects more precisely than we can by simply moving the filter sliders. This approach also allows us to make subsequent adjustments to the effect (within the limits of our original settings) without having to go back and perform the entire filter process a second time.
) lets you set the strength of your chosen effect – 100% opacity means that your effect is completely visible, and 0% makes it entirely invisible. As a rule, we work with slightly over-strong effects and reduce the opacity of the effect layer later, if necessary. This often allows us to control the strength of our effects more precisely than we can by simply moving the filter sliders. This approach also allows us to make subsequent adjustments to the effect (within the limits of our original settings) without having to go back and perform the entire filter process a second time.
In the example in figure 7-34, the image on the far left has fairly bland microcontrast. The version in the middle shows the result of applying Detail Extractor. Here, the effect is somewhat exaggerated, but, instead of discarding the new image layer and running the filter again, we lessened the effect simply by reducing the opacity of the adjustment layer.
Figure 7-33 shows the Layers palette for this image. The source image is a detail of an altar at the Roggenburg monastery in Germany.
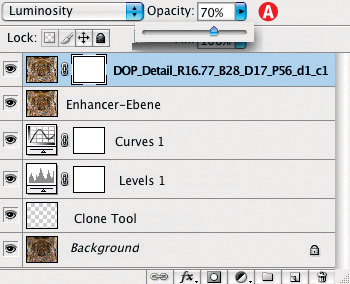
Figure 7-33: The opacity slider (A) allows you to reduce the effect of a filter at any time.
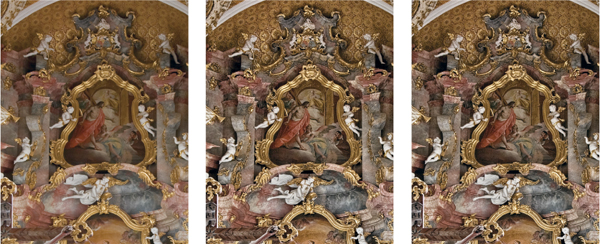
Figure 7-34: On the left is the original image. The center image shows the effect of applying Detail Extractor at 100%. The right-hand image shows the same image with the opacity of the filter layer reduced to 70%.
Limiting Effects Selectively
The method previously described applies to an entire image. You may find, however, that you want to protect certain parts of an image (such as soft transitions or skin-tones) from becoming too high-contrast. It is also not uncommon to use sharpening effects to attract the viewer to specific parts of an image while keeping the effects in the rest of the frame discreet. We use Photoshop layer masks to achieve this type of effect. If you have not yet created a layer mask, the layer mask symbol (![]() ) will be missing from the layer entry in the Layers palette. Click on the
) will be missing from the layer entry in the Layers palette. Click on the ![]() icon at the bottom of the palette to create an empty layer mask (signified by the
icon at the bottom of the palette to create an empty layer mask (signified by the ![]() icon). The Layers palette should now remain open during all of the following steps.*
icon). The Layers palette should now remain open during all of the following steps.*
To be certain the mask is active, we click the ![]() icon and then select the Paintbrush tool
icon and then select the Paintbrush tool ![]() . We use a soft brush (approximately 10% hardness) with a black foreground color and 100% opacity to roughly cover over the areas of the image we wanted to protect.
. We use a soft brush (approximately 10% hardness) with a black foreground color and 100% opacity to roughly cover over the areas of the image we wanted to protect.
If you find yourself painting into the image itself, then you haven’t activated the layer mask. Undo your brushstrokes using ![]() and click once again on the layer mask thumbnail in the Layers palette entry for your layer.
and click once again on the layer mask thumbnail in the Layers palette entry for your layer.
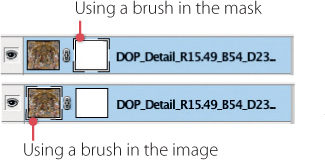
Figure 7-35: The dotted line in a Layers palette entry signifies whether the layer itself or the layer mask is activated.
If we need to apply our effect more selectively and refine our mask, we reduce the opacity of the brush to 20% and reduce the brush size. The brighter a particular area of the mask is, the more the effect will be visible within that area. The layer effect will be 100% visible in white mask areas, weaker in gray areas, and invisible where the mask is black. If you find you have overdone the masking in a certain area, you can switch the brush to white (or use the Eraser tool ![]() ) to correct your mask.
) to correct your mask.
Figure 7-36: A very small view of the layer mask is visible within the layer mask icon.
It is often difficult to make out the exact form of the layer mask because it is displayed at a very reduced size (see figure 7-36), and is only displayed fully after a short delay. You can display the layer mask itself in the editing window by clicking on the layer mask thumbnail while holding down the ![]() key (or the Mac
key (or the Mac ![]() key). You can continue to work on the mask in this mode, but you will not be able to see the image beneath, making it difficult to judge the effect of your work. To return to standard mode, click the layer mask thumbnail while holding down the
key). You can continue to work on the mask in this mode, but you will not be able to see the image beneath, making it difficult to judge the effect of your work. To return to standard mode, click the layer mask thumbnail while holding down the ![]() or
or ![]() key.
key.
There is also a more useful alternative method for working directly in your layer mask. Click the layer mask thumbnail while holding down ![]() and
and ![]() (or
(or ![]() and
and ![]() on a Mac). The layer mask will be displayed (in its default red color) superimposed on your image (see figure 7-38). The mask color can be changed in the Quick Mask Options dialog box (see figure 7-37) which you can reach by double-clicking the
on a Mac). The layer mask will be displayed (in its default red color) superimposed on your image (see figure 7-38). The mask color can be changed in the Quick Mask Options dialog box (see figure 7-37) which you can reach by double-clicking the ![]() toolbox icon. To return to a normal view, click the layer mask thumbnail a second time while holding down the same keystroke combination as described above.
toolbox icon. To return to a normal view, click the layer mask thumbnail a second time while holding down the same keystroke combination as described above.
Should you want to make corrections directly in the image layer, a click on the image thumbnail in the layer entry in the Layers palette activates the image layer.
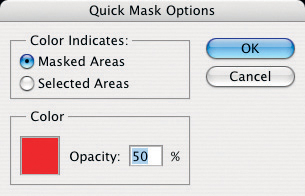
Figure 7-37: The Quick Mask Options dialog, where you can redefine your mask’s color.
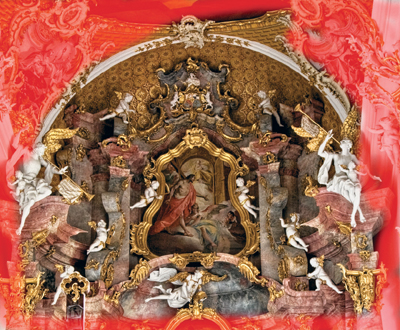
Figure 7-38: This illustration shows the mask (in red) superimposed on the image. You can reach this view by clicking the mask thumbnail in the Layers palette while pressing ![]() (or
(or ![]() on a Mac).
on a Mac).
Any changes you make now will be applied to the layer itself rather than the layer’s mask. Photoshop outlines the currently active layer (or layer mask) with a dotted line, making it easy to see where you are actually working (see figure 7-35).
It is also possible to fill the entire layer mask with black using the Paint Bucket tool ![]() , or to create a black mask directly by holding down the
, or to create a black mask directly by holding down the ![]() or
or ![]() key) when clicking the create mask icon
key) when clicking the create mask icon ![]() . You can then use a white brush to “erase” the parts of the mask where you want your effect (in this case, microcontrast enhancement) to be visible. You can apply any of the normal painting and standard processing tools to a layer mask.
. You can then use a white brush to “erase” the parts of the mask where you want your effect (in this case, microcontrast enhancement) to be visible. You can apply any of the normal painting and standard processing tools to a layer mask.
A click on the layer mask thumbnail while holding down ![]() * deactivates the layer mask but doesn’t delete it (signified by a crossed-out mask symbol:
* deactivates the layer mask but doesn’t delete it (signified by a crossed-out mask symbol: ![]() ). A second click on the thumbnail while holding down
). A second click on the thumbnail while holding down ![]() will reactivate the mask.
will reactivate the mask.
Sharpening
Increasing microcontrast is a step that is generally carried out late in the image optimization cycle after corrections have been made to white balance, exposure, global and local color, and to lens and perspective distortion.
Traditionally, the very last step in the process is to scale the resulting master image copy for its intended output format, whether this be for web display or printing. If the image is to be converted to a different format, it will usually be sharpened beforehand.
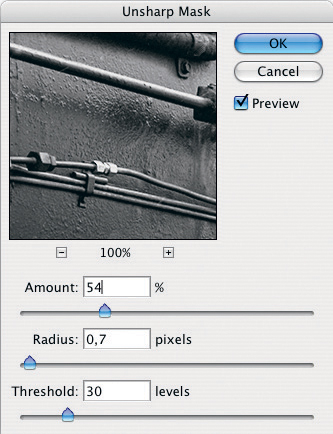
Figure 7-39: If you increase microcontrast in advance, your image will require significantly less sharpening at the post-processing stage.
If you have already increased microcontrast, you will need to sharpen your final image less than you otherwise might. The appropriate degree of sharpening depends on the subject, the extent of any microcontrast enhancement you may have applied, and on the planned output medium. As a general reference point, we recommend halving the normal amount of sharpening you would apply to your images. You need to take special care if you are using semi-automatic sharpening tools such as Nik Software’s Nik Sharpener [23], as these set sharpening levels based on the selected output size and output medium but without taking any manual presharpening into account.
As previously mentioned, most sharpening tools can only be applied directly to regular layers, so it is often necessary to create a subsidiary layer which merges all the layers beneath it into one, as described on page 200. You can create such a layer by pressing ![]() (or
(or ![]() on a Mac). Detail Extractor automatically generates a regular top layer, but in order to avoid making unwanted changes to our already corrected image, we still duplicate this layer to apply sharpening. If necessary, we use layer masks to protect specific image areas from over-sharpening, as previously described.
on a Mac). Detail Extractor automatically generates a regular top layer, but in order to avoid making unwanted changes to our already corrected image, we still duplicate this layer to apply sharpening. If necessary, we use layer masks to protect specific image areas from over-sharpening, as previously described.
In order to avoid color shifts or an increase in color noise when sharpening color photos, it is best to set the sharpening layer to Luminosity blending mode (see figure 7-31 on page 212). We especially recommend this course of action if microcontrast (and therefore detail color contrast) has already been increased in advance of further processing.
Using Filters with “Smart Objects”
If you are working in Photoshop CS3 (or later) and have a regular layer at the top of a layer stack – as is the case in our locomotive image in figure 7-32 – instead of duplicating this layer, you can turn it into a Smart Object using Convert to Smart Object (under the ▸ icon at the top right of the Layers palette or in the Photoshop Layer menu; see figure 7-40).
We then apply the filter to the Smart Object. Not all filters can be applied to Smart Objects, but in this case, the required Unsharp mask or Selective sharpening are both compatible. Our layer entry then appears as shown in figure 7-41.
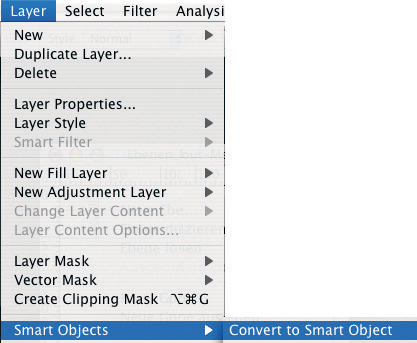
Figure 7-40: The Smart Object conversion function has been available in the Layer menu since Photoshop CS3.
Using this method, you can reactivate the sharpening filter and change its settings at any time without having to delete the top layer and start again. Here, double clicking the filter entry in the Layers palette opens the filter dialog box, allowing you to change the settings. This is called Smart Filter functionality.
Not all filters can be applied as Smart Filters. Tools such as DOP Detail Extractor, which are implemented as scripts rather than as standard Photoshop filters, cannot be applied this way. Some other, third-party filters, such as Color Efex Pro 3 by Nik Software are now Smart Filter-compatible. There is also a work-around that we learned from Uwe Steinmueller:
Photoshop CS3 ships with a script called EnableAllPluginsForSmartFilters.jsx included on the installation CD. Once installed, the script can be run by navigating to File ▸ Scripts ▸ EnableAllPluginsForSmartFilters.
Once you have run the script once, Photoshop remembers the settings it makes, and some filters which aren’t usually Smart Filter-enabled (such as Akvis Enhancer) become functional. This is unfortuantely still not true for all major filters.
We have sometimes experienced Photoshop crashes when using filters in conjunction with Smart Objects. It is always worth taking the time to check for compatibility before you start work.
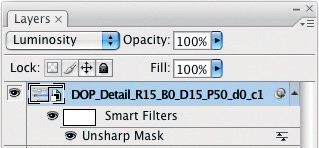
Figure 7-41: The Detail Extractor layer set as a Smart Object and sharpened using the USM filter
Merging Layers into One – Flattening Your Image
If you want to publish your image on the web or have it printed using an online print service, you will need to merge the layers into one using the Photoshop Layer ▸ Flatten Image command. Always flatten a copy, never your master image!
There are, of course, other circumstances under which you no longer need certain layers, and these can then be merged with regular layers beneath them, or even right down to the background layer. Flattening your image this way can save disk space, although adjustment layers without layer masks are not particularly memory-hungry. Layer masks are also not too critical in this respect, as they consist of simple, 8-bit grayscale data. However, the first additional layer will double the original file size (in compatibility mode), as Photoshop here creates an additional, invisible preview layer which contains all visible layers merged into one.* Additional adjustment layers (after the first one) don’t cost much.
We almost never discard individual layers. Keeping all our layers gives us the flexibility to go back and make changes whenever we want, and the documented trail of corrections we have made is more valuable to us than disk space (which is, these days, cheap and easily available).