
2 The Multishot Workflow
The basic steps – or workflow – are quite similar for all the different multishot techniques described in this book. The main differences are the actual applications or techniques used for merging images. A typical workflow will have four main phases:
1. Shooting the images
2. Preparation of the images for the merging process
3. Merging the original images into a single, new image
4. Post-processing. Here you will fine-tune your results, remove artifacts that result from the merging process, and finally (optionally) increase local contrast.
This chapter will provide an overview of a typical multishot workflow, and will introduce the applications we will be using to apply the various multishot techniques. We will also discuss file formats – the ones your camera produces as well as the ones we will be using as input for the merging process.
Finally, we will introduce you to the Adobe DNG Converter. Some of the applications we describe require you to convert your RAW files to a format (TIFF or JPEG) before they can be processed.
2.1 Common Steps in a Multishot Workflow
Although each individual technique described in this book has its own workflow, there are a number of commonalities between them that we would like to touch on at this point. The typical workflow for all of these multishot techniques consists of four phases which are represented in figure 2-1:
1. Shooting the image sequence
2. Image preprocessing
3. Merging the images into one
4. Post-processing (optimizing) the merged image
Each of these phases may consist of several steps that form their own sub-workflow. The following paragraphs will discuss each major step individually.
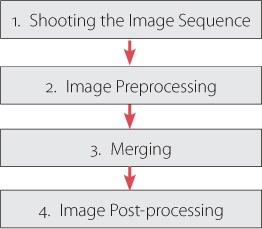
Figure 2-1: Major phases of a multishot workflow
1. Shooting the Image Sequence
This first phase in the process offers a number of opportunities to make decisions which will later allow you to achieve optimum results. While technical aspects (such as the camera’s shutter speed and aperture settings) differ from camera to camera, other aspects of basic technique are generally the same for all multishot techniques. You can assume, for instance, that for all of the techniques we describe, the use of a tripod will improve your results – even if it is possible to shoot Super-Resolution, HDRI, and panorama sequences without one. It’s difficult to shoot focus stacking sequences without a tripod, and it is basically impossible to effectively shoot macro photos hand-held.
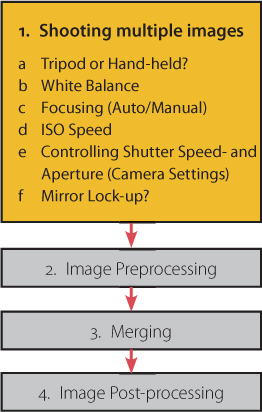
Figure 2-2: Workflow steps and settings for the shooting phase
While shooting photos for use with all of these techniques, it is best to use a preset white balance setting. This is less important if you are shooting in RAW format, because RAW allows you to adjust the white balance later when converting your images into other formats. Here, you can adjust the color temperature without sacrificing image quality.
It is important to note that when a camera is set to automatically meter the color temperature of a shot, it embeds the resulting information directly into the image data (with RAW files it is embedded into the EXIF data). Later, when you process your images using a RAW converter, you have to remember to set them all to the same color temperature (unless you’re using the same program to both convert and merge your images).
It’s also crucial to all of these multishot techniques that the focal distance remains consistent throughout the image sequence* – and you can only be sure that this is the case if you focus manually. If your subject is sufficiently far away, and there are no objects in the foreground to confuse the camera’s systems, you can sometimes use autofocus to shoot for panoramic or HDRI sequences. It is also important to retain a constant ISO speed setting throughout each sequence, and we recommend using a preset ISO setting and not the Auto-ISO feature built into many newer cameras.
Technique: |
Super-Resolution |
Focus Stacking |
Panorama |
HDRI |
Shutter speed |
variable |
fixed |
fixed |
variable |
Aperture |
fixed |
fixed |
fixed |
fixed |
Camera exposure program |
manual or Av bracketing* |
manual (or Av) |
manual |
Av bracketing* |
ISO speed |
fixed |
fixed |
fixed |
fixed |
Subject distance |
fixed |
manual |
fixed |
fixed |
Focal length |
fixed |
fixed |
fixed |
fixed |
White balance |
fixed |
fixed |
fixed |
fixed |
Tripod |
optional |
always |
preferable |
preferable |
Manual exposure settings are usually the best choice when shooting for multishot processes. There are, of course, exceptions, such as shooting for HDRI, or using Av bracketing to vary the shutter speed automatically. Av bracketing can also be used to shoot images for super-resolution applications. Av mode (or “A” mode, as some camera manufacturers call it) can also be used for Super-Resolution.
When taking shots that require slow shutter speeds, it is necessary to use a tripod. Mirror lockup is also a useful tool built into many DSLR cameras, and prevents motion blur caused by the mirror’s movement. Mirror lockup is not suitable for high-speed bracketing sequences, but some cameras allow mirror lockup for entire bracketing sequences, and you should use this feature if your camera has it.
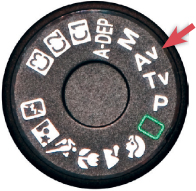
Figure 2-3: To shoot images for HDRI and Super-Resolution applications, use your camera’s aperture priority (Av or A) setting.
2. Image Preprocessing
Download Your Images to Your Hard Drive and Rename Them
The first step to take after downloading your images to your computer is to give them simple and relevant names. The file names automatically assigned by the camera are usually neither unique nor particularly descriptive. Most cameras automatically restart the image numbering sequence from zero once 9999 has been reached. When creating multishot images, it is important that each image has a unique name that is not repeated in any other folder or on any other local drive.
The majority of image processing programs (i.e., Photoshop with Adobe Bridge) and photo management programs nowadays have download functions which support renaming files during the download process. The shooting date followed by a text section describing the shoot and a number assigned by the camera gives each of your images a unique and easily understandable name.
When recording the date, we recommend using the international standard YYYYMMDD format (Year, Month, Date; with two or four digits for the year and two digits each for the month and the day). This results in filenames which are chronologically and numerically ordered. When working with multiple cameras, we also add in the name and the type of camera.
The RAW filename for a shoot in London on June 16th, 2008 with a Canon 40D ends up looking like this: 20080616_40D_London_1283.CR2
Inspection
The next step is to visually inspect your images. You should tag unusable images before re-examining and deleting them later. How you tag your images will depend on which management soft ware you are using. Rotating portrait format images during your first inspection helps you to retain a clear overview of your image stock.
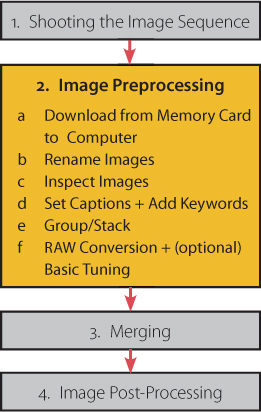
Figure 2-4: Some more image processing details, used before merging
Assigning Keywords
Immediately following inspection, you should assign IPTC metadata to your files. This will help you to locate or group specific images according to your own user-defined criteria (such as themes or events). Metadata entry methods vary from program to program, but it is generally best to first assign keywords that apply to large batches of files before assigning specific information to individual images.
![]() Some downloaders (such as the ones included in Adobe Bridge, Adobe Lightroom, and Apple Aperture) allow IPTC data to be attached to batches of files as part of the download process. The data is either embedded in the image file, saved in a sidecar file, or stored in the image database itself. Adding metadata as you import will save time later on.
Some downloaders (such as the ones included in Adobe Bridge, Adobe Lightroom, and Apple Aperture) allow IPTC data to be attached to batches of files as part of the download process. The data is either embedded in the image file, saved in a sidecar file, or stored in the image database itself. Adding metadata as you import will save time later on.
Grouping Your Images into Sequences
Apple Aperture, Adobe Bridge, Adobe Lightroom, and a number of other image processing and image management applications allow you to automatically group images into virtual stacks, making it easier to view your stock in an image browser. This feature is especially useful for multishot techniques, as it enables you to quickly combine usable images into sequences. The criteria for grouping images into stacks are varied and can be manually configured, although one common preset is a maximum given time delay between shots.

Figure 2-5: Image sequence consisting of three shots for an HDRI merge. On the left are the images shown in an unfolded stack, on the right you can see the collapsed stack (screenshot of a stack in Adobe Lightroom).
You should always put your best shot (your reference shot) at the top of a stack. Automatic grouping according to the time intervals between shots usually works well for images used for super-resolution, HDRI and, for the most part, panoramas. If you are using focus stacking, however, it is sometimes necessary to manually rearrange your shots to achieve the best results.
We have found that manually recording the image numbers from a group of images in the image description can help when organizing your photos. For example, this technique can be applied to all images in a single panorama or a stacking group, and ends up looking like the example in figure 2-7.
For panoramic and focus stacking shoots, where you will often find yourself working with a variable number of shots rather than fixed group sizes, it is common practice to take a shot of your hand between sequences (see figure 2-6). This creates a simple partition, which can be deleted later. An empty, black frame can also serve the same purpose.
This practice also works well for most other techniques, but is impractical when you are shooting bracketing sequences.

Figure 2-6: Sequence of shot for a panorama. The right-most image showing the hand indicates the end of the sequence.
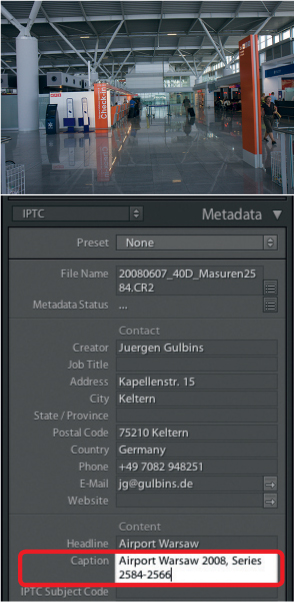
Figure 2-7: Image thumbnail showing part of the IPTC data. Here, we included the image numbers from a HDRI sequence in the Caption (shown here in Adobe Lightroom).
Image Processing
How you go about preparing images for merging depends on which format your camera uses to save images, and which formats your application supports.
If your program can import RAW images directly, you won’t have much initial processing to do. However, if you shoot in RAW and your image processing program only supports TIFF or JPEG files, then you will have to convert the RAW data (to either TIFF, JPEG, or DNG) before further processing.
The standard process for converting RAW files involves converting all the images in a sequence using the same basic settings. The most important settings to consider when converting are white balance, aberration correction, and vignetting. It can also be helpful to adjust the exposure slightly at this point (but not for HDR images). If, for example, the horizon is slanted in a panorama sequence, it would also make sense to correct this now. Most merging applications, however, only support the merging of images with identical pixel dimensions. So, if you decide to straighten and crop your RAW files before merging, make sure that all the files have the same pixel size. For most multishot techniques, it is usually better to crop and straighten your images after they have been merged.
When converting sequences of RAW images to TIFF or JPEG, start by optimizing the reference shot, and subsequently apply the same changes, where appropriate, to the rest of the sequence. Such settings usually include white balance, cropping, noise reduction, and slight sharpening.* It is usually better to make corrections to panoramas in general, to lighting or color saturation, and to contrast after the photos have been merged.
Your reference shot should be the one which is most similar to your desired result. In an HDRI sequence, this will be the one with normal (medium) exposure values, for a panorama it will be the shot in the center of the subject, and for a focus stacking sequence, it will be the shot with the central element of your subject in sharp focus.
The method for transferring the settings used for the reference shot to the other images in a sequence varies according to which RAW converter you are using. With some converters – Adobe Camera Raw or Adobe Lightroom, for example – you simply select the remaining images and click the Synchronize button. In the dialog boxes which follow, you can select which aspects of the reference shot should be transferred (see figure 2-8). Make sure the color temperature and image size (crop) are transferred – most merging applications require all images in a sequence to have the same pixel dimensions.

Figure 2-8: The dialog boxes for synchronizing your RAW conversion settings in Lightroom 2 (above) or Adobe Camera Raw (left). Here, you can select which settings to transfer to the other (currently selected) images in the sequence.
Everything we have said about optimizing RAW data using a converter also applies when optimizing JPEGs or TIFFs in an image editor, although transferring settings to multiple images can be more difficult.* For TIFF and JPEG files, we recommend holding off on image optimization until all the shots have been merged into a single image. Only make corrections which are absolutely necessary, such as removing dust spots, aberration corrections, or vignetting before merging your images.
If you perform these adjustments using the Layers function in Adobe Photoshop, it is possible to apply the same changes to other images by dragging the adjustment layers from the layer palette of your reference image to other open images. Simply select the applicable adjustment layers, hold down the ![]() or
or ![]() key, and drag the layer entry in the layer palette to the image you want to modify. Unfortunately, this doesn’t work with all filters.
key, and drag the layer entry in the layer palette to the image you want to modify. Unfortunately, this doesn’t work with all filters.
3. Merging Your Images into One
This phase varies greatly depending on which multishot technique you are applying. You will find detailed descriptions in individual chapters relating to each technique (chapters 3 through 6).
4. Optimizing Your Merged Image
As a rule, merged images generally need to be further optimized after the merge has taken place. This phase usually includes cropping, either in order to remove the parts of the final image which are poorly defined, or to aid overall composition.
Some of the programs described here – especially those used for focus stacking – are capable of automatically cropping the images in a sequence to include only the image areas that are present in all the images used. It is usually necessary to select the areas to be cropped by hand when stitching panoramas.

Figure 2-9: More post-processing details
If you are cropping to enhance the composition and general feel of your image, other factors, such as personal taste and the intended use of the image, will influence your decisions. When shooting photos for multishot sequences, it is always important to shoot a larger area than you wish to appear in your final image, in order to compensate for potential shifts and distortions, and for any cropping you do while post-processing.
Depending on the technique you are using, a number of different anomalies can occur. These can include rounding errors caused by compression and expansion or rotation and distortion, or blurring caused by the averaging of highlight values. Most optimization scenarios will require a local contrast improvement** and a final sharpening of your image. It might also be necessary to burn or dodge some parts of the final image. You will find descriptions of the necessary techniques on page 114.
Lens distortions can be corrected before or after merging using the Photoshop Lens Correction filter (Filter ▸ Distortions ▸ Lens Correction). The filter also supports correction of vignetting, chromatic aberrations, and perspective distortion. If you are shooting in RAW format, it is usually preferable to correct vignetting and aberrations directly in your RAW converter rather than later using Photoshop.
It is also better to correct perspective and lens distortion before enhancing contrast or image sharpness. Up until now, this was only possible using select RAW converters (such as Bibble, by Bibble Labs [57]). These types of correction functionality are, however, becoming increasingly common in popular RAW conversion software packages.
2.2 Which Camera? Which Settings?
Many of the techniques described in this book can be applied to images shot using inexpensive compact digital cameras. PhotoAcute even has a function designed specially to enhance images shot using cell phones or point-and-shoot cameras.* However, to achieve high-quality results, you will need a camera whose settings you can adjust yourself. The best choice is a camera which allows you to set both shutter speed and aperture manually, but the minimum requirement is at least manual shutter speed adjustment. For macro and panorama shots, it is important to be able to switch off autofocus and focus manually. Almost all bridge cameras and certainly all DSLR cameras offer this kind of flexibility, while compact cameras rarely do.
DSLR = “Digital Single Lens Reflex”
Another invaluable piece of equipment is a good tripod. You won’t need to use it for every shot, but having one with you at all times is a great advantage. Your camera should have its tripod socket as close to the optical axis as possible – a feature not offered by many compact cameras. A third factor which will influence the quality of your results is the image data storage format.
2.3 Which File Format Should I Use?
All modern digital cameras can produce images in the JPEG format, which has the advantage of producing compressed, and therefore compact, image files. JPEG files are often compressed by a factor of 10 or 20, and sometimes as much as 100. It is, however, important to remember that JPEG compression also causes image data loss, so it is always better to set your camera to the minimum possible compression level if you wish to retain as much image detail as possible – even if this results in larger image files.** Regardless of whether you shoot in JPEG, TIFF, or RAW, you should always set your camera to shoot at the highest possible resolution.
Higher-quality cameras will allow you to shoot in RAW (or, occasionally, TIFF) format. TIFF has the advantage of storing non-compressed images, and can also be compressed losslessly. A general loss of image quality is therefore not an issue for TIF-format images, and makes TIFF preferable to JPEG in this respect.
For the majority of the applications discussed here, RAW is the optimum shooting format. When cameras store JPEG and TIFF files, they preprocess the data registered by the camera’s image sensor. The camera automatically interpolates and smoothes the image, and usually enhances contrast and sharpness as well. RAW files, in contrast, reproduce as exactly as possible the data collected by the image sensor, and only adds information regarding camera settings* to the file before saving it losslessly to the camera’s memory card. The actual preparation of a usable image that is suitable for further optimization is only performed later using a RAW converter on a computer. This process can deliver JPEG, TIFF, or PSD files, according to your own personal preferences.
This conversion step causes additional work, but using RAW images has a number of advantages:
1. The user has a high degree of control over the conversion process, and can make adjustments to suit his/her personal taste and the intended use of the final image. The ability to adjust the white balance of an image using a RAW converter is one example of this extended control.
2. As a rule, cameras pack more data into a RAW file than into a JPEG file. This means a modern camera can store RAW image data at a level of 12- to 16-bits per pixel, while a JPEG file can only store 8-bits per RGB channel and pixel. When shooting in JPEG, some of the data registered by the image sensor is automatically discarded by the camera. Often, it is exactly this detail which can be used later to rescue under- or overexposed images.
3. In many of the techniques described in this book, images (or image segments) are distorted, straightened, compressed, stretched, or interpolated. All of these operations result in some loss of image quality, so the reserve detail provided by a 16-bit image can often be more useful than the detail provided by an 8-bit image.**
4. Working on RAW data in a RAW converter is non-destructive. Whatever mistakes you may make, you can always return to the original, unchanged version of your image.
The advantage of the JPEG and TIFF formats is that images can be downloaded from the camera in a near-complete state and often look better than their unprocessed, non-optimized RAW counterparts. Images shot directly in JPEG format are automatically processed to adhere to a generalized consumer taste and usually appear lively and crisp, with contrast and sharpness being automatically enhanced by the camera. One disadvantage of RAW files (apart from the obligatory conversion step) is the sheer number of RAW formats on the market. Not only do all camera manufacturers have their own, proprietary RAW formats, but they also assign each camera model its own version of that format.
Until recently, most image processing programs only supported regular formats such as TIFF, JPEG, BMP, or PSD. All RAW files downloaded from a camera had to be converted to some such format before they could be manipulated. These days, increasing numbers of image processing applications are RAW-compatible, but use their own, built-in converter. Photoshop, for example, uses the Adobe Camera Raw (ACR) module. However, since the continual development of RAW converters is very labor-intensive, most of the programs described in this book address the problem using one of two simple tricks:
A. They use the open-source converter dcraw, which works quite well and is regularly updated to support new formats as they become available. dcraw is a command-line-based RAW converter and is generally not integrated into the user interface.
B. They support a single RAW format: DNG. This is a well-documented, universal, open format created by Adobe.* Other RAW formats are converted to DNG from the source RAW format by the DNG converter before further processing takes place. This is, for example, the technique is used by PhotoAcute.
If you choose to shoot RAW images (which we recommend), for the sake of simplicity, we suggest that you convert your image to the DNG format, as described in section 2.5.
If you manage your photo workflow with an all-in-one program such as Apple Aperture or Adobe Lightroom, you can use the built-in DNG conversion function instead of a stand-alone converter to convert your images during download from the memory card or during export to your hard drive.**
Keep in mind, though, that any corrections you might make to a RAW file using Lightroom will be saved in a sidecar file (with standard RAW files) or will be embedded in a private area within the DNG file. This means that you can only review your changes using Lightroom itself, or Adobe Camera Raw, but not using other third-party programs. Other manufacturers’ programs will only recognize the parts of a DNG file that were originally saved by the camera. If you are lucky, third-party programs will recognize metadata added at a later stage, such as IPTC data (e.g., captions, copyright notes, keywords, etc.).
2.4 About the Programs Used in this Book
The goal of this book is to broaden the scope of your capabilities as a photographer by teaching you new techniques, not by boring you with theory or too many overviews and comparisons.* The simple act of shooting images and enhancing them creatively is central to what this book is about, which is why we shall focus specifically on only a few, proven software programs. Not only is this easier on your wallet, but it will also give you more time to experiment. We will use a broad spectrum of tools, including the Photoshop Merge to HDR command and the PhotoAcute, FDRTools, and Photomatix packages to apply High Dynamic Range (HDR) techniques; Helicon Focus and CombineZM for focus stacking; and the DOP Detail Extractor for improving local contrast. All of these programs run on Mac OS X as well as in Windows, with the exception of CombineZM, which only runs in Windows. Free trial versions of all programs mentioned are available and can be downloaded via the URLs provided at the end of the book as well as on a dedicated web page at the publisher’s site.** With the exception of Photoshop – which is really a necessity for any serious digital photographer – they all cost less than $100. Each program has its own particular uses, and they can all be used in conjunction with each other or as stand-alone applications.
All of the techniques and programs presented here are relatively new, and are developing rapidly. All of these programs are updated several times a year, so what we are providing here is only a snapshot, intended to illustrate the potential which lies therein.
Processing multishot images requires a lot of processing power and main memory, so it’s best to use a system with plenty “under the hood”, and, if possible, one with multiple processors. Your minimum requirement should be a system with 2 GB RAM and a Pentium 4 processor running at at least 2 GHz. Here, more is always better.
![]() 32-bit versions of Windows do not allow single applications to address more than 2 gigabytes of RAM, but this limitation is changing as 64-bit systems become more commonplace.
32-bit versions of Windows do not allow single applications to address more than 2 gigabytes of RAM, but this limitation is changing as 64-bit systems become more commonplace.
A large monitor will also be an advantage when you are processing your images. A sensible minimum should be a 19-inch unit with a resolution of at least 1,280 × 1,024 pixels (this doesn’t, of course, apply to laptops). A calibrated and profiled monitor is also an advantage for a more demanding user, regardless of whether it is being used for the techniques described here or for other applications.
![]() A good value calibration tool was described in FotoEspresso 2/2006 (see [6]).
A good value calibration tool was described in FotoEspresso 2/2006 (see [6]).
The Photoshop “Merge to HDR” and “Photomerge” Commands
There isn’t really much we can say about Photoshop that hasn’t already been said in other books. The program’s Merge to HDR command can be found under File ▸ Automate or in Adobe Bridge under Tools ▸ Photoshop. The command has been in use since the CS2 version of the program, but was significantly improved for CS3, and is really easy to use. We will be using it to create HDRI images.
We will also be using Photoshop’s Photomerge command (File ▸ Automate) to stitch panoramas, and we will also be using Photoshop for simple focus stacking as well as for a number of other overlay and optimization techniques. Simply put, Photoshop is our basic image processing tool.*
With the introduction of the CS4 version, Photoshop provides a more advanced focus stacking functionality, which we will describe in section 4.8.
PhotoAcute
PhotoAcute Studio is manufactured by Texas-based Almalence Incorporated [19]. It is a stand-alone application for Windows and Mac OS X, and its user interface can be easily mastered with the help of this book (the program’s own online manual is not as comprehensive as it could be). PhotoAcute is something of a jack-of-all-trades with many different functions:
![]() PhotoAcute’s other functions can be used even if your camera/lens combination isn’t supported.
PhotoAcute’s other functions can be used even if your camera/lens combination isn’t supported.
1. Profile-based correction of specific errors. This includes chromatic aberration and lens distortion (but not perspective distortion). These corrections are called profile-based because a specific camera/lens-profile is used to establish which particular errors can be corrected automatically for the camera/lens combination being used. An ever-increasing number of profiles for many camera/interchangeable lens combinations is bundled with the software, and new profiles can be downloaded from the internet as they become available. If you wish to take the trouble, you can even have Almalence create a special profile based on shots you take yourself using a special test-card. You can upload the results to Almalence Inc., which will then create your profile and make it available for download.
2. Super-resolution
3. Increased depth of field – also known as Focus Stacking
4. Basic HDRI functionality
5. Elimination of camera shake from merged images
6. Noise reduction in images shot at high ISO speeds
We recommend that you use RAW images as a basis for most of the techniques described in this book. If you decide to follow this recommendation, you will need a copy of the Adobe DNG converter.**
PhotoAcute offers a broad spectrum of functions, but a limited range of settings for fine-tuning your optimized images. It is not necessarily a market leader in any of the areas it covers, but it is inexpensive and easy to use. Like all the programs mentioned, PhotoAcute is being rapidly and continually developed.
FDRTools
FDRTools was created by Andreas Schömann [24]. He currently offers three variants of the package, all of which are available for Windows and Mac OS X. FDRTools Basic is a powerful freeware package, and is an excellent way to try out HDR techniques. The extended version is called FDRTools Advanced, and costs approximately $49. Both versions are stand-alone programs.
The third component is a Photoshop plug-in called FDR Compressor. It has a multi-language user interface and can be used for tone mapping, as well as for other applications external to the HDRI sphere – such as optimizing RAW images exported to Photoshop as 16-bit TIFFs. At the time of writing, the plug-in was only available for Photoshop CS2, but not for CS3 or CS4.*
Photomatix Pro
Photomatix Pro is a product of the Belgian company HDRSoft SARL [13]. It is available for Windows and Mac OS X with a user interface sporting several languages. Photomatix’s specialty is HDRI, and it is among the fastest and most sophisticated programs of its kind. Like PhotoAcute, this is a stand-alone program with a user-friendly interface. The program supports batch processing to ease the strain that processing HDRI sequences puts on the user and the computer.
![]() In addition to the commercially-available Photomatix Pro and Tone Mapping Plug-In, HDRSoft offers the freeware program “Photomatix Basic” for Windows. It can be used to create HDR images.
In addition to the commercially-available Photomatix Pro and Tone Mapping Plug-In, HDRSoft offers the freeware program “Photomatix Basic” for Windows. It can be used to create HDR images.
Photomatix Pro also provides a simplified HDR-creation function called Exposure Blending, which skips the creation of a tone-mapped 32-bit HDR file, and produces 16- or 8-bit low dynamic range images.
In addition to the Photomatix stand-alone program, HDRSoft offers a Photoshop plug-in called Tone Mapping. This can be used to improve localized contrast for PSD images saved with 16- or 32-bits per color channel. Tone mapping for HDR images in Photoshop can also be achieved using a plug-in, as described in section 6.6.
![]() Photomatix provides similar HDR functionality to PhotoAcute and FDRTools, although Photomatix and FDRTools are superior to PhotoAcute for pure HDR applications.
Photomatix provides similar HDR functionality to PhotoAcute and FDRTools, although Photomatix and FDRTools are superior to PhotoAcute for pure HDR applications.
CombineZM
The freeware program CombineZM [21] was created by Alan Hadley, and can be used to merge images of a single subject taken at differing focal distances. This process is known as focus stacking. Of all the programs we will be discussing, this is the only one that is only officially available for Windows, although it can be run on a Mac using an appropriate emulator. CombineZM has a somewhat complicated user interface but gets the job done well. The only real alternative to this program, Helicon Focus [17], is significantly more expensive. There is also a very similar new application, created by the same author, called CombineZP. However, we will only cover CombineZM in this book.
![]() CombineZM has its own Yahoo group with current information and updates. Visit: http://tech.groups.yahoo.com/group/combinez/
CombineZM has its own Yahoo group with current information and updates. Visit: http://tech.groups.yahoo.com/group/combinez/
Helicon Focus
HeliconSoft’s [17] Helicon Focus program is primarily aimed at focus stacking and, after testing the software, we had to break our promise to keep the list of programs we want to discuss short. The program’s user-friendliness and the results it delivers convinced us to include it in this book, even though a Pro license is not necessarily cheap. For those of you who are more cost-conscious, with a little patience, you can achieve similar results using the freeware Lite version of the program.
The program is available for Windows (2000, XP, Vista and Vista x64) and Mac OS X, although the Windows version is obviously being more rapidly developed than the Mac version. The Windows version can process a whole spectrum of RAW data files (including, notably, Canon RAW formats), and while the Mac version supports different formats (JPEGs and 16-bit-TIFFs, for example), it only supports RAW formats for Mac OS X 10.5 and higher. Even then, it can only read the RAW formats already supported by the operating system. The program’s batch processing and image post-processing functions are so far only available in the Windows version.
DOP Detail Extractor
Super-resolution or enhanced depth of field images usually benefit from an increase in local contrast. This is also true of many “normal” digital images. This enhanced local contrast is also known as microcontrast. Improving the microcontrast in an image makes fine textures visible and often makes an image generally more eye-catching. There are many microcontrast-enhancing programs and filters available (more on that later), but our personal favorite is the DOP DetailExtractor Photoshop plug-in written by Uwe Steinmueller. This plug-in enhanced the presence of most of our images using moderate settings. The effects you can achieve using the software can be quite startling, as we will demonstrate in chapter 7.
The plug-in is available for Windows and Mac OS X, and a single license purchase includes both versions. Full licenses and a trial version can be downloaded from the internet [11].
There is also a simplified version of DOP Detail Extractor available (for Mac OS X and Windows), called DOP EasyD Detail Resolver. This version offers less settings, and is designed to keep your images smooth while enhancing sharpness.
2.5 Converting RAW to DNG Using the Adobe DNG Converter
DNG was originally envisioned by Adobe as an open and universal RAW format, and has now been accepted by the ISO (International Standards Organization) as a proposed standard. The format is fairly well documented (which unfortunately isn’t the case for most other RAW formats), and is already supported by a broad range of third-party programs. Using DNG gives programmers the opportunity to offer RAW compatibility without having to support the ever-growing list of proprietary RAW formats available on today’s market. PhotoAcute and Photomatix both use this approach when processing RAW image data.
Adobe’s RAW-to-DNG converter* for Windows and Mac OS X is available for free download. It is capable of converting practically all the RAW formats which Adobe Camera Raw and Adobe Lightroom support, and the list of formats it can process is updated promptly when new cameras/formats become available. The converter is a stand-alone program designed to batch convert all RAW files in a given folder (and, optionally, all subfolders). The program performs this task quickly and reliably.
The DNG converter can also be controlled externally, enabling other programs (such as PhotoAcute) to convert otherwise unsupported RAW formats to DNG, and to interpret the resulting DNG file.
To manually convert RAW files to DNG after installing Adobe DNG Converter, simply double click the program icon. The dialog box in figure 2-10 will appear.
In section ![]() choose the source folder containing the RAW files to be converted.
choose the source folder containing the RAW files to be converted.
In section ![]() select the target folder in which you wish to store your converted DNG images. We recommend using a folder other than the source folder in order to avoid mistakenly overwriting your original image files.
select the target folder in which you wish to store your converted DNG images. We recommend using a folder other than the source folder in order to avoid mistakenly overwriting your original image files.
In section ![]() set the convention to be used for naming the converted files. We keep it simple by using the same name as source file and simply replacing the extension with “.DNG”. That way the new files are linked by name to their source files.
set the convention to be used for naming the converted files. We keep it simple by using the same name as source file and simply replacing the extension with “.DNG”. That way the new files are linked by name to their source files.
In section ![]() the Preferences menu enables you to set the actual parameters for conversion (see figure 2-11).
the Preferences menu enables you to set the actual parameters for conversion (see figure 2-11).
JPEG-Preview • The converter can embed a relatively good quality preview image into the DNG file. We recommend doing this because many programs use this image to create their own previews.
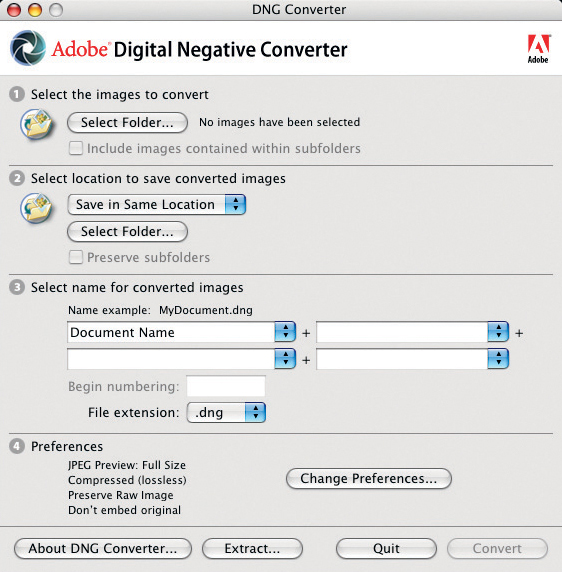
Figure 2-10: Adobe DNG Converter – main dialog
Compressed • This option should be generally activated, as it uses lossless compression to produce DNG files which are 10–65% smaller than the original image files.
Image Conversion Method • There are two possible conversion methods:
1. Preserve Raw Image
For most camera sensors, this means data output by the sensor following the Bayer Pattern. This option keeps the sensor data intact in the DNG file. This is the best option for our purposes.
2. Convert to Linear Image
In this case the image data is converted before saving to DNG. The original data from the sensor is no longer a part of the file, which can be a disadvantage at a later stage.
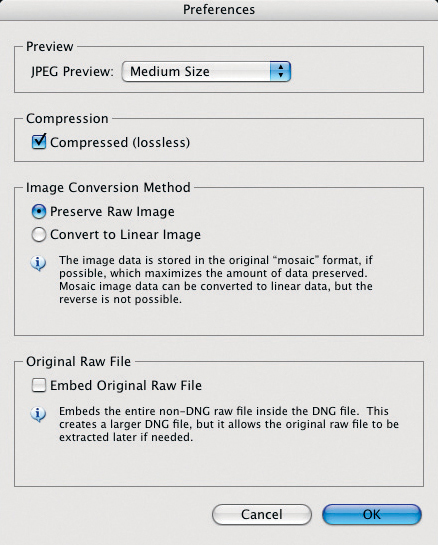
Figure 2-11: Adobe DNG Converter conversion settings
The first option is the best option for use with the techniques described in this book. You will most likely profit from this choice later, as newer converters offer improved processing of Bayer Pattern data. The improvements made in this field in the last few years lead us to expect further positive developments in the near future. Data interpretation takes place during conversion to linear formats, and causes RAW data to lose some of its potential detail. Additionally, a linear file is 60 to 300% larger than a camera image, due to the fact that linear formats store all three RGB components for each pixel (RAW only stores a single, grayscale value for each pixel).
Embed Original Raw File • This option embeds the original RAW data in the DNG file, allowing the original image to be extracted at a later stage. This doesn’t suit our purposes and will double the size of each DNG file – here, two separate RAW versions are saved in a single file.
Should you want to extract the original RAW image from a DNG file which has been saved this way, simply click on Extract (see figure 2-10). This will bring up the dialog box shown in figure 2-12.
This only works for DNG files which were saved with the original RAW image data embedded.
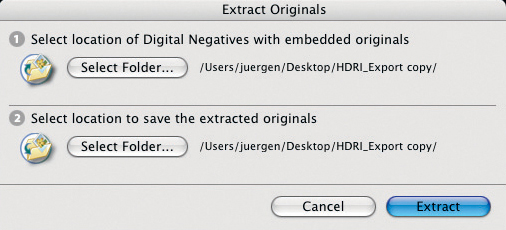
Figure 2-12: Dialog for extracting the original RAW data from a DNG file
Click on convert (figure 2-10) to start the batch conversion of your RAW files to the DNG format. The converter itself is fairly fast, but you will need a fair amount of processing power, depending on the number of images you are converting. The conversion progress is shown in a separate window (figure 2-13). You can use the Stop Conversion button at any time to interrupt (or cancel) the process.
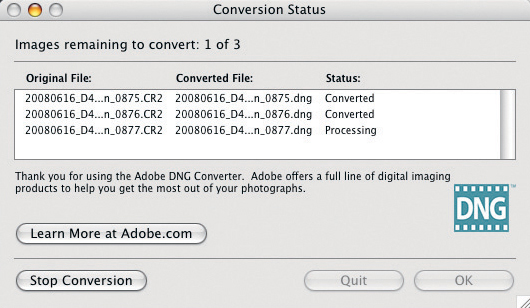
Figure 2-13: The converter shows the conversion status while converting RAW files to DNG.
Once a file has been converted to DNG, it can be opened like any other file in programs which support the format. If you open a DNG file in Photoshop or Bridge, Adobe Camera Raw is automatically activated. The DNG file also automatically includes all metadata (such as EXIF and IPTC) saved with the original RAW file.
2.6 Installing Photoshop Plug-ins, Filters, and Scripts
Several of the tools described here are available not only as standalone programs but also (or even exclusively) as Photoshop plug-ins, filters, or scripts.
Installing these tools is generally simple, but you will need to have administrator privileges to implement system-wide changes. It is best to log in to an administrator account before installing any of these modules. Many of the modules install themselves automatically, but others require a little computer know-how during the process.
The basic Photoshop CS3 folder structure into which we will install our tools is almost identical for Windows and Mac OS X, and is shown in figure 2-14. The illustration shows only the folders relevant to this particular task.
The illustrated file structure is sometimes present in two places. The first folder tree (figure 2-14) is the Photoshop installation, located by default in Windows at:
C:Program FilesAdobeAdobe Photoshop CS3
The standard location in Mac OS X is:
Applications/Adobe Photoshop CS3/
In both cases these folders are located on the system drive and the modules and settings contained within them are available system-wide.
A second, parallel file system stores all of your user-specific settings and extensions. In Windows this is located at C:Documents and SettingsUser NameApplication DataAdobeAdobe Photoshop CS3.
In order to be able to see these settings files, use the Windows Explorer to go to Tools ▸ Folder Options ▸ View ▸ Advanced Options ▸ Hidden Files and Folders. Now activate the option Show all files and folders.
In Mac OS X, this structure is located in the individual user’s Library folder, for example, at ~user/Library/Application Support/Adobe/Adobe Photoshop CS3/, where “~user” represents the user’s home directory.
Both structures are generally self-explanatory, once you are familiar with them. Script-based add-ons such as DOP Detail Extractor are copied into the Scripts folder (a subfolder of Presets) of either the system-wide or user-specific directory tree. Filters like the filter-plug-in FDRCompressor are copied into the Filters folder.
It is always safer to close Photoshop before installing any of the described add-ons, and any modules you do install will only be available once Photoshop has been restarted anyway. You will find your new add-ons in varying locations, depending on their type:

Figure 2-14: The Photoshop CS3 folder structure.
Filter |
will show new filters at the bottom of the menu list. Many filters are registered primarily here – usually under their manufacturers’ name. The actual filter is often located in a sub-menu which extends from the company name (e.g., Filter ▸ Akvis ▸ Enhancer). |
File ▸ Automate |
is where automation modules are located (e.g., File ▸ Automate ▸ Photomerge for stitching multiple shots into a panorama). |
File ▸ Scripts |
is where scripts (such as DOP DetailExtractor) are located. |
File ▸ Export |
is where specialized export modules are located. |
Some add-ons are designed to extend existing Photoshop commands, and will therefore appear in those modules’ dialog boxes. For example, additional formats can appear in the export dialog of the Save as command, while the Open command can be extended to support importing new formats (like JPEG2000), or a specific scanner could be linked to the program, which will then appear in the File ▸ Import menu.
Unfortunately, there are some disadvantages to installing add-ons directly in Photoshop’s folders. If you have to reinstall Photoshop, the addons will be deleted, and whenever you update the program they will be ignored. To work around this, we recommend installing your add-ons (actions and scripts) in folders other than the ones Photoshop provides (the ones described in figure 2-14). You can set Photoshop to look for add-ons in different location by choosing the menu Prefrences ▸ Plug-Ins and using the check box Additional Plug-Ins Folder to point Photoshop to the folder tree where you’ve stored your add-ons. That way, when you update Photoshop (from CS3 to CS4, for example), all you have to do is reset that path.*
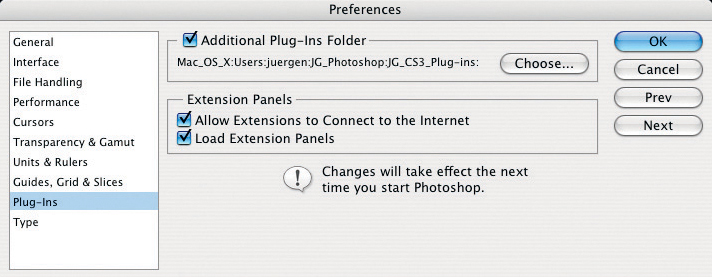
Figure 2-15: In Photoshop’s Preferences, you can define an additional Folder for your own plug-ins.
Actions can also be stored in a separate folder and loaded from the Action panel using Load Actions from the fly-out menu under the ▸ icon at the top left of the Actions panel.