1 Introduction

Digital cameras first became widely available in 2002. Since then, technical advances have not only rapidly increased image sensor resolution, but have also brought great improvements to camera technology in general. The problem of image noise has been addressed, dynamic range has been increased, and cameras are constantly being equipped with ever-faster image processors. Faster processors have simplified the use of “bracketing” techniques, which allow the photographer to automatically shoot sequences of shots with varied exposure settings.
Parallel to these developments, image processing software has also been improving rapidly. RAW conversion is now a simple process, and can be combined with many automatic and manual image correction functions. Modern digital lens correction functions also achieve high-quality results. Combined with appropriate shooting techniques, such technical advancements make previously unimaginable image processing possible. One of the most powerful new options available to the digital photographer is the ability to create a high-quality image by combining multiple shots. This book addresses the use of the following multishot techniques:
1. Super-Resolution, used to increase overall image resolution
2. Focus Stacking, used to increase depth of field
3. Stitching, used to create panoramic photos
4. HDRI Techniques, used to increase the dynamic range of an image
5. Plus other techniques for reducing image noise, and the general optimization of the multishot images you have generated
This book is intended as an introduction to these techniques and demonstrates how to apply them practically using widely available applications.
We will keep theory to a minimum throughout this book, although the technical aspects of the processes described are sometimes very complex. We will also limit the number of software applications we demonstrate. Introducing all the applications available on today’s market would not benefit most users, and new programs and program functions are constantly being introduced anyway.
1.1 Why Use Super-Resolution and Other Multishot Techniques?
The basic approach to multishot techniques (which many professionals have long used in simplified form) is as follows:
▸ Once we’ve found the right angle, lighting and composition for a shot, we make several exposures of the same scene, each with different exposure settings, and hopefully in sharp focus. Taking multiple pictures doesn’t cost the digital photographer any extra money. When shooting such bracketed sequences, the aperture should remain the same while the shutter speed is increased or decreased at set intervals.
▸ You can then simply view the whole sequence at home and choose the best-exposed shot for further processing. At this point, we’re often ready to move directly on to the image optimization stage.
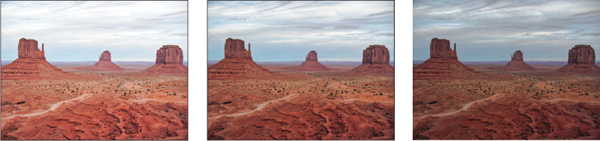
Figure 1-1: A series of three images taken at Monument Valley in the United States. The exposures were varied using different shutter speeds. We think the picture in the middle turned out the best, so we used this one for processing and optimization.
However, the applications described in this book offer a number of other options for processing your image sequences, including:
1. If image resolution isn’t sufficient, for example, for large-format printing, we can use the techniques described in chapter 3 to combine multiple images to make a single image with increased resolution. To achieve this, we need at least four images – the more the better.
2. If poor light forces us to shoot at high ISO speeds, we can combine images to reduce noise. This can be achieved using PhotoAcute (described in chapter 3) or using an HDRI program such as Photomatix Pro or FDRTools. The latter is described in chapter 6.

Figure 1-2: Here we see a scaled-down version of the original picture along with two detail images. The center detail was taken from the original image, and the one to the right was taken from a super-resolution image created using PhotoAcute.
3. If the exposure range of an image isn’t broad enough to capture the dynamic range of a high-contrast scene, it’s possible to increase the dynamic range of your best image by augmenting it with data from the other images in the series. This can be achieved using the PhotoAcute method described in chapter 3, using the HDRI programs described in chapter 6, or using a simple layer mask technique in Photoshop. HDRI stands for High Dynamic Range Imaging.

Figure 1-3: Above are three shots of an old-fashioned carpenter’s workshop. They were taken using different exposure settings. Because the light outside the windows is drastically different than the light inside the building, it’s impossible for a camera to capture the entire dynamic range of the scene and to properly expose both sections of the image. The image on the left shows a combined image created using HDRI. The image was also post-processed to correct perspective distortion.
Varying the image crop or depth of field, instead of changing the lighting, also gives us various new image processing options.
4. In some cases a particular focus setting can’t capture the entire depth of field the photographer would like to portray. This is sometimes the case when shooting architecture, and almost always the case with macro shots. To counteract this problem, we take several shots, changing the focal point from shot to shot. Later, we’ll use software to merge these images into a single new image with extended depth of field. An example is of this technique is shown in figure 1-4. This process is called focus stacking and is described in chapter 4.
5. If a scene is too large (too wide, too tall, or both) to capture in one shot with the lens at hand, we can create multiple, overlapping shots of the entire scene which can be joined together later using specialized software. This process is called stitching and is commonly used to create panoramas. There are, however, a number of other photographic situations in which stitching can be used, including increasing overall image resolution.
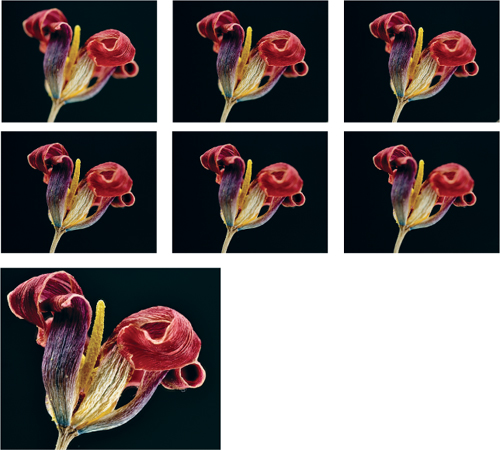
Figure 1-4: Because the desired depth of field for the shot above couldn’t be attained in a single exposure, we took six shots with different focal settings and used focus stacking to combine them into a single image with extended depth of field. The result is pictured here.

Figure 1-5: These two pictures of the city museum in Munich were easily turned into a panorama using Photoshop and a little post-processing.
All of these techniques require multiple, varied exposures of a scene – hence the term “multishot”.
Once you’ve decided to proceed with one specific technique, the next step will be to plan a little. While shooting, it is always necessary to consider which multishot technique you will be applying to your images. Shots taken for a panoramic image call for different camera settings than those taken for use with a focus stacking process. We will describe in detail, the specific requirements for shooting, and give advice on where to find more information in each chapter.
After creating a merged multishot image, you will most likely need to further optimize your results. This can involve smoothing the seams between the individual, merged images, or improving local contrast to make your final image more dynamic, and to give it more presence. Because most of these optimization techniques are applicable to nearly all multishot techniques, we will save the majority of the post-processing discussion for chapter 7 at the end of the book. Other post-processing steps, such as distortion or perspective correction, will be addressed throughout the book where appropriate.

Figure 1-6: A Joshua Tree in the Joshua Tree National Park. The illustration above shows our initial picture and below is the same image with increased local contrast. The difference is (intentionally) subtle, but nevertheless visible.
The results are quite different from those which can be obtained using traditional sharpening techniques.

Some of the techniques we describe will probably be new to you, at least in part. Examining them in great depth quickly becomes complicated, but it is nevertheless possible to achieve great results by combining trial-and-error with a moderate amount of know-how. We want to encourage you to learn and to experiment. We are certain that once you have worked your way through this book, you’ll want to use these techniques on a regular basis. This will enrich your photographic routine and give you new possibilities and perspectives to work with. We don’t recommend that you always use the techniques described here, but only where they are appropriate and can be used to enhance the quality of your work.
1.2 Who Is this Book Aimed At?
This book is written for ambitious amateurs, as well as for professional photographers. Our goal is to expand your photographic repertoire. We assume you have a good working knowledge of your camera and understand the basic principles of digital image processing.
The basic tool used throughout this book is Adobe Photoshop (in the CS2, CS3, or CS4 version). Photoshop CS3 and CS4 occasionally offer version-specific enhancements, and we will mention these where appropriate. Many of the techniques we will describe can be applied using earlier versions of Photoshop, but sometimes with only limited functionality. Throughout this book we also assume that you are familiar with your computer and its operating system, and that you are using a relatively new system version (Windows 2000 and higher, or Mac OS X Version 10.4 or newer).
The Right Camera
Different shooting techniques will require different camera functionality. This book assumes you will be working with a bridge camera (a digital single lens reflex camera with a built-in lens) or a digital single lens reflex camera (DSLR) with interchangeable lenses. Your camera should have two functions which are necessary to work successfully with this book: It should be capable of taking bracketing sequences (i.e., sequences with automatically varied exposure settings), and should allow you to make manual adjustments to aperture, shutter speed, and focus settings. Some compact digital cameras also have appropriate functions, and stitching techniques can often be successfully applied to images made using even the simplest compact digital camera.
How to Read This Book
This book is designed to be read sequentially from beginning to end. We use the early chapters to discuss techniques which will be applied again in later chapters. Chapter 2 focuses on a general workflow for taking pictures, and merging and post-processing them. This information is common to all four of the major techniques described.
After working through chapters 2 and 3, you can skip to a chapter that you’re specifically interested in, although you may have to return to an earlier chapter at some point to find a reference to a particular technique or specific information. Because PhotoAcute covers nearly all of the techniques we will be discussing (with the exception of stitching), we will address the program’s basic use in chapter 3 before we move on to more specific topics in later chapters.
Generally, we have allotted one chapter to each major technique. Chapter 7 focuses on making improvements to local contrast and post-processing in general.
“Make or Break” – The Fine Line Between Success and Failure
The techniques described in this book require planning, manual intervention by the photographer, and experimentation. The programs which support these techniques are rapidly improving, but success is never guaranteed. There is a fine line between success and failure. One small change to your shooting technique, your image processing technique, the program used, or the options and parameters you set can mean the difference between success or failure. Don’t be discouraged by early mistakes. Adjust your workflow, and try different settings or a different program. We will also provide alternatives for all of the techniques we describe.
![]() The techniques described here are relatively new and are subject to constant development. Consequently, comprehensive experience in their use is still rare. Most of the programs’ authors are grateful for feedback, and often build suggestions into one of the many software versions released every year.
The techniques described here are relatively new and are subject to constant development. Consequently, comprehensive experience in their use is still rare. Most of the programs’ authors are grateful for feedback, and often build suggestions into one of the many software versions released every year.
If you don’t have much experience processing digital images, some of the techniques demonstrated in this book might appear quite laborious. We’ve put a lot of effort into making each step comprehensible, but the work at the computer may seem tiring at times, especially in the case of larger, more complex projects. For this reason, we suggest starting with small, simple processes. A panorama doesn’t necessarily have to be composed of five images – two are often fine, and a simpler panorama can be more easily processed. Also, HDRI sequences don’t necessarily have to be created using five or more images – two or three can suffice to greatly increase the dynamic range of a scene. Start small and work your way up. Use simple projects to gather experience before moving on. This will reduce the potential for frustration, and you won’t spoil your own fun with overly large projects and major setbacks.
1.3 Conventions Used in this Book
The majority of the usages in this book should be self-explanatory. The combination Filter ▸ Sharpening ▸ Unsharp Mask, for example, represents the menu sequence Filter followed by Sharpening and finally the menu item Unsharp Mask. Keystroke combinations are designated using the ![]() notation. The hyphen means both keys should be pressed simultaneously. Menu entries and action buttons are written using the File or OK typefaces, and list elements to be selected are written in italics.
notation. The hyphen means both keys should be pressed simultaneously. Menu entries and action buttons are written using the File or OK typefaces, and list elements to be selected are written in italics.
The Windows and Mac OS X versions of the programs included with this book almost always use the same keystroke combinations, although the Windows ![]() key is replaced by the
key is replaced by the ![]() (option)* key in Mac OS. The Windows
(option)* key in Mac OS. The Windows ![]() key is replaced by the
key is replaced by the ![]() key in Mac.**
key in Mac.** ![]() means shift in both systems (
means shift in both systems (![]() is a capital A). The
is a capital A). The ![]() represents the return or enter key. The
represents the return or enter key. The ![]() /
/![]() combination signifies use of
combination signifies use of ![]() in the case of a PC, and
in the case of a PC, and ![]() for a Mac. The same logic applies to the
for a Mac. The same logic applies to the ![]() /
/![]() notation.
notation.
We will occasionally mention functions which require a right mouse click to activate a popup menu. Macintosh users who use a single-button mouse should hold down the ![]() key and click once to simulate a right click.
key and click once to simulate a right click.
![]() We recommend that Mac users invest in a two- or three-button mouse, with a scroll wheel if possible. This investment – which doesn’t have to be a large one – will help you a great deal when using this book.
We recommend that Mac users invest in a two- or three-button mouse, with a scroll wheel if possible. This investment – which doesn’t have to be a large one – will help you a great deal when using this book.
We’ve cropped some of the screenshots in this book in order to keep them down to a manageable size, and we have also reduced extra whitespace in some places to help keep things clear.
Enjoy Your Photography
This book inevitably includes large amounts of technical information – and you’ve already had a first taste. Try to keep in mind the goal of creating an interesting and appealing image. We are simply trying to show you new ways to that achieve that goal, and we hope the techniques demonstrated in this book will help you produce pictures which you and others can enjoy.
In many areas we make suggestions which reflect not only our experience, but also our personal taste. Remember, these are only pointers and are not intended to influence your own personal style or working methods. And don’t let the technical aspects of this book get in the way of your continued efforts to experiment, to gather experience with your camera, and to take great pictures.
![]() It’s impossible to describe everything here, and that isn’t our aim. We hope to present a useful introduction which will stimulate your curiosity.
It’s impossible to describe everything here, and that isn’t our aim. We hope to present a useful introduction which will stimulate your curiosity.
We simply hope you’ll get a lot of enjoyment out of experimenting and realizing your own photographic vision.