
Chapter 7. Peeking under the covers of LINQ to SQL
This chapter covers:
- Mapping from the database to objects
- Exploring how LINQ to SQL works under the covers
- Translating query expressions into SQL with IQueryable and expression trees
- Tracking objects through their life cycle
- Working with disconnected data
In chapter 6, we presented a high-level view of some of the capabilities of LINQ to SQL. By now, you should have enough tools under your belt to start working with LINQ to SQL.
In this chapter, we dive a bit deeper and explore how the technology works under the covers. We’ll start by looking at the mapping options at our disposal. We explain not only the mapping options, but also how to employ some of the tools that come with Visual Studio 2008 to make mapping easier. We’ll continue by looking at the underlying technologies that make LINQ to SQL behave differently from LINQ to Objects. We won’t have enough time to create our own O/R mapper, but we’ll discuss how they differ at their core. We’ll conclude this chapter by examining the object life cycle and see how LINQ to SQL manages the objects through their changes until they are updated. By combining the mapping, translations, and object life cycle, LINQ to SQL emerges as a powerful extension of the LINQ family of technologies.
7.1. Mapping objects to relational data
In the previous chapter, we extended the Book and Subject objects of our running example using several custom attributes. By decorating the classes and properties, we demonstrated how to eliminate repetitive traditional ADO.NET code and let the framework handle mapping the relational tables to our business entity classes. We’re able to specify the mappings once. The framework can determine the SQL necessary to translate our declarative query constructs into a syntax that our database can recognize. By changing the business needs, we do not need to implement an entirely different data tier, potentially with separate code both in our application and on the database itself. We can let the framework manage the language translations based on the mappings we set up.
When we initially presented the mappings, we showed how to manually map the values. The attribute-based mappings provide a direct method of specifying the mappings. In addition to explicitly specifying the mappings with attributes, Visual Studio 2008 offers three other mechanisms to assist with mapping data to your objects. The full list of mapping options consists of
- Attributes declared inline with your classes
- External XML files
- The command-line SqlMetal tool
- The graphical LINQ to SQL Designer tool
In this section, we’ll explore all four of these methods and identify how each one has a role. By understanding each method, we’ll be able to build and maintain applications quicker and more effectively. In chapter 6, we introduced the concept of mapping with attributes. Since we’re already familiar with using the Table and Column attributes to accomplish mappings, let’s begin our exploration by seeing how we can implement more of the capabilities that these attributes offer.
7.1.1. Using inline attributes
In many ways, starting our discussion with the manual method is like learning to ride a unicycle before riding a bicycle with training wheels. However, starting with the basics helps us to better appreciate the other options. We’ll also have a better understanding of the code generated by the other tools.
In the previous chapter we identified LINQ to SQL’s three main types of attributes—Table, Column, and Association. We can decorate our classes with the Table attribute to designate how the object maps to a database table. Properties can be decorated with either the Column attribute or the Association attribute. The Column attribute designates how an individual property maps to a column in the table. The Association attribute designates how tables are related to each other via foreign-key relationships. In addition to these three attributes, there are a number of less frequently used attributes. Table 7.1 provides a brief overview of the basic functionality of each of these attributes.
Table 7.1. Custom attributes exposed by System.Data.Linq.Mapping for mapping databases to objects
|
Attribute |
Description |
|---|---|
| Association | Sets up the primary-key and foreign-key relationships between classes. |
| Column | Identifies the mapping for a column in the database table to the specified property or field. |
| Database | Specifies the database name used by CreateDatabase from your mapping metadata. |
| Function | Used to map user-defined functions or stored procedures to a method. |
| InheritanceMapping | Used when mapping to polymorphic objects. We’ll discuss this in chapter 8. |
| Parameter | Designates the parameters for a stored procedure or function. |
| Provider | Designates the type used to perform the querying. Since LINQ to SQL is limited to SQL Server, this will indicate the version of SQL Server that will be targeted. |
| ResultType | Indicates the type of object that is returned as the result of a stored procedure or function. |
| Table | Designates the name of the table you wish to map to a class. |
For the moment, let’s restrict our focus to the main attributes you’ll use with standard tables. We’ll explore stored procedures, functions, and inheritance in chapter 8. Let’s take a closer look at the Table, Column, and Association attributes.
Table attribute
The Table attribute serves as a starting point to bridge the gap between tables and objects. If we don’t specify that our class is the representation for a table, any of the other attributes we set on the properties will be useless as there will be no way of knowing what table the class is related to. To indicate that a class named Author maps to the Author table, decorate the class with the Table attribute.
[Table()]
public class Author
Not only is the Table attribute one of the most critical, it is also one of the simplest. By default, just decorating the class with the Table attribute indicates that the class name is the same as the name of the table. The Table attribute also takes one parameter as an argument called Name. Use the Name argument to specify the name of the table in the database if they are not the same. For example, if we wanted to modify our Author class to use data from a table called Authors, change the attribute to include the Name parameter as follows:
[Table(Name="dbo.Authors")]
Column Attribute
Typically, the most frequently used attribute is the Column attribute. This attribute maps the columns in the database to the class properties. In mapping a column to a property with the same name, we can get away with decorating the property with the Column attribute without specifying any parameter values. In many cases, we’ll want to specify some of the parameters in table 7.2 to add functionality to the mappings.
Table 7.2. Listing of parameters used by the Column attribute
|
Parameter name |
Description |
|---|---|
| AutoSync | Enumerated value indicating how LINQ to SQL should handle database columns that change as the result of a Create or Update method. This is particularly useful for columns with default values. The valid options are Default, Always, Never, OnInsert, and OnUpdate. |
| CanBeNull | Indicates if the database column can be null. Remember, a null is not the same as an empty string. |
| DbType | This attribute is used to specify the database type used when creating a column with the DataContext.CreateDatabase method. A valid example would be NVarChar(50) Not Null Default('') |
| Expression | This value is only used when generating databases with the CreateDatabase method. The value included here is the SQL string specifying how to create a calculated field in the database. |
| IsDbGenerated | Used to indicate if the database generates the value for this property. This parameter should be used for Identity or AutoNumber columns in the database. The value will be populated in your class immediately after the record is updated in the database via the SubmitChanges method. |
| IsDiscriminator | Use this to designate that the column in question identifies a specific instance type to be used for the given row. We’ll see this in action in section 8.3.3. |
| IsPrimaryKey | Set this value for the column of your table that uniquely identifies the row. Most frequently, this is the primary key column of your table. LINQ to SQL requires at least one column be indicated as the primary key for each class for use by the object identity and change tracking services; for multicolumn keys, set this in each Column attribute. |
| IsVersion | Use this attribute on columns that are the timestamp or version number of your record. This value is updated each time the row is changed, and is useful for optimistic concurrency checks. |
| Name | Indicates the name of the column in the table you wish to map to. |
| Storage | To map a column directly to the underlying private field in a class rather than using the public property setter, specify the name of the field as the storage parameter. |
| UpdateCheck | Specifies how LINQ to SQL will use this column when processing the optimistic concurrency (see section 8.1). By default, all mapped columns in the class will be used when evaluating the concurrency. If you’re using a timestamp or another technique to manage concurrency, use this parameter to optimize your update and delete methods. This parameter takes an enumerated value with the following options: Always (default)—Always check this column Never—Never check this column WhenChanged—Only check this column if the given property has changed. |
Using these attributes, we can map the Author class from our running example to the corresponding table. Every EntitySet collection requires an identifying property. In the case of Author, we’ll use a Guid called ID. Instead of using the public property set method, we specify that we want to store the value directly in the private _ID field using the Storage parameter. For clarity, we indicate that the name of the column is ID using the Name parameter. In case we wanted to generate the database dynamically, we specify the DbType for the column as UniqueIdentifier NOT NULL. Perhaps the most critical parameter on this column is the IsPrimaryKey designation that is required for at least one property in each class. The final parameter of the ID column is CanBeNull, which indicates that a value is required for this property. If no value is supplied, a run-time exception will be thrown.
private System.Guid _ID;
[Column(Storage = "_ID", Name = "ID",
    DbType = "UniqueIdentifier NOT NULL",
    IsPrimaryKey = true, CanBeNull = false)]
public System.Guid ID { get { return _ID;} set{ _ID = value;} }
The next three columns are similar. In each case, we specify the name of the column that corresponds to our property. The data type of each column is VarChar. The FirstName and LastName are optional (NOT NULL and CanBeNull = false). The others allow for null values in the database. If either of these were value types rather than strings, we would need to use the nullable types introduced by the .NET Framework 2.0 for these properties.
[Column(Name = "LastName", DbType = "VarChar(50) NOT NULL",
    CanBeNull = false, UpdateCheck=UpdateCheck.Never)]
public string LastName { get; set; }

[Column(Name = "FirstName", DbType = "VarChar(30) NOT NULL",
    CanBeNull = false, UpdateCheck=UpdateCheck.Never)]
public string FirstName { get; set; }

[Column(Name = "WebSite", DbType = "VarChar(200)",
    UpdateCheck=UpdateCheck.Never)]
public string WebSite { get; set; }
All three of these columns include the parameter instruction to never perform an update check because of a special feature we’re including in this example—the final timestamp column. With SQL Server, a TimeStamp column is changed by the database every time a record is changed. We indicate that the database will assign it by including the IsDbGenerated parameter and setting it to true. We also specify that this column tracks each time the row was changed by setting the IsVersion attribute. We specify that the value is required using the CanBeNull=false designation.
[Column(Name="TimeStamp", DbType="rowversion NOT NULL",
    IsDbGenerated=true, IsVersion=true, CanBeNull=false,
    UpdateCheck=UpdateCheck.Always)]
public byte[] TimeStamp { get; set; }
We’ll discuss concurrency in chapter 8. For now, understand that when making updates, we check to see if values were changed since we last fetched the values. Because the database updates a timestamp each time the row is changed, we don’t need to worry about changes to any other column. By combining the previous value of the ID and timestamp, we check to see that someone else didn’t make a conflicting change to our record while we were working on it. The rest of the properties are not needed for concurrency checking and thus we can state that we never need to check the values on update (UpdateCheck.Never).
With these mappings in place, we’re ready to perform standard queries against our revised Author class. If we wanted to work with object trees to join our authors with the books using the AuthorBooks table, we would need to specify one more set of mapping attributes, Association.
Association attribute
The Association attribute is used to designate how two classes, and by extension their corresponding tables, are related. Unlike the Table and Column attributes, at least one parameter is required in order for our association to work. Table 7.3 lists the parameters used by the Association attribute.
Table 7.3. Listing of parameters used by the Association attribute
|
Parameter Name |
Description |
|---|---|
| DeleteRule | Indicates the cascading delete policy for the relationship. |
| DeleteOnNull | Used in 1:1 relationships to indicate the cascading delete policy when the foreign key fields are not nullable. |
| IsForeignKey | Indicates that the class in question is the child of a parent-child relationship. |
| IsUnique | Used to indicate a 1:1 relationship where both the foreign key and primary key are unique and contained in both tables. This is not used often, as most relationships are 1:0-1 or 1:n rather than a true 1:1. |
| Name | Specifies the name of the foreign key that will be used when dynamically creating the database from the metadata. |
| OtherKey | Used to identify the column(s) in the associated class that contain the related key values. If the parameter is not specified, the ID columns specified in the other class will be assumed. |
| Storage | Specifies the internal field used to track the related child object EntitySets. |
| ThisKey | Identifies the property that contains the local ID field. If this is not specified, the column(s) designated by IsPrimary in the Column attribute are used. If the key consists of multiple columns, include each of them in a comma-separated list of the column names. |
Given this information, let’s take a look at how we can add an association between our new Author class and a BookAuthor class.
private EntitySet<BookAuthor> _BookAuthors;
[Association(Name="FK_BookAuthor_Author", Storage="_BookAuthors",
    OtherKey="Author", ThisKey="ID")]
public EntitySet<BookAuthor> BookAuthors
{
    get
    {
        return this._BookAuthors;
    }
    set
    {
        this._BookAuthors.Assign(value);
    }
}
The primary key of the Author class is the ID property (ThisKey) and the associated key in the BookAuthor is the Author property (OtherKey). We’ll store the collection (Storage) in an EntitySet<BookAuthor> field called _BookAuthors. In case we wish to autogenerate the database from our class attribute metadata, we’ll specify the name of the foreign key to be FK_BookAuthor_Author (Name).
So far in this chapter we’ve focused on the three main attributes—Table, Column, and Association. Using these mapping structures, we can declaratively work with our objects using standard query expressions and allow the framework to automatically handle the data access plumbing for us. Directly embedding the mapping in our classes can be seen as a double-edged sword when it comes to code maintenance. When creating a business class, the developer is typically intimately aware of the relationships between the database and the object. Additionally, we can ensure that changes we make are not orphaned as we continue to enhance our system. However, when maintaining an application down the road, quickly locating the attributes can be difficult when interspersed throughout our code. Additionally, polluting our business code with the mapping information makes focusing on the core business requirements more difficult from a readability standpoint.
A bigger issue with using attributes is that they are set at compile time. Breaking changes in our database’s schema, including renaming or removing an existing column or table, will require us to rebuild the application in order to synchronize the components. If the attributes specify a mapping that no longer exists in the database, a run-time exception will likely arise. To handle both concerns, LINQ offers a second mapping mechanism—using an external XML file.
7.1.2. Mapping with external XML files
Using XML files to specify mappings is similar to using attributes on classes. With XML mapping, the mapping file needs to be specified when instantiating the DataContext. Unlike attribute-based mappings, the XML mapping file can be dynamically changed without recompiling. Additionally, attributes can be removed from the business class definitions, which should facilitate focusing on the business requirements. XML mapping files also offer the added benefit of keeping our mappings in a central location, making maintenance of the mapping portions easier.
We don’t need to be concerned about learning an entirely different set of properties to use the external file. The XML mapping elements look similar to the attributes we’ve already discussed. The amount of code that needs to be maintained is reduced. By using the XML mapping, we can eliminate the inline attributes on our class. Instead, we can use the file shown in listing 7.1 to map our Author object to the database.
Listing 7.1. XML mapping file for Author class
<?xml version="1.0" encoding="utf-16"?> <Database Name="lia" xmlns="http://schemas.microsoft.com/linqtosql/mapping/2007"> <Table Name="Author"><Type Name="LinqInAction.LinqBooks.Common.Author">
<Column Name="ID" Member="ID" Storage="_Id" DbType="UniqueIdentifier NOT NULL" IsPrimaryKey="True" />
<Column Name="LastName" Member="LastName" DbType="VarChar(50) NOT NULL" CanBeNull="False" /> <Column Name="FirstName" Member="FirstName" DbType="VarChar(30)" /> <Column Name="WebSite" Member="WebSite" DbType="VarChar(200)" /> <Column Name="TimeStamp" Member="TimeStamp" DbType="rowversion NOT NULL" CanBeNull="False" IsDbGenerated="True" IsVersion="True" AutoSync="Always" /> </Type> </Table> </Database>
The resulting Author class is similar to the code we set up back in chapter 4. All of the extra mapping work we did has been moved to the XML file. The information in the XML mapping file nearly matches the parameters we previously used in the class’s attributes. We do need to specify the Type and Member information to indicate which class and property we wish to map.
The root node of the XML file is the Database element. Here we specify the name of the database we’re mapping to. The Database can have multiple Table elements. Each Table ![]() element contains a Type element, which indicates the class we use when mapping the given table. The Type
element contains a Type element, which indicates the class we use when mapping the given table. The Type ![]() can have any number of Column and Association elements. The attributes for the Column
can have any number of Column and Association elements. The attributes for the Column ![]() and Association element include one additional value not included in the attribute based version we previously used—Member.
and Association element include one additional value not included in the attribute based version we previously used—Member.
Since we’re not directly decorating individual properties using attributes, we need to specify which property (or Member) the column mapping applies to. Given what we learned previously about the Table, Column, and Association attributes, we can transfer the attributes from the class declarations directly into the Column and Association elements, remembering to add the Member attribute.
In order to use our new mapping file, we need to instruct the DataContext to use the mapping rather than rely on the default attribute based declaration. In listing 7.2, we show how to attach an external mapping file (lia.xml) to the DataContext and then query our undecorated business objects using the XML mappings.
Listing 7.2. Attaching the external XML mapping to the DataContext
XmlMappingSource map =
In the first line of listing 7.2, we create a new System.Data.Linq.XmlMappingSource instance in the lia.xml file in our application directory ![]() . We can load this document using any of the following methods: FromXml, FromUrl, FromStream, or FromReader. To attach our XmlMappingSource object to the DataContext, we add it as the second parameter of the overloaded constructor
. We can load this document using any of the following methods: FromXml, FromUrl, FromStream, or FromReader. To attach our XmlMappingSource object to the DataContext, we add it as the second parameter of the overloaded constructor ![]() . Once we’ve attached the external mapping to the DataContext, we’re free to use all of the querying techniques we learned in chapter 6
. Once we’ve attached the external mapping to the DataContext, we’re free to use all of the querying techniques we learned in chapter 6 ![]() .
.
As we’ve mentioned, the XML mapping offers the benefit of centralizing the definitions and allows us to change the mappings dynamically as schema changes are made in the underlying database. The need to load and parse the XML file increases the overhead required to create the DataContext compared to using attributes. As with any programming task, test the various options in any situation to determine the most appropriate method. Each method has its positives and negatives.
One of the negatives that both the XML and attribute-based mappings face is the tedium caused by having to manually create and maintain the classes and mappings. Thankfully, Visual Studio includes a couple of options to help generate the mappings—the command-line SqlMetal tool and the LINQ to SQL designer. If you’re a masochist who enjoys manually creating your classes and mappings, you can skip the next sections. Otherwise, let’s see how we can exploit the tools to do the monotonous work for us, starting with a command-line option—SqlMetal.
7.1.3. Using the SqlMetal tool
Microsoft realized developers would be more likely to adopt the technology if tools were provided to automate the mapping process. One such tool is a command-line tool called SqlMetal. We point the tool at our database and it generates the corresponding business classes. The basic syntax for using the tool is SqlMetal [switches] [input file]. Let’s see what happens if we try to generate classes for the SqlExpress database for this book.
To begin, open the Visual Studio 2008 Command Prompt, located in the Visual Studio Tools folder for Visual Studio 2008. We need to use this command prompt rather than the standard command-line tool in order to set the necessary path settings. To generate our classes, enter the following from the command prompt, making sure to use the correct path to your database:
SqlMetal /server:.sqlexpress
/namespace:LinqInAction.LinqBooks.Common /code:Common.cs
/language:csharp "C:projectsLialia.mdf"
With this command, we specify that we want SqlMetal to generate a set of C# classes (because of the language switch) based on the LIA SqlExpress database. The code switch indicates that the classes will be generated in a single file called Common.cs and placed in the LinqInAction.LinqBooks.Common namespace because of the namespace switch. SqlMetal has a number of switches that can specify more advanced capabilities.
The switches we provide to SqlMetal will depend on our specific needs. Perhaps the most useful switch as we begin is the help switch, which is fairly standard with command-line tools. This command displays a listing of all of the switches, along with a description and sample usages.
SqlMetal /?
As with the first example, generating classes directly from the database may be sufficient. In the following command, we can generate a set of classes in the LinqInAction namespace to a file called Common.cs. The generated code will be in C# and will include stored procedures in addition to the tables.
SqlMetal /database:lia.mdf /Namespace:LinqInAction /code:Common.cs
/language:csharp /sprocs
Other times, it may be helpful to generate the metadata first. Do this by directing SqlMetal at your database and sending the results to a file called LiaMetadata.xml as follows:
SqlMetal /database:lia.mdf /xml:LiaMetadata.xml
This generated metadata file is an XML file that can be modified to adjust the names of the classes, properties, and columns. Once the metadata is extracted to the XML file, we can use the following command to generate classes based on the metadata rather than going back to the database again:
SqlMetal /namespace:LinqInAction /code:Common.cs
/language:csharp LiaMetadata.xml
Regardless of how we arrive at our final code, the generated code uses the same basic patterns. Go ahead and run the first SqlMetal command. Open the Common.cs file in Visual Studio and explore the generated code. The file can be broken down into the following sections:
- DataContext
- Partial method declarations for custom logic on insert, update, and delete for each table
- Overloaded constructors
- Table accessors
- Stored procedure and function implementations
- Table classes
- Change notification event args
- Private fields
- Partial method declarations for change notification
- Constructors
- Public properties with attribute mapping
- Properties for associated tables
- Change notification events
- Classes for object types returned by stored procedures and functions
Note
Partial methods are a new language feature that allows you to insert method stubs that the generated code can optionally call if they are implemented. We’ll discuss this more fully in chapter 8.
The Common.cs file contains a number of class definitions. The first class encapsulates the DataContext that represents the connection to the database. It also includes methods to access each of the tables and other database objects.
Following the DataContext class, the generated file includes class definitions for each table in the database. Unlike the simplistic class definitions we’ve used thus far, the generated classes have more business functionality. Each class is defined as a partial class. In chapter 8, we’ll look at extending this functionality to add custom business logic.
The table definitions also contain built-in functionality to manage robust change tracking. When any property’s values are changed, the generated code fires change notification events and calls partial methods that will be called if they are implemented. The table classes also offer accessors and tracking of related child objects.
Following the table definitions, SqlMetal generates classes to represent the result types for the various stored procedures and functions. These classes are used as the return types of the function declarations established in the custom DataContext class.
SqlMetal is great if we want to regenerate our entire database model into a single class file. It can even be included as part of a continuous integration practice by scripting it into a custom MSBuild action. The tool does not give the flexibility to pick and choose which elements will be generated. If there are relationships that aren’t included in the database implementation, including table relationships beyond primary key-foreign key relationships that can’t be predefined in the database, they won’t be scripted as part of the SqlMetal implementation. Also, using SqlMetal to directly generate the entities from the database will be restricted to the names defined in your tables and columns. An intermediary database markup language (DBML) file is required to specify mapping changes as necessary. Perhaps the biggest hindrance for SqlMetal is that it’s not a flexible, graphical mapping tool. Visual Studio 2008 comes with a visual designer to help bridge this gap.
7.1.4. The LINQ to SQL Designer
To help developers visually model their data mappings, Visual Studio provides an integrated designer. This designer allows developers to drag and drop objects from their database or manually add conceptual models and visually manage the mappings. Although some expert programmers may shun designers, the tools can often assist not only in seeing a snapshot of the model, but also in helping to learn a new technology. If we’re unsure how to map a specific data relationship, we can try using the design tool. We can always go back and tweak the generated code as long as we don’t plan on regenerating it.
Let’s try using the designer and see what it produces. To begin, right-click the project in the Solution Explorer and select Add, then New Item. From the list of supplied templates, locate the one named LINQ to SQL Classes. Change the name to Lia.dbml and click the Add button. You’ll now be presented with a blank design surface.
With the LINQ to SQL designer visible, open the Server Explorer. If the listing of data connections doesn’t already include our lia database, add it by right-clicking on the Data Connections node in the Server Explorer and selecting Add Connection. In the connection wizard, supply the appropriate values for the server name and database name and click OK to add the connection.
Once the database is included in the Data Connections node, expand the tables for the lia database. Select all of the tables by left-clicking the first one and then holding down the Shift key and left-clicking each of the others. With all of the tables selected, drag them onto the middle of the design surface. The designer will interrogate the tables and their relationships, adding them to the design surface.
The designer is fully editable. From the toolbox, we can drag and drop new Class and Association items. Removing items is done by selecting them and pressing the Delete key. We can also move any of our entities around on the design surface to provide a more coherent representation of our data. Figure 7.1 shows a structured representation of our lia database after we’ve rearranged the classes and associations.
Figure 7.1. Mapping the LINQinAction database using the LINQ to SQL designer tool
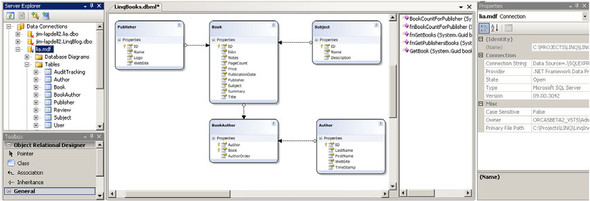
In figure 7.1, we show several regions that are used with the designers. In the upper-left corner, we show the Server Explorer. We can drag server objects onto the main area in the middle, which includes the method pane. This main area in the center is where we can visually design our class structures and mappings. The design surface is divided into two halves. The left side allows us to graphically design our class relationships, similar to using the Class Designer introduced with Visual Studio 2005. On the right side is the method pane, where we can work with our stored procedures and table-defined functions.
The toolbox is in the lower-left corner. When the designer is visible, we can add classes, associations, and inheritance relationships. At this point, the designer surface includes classes (boxes) and associations (arrows). In chapter 8, we’ll add some inheritance as well.
On the right side, we show the context-sensitive property window, which should be familiar. If we need to modify the mapping structures, we do it in the designer or the property window. In this case, we’ve changed the Book’s PubDate column to a property called PublicationDate by setting the Name property for that item. By changing it in the designer, the changes will be retained whenever we regenerate the classes with subsequent changes we make in the designer.
Once we’re happy with our modeling view, we can save it and the associated classes will be generated. The designer consists of three files: an XML-based metadata file (Lia.dbml) specifying how the classes will be generated, another XML file containing visual layout information on the designer surface (Lia.dbml.layout), and the actual generated classes in a single file (Lia.designer.cs). By default, the diagram and designer files are hidden by the Solution Explorer. However, clicking the Show All Files option in the Solution Explorer will expose them. The designer file contains the actual partial class definitions, similar to the code file we generated previously with the SqlMetal tool.
Look at the generated code and use it as a learning tool for creating your own classes by hand. However, resist the temptation to modify the code in the code behind designer file directly. Modifications to the code in the designer file, including adding new tables and associations, will be overwritten if unrelated changes in the actual design surface are made. Instead, try to limit modifying the objects to the graphical designer by using the property window or directly in the DBML file.
So far, this chapter has explored the mapping options. We can do it manually with attributes or XML. If we’re not comfortable doing it manually or want to reduce the amount of redundant typing needed to establish the classes, we can use a command-line tool or a visual designer. The command-line tool offers a mechanism to generate the entire database mapping, but it doesn’t offer the ability to take parts of the database or customize the mappings for particular business entity needs. The designer gives an easy snapshot of just the pertinent portions of the database and allows for customization. The designer does not offer any easy method to regenerate the classes when the database schema changes. Manually dropping and re-creating the table(s) in question is the current solution.
SqlMetal does offer the option of incorporating it into a regular build process. By using SqlMetal to construct the metadata (DBML) file and modifying that manually as necessary, it can generate your class definitions directly from the DBML file as part of the regular build process and thus achieve the best of both worlds.
7.2. Translating query expressions to SQL
In this chapter, we’re attempting to pull back the covers and expose the core of LINQ to SQL. So far, we’ve peeled back the outer layer by exploring the mapping options. We have to get through some more layers before we can truly understand LINQ. One of the layers we can pull back relatively easily is the query expressions. Since the LINQ querying functionality is built around extending types that implement IEnumerable<T>, all we need is for our EntitySets and Tables to implement IEnumerable<T>.
Naturally, EntitySet<T> and Table<T> do implement IEnumerable<T>. However, if that were as far as they went, all of the querying functionality would be performed on the client, including filtering and sorting. We need a way to advance to a more specialized implementation if we want to translate our expressions to the server. Enter an interface that extends the IEnumerable<T> model called IQueryable<T>.
7.2.1. IQueryable
One of the biggest advantages LINQ to SQL has over LINQ to Objects is the ability to evaluate query expressions and translate them into another format. In order to accomplish this, the objects need to expose additional information regarding the structure of the query. All of the query expressions in LINQ to Objects are built to be able to extend IEnumerable<T>. However, IEnumerable<T> only offers the ability to iterate over data. It doesn’t include information that would allow us to easily analyze the query’s definition in order to accomplish the necessary translation. The .NET Framework 3.5 adds a new interface that extends IEnumerable and does include the necessary information—the IQueryable interface. Figure 7.2 shows the relationship between IQueryable and IEnumerable and their generic counterparts.
Figure 7.2. Object model for the IQueryable interface
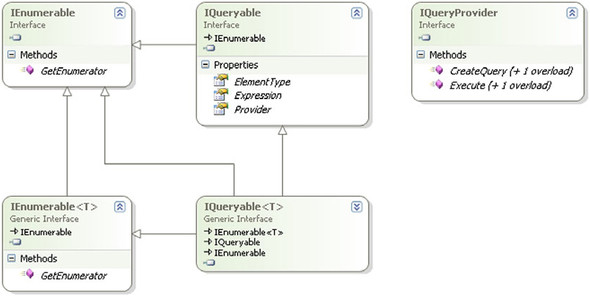
IQueryable requires the implementing class to inherit IEnumerable. In addition, it requires the class to contain three other pieces of information—the ElementType that it contains, an Expression that represents the actions to be taken, and a Provider that implements the IQueryProvider generic interface.
By containing an interface implementation, IQueryable supports creating additional provider models for other data sources, including specific SQL flavors for databases other than SQL Server. The provider takes the information contained by the IQueryable expression and performs the heavy work of translating the structure into an expression that can be consumed. The translation is done by CreateQuery. The Execute method consumes the query that was created.
The Expression property contains the definition of the method. To help understand the difference, let’s consider the case of the following query.
var query = books.Where(book => book.Price>30);
If the books object only implemented IEnumerable<T>, the compiler would translate it into a standard static method call similar to the following:
IEnumerable<Book> query =
  System.Linq.Enumerable.Where<Book>(
    delegate(Book book){return book.Price > 30M;});
However if the Books object implements IQueryable<T>, the compiler would retain the steps used to create the result as an expression tree (listing 7.3):
Listing 7.3. Query expressed as expressions
LinqBooksDataContext context = new LinqBooksDataContext();

var bookParam = Expression.Parameter(typeof(Book), "book");

var query =
  context.Books.Where<Book>(Expression.Lambda<Func<Book, bool>>
    (Expression.GreaterThan(
  Expression.Property(
    bookParam,
    typeof(Book).GetProperty("Price")),
  Expression.Constant(30M, typeof(decimal?))),
new ParameterExpression[] { bookParam }));
By retaining the steps that were used to create the query, IQueryable’s provider implementation can translate the language construct into a format understood by the underlying data source. Also, we can compositionally create and extend the query constructs by adding more functionality (ordering, grouping, aggregating, paging) and then evaluate and execute the results all at once.
At this point, you may be saying, “Okay, I understand how the compiler can know to use LINQ to SQL instead of LINQ to Objects, but what are the expression things you keep mentioning?” I’m glad you asked, as they are the next layer that we must strip away.
7.2.2. Expression trees
Expression trees supply the working pieces of LINQ to SQL with the information necessary to work. We introduced expression trees in section 3.5. In section 5.1.3, we demonstrated how to dynamically create expressions and add them to the trees to build a query dynamically.
In contrast to our previous explorations, with LINQ to SQL we take existing expression trees and examine them branch by branch in order to translate our query expressions to a syntax understood by the database. There have been other efforts to make database access more generic so that the same query syntax can be applied to multiple database engines, even though the engines may process the query differently. Often these solutions rely on taking queries as strings and applying a number of string manipulations to convert one string representation into another.
Unlike these other query translation systems, LINQ to SQL distinguishes itself by translating the query expressions into expression trees. By retaining the expressions, we can enhance the queries by adding to them compositionally, keep the queries strongly typed, provide better IDE integration, and retain the necessary metadata. Best of all, we don’t have to worry about parsing a string representation of our intent. The expression trees allow us to use similar heuristics that are implemented by the language compilers themselves.
Let’s see what happens if we apply this concept to our earlier IQueryable example. In this case, let’s focus on the expressions in the example.
LinqBooksDataContext context = new LinqBooksDataContext();

var bookParam = Expression.Parameter(typeof(Book), "book");

var query =
  context.Books.Where<Book>(Expression.Lambda<Func<Book, bool>>
    (Expression.GreaterThan(
      Expression.Property(
        bookParam,
        typeof(Book).GetProperty("Price")),
      Expression.Constant(30M, typeof(decimal?))),
    new ParameterExpression[] { bookParam }));
By highlighting our expression types, we can see that we have the following kinds of expressions: Lambda, GreaterThan, Property, Parameter, Constant. Each of these expression types can be broken down into more granular portions to encapsulate more information. For example, the GreaterThan expression is actually a BinaryExpression that takes two parts, a left side and a right side. With this, we can compare the value from the left side to see if it is GreaterThan the value on the right side. By breaking the expression down, we can then generalize the analysis and allow for variations in the left and right portions. In this example, the left value is the book’s price and the right side is the constant value of 30. Figure 7.3 shows a graphical representation of the full expression tree.
Figure 7.3. ExpressionTree Visualizer representation of the book query
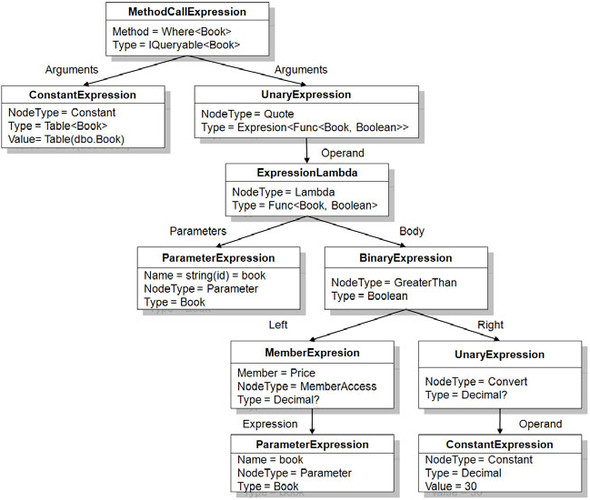
In the figure, we can see that more information is available about the method than was evident in the compiler representation from the IQueryable example.[1] Starting at the top, we can see that the Where MethodCallExpression takes two arguments, the ConstantExpression that contains the source of the data and a UnaryExpression that contains the function we’ll apply. Because the data context maintains a reference to the metadata information including the mapping (generated from attributes or XML), we can translate the object representation into terms that the database understands.
1 The LINQ samples at http://msdn2.microsoft.com/en-us/bb330936.aspx include an expression tree visualizer project that can evaluate an expression tree and display it in a treeview control.
Looking further down the expression tree, we can see how additional nodes are inserted when applying the GreaterThan BinaryExpression. When applying the GreaterThan operator on CLR types, we need to compare similar types. Thus, we need to convert the ConstantExpression into a nullable Decimal type in order to compare it with the data type in the underlying book’s Price property. However, this additional step is not necessary when we issue a SQL statement to the database.
So, how does LINQ to SQL take all of this information and translate it to the database? When we first try to iterate over the results of our IQueryable<T> type, the entire Expression value is passed to its assigned Provider. The provider then uses a Visitor pattern to walk the expression tree identifying expression types that it knows how to handle, such as Where and GreaterThan. Additionally, it walks the expression tree from the bottom up to identify nodes that don’t need to be evaluated, like lifting the constant to a nullable type. The provider constructs a parallel expression tree that more closely matches the SQL implementation.
Once the expressions are parsed, the provider constructs the resulting SQL statement, substituting the appropriate mappings to translate the objects into table and column names taken from the attributes or XML mapping source. Once all of the pieces are put together, the resulting SQL statement can be sent to the database. The resulting values are then used to populate the necessary object collection, again using the mapping information as appropriate.
Performing the translation from the expression tree to a provider-specific implementation increases in complexity as we add more functions to the tree. It would be impossible to cover all of the possible query permutations in this book. If you’re interested in pursuing this further, Matt Warren, one of the original architects of LINQ to SQL, has a detailed explanation demonstrating how to implement an IQueryable provider in a blog series starting with http://blogs.msdn.com/mattwar/archive/2007/07/30/linq-building-an-iqueryable-provider-part-i.aspx.
Additionally, we’ll dig deeper with the expression trees at the end of this book, when we investigate extending LINQ to use a web service provided by Amazon. For now, the important thing to take away is to understand the difference between LINQ to Objects and LINQ to SQL and how the IQueryable interface can be used to perform the key translations that make the technology work.
So far we’ve shown how LINQ to SQL knows how to map the data to classes. We also have shown how it translates our query expressions into a syntax the database understands. By combining these features, the .NET 3.5 Framework has provided a powerful querying functionality. As we demonstrated in chapter 6, LINQ to SQL is not limited to only viewing data. It also maintains information necessary to persist our changes back to the database. Let’s continue our look under the covers by seeing what happens to our objects in their life cycle after we fetch them.
7.3. The entity life cycle
If LINQ to SQL were limited to mapping data between relational data and objects, it would represent yet another in a long line of object-relational mapping solutions. As we’ve already seen, LINQ offers the capability to construct strongly typed queries directly within the language. Beyond that, the framework includes support to manage object changes and to optimize the database interaction based on those values.
The DataContext object continues to play a pivotal role in the entity’s life cycle. As we’ve already seen, the DataContext manages the connection to the database. In addition, it evaluates the mappings and translates the expression trees into consumable structures. If we were only concerned with viewing data, the mapping and translation services would be sufficient for our needs. The life cycle would end the moment we fetched the objects.
As applications work with the results of queries, they typically view the data and make changes. We need a mechanism for tracking the changes that are made and maintaining those values until they are no longer needed. Additionally, we need to retain the changes so that we can commit them to the database. To handle the rest of the object’s life cycle, the DataContext also manages references to the retrieved objects. It watches as changes are made to them by tracking the retrieved object’s identities and the changed values. Figure 7.4 illustrates the services offered by the DataContext.
Figure 7.4. DataContext services to maintain the object life cycle between the application and database
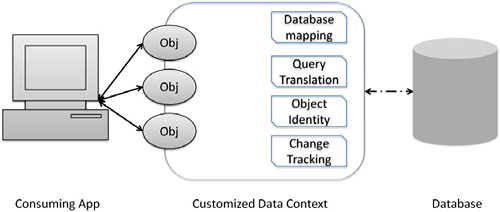
The life cycle begins when we first read a value from the database. Prior to passing the resulting object on to the consuming application code, the DataContext retains a reference to the object. An identity management service tracks the object in a list indexed by the identity designated in the mapping. By retaining this value, we can refer back to the object based on its object identity.
Each time we query values from the database, the DataContext checks with the identity management service to see if an object with the same identity has already been returned in a previous query. If so, the DataContext will return the value stored in the internal cache rather than remapping the row to the table. By retaining the original value, we can allow clients to make changes to their copy of the data without regard for changes that other users have made. We won’t worry about concurrency issues until the changes are submitted.
You may expect that if the context is caching the returned values, separate database queries will not be issued each time you request information. Assuming you don’t prefetch your results using the ToList or similar extension methods, the database will be queried each time. The distinction here is that if the context is already aware of the object, only the identifying column(s) will be used. The additional columns will be ignored.
There are a couple of instances where the object identity implementation may catch you off guard. Using the Single extension method is an exception to this caching behavior. With Single, the internal cache is checked first. If the requested object is not in the cache, the database will be queried. This optimization did not make it into the initial release, but may return in future updates.
Additionally, you may expect that an item inserted into or removed from a table will be available for querying. Since the database is hit and only items that the database knows about are returned, objects added or removed using InsertOnSubmit or DeleteOnSubmit are not included in the results until they are actually submitted. This is the key reason why the xxxOnSubmit methods were used instead of the typical IList method names. The at times counterintuitive behavior of the object identity is important to understand as we use LINQ to change data.
7.3.1. Tracking changes
As we make changes to our objects, the DataContext maintains both the original value of that property and the newly changed value by a change tracking service. By retaining both the original and new values, we can optimize the submission back to the database and only update the changed records. In listing 7.4, we establish two different DataContext objects. Each of them manages its own set of object identities and change tracking.
Listing 7.4. Identity management and change tracking
LinqBooksDataContext context1 = new LinqBooksDataContext();ObjectDumper.Write(context1.Subjects.Where(s => s.ID == Id)); ObjectDumper.Write(context2.Subjects.Where(s => s.ID == Id));
As we did in listing 7.3, we begin by setting up our two data context objects ![]() . We use two contexts for the purpose of this example to simulate two separate users. Each context manages the identity and
change tracking services separately. In this example, we retrieve the subject that corresponds to a given Guid. In order to demonstrate the identity management, we fetch the same record from our database in two separate contexts. We
also include logging
. We use two contexts for the purpose of this example to simulate two separate users. Each context manages the identity and
change tracking services separately. In this example, we retrieve the subject that corresponds to a given Guid. In order to demonstrate the identity management, we fetch the same record from our database in two separate contexts. We
also include logging ![]() for each context to output the results to the console (or output) window to prove that we’re actually requesting information
from the database.
for each context to output the results to the console (or output) window to prove that we’re actually requesting information
from the database.
We fetch the editingSubject from the first context and display the values in both the editingSubject and the database in the second context ![]() . As shown in table 7.4, the output for both values should be identical. We then change the description on the editing subject, but we don’t commit
the change to the database
. As shown in table 7.4, the output for both values should be identical. We then change the description on the editing subject, but we don’t commit
the change to the database ![]() . At this point, the change is only retained in memory via the change tracking service of the context1 instance. Context2 has no knowledge of the change.
. At this point, the change is only retained in memory via the change tracking service of the context1 instance. Context2 has no knowledge of the change.
Table 7.4. State of values returned by queries before and after changes
|
Context1 |
Context2 |
Database |
|
|---|---|---|---|
| Value returned from original query | Original | Original | Original |
| Make change and requery | Changed | Original | Original |
When we output the results by reissuing the original query, we now see that the description returned by the query on context1 returns our new description value, but the one using context2 still returns the original value. Remember, since each context mimics a different user, this would mean that two users would see different representations of the data. If we were to check the value in the database, we would see that it still retains the original values as well.
It is important to realize the difference between the value stored in memory for each context object and the value stored in the database. The results of the query on the second context object are not surprising. However, what is not expected is that requerying the first context returns the object from the identity tracking service instead of a new object from the database. Actually, the second context is returning the object it has retained as well, but since we haven’t made any change to the object tracked by the second context, it appears to be identical to the values stored in the database for that row.
In addition to tracking changes in column-mapped properties, the change-tracking service also monitors changes in object associations. Thus if we were to move a comment from one book to another, the change tracking would maintain that change in memory until we actually submit the change back to the database.
7.3.2. Submitting changes
So far, all of the changes we’ve made have been retained in memory and not persisted to the database. It only appears that the changes have been applied on subsequent queries due to the identity tracking on the DataContext. As we demonstrated in chapter 6, submitting changes to the database is done with a single call of SubmitChanges on the context. When SubmitChanges is called, the context compares the original values of the objects that it is tracking with the current values. If these differ, the context packages up the changes and creates the necessary query string to be executed by the database.
Assuming no conflicts occurred in the update and the appropriate records are updated, the context flushes its list of changes. If there are problems, the changes are rolled back in the database based on the concurrency management selected. Listing 7.5 extends the previous example by actually saving the data to the database.
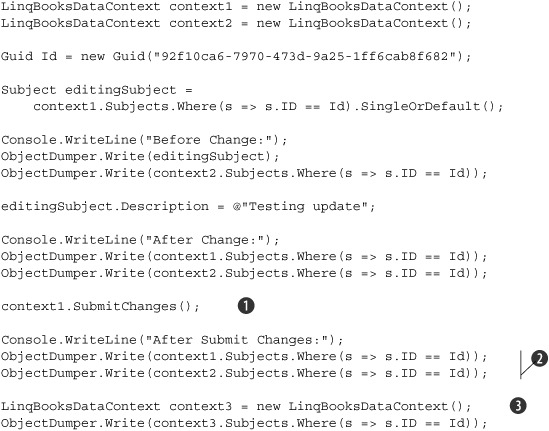
Listing 7.5. Submitting changes with identity and change tracking management
This results in the following output:
Before Change:
ID=92f10ca6-7970-473d-9a25-1ff6cab8f682
Name=Novel
Description=Initial Value
ObjectId=448c7362-ca4e-4199-9e4f-0a0d029b9c8d

ID=92f10ca6-7970-473d-9a25-1ff6cab8f682
Name=Novel
Description=Initial Value
ObjectId=5040810a-eca9-4850-bcf6-09e42837fe92

After Change:
ID=92f10ca6-7970-473d-9a25-1ff6cab8f682
Name=Novel
Description=Testing Update
ObjectId=448c7362-ca4e-4199-9e4f-0a0d029b9c8d

ID=92f10ca6-7970-473d-9a25-1ff6cab8f682
Name=Novel
Description=Initial Value
ObjectId=5040810a-eca9-4850-bcf6-09e42837fe92

After Submit Changes:
Id=92f10ca6-7970-473d-9a25-1ff6cab8f682
Name=Novel
Description=Testing update
ObjectId=bc2d5231-ed4e-4447-9027-a7f42face624

Id=92f10ca6-7970-473d-9a25-1ff6cab8f682
Name=Novel
Description=Original Value
ObjectId=18792750-c170-4d62-9a97-3a7444514b0b

Id=92f10ca6-7970-473d-9a25-1ff6cab8f682
Name=Novel
Description=Testing update
ObjectId=207eb678-0c29-479b-b844-3aa28d9572ac
Listing 7.5 begins just as the previous example did. Up until we call SubmitChanges on the first context ![]() , any changes we made were retained only in memory. Calling SubmitChanges on context1 commits the changes to the database and flushes the change tracking on context1. Following SubmitChanges, we issue the same LINQ query on context1 and context2
, any changes we made were retained only in memory. Calling SubmitChanges on context1 commits the changes to the database and flushes the change tracking on context1. Following SubmitChanges, we issue the same LINQ query on context1 and context2 ![]() . Additionally, for the purposes of this example, we create a new third context that is oblivious to the identity and change
tracking of the other two contexts
. Additionally, for the purposes of this example, we create a new third context that is oblivious to the identity and change
tracking of the other two contexts ![]() . The final three queries are identical except for the context that is issuing the request. In Table 7.5 we summarize the results before and after submitting the changes.
. The final three queries are identical except for the context that is issuing the request. In Table 7.5 we summarize the results before and after submitting the changes.
Table 7.5. Values returned before and after submitting changes from each DataContext
|
Action |
Description1 |
Description2 |
Description3 |
Id1 |
Id2 |
Id3 |
|---|---|---|---|---|---|---|
| Initial fetch | Original | Original | n/a | Guid1 | Guid2 | n/a |
| After change | Changed | Original | n/a | Guid1 | Guid2 | n/a |
| After commit | Changed | Original | Changed | Guid1 | Guid2 | Guid3 |
In order to explicitly identify the objects, we’ve added a new Guid property called ObjectId. The value of this column is assigned as part of the Subject’s constructor. This way, the value should change each time we have a different object instance. In the resulting output, compare the values in each object before changes, after changes, and after submitting. Notice that the ObjectId in the subject returned by the first context is retained for the life of the context. Even after we submit changes, context1 continues to track the same object through the identity-tracking service. To prove that the value actually exists in the database following the submit changes, we compare the results from context1 and the local context instance (Description3 and Id3). Notice that the fetched values are identical, but the ObjectId differs between these objects. Also notice that the subject returned from context2 is still maintaining the values from its identity service.
It is important to realize how your objects work in relation to the data context. The DataContext is intended to be a short-lived object. We need to be aware of the context(s) we’re using and how the identity- and change-tracking services work in order to avoid unexpected results. When only fetching data, we can create the context as we fetch the values and then throw it away. In that case, we can optimize the context by setting the ObjectTrackingEnabled property to false. This increases performance by disabling the change- and identity-tracking services, but disables the ability to update the changes.
If we need to be able to update the data, be aware of the context’s scope and manage it appropriately. In Windows applications, it may be acceptable to retain a context as changes are made, but realize the performance and memory overhead that come with retaining all objects and the changed values. The intended usage pattern for LINQ to SQL is as a unit of work, which uses the following pattern: Query – Report – Edit – Submit – Dispose. As soon as we no longer need to maintain changes on an object, we should clean up the context and create a new one.
7.3.3. Working with disconnected data
Occasionally, working in a connected environment with the context is either inadvisable or impossible. This situation typically occurs when updating values from an ASP.NET page, web service, or other similar disconnected model, including Workflow (WF) and Windows Communication Foundation (WCF). When fetching records in the disconnected model, we need to encapsulate the results. We cannot cache the context or transmit it to the disconnected user.
Since the object must be divorced from the context, we can no longer rely on the context’s change-tracking or identity-management services. Transmission to the client is limited to simple objects (or an XML representation of the objects). Managing changes becomes a bigger challenge in the disconnected model.
To support the disconnected model, LINQ to SQL offers two alternatives to apply changes. If you’re just adding a row to a table, you can call the InsertOnSubmit[2] method on the appropriate DataContext’s table object. Change tracking is not necessary for new records, only for changing existing ones, thus calling InsertOnSubmit works fine since we don’t need to worry about conflicts with existing records.
2 LINQ releases through the beta cycle used the Add and Remove methods on the table objects. When Visual Studio 2008 was finished, the names for these methods were changed to InsertOnSubmit and RemoveOnSubmit. Earlier documentation may still refer to the earlier API.
However, if we need to change an existing record, we need to associate the changes with the existing record. Several options exist to attach the changed object to the context. The easiest and preferred method is to use the Attach method to introduce the record to a DataContext as if it were loaded via a normal query. The example in listing 7.6 uses the Attach method to connect an object to a new DataContext.
Listing 7.6. Updating records in a disconnected environment
public void UpdateSubject(Subject cachedSubject)
{
  LinqBooksDataContext context = new LinqBooksDataContext();
  context.Subjects.Attach(cachedSubject);
  cachedSubject.Name = @"Testing update";
  context.SubmitChanges();
}
In this example, we begin with the existing, unchanged object. This object could have been cached in an ASP.NET Session object or supplied as a parameter of our method. We connect the object to the DataContext using the Attach method ![]() . Once it is attached, the context’s change- and identity-tracking service can monitor the changes we’re going to apply. Any
subsequent changes
. Once it is attached, the context’s change- and identity-tracking service can monitor the changes we’re going to apply. Any
subsequent changes ![]() will be tracked by the change-tracking service and updated accordingly. Remember that the object must be attached prior to making the changes or else the change tracking will not be aware of the changes.
will be tracked by the change-tracking service and updated accordingly. Remember that the object must be attached prior to making the changes or else the change tracking will not be aware of the changes.
If you try to attach a value already updated, as is typical in a web service scenario, you can’t just attach this already-changed version unless the object has some special characteristics. If you implement a TimeStamp column in your object, as we did with the Author object, you can attach the author object using the overloaded Attach method as follows:
context.Authors.Attach(cachedAuthor, True)
The second parameter indicates that the object should be considered dirty and forces the context to add the object to the list of changed objects. If you don’t have the liberty of enhancing your database schema to include timestamp columns and you need to use Attach like this, you can set the UpdateCheck property on the mapping so that the values are not checked. In both of these cases, all properties will be updated, regardless of whether or not they have been changed.
If you retain a copy of the original object (either via a cache or by keeping a copy inside the entity itself), attach the new object by using the Attach method and including both the changed version along with the original version:
context.Subjects.Attach(changedSubject, originalSubject);
In this case, only the changed columns will be included in the Update clause, rather than an update being forced on all columns. The original values will be used in the Where clause for concurrency checking.
If you can’t take advantage of any of these Attach scenarios, you can replace the originalSubject with one newly fetched from the database as part of the update transaction as shown in listing 7.7.
Listing 7.7. Updating a disconnected object that has already been changed
public static void UpdateSubject(Subject changingSubject)
{
  LinqBooksDataContext context = new LinqBooksDataContext();
  Subject existingSubject = context.Subjects
                            .Where(s => s.ID == changingSubject.ID)
                            .FirstOrDefault<Subject>();
  existingSubject.Name = changingSubject.Name;
  existingSubject.Description = changingSubject.Description;
  context.SubmitChanges();
}
In the case of objects that have already been updated, simply attaching them to the DataContext will fail. No values would be flagged as needing to be updated, as the change-tracking service will have been unaware of
the changes. Here, we need to fetch the record from the database based on the ID of the object that we’re trying to update
![]() . Then, we need to update each property as necessary
. Then, we need to update each property as necessary ![]() . If the values in the properties are the same, the change-tracking service will continue to exclude those properties from
needing to be updated. When we call SubmitChanges, only the properties and objects that have changed will be submitted.
. If the values in the properties are the same, the change-tracking service will continue to exclude those properties from
needing to be updated. When we call SubmitChanges, only the properties and objects that have changed will be submitted. ![]()
Be aware that the object we’re updating may have been based on values that have been subsequently changed in the database. In order to manage concurrency tracking, our best option is to supply a timestamp that indicates the database version when originally fetching the record. If adding the timestamp column is not an option, we can retain a copy of the original values or a hash of the original values. We can then compare the appropriate values and manage the concurrency ourselves.
The DataContext’s object identity and change-tracking services play a crucial role in the object’s life cycle. If we simply need to read the values, we can set the DataContext to a read-only mode by setting the ObjectTrackingEnabled to false, thus bypassing these services. However, if we need to be able to change and persist the values, tracking the objects and changes is critical.
7.4. Summary
On the surface, LINQ to SQL allows for easy access to querying and updating abilities without the need to manually define the database access. Under the covers, it offers a powerful set of mapping structures, expression parsing, and entity management. You can use the technology without fully understanding how everything works under the covers. The more you understand how it works, the less likely you are to find yourself experiencing unexpected results. If nothing else, it is important to understand how the DataContext manages the object identity and change management so that you make sure you update the correct information.
At this point, we’ve covered the core concepts behind LINQ to SQL and pulled back the covers to get an understanding of how it works. In the next chapter, we’ll continue to examine LINQ to SQL by exploring some more advanced functionality. By the time we’re done, you should have a full tool belt for using LINQ with the SQL Server family of databases.