
Chapter 1. Ruby on Rails, the framework
- Exploring Ruby on Rails
- Building the foundations of a Ruby on Rails app
- Working with the scaffold generator
Welcome aboard! It’s great to have you with us on this journey through the world of Ruby on Rails. Ruby on Rails is known throughout the lands as a powerful web framework that helps developers rapidly build modern web applications. In particular, it provides lots of niceties to help you in your quest to develop a full-featured real-world application and be happy doing it. Great developers are happy developers. There’s much more to the Rails world than might appear at first glance, but not overwhelmingly too much. And what a first glance! Oh, you two haven’t met? Well, time for some introductions then!
1.1. What is Ruby on Rails?
Ruby on Rails is a framework built on the Ruby language, hence the name Ruby on Rails. The Ruby language was created back in 1993 by Yukihiro “Matz” Matsumuto of Japan. Ruby was released to the general public in 1995. Since then, it has earned both a reputation and an enthusiastic following for its clean design, elegant syntax, and wide selection of tools available in the standard library and via a package management system called RubyGems. It also has a worldwide community and many active contributors constantly improving the language and the ecosystem around it.
Ruby on Rails was created in 2004 by David Heinemeier Hansson during the development of 37signals’ flagship product: Basecamp. When Rails was needed for other 37signals projects, the team extracted the Rails code from it, crafted the beginnings of the framework, and released it as open source under the MIT license.[1] Since then, Ruby on Rails has quickly progressed to become one of the leading web development frameworks. This is in no small part due to the large community surrounding it who are constantly working on submitting patches to add new features or to fix existing bugs. Version 3 of this framework indicates yet another significant milestone in the project’s history and introduces some new concepts, but won’t leave those already familiar with the framework in the dark. The latest version of Rails is the primary focus of this book.
1 The MIT license: http://en.wikipedia.org/wiki/MIT_License.
1.1.1. Benefits
Ruby on Rails allows for rapid development of applications by using a concept known as convention over configuration. When you begin writing a Ruby on Rails application, you run an application generator, which creates a basic skeleton of directories and files for your application. These files and directories provide categorization for pieces of your code, such as the app/models directory for containing files that interact with the database and the public/images directory for images. Because all of this is already there for you, you won’t be spending your time configuring the way your application is laid out. It’s done for you.
How rapidly can you develop a Ruby on Rails application? Take the annual Rails Rumble event. This event aims to bring together small teams of one to four developers around the world to develop Ruby on Rails[2] applications in a 48-hour period. Using Rails, these teams can deliver amazing web applications in just two days.[3] Another great example of rapid development of a Rails application is the 20-minute blog screencast recorded by Yehuda Katz.[4] This screencast takes you from a no-application state to having a basic blogging and commenting system.
2 And now other Ruby-based web frameworks, such as Sinatra.
3 To see an example of what has come out of previous Rails Rumbles, take a look at their alumni archive: http://r09.railsrumble.com/entries.
4 20-minute blog screencast: http://vimeo.com/10732081.
Ruby on Rails affords you a level of productivity unheard of in other web frameworks because every Ruby on Rails application starts out the same way. The similarity between the applications is so close that the paradigm shift between different Rails applications is not tremendous. If and when you jump between Rails applications, you don’t have to relearn how it all connects—it’s mostly the same.
The core features of Rails are a conglomerate of many different parts called Railties (when said aloud it rhymes with “bowties”), such as Active Record, Active Support, Action Mailer, and Action Pack.[5] These different Railties provide a wide range of methods and classes that help you develop your applications. They prevent you from performing boring, repetitive tasks—such as coding how your application hooks into your database—and let you get right down to writing valuable code for your business.
5 Railties share the same version number as Rails, which means when you’re using Rails 3.1, you’re using the 3.1 version of the Railtie. This is helpful to know when you upgrade Rails because the version number of the installed Railties should be the same as the version number of Rails.
Ever wished for a built-in way of writing automated tests for your web application? Ruby on Rails has you covered with Test::Unit, part of Ruby’s standard library. It’s incredibly easy to write automated test code for your application, as you’ll see throughout this book. Test::Unit saves your bacon in the long term, and that’s a fantastic thing. We touch on Test::Unit in the next chapter before moving on to RSpec and Cucumber, two other test frameworks that are preferred over Test::Unit and a little easier on the eyes too.
In addition to testing frameworks, the Ruby community has produced several high-quality libraries (called RubyGems, or gems for short) for use in your day-to-day development with Ruby on Rails. Some of these libraries add additional functionality to Ruby on Rails; others provide ways to turn alternative markup languages such as Markdown and Textile into HTML. Usually, if you can think it, there’s a gem out there that will help you do it.
Noticing a common pattern yet? Probably. As you can see, Ruby on Rails (and the great community surrounding it) provides code that performs the trivial application tasks for you, from setting up the foundations of your application to handling the delivery of email. The time you save with all these libraries is immense! And because the code is open source, you don’t have to go to a specific vendor to get support. Anybody who knows Ruby can help you if you’re stuck.
1.1.2. Common terms
You’ll hear a few common Ruby on Rails terms quite often. This section explains what they mean and how they relate to a Rails application.
MVC
The Model-View-Controller (MVC) paradigm is not unique to Ruby on Rails but provides much of the core foundation for a Ruby on Rails application. This paradigm is designed to keep the logically different parts of the application separate while providing a way for data to flow between them.
In applications that don’t use MVC, the directory structure and how the different parts connect to each other is commonly left up to the original developer. Generally, this is a bad idea because different people have different opinions on where things should go. In Rails, a specific directory structure makes all developers conform to the same layout, putting all the major parts of the application inside an app directory. This app directory has three main subdirectories: models, controllers, and views.
Domain logic—how the records in your database are retrieved—is kept in models. In Rails applications, models define the code that interacts with the database’s tables to retrieve and set information in them. Domain logic also means things such as validations or particular actions to perform on the data.
Controllers interact with the models to gather information to send to the view. They call methods on the model classes, which can return single objects representing rows in the database or collections (arrays) of these objects. Controllers then make these objects available to the view through instance variables.
Views display the information gathered by the controller, by referencing the instance variables set there, in a user-friendly manner. In Ruby on Rails, this display is done by default with a templating language known as Embedded Ruby (ERB). ERB allows you to embed Ruby (hence the name) into any kind of file you wish. This template is then preprocessed on the server side into the output that’s shown to the user.
The assets, helpers, and mailers directories aren’t part of the MVC paradigm, but they are important parts of Rails. The assets directory is for the static assets of the application, such as JavaScript files, images, and Cascading Style Sheets (CSS) for making the application look pretty. We look more closely at this in chapter 3.
The helpers directory is a place to put Ruby code (specifically, modules) that provides helper methods for just the views. These helper methods can help with complex formatting that would otherwise be messy in the view or is used in more than one place.
Finally, mailers is a home for the classes of your application that deal with sending email. In previous versions of Rails, these classes were grouped with models but have since been given their own home. We look at them in chapter 11.
REST
MVC in Rails is aided by REST, a routing paradigm. Representational State Transfer (REST) is the convention for routing in Rails. When something adheres to this convention, it’s said to be RESTful. Routing in Rails refers to how requests are routed within the application itself. You benefit greatly by adhering to these conventions, because Rails provides a lot of functionality around RESTful routing, such as determining where a form can, or will, send to.
1.1.3. Rails in the wild
A question sometimes asked by people new to Rails is, “Is Rails ready?” Of course it is! The evidence is stacked mightily in Rails’ favor with websites such as Twitter, Yellow Pages, and of course Basecamp, serving millions and millions of page requests daily.[6]
6 Some of the more well-known applications that run on Ruby on Rails can be found at http://rubyonrails.org/applications.
If any site is a testament to the power of Ruby on Rails, Twitter is it. Even though Twitter suffered from scaling problems back in 2008 (due to its massive growth and other technological problems, not due to Rails), it is now the eleventh most popular website, according to Alexa, and is exceptionally stable.
Another well-known site that runs Ruby on Rails is GitHub, a hosting service for Git repositories. This site was launched in February 2008 and is now the leading Git web-hosting site. GitHub’s massive growth was in part due to the Ruby on Rails community quickly adopting it as their de facto repository hosting site. Now GitHub is home to over a million repositories for just about every programming language on the planet. It’s not exclusive to programming languages either; if it can go in a Git repository, it can go on GitHub. As a matter of fact, this book and its source code are kept on GitHub!
Now that you know what other people have accomplished with this framework, let’s dive into creating your own application.
1.2. Developing your first application
We covered the theory behind Rails and showed how quickly and easily you can develop an application. Now it’s your turn to get an application going.
1.2.1. Installing Rails
To get started, you must have these three things installed:
- Ruby
- RubyGems
- Rails
If you’re on a UNIX-based system (Linux or Mac), we recommend you use RVM (http://rvm.beginrescueend.com) to install Ruby and RubyGems. It is the preferred solution of the community because it works so simply. Installing from a package management system such as Ubuntu’s Aptitude has been known to be broken.[7] After installing RVM, you must run this command to install a 1.9.2 version of Ruby:
7 Broken Ubuntu Ruby explained here: http://ryanbigg.com/2010/12/ubuntu-ruby-rvm-rails-and-you/.
rvm install 1.9.2
To use this version of Ruby, you would need to use rvm use 1.9.2 every time you wished to use it or else set up a .rvmrc file in the root of your project, which is explained on the RVM site in great detail. Alternatively, you can set this version of Ruby as the default with the command rvm use --default 1.9.2, and use rvm use system if you ever want to swap back to the system-provided Ruby install if you have one.
If you’re on Windows, you can’t use RVM and you can’t use a 1.9.* version of Ruby, but that’s okay. Rails 3 works with Ruby 1.8 versions of Rails too. We would recommend the use of the Rails Installer program (http://railsinstaller.org) from Engine Yard, or installing the Ruby 1.8.7-p352 binary from ruby-lang.org as an alternative.
Next, you need to install the rails gem. The following command installs both Rails and its dependencies. If you’re using the Rails installer you will not need to run this command because Rails will already be installed:
gem install rails -v 3.1.0
1.2.2. Generating an application
With Rails now installed, to generate an application, you run the rails command and pass it the new argument and the name of the application you want to generate: things_i_bought. When you run this command, it creates a new directory called things_i_bought, which is where all your application’s code will go. You can call your application anything you wish, but it can’t be given the same name as a reserved word in Rails. For example, you wouldn’t call your application rails because it defines a Rails constant, which is internal to Rails, and the two constants would clash.
The application that you’re going to generate will be able to record purchases you have made. You can generate it using this command:
rails new things_i_bought
The output from this command may seem a bit overwhelming at first, but rest assured: it’s for your own good. All of the directories and files generated here provide the building blocks for your application, and you’ll get to know each of them as we progress. For now, let’s get rolling and learn by doing, which is the best way of learning.
1.2.3. Starting the application
To get the server running, you must first change into the newly created application’s directory and then run these commands to start the application server:
cd things_i_bought
bundle install
rails server
The bundle install command installs all the gems required for your application. This is explained in further detail in chapter 3.
This starts a web server on your local address on port 3000 using a Ruby standard library web server known as WEBrick. It will say it’s “starting in development on http://0.0.0.0:3000,” which indicates to you that the server will be available on port 3000 on all network interfaces of this machine.[8] To connect to this server, go to http://localhost:3000 in your favorite browser. You’ll see the “Welcome aboard” page, which is so famous in Rails (see figure 1.1).
8 This is what the 0.0.0.0 address represents. It is not an actual address, so to speak, and so localhost or 127.0.0.1 should be used.
Figure 1.1. Welcome aboard!

If you click About Your Application’s Environment, you’ll find your Ruby, RubyGems, Ruby on Rails, and Rack versions and other environmental data. One of the things to note here is that the output for Environment is Development. Rails provides three environments for running your application: development, test, and production. How your application functions can depend on the environment in which it is running. For example, in the development environment, classes are not cached; so if you make a change to a class when running an application in development mode, you don’t need to restart the server, but the same change in the production environment would require a restart.
1.2.4. Scaffolding
To get started with this Rails application, you generate a scaffold. Scaffolds in Rails provide a lot of basic functionality but are generally not used for full-scale development because you may want something more customized, in which case you’d build it yourself. But for this example of what Rails can do, let’s generate a scaffold by running this command:
rails generate scaffold purchase name:string cost:float
When you used the rails command earlier, it generated an entire Rails application. You can use this command inside of an application to generate a specific part of the application by passing the generate argument to the rails command, followed by what it is you want to generate.
The scaffold command generates a model, a controller, and views based on the name passed after scaffold in this command. These are the three important parts needed for your purchase tracking. The model provides a way to interact with a database. The controller interacts with the model to retrieve and format its information and defines different actions to perform on this data. The views display the information from the controller in a neat format.
Everything after the name for the scaffold are the fields for the database table and the attributes for the objects of this scaffold. Here you tell Rails that the table for your purchase scaffold will contain name and cost fields, which are a string and a float.[9] To create this table, the scaffold generator generates what’s known as a migration. Let’s have a look at what migrations are.
9 Usually you wouldn’t use a float for storing monetary amounts because it can lead to incorrect-rounding errors. Generally, you store the amount in cents as an integer and then do the conversion back to a full dollar amount. This example uses a float because it’s easier to not have to define the conversion at this point.
1.2.5. Migrations
Migrations are used in Rails as a form of version control for the database, providing a way to implement incremental changes to the schema of the database. Each migration is timestamped right down to the second, which provides you (and anybody else developing the application with you) an accurate timeline of your database. When two developers are working on separate features of an application and both generate a new migration, this timestamp will stop them from clashing. Let’s open the only file in db/migrate now and see what it does. Its contents are shown in the following listing.
Listing 1.1. db/migrate/[date]_create_purchases.rb
class CreatePurchases < ActiveRecord::Migration
  def self.up
    create_table :purchases do |t|
      t.string :name
      t.float :cost

      t.timestamps
    end
  end

  def self.down
    drop_table :purchases
  end
end
Migrations are Ruby classes that inherit from ActiveRecord::Migration. Inside the class, two class methods are defined: up and down. Inside the up method is the code you want to be run when you run the migration, and inside the down method is the code that runs when you roll the migration back.
Inside both of these methods you use database-agnostic commands to create and drop a table. In the up method, you create a table and specify the fields you want in that table by calling methods on the t block variable. The string and float methods create fields of those particular types on any Rails-compatible database system.[10] You specified these fields when you used the scaffold command. The timestamps method is special; it creates two fields called created_at and updated_at, which have their values set when records are created and updated automatically by Rails.
10 So far, MySQL, PostgreSQL, SQLite3, Oracle, Frontbase, and IBM DB.
To run the migration, type this command into the console:
rake db:migrate
This command run the self.up part of this migration. Because this is your first time running migrations in your Rails application, and because you’re using a SQLite3 database, Rails first creates the database in a new file at db/development.sqlite3 and then creates the purchases table inside that. When you run rake db:migrate, it doesn’t just run the self.up method from the latest migration but runs any migration that hasn’t yet been run, allowing you to run multiple migrations sequentially.
Your application is, by default, already set up to talk to this new database, so you don’t need to change anything. If you ever want to roll back this migration, you’d use rake db:rollback, which rolls back the latest migration by running the self.down method of the migration.[11]
11 If you want to roll back more than one migration, use the rake db:rollback STEP=3 command, which rolls back the three most recent migrations.
Rails keeps track of the last migration that was run by storing it using this line in the db/schema.rb file:
ActiveRecord::Schema.define(:version => [timestamp]) do
This version should match the prefix of the migration you just created,[12] and Rails uses this value to know what migration it’s up to. The remaining content of this file shows the combined state of all the migrations to this point. This file can be used to restore the last-known state of your database if you run the rake db:schema:load command.
12 Where [timestamp] in this example is an actual timestamp formatted like YYYYmmddHHMMSS.
With your database set up with a purchases table in it, let’s look at how you can add rows to it through your application
1.2.6. Viewing and creating purchases
Start your browser now and go to http://localhost:3000/purchases. You’ll see the scaffolded screen for purchases, as shown in figure 1.2. No purchases are listed yet, so let’s add a new purchase by clicking New Purchase.
Figure 1.2. Purchases

In figure 1.3, you see two inputs for the fields you generated. This page is the result of the new action from thePurchasesController controller. What you see on the page comes from the view located at app/views/purchases/new.html.erb, and it looks like the following listing.
Figure 1.3. A new purchase

Listing 1.2. app/views/purchases/new.html.erb
<h1>New purchase</h1>

<%= render 'form' %>

<%= link_to 'Back', purchases_path %>
This is an ERB file, which allows you to mix HTML and Ruby code to generate dynamic pages. The beginning of an ERB tag indicates that the result of the code inside the tag will be output to the page. If you want the code to be evaluated but not output, you use the <% tag, like this:
<% some_variable = "foo" %>
If you were to use <%= some_variable = "foo" %> here, the some_variable variable would be set and the value output to the screen. By using <%=, the Ruby code is evaluated but not output.
The render method, when passed a string as in this example, renders a partial. A partial is a separate template file that you can include in other templates to repeat similar code. We’ll take a closer look at these in chapter 3.
The link_to method generates a link with the text of the first argument (Back) and with an href attribute specified by the second argument (purchases_path), which is simply /purchases.
This particular partial is at app/views/purchases/_form.html.erb, and the first half of it looks like the following listing.
Listing 1.3. First half of app/views/purchases/_form.html.erb
<%= form_for(@purchase) do |f| %>
  <% if @purchase.errors.any? %>
    <div id="error_explanation">
      <h2><%= pluralize(@purchase.errors.count, "error") %> prohibited this
        purchase from being saved:</h2>

      <ul>
      <% @purchase.errors.full_messages.each do |msg| %>
        <li><%= msg %></li>
      <% end %>
      </ul>
    </div>
  <% end %>
This half is responsible for defining the form by using the form_for helper. The form_for method is passed one argument—an instance variable called @purchase—and with @purchase it generates a form. This variable comes from the PurchasesController’s new action, which is shown in the following listing.
Listing 1.4. app/controllers/purchases_controller.rb
def new
  @purchase = Purchase.new

  respond_to do |format|
    format.html # new.html.erb
    format.xml { render :xml => @purchase }
  end
end
The first line in this action sets up a new @purchase variable by calling the new method on the Product model, which initializes a new object of this model. The variable is then automatically passed through to the view by Rails.
Next in the controller is the respond_to method that defines what formats this action responds to. Here, the controller responds to the html and xml formats. The html method here isn’t given a block and so will render the template from app/views/purchases/new.html.erb, whereas the xml method, which is given a block, will execute the code inside the block and return an XML version of the @purchase object. You’ll be looking at what the html response does from here forward because that is the default format requested.
So far, all of this functionality is provided by Rails. You’ve coded nothing yourself. With the scaffold generator, you get an awful lot for free.
Going back to the view, the block for the form_for is defined between its do and the %> at the end of the file. Inside this block, you check the @purchase object for any errors by using the @purchase.errors.any? method. These errors will come from the model if the object did not pass the validation requirements set in the model. If any errors exist, they’re rendered by the content inside this if statement. Validation is a concept covered shortly.
The second half of this partial looks like the following listing.
Listing 1.5. Second half of app/views/purchases/_form.html.erb
  <div class="field">
    <%= f.label :name %><br />
    <%= f.text_field :name %>
  </div>
  <div class="field">
    <%= f.label :cost %><br />
    <%= f.text_field :cost %>
  </div>
  <div class="actions">
    <%= f.submit %>
  </div>
<% end %>
Here, the f object from the form_for block is used to define labels and fields for your form. At the end of this partial, the submit method provides a dynamic submit button.
Let’s fill in this form now and click the submit button. You should see something similar to figure 1.4.
Figure 1.4. Your first purchase
What you see here is the result of your posting: a successful creation of a Purchase. Let’s see how it got there. The submit button posts the data from the form to the create action, which looks like the following listing.
Listing 1.6. app/controllers/purchases_controller.rb
def create
  @purchase = Purchase.new(params[:purchase])

  respond_to do |format|
    if @purchase.save
      format.html { redirect_to(@purchase, :notice => 'Purchase was successfu
     lly created.') }
      format.xml { render :xml => @purchase, :status => :created, :location
     => @purchase }
    else
      format.html { render :action => "new" }
      format.xml { render :xml => @purchase.errors, :status => :unprocessabl
     e_entity }
    end
  end
end
Here, you use the Purchase.new you first saw used in the new action. But this time you pass it an argument of params[:purchase]. params (short for parameters) is a method that returns the parameters sent from your form in a Hash-like object. When you pass this params hash into new, Rails sets the attributes[13] to the values from the form.
13 The Rails word for fields.
Inside the respond_to is an if statement that calls @purchase.save. This method validates the record, and if it’s valid, the method saves the record to the database and returns true.
If the return value is true, the action responds by redirecting to the new @purchase object using the redirect_to method, which takes either a path or an object that it turns into a path (as seen in this example). The redirect_to method interprets what the @purchase object is and determines that the path required is purchase_path because it’s an object of the Purchase model. This path takes you to the show action for this controller. The :notice option passed to the redirect_to sets up a flash message. A flash message is a message that can be displayed on the next request.
You’ve seen what happens when the purchase is valid, but what happens when it’s invalid? Well, it uses the render method to show the new action’s template again. We should note here that this doesn’t call the new action/method again[14] but only renders the template.
14 To do that, you call redirect_to new_purchase_path, but that wouldn’t persist the state of the @purchase object to this new request without some seriously bad hackery. By rerendering the template, you can display information about the object if the object is invalid.
You can make the creation of the @purchase object fail by adding a validation. Let’s do that now.
1.2.7. Validations
You can add validations to your model to ensure that the data conforms to certain rules or that data for a certain field must be present or that a number you enter must be above a certain other number. You’re going to write your first code for this application and implement both of these things now.
Open up your Purchase model and change the whole file to what’s shown in the following listing.
Listing 1.7. app/models/purchase.rb
class Purchase < ActiveRecord::Base
  validates_presence_of :name
  validates_numericality_of :cost, :greater_than => 0
end
You use the validates_presence_of method to define a validation that does what it says on the box: validates that the field has a value. The other validation method, validates_numericality_of, does more than what it initially claims: it validates that the cost attribute is a number and that it is greater than 0.
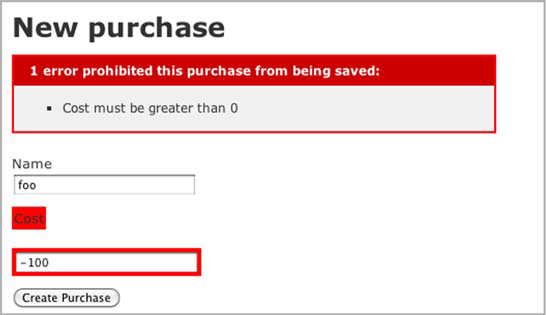
Let’s test out these validations by going back to http://localhost:3000/purchases, clicking New Purchase, and clicking Create Purchase. You should see the errors shown in figure 1.5.
Figure 1.5. Errors on purchase

Great! Here, you’re told that Name can’t be blank and that the value you entered for Cost isn’t a number. Let’s see what happens if you enter foo for the Name field and -100 for the Cost field, and click Create Purchase. You should get a different error for the Cost field now, as shown in figure 1.6.
Figure 1.6. Cost must be greater than 0
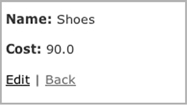
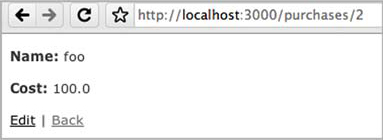
Good to see! Both of your validations are working now. When you change Cost to 100 and click Create Purchase, it should be considered valid by the validations and take you to the show action. Let’s look at what this particular action does now.
1.2.8. Showing off
This action displays the content such as shown in figure 1.7.
Figure 1.7. A single purchase
The number at the end of the URL is the unique numerical ID for this purchase. But what does it mean? Let’s look at the view for this show action now, as shown in the following listing.
Listing 1.8. app/views/purchases/show.html.erb
<p id="notice"><%= notice %></p>

<p>
  <b>Name:</b>
  <%= @purchase.name %>
</p>

<p>
  <b>Cost:</b>
  <%= @purchase.cost %>
</p>


<%= link_to 'Edit', edit_purchase_path(@purchase) %> |
<%= link_to 'Back', purchases_path %>
On the first line is the notice method, which displays the notice set on the redirect_to from the create action. After that, field values are displayed in p tags by simply calling them as methods on your @purchase object. This object is defined in your PurchasesController’s show action, as shown in the following listing.
Listing 1.9. app/controllers/purchases_controller.rb
def show
  @purchase = Purchase.find(params[:id])

  ...
end
The find method of the Purchase class is used to find the record with the ID of params[:id] and instantiate a new Purchase object from it with params[:id] as the number on the end of the URL.
Going back to the view (app/views/purchases/show.html.erb) now, at the end of this file you see link_to, which generates a link using the first argument as the text for it and the second argument as the href for that URL. The second argument for link_to is a method itself: edit_purchase_path. This method is provided by a method call in config/routes.rb, which we now look at.
1.2.9. Routing
The config/routes.rb file of every Rails application is where the application routes are defined in a succinct Ruby syntax. The methods used in this file define the pathways from requests to controllers. If you look in your config/routes.rb while ignoring the commented-out lines for now, you’ll see what’s shown in the following listing.
Listing 1.10. config/routes.rb
ThingsIBought::Application.routes.draw do
  resources :purchases
end
Inside the block for the draw method is the resources method. Collections of similar objects in Rails are referred to as resources. This method defines the routes and routing helpers (such as the edit_purchase_path method) to your purchases resources. Look at table 1.1 for a list of the helpers and their corresponding routes.
Table 1.1. Routing helpers and their routes
|
Helper |
Route |
|---|---|
| purchases_path | /purchases |
| new_purchase_path | /purchases/new |
| edit_purchase_path | /purchases/:id/edit |
| purchase_path | /purchases/:id |
In this table, :id can be substituted for the ID of a record. Each routing helper has an alternative version that will give you the full URL to the resource. Simply use the _url extension rather than _path, and you’ll get a URL such as http://localhost:3000/purchases for purchases_url.
From this table, two of these routes will act differently depending on how they’re requested. The first route, /purchases, takes you to the index action of PurchasesController if you do a GET request. GET requests are the standard type of requests for web browsers, and this is the first request you did to this application. If you do a POST request to this route, it will go to the create action of the controller. This is the case when you submit the form from the new view. Let’s go to http://localhost:3000/purchases/new now and look at the source of the page. You should see the beginning tag for your form looking like the following listing.
Listing 1.11. The HTML source of app/views/purchases/new.html.erb
<form action="/
        purchases" class="new_purchase" id="new_purchase" method="post">
The two attributes to note here are the action and method attributes. The action dictates the route to where this form goes, and the method tells the form what kind of HTTP request to make.
How’d this tag get rendered in the first place? Well, as you saw before, the app/views/purchases/new.html.erb template uses the form partial from app/views/purchases/_form.html.erb, which contains this as the first line:
<%= form_for(@purchase) do |f| %>
This one simple line generates that form tag. When we look at the edit action shortly, you’ll see that the output of this tag is different, and you’ll see why.
The other route that responds differently is the /purchases/{id} route, which acts in one of three ways. You already saw the first way: it’s the show action to which you’re redirected (a GET request) after you create a purchase. The second of the three ways is when you update a record, which we look at now.
1.2.10. Updating
Let’s change the cost of the foo purchase now. Perhaps it only cost 10. To change it, go back to http://localhost:3000/purchases and click the Edit link next to the foo record. You should now see a page that looks similar to the new page, shown in figure 1.8.
Figure 1.8. Editing a purchase
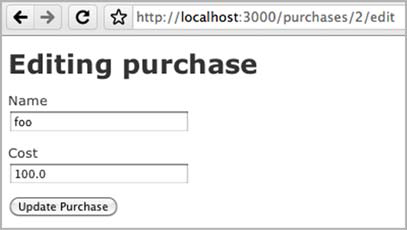
This page looks similar because it re-uses the partial used in the new action. Such is the power of partials: you can use the same code for two different requests to your application. The template for this action can be seen in the following listing.
Listing 1.12. app/views/purchases/edit.html.erb
<h1>Editing purchase</h1>

<%= render 'form' %>

<%= link_to 'Show', @purchase %> |
<%= link_to 'Back', purchases_path %>
For this action, you’re working with a pre-existing object rather than a new object, which you used in new. This pre-existing object is found by the edit action in PurchasesController, shown in the next listing.
Listing 1.13. app/controllers/purchases_controller.rb
# GET /purchases/1/edit
def edit
  @purchase = Purchase.find(params[:id])
  ...
end
The code to find the @purchase object here is identical to what you saw earlier in the show action.
Back in the view for a moment, at the bottom of it you can see two uses of link_to. The first creates a Show link, linking to the @purchase object, which is set up in the edit action of your controller. Clicking this link would take you to purchase_path(@purchase) or /purchases/:id. Rails will figure out where the link needs to go according to the class of the object. Using this syntax, it will attempt to call the purchase_path method because the object has a class of Purchase and will pass the object along to that call, generating the URL.[15]
15 This syntax is exceptionally handy if you have an object and are not sure of its type but still want to generate a link for it. For example, if you had a different kind of object called Order and it was used instead, it would use order_path rather than purchase_path.
The second use of link_to in this view generates a Back link, which uses the routing helper purchases_path. It can’t use an object here because it doesn’t make sense to; calling purchases_path is the easy way to go back to the index action.
In really early versions of Rails, you had to generate links like this:
link_to "Back", { :controller => "purchases",
:action => "show",
:id => @purchase.id }
This hash was then interpreted and matched to a route, like /purchases/1. You can still use it today in Rails 3 if you wish, but it’s not best practice. The hash can be shortened:
link_to "Back", "/purchases/#{@purchase.id}"
These days, the following is best:
link_to "Back", @purchase
By using the routing helpers introduced in Rails 2 and still available in Rails 3.1, you can have much shorter link_to calls in your application, increasing the readability of the code throughout.
Let’s try filling in this form now, for example, by changing the cost from 100 to 10 and clicking Update Purchase. You now see the show page but with a different message, shown in figure 1.9.
Figure 1.9. Viewing an updated purchase

Clicking Update Purchase brought you back to the show page. How did that happen? Click the back button on your browser and view the source of this page, specifically the form tag and the tags directly underneath, shown in the following listing.
Listing 1.14. The HTML source of app/views/purchases/edit.html.erb
form action="/purchases/
     2" class="edit_purchase" id="edit_purchase_2" method="post"
   div style="margin:0;padding:0;display:inline"
     input name="_method" type="hidden" value="put" /
   /div
  ...
This form’s action points at /purchases/2, which is the route to the show action in PurchasesController. You should also note two other things. The method attribute of this form is a post, but there’s also the input tag underneath.
The input tag passes through the _method parameter with the value set to "put". Rails catches this parameter and turns the request from a POST into a PUT. This is the second (of three) ways the /purchases/{id} responds according to the method. By making a PUT request to this route, you’re taken to the update action in PurchasesController. Let’s take a look at this in the following listing.
Listing 1.15. app/controllers/purchases_controller.rb
def update
  @purchase = Purchase.find(params[:id])

  respond_to do |format|
    if @purchase.update_attributes(params[:purchase])
      format.html { redirect_to(@purchase,
                       :notice => 'Purchase was successfully updated.') }
      format.xml  { head :ok }
    else
      format.html { render :action => "edit" }
      format.xml  { render :xml => @purchase.errors,
                           :status => :unprocessable_entity }
    end
  end
end
Just as in the show and edit actions, you fetch the object first by using the find method. The parameters from the form are sent through in the same fashion as they were in the create action, coming through as params[:purchase]. Rather than instantiating a new object by using the new class method, you use update_attributes on the @purchase object. This does what it says on the tin: updates the attributes. What it doesn’t say on the tin, though, is that it validates the attributes and, if the attributes are valid, saves the record and returns true. If they aren’t valid, it returns false.
When update_attributes returns true, you’re redirected back to the show action for this particular purchase by using redirect_to.
If it returns false, you’re shown the edit action’s template again, just as back in the create action where you were shown the new template again. This works in the same fashion and displays errors if you enter something wrong. Let’s try editing a purchase and setting the name to blank and then clicking Update Purchase. It should error exactly like the create method did, as shown in figure 1.10.
Figure 1.10. Update fails!

As you can see by this example, the validations you defined in your Purchase model take effect for both the creation and updating of records automatically.
Now what would happen if, rather than update a purchase, you wanted to delete it? That’s built in to the scaffold too.
1.2.11. Deleting
In Rails, delete is given a much more forceful name: destroy. This is another sensible name because to destroy a record is to put an end to its existence.[16] Once this record’s gone, it’s gone, baby, gone.
16 Mac OS X dictionary.
You can destroy a record by going to http://localhost:3000/purchases and clicking the Destroy link shown in figure 1.11 and then clicking OK on the confirmation box that pops up.
Figure 1.11. Destroy!

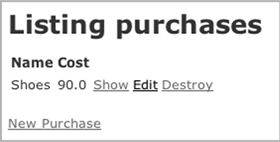
When that record’s destroyed, you’re taken back to the Listing Purchases page. You’ll see that the record no longer exists. You should now only have one record, as shown in figure 1.12.
Figure 1.12. Last record standing
How does all of this work? Let’s look at the index template in the following listing to understand, specifically the part that’s used to list the purchases.
Listing 1.16. app/views/purchases/index.html.erb
<% @purchases.each do |purchase| %>
  <tr>
    <td><%= purchase.name %></td>
    <td><%= purchase.cost %></td>
    <td><%= link_to 'Show', purchase %></td>
    <td><%= link_to 'Edit', edit_purchase_path(purchase) %></td>
    <td><%= link_to 'Destroy', purchase, :confirm => 'Are you sure?',
                                         :method => :delete %></td>
  </tr>
<% end %>
</table>

<br />

<%= link_to 'New Purchase', new_purchase_path %>
In this template, @purchases is a collection of all the objects from the Purchase model, and each is used to iterate over each, setting purchase as the variable used in this block.
The methods name and cost are the same methods used in app/views/purchases/show.html.erb to display the values for the fields. After these, you see the three uses of link_to.
The first link_to passes in the purchase object, which links to the show action of PurchasesController by using a route such as/purchases/{id}, where {id} is the ID for this purchase object.
The second link_to links to the edit action using edit_purchase_path and passes the purchase object as the argument to this method. This routing helper determines the path is /purchases/{id}/edit.
The third link_to links seemingly to the purchase object exactly as the first, but it doesn’t go there. The :method option on the end of this route specifies the method of :delete, which is the third and final way the /purchases/{id} route can be used. If you specify :delete as the method of this link_to, Rails interprets this request and takes you to the destroy action in the PurchasesController. This action is shown in the following listing.
Listing 1.17. app/controllers/purchases_controller.rb
def destroy
  @purchase = Purchase.find(params[:id])
  @purchase.destroy

  respond_to do |format|
    format.html { redirect_to(purchases_url) }
    format.xml { head :ok }
  end
end
Just as in the show, edit, and update actions shown earlier, this action finds the @purchase object by using Purchase.find and then destroys the record by calling destroy on it, which permanently deletes the record. Then it uses redirect_to to take you to the purchases_url, which is the route helper defined to take you to http://localhost:3000/purchases. Note that this action uses the purchases_url method rather than purchases_path, which generate a full URL back to the purchases listing, such as http://localhost:3000/purchases/1.
That wraps up our application run-through!
1.3. Summary
In this chapter you learned what Rails is and how to get an application started with it, the absolute bare, bare, bare essentials of a Rails application. But look how fast you got going! It took only a few simple commands and an entire two lines of your own code to get the bones of a Rails application going. From this basic skeleton, you can keep adding on bits and pieces to develop your application, and all the while you get things for free from Rails. You don’t have to code the logic of what happens when Rails receives a request or specify what query to execute on your database to insert a record—Rails does it for you.
You also saw that some big-name players—such as Twitter and GitHub—use Ruby on Rails. This clearly answers the question “Is Rails ready?” Yes, it very much is. A wide range of companies have built successful websites on the Rails framework, and a lot more will do so in the future.
Still wondering if Ruby on Rails is right for you? Ask around. You’ll hear a lot of people singing its praises. The Ruby on Rails community is passionate not only about Rails but also about community building. Events, conferences, user group meetings, and even camps are held all around the world for Rails. Attend these and discuss Ruby on Rails with the people who know about it. If you can’t attend these events, you can explore the IRC channel on Freenode #rubyonrails, the mailing list rubyonrails-talk on Google Groups, not to mention Stack Overflow and a multitude of other areas on the internet where you can discuss with experienced people what they think of Rails. Don’t let this book be the only source for your knowledge. There’s a whole world out there, and no book could cover it all!
The best way to answer the question “What is Rails?” is to experience it for yourself. This book and your own exploration can eventually make you a Ruby on Rails expert.
When you added validations to your application earlier, you manually tested that they were working. This may seem like a good idea for now, but when the application grows beyond a couple of pages, it becomes cumbersome to manually test them. Wouldn’t it be nice to have some automated way of testing your applications? Something to ensure that all the individual parts always work? Something to provide the peace of mind that you crave when you develop anything? You want to be sure that it’s continuously working with the most minimal effort possible, right?
Well, Ruby on Rails does that too. There are several testing frameworks for Ruby and Ruby on Rails, and in chapter 2 we look at three of them: Test::Unit, RSpec, and Cucumber.