
Chapter 8. More authorization
- Expanding with a more advanced system
- Setting permissions to control user actions
- Implementing a seed of data for the app
At the end of chapter 7, you learned a basic form of authorization based on a boolean field on the users table called admin. If this field is set to true, identifying admin users, those users can access the CRUD functions of the Project resource as well as an admin namespace where they can perform CRUD on the User resource.
In this chapter, we expand on authorization options by implementing a broader authorization system using a Permission model. The records for this model’s table define the actions specified users can take on objects from your system, such as projects. Each record tracks the user who has a specific permission, the object to which the permission applies, and the type of permission granted.
The authorization implemented in this chapter is whitelist authorization. Under whitelist authorization, all users are denied access to everything by default, and you must specify what the user can do. The opposite is blacklist authorization, under which all users are allowed access to everything by default and you must block what they may not access. You use whitelist authorization for your application because you may have a large number of projects and want to assign a user to only one of them. Whitelist authorization involves fewer steps in restricting a user to one project.
A good way to think about whitelist authorization is as the kind of list a security guard would have at an event. If you’re not on the list, you don’t get in. A blacklist comparison would be if the security guard had a list of people who weren’t allowed in.
This chapter guides you through restricting access to the CRUD operations of TicketsController one by one, starting with reading and then moving into creating, updating, and deleting. Any time users want to perform one of these actions, they must be granted permission to do so, or added to “the list.”
During this process, you’ll see another gem called CanCan, which provides some methods for your controllers and views that help you check the current user’s permission to perform a specific action.
You first set up permissions through the Cucumber features, and once you’re done with restricting the actions in your controller, you’ll generate functionality in the backend to allow administrators of the application to assign permissions to users.
8.1. Restricting read access
A time comes in every ticket-tracking application’s life when it’s necessary to restrict which users can see which projects. For example, you could be operating in a consultancy where some people are working on one application, and others are working on another. You want the admins of the application to be able to customize which projects each user can see.
First, you create a model called Permission that tracks which users have which permissions for which actions. Before you create that model, you must update one of your Viewing Projects features to make sure only users who have permission to view a project are able to do so.
Add a background and change the scenario in this feature to set up a user with the correct permissions, and then make the user visit that project, changing the code in the scenario in this feature to what is shown in the following listing.
Listing 8.1. features/viewing_projects.feature
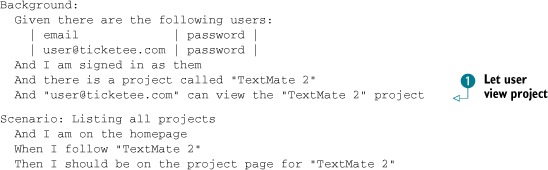
You’ve effectively rewritten a large portion of this feature, which is common practice when implementing such large changes.
Underneath the there is a project step in the Background for this feature is a new step ![]() . It’s responsible for giving the specified user access to the specified project, but not just any permission: permission
to view the project. This step is currently undefined, so when you run bin/cucumber features/viewing_projects.feature, you get the step definition for it:
. It’s responsible for giving the specified user access to the specified project, but not just any permission: permission
to view the project. This step is currently undefined, so when you run bin/cucumber features/viewing_projects.feature, you get the step definition for it:
Given /^"([^"]*)" can view the "([^"]*)" project$/ do |arg1, arg2|
  pending # express the regexp above with the code you wish you had
end
To implement this step, you use the not-yet-existent Permission model, which stores the permissions in the database. This model needs a related table called permissions, which contains three fields.
The first field is the action field, which keeps track of the type of permission a user has on particular objects. The objects can be of different types, so you must create two fields to track the association to the object: thing_type and thing_id. This kind of association is called a polymorphic association, poly meaning “many” and morphic meaning “forms,” which is fitting. You’ll see more on these in a little while.
One more field you add to this permissions table is a user_id column linking that Permission to a User.
With all of that in mind, you can define this step in a new file at features/step_definitions/permission_steps.rb, as shown in the following listing.
Listing 8.2. features/step_definitions/permission_steps.rb
Given /^"([^"]*)" can view the "([^"]*)" project$/ do |user, project|
  Permission.create!(:user => User.find_by_email!(user),
                    :thing => Project.find_by_name!(project),
                    :action => "view")
end
In listing 8.2, you create a new Permission record with the action defined as view linking the project and user passed in. This record defines the users who can access the project. When you run this feature, you get an error because the Permission class is not yet defined:
And "[email protected]" can view the "TextMate 2" project
  uninitialized constant Permission (NameError)
Define it now by generating the model using the following command, typed all on one line:
rails generate model permission user_id:integer thing_id:integer
  thing_type:string action:string
With this model and its related migration, you can run rake db:migrate and rake db:test:prepare to set up the development and test databases. When you run your feature again, you get this error message:
And "[email protected]" can view the "TextMate 2" project
  unknown attribute: user (ActiveRecord::UnknownAttributeError)
This message occurs because you haven’t defined a belongs_to association between the Permission objects and the users they relate to. To set up this association, open app/models/permission.rb and define it using a simple belongs_to:
belongs_to :user
That’s the first association you need to define, and when you run this feature again, you get a second error that looks similar to the first:
And "[email protected]" can view the "TextMate 2" project
  unknown attribute: thing (ActiveRecord::UnknownAttributeError)
This code represents a polymorphic association, which as mentioned earlier, needs to associate with many types of objects. A polymorphic association uses the thing_type and thing_id fields to determine what object a Permission object relates to.
To define this association in your model, use this line:
belongs_to :thing, :polymorphic => true
Figure 8.1 illustrates how this association works.
Figure 8.1. Polymorphic saving
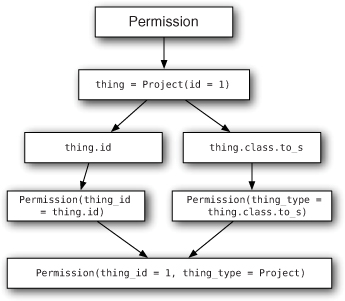
When you assign an object to the thing polymorphic association, instead of just saving thing_id as in a normal belongs_to, Rails also saves the thing_type field, which is the string version of the object’s class, or thing.class.to_s. In this step of your application, the thing_type field is set to Project because you’re assigning a Project object to thing. Therefore, the new record in the table has both thing_type and thing_id attributes set.
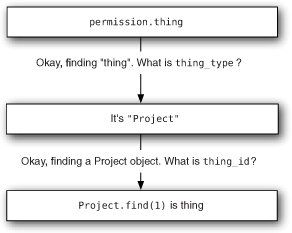
When Rails loads this object, it goes through the process shown in figure 8.2. Rails knows this is a polymorphic association because you told it in the Permission model, and it therefore uses the thing_id and thing_type fields to find the object. By knowing thing_type, Rails can figure out what model the association is and then use that model to load a specific object with the id of thing_id. Then, boom, you’ve got a Project object.
Figure 8.2. Polymorphic loading
Now when you run bin/cucumber features/viewing_projects.feature, it passes:
1 scenario (1 passed)
7 steps (7 passed)
The feature should pass with or without the new permission step because, at the moment, the permission settings have no bearing on what projects a user can see.
The easiest way to specify which projects users can see is to restrict the scope of the projects the show action searches on so that projects the user doesn’t have access to don’t show up in this list. By default, a find on a model searches all records in the related table, but you can add a scope method to your model to allow you to search on restricted sets of records.
8.2. Restricting by scope
To restrict the show action to certain record sets, you implement a scope on the Project model that returns only the projects with related Permission records that declare the user is authorized to read them.
Before you scope down this find, you must write a spec to test that the show action in the ProjectsController really does scope down this find, and if the project can’t be found, the controller should deny all knowledge of a project ever having existed.
The spec goes into spec/controllers/projects_controller_spec.rb directly under the spec for testing that standard users can’t access specified actions, but still inside the context block for standard users. This spec is shown in the following listing.
Listing 8.3. spec/controllers/projects_controller_spec.rb
it "cannot access the show action" do
  sign_in(:user, user)
  get :show, :id => project.id
  response.should redirect_to(projects_path)
  flash[:alert].should eql("The project you were looking for could not be fou
     nd.")
end
You use the same error message from the missing project spec because you don’t want to acknowledge to unauthorized users that the project they’re looking for exists when they don’t have access to read it. When you run this spec using bin/rspec spec/controllers/projects_controller_spec.rb, it fails:
1) ProjectsController standard users cannot access the show action
    Failure/Error: response.should redirect_to(projects_path)
The spec fails because you haven’t yet scoped down the find call in the find_project method, which is called using a before_filter in ProjectsController.
With a failing spec testing the nonexistent behavior, open app/controllers/projects_controller.rb and change the find_project method to look for projects that the current user has access to so your spec will pass. But there’s one problem: you’re not restricting the show action to only users who are signed in now.
You must make it so that the user has to sign in before accessing the show action because you need to use the current_user method to check what permissions this user has access to within the find_project method.
To do so, call the authenticate_user! method as a before_filter in this controller, just as you did for certain actions in the TicketsController. Place this method above the find_project to ensure that a user is authenticated before find_project does its job. The filters in ProjectsController should now look like the following listing.
Listing 8.4. app/controllers/projects_controller.rb
before_filter :authorize_admin!, :except => [:index, :show]
before_filter :authenticate_user!, :only => [:show]
before_filter :find_project, :only => [:show, :edit, :update, :destroy]
Now alter the find_project method to check the permissions of the project before letting authorized users see it or refusing unauthorized users access. Change the line that defines the @project variable from this
@project = Project.find(params[:id])
to this:
@project = Project.readable_by(current_user).find(params[:id])
The readable_by method doesn’t exist yet; you’ll define it in just a moment. The readable_by method returns a scope of only the projects the user is allowed to view. This scope has exactly the same methods that an Active Record class has, so you can treat it just like one. You can define this method using the scope class method in your Project mode.
The scope method provides a method you can call on your class or on an association collection for this class that returns a subset of records. The following scope call, for example, defines a method called admins:
scope :admins, where(:admin => true)
If you wanted to, you could call this admins method on your User model to return all the users who are admins:
User.admins
If you didn’t have the scope method, you’d have to specify the where manually on your queries everywhere you used them, like this:
User.where(:admin => true)
As you can see, manually specifying where isn’t nearly as pretty as simply calling User.admins. This may seem like a contrived example, but trust us: it gets ugly when the conditions become more complex. Scopes are yet another great example of the DRY (Don’t Repeat Yourself) convention seen throughout Rails. Because the scope method defines your scope’s logic in one central location, you can easily change all uses of this scope by changing it in this one spot.
Scopes are also chainable. Imagine that you had another scope defined on your User model, such as the following, as well as a field for storing the gender, appropriately called gender:
scope :female, where(:gender => "Female")
You can call this scope by itself
User.female
which return all of your female users, or you can get all your female admins by doing either this
User.admin.female
or this
User.female.admin
Rails builds up the queries by applying the scopes one at a time, and calling them in any order will result in the same query.
Let’s define a real scope now, along with the permissions association it needs to use. Put this scope under the validation inside the Project model, as shown in the following lines:

The :as option on the has_many :permissions association ![]() links your projects to the thing association on the Permission objects. You need this association defined here because it’s used by the scope below it.
links your projects to the thing association on the Permission objects. You need this association defined here because it’s used by the scope below it.
Usually, you use scope without passing a block (represented by the lambda), but here the outcome of this scope is dynamic according to which user is passed to it. You therefore use a block to be able to pass this argument to the method generated by the scope call, which then becomes available in the block for use in the where statement.
The joins method here joins the permissions table using a SQL INNER JOIN, allowing you to perform queries on columns from that table too. You do just that with the where method, specifying a hash that contains the permissions key, which points to another hash containing the fields you want to search on and their expected values.
This scope then returns all the Project objects containing a related record in the permissions table that has the action field set to view and the user ID equal to that of the passed-in user.
With this scope method in place, when you run this spec file again with bin/rspec spec/controllers/projects_controller_spec.rb, your tests pass because you’re now scoping down the find in the find_project method. But you still have one failure:
7 examples, 1 failure
This failing spec is the last one in this file where you assert that users receive the message “The project you were looking for could not be found” if they attempt to access a project that is unknown to the system. It fails with this error:
Expected response to be a redirect to <http://test.host/projects>
but was a redirect to <http://test.host/users/sign_in>
Rather than redirecting back to /projects as it should, this code now redirects to the /users/sign_in path. This would happen only if the user attempted to access an action that you had locked down to be visible only to those who were signed in. Recent changes to the show action fit this bill: users are now required to sign in before you run the find_project method.
Therefore, you just need to make a small fix to this final spec: you must sign in as a user before you make the get :show request. Let’s change the first two lines of this spec in spec/controllers/projects_controller.rb from this
it "displays an error for a missing project" do
  get :show, :id => "not-here"
to this:
it "displays an error for a missing project" do
  sign_in(:user, user)
  get :show, :id => "not-here"
Now when you run bin/rspec spec/controllers/projects_controller_spec.rb, all the examples pass:
.......

7 examples, 0 failures
All right! The examples for this controller are passing, but how about the feature—the one you wrote previously to test that users can access this show action if they have the correct permissions? This spec tested the negative, making sure a user without permission can’t access this project.
With the code you just implemented, this feature should still pass as it did the last time you ran it. Let’s find out by running bin/cucumber features/viewing_projects.feature:
1 scenario (1 passed)
7 steps (7 passed)
Isn’t that wonderful? You rewrote the feature and it still passed! You’ve tested both the granted and denied facets of this particular permission by writing a feature and spec respectively.
Now that you implemented that little chunk of functionality and everything seems to be going smoothly, let’s make sure the entire application is going the same way by running rake cucumber:ok spec. Oh dear! You broke just about every feature in some way:
Failing Scenarios:
cucumber features/creating_projects.feature:14
cucumber features/creating_tickets.feature:20
cucumber features/deleting_projects.feature:12
cucumber features/deleting_tickets.feature:19
cucumber features/editing_projects.feature:16
cucumber features/editing_tickets.feature:20
cucumber features/hidden_links.feature:35
cucumber features/hidden_links.feature:50
cucumber features/viewing_tickets.feature:20

33 scenarios (9 failed, 4 skipped, 20 passed)
289 steps (9 failed, 87 skipped, 193 passed)
These features are all broken because you restricted the permissions on the find_project method, and all of these features depend on this functionality in one way or another. Let’s fix these, from the top, one at a time.
8.3. Fixing what you broke
Currently, you have a whole bundle of features that are failing! When this happens, it may seem like everything’s broken (and maybe some things are on fire), but in reality it’s not as bad as it seems. The best way to fix a mess like this is to break it down into smaller chunks and tackle it one chunk at a time. The output from rake cucumber:ok spec provided a list of the broken features: they are your chunks. Let’s go through them and fix them, starting with the Editing Projects feature.
8.3.1. Fixing Editing Projects
When you run bin/cucumber features/editing_projects.feature:14, Cucumber can’t find the Edit Project link:
And I follow "Edit Project" no link with title, id or text 'Edit Project' found(Capybara::ElementNotFound)
This error occurs because when Cucumber follows the TextMate 2 link, it’s taken to the show action, which redirects it to the projects_path because the user doesn’t have access to this project, and the page the user would now be on doesn’t have an Edit Project link. But the users for this feature are the all-seeing admins and therefore should be able to access all projects regardless of whether or not they have permission to do so. Therefore, you must change how you declare @project in the find_project method in ProjectsController to account for admins. Change it from this
@project = Project.readable_by(current_user).find(params[:id])
to this:
@project = if current_user.admin?
  Project.find(params[:id])
else
  Project.readable_by(current_user).find(params[:id])
end
As you can see, this code won’t scope the find using the readable_by scope if the user is an admin, but it will if the user isn’t. When you run bin/cucumber features/editing_projects.feature, it should now pass:
2 scenarios (2 passed)
19 steps (19 passed)
This change should fix a couple of other features as well, so rerun rake cucumber:ok to find the ones that are still broken. You have a much shorter list now:
cucumber features/creating_tickets.feature:20
cucumber features/deleting_tickets.feature:19
cucumber features/editing_tickets.feature:20
cucumber features/viewing_tickets.feature:20
You reduced your failing scenarios from nine to only four, which is pretty good. Let’s fix the first of these, the Creating Tickets feature.
8.3.2. Fixing the four failing features
Let’s run the first feature with bin/cucumber features/creating_tickets.feature. You’ll see that it can’t find the New Ticket link:
And I follow "New Ticket"
  no link with title, id or text 'New Ticket' found (Capybara::ElementNotFound)
This is the same problem as before: the user doesn’t have permission to access that project. To fix this problem, alter the Background, put the permission step underneath the user-creation step, and sign in as that user, like this:
Given there are the following users:
  | email              | password |
  | [email protected]  | password |
And "[email protected]" can view the "Internet Explorer" project
And I am signed in as them
This Background also contains code that ensures users are asked to sign in if they click the New Ticket link when they’re not signed in. Because you’ll log in as a user before you get to this point, you can remove the last few lines from this Background:
Then I should see "You need to sign in or sign up before continuing."
When I fill in "Email" with "[email protected]"
And I fill in "Password" with "password"
And I press "Sign in"
Then I should see "New Ticket"
When you run this feature again, all the scenarios pass:
3 scenarios (3 passed)
35 steps (35 passed)
One down, three to go. The next failing feature is the Deleting Tickets feature.
It fails for the same reason as the previous one: the user doesn’t have access to the project to delete a ticket. Let’s fix this now by putting the following line underneath where your project is created:
Given there is a project called "TextMate 2"
And "[email protected]" can view the "TextMate 2" project
That’s a little too easy! When you run bin/cucumber features/deleting_tickets.feature, this feature now passes:
1 scenario (1 passed)
11 steps (11 passed)
Next up is the Editing Tickets feature, which contains not one but two broken scenarios. The two scenarios in this feature, similar to the Editing Projects scenario, are broken because the feature can’t find a link:
And I follow "Make it shiny!" no link with title, id or text 'Make it shiny!' found
Again, the error occurs because the user doesn’t have permission to access this particular project. You must specify that this user has access to this project in the Background, just as you did for the Creating Tickets and Editing Tickets features. Add this line directly under the line that creates the project in the Background:
And "[email protected]" can view the "TextMate 2" project
When you run bin/cucumber features/editing_tickets.feature, both scenarios should pass:
2 scenarios (2 passed)
26 steps (26 passed)
Great! You fixed another feature. The one remaining feature that fails is Viewing Tickets, which you fix in the same way as you fixed the previous features. Add this line again underneath where you create the TextMate 2 project, this time in features/viewing_tickets.feature:
And "[email protected]" can view the "TextMate 2" project
You also need to add one for the Internet Explorer project:
And "[email protected]" can view the "Internet Explorer" project
Also in this feature, you’re not signing in as the user who has these permissions, so directly underneath the first step in your Background, add the following step:
And I am signed in as them
Running bin/cucumber features/viewing_tickets.feature, you’ll see that this feature is passing:
1 scenario (1 passed)
23 steps (23 passed)
That was fast! All four failing features are fixed. Well, so we hope. You independently verified them, but run rake cucumber:ok spec to make sure nothing else is broken:
33 scenarios (33 passed)
287 steps (287 passed)
# and
16 examples, 0 failures, 8 pending
Great! Everything’s working again! Let’s commit that:
git add .
git commit -m "Made projects only visible to users with
permission to see them"
git push
In these first two sections, you added the restriction on the ProjectsController that projects should be accessible only to users with Permission records with the action set to view. In the process, you broke a couple of features, but fixing them was really simple.
However, these changes only protect the actions in the ProjectsController that use the find_project method and not those in the TicketsController. Before you make changes in the TicketsController, note that the links to all projects are still visible to all users through the ProjectsController’s index, which is definitely something you should fix first.
8.3.3. One more thing
As described previously, the links to all projects are still visible to all users on the homepage. The way to fix it is to write a new scenario to test that this behavior is always present. You don’t have to write the whole scenario because you already have a scenario you can modify instead, the one inside features/viewing_projects.feature.
To test that the links are hidden on the index action, add a new step to the Background and one to the scenario. The one in the Background goes directly under the line that creates the TextMate 2 project, and it creates another project called Internet Explorer:
And there is a project called "Internet Explorer"
Place the line that goes in the scenario directly under the line that takes you to the homepage, making the first two lines of this scenario look like this:
And I am on the homepage
Then I should not see "Internet Explorer"
This feature will now ensure that the user who doesn’t have permission to view the TextMate 2 project no longer can see the Internet Explorer project. When you run this feature using bin/cucumber features/viewing_projects.feature, it fails:
expected #has_no_content?("Internet Explorer")
 to return true, got false
To fix it, open app/controllers/projects_controller.rb and modify the index method to do exactly what the find_project method does: restrict. You could re-use the code from the find_project method in the index action, but that isn’t very DRY. Instead, extract the code from find_project and move it into the Project model. Take the code from this method
@project = if current_user.admin?
  Project.find(params[:id])
else
  Project.readable_by(current_user).find(params[:id])
end
and change it to this much shorter version:
@project = Project.for(current_user).find(params[:id])
The model is a better place than the controller for this logic. Open app/models/project .rb and define this new for class method using the code shown next. You’ll also refactor the method:
def self.for(user)
  user.admin? ? Project : Project.readable_by(user)
end
The first line of this method uses a ternary statement, which is a shorter version of this:
if current_user.admin?
  Project
 else
  Project.readable_by(current_user)
end
This statement is useful when you have short conditional statements like this one, but it shouldn’t be (ab)used for longer conditional statements. As a general rule of thumb, if the line for a ternary statement is longer than 80 characters, it’s probably best to split it out over multiple lines for better readability.
In the find_project method, you can call find on what this new for method returns, and now in the index method, you can use it in an identical fashion, but just replace the call to find with all, like this:
def index
  @projects = Project.for(current_user).all
end
Because you are referencing current_user in this action, you must modify the before_filter line that references authenticate_user! to ensure that users are signed in before they visit this page. Let’s change it to this:
before_filter :authenticate_user!, :only => [:index, :show]
When you run the feature again with bin/cucumber features/viewing_projects.feature, it passes:
1 scenario (1 passed)
9 steps (9 passed)
Ensure that everything is working as it should by running rake cucumber:ok spec. Oops! You broke some of the scenarios inside the Hidden Links feature, as shown by this output from the cucumber:ok part of the command you just ran:
cucumber features/hidden_links.feature:23
cucumber features/hidden_links.feature:27
cucumber features/hidden_links.feature:36
cucumber features/hidden_links.feature:40
If you run the first one of these features with bin/cucumber features/hidden_links.feature:23, you’ll see that it can’t find the TextMate 2 link.
When I follow "TextMate 2"
  no link with title, id or text 'TextMate 2' found (Capybara::ElementNotFound)
This error occurs because the user in this feature doesn’t have permission to view the TextMate 2 project. But if you look at this scenario, it’s for users who are not signed in—users who can no longer visit this page because, when they do, they are redirected to the sign-in page. This means that the following scenarios no longer apply and can be deleted:
Scenario: Edit project link is hidden for non-signed-in users
Scenario: Delete project link is hidden for non-signed-in users
Removing these scenarios removes two of the failing scenarios, but two more are still failing:
Failing Scenarios:
cucumber features/hidden_links.feature:21
cucumber features/hidden_links.feature:31
These two scenarios fail because [email protected] doesn’t have access to the TextMate 2 project. To give it access, you can put the permission step underneath the project-creation step in the Background, like this:
And there is a project called "TextMate 2"
And "[email protected]" can view the "TextMate 2" project
When you run this feature again using bin/cucumber features/hidden_links.feature, it passes:
7 scenarios (7 passed)
39 steps (39 passed)
You fixed the scenarios in the Hidden Links feature, but the Signing Up feature still fails. These two features aren’t closely related, so it’s best to make a commit but not push it to GitHub now so you have all related changes in one commit and other changes in separate commits. For this commit, the ProjectsController’s index action is restricted to displaying projects only the user can see, so the commit commands are as follows:
git add .
git commit -m "Don't show projects that a
 user doesn't have permission to see"
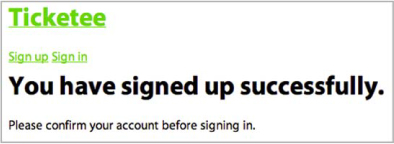
Now let’s see why the Signing Up feature is acting up. When you run it using bin/cucumber features/signing_up.feature, the final step fails:
Then I should see "You have signed up successfully"
expected #has_content?("You have signed up successfully.")
to return true, got false
When users sign up to your application, they’re shown the “You have signed up successfully” message, as the feature says they should, and they’re also redirected to the root of your application. The problem lies with this final step: people are redirected to the root of the application, the ProjectsController’s index action, which is now locked down to require that users be authenticated before they can view this action. This is problematic, but it’s fixable.
8.3.4. Fixing Signing Up
The Signing Up feature is broken, and the problem lies solely with the latest changes you made to the ProjectsController. When users sign up, they’re sent to the root_path in the application, which resolves to the index action in the ProjectsController. This controller has the authenticate_user! method called before all actions in it, checking if users are authenticated. If they aren’t, they’re redirected to the sign-in page.
You can see all of this in action if you start your server using rails server and attempt to sign up. Rather than being properly shown the “You have signed up successfully” message, you’ll see the Sign In page, as shown in figure 8.3.
Figure 8.3. Sign-in page

The configuration to send users to the root_path after sign-up is in Devise’s Devise::RegistrationsController[1] and is defined in a method called after_inactive_sign_up_path_for:
1 The Devise::RegistrationsController can be found at https://github.com/plataformatec/devise/blob/v1.4.2/app/controllers/devise/registrations_controller.rb#L93-95.
# The path used after sign up for inactive accounts.
As you can see, this method is hardcoded to return root_path. The comment above this method suggests that you override the method in your own RegistrationsController. It means you must create a new controller called RegistrationsController[2] and, inside this controller, override the after_inactive_sign_up_path_for method. To give this controller the same functionality as Devise’s Devise::Registrations Controller, you need to inherit from that controller. Finally, you can no longer redirect to root_path, so you generate a new part of your application to present new users with a message telling them they must confirm their account.
2 The controller could be called anything: it just needs a name so you can point Devise at it later.
Create a new controller now at app/controllers/registrations_controller.rb and fill it with this content:
class RegistrationsController < Devise::RegistrationsController

  private

  def after_inactive_sign_up_path_for(resource)
    confirm_user_path
  end
end
By defining this new controller as inheriting from Devise::RegistrationsController, you inherit all the behavior from that controller and gain the ability to override things such as the after_inactive_sign_up_path_for, of which you take full advantage here. The resource argument is the User object representing who’s signing up. You could use it, but in this context, don’t. Next, you need to tell Devise to use this controller instead of its own. Alter the following line in config/routes.rb
devise_for :users
to this:
devise_for :users, :controllers => { :registrations => "registrations" }
The :controllers option tells Devise you want to customize the controllers it uses, and with this new hash, you tell it to use the RegistrationsController you defined for registrations. In this controller, you override after_inactive_sign_up_path_for to go to a new route: confirm_user_path.
Because you’re overriding Devise’s controller, Rails won’t use Devise’s views. You must copy the views from Devise into your application and move them into the app/views/registrations directory. Lucky for you, Devise has a generator that places Devise’s views in your application: devise:views. You can run the generator with this command:
rails g devise:views
This command places Devise’s views into the app/views/devise directory of your application. This directory shares the same name as the directory internal to Devise where these views came from, and if a view exists in your application first, then Rails doesn’t look for it in the engines attached to the application. With these files copied over, move the app/views/devise/registrations directory out to app/views/registrations so you have some views to use for your new RegistrationsController.
Now you must address the problem that although the confirm_users_path method used in your RegistrationsController isn’t defined yet, redirect_to takes users to that location. Define a route for it by opening config/routes.rb and inserting this line underneath devise_for :users:
get '/awaiting_confirmation',
  :to => "users#confirmation",
  :as => 'confirm_user'
You can define routes that respond only to POST, PUT, and DELETE requests using the post, put, and delete methods, respectively. All of these methods use the same syntax and work in similar manners, but they define routes that respond only to certain HTTP methods.
If it doesn’t matter which HTTP method a route responds to, you can use the match method:
match '/some_route',
:to => "some#where"
This would respond to GET, POST, PUT and DELETE methods. This method is actually used by the get, post, put, and delete methods internally, except they call it like this:
match '/some_route',
:to => "some#where",
:conditions => { :method => :get }
You could use conditions to filter the HTTP methods to which a route would respond, but it’s better to just use the relevant HTTP method’s method.
The get method defines a new route in your application that responds to only GET requests to /awaiting_confirmation. This route goes to the confirmation action in UsersController, which you haven’t created yet either. Soon!
The :as option tells Rails that you want routing helpers generated for this route and you want the helpers to have the prefix confirm_user. This generates confirm_user_path, which you use in your new check_for_sign_up action in ProjectsController as well as in a confirm_user_url method.
When you run the Signing Up feature again with bin/cucumber features/signing_up.feature you don’t get the same error, but you get one that can be easily fixed:
Given I am on the homepage
  uninitialized constant UsersController
This is the controller you’ll use to show users the confirmation page, so let’s create it with a confirmation action that you’ll need with this command:
rails g controller users confirmation
This command adds a route to your routes file that you don’t want (because it overrides a route that Devise uses), so remove this line from config/routes.rb:
get "users/confirmation"
The added bonus of putting the action here is that you get a view for free at app/views/users/confirmation.html.erb. In this view you’ll display the “You have signed up successfully” message as well as a “Please confirm your account before signing in” message. Before you add these messages to the template, add a line at the bottom of the scenario inside features/signing_up.feature to check for this confirmation message:
Then I should see "Please confirm your account before signing in."
This line ensures that you’re always taken to the correct page upon sign-up. Now replace the code inside app/views/users/confirmation.html.erb with the following code to make this feature pass again:
<h1>You have signed up successfully.</h1>

Please confirm your account before signing in.
When users sign up, rather than seeing a confusing page telling them they must be signed in, they’ll instead see the page shown in figure 8.4.
Figure 8.4. “Please confirm your account”
The Signing Up feature is probably fixed now, but the only true way to make sure it’s working is to test it manually or to run the feature. Running the feature is easier, so let’s do that with bin/cucumber features/signing_up.feature:
1 scenario (1 passed)
7 steps (7 passed)
Everything is green. Awesome! This feature is passing again. Let’s make a commit for that:
git add .
git commit -m "Fix signing up feature,
  take user to alternative confirmation page"
Is everything else working, though? Let’s check with rake cucumber:ok spec:
31 scenarios (31 passed)
285 steps (285 passed)
# and
19 examples, 0 failures, 10 pending
Now everything’s working! Let’s push those changes to GitHub:
git push
You’ve limited the ability of users to take action on things inside the ProjectsController and fixed the Signing Up feature that broke because of the changes you made. But you haven’t protected the TicketsController. This is a problem because users who can’t view a project will still be able to view its tickets, which could pose a security risk. A project’s most vital assets (for now) are the tickets associated with it, and users who don’t have permission to see the project shouldn’t be able to see the associated tickets. Let’s add this restriction next.
8.4. Blocking access to tickets
When implementing permissions, you have to be careful to ensure that all users who should have access to something do, and all users who shouldn’t have access to something don’t. All of the TicketsController’s actions are still available to all users because it has no permission checking. If you leave it in that state, users who are unable to see the project can still make requests to the actions inside TicketsController. They shouldn’t be able to do anything to the tickets in a project if they don’t have permission to view tickets for it. Let’s implement permission checking to remedy this problem.
8.4.1. Locking out the bad guys
To prevent users from seeing tickets in a project they’re unauthorized to see, you must lock down the show action of TicketsController.
To test that when you put this restriction in place, it’s correct, write a spec in the spec/controllers/tickets_controller_spec.rb file, just as you did for the ProjectsController. This file should now look like the following listing.
Listing 8.5. spec/controllers/tickets_controller_spec.rb
require 'spec_helper'

describe TicketsController do
  let(:user) { create_user! }
  let(:project) { Factory(:project) }
  let(:ticket) { Factory(:ticket, :project => project,
                                  :user => user) }

  context "standard users" do
    it "cannot access a ticket for a project" do
      sign_in(:user, user)
      get :show, :id => ticket.id, :project_id => project.id
      response.should redirect_to(root_path)
      flash[:alert].should eql("The project you were looking for could not be
      found.")
    end
  end
end
This test sets up a project, a ticket, and a user who has no explicit permission to view the project and therefore shouldn’t be able to view the ticket. You test this spec by signing in as the unauthorized user and trying to go to the show action for this ticket, which requires you to pass through a project_id to help it find what project the ticket is in. The test should pass if the user is redirected to the root_path and if, upon the user seeing the flash[:alert], the application denies all knowledge of this project ever having existed.
When you run this test using bin/rspec spec/controllers/tickets_controller_spec.rb, you see the ticket factory is undefined:
No such factory: ticket (ArgumentError)
Define this factory now in a new file called factories/ticket_factory.rb. This file will be automatically loaded by the code in spec/support/factories.rb:
Factory.define :ticket do |ticket|
  ticket.title "A ticket"
  ticket.description "A ticket, nothing more"
  ticket.user { |u| u.association(:user) }
  ticket.project { |p| p.association(:project) }
end
Here you set up some defaults for the title and description fields for a factory-provided ticket, but you do something new with the user method. You pass a block and call the association method on the object returned from the block, and the user for this ticket becomes one user factory-created object. Nifty. You do the same thing for the project method, so you can create tickets using this factory and have them related to a project automatically if you want. For this spec, however, you override it.
When you run bin/rspec spec/controllers/tickets_controller_spec.rb again, this test fails because the user can still access this action:
TicketsController standard users cannot access a ticket for a project
    Failure/Error: response.should redirect_to(root_path)
With this test failing correctly, you can work on restricting the access to only the projects the user has access to. Open app/controllers/tickets_controller.rb and remove the :except option from the authenticate_user! filter, so it goes from this
before_filter :authenticate_user!, :except => [:index, :show]
to this:
before_filter :authenticate_user!
Now users should always be asked to sign in before accessing the index and show actions for this controller, meaning that current_user will always return a User object.
You can reference the current_user method in find_project and use the for method to limit the project find scope to only the projects to which that user has access. You can change the find_project method to the following example:
def find_project
  @project = Project.for(current_user).find(params[:project_id])
  rescue ActiveRecord::RecordNotFound
    flash[:alert] = "The project you were looking for could not be found."
    redirect_to root_path
end
The rewritten find_project method will retrieve a Project only if the current_user has permission to view that project or is an admin. Otherwise, an ActiveRecord ::RecordNotFound exception will be thrown and rescued here, showing users “The project you were looking for could not be found.”
When you run the spec again with bin/rspec spec/controllers/tickets_controller_spec.rb, it now passes because this user can no longer see this project and is shown the error:
.
1 example, 0 failures
You scoped the project find for the TicketsController in the same way you did for the ProjectsController, limiting it to only those projects to which the current user has access.
That’s the end of that! Now ensure that all your specs and features are passing by running rake cucumber:ok spec. You should see this output:
31 scenarios (31 passed)
285 steps (285 passed)
# and
20 examples, 0 failures, 10 pending
In this section, you altered the TicketsController so that only users with permission to access a project can see the tickets inside it. Let’s commit that:
git add .
git commit -m "Restrict reading tickets to correct project scope"
git push
Now let’s add a new permission that restricts who can create tickets in a project.
8.5. Restricting write access
Sometimes when working on a project, you’ll want to limit the creation of tickets to a certain person or a group of people, such as to only developers or only clients. For this, you want the New link to be hidden from people who don’t have this permission, and you need both the new and create actions to reject such users.
8.5.1. Rewriting a feature
You’re lucky to already have the feature for creating tickets, so you just need to add a step to the Background declaring that the user can create tickets in the project. Place this step directly under the one declaring that users can view the project. Open features/creating_tickets.feature, and modify the Background so it contains these two lines:
And "[email protected]" can view the "Internet Explorer" project
And "[email protected]" can create tickets in the "Internet Explorer" project
When you run bin/cucumber features/creating_tickets.feature, you’re told this step is undefined:
Given /^"([^"]*)" can create tickets in the "([^"]*)"
Define it in features/step_definitions/permission_steps.rb directly under the viewing projects step. This new step goes like this:
Given /^"([^"]*)" can create tickets in the "([^"]*)" project$/
      do |user, project|
  Permission.create!(:user => User.find_by_email!(email),
                    :thing => Project.find_by_name!(project),
                    :action => "create tickets")
end
This step is similar to the step before it. You changed the word view to create tickets and made a few other small changes, so you should DRY these steps up now. Change the steps to read exactly like the following listing.
Listing 8.6. features/step_definitions/permission_steps.rb
permission_step = /
     ^"([^"]*)" can ([^"]*?) ([o|i]n)?s?the "([^"]*)" project$/
Given permission_step do |user, permission, on, project|
  create_permission(user, find_project(project), permission)
end

def create_permission(email, object, action)
  Permission.create!(:user => User.find_by_email!(email),
                     :thing => object,
                     :action => action)
end

def find_project(name)
  Project.find_by_name!(name)
end
Here we separated the regular expression onto its own line to make the line a little shorter. It can all be put on one line without any adverse effects; this just makes it neater.
Now you extract creating permissions, finding the user, and finding the project into separate methods, which means you won’t have to change each step if you want to change the way a permission is created. You also combine the acts involved in creating permissions into one step that matches all currently defined step definitions using a regular expression that conforms to the style of other steps:
Given "[email protected]" can create tickets on the "Ticketee" project
Given "[email protected]" can view the "Ticketee" project
Given "[email protected]" can edit tickets in the "Ticketee" project
This new step definition allows greater flexibility in how your steps are defined yet leaves them easy to parse.
With this permission step defined, run bin/cucumber features/creating_tickets.feature, and the entire feature passes:
3 scenarios (3 passed)
35 steps (35 passed)
This feature will pass whether the user has permission to create a ticket or not. You’re now basically in the same situation you faced with the Viewing Tickets feature: the feature would pass either way. So, just like before, you use RSpec to test that users can’t create a ticket if they don’t have permission to do so.
8.5.2. Blocking creation
Let’s write the specs to test that users with permission to view the project but without permission to create tickets can’t create tickets. Put the specs shown in the following listing in spec/controllers/tickets_controller_spec.rb inside the standard users context block so all the examples are grouped nicely.
Listing 8.7. spec/controllers/tickets_controller_spec.rb
context "with permission to view the project" do

  before do
    sign_in(:user, user)
    Permission.create!(:user => user, :thing => project, :action => "view")
  end

  def cannot_create_tickets!
    response.should redirect_to(project)
    flash[:alert].should eql("You cannot create tickets on this project.")
  end

  it "cannot begin to create a ticket" do
    get :new, :project_id => project.id
    cannot_create_tickets!
  end

  it "cannot create a ticket without permission" do
    post :create, :project_id => project.id
    cannot_create_tickets!
  end
end
You first set up the specs using a before, signing in as a user, and defining a permission for that user to view the project. Next, you define a method called cannot_create_tickets! asserting that unauthorized users should be redirected to the project and shown an alert stating they’re not allowed to create tickets. Rather than duplicating these two lines in each spec where you want to check that a user receives the correct message, you just call the cannot_create_tickets! method in that place. The two examples you just added ensure that unauthorized visitors to the new and create actions can’t create tickets.
When you run this file with bin/rspec spec/controllers/tickets_controller_spec.rb, the specs fail, just as you might expect:
Failure/Error: response.should redirect_to(project)
Expected response to be a <:redirect>, but was <200>
To make the spec pass, you need to implement the permission checking on the new and create actions in your TicketsController.
Run a before_filter before the new action that checks whether the current user has permission; if not, then redirect the user to the project page and display the error described in the spec.
Now change the before_filter calls to include this new one, as shown in the following lines:
before_filter :authenticate_user!
before_filter :find_project
before_filter :find_ticket, :only => [:show, :edit, :update, :destroy]
before_filter :authorize_create!, :only => [:new, :create]
This authorize_create!before_filter is placed after the authenticate_user! and find_project before_filters because it uses the current_user object set up by the authenticate_user! method and the @project object from find_project.
In this new filter, you call a new method called cannot?, which returns true or false to indicate whether the currently signed-in user can’t or can do a particular action. You define the authorize_create! method code shown next:
def authorize_create!
  if !current_user.admin? && cannot?("create tickets".to_sym, @project)
    flash[:alert] = "You cannot create tickets on this project."
    redirect_to @project
  end
end
In this example, you use to_sym to create a symbolized version of a string, which is required because the cannot? method takes only symbols. You also check whether or not the user is an admin; if so, the user should be allowed to create tickets. If you run the controller’s spec again with bin/rspec spec/controllers/tickets_controller_spec.rb, the example fails because the cannot? method is undefined:
Failure/Error: get :new, :project_id => project.id
undefined method 'cannot?' for #<TicketsController:0xb651244c>
Rails doesn’t come with a cannot? method, but a gem called cancan (stylized as CanCan) does. This gem helps you tie together the User and Permission records. Let’s install it now.
8.5.3. What is CanCan?
CanCan is a gem written by Ryan Bates of Railscasts fame; it provides some nice helper methods (such as the cannot? method and its antithesis, can?) to use in controllers and views.
The can? and cannot? methods use the same permissions table you created to check that a user has permission to perform a specific action on a specific object.
To install CanCan, add this line to your Gemfile directly underneath the line for Devise:
gem 'cancan'
(There’s no particular reason to put this gem underneath Devise other than that it’s sensible to group together gems dealing with similar functions.) To install the CanCan gem, run bundle install.
8.5.4. Adding abilities
When you run bin/rspec spec/controllers/tickets_controller_spec.rb, you get this output:
Failure/Error: get :new, :project_id => project.id
    uninitialized constant Ability
This error occurs because CanCan is now defining the cannot? method for the controller, which uses a CanCan in-built method called current_ability:
@current_ability ||= ::Ability.new(current_user)
The ||= sets @current_ability if it isn’t already set. The :: before Ability indicates to Ruby that you want the Ability at the root namespace. This allows you to have a module called CanCan::Ability and a class at Ability and to differentiate between the two. In this example, it’s trying to access just Ability, which is a class that doesn’t yet exist.
This new Ability class will provide the link between users and their permissions. You define it in a new file at app/models/ability.rb exactly like the following listing.
Listing 8.8. app/models/ability.rb
class Ability
  include CanCan::Ability

  def initialize(user)
    user.permissions.each do |permission|
      can permission.action.to_sym,
      permission.thing_type.constantize do |thing|
        thing.nil? ||
        permission.thing_id.nil? ||
        permission.thing_id == thing.id
      end
    end
  end
end
The Ability class’s initialize method defines how can? and cannot? will act. In this example, you iterate over all the users’ permissions and use the can? method to say that a user can perform a specific function. Users who shouldn’t be able to perform that function won’t have an entry in the permissions table for it. This is the whitelist authorization described at the beginning of the chapter.
When you run bin/rspec spec/controllers/tickets_controller_spec.rb, you get this error:
Failure/Error: get :new, :project_id => project.id
undefined method 'permissions' for #<User:0xb59dc528>
This error occurs because you haven’t yet defined a has_many association on the User model to the Permission model. To do so, open app/models/user.rb and add this line within the class:
has_many :permissions
This is another case where there’s no reason other than that it makes sense to put it directly underneath the line for the tickets association. It’s best if you group all similar methods together. With this association in place, run bin/rspec spec/controllers/tickets_controller_spec.rb, and the whole spec file passes:
...
3 examples, 0 failures
Great! Now that the spec’s passing, unauthorized users don’t have access to the new and create actions. How about checking that those who have permissions can access these actions? Let’s check on the Creating Tickets feature. With this permission checking in place, any user with the right permissions should still be able to create tickets. Run bin/cucumber features/creating_tickets.feature to make sure. It should pass:
3 scenarios (3 passed)
38 steps (38 passed)
Good. Users without permission to create tickets no longer can do so.
Now that you’ve implemented this story, it’s time to commit. As usual, you should ensure that everything is still working by running rake cucumber:ok spec. Everything should pass:
31 scenarios (31 passed)
288 steps (288 passed)
# and
22 examples, 0 failures, 10 pending
Let’s commit the changes:
git add . git commit -m "Restricting creating tickets to only users
In this section, you limited the creation of tickets to only those users who’re granted permission to do so by using the Permission class and the CanCan gem.
8.6. Restricting update access
You just learned how to restrict access to the creation of tickets; your next step is to restrict which users can update tickets. Thankfully, you can re-use the framework that’s already in place with CanCan to make this a cinch. You can also re-use the Editing Tickets feature to test the restriction.
For this feature, at features/editing_tickets.feature, you set up a Permission that says the user you sign in as has permission to update tickets. To do this, write a step in the Background directly under the other one that sets up read access, as shown here:
And "[email protected]" can view the "TextMate 2" project
And "[email protected]" can edit tickets in the "TextMate 2" project
When you run bin/cucumber features/editing_tickets.feature, it all passes, just as you expect. This step covers the scenario in which the user has permission to update tickets; to cover the scenario in which the user doesn’t have permission, you need to write a couple of specs first.
8.6.1. No updating for you!
In this section, you restrict updating of tickets in the same way you restricted creating tickets. You start by writing two examples: one to test the edit action and the other to test the update action. Inside spec/controllers/tickets_controller_spec.rb, within the “with permission to view the project” context, define a cannot_update_tickets! method right under the cannot_create_tickets! method, as shown next:
def cannot_update_tickets!
  response.should redirect_to(project)
  flash[:alert].should eql("You cannot edit tickets on this project.")
end
Then, underneath the existing examples, put the specs, as shown in the following listing.
Listing 8.9. Update tests for spec/controllers/tickets_controller_spec.rb
it "cannot edit a ticket without permission" do
  get :edit, { :project_id => project.id, :id => ticket.id }
  cannot_update_tickets!
end

it "cannot update a ticket without permission" do
  put :update, { :project_id => project.id,
                 :id => ticket.id,
                 :ticket => {}
               }
  cannot_update_tickets!
end
These two examples make requests to their respective actions and assert that the user is redirected away from them with an error message explaining why. With both of these actions, you need to pass a project_id parameter so the find_project method can find a project and an id parameter so the find_ticket method can find a ticket. For the update action, you pass an empty hash so params[:ticket] is set. If you didn’t do this, you would get a confusing error in your test:
NoMethodError:
  undefined method 'stringify_keys' for nil:NilClass
This error occurs because the update_attributes call in the update action would be passed nil, because that’s what params[:ticket] defaults to if you don’t pass it in here. This error would happen only if the user had permission to update a ticket, which all users have for now (but not for long).
When you run this file using bin/rspec spec/controllers/tickets_controller_spec.rb, these two examples fail:
1) TicketsController standard users with permission to view the project
   cannot edit a ticket without permission
    Failure/Error: response.should redirect_to(project)
2) TicketsController standard users with permission to view the project
   cannot update a ticket without permission
    Failure/Error: response.should redirect_to(project)
Now you can implement this feature in your controller!
8.6.2. Authorizing editing
Before the edit and update actions are run, you want to authorize the user for them. Write another before_filter for TicketsController: the before_filter list for this controller should now look like the following listing.
Listing 8.10. app/controllers/tickets_controller.rb
before_filter :authenticate_user!
before_filter :find_project
before_filter :find_ticket, :only => [:show, :edit, :update, :destroy]
before_filter :authorize_create!, :only => [:new, :create]
before_filter :authorize_update!, :only => [:edit, :update]
At the bottom of this controller class, define the new method shown in the following listing:
def authorize_update!
  if !current_user.admin? && cannot?(:"edit tickets", @project)
    flash[:alert] = "You cannot edit tickets on this project."
    redirect_to @project
  end
end
Now check whether the specs pass by running bin/rspec spec/controllers/tickets_controller_spec.rb:
5 examples, 0 failures
Wasn’t that easy? The edit and update actions in the TicketsController are now restricted, just like the create action. How’s the feature going? Let’s see if those with permission can still update tickets. Run bin/cucumber features/editing_tickets.feature:
2 scenarios (2 passed)
28 steps (28 passed)
Just like that, you’re finished restricting updating tickets to only some users.
Now run rake cucumber:ok spec to make sure nothing is broken. Everything should be good:
31 scenarios (31 passed)
290 steps (290 passed)
# and
24 examples, 0 failures, 10 pending
Fantastic! Let’s commit that:
git add .
git commit -m "Restricting ticket updating to only those who have permission"
git push
Good stuff. In this section, you learned how to restrict the edit and update actions using the permissions you implemented earlier. There’s one last port of call for this restricting business: the destroy action.
8.7. Restricting delete access
The final action you restrict is the destroy action in the TicketsController. Again, you can re-use a feature to test this behavior: the Deleting Tickets feature.
As you did with the Creating Tickets and Updating Tickets features, you implement a step here in the Deleting Tickets feature to give the user permission to delete tickets. Under the line that grants users permission to view the TextMate 2 project, put another one to grant them permission to delete tickets, as shown here:
And "[email protected]" can view the "TextMate 2" project
And "[email protected]" can delete tickets in the "TextMate 2" project
When you run this feature, the whole thing passes because you already have the step that supports the different permissions you require:
1 scenario (1 passed)
12 steps (12 passed)
This feature ensures that anybody with permission can delete tickets for projects, but you need another spec to test that anybody without permission is prevented from deleting tickets.
8.7.1. Enforcing destroy protection
To ensure that users without permission to delete tickets can’t do so, you write a spec (shown next) directly under the one for the update action in spec/controllers/tickets_controller_spec.rb:
it "cannot delete a ticket without permission" do
  delete :destroy, { :project_id => project.id, :id => ticket.id }
  response.should redirect_to(project)
  flash[:alert].should eql("You cannot delete tickets from this project.")
end
You don’t have to put the last two lines in their own method because you won’t use them more than once. When you run this spec, it fails on the final line rather than on the third line:
1) TicketsController standard users with permission to view the project
   cannot delete a ticket without permission
    Failure/Error: flash[:alert].should eql
    ("You cannot delete tickets from this project.")
This error occurs because the destroy action is actually being processed, and it redirects the user to the project once it’s complete. The spec doesn’t know the difference between a redirect from within the action or within the before_filter, nor should it.
To make this spec pass, define a new method called authorize_delete! at the bottom of the TicketsController:
def authorize_delete!
  if !current_user.admin? && cannot?(:"delete tickets", @project)
    flash[:alert] = "You cannot delete tickets from this project."
    redirect_to @project
  end
end
Then you can call this method in a before_filter too:
before_filter :authorize_delete!, :only => :destroy
When you run this spec using bin/rspec spec/controllers/tickets_controller_spec.rb, it’s all passing:
6 examples, 0 failures
Now that you’re stopping users without permission, how goes your feature? Run bin/cucumber features/deleting_tickets.feature to find out:
1 scenario (1 passed)
12 steps (12 passed)
Great! With this last permission in place, all the actions in the TicketsController are restricted to their appropriate users. Let’s make a commit:
git add .
git commit -m "Restrict destroy action to only people with permission"
git push
Because the controller’s actions are restricted, the links associated with these actions should be hidden from users who are unable to perform these actions.
8.7.2. Hiding links based on permission
To ensure that these links are hidden from those who shouldn’t be able to see them but are still visible to admins (because admins should be able to do everything), you use features/hidden_links.feature. Start with the New Ticket link by adding the scenarios from the following listing.
Listing 8.11. features/hidden_links.feature
Scenario: New ticket link is shown to a user with permission
  Given "[email protected]" can view the "TextMate 2" project
  And "[email protected]" can create tickets on the "TextMate 2" project
  And I am signed in as "[email protected]"
  When I follow "TextMate 2"
  Then I should see "New Ticket"

Scenario: New ticket link is hidden from a user without permission
  Given "[email protected]" can view the "TextMate 2" project
  And I am signed in as "[email protected]"
  When I follow "TextMate 2"
  Then I should not see the "New Ticket" link

Scenario: New ticket link is shown to admins
  Given I am signed in as "[email protected]"
  When I follow "TextMate 2"
  Then I should see the "New Ticket" link
These three scenarios test all three permutations of users who could possibly see this page. Users with permission and admins should be able to see the link, and users without permission should not. When you run this feature with bin/cucumber features/hidden_links.feature, the second scenario fails:
Expected to not see the "New Ticket" link, but did.
  (RSpec::Expectations::ExpectationNotMetError)
This error occurs because the link is visible independently of whether or not the user has permission. With these scenarios in place, you can work on making them pass. You can wrap the New Ticket in a helper method, similar to the admins_only helper used in chapter 6. Open app/views/projects/show.html.erb, and change the New Ticket link from this
<%= link_to "New Ticket", new_project_ticket_path(@project) %>
to this:
<%= authorized?("create tickets".to_sym, @project) do %>
  <%= link_to "New Ticket", new_project_ticket_path(@project) %>
<% end %>
Currently, this authorized? method is undefined. This is the method you need in views all across your application to determine if the user has permission to see the specific action and if that user is an admin. Because you’ll use this helper everywhere, define it inside app/helpers/application_helper.rb, as shown here:
def authorized?(permission, thing, &block)
  block.call if can?(permission.to_sym, thing) ||
           current_user.try(:admin?)
  nil
end
This helper uses CanCan’s can? method to check if the user is authorized to perform this action. If so, then all is fine and dandy. If not, then you check to see if the current_user is set (it won’t be set if the user isn’t signed in), and if it is, check to see if that user is an admin by using the try method, which returns nil. If the method specified can’t be found on thing, try is called. If it’s found, then you use block.call, which runs the passed-in block.
With this helper implemented, all three new scenarios should pass. Run bin/cucumber features/hidden_links.feature to find out:
10 scenarios (10 passed)
60 steps (60 passed)
Great! They’re passing! Now let’s implement another few for testing the Edit link for tickets. Add the three scenarios from the following listing to the bottom of features/hidden_links.feature.
Listing 8.12. features/hidden_links.feature
Scenario: Edit ticket link is shown to a user with permission
  Given "[email protected]" can view the "TextMate 2" project
  And "[email protected]" can edit tickets on the "TextMate 2" project
  And I am signed in as "[email protected]"
  When I follow "TextMate 2"
  And I follow "Shiny!"
  Then I should see the "Edit" link

Scenario: Edit ticket link is hidden from a user without permission
  Given "[email protected]" can view the "TextMate 2" project
  And I am signed in as "[email protected]"
  When I follow "TextMate 2"
  And I follow "Shiny!"
  Then I should not see the "Edit" link

Scenario: Edit ticket link is shown to admins
  Given I am signed in as "[email protected]"
  When I follow "TextMate 2"
  And I follow "Shiny!"
  Then I should see the "Edit" link
When you run these scenarios using bin/cucumber feature/hidden_links.feature, the link to Shiny! can’t be found for any of them:
And I follow "Shiny!"
  no link with title, id or text 'Shiny!' found (Capybara::ElementNotFound)
The Shiny! link should be a link to a ticket, but you haven’t yet created this ticket. To do so, under the line where you created the TextMate 2 project in the Background, add the following to create a ticket:
And "[email protected]" has created a ticket for this project:
  | title  | description       |
  | Shiny! | My eyes! My eyes! |
Now when you run this feature, the middle scenario fails, just like when you implemented the Create link filtering:
Expected to see the "Edit" link, but did not.
  (RSpec::Expectations::ExpectationNotMetError)
This time, you edit the file app/views/tickets/show.html.erb. Change the Edit link from this
<%= link_to "Edit Ticket", [:edit, @project, @ticket] %>
to this:
<%= authorized?("edit tickets", @project) do %>
  <%= link_to "Edit Ticket", [:edit, @project, @ticket] %>
<% end %>
With this one small change to use the authorized? helper to check for the permission to edit tickets for the current project, the Hidden Links feature now passes when you run bin/cucumber features/editing_tickets.feature:
13 scenarios (13 passed)
97 steps (97 passed)
Great! You’ve got one last link to protect now: the Delete Project link on the tickets show page. Add another three scenarios to this feature, shown in the following listing.
Listing 8.13. features/deleting_tickets.feature
Scenario: Delete ticket link is shown to a user with permission
  Given "[email protected]" can view the "TextMate 2" project
  And "[email protected]" can delete tickets in the "TextMate 2" project
  And I am signed in as "[email protected]"
  When I follow "TextMate 2"
  And I follow "Shiny!"
  Then I should see "Delete"

Scenario: Delete ticket link is hidden from a user without permission
  Given "[email protected]" can view the "TextMate 2" project
  And I am signed in as "[email protected]"
  When I follow "TextMate 2"
  And I follow "Shiny!"
  Then I should not see the "Delete" link

Scenario: Delete ticket link is shown to admins
  Given I am signed in as "[email protected]"
  When I follow "TextMate 2"
  And I follow "Shiny!"
  Then I should see the "Delete" link
When you run this feature, the middle scenario fails again:
Then I should not see "Delete"
  Expected to not see the "Delete" link, but did.
  (RSpec::Expectations::ExpectationNotMetError)
To fix it, open or switch back to app/views/tickets/show.html.erb and wrap the Delete Ticket link in the warm embrace of the authorized? method, just as you did with the Edit Ticket link:
<%= authorized?("delete tickets", @project) do %>
  <%= link_to "Delete Ticket",
              project_ticket_path(@project, @ticket),
              :method => :delete,
              :confirm => "Are you sure you want to delete this ticket?" %>
<% end %>
When you run bin/cucumber features/hidden_links.feature, all 15 scenarios pass:
16 scenarios (16 passed)
124 steps (124 passed)
Fantastic! Now you’ve stopped displaying links to the users who shouldn’t see them and switched to displaying them only to people who should be able to see them.
What a whirlwind adventure! First you learned to check for permissions for all the actions in the TicketsController, and then you learned to hide links from users in the views. Let’s make sure everything is working by running rake cucumber:ok spec:
40 scenarios (40 passed)
376 steps (376 passed)
# and
17 examples, 0 failures, 3 pending
Great! Now let’s commit:
git add .
git commit -m "Restrict actions in TicketsController
    based on permissions and hide links"
git push
With all that done, you now have the scaffold for setting up permissions but no interface to it! There’s currently no way in the system for a user (in particular, an admin) to set up the permissions on other users. We now implement that.
8.8. Assigning permissions
In chapter 6, you added an admin field to the users table and then triggered it through the admin backend by checking or unchecking a check box. You’re going to do the same thing with the permissions for the projects. When you’re done, you’ll see a permissions screen that allows you to pick and choose the permissions for the users and projects.
You implement this screen one check box at a time because you must confirm that the permissions you assign through this interface work just as well as when you use the step definitions in Cucumber. Let’s get started with the permission to view projects.
8.8.1. Viewing projects
In this section, you implement the foundations for assigning the permissions through the admin backend, starting with the permission to view projects. Create a new feature called features/assigning_permissions.feature, and start it out with the code from the following listing.
Listing 8.14. features/assigning_permissions.feature
Feature: Assigning permissions
  In order to set up users with the correct permissions
  As an admin
  I want to check all the boxes

  Background:
    Given there are the following users:
      | email              | password | admin |
      | [email protected] | password | true  |
    And I am signed in as them

    And there are the following users:
      | email             | password |
      | [email protected] | password |
    And there is a project called "TextMate 2"

    When I follow "Admin"
    And I follow "Users"
    And I follow "[email protected]"
    And I follow "Permissions"

  Scenario: Viewing a project
    When I check "View" for "TextMate 2"
    And I press "Update"
    And I follow "Sign out"

    Given I am signed in as "[email protected]"
    Then I should see "TextMate 2"
This scenario has two users: an admin user and a standard user. You sign in as the admin user, go to the permissions page, check a box, click Update, and then sign out. Then you sign in as the user who was just granted permission to test that permission, which you do in the next step. This ensures that the assigning of the permissions always works. For now, you’re only testing the permission to view a project permission.
When you run bin/cucumber features/assigning_permissions.feature, it fails when it tries to follow the Permissions link:
And I follow "Permissions" no link with title, id or text 'Permissions' found
If you look at how the Background gets to this point, you can see that it follows the Admin link, which leads to the admin dashboard, then to Users to take you to the place where you can see users, and finally clicks a user, taking you to the Admin::UsersControllershow action. Therefore, you need to add the missing Permissions link to the app/views/admin/users/show.html.erb directly underneath the Delete User link:
<%= link_to "Delete User", admin_user_path(@user),
                    :method => :delete,
                    :confirm => "Are you sure you want
                    to delete this user?" %>
<%= link_to "Permissions", admin_user_permissions_path(@user) %>
The path for this link_to (which is not yet defined) takes you to the Admin ::PermissionsController’s index action. To get this link_to to work, define that permissions are nested under users in the config/routes.rb, and add the admin namespace in the definition using this code:
namespace :admin do
  root :to => "base#index"
  resources :users do
    resources :permissions
  end
end
With these changes in the config/routes.rb file, the admin_user_permissions_path used in the link_to will now be defined. When you run the feature using bin/cucumber features/assigning_permissions.feature, you see there’s more to be done for this step:
And I follow "Permissions" uninitialized constant Admin::PermissionsController
Ah, of course! You must create the controller for this link!
The Permissions Controller
You can generate the Admin::PermissionsController file by running this command:
rails g controller admin/permissions
Along with an app/controllers/admin/permissions_controller.rb file, this command generates other goodies, such as a helper and a directory for the views at app/views/admin/permissions. Before you go further, you must modify this file to make the class inherit from the right place so that only admins can access it. Open the file, and change the first line to this:
class Admin::PermissionsController < Admin::BaseController
This line makes the controller inherit from the Admin::BaseController class, which restricts all actions in this controller to only admin users. When you run the feature again, the index action is missing from this controller:
And I follow "Permissions"
  The action 'index' could not be found for Admin::PermissionsController
Obviously, you need to define this action before you carry on. Inside this action, load all the permissions for the user you’re currently looking at, and then, with the view, display a page from which an admin can choose what permissions this user has on each project. It’d be helpful if this user was loaded by a before_filter because you’ll need it for the action that updates the permissions later. With all this in mind, update the entire controller to resemble the following listing.
Listing 8.15. app/controllers/admin/permissions_controller.rb
class Admin::PermissionsController < Admin::BaseController
  before_filter :find_user

  def index
    @ability = Ability.new(@user)
    @projects = Project.all
  end

  private

    def find_user
      @user = User.find(params[:user_id])
    end
end
The new Ability instance created here lets you check the user’s ability to perform specific actions on any project by simply calling this code:
@ability.can?(:"view", @project)
This syntax may look similar to the syntax used in TicketsController—it is. In that controller, you used the cannot? method, which is the opposite of the can? method. These methods are added to the controller by CanCan and are just shorter helper methods to do almost exactly what you did in this controller. The only difference is that you’re not acting on the current_user here, so you must define an Ability object yourself and use that instead.
The Permissions Screen
Now that you have the index action up, you need to make its view look like what is shown in figure 8.5. Create a new file at app/views/admin/permissions/index.html.erb, and fill it with the content from the following listing.
Figure 8.5. The permissions screen
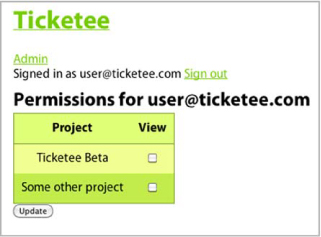
Listing 8.16. app/views/admin/permissions/index.html.erb

This template defines the table discussed earlier. It provides a header row of permission titles and rows for each project
containing that project’s name followed by check boxes for each of the permissions. In this view, you use the form_tag, which generates a form that points to the path specified by its first argument. You also use a permissions helper method ![]() , which isn’t currently defined but will provide a list of permissions to iterate through to check on each project.
, which isn’t currently defined but will provide a list of permissions to iterate through to check on each project.
Right underneath where you use permissions, you use another helper method called cycle ![]() . This method is built into Rails and cycles through its given arguments for each iteration of whatever it’s encapsulated
in, so when this page displays the first project, the method sets the class of that tr tag to odd and the second one to even. It cycles between these two classes until it runs out of projects. This is how you can easily get different rows in this
table to be styled differently.
. This method is built into Rails and cycles through its given arguments for each iteration of whatever it’s encapsulated
in, so when this page displays the first project, the method sets the class of that tr tag to odd and the second one to even. It cycles between these two classes until it runs out of projects. This is how you can easily get different rows in this
table to be styled differently.
Before we look at how to define the permissions method, run bin/cucumber cucumber features/assigning_permissions.feature:
undefined local variable or method
  'update_user_permissions_path' [...]
You get an error because you haven’t yet defined the route for the form. The Admin::PermissionsController serves a different purpose than the standard REST controllers. For this controller, you use the update action to update a whole slew of permissions rather than a single one. To map to this action by using the update method, you must define another named route in your config/routes.rb file using the put method:
put '/admin/users/:user_id/permissions',
               :to => 'admin/permissions#update',
               :as => :update_user_permissions
With this method, you define a new route for your application that will only respond to PUT requests to this route. The :user_id inside the route is a variable and is passed to the action as params[:user_id]. The controller and action are defined using the :to symbol, and finally the method itself is given a name with the :as option.
Now when you run the feature again, this route method is defined, but the permissions method isn’t:
And I follow "Permissions" undefined local variable or method 'permissions' [...]
Great! It seems like your page just requires this permissions helper method.
Defining a Helper Method
Back in chapter 6, you defined a helper method called admins_only in ApplicationHelper, which allowed you to show links only for admin users. This time, you define the permissions method, which contains a list of permissions to display check boxes on this page. Because this method is specific to views from the Admin ::PermissionsController controller, place it in app/helpers/admin/permissions_helper.rb and define it as shown in the following listing.
Listing 8.17. app/helpers/admin/permissions_helper.rb
module Admin::PermissionsHelper
  def permissions
    {
      "view" => "View"
    }
  end
end
This permissions method returns a hash containing only one key-value pair at the moment because you’re testing only one particular check box. You use this method to display all the permissions you want to be configurable by admins, and you revisit this method later to define more pairs. You use this method in your view twice; the first time, you iterate over it like this:
<% permissions.each do |name, text| %>
  <th><%= text %></th>
<% end %>
When you iterate over a Hash object with the each method, the key for the hash becomes the first block variable and the value becomes the second block variable; these variables change for each key-value pair of the Hash object. In this case, it renders headers for the table in this view. You use this helper later in the view too:
<% permissions.each do |name, text| %>
  <td>
    <%= check_box_tag "permissions[#{project.id}][#{name}]",
      @ability.can?(name.to_sym, project) %>
  </td>
<% end %>
Here you use just the key from the hash to define a uniquely identifiable name for this check box. The second argument is the value returned to the controller, which you use to determine whether or not this check box is checked. The third argument uses the @ability object to determine whether or not this check box is displayed as checked. By using this method, you get a tag like this:
<input id="permissions_1_view"
  name="permissions[1][view]"
  type="checkbox"
  value="1" />
You’re given both the id and name attributes, which are generated from the first argument you passed to check_box_tag. The id attribute indicates not the permission’s ID but the ID of the project that you’re determining the permission is for. You use the id attribute shortly to check this box using Capybara and the parsed-into-params version of the name attribute just after that in your controller.
When you run bin/cucumber features/assigning_permissions.feature again, you reach the following undefined step:
When I check "View" for "TextMate 2"
  Undefined step: "I check "View" for "TextMate 2"" (Cucumber::Undefined)

...

When /^I check "([^"]*)" for "([^"]*)"$/ do |arg1, arg2|
  pending # express the regexp above with the code you wish you had
end
Take the snippet at the end of the output and put it in features/step_definitions/permission_steps.rb underneath the other step definitions but above the methods. You should end up with a step definition like this:
When /^I check "([^"]*)" for "([^"]*)"$/ do |permission, name|
  project = Project.find_by_name!(name)
  permission = permission.downcase.gsub(" ", "_")
  field_id = "permissions_#{project.id}_#{permission}"
  steps(%Q{When I check "#{field_id}"})
end
For this step definition, you must first find the project by its name so you can get its ID, because a later part of this step that checks the permission check box requires the ID of the project to compile the ID for the fields.[3] Then you use the handy steps method you used in chapter 7 to call another step where you pass in the downcase’d and gsub’d version of the permission string. The name passed in is the titleize’d version of the permission and should match the title in the permissions table heading.
3 The project name won’t change, but the ID might, so you use the identifier that’s unlikely to change.
When you run this feature again, it passes because this step is defined and because it can check this check box, but it fails because the form tries to go to the update action inside Admin::PermissionsController, which doesn’t exist yet:
And I press "Update"
  The action 'update' could not be found for Admin::PermissionsController
This action’s a little tricky. Not only do you want it to add permissions for users, you also want to delete those permissions.[4] This action receives params[:permissions] in this Hash format from the form:
4 Which is possibly why the action is called update.
{"1"=>{"view"=>"1"}}
The first key is the ID of the project, and the hash inside contains the permissions for that project. If no check boxes are checked for that project, then no hash exists in params[:permissions] for it. Therefore, you use this hash to update the permissions that a user can do now, as shown in the following listing.
Listing 8.18. update action inside app/controllers/admin/permissions_controller.rb
def update
  @user.permissions.clear
  params[:permissions].each do |id, permissions|
    project = Project.find(id)
    permissions.each do |permission, checked|
      Permission.create!(:user => @user,
                         :thing => project,
                         :action => permission)
    end
  end
  flash[:notice] = "Permissions updated."
  redirect_to admin_user_permissions_path
end
You first clear all the users’ permissions using the association method clear. Next, you iterate through all the key-value pairs in params[:permissions] and find the project for each one. Then you iterate through the permissions for the parameter and create a new permission for every project. Finally, you set a flash[:notice] and redirect back to the permissions page. Now when you run this feature, the Sign Out link is missing:
no link with title, id or text 'Sign out' found (Capybara::ElementNotFound)
You didn’t add this link in chapter 7 because you didn’t need it, but in hindsight, you should have. Add this link now to app/views/layouts/application.html.erb directly under the Signed in as text:
Signed in as <%= current_user.email %>
<%= link_to "Sign out", destroy_user_session_path, :method =>
:delete %>
This link now shows only to people who are signed in. The routing helper destroy_user_session_path is provided for free by Devise. When you rerun the Assigning Permissions feature with bin/cucumber features/assigning_permissions.feature, everything passes:
1 scenario (1 passed)
13 steps (13 passed)
Great! You created a way for admins to choose which users can see which projects through an interface of check boxes and confirmed that users can see the project they have access to and can’t see the projects they aren’t authorized to see. Let’s run all the tests with rake cucumber:ok spec to make sure everything is working:
41 scenarios (41 passed)
389 steps (389 passed)
# and
26 examples, 0 failures, 11 pending
All systems green! Let’s make a commit before you go any further:
git add .
git commit -m "Added permissions screen for admins"
Next, you implement this feature for the other permissions used.
8.8.2. And the rest
Now that you have the foundation in place for this check box screen, you can add the rest of the permissions you’ve implemented. The next permission you implemented after the restriction of read access was the restriction of write access, restricting which users could and couldn’t perform the new and create actions on TicketsController. With an interface in place for admins to assign permissions through the backend, you should ensure that they can assign the permission to create tickets and that users to whom they assign this permission can perform that action.
Creating Tickets
Open features/assigning_permissions.feature, and add the scenario shown in the following listing right under the scenario currently in this file.
Listing 8.19. features/assigning_permissions.feature
Scenario: Creating tickets for a project
  When I check "View" for "TextMate 2"
  When I check "Create tickets" for "TextMate 2"
  And I press "Update"
  And I follow "Sign out"

  Given I am signed in as "[email protected]"
  When I follow "TextMate 2"
  And I follow "New Ticket"
  And I fill in "Title" with "Shiny!"
  And I fill in "Description" with "Make it so!"
  And I press "Create"
  Then I should see "Ticket has been created."
Just as in your first scenario, you check the View check box for the project. Otherwise, the user wouldn’t be able to see the project where the new ticket link was. Then you check the Create Tickets check box, update the user’s permissions, and sign out. Next, you sign in as that user and make sure you can do what you just gave that user permission to do. When you run this feature with bin/cucumber features/assigning_permissions.feature, the first step fails because it can’t find the check box:
cannot check field, no checkbox with id, name,
or label 'permissions_1_create_tickets' found (Capybara::ElementNotFound)
Let’s add this check box then! Open app/helpers/admin/permissions_helper.rb, and add the permission to your hash, changing this method from
def permissions
  {
    "view" => "View"
  }
end
to
def permissions
  {
    "view" => "View",
    "create tickets" => "Create Tickets"
  }
end
Keep in mind that the key must match the intended action for the Permission object; the value is just a label for this permission. The action is what you use in your authorized? helpers around the application.
When you another key-value pair in this hash, the code inside app/views/admin/permissions/index.html.erb automatically shows a check box for this new permission. When you run this feature again, it passes because this new check box is visible and the permission is applied correctly:
2 scenarios (2 passed)
35 steps (35 passed)
Wasn’t that a piece of cake? Let’s move on to the next permission now: updating tickets. Actually, let’s do both updating tickets and deleting tickets at the same time.
The Double Whammy
Just to show the world how great you are at developing this application, you’ll now write two scenarios and get them both to pass at the same time. Add both of these scenarios to the end of features/assigning_permissions.feature, as shown in the following listing.
Listing 8.20. features/assigning_permissions.feature
Scenario: Updating a ticket for a project
  When I check "View" for "TextMate 2"
  And I check "Edit tickets" for "TextMate 2"
  And I press "Update"
  And I follow "Sign out"

  Given I am signed in as "[email protected]"
  When I follow "TextMate 2"
  And I follow "Shiny!"
  And I follow "Edit"
  And I fill in "Title" with "Really shiny!"
  And I press "Update Ticket"
  Then I should see "Ticket has been updated"

Scenario: Deleting a ticket for a project
  When I check "View" for "TextMate 2"
  And I check "Delete tickets" for "TextMate 2"
  And I press "Update"
  And I follow "Sign out"

  Given I am signed in as "[email protected]"
  When I follow "TextMate 2"
  And I follow "Shiny!"
  And I follow "Delete"
  Then I should see "Ticket has been deleted."
The scenarios should be descriptive enough to understand—no particular magic going on here. But you’re acting on a ticket in both these scenarios that doesn’t exist: the Shiny! ticket. You need to create this ticket in your Background if you want these scenarios to pass. Add this step definition right under the line in the Background that creates the TextMate 2 project, as shown next:
And "[email protected]" has created a ticket for this project:
  | title  | description       |
  | Shiny! | Eye-blindingly so |
Now when you run this feature, your two newest scenarios are failing, both with similar errors:
cannot check field, no checkbox with id, name,
or label 'permissions_1_update_tickets' found
# and
cannot check field, no checkbox with id, name,
or label 'permissions_1_delete_tickets' found
Of course! You have no check boxes for Capybara to check yet! Add them now by changing the permissions method in app/helper/admin/permissions_helper.rb from this
def permissions
  {
    "view" => "View",
    "create tickets" => "Create Tickets"
  }
end
def permissions
  {
    "view" => "View",
    "create tickets" => "Create Tickets",
    "edit tickets" => "Edit Tickets",
    "delete tickets" => "Delete Tickets"
  }
end
By adding these two permissions here, you display the check boxes that should make your scenarios all green. Let’s run the feature with bin/cucumber features/assigning_permissions.feature to find out:
4 scenarios (4 passed)
72 steps (72 passed)
How great are you? Two features with one blow. Awesome stuff.
That’s the final piece of the authorization puzzle. You now have a way for admins to assign permissions to users. But does everything work? Here’s hoping! Let’s run rake cucumber:ok spec:
44 scenarios (44 passed)
448 steps (448 passed)
# and
26 examples, 0 failures, 11 pending
Awesome! Let’s commit this:
git add .
git commit -m "Added creating, editing, updating and deleting
               tickets to assigning permissions interface"
git push
Although it’s great that you now have an interface for assigning permissions, you don’t have a way to do it without first having an admin user set up. You can set up an admin user manually through the console, or you can do it by creating seed data.
8.9. Seed data
Seed data is records created for the purpose of providing the minimal viable requirements to get an application running. Before Rails 2.2, many applications implemented such records through using plugins such as seed_fu, but since 2.2, seed data is built in.
Seed data allows you to create records for your application to provide a usable base if you or anybody else wants to get set up with the application quickly and easily. For your application’s seed data, you’ll create an admin user and an example project. From there, anybody using the admin user will be able to perform all the functions of the application.
Seed data lives under db/seeds.rb, and you can run this file by running rake db:seed. The code for this rake task is this:
load Rails.root + "db/seeds.rb"
The load method works in a similar fashion to require, loading and executing the code inside the file. One difference, however, is that load expects the given string (or Pathname) to be the full path, with the extension, to the file.
First write a feature to ensure that when the seed data is loaded, you can sign in with the email [email protected] and the password password and you can get to the TicketeeBeta project. Put this feature in features/seed.feature, and write it as shown in the following listing.
Listing 8.21. features/seed.feature
Feature: Seed Data
  In order to fill the database with the basics
  As the system
  I want to run the seed task

  Scenario: The basics
    Given I have run the seed task
    And I am signed in as "[email protected]"
    Then I should see "Ticketee Beta"
It’s a pretty basic feature, but your seed file will be equally basic. Before you create it, however, you should define the first step of this scenario. You can get the definition for this step by running bin/cucumber features/seed.feature. The step definition looks like this:
Given /^I have run the seed task$/ do
  pending # express the regexp above with the code you wish you had
end
Put this step definition in a new file called features/step_definitions/application_steps.rb because it doesn’t really tie in with the other step files you’ve defined. If you have more steps like this, you can put them into this file later too. The code for this file is simple:
Given /^I have run the seed task$/ do
  load Rails.root + "db/seeds.rb"
end
Now when you run your feature again, it can’t find the user your seed data is supposed to create:
And I am signed in as "[email protected]" Couldn't find User with email = [email protected]
It can’t find this user because you haven’t yet created one for this scenario. This user should be created by the db/seeds.rbfile. Open this file now, and add a couple of lines to create this user, set the user up as an admin, and confirm the user, as shown in the following listing.
Listing 8.22. db/seeds.rb
admin_user = User.create(:email => "[email protected]",
                         :password => "password")
admin_user.admin = true
admin_user.confirm!
Now run bin/cucumber features/seed.feature to ensure that you can sign in as this user. If you can, you should see the step passing and the next step failing:
And I am signed in as "[email protected]"
Then I should see "Ticketee Beta"
  Failed assertion, no message given. (MiniTest::Assertion)
To get this last step of the scenario to pass, you must add the project to db/seeds.rb by putting this line in there:
Project.create(:name => "Ticketee Beta")
Your entire seeds file should look like the following listing.
Listing 8.23. db/seeds.rb
admin_user = User.create(:email => "[email protected]",
                         :password => "password")
admin_user.admin = true
admin_user.confirm!

Project.create(:name => "Ticketee Beta")
This is all you need to get this feature to pass. Let’s run it now with bin/cucumber features/seed.feature to make sure:
1 scenario (1 passed)
3 steps (3 passed)
Great! With this seeds file, you now have data to put in the database so you can bootstrap your application. Let’s run rake db:seed to load this data. Start your application’s server by typing rails server into a terminal, and then go to your server at http://localhost:3000 in your browser. Sign in as the admin user using the same email and password you set up in your seeds file. You should see the display shown in figure 8.6.
Figure 8.6. What admins see
When you’re signed in as a user, you should be able to do everything from creating a new ticket to creating a new user and setting up user permissions. Go ahead and play around with what you’ve created so far.
When you’re done playing, run rake cucumber:ok spec for the final time this chapter:
45 scenarios (45 passed)
451 steps (451 passed)
# and
26 examples, 0 failures, 11 pending
Everything’s still green, which means it’s time for another commit:
git add .
git commit -m "Added a seeds file"
git push
Now you’re done!
8.10. Summary
This chapter covered implementing authorization for your application and setting up a permissions-based system for both the ProjectsController and TicketsController.
You started with a Permission model, which you used in a scope on the Project model to show only the projects a user should be able to access. Then you used the CanCan plugin, which provided the can? and cannot? methods to use first in the controllers to stop users from accessing specified actions and then in the views, through the authorized? method, to stop users from seeing specified links.
You implemented a way for admins to change the permissions of a user through the admin backend of the system by displaying a series of check boxes. Here you used an update action that wasn’t quite like the normal update action, and you had to define a custom-named route for it.
Finally, you learned how to set up seed data for your application so you have a solid base of objects to work from. Without using seed data, you’d have to manually set up the data not only for your local development environment but also for your production server, which can be tedious. Seed data saves you that effort. You also wrote a test for this data in the form of a feature that ensures the data from the seed file is always created when the seed task is run.
In chapter 9, you learn how to attach files to tickets. File uploading is an essential part of any ticket-tracking application because files can provide that additional piece of context required for a ticket, such as a screenshot, a patch, or any type of file. You also learn about restricting the availability of these files on the basis of users’ permissions.