
Chapter 9. File uploading
- Uploading files to the app
- Locking down file access based on declared permissions
- Uploading multiple files using JavaScript, jQuery, and CoffeeScript
In chapter 9, you learned how to restrict access to specific actions in your application, such as viewing projects and creating tickets, by defining a Permission model that keeps track of which users have access to which actions.
Ticketee’s getting pretty useful now. This chapter focuses on file uploading, the next logical step in a ticket-tracking application. Sometimes, when people file a ticket on an application such as Ticketee, they want to attach a file to provide more information for that ticket, because words alone can only describe so much. For example, a ticket description saying, “This button should move up a bit,” could be better explained with a picture showing where the button is now and where it should be. Users may want to attach any kind of file: a picture, a crash log, a text file, you name it. Currently, Ticketee has no way to attach files to the ticket: people would have to upload them elsewhere and then include a link with their ticket description.
By providing Ticketee the functionality to attach files to the ticket, you provide the project owners a useful context that will help them more easily understand what the ticket creator means. Luckily, there’s a gem called Paperclip that allows you to implement this feature easily.
Once you’re familiar with Paperclip, you’ll change your application to accept multiple files attached to the same ticket using a JavaScript library called Prototype (which comes with Rails) and some custom JavaScript code of your own. Because you’re using JavaScript, you have to alter the way you test parts of your application. To test JavaScript functionality, you’ll be using WebDriver,[1] which is a framework built for automatic control of web browsers. WebDriver is especially useful because you can use the same steps you use for standard Cucumber and Capybara tests and because Capybara will take care of driving the browser. By running the tests inside the browser, you ensure the JavaScript on the page will be executed, and then you can run the tests on the results. Pretty handy!
1 There’s a great post explaining WebDriver on the Google Open Source blog: http://google-opensource.blogspot.com/2009/05/introducing-webdriver.html.
Finally, you’ll see how you can restrict access to the files contained within the projects of your application so that confidential information isn’t shared with people who don’t have access to a particular project.
File uploading is also useful in other types of applications. Suppose you wrote a Rails application for a book. You could upload the chapters to this application, and then people could provide notes on those chapters. Another example is a photo gallery application that allows you to upload images of your favorite cars for people to vote on. File uploading has many different uses and is a cornerstone of many Rails applications.
9.1. Attaching a file
You start off by letting users attach files when they begin creating a ticket. As explained before, files attached to tickets can provide useful context as to what feature a user is requesting or can point out a specific bug. A picture is worth a thousand words, as they say. It doesn’t have to be an image; it can be any type of file. This kind of context is key to solving tickets.
To provide this functionality, you must add a file-upload box to the new ticket page, which allows users to select a file to upload. When the form is submitted, the file is submitted along with it. You use the Paperclip gem to store the file inside your application’s directory.
9.1.1. A feature featuring files
You first need to write a scenario to make sure the functionality works. This scenario shows you how to deal with file uploads when creating a ticket. Users should be able to create a ticket, select a file, and upload it. Then they should be able see this file, along with the other ticket details, on the ticket’s page. They may choose to click the filename, which would download the file. Let’s test all this by adding a scenario at the bottom of features/creating_tickets.feature that creates a ticket with an attachment,[2] as shown in the following listing.
2 Please note that although the blink tag was once a part of HTML, it should never be used. Same goes for the marquee tag.
Listing 9.1. features/creating_tickets.feature

In this feature you introduce a new concept: the Attach the File step ![]() of this scenario, which attaches the file found at the specified path to the specified field. The path here is deliberately
in the spec/fixtures directory because you may use this file for functional tests later. This directory would usually be used
for test fixtures, except that at the moment, you don’t have any.[3] Create the spec/fixtures/speed.txt file now, and fill it with some random filler text like this:
of this scenario, which attaches the file found at the specified path to the specified field. The path here is deliberately
in the spec/fixtures directory because you may use this file for functional tests later. This directory would usually be used
for test fixtures, except that at the moment, you don’t have any.[3] Create the spec/fixtures/speed.txt file now, and fill it with some random filler text like this:
3 Nor will you ever, as factories replace them in your application.
The blink tag can blink faster if you use the speed="hyper" attribute.
Try running this feature using bin/cucumber features/creating_tickets.feature :37 and see how far you get. It fails on the attaching step because the File field isn’t yet available:
And I attach the file "spec/fixtures/speed.txt" to "File"
  cannot attach file, no file field with id, name,
  or label 'File' found (Capybara::ElementNotFound)
Add the File field to the ticket form partial directly underneath the p tag for the description field using the code in the following listing.
Listing 9.2. app/views/tickets/_form.html.erb
<p>
  <%= f.label :asset, "File" %>
  <%= f.file_field :asset %>
</p>
You call this field asset internally, but the user will see File. The reason for this is explained a little later.
In earlier versions of Rails, you were required to specify that this form is multipart. A multipart form should be used for any HTML form that contains a file-upload field. In earlier versions, if you didn’t enable this form setting, you’d only get the filename from the field rather than the file itself. In Rails 3.1, you don’t need to do this because it’s done automatically if the form uses the file_field. But it’s preferable to indicate that the form is multipart anyway, so you should do this now by changing the form_for line in app/views/tickets/_form.html.erb from this
<%= form_for [@project, @ticket] do |f| %>
to this:
<%= form_for [@project, @ticket], :html => { :multipart => true } do |f| %>
Now we come to a very interesting point in implementing file uploading. When you run bin/cucumber features/creating_tickets.feature, all of the scenarios are broken and all for the same reason:
And I press "Create Ticket"
  unknown attribute: asset (ActiveRecord::UnknownAttributeError)
Because you added this file_field, the create action’s code dutifully tries to assign it as an attribute, only to find that it’s not defined and so causes this error. Rather than running a migration to add an attribute by this name, you use the Paperclip gem to handle it.
9.1.2. Enter stage right, Paperclip
Just as you would use a normal paperclip to attach paper files together, in your application you use the Paperclip gem to provide the attachment functionality you need for tickets. This gem was created by thoughtbot,[4] which has a whole slew of other useful gems, such as Hoptoad.[5]
5 For a full list of thoughtbot’s gems, see its GitHub page: http://github.com/thoughtbot.
To install Paperclip, you need to add a line to the Gemfile to tell Bundler that you want to use this gem. Put this underneath the line specifying the CanCan gem, separated by a line because it’s a different type of gem (CanCan has to do with users, paperclip has to do with files):
gem 'cancan'

gem 'paperclip'
Next, you must run bundle install to install this gem.
With Paperclip now installed, you can work on defining the asset attribute that your model wants. It’s not really an attribute; the error message is misleading in that respect. All it needs is a setter method (asset=) and it would be happy. But you need this method to do more than set an attribute on this object; you need it to accept the uploaded file and store it locally. Paperclip lets you define this fairly easily with its has_attached_file method. This method goes in the Ticket model, defines the setter method you need, and gives four application the ability to accept and process this file. Add it to your Ticket model with this line:
has_attached_file :asset
Now this asset= method is defined, but it’s not yet over!
9.1.3. Using Paperclip
When you run bin/cucumber features/creating_tickets.feature again, you’re told your model is missing one more thing:
When I press "Create Ticket"
  Ticket model missing required attr_accessor
  for 'asset_file_name' (Paperclip::PaperclipError)
attr_accessor references a Ruby method that defines a setter and a getter method named after its arguments, such as in the following listing.
Listing 9.3. attr_accessor example
attr_accessor :foo

# is the same as...

def foo
  @foo
end

def foo=(value)
  @foo = value
end
These getter and setter methods are defined automatically by Active Model for the fields in your database. Paperclip wants the asset_file_name method defined on your Ticket instance’s method. asset_file_name is one of four methods used by Paperclip to track details about the file. The other methods are asset_content_type, asset_file_size, and asset_updated_at. To define the asset_file_name method and its siblings, create a migration that adds them as attributes of the Ticket model by running this command:
rails g paperclip ticket asset
This paperclip generator (provided by the Paperclip gem) adds the proper fields to your tickets table. You tell it you want the attachment to be called asset.
By running this command, you get a new file in db/migrate that ends with_add_attachment_asset_to_ticket.rb. If you open this file now, you should see a prefilled migration, as shown in the following listing.
Listing 9.4. db/migrate/[time]_add_attachment_asset_to_ticket.rb
class AddAttachmentAssetToTicket < ActiveRecord::Migration
  def self.up
    add_column :tickets, :asset_file_name, :string
    add_column :tickets, :asset_content_type, :string
    add_column :tickets, :asset_file_size, :integer
    add_column :tickets, :asset_updated_at, :datetime
  end

  def self.down
    remove_column :tickets, :asset_file_name
    remove_column :tickets, :asset_content_type
    remove_column :tickets, :asset_file_size
    remove_column :tickets, :asset_updated_at
  end
end
Remember that you call the field asset internally, but to the user, it’s called File? This column-naming convention is the reason for the different names. To ease confusion for people working on the application (you!), you call these fields with the asset prefix so that the column names are asset_file_name and not file_file_name. There’s also another reason, which is explained in section 9.2.
To add these columns to your development environment’s database, run rake db:migrate. Then run rake db:test:prepare to add them to your test environment’s database. If you run the feature with bin/cucumber features/creating_tickets.feature, all the scenarios that were previously passing are still passing. But the scenario you just added fails with this error:
Then I should see "speed.txt" within "#ticket .asset"
You can see that the scenario failed because Capybara can’t find the text within this element on the TicketsController’s show page: this text and this element don’t exist! You need to add at least the filename for your scenario to pass, so add it underneath the spot in the show view where you currently have the following:
Created by <%= @ticket.user.email %>
<%= simple_format(@ticket.description) %>
You must also wrap all the code in this view inside a div tag with the id attribute ticket and spice it up a little by adding the content type and file size there too, as shown in the following listing.
Listing 9.5. app/views/tickets/show.html.erb
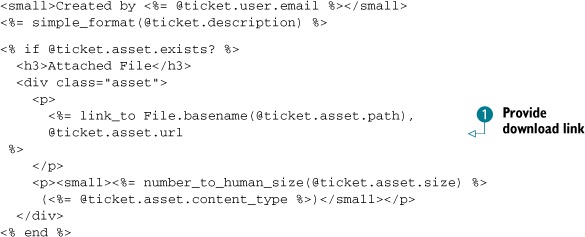
Here you use the exists? method defined on the asset method (which was defined by Paperclip and returns a Paperclip::Attachment object); the exists? method returns true if the file exists. You use it because you don’t want it trying to display the path or any other information of a file when there isn’t one.
You use the url ![]() method here with link_to to provide the user with a link to download[6] this file. In this case, the URL for this file would be something like http://localhost:3000/system/assets/1/original/file.txt.
method here with link_to to provide the user with a link to download[6] this file. In this case, the URL for this file would be something like http://localhost:3000/system/assets/1/original/file.txt.
6 Some browsers open certain files as pages rather than downloading them. Modern browsers do so for .txt files and the like.
Where is this system route defined? Well, it’s not a route. It’s actually a directory inside the public folder of your application where Paperclip saves your files.
Requests to files from the public directory are handled by the server rather than by Rails, and anybody who enters the URL in their browser can access them. This is bad because the files in a project should be visible only to authorized users. You’ll handle that problem a little later in the chapter.
Underneath the filename, you display the size of the file, which is stored in the database as the number of bytes. To convert it to a human-readable output (such as “71 Bytes,” which will be displayed for your file), you use the number_to_human_size Action View helper.
With the file’s information now being output in app/views/tickets/show.html.erb, this feature passes when you run bin/cucumber features/creating_tickets.feature:
4 scenarios (4 passed)
52 steps (52 passed)
Awesome! Your files are being uploaded and taken care of by Paperclip, which stores them at public/system/assets. Let’s see if your changes have brought destruction or salvation by running rake cucumber:ok spec:
46 scenarios (46 passed)
466 steps (466 passed)
# and
26 examples, 0 failures, 11 pending
What I will say when I get through this book! Let’s commit but not push this just yet:
git add .
git commit -m "Added the ability to attach a file to a ticket"
Have a look at the commit output. It contains this line:
create mode 100644 public/system/assets/1/original/speed.txt
This line is a leftover file from your test and shouldn’t be committed to the repository because you could be testing using files much larger than this. You can tell Git to ignore the entire public/system directory by adding it to the .gitignore file. Open that file now and add this line to the bottom:
public/system
This file tells Git which files you don’t want versioned. The whole file should look like this now:
.bundle
db/*.sqlite3
log/*.log
tmp/**/*
public/system
By default, the .bundle directory (for Bundler’s configuration), the SQLite3 databases, the logs for the application, and any files in tmp are ignored. With public/system added, this directory is now ignored by Git too. You should also remove this directory from your latest commit, and thankfully, Git provides a way to do so by using these two commands:
git rm public/system/assets/1/original/speed.txt
git commit --amend -m "Added the ability to attach a file to a ticket"
The first command removes the file from the filesystem and tells Git to remove it from the repository. The second command amends your latest commit to exclude this file, and it will be as if your first commit with this message never existed. Let’s push this change:
git push
Great! Now you can attach a file to a ticket. There’s still some work to do, however. What would happen if somebody wanted to add more than one file to a ticket? Let’s take a look at how to do that.
9.2. Attaching many files
You have an interface for attaching a single file to a ticket but no way for a user to attach more than one. Let’s imagine your pretend client asked you to boost the number of file-input fields on this page to three.
If you’re going to add these three file-input fields to your view, you need some more fields in your database to handle them. You could define four fields for each file-upload field, but a much better way to handle this is to add another model.
Creating another model gives you the advantage of being able to scale it to not just three file-input fields but more if you ever need them. Call this model Asset, after the name you gave to the has_attached_file in the Ticket model.
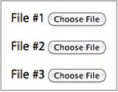
When you’re done with this feature, you should see three file-upload fields as shown in figure 9.1.
Figure 9.1. File-upload boxes
You can create new instances of this model through the ticket form by using nested attributes. Nested attributes have been a feature of Rails since version 2.3, and they allow the attributes of an association to be passed from the creation or update of a particular resource. In this case, you’ll be passing nested attributes for new asset objects while creating a new Ticket model. The best part is that the code to do all of this remains the same in the controller.
You need to modify the scenario for creating a ticket with an attachment in your Creating Tickets feature so it uploads two additional files.
9.2.1. Two more files
Let’s take the scenario for creating a ticket with an attachment from features/creating_tickets.feature and add these two additional file upload fields so the entire scenario looks like the following listing.
Listing 9.6. File attachment scenario, features/creating_tickets.feature
Scenario: Creating a ticket with an attachment
  When I fill in "Title" with "Add documentation for blink tag"
  And I fill in "Description" with "The blink tag has an undocumented
        speed attribute"
  And I attach the file "spec/fixtures/speed.txt" to "File #1"
  And I attach the file "spec/fixtures/spin.txt" to "File #2"
  And I attach the file "spec/fixtures/gradient.txt" to "File #3"
  And I press "Create Ticket"
  Then I should see "Ticket has been  created."
  And I should see "speed.txt" within "#ticket .assets"
  And I should see "spin.txt" within "#ticket .assets"
  And I should see "gradient.txt" within "#ticket .assets"
speed attribute"
And I attach the file "spec/fixtures/speed.txt" to "File #1"
And I attach the file "spec/fixtures/spin.txt" to "File #2"
And I attach the file "spec/fixtures/gradient.txt" to "File #3"
And I press "Create Ticket"
Then I should see "Ticket has been created."
And I should see "speed.txt" within "#ticket .assets"
And I should see "spin.txt" within "#ticket .assets"
And I should see "gradient.txt" within "#ticket .assets"
In this scenario, you attach three files to your ticket and assert that you see them within the assets element, which was previously called #ticket .asset but now has the pluralized name of #ticket .assets.
You download only the one file here and check for the content. It’s not at all likely that the other two files wouldn’t work in the same way given that they’re interpreted and rendered identically.
Now run this single scenario using bin/cucumber features/creating_tickets.feature:36. It should fail on the first Attach the File step, because you renamed the label of this field:
And I attach the file "spec/fixtures/speed.txt" to "File #1"
  cannot attach file, no file field with id, name,
  or label 'File #1' found (Capybara::ElementNotFound)
To get this step to pass, you can change the label on the field in app/views/tickets/_form.html.erb to "File #1":
<p>
  <%= f.label :asset, "File #1" %>
  <%= f.file_field :asset %>
</p>
While you’re changing things, you may as well change app/views/tickets/show.html.erb to reflect these latest developments. First, change the if around the asset field to use the assets method, because it’ll need to check the assets of a ticket rather than the asset. You also need to change the h3 that currently reads Attached File so it reads Attached Files because there’s more than one file. You should also change the div that encapsulates your assets to have the class attribute of assets. These three changes mean that you now have these three lines in app/views/tickets/show.html.erb:
<% if @ticket.assets.exists? %>
  <h3>Attached Files</h3>
  <div class="assets">
When you call exists? this time, it calls the ActiveRecord::Base association method, which checks if there are any assets on a ticket and returns true if there are. Although assets isn’t yet defined, you can probably guess what you’re about to do.
First, though, you need to change the lines underneath the ones you just changed to the following:
<% @ticket.assets.each do |asset| %>
  <p>
    <%= link_to File.basename(asset.asset_file_name), asset.asset.url %>
  </p>
  <p>
    <small><%= number_to_human_size(asset.asset.size) %></small>
  </p>
<% end %>
Here you switch to using the assets method and iterate through each element in the array, rendering the same output as you did when you had a single asset.
All of these changes combined will help your scenario pass, which is a great thing. When you run this scenario again, the first file field step passes, but the second fails:
And I attach the file "spec/fixtures/speed.txt" to "File #1"
And I attach the file "spec/fixtures/spin.txt" to "File #2"
  cannot attach file, no file field with id, name,
  or label 'File #2' found (Capybara::ElementNotFound)
You could add another field:
<p>
   <%= f.label :asset_2, "File #2" %>
   <%= f.file_field :asset_2 %>
 </p>
But that’s a messy way of going about it. The best way to handle this problem is through an associated model, a has_many association, and by using nested attributes. To use nested attributes in the view, you use the fields_for helper. This helper defines the fields for an association’s records, as many as you like. Let’s remove the file field completely and replace it with this:

Directly before the fields_for call, you set a local variable called number, which is incremented whenever you render a label ![]() .
.
You use fields_for much in the same way you use form_for. You call fields_for on the f block variable from form_for, which tells it you want to define nested fields inside this original form. The argument to fields_for—:assets ![]() —tells Rails the name of the nested fields.
—tells Rails the name of the nested fields.
The file field inside this fields_for now has the name attribute of ticket[assets][asset] rather than simply ticket[asset], meaning it will be available in the controller as params[:ticket][:assets][:asset].
When you run this scenario with bin/cucumber features creating_tickets.feature:36, it now fails because it still can’t find the second file-upload field:
And I attach the file "spec/fixtures/spin.txt" to "File #2"
  cannot attach file, no file field with id, name,
  or label 'File #2' found (Capybara::ElementNotFound)
To make this appear, you must define an assets association in your Ticket model so the fields_for in your view will provide file_fields for three new Asset objects. If this method is available and you’ve declared that your model accepts nested attributes for this association, fields_for iterates through the output from this method and renders the fields from fields_for for each element.
You can define this assets method by defining a has_many association in your Ticket model:
has_many :assets
Underneath this has_many, you also define that a Ticket model accepts nested attributes for assets by using accepts_nested_attributes_for:
accepts_nested_attributes_for :assets
This little helper tells your model to accept asset attributes along with ticket attributes whenever you call methods like new, build, and update. It has the added bonus of switching how fields_for performs in your form, making it reference the association and calling the attributes it defines assets_attributes rather than assets.
When you run the scenario with bin/cucumber features/creating_tickets.feature:38, you see again that the Asset is not defined:
And I follow "New Ticket"
  uninitialized constant Ticket::Asset (ActionView::Template::Error)
You’d best get onto that then!
9.2.2. Using nested attributes
You used the term Asset rather than File throughout this application because of this model. You can’t define a File model because there’s already a File class in Ruby. Asset is an alternative name you can use. To define this Asset constant in your application, you can run the model generator:
rails g model asset
Each record for this model refers to a single file that has been uploaded to a ticket. Therefore, each record in the assets table must have the same asset_* fields that each tickets record currently has. Storing the asset references in the assets table now makes the references in the tickets table irrelevant, so you should remove them. You should also add a relationship between the asset records and the ticket records by adding a ticket_id field to the assets table. Open the migration this generates, and change it to the following listing to reflect these ideas.
Listing 9.7. db/migrate/[date]_create_assets.rb
class CreateAssets < ActiveRecord::Migration
  def change
    create_table :assets do |t|
      t.string :asset_file_name
      t.integer :asset_file_size
      t.string :asset_content_type
      t.datetime :asset_updated_at
      t.integer :ticket_id

      t.timestamps
    end

    [:asset_file_name,
     :asset_file_size,
     :asset_content_type,
     :asset_updated_at].each do |column|
      remove_column :tickets, column
    end
  end
end
Run this migration with rake db:migrate to migrate your development environment’s database, and then run rake db:test:prepare to migrate the test environment’s database. When you run the feature again with bin/cucumber features/creating_tickets.feature:36, your File #1 field is once again missing:
And I attach the file "spec/fixtures/speed.txt" to "File #1"
  cannot attach file, no file field with id, name,
  or label 'File #1' found (Capybara::ElementNotFound)
You’ve gone backward! Or so it seems.
As mentioned earlier, fields_for detects that the assets method is defined on your Ticket object and then iterates through each object in this collection while rendering the fields inside fields_for for each. When you create a new ticket in TicketsController’s new action, however, you don’t initialize any assets for this ticket, so assets returns an empty array and no fields at all are displayed.
To get this action to render three file input fields, you must initialize three Asset objects associated to the Ticket object the form uses. Change your new action inside TicketsController to this:
def new
  @ticket = @project.tickets.build
  3.times { @ticket.assets.build }
end
The final line of this action calls @ticket.assets.build three times, which creates the three Asset objects you need for your fields_for.
When you run the scenario again, the three fields are available, but the scenario now fails because it can’t find a file to upload:
And I attach the file "spec/fixtures/speed.txt" to "File #1"
And I attach the file "spec/fixtures/spin.txt" to "File #2"
And I attach the file "spec/fixtures/gradient.txt" to "File #3"
And I press "Create Ticket"
  /home/you/ticketee/spec/fixtures/
     spin.txt file does not exist (RuntimeError)
Create this spin.txt file now inside the spec/fixtures directory, and give it the following content:
Spinning blink tags have a 200% higher click rate!
You also need to add the gradient.txt file to the same directory, and it contains this:
Everything looks better with a gradient!
These two text pieces are random filler meant only to provide some text if you ever need to reference it. Let’s run the scenario again:
And I press "Create Ticket"
  unknown attribute: asset (ActiveRecord::UnknownAttributeError)
You got this message earlier when you were implementing single-file uploading because you didn’t define has_attached_file on the Ticket class. Let’s get more backtrace for this error by using the -b switch at the end of the command: bin/cucumber features/creating_tickets.feature:36 -b. This command provides the whole backtrace for an error. In this particular backtrace, you’re after anything to do with assets, because that’s the only thing that’s changed since this feature was passing. You should see a line like the following about 10 lines down:
.../active_record/nested_attributes.rb:254:in 'assets_attributes='
This line indicates that the failure most likely has to do with the assets_attributes= method, which was kindly enough provided by Rails through the call to accepts_nested_attributes_for. If this error occurs after the assets_attributes= method, then it definitely has to do with this method. In fact, it’s probably because you haven’t yet defined the has_attached_file in the Asset model, right? Yup, you should do that!
Open app/models/asset.rb, and add this line:
has_attached_file :asset
Remove the same line from app/models/ticket.rb because you no longer need it. Having this has_attached_file defined in the Asset model is probably all you need. You’ve had all three file fields displaying, and now you’ve got your Asset model set up to receive these files. When you run the scenario again using bin/cucumber features /creating_tickets.feature:38, it all passes:
1 scenario (1 passed)
18 steps (18 passed)
Hooray, the scenario passed! In this section, you set up the form that creates new Ticket objects to also create three associated Asset objects by using nested attributes. This process was made possible by moving the responsibility of handling file uploads out of the Ticket model and into the associated Asset model.
Let’s ensure that nothing is broken by running rake cucumber:ok spec:
46 scenarios (46 passed)
470 steps (470 passed)
# and
21 examples, 0 failures, 4 pending
Awesome, let’s commit and push this:
git add .
git commit -m "Users can now upload 3 files at a time"
git push
Great. You’re done with nested attributes! Earlier, it was mentioned that the files uploaded to your application are publicly available for anybody to access because these files are in the public directory. Any file in the public directory is served up automatically by any Rails server, bypassing all the authentication and authorization in your application. This is a bad thing. What if one of the projects in your application has files that should be accessed only by authorized users?
9.3. Serving files through a controller
You can solve this issue by serving the uploaded files through a controller for your application. Using a before_filter similar to the one you used previously in the TicketsController, this controller will check that the user attempting to access a file has permission to access that particular project.
When you implemented permission behavior before, you ensured that any unauthorized user would be blocked from accessing the resource you were trying to protect by writing a controller spec. You write this same kind of spec test for serving files.
9.3.1. Protecting files
You first need to generate the controller through which you’ll serve the assets. Call it files, because assets is already reserved by Sprockets:
rails g controller files
Now write a spec to ensure that unauthorized users can’t see the files inside it. For this spec test, you must create two users, a project, a ticket, and an asset. The first user should have permission to read this project, and the second user shouldn’t.
Open spec/controllers/files_controller_spec.rb, and add let definitions that set up your users, project, ticket, and asset inside the describe for FilesController, as shown in the following listing.
Listing 9.8. spec/controllers/files_controller_spec.rb
describe FilesController do
  let(:project) { Factory(:project) }
  let(:ticket) { Factory(:ticket, :project => project) }
  let(:good_user) { create_user! }
  let(:bad_user) { create_user! }

  let(:path) { Rails.root + "spec/fixtures/speed.txt" }
  let(:asset) do
    ticket.assets.create(:asset => File.open(path))
  end

  before do
    good_user.permissions.create!(:action => "view",
                                  :thing => project)
  end
end
You used a let for setting up a project, two users, a ticket for this project, a path to the file that’s served from the controller, and the asset for the ticket. This is the asset you’ll be serving from the controller for this spec test.
You set up the permission in a before block because you won’t be referencing it anywhere in your tests, so having it as a let block wouldn’t work. You should use let blocks only when you’re going to be referencing them inside your tests. If you need code set up beforehand, you should use a before block instead.
To serve the files from this controller, use the show action, using the id parameter to find the asset the user is requesting. When the application finds this asset, you want it to check that the user requesting the asset has permission to read the project this asset links to. The good_user object should be able to, and the bad_user object shouldn’t. Now add the spec to test the good_user’s ability to download this asset by using the code from the following listing.
Listing 9.9. spec/controllers/assets_controller_spec.rb
context "users with access" do

   before do
    sign_in(:user, good_user)
  end

  it "can access assets in a project" do
    get 'show', :id => asset.id
    response.body.should eql(File.read(path))
  end
end
If you’re using Windows you may have to do this on the response.body line instead, because the line breaks on Windows are slightly different:
response.body.gsub!(/
?/, "
").should eql(File.read(path))
In this example, you sign in as the good_user by using another before block. Then you assert that when this user attempts to get this asset through the show action, the user should receive it as a response. Write another context and spec for the bad_user too, as shown in the following listing.
Listing 9.10. spec/controllers/assets_controller_spec.rb
context "users without access" do
  before do
    sign_in(:user, bad_user)
  end

  it "cannot access assets in this project" do
    get 'show', :id => asset.id
    response.should redirect_to(root_path)
    flash[:alert].should eql("The asset you were looking for
  could not be found.")
  end
end
Here you sign in as the bad_user and then deny all knowledge of the asset’s existence by redirecting to root and displaying an alert flash message. Let’s run these specs now with bin/rspec spec/controllers/assets_controller_spec.rb. Both examples complain:
The action 'show' could not be found for FilesController
Well, that’s no good. Now you need to define this show action.
9.3.2. Showing your assets
Open your FilesController file and define the show action, along with a before_filter to set the current_user variable, which you’ll need for permission checking. This code is shown in the following listing.
Listing 9.11. app/controllers/files_controller.rb
class FilesController < ApplicationController
  before_filter :authenticate_user!
  def show
    asset = Asset.find(params[:id])
    send_file asset.asset.path, :filename     => asset.asset_file_name,
                                :content_type => asset.asset_content_type
  end
end
In this action, you find the Asset object by using the params[:id] the action receives. Then you use the asset object in combination with the send_file method to send the file back as a response rather than a view in your application.
The first argument for send_file is the path to the file you’re sending. The next argument is an options hash used to pass in the filename and content_type options so the browser receiving the file knows what to call it and what type of file it is.
To route requests to this controller, you need to define a route in your config/routes.rb file, which you can do with this line:
resources :files
When you run the specs for this controller again using bin/rspec spec/controllers/files_controller_spec.rb, the first spec passes, but the second one fails:
FilesController users without access cannot access assets in this project
 ...
Expected response to be a <:redirect>, but was <200>.
The show action doesn’t redirect as this example expects because you’re not doing any permission checking in your action, which is what this example is all about: “users without access cannot access assets in this project.” To fix this problem, check that the user has permission to access this asset’s project by using the CanCan helpers you used in chapter 8. You can use them in your show action now, as shown in the following listing.
Listing 9.12. app/controllers/files_controller.rb
def show
  asset = Asset.find(params[:id])
  if can?(:view, asset.ticket.project)
    send_file asset.asset.path, :filename     => asset.asset_file_name,
                                :content_type => asset.asset_content_type
  else
    flash[:alert] = "The asset you were looking for could not be found."
    redirect_to root_path
  end
end
Now when you rerun these specs, you’re missing a method:
undefined method 'ticket' for #<Asset:0x000001043d1e18>
This method is a simple belongs_to, which you must define inside the Asset model:
belongs_to :ticket
When you rerun your specs, they both pass because the authorized user (good_user) can get a file and the unauthorized user (bad_user) can’t:
2 examples, 0 failures
Great! Now you’ve begun to serve the files from FilesController to only people who have access to the asset’s relative projects. There’s one problem, though: all users can still access these files without having to go through the FilesController.
9.3.3. Public assets
People can still get to your files as long as they have the link provided to them because the files are still stored in the public folder. Let’s see how this is possible by starting up the server using rails server, signing in, and creating a ticket. Upload the spec/fixtures/spin.txt file as the only file attached to this ticket. You should see a ticket like the one in figure 9.2.
Figure 9.2. A ticket with spin!
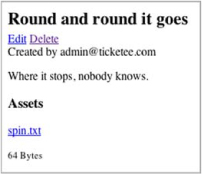
Hover over the spin.txt link on this page, and you’ll see a link like this:
http://localhost:3000/system/assets/5/original/spin.txt?1282564953
As you saw earlier in this chapter, this link is a route not to a controller in your application but to a file inside the public directory. Any file in the public directory is accessible to the public. Sensible naming schemes rock!
If you copy the link to this file, sign out, and then paste the link into your browser window, you can still access it. These files need to be protected, and you can do that by moving them out of the public directory and into another directory at the root of your application called files. You should create this directory now.
9.3.4. Privatizing assets
You can make these files private by storing them in the files folder. You don’t have to move them there manually: you can tell Paperclip to put them there by default by passing the :path option to has_attached_file in app/models/asset.rb like this:
has_attached_file :asset, :path => (Rails.root + "files/:id").to_s
Now try creating another ticket and attaching the spec/fixtures/spin.txt file. This time when you use the link to access the file, you’re told there’s no route. This is shown in figure 9.3.
Figure 9.3. No route!
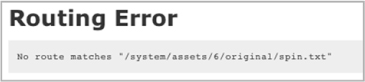
The URL generated for this file is incorrect because Paperclip automatically assumes all files are kept in the public folder. Because you changed the path of where the files are kept, the URL is out of sync. You should now tell Paperclip the new URL for your files, which is the URL for the show action for the FilesController:
has_attached_file :asset, :path => (Rails.root + "files/:id").to_s,
                          :url => "/files/:id"
A great test to see if you can still see assets after this change is to run the scenario from features/creating_tickets.feature, which creates a ticket with three attachments and then opens one of them. Run bin/cucumber features/creating_tickets.feature :38 to see if this still works:
1 scenario (1 passed)
18 steps (18 passed)
Great! With this feature still passing, the files are being served through the FilesController controller correctly. You’re done with implementing the functionality to protect assets from unauthorized access, so you should commit. First ensure that nothing is broken by running rake cucumber:ok spec:
44 scenarios (44 passed)
508 steps (508 passed)
# and
22 examples, 0 failures, 5 pending
It’s great to see everything is still in working order. Now commit and push your changes:
git add .
git commit -m "Assets are now strictly served through FilesController"
git push
By serving these files through the FilesController, you can provide a level of control over who can see them and who can’t by allowing only those who have access to the asset’s project to have access to the asset.
Inevitably, somebody’s going to want to attach more than three files to a ticket, and then what? Well, you could add more fields until people stop asking for them, or you could be lazy and code a solution to save time. This solution entails putting an Add Another File link underneath the final file field in your form that, when clicked, adds another file field. Users should be able to continue to do this ad infinitum. How do you implement this?
You use JavaScript. That’s how.
9.4. Using JavaScript
You started this chapter with only one file field and then moved to three after you realized users may want to upload more than one file to your application. Although having three fields suits the purposes of many users, others may wish to upload yet more files.
You could keep adding file fields until all the users are satisfied, or you could be sensible about it and switch back to using one field and, directly underneath it, providing a link that, when clicked, adds another file field. Using this solution, you also clean up your UI a bit by removing possible extra file fields yet still allowing users to attach as many files as they like. This is where JavaScript comes in.
When you introduce JavaScript into your application, you have to run any scenarios that rely on it through another piece of software called WebDriver. WebDriver is a browser driver, which was installed when the Capybara gem was installed, so you don’t have to do anything to set it up. Capybara without WebDriver won’t run JavaScript because it doesn’t support it by itself. By running these JavaScript-reliant scenarios through WebDriver, you ensure the JavaScript will be executed. One of the great things with this WebDriver and Capybara partnership is that you can use the same old, familiar Capybara steps to test JavaScript behavior.
9.4.1. JavaScript testing
Capybara provides an easy way to trigger WebDriver testing. You tag a scenario (or feature) with the @javascript tag, and it launches a new web browser window and tests your code by using the same steps as standard Capybara testing. Isn’t that neat? To tag a scenario, place @javascript above it. Let’s write a new scenario in the Creating Tickets feature for multifile uploading, as shown in the following listing.
Listing 9.13. features/creating_tickets.feature

The @javascript tag at the top of this scenario tells Cucumber that the scenario uses JavaScript, so it should be run using WebDriver. Also
in this scenario, you’ve filled in only one file field ![]() because, as stated before, you’re going to reduce the number of initial file fields to one. After filling in this field,
you follow the Add Another File link that triggers a JavaScript event, which renders the second file field that you can then
fill in. The rest of this scenario remains the same: ensuring that the ticket is created
because, as stated before, you’re going to reduce the number of initial file fields to one. After filling in this field,
you follow the Add Another File link that triggers a JavaScript event, which renders the second file field that you can then
fill in. The rest of this scenario remains the same: ensuring that the ticket is created ![]() and that you can see the files inside the element with the class assets.
and that you can see the files inside the element with the class assets.
When you run this scenario with bin/cucumber features/creating_tickets.feature:36, it fails because the Add Another File link doesn’t yet exist:
And I follow "Add another file"
  no link with title, id or text 'Add another file' found
Before you fix it, however, let’s make the form render only a single asset field by changing this line in the new action in TicketsController
3.times { @ticket.assets.build }
to this:
@ticket.assets.build
By building only one asset to begin with, you show users that they may upload a file. By providing the link to Add Another File, you show them that they may upload more than one if they please. This is the best UI solution because you’re not presenting the user with fields they may not use.
Now it’s time to make the Add Another File link exist and do something useful!
9.4.2. Introducing jQuery
The Add Another File link, when clicked, triggers an asynchronous call to an action, which renders a second file field.
For the Add Another File link to perform an asynchronous request when it’s clicked, you can use the JavaScript framework called jQuery. In earlier versions of Rails, a JavaScript framework called Prototype came with it, but a large portion of the community prefers jQuery to Prototype. Developers can choose whether to use Prototype or jQuery or any other kind of JavaScript framework, but we use jQuery here because it’s favored in the community.[7]
7 Our choice totally has nothing to do with the fact that one of the authors is on the jQuery Core Team! We promise!
To install jQuery in earlier versions of Rails, you would have had to go to http://jquery.com, download the latest version of jQuery, put it in your public/javascripts, and then include it in your application layout. Next, you would have had to install the jquery-rails gem. It was quite a lot of work for something that should have been simple!
With Rails 3.1, you don’t need to download jQuery from the website or alter the default application in any way. With jquery-rails in the application’s Gemfile, you are already set up.
Next, tell your application to include the JavaScript files from this gem if Rails hasn’t done it already. Currently, you have this line in your app/views/layouts/application.html.erb file:
<%= javascript_include_tag "application" %>
It generates HTML like this:
<script src="/assets/application.js" type="text/javascript">
</script>
The /assets path here is handled by the sprockets gem, which comes standard with Rails 3.1. When this route is requested, the sprockets gem takes care of serving it. It begins by reading the assets/javascripts/application.js file, which specifies the following things:
// FIXME: Tell people that this is a manifest file, real code should go
The lines prefixed with // are comments, but the lines prefixed with //= are directives that tell Sprockets what to do. These directives require the jquery and jquery_ujs files from the jquery-rails gem. The jquery file is the jQuery framework itself, whereas the jquery-ujs file provides unobtrusive JavaScript helpers for things such as the confirmation box that pops up when you click on a link, which was defined using link_to’s :confirm helper.
Rails has already required all the JavaScript files you need to get started here. Let’s define the Add Another File link now.
9.4.3. Adding more files with JavaScript
You must add the Add Another File link to your tickets form at app/views/tickets/_form.html.erb. Put it underneath the end for the fields_for so it’s displayed below existing file fields:

Here you use the link_to method to define a link, and you pass some options to it. The first option is :remote => true ![]() , which tells Rails you want to generate a link that uses JavaScript to make a background request, called an asynchronous request, to the server. More precisely, the request uses the JavaScript provided by the jqueryujs.js file that came with the jquery-rails gem.
, which tells Rails you want to generate a link that uses JavaScript to make a background request, called an asynchronous request, to the server. More precisely, the request uses the JavaScript provided by the jqueryujs.js file that came with the jquery-rails gem.
This request then responds with some content, which is dealt with by the :update ![]() and :position
and :position ![]() options. The first option, :update, tells Rails to tell the JavaScript that handles the response that you want to insert the content from the background request
into the element with the id attribute of files. The second, :position, tells it that you want to insert the content after any other content in the element, which would make your second file field
appear after the first file field.
options. The first option, :update, tells Rails to tell the JavaScript that handles the response that you want to insert the content from the background request
into the element with the id attribute of files. The second, :position, tells it that you want to insert the content after any other content in the element, which would make your second file field
appear after the first file field.
The element this updates doesn’t currently exist, but you can easily create it by wrapping the fields_for inside a div with the id attribute set to files, as shown in the following listing.
Listing 9.14. app/views/tickets/_form.html.erb
<div id='files'>
  <%= f.fields_for :assets, :child_index => number do |asset| %>
    <p>
      <%= asset.label :asset, "File ##{number += 1}" %>
      <%= asset.file_field :asset %>
    </p>
  <% end %>
</div>
This div tag provides an element for your new link_to to insert a file field into. If you run this scenario with bin/cucumber features/creating_tickets.feature:36, the step that follows the Add Another File link passes, but the file field is still not visible:
And I follow "Add another file"
And I attach the file "spec/fixtures/spin.txt" to "File #2"
  cannot attach file, no file field with id, name, or label 'File #2'
The Add Another File link currently uses the new_file_path helper, which generates a route such as /files/new. This route points to the new action in FilesController. This action isn’t defined at the moment, so the feature won’t work. Therefore, the next step is to define the action you need.
9.4.4. Responding to an asynchronous request
The job of the new action inside the FilesController is to render a single file field for the ticket form so users may upload another file. This action needs to render the fields for an asset, which you already do inside app/views/tickets/_form.html.erb by using these lines:
<p>
  <%= f.fields_for :assets do |asset| %>
   <p>
     <%= asset.label :asset, "File ##{number += 1}" %>
     <%= asset.file_field :asset %>
   </p>
  <% end %>
</p>
To re-use this code for the new action in FilesController, move it into a partial located at app/views/files/_form.html.erb.
In app/views/tickets/_form.html.erb, you can replace the lines with this simple line:
<%= render :partial => "files/form",
           :locals  => { :number => number } %>
When you pass the :locals option to render, you can set local variables that can be used in the partial. Local variables in views are usable only in the views or partials in which they’re defined unless you pass them through by using this :locals. You pass through the number of your file field and the asset object provided by fields_for :assets.
To get the new action to render this partial, you can use the same code in the new action in FilesController but with a small change:
def new
  asset = Asset.new
  render :partial => "files/form",
         :locals => { :asset => asset }
end
Here you must pass the name of the partial using the :partial option so the controller will attempt to render a partial. If you left it without the option, the controller would instead try to render the template at app/views/files/form.html.erb, which doesn’t exist.
Before this line, you need to set up the asset variable that you reference. Add these two lines directly above the first line inside the new action:
@ticket = Ticket.new
asset = @ticket.assets.build
Because the Ticket object for your form is only a new record, it isn’t important precisely what object it is: all new Ticket objects are the same until they’re saved to the database and given a unique identifier. You can exploit this by creating another Ticket object and building your new asset from it.
It makes sense to do this because in your app/views/files/_form.html.erb file, you still reference the now-nonexistent f variable, which came from form_for @ticket in app/views/tickets/new.html.erb. Again, you can exploit the fact that all new Ticket objects are the same and use a fields_for instead of a form_for in this partial to get it to give the file field a proper name. Without this fields_for, the name of the field would be something like asset[asset], and you need it to be something more like ticket[asset_attributes][0][asset]. Now change the app/views/files/_form.html.erb partial to look like the following listing.
Listing 9.15. app/views/files/_form.html.erb
<%= fields_for @ticket do |f| %>
  <%= f.fields_for :assets, :child_index => number do |asset| %>
    <p>
      <%= asset.label :asset, "File ##{number += 1}" %>
      <%= asset.file_field :asset %>
    </p>
  <% end %>
<% end %>
The @ticket object here could either be from the new action in the TicketsController or from the new action in the FilesController: it doesn’t matter.
What does matter here is the number variable that identifies the number of file fields you are currently up to. You specify the child_index option in your fields_for so that each time these fields are rendered, they’re given different identifiers. The assets form partial gets this number variable only from the tickets partial; you’ve yet to set up a way the new action sets this variable. Without this variable set in the new action, you can’t render the app/views/files/_form.html.erb for a new asset without knowing what number you’re up to. Let’s set that up now.
9.4.5. Sending parameters for an asynchronous request
The number variable indicates what file field you are up to, so you need a way to tell the new action in FilesController how many file fields are currently on the page. Previous versions of Rails had an option for this called :with, which has now, unfortunately, been removed. No matter, you can do it in JavaScript. It’s better to put this code in JavaScript anyway, because it’ll already be using some to determine the number to pass through. Rather than using pure JavaScript, you’ll be using CoffeeScript, which comes with Rails 3.1 but can be used in any other language. Let’s learn some CoffeeScript now.
Learning Coffeescript
CoffeeScript is, in the words of its website, “a little language that compiles into JavaScript.” It’s written in a simple syntax, like this:
square = (x) -> x * x
This code compiles into the following JavaScript code:
var square;
square = function(x) {
  return x * x;
};
In the CoffeeScript version, you define a variable called square. Because this isn’t yet initialized, it is set up using var square; in the JavaScript output. You assign a function to this variable, specifying the arguments using parentheses (x) and then specifying the code of the function after ->. The code inside the function in this case is converted into literal JavaScript, making this function take an argument, multiply it by itself, and return the result.
Although this is a pretty basic example of CoffeeScript, it shows off its power. What you would write on four lines of JavaScript requires just one line of extremely easy-to-understand CoffeeScript.
Each time you generate a controller using Rails, a new file called app/assets/javascripts/[controller_name].js.coffee is created.[8] This file is created so you have a location to put CoffeeScript code that is specific to views for the relevant controller. This is really helpful in your situation, because you’re going to use some CoffeeScript to tell your Add Another File link what to do when it’s clicked.
8 If you have the coffee-rails gem in your Gemfile.
Open app/assets/javascripts/tickets.js.coffee, and we’ll build up your function line by line so you can understand what you’re doing. Let’s begin by putting this line first:
$(->
It seems like a random amalgamation of characters, but this line is really helpful. It calls the jQuery $[9] function and passes it a function as an argument. This line runs the function only when the page has fully loaded.[10] You need this because the JavaScript otherwise would be executed before the link you’re going to be referencing is loaded. Let’s add a second line to this:
9 Aliased from the jQuery function: http://api.jquery.com/jquery/.
10 For the meaning of “loaded,” see this: http://api.jquery.com/ready
$(->
  $('a#add_another_file').click(->
This line uses jQuery’s $ function to select an element on the page called a, which has an id attribute of add_another_file that will soon be your Add Another File link. This would happen only after the page is ready. After this, you call the click function on it and pass it a function that runs when you click on this link. Let’s now add a third line:
$(->
  $('a#add_another_file').click(->
  url = "/files/new?number=" + $('#files input').length
The double-space indent here indicates to CoffeeScript that this code belongs inside the function passed to click.[11] Here, you define a variable called url, which will be the URL you use to request a new file field on your page. At the end of this URL you specify the number parameter with some additional jQuery code. This code selects all the input elements inside the element on the page with the id attribute of files and stores them in an array. To find out how many elements are in that array, you call length on it. The URL for the first time you click this link would now look something like /files/new?number=1, indicating that you already have one file field on your page.
Let’s make the fourth line now:
$(->
  $('a#add_another_file').click(->
    url = "/files/new?number=" + $('#files input').length
    $.get(url,
This line is pretty simple; you call the jQuery function $, and then call the get[12] function on it, which starts an asynchronous request to the specified URL that is the first argument here, using the variable you set up on the previous line. Another line:
$(->
  $('a#add_another_file').click(->
    url = "/files/new?number=" + $('#files input').length
  $.get(url,
    (data)->
This line is indented another two spaces again, meaning it is going to be an argument for the get function. This line defines a new function with an argument called data, which is called when the asynchronous request completes, with the data argument being the data sent back from the request. One more line:
$(->
  $('a#add_another_file').click(->
    url = "/files/new?number=" + $('#files input').length
    $.get(url,
      (data)->
        $('#files').append(data)
This final line takes the data received from the request and appends[13] it to the end of the element that has the id attribute of files on this page. That’s the one with the single file-input field currently.
Finally, you need to close these functions you’ve defined, which you can do with three closing parentheses matching the levels of indentation, finalizing your code as this:
$(->
  $('a#add_another_file').click(->
    url = "/files/new?number=" + $('#files input').length
    $.get(url,
      (data)->
        $('#files').append(data)
    )
  )
)
That’s all there is to it! When your server receives a request at /assets/application.js, the request will be handled by the Sprockets gem. The Sprockets gem will then combine jquery, jquery_ujs, and app/assets/javascripts/tickets.js.coffee into one JavaScript file, parsing the CoffeeScript into the following JavaScript:
$(function() {
  return $('a#add_another_file').click(function() {
    var url;
    url = "/files/new?number=" + $('#files input').length;
    return $.get(url, function(data) {
      return $('#files').append(data);
    });
  });
});
In the production environment, this file is compiled upon the first request and then cached to save valuable processing time.
This is a little more verbose than the CoffeeScript and another great demonstration of how CoffeeScript allows you to write more with less. For more information and usage examples of CoffeeScript, see the CoffeeScript site: http://coffeescript.org.
Let’s now give your link the id attribute that’s required to get this working so we can move on.
Passing Through a Number
Open your app/views/tickets/_form.html.erb and replace the code for your Add Another File link with this:
<%= link_to "Add another file", 'javascript:',
  :id => "add_another_file" %>
This gives the element the id attribute you require. Let’s witness this JavaScript in action now by running rails server to start up a server, signing in using the email address [email protected] and the password password, and then creating a ticket on a project. Clicking the Add Another File link results in an error that you’ll fix shortly. Click it anyway. Afterward, go back to the window where rails server is running.
This window shows information such as queries and results for every request, but you’re only interested in the last request made. This request should begin with the following line:
Started GET "/files/new?number=1...
This line tells you that Rails has begun serving a GET request to the /files/new route with a bunch of URL parameters. Your number parameter is the first one in this example. The following lines show the URL that was requested as well as what action and controller served this request:
Started GET "/files/new?number=1" for 127.0.0.1 at [timestamps]
  Processing by FilesController#new as */*
  Parameters: {"number"=>"1"}
The line you’re most interested in is the third line:
Parameters: {"number"=>"1", ... }
This is the params hash output in a semi-human-readable format. Here you can see it has the number parameter, so you can use this inside the new action. With all this in mind, you can change how you render the partial in the new action inside FilesController to this:
render :partial => "files/form",
       :locals => { :number => params[:number].to_i,
                    :asset => asset }
You must convert the number parameter to an integer using the to_i method because it’ll be a String when it comes from params. It needs to be a Fixnum so the partial can add 1 to it.
Now if you refresh this page and attempt to upload two files, you should see that it works. Does your scenario agree? Let’s find out by running bin/cucumber features/creating_tickets.feature:38:
1 scenario (1 passed)
18 steps (18 passed)
Yup, all working! Great. You’ve switched the ticket form back to only providing one file field but providing a link called Add Another File, which adds another file field on the page every time it’s clicked. You originally had implemented this link using the :remote option for link_to, but switched to using CoffeeScript when you needed to pass the number parameter through. A couple of other small changes, and you got it all working very neatly again!
This is a great point to see how the application is faring before committing. Let’s run the tests with rake cucumber:ok spec. You should see the following:
46 scenarios (46 passed)
469 steps (469 passed)
# and
30 examples, 0 failures, 13 pending
Awesome! Let’s commit it:
git add .
git commit -m "Provide an 'Add another file link' that uses Javascript
               so that users can upload more than one file"
git push
This section showed how you can use JavaScript and CoffeeScript to provide the user with another file field on the page using some basic helpers. JavaScript is a powerful language and is a mainstay of web development that has gained a lot of traction in recent years thanks to libraries such as the two you saw here, jQuery and CoffeeScript, as well as others such as Prototype and Raphael.
By using JavaScript, you can provide some great functionality to your users. The best part? Just as you can test your Rails code, you can make sure JavaScript is working by writing tests that use WebDriver.
9.5. Summary
This chapter covered two flavors of file uploading: single-file uploading and multiple-file uploading.
You first saw how to upload a single file by adding the file_field helper to your view, making your form multipart, and using the Paperclip gem to handle the file when it arrives in your application.
After you conquered single-file uploading, you tackled multiple-file uploading. You off loaded the file handling to another class called Asset, which kept a record for each file you uploaded. You passed the files from your form by using nested attributes, which allowed you to create Asset objects related to the ticket being created through the form.
After multiple-file uploading, you learned how to restrict which files are served through your application by serving them through a controller. By using a controller, you can use CanCan’s can? helper to determine if the currently signed-in user has access to the requested asset’s project. If so, then you give the user the requested asset using the send_file controller method. If not, you deny all knowledge of the asset ever having existed.
Finally, you used a JavaScript library called jQuery, in combination with a simpler way of writing JavaScript called CoffeeScript, to provide users with an Add Another File link. jQuery does more than simple asynchronous requests, though, and if you’re interested, the documentation[14] is definitely worth exploring.
In the next chapter, we look at giving tickets a concept of state, which enables users to see which tickets need to be worked on and which are closed. Tickets will also have a default state so they can be easily identified when they’re created.