
Chapter 16. Basic performance enhancements
- Implementing pagination for resources with the Kaminari gem
- Improving database query speeds with Active Record features
- Caching pages and fragments of pages
- Using the Delayed Job gem with background workers
When an application is written, it may be done in such a way that it will not perform ideally. A common situation is that an application with a small database will perform quickly because there is less data to retrieve, but starts to slow as the database grows larger. This problem can be fixed in many different ways.
The first way is to limit the amount of data retrieved in any one call to a fixed limit, a process known as pagination. At the moment, for example, you’re not limiting the number of tickets shown in the show action of the ProjectsController. The more tickets that get added to a project, the slower the page that shows this data is going to perform because it will have to retrieve more data from the database and render it out to the page. By breaking the data down into a set of pages, you can show 50 tickets per page. This will lessen the load on your database, but not completely eliminate it. That would only be possible if you were to run no queries at all. You could do exactly that if you cached the output of the page, or even just the part of the page that showed the list of tickets.
The first process involves saving a copy of the page in the public directory, which would then be used to serve this page. Any action on tickets, such as creating one, adding a comment, or changing a state would then wipe this cache and start afresh.
The second process is slightly different. Rather than storing the fragment as a file on the system, you will store it in memory and then access it through a key.
Finally, by adding indexes to key columns in your tables, such as foreign keys, you can greatly speed up the queries it runs too. If you had 10,000 tickets in your system and you wanted to find all the tickets which had project_id set to 123, an index would help speed up this process.
We’ll show you examples of all of these approaches in this chapter, beginning with pagination.
16.1. Pagination
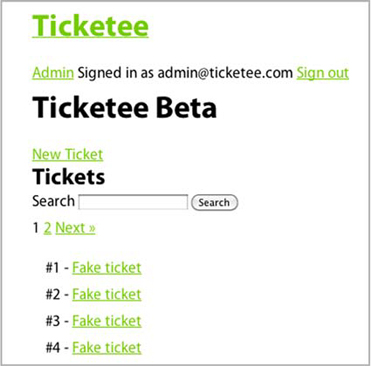
We’ll discuss two different kinds of pagination here. The first kind paginates the interface that users can see, as shown in figure 16.1.
Figure 16.1. Tickets for a project

If this project had a thousand tickets, it wouldn’t make sense to show all 1,000 at a time. It would also be terribly slow, because the database would have to retrieve 1,000 records. Rails would then have to instantiate 1,000 Ticket objects, render 1,000 tickets to the page, and send back that massive chunk of HTML.
The second kind of pagination has to do with your API. Back in chapter 13 you wrote the beginnings of the ticket API, and we promised you we’d revisit it in this chapter. Inside the Api::V1::TicketsController’s index action you have this innocuous-looking line:
respond_with(@project.tickets)
Again, if the database’s tickets table contains 1,000 records for this project, it will have to send all of them to Rails. Rails will then have to instantiate 1,000 objects, parsing them all to JSON or XML before sending them off to the user. All of this would happen with each request, and if you were getting a lot of requests it would bring your application to its knees.
By paginating the result sets in both of these situations, you can change your application to return only 50 tickets at a time, which would theoretically make your application respond 20 times faster than if it were returning 1,000 tickets. Let’s begin by installing a gem called Kaminari that will help you with pagination.
16.1.1. Introducing Kaminari
The Kaminari gem[1] is a new breed of pagination gem written by Akira Matsuda, and is considered the Rails 3 successor to the will_paginate gem,[2] which was the favorite for a long time.[3]
3 Since this original writing, will_paginate has been updated to be Rails 3 compatible.
After you install this gem, you’re given an interface on the models of your application, which allows you to make calls like this:
@project.tickets.page(2).per(50)
This call would ask for the second page of tickets, with each page containing 50 tickets. It’s a very clean API. Those familiar with will_paginate will be used to a syntax like this:
@project.tickets.paginate(:per_page => 50, :page => 2)
The syntax is a little longer, but it’s a little clearer what it’s doing to those who are familiar with it. You’ll use Kaminari here just for something different. In your views, you can use the same paginate method, which is made available by both gems:
<%= paginate @tickets %>
This little helper generates the output shown in figure 16.2.
Figure 16.2. Pagination helper
To install this gem, add this line to your Gemfile underneath the searcher gem:
gem 'kaminari'
You’ll then run the bundle install command to install the gem. With the gem installed, you can now begin to write a Cucumber feature to test that when you’re on the tickets page with more than 50 tickets in the system, you will see a pagination link somewhere on that page. You should be able to click Next and then see the next 50 tickets.
16.1.2. Paginating an interface
You’re going to now implement paging for your tickets listing, showing 50 tickets at a time. Users will be able to navigate between pages by clicking the Next and Prev links. These two links will be provided by a helper from the kaminari gem.
Testing Pagination
To test this, you’ll write a new scenario at features/paginating_tickets.feature, shown in the following listing. If you create 100 tickets in this feature, you’ll see the pagination links and can then make sure they’re working.
Listing 16.1. features/paginating_tickets.feature
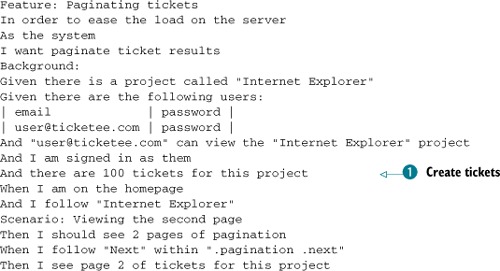
In this feature you use the “Given there is a project” step you’ve used many times before to create a project, and then a
new step ![]() , which will create a given number of tickets for the project. This is required so that the pagination links will appear on
your tickets. If you didn’t have enough tickets in your project to warrant pagination, then the links would not appear at
all.
, which will create a given number of tickets for the project. This is required so that the pagination links will appear on
your tickets. If you didn’t have enough tickets in your project to warrant pagination, then the links would not appear at
all.
You then go through the motions of creating a user, giving them access to that project so that they can see into it, signing in as them, and then navigating to that project. On that project’s page you should see the pagination links displaying two pages’ worth of pagination. When you click the Next link within the pagination element, you should be on the second page.
You’ve got three undefined steps within this feature, and you can get the step definitions for these steps by running this feature using the bin/cucumber features/paginating_tickets.feature:
Given /^there are (d+) tickets for this project$/ do |arg1|
pending # express the regexp above with the code you wish you had
end
Then /^I should see (d+) pages of pagination$/ do |arg1|
pending # express the regexp above with the code you wish you had
end
Then /^I see page (d+) of tickets for this project$/ do
pending # express the regexp above with the code you wish you had
end
The first step definition here has to do with tickets, and so you’ll put it in features/step_definitions/ticket_steps.rb using the code shown in the following listing.
Listing 16.2. features/step_definitions/ticket_steps.rb
Given /^there are (d+) tickets for this project$/ do |number|
number.to_i.times do |i|
@project.tickets.create!(:title => "Test",
:description => "Placeholder ticket.",
:user => @user)
end
end
This small piece of code will create as many tickets as you’ve specified for the @project object set up by the “Given there is a project” step, using the @user variable set up by the “Given there are the following users” step. It’s not important what the title and description attributes are for these tickets, just that you have enough of them to trigger the pagination links to appear.
The next two undefined steps can go into a new file called features/step_definitions/pagination_steps.rb, as they’re about the pagination more than any other resource in your application.
The Kaminari paginate method you’ll use in your view shortly will output a nav element with the class of pagination. Inside this nav element there are a couple of other elements. The first is a span element with the class of prev, which would contain a Previous button if you’re a page or two in with pagination. After that, there are a couple more span elements, all with the class of page. The span tag representing the current page has an additional class name of current, which we’ll discuss a little later. You can count these span.page elements easily, using the css method to find them using a CSS selector and then using count on what that returns to count the number of pages shown in pagination.
By gathering up these page elements and counting them, you easily assert that there’s pagination on this page. You can define the next step like this in features/step_definitions/pagination_steps.rb:
Then /^I should see (d+) pages of pagination$/ do |number|
pages = all(".pagination .page")
pages.count.should eql(number.to_i)
end
Here you use Capybara’s all method, which will find all the elements matching the CSS selector specified and return them as an Array object. Then it’s a simple matter of calling count on that Array and making sure it contains as many as you say it should.
You final undefined step asserts that you’re on a specific page of the pagination. Write this step like this:
Then /^I see page (d+) of tickets for this project$/ do |number|
current_page = find(".pagination .current").text.strip
current_page.should eql(number)
end
You use the find method rather than the all method because there is only going to be one current page element. This method will only return a single element, which matches the specified CSS selector. Calling text on this element will return the number inside it, and you can strip it (as it contains spaces) and then compare that to the number passed in for your step. If the two numbers are equal, then this step will pass.
With the last of your undefined steps now actually defined, let’s see what happens when you run bin/cucumber features/pagination.feature:
Then I should see 2 pages of pagination
expected 2
got 0
Implementing Pagination Helpers
Your step that checks for two pages of pagination wasn’t able to see any at all, most likely because you aren’t showing any right now! To fix this, you’ll have to display the pagination link in app/views/projects/show.html.erb by putting this line above the ul that displays tickets:
<%= paginate @tickets %>
This line will display the pagination links that your failing step currently requires. You’re going to need to set up the @tickets variable for pagination in your controller so that these pagination links know what page you’re on and that there are only 50 tickets displayed. You’ll replace this line in the show action of app/controllers/projects_controller.rb
@tickets = @project.tickets
with this line:
@tickets = @project.tickets.page(params[:page]).per(50)
This page method will set @tickets to display only the tickets for the current page number, available in the params[:page] variable. The per method after it will retrieve 50 ticket objects rather than Kaminari’s default 25. Your tickets don’t take up much room on your page so you can bump this up.
When you run your feature again with bin/cucumber features/paginating_tickets.feature, it will pass because you’ve now got your pagination links showing:
1 scenario (1 passed)
10 steps (10 passed)
That’s all there is to paginating a resource. You can also call the page and per methods on models themselves rather than associations; it was just in this case that you were calling it on an association.
Before you make a commit for this change, quickly make sure that everything’s working by running rake cucumber:ok spec:
Failing Scenarios:
cucumber features/searching.feature:23
cucumber features/searching.feature:29
cucumber features/searching.feature:35
62 scenarios (3 failed, 59 passed)
736 steps (3 failed, 6 skipped, 727 passed)
Oh dear, it appears the feature in features/searching.feature has been broken by your changes! Good thing that you’ve got a feature to catch these kinds of things.
Fixing Broken Scenarios
All three scenarios in this feature failed with the same error:
undefined method 'current_page' for ...
This looks to be associated with the feature you just implemented, as it’s trying to call a method called current_page. If you look a couple of lines down in the output, you’ll see that there’s a line in the stack trace that shows that this is from Kaminari:
...kaminari/helpers/action_view_extension.rb:21:in 'paginate'
Okay, so it looks to be a problem coming from Kaminari, but why? Well, if you look even further down in the stacktrace for this error somewhere in your application, probably from the app folder, you’ll come across this line:
./app/controllers/tickets_controller.rb:60:in 'search'
What’s so great about this line? Well, this line renders the projects/show view:
render "projects/show"
Above that, however, is the real culprit:
@tickets = @project.tickets.search(params[:search])
You’re not calling either page or per on your search results, and so it’s not going to be paginating them. You’re going to call the same methods you called back in the ProjectsController’s show action here so that you get paginated search results:
@tickets = @project.tickets.search(params[:search])
@tickets = @tickets.page(params[:page]).per(50)
With paginated search results, the feature in features/searching.feature will no longer complain when you run it with bin/cucumber features/searching.feature:
3 scenarios (3 passed)
39 steps (39 passed)
Alright, so that one’s passing. Let’s see what happens when you run rake cucumber:ok spec again:
66 scenarios (66 passed)
756 steps (756 passed)
# and
72 examples, 0 failures, 19 pending
All areas where you need pagination are working. You’ve called the per method twice, once in the show action of the ProjectsController and again in the search method of TicketsController. If you wish to change the number of elements returned for a list of tickets, you’d need to change both of these locations. Instead, you’ll move the setting for the number of ticket objects returned on each page into the model.
Cleaning Up After Yourself
Let’s take the per(50) call out of this line in the show action of ProjectsController
@tickets = @project.tickets.page(params[:page]).per(50)
turning it into this:
@tickets = @project.tickets.page(params[:page])
Next, you’ll do the same thing for the line that uses per in the search action of the TicketsController
@tickets = @tickets.page(params[:page]).per(50)
changing it into this:
@tickets = @tickets.page(params[:page])
To make 50 objects the default for this model, you can put this line directly under the searcher block in your Ticket model:
paginates_per 50
Now when your application is asked for a list of paginated tickets, you’ll be given 50 tickets per page. You can make sure this is the case by rerunning your “Paginating tickets” feature by running bin/cucumber features/paginating_tickets.feature:
1 scenario (1 passed)
10 steps (10 passed)
Alright, that’s still working, so that’s good! Are your features and specs still working too? Another quick run of rake cucumber:ok spec will tell you:
66 scenarios (66 passed)
752 steps (752 passed)
# and
72 examples, 0 failures, 19 pending
Great, time to make a commit with this new feature:
git add .
git commit -m "Added pagination for tickets"
git push
Seeing Pagination for Yourself
Here you’ve seen an easy way to add pagination links to resources in your application by using the Kaminari gem. You could have used the will_paginate gem and that would have worked just as easily. It’s really up to personal preference. Pagination allows you to ease the load on the database server by returning only limited amounts of records per page, and also doesn’t overwhelm the user with choices.
Let’s see how this works in a browser before you continue. First, you’ll need to create 100 tickets for a project so that you can get two pages of pagination. To do that, launch rails console and put in this code:
project = Project.first
100.times do |i|
project.tickets.create!(
:title => "Fake ticket",
:description => "Fake description",
:user => User.first
)
end
Next, type exit and press Enter to exit out of the console, and then launch your application with rails server. You can log in using the email and password you’ve set up in db/seeds.rb, which are [email protected] and password, respectively. You can then click the Ticketee Beta page and you should see a page like figure 16.3.
Figure 16.3. Paginated tickets

The pagination here shows that you’re on the first page and that there’s a second page you can go to, by clicking either the 2 link or the Next link. By clicking this link, the page switches to the second page of tickets and the URL now becomes http://localhost:3000/projects/1?page=2. This page parameter is passed to the controller as params[:page] and then passed to the page method provided by Kaminari.
If you click the 1 link or the Prev link, you’ll be taken back to the first page. All of that functionality was given to you by the paginate method in your views and the page call in your controller. You didn’t have to code any of this yourself, which is great. Next, we’ll look at how you can add this same kind of pagination to the tickets API.
16.1.3. Paginating an API
You’ve easily set up pagination for your tickets on the interface that a user sees, to ease the load on the database. However, for your tickets API you’re still returning all the tickets for a project when they’re requested, and therefore you’ll run into the same problems you solved in the previous section.
Your API is different though. You can’t provide a pagination link for the tickets returned by an API. Instead, you’ll have to rely on people passing in a page number, which you’ll then use to return that page of tickets.
To test this, you’re going to go into your API spec file for tickets at spec/api/v2/tickets_spec.rb and add another test. This one should assert that when you pass in a page parameter to your requests, you receive that page of tickets, rather than all of the tickets or a different page.
In your API you’ll limit requests to 50 per response, but you may choose to set this a little higher.[4] Therefore, you’ll create 100 tickets, which should give you enough tickets to test that you can get the first and second pages of your API.
4 200 seems to be a common number to use for API return objects per request.
You’ll add another context to spec/api/v2/tickets_spec.rb to test pagination, using the code shown in the following listing.
Listing 16.3. spec/api/v2/tickets_spec.rb
context "pagination" do
  before do
    100.times do
      Factory(:ticket, :project => project, :user => @user)
    end
  end

  it "gets the first page" do
    get "/api/v2/projects/#{project.id}/tickets.json",
      :token => token,
      :page => 1

    last_response.body.should eql(project.tickets.page(1).per(50).to_json)
  end

  it "gets the second page" do
    get "/api/v2/projects/#{project.id}/tickets.json?page=2",
      :token => token,
      :page => 2

    last_response.body.should eql(project.tickets.page(2).per(50).to_json)
  end
end
In this new context, you’ll create 100 tickets using the ticket factory, referencing the @user variable set up in the spec’s before block and also pointing it at the project object set up near the top of this file. Your first test makes sure that you’re getting back the first 50 tickets for the project, and the second test checks for the second 50.
When you run this test using bin/rspec spec/api/v2/tickets_spec.rb:36, it won’t pass because you’ve not got the pagination in place yet:
expected [small array of JSON'ified tickets]
got [larger array of JSON'ified tickets]
You can easily fix this by changing this line in the index action of app/controllers/api/v2/tickets_controller.rb
respond_with(@project.tickets)
to this:
respond_with(@project.tickets.page(params[:page]))
When you rerun the pagination context with bin/rspec spec/api/v2/tickets_spec.rb:35, both tests will pass:
2 examples, 0 failures
Now users can go to /api/v2/projects/:project_id/tickets.json to get the first page of 50 tickets, or specify the page parameter by putting it on the end of the URL as a query parameter (that is, /api/v2/projects/:project_id/tickets.json?page=2) to get to the second page of tickets.
You can now run rake cucumber:ok spec to check for any breakage:
62 scenarios (62 passed)
736 steps (736 passed)
# and
66 examples, 0 failures, 12 pending
By paginating the number of tickets shown both on the interface and in the API, you can ease the load on the server and provide a better interface to your users at the same time.
Sometimes when you’re coding your application you may inadvertently call queries that aren’t that performant. This could happen in a view if you were wanting to display all tags for each ticket as you iterated through them. In the next section, we take a look at how you can cause this problem to happen and at two ways to fix it.
16.2. Database query enhancements
What would you do without database queries? Well, you’d have a boring application, that’s for sure! But it’s database queries that can be the biggest bottleneck for your application once it grows to a larger size. Having a page that—in the beginning—only ran 5 queries and is now running 100 on each request will just not be webscale.
The most common place where performance degradation can occur in a Rails application is when an operation called N+1 selects takes place. Let’s use your application as an example of this. Imagine that you have 50 tickets and want to display them all on the same page, but also along with these tickets you wanted to display all the tags for these tickets. Before you render this page, you know all the tickets but don’t yet know what the tags are for the tickets. Therefore, you’d need to retrieve the tags as you are iterating over each of the tickets, generating another query to retrieve all the tags for each ticket.
This is the N+1 selects problem. You have an initial query for all of your tickets, but then N queries more, depending on the amount of tickets you’re showing. This problem is not so much of a big deal now that you’ve got pagination, but it still can crop up.
16.2.1. Eager loading
In your app/views/projects/show.html.erb you can perform N+1 selects, asking for each ticket’s tags just like in the example, by putting this line within the block where you iterate over each ticket:
<%= render ticket.tags %>
When you start your server using rails server and navigate to your first project’s page, Rails will diligently run through each ticket in the @tickets array, performing a query for each one to find its tags. If you switch back over to the console, you’ll see queries like this:
SELECT * FROM "tags"
INNER JOIN "tags_tickets" ON "tags".id = "tags_tickets".tag_id
WHERE ("tags_tickets".ticket_id = 1 )
There should be 50 of these little queries, and 50 adds up to a big number[5] when it comes to lots of requests hitting this page and running these queries. Fifty requests to this page would result in over 2,500 queries. Oh, your poor database server![6] It would be much better if you didn’t have to run so many queries.
5 When used in a function that uses squares, or even worse, cubes.
6 Yes, they’re made for this kind of thing, but that’s not the point!
Thankfully, there’s yet another thing in Rails that helps us be better programmers and better friends with our databases. This wonderful invention is known as eager loading and will allow you to run two queries to get all the tickets and all the tags, rather than one query for the ticket and N queries for all the tags for all the tickets.
There are two ways of doing this: you can use the joins or includes method when you attempt to grab all the tags for the tickets in app/controllers/projects_controller.rb. You’re currently grabbing and paginating all the tickets for the current project using this line in the show action in ProjectsController:
@tickets = @project.tickets.page(params[:page])
The @project.tickets part of this line generates a query,[7] but doesn’t eager-load the tags yet. To make it do this, you could use the joins method like this:
7 But doesn’t run it! When it gets to the view and you call each on it, then it runs.
@tickets = @project.tickets.joins(:tags).page(params[:page])
This line would generate an SQL query like this:
SELECT "tickets".* FROM "tickets"
INNER JOIN "tags_tickets" ON "tags_tickets"."ticket_id" = "tickets"."id"
INNER JOIN "tags" ON "tags"."id" = "tags_tickets"."tag_id"
WHERE ("tickets".project_id = 1)
The INNER JOIN parts of the query here mean that it will find all records in the tickets table that have tags only. It will also return a ticket record for every tag that it has, so if one ticket has three tags it will return three tickets. This is somewhat of a problem, given that you’re going to want to display all tickets regardless of if they are tagged or not, and you definitely don’t want three of them appearing when only one should.
To fix this, use join’s brother includes, switching the line in the show action to this:
@tickets = @project.tickets.includes(:tags).page(params[:page])
When you refresh the page, Rails will generate two queries this time around:
SELECT "tickets".* FROM "tickets"
WHERE ("tickets".project_id = 1)
LIMIT 50
OFFSET 0

SELECT "tags".*, t0.ticket_id as the_parent_record_id FROM "tags"
INNER JOIN "tags_tickets" t0 ON "tags".id = t0.tag_id
WHERE (t0.ticket_id IN (1,2,[...],49,50))
Rails has run the query to find all the tickets first, then another query to gather all the tags for all the selected tickets as the second query. This query doesn’t care if tickets have tags or not, it will still fetch them.
Here you’ve seen a way to cause an N+1 query and how to stop it from happening. You can remove the <%= ticket.tags %> from app/views/projects/show.html.erb now, because you’re done with this experiment.
This is just one way your database can be slow. Another is more insidious. It creeps in slowly over months of the application seemingly running fine and makes it progressively slower and slower. The problem is a lack of database indexes, and it affects many Rails applications even today.
16.2.2. Database indexes
Database indexes aren’t a Rails feature, they’re a feature of your own database that can greatly improve its performance when used correctly. The absence of database indexes may not seem like a problem immediately, but when you’re dealing with larger datasets it becomes more and more of a problem. Take for example if you had 10,000 tickets with 2,300 of them belonging to Project A. To find all the tickets for Project A, your database sans indexes would have to do a full table scan, searching through each ticket and determining if it belonged to Project A or not. That’s a problem, because the more records you have, the longer this scan is going to take.
Indexing the data in your databases allows you to perform fast lookups and avoid full table scans. Imagine that your database is a phonebook and that the names are in no particular order. In this situation, it would be difficult to find all people with a name such as John Smith-McGee, because you’d have to scan the entire phone book to find out who has this name.
An index sorts this data into a logical order and allows for a much faster lookup. Ever seen how a phonebook that has the letter and the first name at upper left, and maybe the same or a different letter at upper right, with another name? That’s an index. That allows you to easily find names because you know that the letter A comes before B, and C after B, and so on.
Indexes allow you to run much faster queries because you tell your database how to index the data. Although it may seem like premature optimization at this point, you’re going to put an index on your tickets table to speed up finding collections of tickets for a project. It’s common sense to have these from the beginning: adding them onto large datasets will take a long time, because you’ll need to work out how to index each record.
To add this index, create a new migration with this command:
rails g migration add_project_id_index_to_tickets
This will generate a file at db/migrate that ends with the name you’ve given it. You’re going to need to open this file now and add in the index, because Rails cannot (yet) read your mind. You’ll add this index inside the self.up part of the migration using add_index and remove it in the self.down method using remove_index, like this:
def change
  add_index :tickets, :project_id
end
Run this migration using rake db:migrate db:test:prepare to run it on the development and test environment databases. You’ll see this line in the output:
-- add_index(:tickets, :project_id)
   -> 0.0015s
Just to reinforce the message: it’s better to add the indexes when the database is first being designed rather than at a later point because this 0.0015 seconds could easily become whole seconds on a larger dataset. This index will now group your tickets into groups of project_id columns, allowing for much faster lookups to find what tickets belong to a specific project.
You want the absolute best performance you can get out of your database because it’s a key point in your requests. Indexes and eager loading are the two most basic ways you can get better performance out of your database.
If your database is performing optimally and your pages still aren’t loading fast enough, you’ll need to look for alternative methods of speeding them up. Two of these methods are page and action caching, which allow you to store the output of a page to serve it up rather than re-processing the code and hitting the database again.
16.3. Page and action caching
Rails has several methods of caching pages. The first of these methods serves a request and then stores the output of that page in the public folder of your application so that it can be served without going through the Rails stack by the web server. This is known as page caching
You’d cache a page if that page took a long time to process, or if there were a lot of requests to it. If either of these situations happens, the performance of the web server can be degraded and requests can end up piling up.
By caching a page, you take the responsibility of processing and serving it off your Rails stack and put it on the (usually) more-than-capable web server.[8]
8 Such as Apache or nginx, or any other HTTP server. Not WEBrick. There are some things that Ruby’s made for, and being a fast/stable HTTP server ain’t one.
The first time a page is requested, you store it as a file in your application. The next time the request is made, that static page will be served rather than having the action processed again.
This first type of caching is great for pages that don’t require authentication. For pages that do require authentication you’ll need to use a different kind of caching called action caching. This type of caching runs the before filters on a request before it serves the cached page, and you’ll see a great example of this in this section.
Let’s take a look at the first kind of caching, plain ol’ page caching.
16.3.1. Caching a page
You’re going to cache the page that’s rendered when a user looks at ProjectsController’s show action. By caching this particular page, Rails will serve the first request to this file and then save the output of the request to a new file at public/projects/:id.html. This public/projects directory will be created by Rails automatically. This process is shown in figure 16.4.
Figure 16.4. First request, no cached page

On the next request, due to how the web server is configured, it will serve the file rather than hit the Rails stack, as shown in figure 16.5. This is absolutely a faster request, regardless of how little goes on in an action in Rails. If a request doesn’t have to go down that extra level in the stack it’s going to save a great deal of time, and again: modern web servers are built to serve these static files.
Figure 16.5. Subsequent requests, cached page

One of the downsides of this is that it will not cache the GET parameter on the request, like your page numbers. Earlier, when you used rails server to use your pagination, the URL became http://localhost:3000/projects/1?page=2. The page that’s cached doesn’t have this parameter at the end, and so it will always display the first page, because that’s what will be stored at public/projects/:id.html.
Regardless of this, you’ll at least see how this method works. In your ProjectsController, underneath the before_filter lines, you can put this method to tell Rails to cache the page for the show action:
caches_page :show
In development mode, caching is turned off by default. Obviously, in development mode you don’t care so much about caching, as all requests are going to be local and not on a heavy-load server. You can turn caching on by going into config/environments/development.rb and changing this line
config.action_controller.perform_caching = false
to this:
config.action_controller.perform_caching = true
Without this option, you can still have caches_page in your controllers, it just won’t do anything. With it turned on, your pages will be cached upon their first request.
Launch rails server again and this time go to http://localhost:3000/projects/1. In the server output, you’ll see an additional line:
Write page /.../ticketee/public/projects/1.html (0.3ms)
This time, rather than simply processing your action and sending the response body back to the server, Rails will save the body in a new file in your application at public/projects/1.html. The next time this route is requested, because the public/projects/1.html page exists, it will be served by your web server, rather than Rails. A side-effect of this means that your request will not show up in the Rails console, but at least it will be served faster.
Let’s reload the page now; it should be a little faster because it’s serving that static page. If you click the Next link on your pagination, you’ll still be shown the first page. This is because the GET parameter was ignored, and the first page for this project’s tickets was what was cached.
There’s another problem too: this result is cached for all users of your application. At the top of the page, you’ll be able to see the message that says “Signed in as [email protected],” as shown in figure 16.6.
Figure 16.6. Signed in as admin

To see this little issue in action, sign up as another user by first clicking the Sign Out link in the application to sign out, then the Sign Up link to be presented with a form to sign up. In this form, enter [email protected] for the email and password for both the password and password confirmation fields. When you click the Sign Up button, this will create your new user account.
You currently require users to confirm their account through an email they receive, but because you’re in development mode there will be no emails sent. To confirm this user, launch rails console now and run these commands:
user = User.find_by_email("[email protected]")
user.confirm!
You’ll also need to give this user access to the first project in your system, so that they can view the tickets too. To do this, run these couple of commands:
project = Project.first
user.permissions.create!(:action => "view", :thing => project)
Alright, now that your user is confirmed and has access to this project, let’s see what happens when you sign in with the email and password you used to sign up, [email protected] and password. At the top of the page you’ll see that you’re signed in as the new user, as seen in figure 16.7.
Figure 16.7. Signed in as a user

However, when you click the Ticketee Beta link to go to your first project, the page will change to saying that you’re signed in as the [email protected] user again, as shown in figure 16.8.
Figure 16.8. Still signed in as [email protected]?

You know better; you’re actually signed in as the user! This is happening because Rails has cached the entire page, rather than just the tickets list. This page also ignores any kind of authorization you’ve set up in your controllers, making it available for every single person who wishes to access it, which is just a Very Bad Thing.
So it looks like caches_page isn’t going to work in this situation. This method is better for pages that don’t have dynamic elements on them, such as the place at the top that displays the currently logged-in user or the list of tickets.
This method has a brother called caches_action that will help you fix both the issue of the currently logged-in user display message, as well as the issue of it only showing the first page of pagination.
16.3.2. Caching an action
Caching an entire page is helpful when you don’t have authentication, but if you have authentication then it’s better to cache the response of the action on a per-user basis. Caching an action involves caching the response for a particular session, so that when that user requests it again they’ll be shown it again.
Caching a page is great for a page that’s accessible by anybody, as the body would be served as a static file from the public folder by the web server. Caching an action is best used for actions that take a long time to process (you don’t have any at the moment) and that require some interaction with the Rails stack, such as a before_filter that authenticates your user.
There’s a third way of caching, and that’s fragment caching, where you’d cache just a bit of a page at a time, rather than the entire result. Before you get on to using that, let’s see what caches_action provides you.
Note
Before you do anything, you’ll want to remove the old file that has been cached. To do this, delete the public/projects directory. Next time this page is requested, the cache will be re-created.
Let’s replace this line in your ProjectsController
caches_page :show
caches_action :show
For this change to take effect, you only need to refresh the page at http://localhost:3000/projects/1 or actually visit it again if you’ve closed the browser since the last time. If you switch over to the terminal where your server is running, you won’t see the line that says this:
Write page /.../ticketee/public/projects/1.html (0.3ms)
Rather, you’ll see this line instead:
Write fragment views/localhost:3000/projects/1 (40.3ms)
This time, Rails has written a fragment rather than writing a page. In this case, the fragment is actually the entire page, but it is the page available only for this user. When you request this page again, you’ll see this line in the server’s output:
Read fragment views/localhost:3000/projects/1 (0.3ms)
Upon the second request here, Rails has found the fragment pertaining to this request and served that instead. Rather than saving these files into the public directory, Rails instead saves them to the tmp/cache directory. Files that are in the public directory are automatically served by your web server without hitting the Rails stack, but cached responses in tmp/cache are served by the Rails stack itself. This may seem counterintuitive at first, but it’s really helpful if you want to alter what cache fragments are served to what user.
Currently, the fragment is written to a file such as tmp/cache/CC6/080/views%2Flocalhost%3A3000%2Fprojects%2F1. This location is simply a location in the tmp/cache folder with a hashed path, followed by the escaped name of views/localhost:3000/projects/1. It’s with this name that Rails can retrieve this fragment and show it again.
But you’re still going to have the problem that both of your users are going to see the same page. Sign out of your current user, and sign in as the other one. Once you visit this page again, you’ll see you’re still signed in as the first user! It’s doing the same darn thing as caches_page!
As stated before, caches_action is different. It runs the before_filters of your controller and has one more special benefit: you can change the path of where this file is cached by using the cache_path option passed to caches_action. You can then set this option to be a Proc object, which means it will be evaluated before every request made to the action (or actions) you are caching. In this Proc object you’ll have access to the current controller instance, meaning you’ll have access to current_user. With this access, you’ll be able to customize the path where the cache is kept so that you can cache the same page for different users.
To do this, change your caches_action line in your controller to these lines:
caches_action :show, :cache_path => (proc do
  project_path(params[:id], :user_id => current_user.id)
end)
Here, you’ve passed the cache_path option to caches_action. This is a proc object, and you need to wrap the value for this option in brackets or Ruby will think the block is for the caches_action call.
This Proc object is evaluated within the context of an instance of this controller, and therefore you’ll have access to the params and current_user methods usually available within an action or a before_filter. With these, you’re building a string by combining the URL of the current project (provided to you by the helper project_path) and the id of current_user.
When you access this page again in the browser, Rails will re-process this action because the cache path has changed and then save the page in a new location. In the output for the server you’ll see this new fragment has been written, indicated by this line:
Write fragment views/localhost:3000/projects/1/1 (4.4ms)
This time, the path to the file and the file itself have changed because you’ve changed the URL of the page; it’s now the cached version of this page currently for this user. When you sign out as your current user and sign in as the other user and navigate to this project’s page, you’ll see that the “Signed in” message at the top of the page is now the correct one, as shown in figure 16.9.
Figure 16.9. Signed in as admin for a cached page

This means that you’ve now fixed the problem where the same cached page was shown for all users, meaning that each of your users will see a slightly different version of this page. This is almost right, but not quite. When you click the Next link for pagination, you’ll still only be shown the first page. This is because much like caches_page, your caches_action also ignores the page parameter.
You can fix this, however, by changing the path generated for the cached page to contain the current page number. To do this, change this line in caches_action’s cache_path option in ProjectsController
project_path(params[:id]) + "/#{current_user.id}"
project_path(params[:id]) + "/#{current_user.id}/#{params[:page] || 1}"
The next time you request this page, it will again save a new version of it, this time outputting a line like this:
Write fragment views/localhost:3000/projects/1/1/1
The first 1 here represents the project’s id, the second represents the user’s, and the third represents the page number. This file is saved to a path such as tmp/cache/E62/3E0/views%2Flocalhost%3A3000%2Fprojects%2F1%2F1%2F1.
So in this section you’ve fixed the problem where all people would see that they were signed in as the first person who requested the page, as well as the case where only one page of your tickets was available. Now what happens when you update this page and the tickets change? These pages will still be cached, and your new tickets or updates to them will not be shown!
You’re going to need a way to clear this cache, to expire the fragments that are created when these events happen. Right now, the number-one situation where that’s going to happen is when you create a new ticket for a project. You can trigger this event to clear your cache by using a feature in Rails known as cache sweepers.
16.3.3. Cache sweepers
Cache sweepers are much like the observers you used back in chapter 12. In fact, the ActionController::Caching::Sweeper class inherits from ActiveRecord::Observer, effectively making them the same thing. The difference here is that you refer to the sweeper in the controller, telling it to run after certain actions have completed.[9]
9 It uses after_filter to do this, which can also be used to run other actions after a controller’s action has been processed, just like a before_filter can be used to run actions before a controller’s action runs.
In this case, whenever a ticket is created, updated, or destroyed in a project, you’ll want your application to clear out the cached pages because they would be out of date at that point. This is precisely what you can use a sweeper for. To call this sweeper, put this line underneath the before_filter calls in TicketsController:
cache_sweeper :tickets_sweeper, :only => [:create, :update, :destroy]
You put this line in your TicketsController because you want it to run after the create, update, and destroy actions.
Now when you go to a project in your application and attempt to create a new ticket on it, you’ll get this error:
uninitialized constant TicketsSweeper
Rails is looking for the TicketsSweeeper constant, which is supposed to define the cache sweeping behavior for your TicketsController, but can’t find it because you haven’t defined it yet. To define this, create a new folder at app/sweepers for this sweeper and its brethren to live.[10] In this directory you’ll create a new file called app/sweepers/tickets_sweeper.rb and fill it with this content:
10 Because it doesn’t really belong in the controllers, helpers, models, observers, or views directory, but is still a vital part of your application.
class TicketsSweeper < ActionController::Caching::Sweeper
  observe Ticket
  def after_create(ticket)
    # expire fragment code goes here
  end
end
Rather than passing the symbolized version of the name along to the cache_sweeper method, you can also alternatively pass along a class:
cache_sweeper TicketsSweeeper
This doesn’t perform any differently than passing in a symbol, but is really helpful if your sweeper was modularized:
cache_sweeper Ticketee::TicketsSweeper
You can’t pass a modularized sweeper name as a symbol, and so the cache_sweeper method supports passing both a symbol and a constant reference as well.
You’ll get around to adding the expire fragment code in just a bit, but first a bit of explanation is needed. A sweeper looks and acts much the same as an observer. By calling the observe method at the top of the TicketsSweeper, you tell this sweeper to watch the Ticket class for changes. The after_create method here will be called after creation of a new Ticket object, but because you’re in a sweeper, you’ll have access to the controller’s parameters also. With them, you can use what’s usually available in the controller to expire the cached fragments.
To do this, you can call the expire_fragment method, passing it a regular expression. This regular expression will match all cached fragments for the ticket’s project for all users, effectively wiping clean the slate for this project in terms of cached pages. Inside your after_create method you’ll put this:
expire_fragment(/projects/#{ticket.project.id}/.*?/)
Now when you create a new ticket for a project, this expire_fragment method will be called. Let’s try this out now, creating a new ticket by clicking the New Ticket link on a project’s page and filling out the form. Once you’ve clicked the Create Ticket button on the form, you’ll see this in the console:
Expire fragment (?-mix:projects/1/.*?) (327.3ms)
Rails has gone through and expired all the fragments associated with this ticket’s project. If you now go into tmp/cache and into any one of the directories there looking for a file, you shouldn’t see any. The directories (with names like E62 and 3E0) will still exist, but there aren’t any files. This means that Rails has successfully cleared its cache of fragments for the project.
Let’s get your sweeper to perform this same action when tickets are updated and destroyed. Move the expire_fragment call into another method and then call it in the after_create, after_update, and after_destroy methods in TicketsSweeper using the code shown in the following listing.
Listing 16.4. app/sweepers/tickets_sweeper.rb
class TicketsSweeper < ActionController::Caching::Sweeper
  observe Ticket
  def after_create(ticket)
    expire_fragments_for_project(ticket.project)
  end

  def after_update(ticket)
    expire_fragments_for_project(ticket.project)
  end

  def after_destroy(ticket)
    expire_fragments_for_project(ticket.project)
  end

  private

    def expire_fragments_for_project(project)
       expire_fragment(/projects/#{project.id}/.*?/)
    end
end
Now you have Rails caching the pages of tickets for all projects in your application and clearing that cache when tickets are updated. This is a great demonstration of caching on a per-user basis, even if your project page isn’t that intensive. If you had a system resource (CPU/memory) intensive action in your application that required user customization like this, you could use this same method to cache that action to stop it from being hit so often, which would reduce the strain on your server.
If you were still using caches_page, you wouldn’t use expire_fragment to expire the cache files that were generated. Instead, you’d use expire_page, which can take a hash like this:
expire_page(:controller => "projects",
:action => "show",
:id => 1)
Or, better still would be to pass it the URL helper:
expire_page(project_path(1))
Even though you’re not caching pages any more, it’s still handy to know how to clear cached pages and fragments.
Let’s make a commit now for this:
git add .
git commit -m "Add fragment caching to ticket listings on a project"
Another way to ease the load on the server side is to use the browser (client) side caching by sending back a 304 Not Modified status from your Rails application. In the next section, we’ll look at a Rails controller method that’ll help you with this.
16.3.4. Client-side caching
There’s one more method in the controller you’re going to see in this section, and that’s the fresh_when method. This method will send an ETag[11] header back with the initial request to a client, and then the client’s browser will cache that page with that ETag on the client’s machine.[12] The ETag is the unique identifier for this page, or entity, at the current point in time.
11 The E stands for entity. More information is available on the Wikipedia page for this: http://en.wikipedia.org/wiki/HTTP_ETag.
12 If Private Browsing is turned on in the browser, this wouldn’t happen.
In this situation, you’ll use this type of caching for the show action on a ticket in a project, meaning the URL will be something like /projects/1/tickets/2. The first request to this action after you’re done will follow the steps shown in figure 16.10.
Figure 16.10. ETag caching
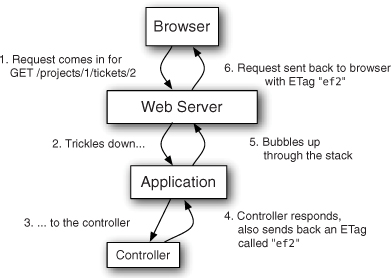
The next time the page is requested, the browser will send a request with the ETag it received on the first request to the server, this time in a If-None-Match header. The server then regenerates the ETag for the page that’s been requested and compares it against the If-None-Match incoming header. If these two match, then the server will send back a 304 Not Modified header, telling the browser to use its cached copy. This means that, rather than having the server re-render the view and its pieces, the client does all the hard work of just re-showing the initial page. This whole process is shown in figure 16.11.
Figure 16.11. 304 Not Modified response

Even though this goes through the same series of events both times, what happens in the controller is the clincher: by returning a 304 Not Modified, you can respond with a lightweight response and get the user’s browser to render the page, rather than having your application do it again.
For your ticket page, you’re going to want your application to send back this status only when your ticket hasn’t been updated. When a ticket’s information such as the title or description is updated, or when a comment is posted to the ticket, you’d want to send back a proper response rather than the 304 Not Modified header. It’s this timestamp that you’re going to be using to determine if a page is either fresh or stale. A fresh page is one that’s been recently updated, with a stale page being one that hasn’t been.
You’ve got a column in your tickets table that you can use to determine if a ticket’s been updated: the updated_at column. Each time a ticket’s updated through your application, this field will be set to the timestamp automatically. But, when a comment is posted to the ticket, the updated_at field for the ticket will remain the same.
To fix this problem, you can configure the Comment model to touch the ticket object it’s related to, which will update its updated_at timestamp. The way you do this is with an option on the belongs_to association in Comment called touch. Let’s change the belongs_to :ticket line currently in app/models/comment.rb to this:
belongs_to :ticket, :touch => true
Whenever a comment is updated, created, or even destroyed, the related ticket’s updated_at attribute will be updated. With the touch option, you can now confidently use this attribute to provide a reliable timestamp for your new form of caching. This particular form of caching uses a new method in your controllers called fresh_when.
To make the show action in TicketsController conditionally send back the 304 Not Modified, put this at the bottom of the show method in app/controllers/tickets_controller.rb:
fresh_when :last_modified => @ticket.updated_at,
            :etag => @ticket.to_s + current_user.id.to_s
The last_modified option here sends back another header to the client: the Last-Modified header. This header is used by a browser to detect when the page was last updated, which provides a near-identical purpose to an ETag. A browser sends an If-Modified-Since header that contains the last Last-Modified time. If the server sees that the Last-Modified time is later than the If-Modified-Since, it will send a new copy of the page. Otherwise, it will send a 304 Not Modified header.
The :etag option tells fresh_when to generate a new ETag for the resource. Until this resource changes, the ETag generated will be the same for each user. This wouldn’t be the case if you didn’t pass through the current_user.id.to_s to the ETag, but only for two user accounts accessed on the same computer. By using the current_user’s id attribute to seed the etag option, the tag will be different between users. How this ETag is generated differs from implementation to implementation; in Rails it’s an MD5 hash, which is guaranteed uniqueness.
Even though these two options are nearly identical, some browsers may support one or the other. It’s more of a way to cover your bases to pass through both headers, and it’s a worthwhile thing to cover.
You can see this in action now if you attempt to visit a ticket’s page. Your first request will have a final line that says something like this:
Completed 200 OK in 486ms (Views: 200.4ms | ActiveRecord: 5.6ms)
In this instance, the views have been rendered and the entire procedure has taken 486ms. Rather than refreshing the page (because in some browsers, this triggers them to not send the If-Modified-Since or If-None-Match headers), you’ll go back to the project’s page and then click back on the same ticket again. This time in the server output you’ll see this output:
Completed 304 Not Modified in 267ms
The server has sent back a 304 Not Modified response in a slightly quicker time than your original request, mainly because it didn’t have to re-render the views for the application and send back all that HTML.
This is another way to ease the load on your server, by getting the browser to deal with the page caching and serving, rather than the server.
That wraps up this section. You’ve made a small change here you should probably commit. You can do that by typing these commands into the terminal:
git add .
git commit -m "Add ETag and Last-Modified
               support to ticket show page"
You’ve now seen many different flavors of controller caching, ranging from caching pages and caching actions (actually, fragments), to getting the browser to take care of the hard part of the caching process (storing a file and expiring it). All of these caching methods deal with caching entire pages, so what’s a Railer supposed to do if they want to cache only a bit of a page at a time? For that, you can tell Rails to cache just these parts using an aptly named method: cache.
16.3.5. Caching page fragments
If part of a page takes a long time to render, then that’s a problem. To fix this kind of problem, you can use fragment caching, which allows you to cache fragments of pages using the cache method in your views where appropriate. This method takes a block, like this:
<% cache do %>
  # some horribly long and complex thing
<% end %>
This way, when Rails attempts to load the page and comes across your cache call, it will check to see if there’s an available fragment for it. Otherwise it will perform the code inside the block and then store it in tmp/cache, just like caches_action does for an entire page.
You don’t have an actual use-case for this in your application at the moment, but you’ll still use it just to see what it does. You’re going to be using it back on the app/views/projects/show.html.erb view, meaning you’re going to want to temporarily disable caches_action in ProjectsController for this action so that it doesn’t cache the page before cache has a chance to run. You can do this by simply removing the lines in ProjectsController:
# caches_action :show, :cache_path => (proc do
#   project_path(params[:id]) + "/#{current_user.id}/#{params[:page] || 1}"
# end)
In the app/views/projects/show.html.erb, the primary content that’s going to be changing is the list of tickets, and so you’ll want to cache that and leave out the rest. To do this, you’ll wrap the whole list of tickets, including the pagination link above it, in a cache block, as shown in the following listing.
Listing 16.5. app/views/projects/show.html.erb
<% cache do %>
  <%= paginate @tickets %>
  <ul id='tickets'>
    <% @tickets.each do |ticket| %>
      <li>
        <%= render ticket.state if ticket.state %>
        #<%= ticket.id %> - <%= link_to ticket.title, [@project, ticket] %>
      </li>
    <% end %>
  </ul>
<% end %>
The next time you reload this page in your browser, you’ll see this line in your server’s output:
Write fragment views/localhost:3000/projects/1 (3.0ms)
Look familiar? It’s exactly the same output generated by caches_action. The cache method that you just used assumes that it’s only being used once per page and so will save it with the same path (more commonly referred to as the cache key). You had a problem with this initially, didn’t you?
Yes, you did. It was saving the page name just fine, but it didn’t care if you were on your first page of pagination or the last, it was always showing the first cached page. If you click the Next link on your pagination, you’ll find that you’ve regressed this behavior accidentally. Not to worry, this is easy to fix. You need to tell your cache method that there’s more than one type of this page. You can do that by passing a string containing the page number to the method to give it a unique name, or key. By making this key unique for each page, Rails will cache a list of tickets for each page rather than one for all.
To fix this, change the cache call in your app/views/projects/show.html.erb file to this:
<% cache "projects/#{@project.id}/#{params[:page] || 1}" do %>
When you refresh this page and switch back into the terminal where your server is running, you’ll see this line of output:
Write fragment views/projects/1/1 (3.3ms)
You’ve specified the key that the cache now uses to store the fragment, and so you’ll see that it’s saved it as views/projects/1/1 now, with the first 1 being the ID of your project and the second one being the page number. If you create, update, or delete a ticket, you’ll see that this fragment gets cleared away.
Expire fragment (?-mix:projects/1/.*?) (1.9ms)
The next time you revisit the project’s page, you’ll see that it rewrites the fragment again:
Write fragment views/projects/1/1 (1.5ms)
In this section, you’ve seen that fragment caching is useful not only for caching dynamic actions with caches_action, but also for caching small chunks of pages by using the cache method. The latter allowed you to cache a small fragment of the page rather than the entire page, which is great if you have a small chunk of the page that takes a long time to render. You didn’t, but it’s always good to know what tools are available if you come up against this particular beast.
With the cache method in the view, you don’t have to set the cache_path for the user because you’re only caching the part of the page that is user-agnostic. Everything else in either the layout or elsewhere in this view would be processed each time the page is requested, but the part you have cached will be retrieved from that cache and added to the output, rather than re-processed. All in all, this solution is more elegant than caches_action. Another commit is in order!
git add . git commit -m "Implement tidier caching for the ticketslist on the projects page"
That covers all the major methods for basic caching in controllers and views. You’ve seen ways to cache entire pages and parts of pages as cached files on the filesystem. In a Rails application there may be a lot of reading and writing to the filesystem, which can cause degradation of performance, so storing these files on the filesystem may not be the best idea. A speedier way of doing this would be to store these files in memory by switching the cache store that Rails uses. You can do this by putting this line in one of your config/environments files, probably production.rb:
config.action_controller.cache_store = :memory_store
Rather than storing the fragments on the file system, Rails will now store them in memory along with the code for the application. The retrieval time is faster here, but comes at the cost losing the cache if the server was ever stopped. If you want something more persistent, you may choose to use either Memcached (http://memcached.org) or Redis (http://redis.io). We won’t go into these in this chapter, as they exceed the boundaries of what would be considered basic performance enhancements.
In this section you’ve learned how to use fragment caching to store parts of the view that may take a long time to process. This type of caching would store these fragments in the tmp/cache directory; they can be retrieved later on.
16.4. Background workers
There are other situations where requests can be slow for your application too. One of these cases would be if a ticket had a large number of watchers, and a comment was posted to that ticket. The reason for this slowdown would be because Rails would have to iterate through all the watchers and send out the update notification email to each of them individually, using the feature that you developed in chapter 12.
Rather than having a user make the request to create a comment in the application, having the server process the email notifications, and then send a response back, you can take the long-running task of sending these emails and move it into a job that runs in a background.
This will work by having your CommentObserver add the task of sending these emails to a job queue that runs in the background. You’ll then have a background process separate from your application that will run these jobs as it receives them. This way, the hard work is done behind the scenes and the user receives the request back almost as if nothing of consequence happened.
To make this happen, you’ll use a gem called delayed_job. This gem will allow you to create a table in your database where the jobs that the background worker needs to work off will be stored. The gem will also provide you with the ability to start a worker process. To add this to your application you’ll put this line in your Gemfile:
gem 'delayed_job'
Then you’ll need to run bundle install to install it. Once you’re done there, you can run this command, which will generate a migration to create the delayed_job table:
rails g delayed_job
You can now run this migration with rake db:migrate db:test:prepare. That’s all that’s needed to set up the gem itself.
Your next task is to create a job. A job is any object that responds to perform. This method needs to perform the action of sending out the email to all the watchers of the ticket, which is currently the responsibility of the after_create method in CommentObserver, which uses this code:
watchers = comment.ticket.watchers - [comment.user]
watchers.each do |user|
  Notifier.comment_updated(comment, user).deliver
end
You’ll take this code out of the after_create method and replace it with code to enqueue your job to be performed, using a method given to you by the delayed_job gem:
Delayed::Job.enqueue CommentNotifierJob.new(comment.id)
The CommentNotifierJob class here will actually be a Struct object. You can create the code by first creating a new directory called app/jobs and then a new file in it called comment_notifier_job.rb, using the code you stole from the after_create method as shown in the following listing.
Listing 16.6. app/jobs/comment_notifier_job.rb
class CommentNotifierJob < Struct.new(:comment_id)
  def perform
    comment = Comment.find(comment_id)
    watchers = comment.ticket.watchers - [comment.user]
    watchers.each do |user|
      Notifier.comment_updated(comment, user).deliver
    end
  end
end
In the perform method here, you find the comment based on the comment_id and then iterate through all the watchers of the comment’s ticket who are not the commenter themselves, sending them each an email that the ticket has been updated with a new comment.
By enqueueing this job using the Delayed::Job.enqueue method, the delayed_job gem will store a marshalled format (actually a YAML string) of this object in the table, such as this:
--- !ruby/struct:CommentNotifierJob
comment_id: 1
When a worker reads this row, it will convert this marshalled object back into a real object and then call the perform method on it. The reason for making another class and using a Struct over using one such as the Comment is that a Struct object will always be lighter than a full-on class that inherits from ActiveRecord::Base. If you enqueued a Comment object instead, the result would be this:
"--- !ruby/
     ActiveRecord:Comment
attributes:
  text: This is a comment
  ticket
     _id: 1
  user_id: 2
  created_at: &id001 2011-04-
     21 09:35:20.497749 Z
  updated_at: *id001
  state_id:
  previous_sta
     te_id:
  id: 1
"
This contains a lot of useless information that you don’t care about when you’re enqueueing the job, and so you should not use it. When enqueueing jobs, you should always try for the lightest possible solution so that the job is queued quickly.
Now when a comment is created, a job will be enqueued to notify the watchers of the relevant ticket. This job is actually a record in a table called delayed_jobs that the worker reads from, running each job one at a time and working them off the queue. When there are no more jobs, it will simply wait.
To make sure that this is working, you’re going to write a test for it. The test should check that a job is enqueued when a comment is created and that the watchers of the comment’s ticket are notified by email when the job is run. Primarily, this test will check the perform method in the Comment model, and so you’ll put it in spec/models/comment_spec.rb, using the code shown in the following listing.
Listing 16.7. spec/models/comment_spec.rb
require 'spec_helper'

describe Comment do
  let(:user) { Factory(:user) }

  before do
    @ticket = Factory(:ticket)
    @ticket.watchers << user
  end

  it "notifies people through a delayed job" do
    Delayed::Job.count.should eql(0)
    ticket.comments.create!(:text => "This is a comment",
                            :user => ticket.user)
    Delayed::Job.count.should eql(1)

    Delayed::Worker.new.work_off!
    Delayed::Job.count.should eql(0)

    email = ActionMailer::Base.deliveries.last
    email.to.should eql(user.email)
  end
end
At the beginning of the describe Comment block, you set up a user who will be the one to watch the ticket that you set up in the before block.
In the test itself you make reference to a Delayed::Job class, which is actually a model provided by the delayed_job gem which connects to the delayed_jobs table. You call count first up and make sure that’s 0 because you don’t want any jobs in the table before comments exist.
Next, you create a comment for the ticket, making it originate from the creator of the ticket (ticket.user). This way, you can be sure that the user you set up with the let block will receive the notification. After the comment has been created, there should be exactly one job in the table.
You then call Delayed::Worker.new.work_off(1) to create a new Delayed ::Worker instance that will work off a single job on the queue and then finish.[13] When it’s done, there will be no more jobs in the queue.
13 The default of this method is 100 jobs.
Finally, you check that the last email sent out (by referencing ActionMailer::Base.deliveries, which stores the emails that have been sent but only in the test environment) has gone to the user who should have been notified, indicating that the job has run successfully.
This test should pass automatically because you’ve already implemented the feature. You can see this by running bin/rspec spec/model/comment_spec.rb:
1 example, 0 failures
Great! Now when a comment is created it should be created at the same speed, independent of the number of watchers on a ticket. Although the number of watchers on a ticket would have to reach a high number before a problem like this would arise, it is still a perfect example of how you can use delayed_job to queue jobs in the background.
One final thing. You’ve seen how you can enqueue the jobs and work them off using the Delayed::Worker#work_off method, but that isn’t quite the way you’d do it in the real world or in a production environment. There, you’d run a command like this:
script/delayed_job start
This command will start a single delayed job worker,[14] which will check the database every five seconds for jobs and work them off as they come in. However, there is no monitoring in place for this, and so it is advisable that a tool such as Monit or God is used to monitor this process and restart it if it happens to go down.
14 Watch out: this loads the entire Rails environment again. On a low-memory system, a large number of Rails instances and job workers can suck up all the RAM of the system. It is advised to take care when deciding how many of each process are running on a machine. If this is outside the bounds of the system, then perhaps it is time to upgrade.
You can stop this job runner by using this command:
script/delayed_job stop
If you’re using delayed_job extensively, you may wish to start more than one worker, which you can do by passing in the -n option to the command, like this:
script/delayed_job -n 2 start
This particular example will start two workers rather than one. For more examples on how to use this gem, check out the README on https://github.com/collectiveidea/delayed_job.
That does it for background jobs. You’ve learned how to take things that could potentially slow down a request and move them into the background, allowing the Rails application to continue serving the request.
Let’s make a commit for these changes:
git add .
git commit -m "Ticket notifications are now a background job"
git push
Now you’re done!
16.5. Summary
In this chapter you learned how to implement small, easy changes that help your application perform faster, beginning with pagination and ending with view-fragment caching and delayed jobs.
By using pagination, you’re able to lighten the load on the database by retrieving smaller sets of records at a time. This is the easiest way to lessen the load on your application’s infrastructure.
Database queries are often the bottleneck in the application because they may inadvertently be performed in excessive amounts, or they may not be indexed in the correct manner. You saw in the beginning how to implement eager loading for your queries so that rather than doing more requests than necessary, Rails will load all the necessary objects in a second, separate query.
The second way to improve database performance is to use an index similar to the page titles in a phonebook, but for a database. If you had a large number of records in your database, the index would allow for speed increases in the lookups for records for that index.
If your database speed can’t be enhanced any further, then the next stop is caching the resulting pages from your actions. You first attempted to use caches_page but found that it came with a couple of problems: the page was available to all users regardless of their authorization, showing “Signed in as x” where “x” was the first user who requested the page, and it completely ignored your page parameter. So you moved on to the caches_action method, which allowed you to pass an option called cache_path to define where your file was saved.
Then you learned that you can cache specific parts of a view using the simply named cache method in them. This saves fragments of a view into the tmp/cache directory, allowing you to store the result of potentially computationally expensive parts of your view.
These are the basic concepts for enhancing the performance of your application. There is more you can do, like integrating with tools such as Memcached (http://memcached.org) and Redis (http://redis.io), and interacting with the Rails.cache variable which gives you fine-grained control over the cache that Rails uses to store fragments and can be used to store other pieces of information.