
Chapter 10. Tracking state
- Adding a state-tracking ability to a model
- Using callbacks within Active Record
- Preventing basic form hacking
In a ticket-tracking application such as Ticketee, tickets aren’t there to provide information about a particular problem or suggestion; rather, they’re there to provide the workflow for it. The general workflow of a ticket is that a user will file it and it’ll be classified as a “new” ticket. When the developers of the project look at this ticket and decide to work on it, they’ll switch the state on the ticket to “open” and, once they’re done, mark it as “resolved.” If a ticket needs more information on it then they’ll add another state, such as “needs more info.” A ticket could also be a duplicate of another ticket or it could be something that the developers determine isn’t worthwhile putting in. In cases such as this, the ticket may be marked as “duplicate” or “invalid,” respectively.
The point is that tickets have a workflow, and that workflow revolves around state changes. You’ll allow the admin users of this application to add states, but not to delete them. The reason for this is if an admin were to delete a state that was used, then you’d have no record of that state ever existing. It’s best if, once states are created and used on a ticket, they can’t be deleted.[1]
1 Alternatively, these states could be moved into an “archive” state of their own so they couldn’t be assigned to new tickets but still would be visible on older tickets.
To track the states, you’ll let users leave a comment. With a comment, users will be able to leave a text message about the ticket and may also elect to change the state of the ticket to something else by selecting it from a drop-down box. But not all users will be able to leave a comment and change the state. You’ll protect both creating a comment and changing the state.
By the time you’re done with all of this, the users of your application will have the ability to add comments to your tickets. Some users, due to permission restriction, will be able to change the state of a ticket through the comment interface.
You’ll begin with creating that interface for a user to create a comment and then build on top of that the ability for the user to change the state of a ticket while adding a comment. Let’s get into it.
10.1. Leaving a comment
Let’s get started by adding the ability to leave a comment. When you’re done you will have a simple form that looks like figure 10.1.
Figure 10.1. The comment form

To get started with this you’ll write a Cucumber feature that goes through the process of creating a comment. When you’re done with this feature, you will have a comment form at the bottom of the show action for the TicketsController which you’ll then use as a base for adding your state drop-down box later on. Put this feature in a new file at features/creating_comments.feature, and make it look like the following listing.
Listing 10.1. features/creating_comments.feature
Feature: Creating comments
  In order to update a ticket's progress
  As a user
  I want to leave comments

  Background:
    Given there are the following users:
      | email             | password |
      | [email protected] | password |
    And I am signed in as them
    And there is a project called "Ticketee"
    And "[email protected]" can view the "Ticketee" project
    And "[email protected]" has created a ticket for this project:
    | title                   | description                            |
    | Change a ticket's state | You should be able to create a comment |
  Given I am on the homepage
  And I follow "Ticketee"

Scenario: Creating a comment
  When I follow "Change a ticket's state"
  And I fill in "Text" with "Added a comment!"
  And I press "Create Comment"
  Then I should see "Comment has been created."
  Then I should see "Added a comment!" within "#comments"

Scenario: Creating an invalid comment
  When I follow "Change a ticket's state"
  And I press "Create Comment"
  Then I should see "Comment has not been created."
  And I should see "Text can't be blank"
Here you navigate from the homepage to the ticket page by following the respective links, fill in the box with the label Text, and create your comment. You’ve put the link to the ticket inside the scenarios rather than the Background because you’ll use this feature for permission checking later on. Let’s try running this feature now by running bin/cucumber features/creating_comments.feature.
10.1.1. Where’s the ticket?
You’ll see that, after it follows the Ticketee link on the page, it can’t find the ticket. What?
And I follow "Change a ticket's state"
  no link with title, id or text 'Change a ticket's state'
  found (Capybara::ElementNotFound)
Uh oh, something’s gone wrong and for some reason Capybara can’t find the link. Before the failing step in the scenario you put this line:
Then show me the page
This step will show the exact page that Capybara sees when it tries to follow this link, providing a certain gem is installed. If you run this feature by using bin/cucumber features/creating_comments.feature, you’ll be told to install the launchy gem:
Sorry, you need to install launchy to open pages: `gem install launchy`
Warning
Launchy is known to be problematic on Windows and just may not work at all. As a replacement, you may have to manually open the pages created in the tmp directory called capybara-[date].
Launchy is the gem responsible for launching the browser to show you the page. Launchy also provides a common cross-platform of launching different applications. Rather than installing this using gem install launchy, you’ll add this to your Gemfile inside the cucumber group because you only need this gem for your Cucumber features. The whole cucumber group for your Gemfile should now look like this:
group :test do
  gem 'cucumber-rails'
  gem 'capybara'
  gem 'database_cleaner'
  gem 'factory_girl'
  gem 'email_spec'
  gem 'launchy'
end
When you run bundle install, it will install the launchy gem for you. Let’s rerun your feature again. This time, a page pops up with your home page, as shown in figure 10.2.
Figure 10.2. The home page
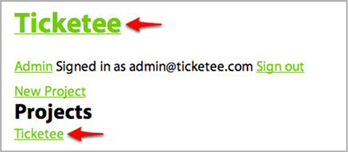
See how there are two Ticketee links on this page? Capybara’s dutifully following your instruction to click the Ticketee link, and it clicks the first link it finds on the page! You want it to click the second link. Let’s change the line in your features/creating_comments.feature that follows this link to the following:
And I follow "Ticketee" within "#projects"
Here you use the within version of this step which will look up the link within the element with the id attribute set to “projects.” No element currently has this attribute, so let’s preempt the scenario failing on this step and add this id to the ul element in app/views/projects/index.html.erb, as shown in the following listing.
Listing 10.2. app/views/projects/index.html.erb
<ul id='projects'>
  <% for project in @projects %>
    <li><%= link_to project.name, project %></li>
  <% end %>
</ul>
Good! That should make your scenario follow the correct link. Try rerunning it now. You should see this:
And I fill in "Text" with "Added a comment!"
  cannot fill in, no text field, text area or password field
  with id, name, or label 'Text' found (Capybara::ElementNotFound)
Oops! A web page from the "Then show me the page" step came up. Remove this step from your scenario now.
This failing step means that you’ve got work to do! The label it’s looking for is going to belong to the comment box underneath your ticket’s information.
10.1.2. The comment form
Let’s continue building this comment form for the application, the same one to which you’ll eventually add a state-select box to complete this feature. This comment form will consist of a single text field in which the user can insert their comment.
Add a single line to the bottom of app/views/tickets/show.html.erb to render the comment form partial:
<%= render "comments/form" %>
This line renders the partial from app/views/comments/_form.html.erb, which you now create and fill with the content from the following listing.
Listing 10.3. app/views/comments/_form.html.erb
<strong>New comment</strong>
<%= form_for [@ticket, @comment] do |f| %>
  <%= f.error_messages %>
  <p>
    <%= f.label :text %><br>
    <%= f.text_area :text %>
  </p>

  <%= f.submit %>
<% end %>
Pretty much the standard form_for here, except you use the Array-argument syntax again, which will generate a nested route. You need to do four things before this form will work.
First, you must define the @comment variable in the show action in TicketsController so this form_for has something to work with.
Second, you need to create the Comment model and associate this with your Ticket model so you can create new records from the data in the form and associate it with the right ticket.
Third, you need to define the nested resource so that the form_for knows to POST to the correct URL, one similar to /tickets/1/comments. Without this, you run into an undefined method of ticket_comments_path when the form_for tries to generate the URL by combining the classes of the objects in the array for its action.
Finally, you need to generate the CommentsController and the create action along with it so that your form has somewhere to go when a user submits it.
Now set up your TicketsController to use the Comment model for creating new comments, which you’ll create shortly afterward. To do this, you need to first build a new Comment object using the comments association on your @ticket object.
10.1.3. The comment model
The first step to getting this feature to pass is to set up the show action in your TicketsController to define a @comment variable for the comment form. To do this, change the show action, as shown in the following listing.
Listing 10.4. app/controllers/tickets_controller.rb
def show
  @comment = @ticket.comments.build
end
This will use the build method on the comments association for your @ticket object (which is set up by the find_ticketbefore_filter) to create a new Comment object for the view’s form_for.
Next, you generate the Comment model so that you can define the comments association on your Ticket model. This model’s going to need to have an attribute called text for the text from the form, a foreign key to link it to a ticket, and another foreign key to link to a user record. Let’s generate this model using this command:
rails g model comment text:text ticket_id:integer user_id:integer
Then run the migration for this model on both your development and test databases by running these familiar commands:
rake db:migrate
rake db:test:prepare
With these done, your next stop is to add the associations to the Ticket and Comment models. For this, you add this line to app/models/ticket.rb directly under the accepts_nested_attributes_for :assets line:
has_many :comments
Add a validation to your Comment model to validate the presence of text for the records by adding this line to app/models/comment.rb:
validates :text, :presence => true
This will help your second scenario pass, because it requires that an error message is displayed when you don’t enter any text. You also add a belongs_to association definition to this model, given that you have a user_id column in your comments table:
belongs_to :user
When you run your feature at this mid-point, you’re told that it can’t find the routing helper that form_for is trying to use:
undefined method `ticket_comments_path' for ...
This is because you don’t have a nested route for comments inside your tickets resource yet. To define one, you need to add it to config/routes.rb.
Currently in your config/routes.rb you’ve got the tickets resource nested inside the projects resource with these lines:
resources :projects do
  resources :tickets
end
This generates helpers such as project_tickets_path. But for your form it’s not important what comment the project is being created for, so you use ticket_comments_path instead. This means you need to define a separate nonnested resource for your tickets and then a nested resource under that for your comments, as shown in the following listing.
Listing 10.5. config/routes.rb
resources :projects do
  resources :tickets
end

resources :tickets do
  resources :comments
end
The last three lines in listing 10.5 are the lines you need in order for ticket_comments_path to be defined, which will make your form work.
10.1.4. The comments controller
Now finally you need to generate the CommentsController so that your form has somewhere to post to. You can do this by running the following command:
rails g controller comments
A create action in this controller will provide the receiving end for the comment form, so you should add this now. You need to define two before_filters in this controller. The first is to ensure the user is signed in, because you don’t want anonymous users creating comments; the other is to find the Ticket object. This entire controller is shown in the following listing.
Listing 10.6. app/controllers/comments_controller.rb
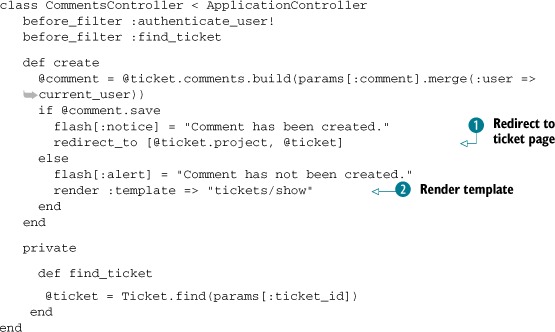
In this action you use the template option of render when your @comment.save returns false to render a template of another controller. Previously you’ve used the action option to render templates that are for the current controller. By doing this, the @ticket and @comment objects will be available when the app/views/tickets/show.html.erb template is rendered.
If the object saves successfully you redirect back to the ticket’s page by passing an Array argument to redirect_to ![]() , which compiles the path from the arguments passed in, like form_for does to a nested route similar to /projects/1/tickets/2.
, which compiles the path from the arguments passed in, like form_for does to a nested route similar to /projects/1/tickets/2.
But if the object doesn’t save successfully you want it to render the template that TicketsController’s show action renders. You can do this by using the render method and passing it "tickets/show" ![]() . Keep in mind that the render method doesn’t call the action, and so any code within the show method of TicketsController wouldn’t be run. This is fine, though, because you’re setting up the @ticket variable the template renders by using the find_ticket before filter in your controller.
. Keep in mind that the render method doesn’t call the action, and so any code within the show method of TicketsController wouldn’t be run. This is fine, though, because you’re setting up the @ticket variable the template renders by using the find_ticket before filter in your controller.
By creating the controller, you’ve now got all the important parts needed to create comments. Let’s run this feature again by running bin/cucumber features/creating_comments.feature to see how you’re progressing. You see that it’s able to create the comment but it’s unable to find the text within the #comments element on the page:
Then I should see "Added a comment!" within "#comments"
  Unable to find css "#comments" (Capybara::ElementNotFound)
This step is failing because you haven’t added the element with the id attribute of comments to the show template yet. This element will contain all the comments for a ticket. Let’s add it by entering the code from the following listing above the spot where you render the comment form partial.
Listing 10.7. app/views/tickets/show.html.erb
<h3>Comments</h3>
<div id='comments'>
  <% if @ticket.comments.exists? %> <co id='ch10_191_1' />
    <%= render @ticket.comments.select(&:persisted?) %>
  <% else %>
    There are no comments for this ticket.
  <% end %>
</div>
Here you create the element the scenario requires: one with an id attribute of comments. In this you check if there are no comments by using the exists? method from Active Record. This will do a light query similar to this to check if there are any comments:
SELECT "comments"."id" FROM "comments"
WHERE ("comments".ticket_id = 1) LIMIT 1
It only selects the id column from the comments table and limits the result set to 1, which results in a super-fast query to check if there are any comments. You used exists? back in chapter 8 when you checked if a ticket had any assets. You could use empty? here instead, but that would load the comments association in its entirety and then check to see if the array was empty. If there were a lot of comments, then this would be slow. By using exists?, you stop this potential performance issue from cropping up.
Inside this div, if there are comments, you call render and pass it the argument of @ticket.comments. On the end of that call, select on it.
You use select here because you don’t want to render the comment object you’re building for the form at the bottom of the page. If you left off the select, @ticket.comments would include this new object and render a blank comment box. When you call select on an array, you can pass it a block that it will evaluate on all objects inside that array and return any element that makes the block evaluate to anything that’s not nil or false.
The argument you pass to select is called a Symbol-to-Proc and is a shorter way of writing this:
{ |x| x.persisted? }
This is a new syntax versions of Ruby >= 1.8.7 and used to be in Active Support in Rails 2. It’s a handy way of writing a shorter block syntax if you’re only looking to call a single method on an object.
The persisted? method checks if an object is persisted in the database by checking if it has its id attribute set and will return true if that’s the case and false if not.
By using render in this form, Rails will render a partial for every single element in this collection and will try to locate the partial using the first object’s class name. Objects in this particular collection are of the Comment class, so the partial Rails will try to find will be at app/views/comments/_comment.html.erb, but you don’t have this file right now. Let’s create it and fill it with the content from the following listing.
Listing 10.8. app/views/comments/_comment.html.erb
<%= div_for(comment) do %>
  <h4><%= comment.user %></h4>
  <%= simple_format(comment.text) %>
<% end %>
Here you’ve used a new method, div_for. This method generates a div tag around the content in the block and also sets class and id attributes based on the object passed in. In this instance, the div tag would be the following:
<div id="comment_1" class="comment">
The class method from this tag is used to style your comments so that they will look like figure 10.3 when the styles from the stylesheet are applied.
Figure 10.3. A comment

With the code in place not only to create comments but also to display them, your feature should pass when you run it with bin/cucumber features/creating_comments.feature:
2 scenario (2 passed)
23 steps (23 passed)
Good to see. You’ve now got the base for users to be able to change the state of a ticket. Before proceeding further, you should make sure that everything is working as it should by running rake cucumber:ok spec, and you should also commit your changes. When you run the tests, you’ll see this output:
48 scenarios (48 passed)
492 steps (492 passed)
# and
32 examples, 0 failures, 15 pending
Good stuff! Let’s commit and push this:
git add .
git commit -m "Users can now leave comments on tickets"
git push
With this form added to the ticket’s page, users are now able to leave comments on tickets. This feature of your application is useful because it provides a way for users of a project to have a discussion about a ticket and keep track of it. Next up, we’ll look at adding another way to provide additional context to this ticket by adding states.
10.2. Changing a ticket’s state
States provide a helpful way of standardizing the way that a ticket’s progress is tracked. By glancing at the state of a ticket, a user will be able to determine if that ticket needs more work or if it’s complete, as shown in figure 10.4.
Figure 10.4. A ticket’s state

To change a ticket’s state, you’ll add a drop-down box on the comment form where a user can select a state from a list of states. These states will be stored in another table called states, and they’ll be accessed through the State model.
Eventually, you’ll let some users of the application have the ability to add states for the select box and make one of them the default. For now, you’ll focus on creating the drop-down box so that states can be selected.
As usual, you’ll cover creating a comment that changes a ticket’s state by writing another scenario. The scenario you’ll now write goes at the bottom of features/creating_comments.feature and is shown in the following listing.
Listing 10.9. features/creating_comments.feature
Scenario: Changing a ticket's state
  When I follow "Change a ticket's state"
  When I fill in "Text" with "This is a real issue"
  And I select "Open" from "State"
  And I press "Create Comment"
  Then I should see "Comment has been created."
  And I should see "Open" within "#ticket .state"
In this scenario, you follow a ticket’s link from the homepage (which you go to in the Background) and go through the process of creating a comment, much like in the Creating Comments feature, only this time you select a state. This is the first part of the scenario that you can expect to fail because you don’t have a state-select box yet. After the comment is created, you should see the state appear in the #ticket .state area. This is the second part of the scenario that will fail.
When you run this scenario by running bin/cucumber features/creating_comments.feature:36, it will fail like this:
And I select "Open" from "State"
  cannot select option, no select box with id,
  name, or label 'State' found (Capybara::ElementNotFound)
As you can see from this output, the “I select” step attempts to select an option from a select box. In this case, it can’t find the select box because you haven’t added it yet! With this select box, users of your application should be able to change the ticket’s state by selecting a value from it, entering some comment text, and clicking the Create Comment button.
Before you do all that, however, you need to create the State model and its related table, which is used to store the states.
10.2.1. Creating the State model
Right now you need to add a select box. When you’re done, you should have one that looks like figure 10.5.
Figure 10.5. State select box

Before adding this select box, let’s set up the TicketsController’s show action to return a collection of states that you can populate the drop select box with. Change the show action to be like this now:
def show
  @comment = @ticket.comments.build
  @states = State.all
end
Here you call all on the State class, which doesn’t exist yet. You’ll be storing the states in a table because you’d like the users to be able to create their own states. For now, you define this State model to have a name field as well as two other fields: color and background, which define the colors of the label for this ticket. Later on, you’ll add a position field that you’ll use to determine the sort order of the states in the select box. Let’s create this State model and the associated migration by running this command:
rails g model state name:string color:string background:string
Before running this migration, you need to define a way that states link to comments and to tickets, but there are a couple of things worth mentioning beforehand. For comments, you want to track the previous state so you can display that a comment has changed the ticket’s state. For tickets, you want to track the state for which you’ll use a foreign key. With all of this in mind, let’s add these fields to the migration now. You also remove the timestamps call from within create_table because it’s not important when states were created or updated. When you’re done, the whole migration should look like the following listing.
Listing 10.10. db/migrate/[date]_create_states.rb
class CreateStates < ActiveRecord::Migration
  def up
    create_table :states do |t|
      t.string :name
      t.string :color
      t.string :background
    end

    add_column :tickets, :state_id, :integer
    add_index :tickets, :state_id

    add_column :comments, :state_id, :integer
  end

  def down
    drop_table :states
    remove_column :tickets, :state_id
    remove_column :comments, :state_id
  end
end
In this migration you use the add_index method to add a database index on the tickets table’s state_id field. By adding an index on this field, you can speed up queries made that search for this particular field. The side-effect of indexing is that it will result in slower writes and more disk space. It’s always important to have indexes on nonprimary-key fields[2] because of this great read speed increase.
2 Primary key in this case is the id field that is automatically created for each model by create_table. Primary key fields are, by default, indexed.
Let’s run this migration now by running these two commands:
rake db:migrate
rake db:test:prepare
There you have it! The State model is up and running. Let’s now associate this class with the Comment class by adding this line to the top of the Comment model’s definition:
belongs_to :state
The state method provided by this belongs_to will be used shortly to display the state on the ticket page, as in figure 10.6.
Figure 10.6. A ticket’s state
![]()
Before doing that, however, you need to add the select box for the state to the comment form.
10.2.2. Selecting states
In the comment form partial, add this select box underneath the text box, as shown in the following listing.
Listing 10.11. app/views/comments/_form.html.erb
<p>
  <%= f.label :state_id %>
  <%= f.select :state_id , @states.map { |s| [s.name, s.id] },
      :selected => @ticket.state_id %>

</p>
Here you use a new method, select, which takes its first argument as the foreign-key attribute of your Comment object, not the association. You also use the :state_id value for the argument passed to the label, but Rails is smart enough to know the text for this should be “State”. select’s second argument is a two-dimensional[3]Array that you create by using map on the State objects returned from the controller in the @states variable. The first element of each array is the value you want shown as an option in the select box to the user, whereas the second element is the value that’s passed back to the controller.
3 A two-dimensional array is an array that contains arrays as elements.
Use the :selected option in the select call to select the current state of the ticket from the list. This value must match the value argument for one of the options in the select box; otherwise it will default to the first option.
Let’s assume for a moment that you’ve got three states: New, Open, and Closed. For a ticket that has its state set to New, the select box generated by f.select would look like this:
<select id="comment_state_id" name="comment[state_id]">
  <option value="1" selected="selected">New</option>
  <option value="2">Open</option>
  <option value="3">Closed</option>
</select>
The first option tag in the select tag has an additional attribute: selected. When this attribute is set, the option is the one selected as the default option for the select. This is achieved by using the :selected option for f.select. The value for this option is the corresponding value attribute for the option tag. In this case, it’s the state_id of the @ticket object.
With the select box in place, you’re almost at a point where this scenario will be passing. Let’s see how far you’ve gotten by running bin/cucumber features/creating_comments.feature. It won’t be able to find the Open option in your select box:
And I select "Open" from "State" No such option 'Open' in this select box. Available options:(Capybara::OptionNotFound)
This is because you need to add a state to your database! Let’s add this line to the bottom of your Background in features/creating_comments.feature to do this:
Given there is a state called "Open"
Let’s now run the scenario using bin/cucumber features/creating_comments.feature so you can get the step definition. Put this step definition in a new file called features/step_definitions/state_steps.rb using this code:
Given /^there is a state called "([^"]*)"$/ do |name|
  State.create!(:name => name)
end
By defining this step and rerunning the scenario you’ll see that it’s now failing at the last step:
And I should see "Open" within "#ticket .state"
  Unable to find css "#ticket .state" (Capybara::ElementNotFound)
This output means it’s looking for any element with the id attribute of ticket that contains any type of element with the id of state, but it can’t find it.
Rather than putting the state inside the TicketsController’s show template, put it in a partial. This is due to the fact that you’ll be reusing this to display a state wherever you need it in the future. Additionally, you’ll apply a dynamic class around the state so you can style it later on. Let’s create a new partial at app/views/states/_state.html.erb and fill it with this content:
<div class='state state_<%= state.name.parameterize %>'>
  <%= state %>
</div>
To style the element you need a valid CSS class name. You can get one by using the parameterize method. If, for example, you had a state called “Drop bears strike without warning!” and used parameterize on it, all the spaces and non-URL-valid characters would be stripped, leaving you with “drop-bears-strike-without-warning,” which is a perfectly valid CSS class name. You’ll use this later on to style the state using the color and background attributes.
You’re now going to render this partial underneath the “Created by” line on app/views/tickets/show.html.erb using the following line:
<%= render @ticket.state if @ticket.state %>
You’re using the short form of rendering a partial here once again, and you conditionally render it if the ticket has a state. If you don’t have the if at the end and the state is nil, this will raise an exception because it will try to determine the model name of nil.
To get this state method for your Ticket, you should add the association method to the model. This method should go directly above the belongs_to :user line in app/models/ticket.rb:
belongs_to :state
If you run the feature again it will fail because there’s nothing shown in the #ticket .state element:
And I should see "Open" within "#ticket .state"
<false> is not true. (Test::Unit::AssertionFailedError)
This is because you’re updating the state on the Comment object you’re creating, not the associated Ticket object! You’re trying to get the new state to display on the ticket object so that the users of the application can change the state of a ticket when they add a comment to it. For this to work, you need to define a callback in your Comment model.
10.2.3. Callbacks
When a user selects a state from the drop-down box attached to the comment form on a ticket’s page, you want that ticket’s state to be updated with what that user picked.
To do this you can use a callback to set the ticket’s status when you change it through the comment form. A callback is a method that’s called either before or after a certain event. For models, there are before-and-after callbacks for the following events (where * can be substituted for either before or after):
- Validation (*_validation)
- Creating (*_create)
- Updating (*_update)
- Saving (*_save)
- Destruction (*_destroy)
You’re able to trigger a specific piece of code or method to run before or after any of these events. The Saving item in the list refers to when a record is saved to the database, which occurs when a record is created or updated. For your Comment model you want to define a callback that occurs after a record has been created, and for this you use the after_create method at the top of your Comment model, as well as a ticket association, transforming this model into the code shown in the following listing.
Listing 10.12. app/models/comment.rb
class Comment < ActiveRecord::Base
  after_create :set_ticket_state

  belongs_to :ticket
  belongs_to :user
  belongs_to :state
  validates :text, :presence => true
end
While you’re here, you can also set it up so that you can access the project association that the ticket association has in this model by using the delegates method:
delegate :project, :to => :ticket
If you call the project method on a Comment object, this method will “delegate” the project method to the ticket object, making a call exactly like ticket .project. This makes your code shorter and will come in handy later on.
The symbol passed to the after_create method here is the name of the method to call for this callback. You can define this method at the bottom of your Comment model using the code from the following listing.
Listing 10.13. app/models/comment.rb
class Comment < ActiveRecord::Base
  ...
  private

    def set_ticket_state
      self.ticket.state = self.state
      self.ticket.save!
    end
end
With this callback and associated method now in place, the associated ticket’s state will be set to the comment’s state after the comment is created. When you run your feature again by running bin/cucumber features/creating_comments.feature, it still fails:
And I should see "Open" within "#ticket .state"
   Failed assertion, no message given. (MiniTest::Assertion)
Even though you’re correctly assigning the state to the ticket, it still doesn’t display as the state in the view. But why is this? You can attempt to duplicate this issue by running the server using the rails server. By visiting http://localhost:3000, you can follow the steps inside the scenario to attempt to duplicate the behavior you’ve seen in your feature.
Because you have no states in the development database, you won’t be able to reproduce this problem right away. Your feature uses the “Given there is a state called...” steps to define states, but you can’t use these in your development environment. It would be better if you added seed data to your database because then you’ll have a repeatable way of setting up the states in your application’s database.
10.2.4. Seeding states
If you add some states to the db/seeds.rb file, users will be able to select them from the State drop-down box on the tickets page rather than leaving it blank and useless, much like it is now. With these states in the db/seeds.rb file, as mentioned before, you will have a repeatable way of creating this data if you ever need to run your application on another server, such as would be the case when you put the application on another computer.
You’re adding these files to the db/seeds.rb so you have some to play around with in the development environment of your application. You’re attempting to figure out why, when a user picks Open from the State select box and clicks Create Comment, the state doesn’t display on the ticket that should be updated.
When you go to the Ticketee Beta project to create a ticket and then attempt to create a comment on that ticket with the state of Open, you’ll see that there are no states (as shown in figure 10.7).
Figure 10.7. Oops! No states!

You should add a couple of states to your seeds file now; they’ll be New, Open, and Closed. Ideally, New will be the default state of tickets, and you’ll set this up a little later on. Before adding these states, let’s add a couple of steps to features/seed.feature to always ensure that your states are defined.
You extend this feature to go inside the Ticketee Beta project, create a ticket, and then begin to create a comment on that ticket. When it’s on the comment-creation screen, you check to see that all your states are in the state box. To do this, modify the scenario in this file to what’s shown in the following listing.
Listing 10.14. features/seed.feature, the basics scenario
Scenario: The basics
  Given I have run the seed task
  And I am signed in as "[email protected]"
  When I follow "Ticketee Beta"
  And I follow "New Ticket"
  And I fill in "Title" with "Comments with state"
  And I fill in "Description" with "Comments always have a state."
  And I press "Create Ticket"
  Then I should see "New" within "#comment_state_id"
  And I should see "Open" within "#comment_state_id"
  And I should see "Closed" within "#comment_state_id"
The #comment_state_id element referenced here is the State select box for your comments, and you’re confirming that it’s got the three states you’re going to be seeding your database with. When you run this feature by running bin/cucumber features/seed.feature, it will fail because you don’t have your states yet:
Then I should see "New" within "#comment_state_id"
  <false> is not true. (Test::Unit::AssertionFailedError)
Let’s add these states to your db/seeds.rb file by using the lines shown in the following listing.
Listing 10.15. db/seeds.rb
State.create(:name       => "New",
             :background => "#85FF00",
             :color      => "white")

State.create(:name       => "Open",
             :background => "#00CFFD",
             :color      => "white")

State.create(:name       => "Closed",
             :background => "black",
             :color      => "white")
If you try to run rake db:seed now, you see that this task was aborted:
rake aborted!
Validation failed: Email has already been taken

(See full trace by running task with --trace)
When a rake task aborts, it means an exception has been raised. As the output suggests, you can see the backtrace by running the same command with --trace :rake db:seed --trace. You’ll now be given the complete backtrace of your rake task and can determine what broke. The first line of application-related backtrace in the output provides a useful clue:
/home/you/ticketee/db/seeds.rb:1:in `<top (required)>'
It’s the first line of db/seeds.rb that’s causing the problem! This is the line that creates your admin user, and it’s rightly failing because you already have a user with the email address [email protected]. Let’s comment out these first couple of lines as well as the line that creates the Ticketee Beta project, because you don’t want two Ticketee Beta projects. The only line left uncommented in your seeds file should be the line you’ve just added. When you run rake db:seed again, it will run successfully. Let’s uncomment these lines that you’ve just commented out.
With these states now defined inside db/seeds.rb, your feature at features/seed.feature will pass:
1 scenario (1 passed)
10 steps (10 passed)
Also, with your states seeding, you can go back to your server at http://localhost:3000 and create a comment on your ticket with any status, because you’re trying to figure out why the “Creating comments” feature is failing. After creating your comment, you should see that the ticket’s state doesn’t display as simple text like New, Open, or Closed, but rather as a standard inspect output, as shown in figure 10.8.
Figure 10.8. Ugly state output
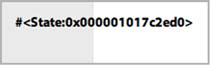
Well, isn’t that ugly and not user-friendly? It flows off the end of the ticket box! Thankfully, you can fix this by defining the to_s method in your State model to call the name method:
def to_s
  name
end
By default, objects in Ruby have a to_s method that outputs the ugly version, the inspected version of this object, you saw earlier. By overriding this in the model to call the name method, you’ll get it to display the state’s name rather than its object output.
When you refresh the page in your browser, you should see the correct state, as shown in figure 10.9.
Figure 10.9. The correct state

Great! This should mean that the last scenario in your “Creating comments” feature will pass. Let’s run it with bin/cucumber features/creating_comments.feature and find out:
1 scenario (1 passed)
14 steps (14 passed)
Indeed it’s passing! This is a good stage to ensure that everything is working by running rake cucumber:ok spec. Blast, one of the features is failing:
Failing Scenarios:
cucumber features/
     creating_comments.feature:26 # Scenario: Creating an invalid comment
A broken feature often means a broken part of your code, so you should investigate this before continuing. If there are thoughts of “it’s only one feature,” think again. At what point do you draw the line? One? Two? Three failing scenarios? Let’s have a zero-tolerance policy on these and fix them when they break.
10.2.5. Fixing creating comments
The entire reason why you write features before you write code is so that you can catch scenarios like this where something unexpectedly breaks. If you didn’t have these scenarios in place, then you wouldn’t be made aware of these scenarios until a user of your site stumbled across it. This isn’t what you want. You want your users to assume that you’re perfect.
You should look into why this feature is failing and fix it right away. This particular scenario is failing with this backtrace:
And I press "Create Comment"
  You have a nil object when you didn't expect it!
  You might have expected an instance of Array.
  The error occurred while evaluating nil.map (ActionView::Template::Error)
  ./app/views/comments/_form.html.erb:12
Here it claims you’re calling map on a nil object, and that it’s on line 12 of app/views/comments/_form.html.erb. The line it’s referencing is the following:
<%= f.select :state_id, @states.map { |s| [s.name, s.id] } %>
Alright, the only place where map is being called is on the @states variable, so it’s pretty straightforward that @states is the nil object. But how did it come to be? Let’s review this scenario, as shown in the following listing.
Listing 10.16. features/creating_comments.feature:26
Scenario: Creating an invalid comment
   When I follow "Change a ticket's state"
   And I press "Create Comment"
   Then I should see "Comment has not been created."
   And I should see "Text can't be blank"
This scenario tests that you’re shown the “Text can’t be blank” error when you don’t enter any text for your comment. In this scenario, you click the Create Comment button, which submits your form, which goes to the create action in CommentsController. This action looks like the following listing.
Listing 10.17. app/controllers/comments_controller.rb
def create @comment = @ticket.comments.build(params[:comment].merge(:user
As you can see from this action, when the comment fails validation (when @comment.save returns false), then it rerenders the app/views/tickets/show.html.erb template. The problem with this is that, by rerendering this template, it calls the following line in the template:
<%= render "comments/form" %>
This inevitably leads you right back to app/views/comments/_form.html.erb, the source of the problem. Therefore, you can determine that you need to set up the @states variable during the “failed save” part of your action, and the best place for this is right after the else so that this part ends up looking like the following listing.
Listing 10.18. app/controllers/comments_controller.rb
else
  @states = State.all
  flash[:alert] = "Comment has not been created."
  render :template => "tickets/show"
end
Now that you’re correctly initializing your @states variable, this scenario will pass. Let’s run the whole feature now using bin/cucumber features/creating_comments.feature:
3 scenarios (3 passed)
39 steps (39 passed)
Awesome! Now let’s try rerunning rake cucumber:ok spec. That should be the last thing you need to fix. You should see the following output:
49 scenarios (49 passed)
515 steps (515 passed)
# and
33 examples, 0 failures, 16 pending
Excellent, everything’s fixed. Let’s commit these changes now:
git add . git commit -m "When updating a comment's status, it also updates
It’s great that you’ve now got the ticket status updating along with the comment status, but it would be handy to know what the timeline of a status change looks like. You can display this on the comment by showing a little indication of whether the state has changed during that comment. Let’s work on adding this tidbit of information to the comments right now.
10.3. Tracking changes
When a person posts a comment that changes the state of a ticket, you’d like this information displayed on the page next to the comment, as shown in figure 10.10.
Figure 10.10. State transitions

By visually tracking this state change, along with the text of the comment, you can provide context as to why the state was changed. At the moment, you only track the state of the comment and then don’t even display it alongside the comment’s text; you only use it to update the ticket’s status.
10.3.1. Ch-ch-changes
What you need now is some way of making sure that, when changing a ticket’s state by way of a comment, the “State: Open” text appears. A scenario would fit this bill, and luckily you wrote one that fits almost perfectly. This scenario is the final scenario (“Changing a ticket’s state”) in features/creating_comments.feature.
To check for the state change text in your “Changing a ticket’s state” scenario, you add this single line to the bottom of it:
Then I should see "State: Open" within "#comments"
If the ticket was assigned the New state, this text would say “State: New ?’ Open,” but because your tickets don’t have default states assigned to them the previous state for the first comment will be nil. When you run this scenario by using bin/cucumber features/creating_comments.feature:33, it will fail:
Then I should see "State: Open" within "#comments"
  expected there to be content "State: Open"
  in "

 [email protected] (User)

     This is a real issue

"
Good, now you’ve got a way to test this state message that should be appearing when a comment changes the state of the ticket. Now, you’d like to track the state the ticket was at before the comment as well as the state of the comment itself. To track this extra attribute, you’ll create another field on your comments table called previous_state_id. Before you save a comment, you’ll update this field to be the current state of the ticket. Let’s create a new migration to add the previous_state_id field to your comments table by running the following command:
rails g migration add_previous_state_id_to_comments previous_state_id:integer
Again, Rails is pretty smart here and will use the name of the migration to infer that you want to add a column called previous_state_id to a table called comments. You only have to tell it what the type of this field is by passing previous_state_id :integer to the migration.
If you open up this migration now, you’ll see that it defines a change method which calls the add_column method inside it. You can see the entire migration shown in the following listing.
Listing 10.19. db/migrate_[date]_add_previous_state_id_to_comments.rb
class AddPreviousStateIdToComments < ActiveRecord::Migration
  def change
    add_column :comments, :previous_state_id, :integer
  end
end
It’s done this way because Rails knows how to roll back this migration easily. It’s a simple call to remove_column passing in the first two arguments in this method.
You don’t need to do anything else to this migration other than run it. Do this now by running rake db:migrate and rake db:test:prepare. This field will be used for storing the previous state’s id so that you can then use it to show a state transition on a comment, as pictured in figure 10.11.
Figure 10.11. A state transition

With this little bit of information, users can see what comments changed the ticket’s state, which is helpful for determining what steps the ticket has gone through to wind up at this point.
To use the previous_state_id field properly, you’re going to need to add another callback to save it.
10.3.2. Another c-c-callback
To set this field before a comment is created, you use a before_create callback on the Comment model. A before_create callback is triggered—as the name suggests—before a record is created, but after the validations have been run. This means that this callback will only be triggered for valid objects that are about to be saved to the database for the first time.
Put this new callback on a line directly above the after_create because it makes sense to have all your callbacks grouped together and in the order that they’re called in:
before_create :set_previous_state
Call the set_previous_state method for this callback, which you define at the bottom of the Comment model just before the set_ticket_state method, like this:
def set_previous_state
  self.previous_state = ticket.state
end
The previous_state= method you call here isn’t yet defined. You can define this method by declaring that your Comment objects belongs_to a previous_state, which is a State object. Let’s put this line with the belongs_to in your Comment model:
belongs_to :previous_state, :class_name => "State"
Here you use a new option for belongs_to: class_name. The field in your comments table is called previous_state_id and so you call your association previous_state. To tell Rails what class this associated record is, you must use the class_name option, otherwise Rails will go looking for the PreviousState class.
With this belongs_to defined, you get the previous_state= method for free and so your callback should work alright. There’s one way to make sure of this, and that’s to attempt to display these transitions between the states in your view so that your feature will potentially pass. You’ll now work on displaying these transitions.
10.3.3. Displaying changes
When you display a comment that changes a ticket’s state, you want to display this state transition along with the comment.
To get this text to show up, add the following lines to app/views/comments/_comment.html.erb underneath the h4 tag:
<%= render comment.previous_state %> →
<%= render comment.state %>
This is almost correct, but there’s a slight problem. Your callback will set the previous_state regardless of what the current state is, and in this case you can end up with something like figure 10.12.
Figure 10.12. State transition from itself to itself
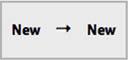
To stop this from happening, you can wrap this code in an if statement, like this:
<% if comment.previous_state != comment.state %> <%= comment.previous_state %> → <%= comment.state %> <% end %>
Now this text will only show up when the previous state isn’t the same as the current state.
You can go one step further and move this code into a helper. Views are more for displaying information than for deciding how it should be output, which should be left to the helpers and controllers. Move this code into the app/helpers/tickets_helper.rb because this partial is displayed from the TicketsController’s show template. The entire TicketsHelper should now look like the following listing.
Listing 10.20. app/helpers/tickets_helper.rb
module TicketsHelper
  def state_for(comment)
    content_tag(:div, :class => "states") do
      if comment.state
        if comment.previous_state && comment.state != comment.previous_state
          "#{render comment.previous_state} → #{render comment.state}"
        else
          "→" + render(comment.state)
        end
      end
    end
  end
end
In this example, you check to see if the comment has an assigned state and then if it has a previous state. If it has a previous state that isn’t the assigned state, then you show the state transition; otherwise you render the assigned state.
You can now replace the whole if statement in app/views/comments/_comment.html.erb with this single line:
<%= state_for(comment) %>
Now check to see if this is working by running your scenario using bin/cucumber features/creating_comments.feature:33:
Then I should see "State: Open" within "#comments"
expected there to be content "State: Open" in
  "

 [email protected] (User)


  Open

 This is a real issue

"
It’s still failing? Are you sure you’ve set everything up correctly? Absolutely. Capybara (through Cucumber) is telling you that it still can’t find this text on the page. Lucky for you there’s a way to see the page that Cucumber is seeing: the “Then show me the page” step you saw a little earlier.
10.3.4. Show me the page
When you use this step, it saves the current page to a file and opens it in the browser so you’re able to see exactly what Cucumber is seeing. Let’s put this step as the second-to-last step in “Changing a ticket’s state.” The last three steps in this scenario should look like the following:
And I should see "Open" within "#ticket .state"
Then show me the page
Then I should see "Open" within "#comments"
When you run your scenario again, it should pop up a browser window that shows you the exact same page as Cucumber sees, shown in figure 10.13.
Figure 10.13. The states aren’t what they should be...
![]()
Here you can see the partials rendered with their HTML shown on the page. This is because code coming from a string in a helper is automatically escaped, which is helpful—but sometimes things like this happen. Better safe than sorry!
10.3.5. Automatic escaping saves your bacon
This automatic escaping of strings is one of Rails 3’s big features. This saves your bacon because it stops malicious output being input into forms accidentally. This output would be things like your ticket’s description or comment text, which comes from the users. Never trust the users with outputting nonmalicious content!
If this input wasn’t escaped before it was output to the page, it could potentially contain HTML tags like <script>, which could contain malicious content. Rails 3 saves your bacon in this respect by automatically escaping all strings output to the view through ERB tags. Yes, sometimes it will be overzealous and escape things you don’t want it to escape, like your state partials.
You can tell it that the string is safe by calling html_safe in your helper, changing it to this:
"#{render comment.previous_state} → #{render comment.state}".html_safe
The html_safe method effectively tells Rails, “It’s cool, man,” and Rails won’t escape anything inside the string. When you run bin/cucumber features/creating_tickets.feature:33, your scenario will now pass:
1 scenario (1 passed)
17 steps (17 passed)
A browser window will appear, showing you the correct states, as shown in figure 10.14.
Figure 10.14. The unescaped states

Let’s remove the “Then show me the page” step from this scenario now, and you’re done. You’ve got your application showing the users what state a comment has switched the ticket to. Now’s a good time to check that you haven’t broken anything. When you run rake cucumber:ok spec, you should see that everything is A-OK:
49 scenarios (49 passed)
516 steps (516 passed)
# and
33 examples, 0 failures, 16 pending
You have state transition showing in your application neatly, which is great to see. Let’s commit and push this to GitHub:
git add .
git commit -m "Display a comment's state transition"
git push
Currently, your styles aren’t distinguishable. Look at figure 10.14, and gaze upon their ugliness.
You could distinguish them by using the colors you’ve specified in the attributes. Earlier, you wrapped the state name in a special div that will allow you to style these elements, based on the class. For the New state, the HTML for the div looks like this:
<div class="state state_new">
  New
</div>
The state_new part of this you can use to apply the colors from the record to this element. To do this, you put a style tag at the top of your application’s layout and dynamically define some CSS that will apply the colors.
10.3.6. Styling states
The states in your system can change at any point in time in the future, and so you can’t have set styles in public/stylesheets/application.css for them. To get around this little problem, put a style tag in your app/views/layouts/application.html.erb file, which will contain some ERB code to output the styles for the states. Directly underneath the stylesheet_link_tag line, put this code:
<style>
  <% for state in @states %>
    .state_<%= state.name.parameterize %> {
      background: <%= state.background %>;
      color: <%= state.color %>;
    }
  <% end %>
</style>
You need to define the @states variable in a place that will be accessible in all views of your application. This means you can’t define it inside any controller other than ApplicationController. Lucky for you, this is like a normal controller, and you can use a before_filter to load the states. Underneath the class definition for ApplicationController, you can add this before_filter:
before_filter :find_states
Now you define the method under the authorize_admin! definition:
def find_states
  @states = State.all
end
With these few lines of code, your states should now be styled. If you visit a ticket page that has comments that have changed the state, you should see a state styled, as shown in figure 10.15.
Figure 10.15. States, now with 100% more style

While you’re in the business of prettying things up, you can also add the state of your ticket to the listing on app/views/projects/show.html.erb so that users can easily glance at the list of tickets and see a state next to each of them. Let’s add this to the left of the ticket name so that the li element becomes
<li>
  <%= render ticket.state if ticket.state %>
  #<%= ticket.id %> - <%= link_to ticket.title, [@project, ticket] %>
</li
Now that’s looking a lot better! You’ve completed all that you need to do to let users change the state of a ticket. They’ll be able to select one from the State select box on the comment form, and when they create a comment, that ticket will be updated to the new state. Right next to the comment’s text on the ticket page is a state transition shown, and (ideally) the comment’s text will provide context for that change.
Why did you add states in the first place? Because they provide a great way of standardizing the lifecycle of a ticket. When a ticket is assigned a New state, it means that the ticket is up for grabs. The next phase of a ticket’s life is the Open state, which means that this ticket is being looked into/cared for by somebody. When the ticket is fixed, then it should be marked as Closed, perhaps with some information in its related comment relating where the fix is located.
If you want to add more states than these three default states, you can’t at the moment. Tickets can have two different types of Closed: one could be “Yes, this is now fixed” and another could be “No, I don’t believe this is a problem.” A third type could be “I couldn’t reproduce.” It would be great if you could add more states to the application without having to add them to the state list in db/seeds.rb, wouldn’t it? Well, that’s easy enough. You can create an interface for the admin users of your application to allow them to add additional states.
10.4. Managing states
Currently your application has only three states: New, Open, and Closed. If you want to add more, you have to go into the console and add them there. Admins of this application should be able to add more states through the application itself, not the console. They should also be able to rename them and delete them, but only if they don’t have any tickets assigned to them. Finally, the admins should also be able to set a default state for the application, because no ticket should be without a state.
You’ll start out by writing a feature to create new states, which will involve creating a new controller called Admin::StatesController. This controller will provide the admins of your application with the basic CRUD functionality for states, as well as the ability to mark a state as the default, which all tickets will then be associated with.
We’re not going to look at adding an edit, update, or destroy action to this controller because it’s been covered previously and should be left as an exercise for you.
10.4.1. Adding additional states
You have three default states from the db/seeds.rb file currently: New, Open, and Closed. If the admin users of your application wish to add more, they can’t—not until you’ve created the Admin::StatesController and the new and create actions inside it. This will allow those users to create additional states which then can be assigned to a ticket.
You have this lovely State model, but no way for admins of the application to add any new records to it. What if they want to add more states? You’ll create a new controller called Admin::StatesController and put a new and create action in it so that admins can create more states.
But before you write any real code, you’ll write a feature that describes the process of creating a state. Put it in a new file called features/creating_states.feature, which is shown in the following listing.
Listing 10.21. features/creating_states.feature
Feature: Creating states
  In order to be able to specify other states for tickets
  As an admin
  I want to add them to the application

  Background:
    Given there are the following users:
      | email              | password | admin |
      | [email protected] | password | true  |
    And I am signed in as them

  Scenario: Creating a state
    When I follow "Admin"
    And I follow "States"
    And I follow "New State"
    And I fill in "Name" with "Duplicate"
    And I press "Create State"
    Then I should see "State has been created."
Here you sign in as an admin user and go through the motions of creating a new state. When you run this feature through using the command bin/cucumber features/creating_states.feature, it will fail because it can’t find the States link:
And I follow "States"
  no link with title, id or text 'States' found (Capybara::ElementNotFound)
The States link should take you to the StatesController’s index action, which is missing from the admin home page, located at app/views/admin/base/index.html .erb. You can add this link now by adding the following line to this file:
<%= link_to "States", admin_states_path %>
The admin_states_path method isn’t defined yet, and you can fix this by adding another resources line inside the admin namespace in config/routes.rb like this:
namespace :admin do
  ...
  resources :states
end
With this line in the admin namespace, the admin_states_path method (and its siblings) are defined. Let’s run the feature again now to see what you have to do next:
And I follow "States"
  uninitialized constant Admin::StatesController
Ah, that’s right! You need to generate your controller. You can do this by running the controller generator:
rails g controller admin/states
When you run this feature again, you’re told that you’re missing the index action from this controller:
And I follow "States"
  The action 'index' could not be found for Admin::StatesController
You add this action to the app/controllers/admin/states_controller.rb file now, as well as making this controller inherit from Admin::BaseController. After you’re done, the whole controller class will appear as shown in the following listing
Listing 10.22. app/controllers/admin/states_controller.rb
class Admin::StatesController < Admin::BaseController

  def index
    @states = State.all
  end
end
Next on the menu is defining the view for this action in a brand new file to be located at app/views/admin/states/index.html.erb. This view must contain the New State link your feature will go looking for, and it should also include a list of states so that anyone looking at the page knows which states already exist The code to do all this is shown in the following listing.
Listing 10.23. app/views/admin/states/index.html.erb
<%= link_to "New State", new_admin_state_path %>

<ul id='states'>
  <% for state in @states %>
    <li><%= state.name %></li>
  <% end %>
</ul>
With this view written, your feature will now whinge about the new action when you run bin/cucumber feature/creating_states.feature:
And I follow "New State"
  The action 'new' could not be found
  for Admin::StatesController (AbstractController::ActionNotFound)
Alright then, you should add the new action to Admin::StatesController if you want to continue any further. It should be defined like the following inside that controller:
def new
  @state = State.new
end
You now need to create the view for this action at app/views/admin/states/new.html.erb and fill it in with the following content:
<h1>New State</h1>
<%= render "form" %>
You’re using a form partial here again because it’s best practice and also just in case you ever wanted to use it for an edit action. In a new file for your partial at app/views/admin/states/_form.html.erb, you put the form that will be used to create new states. This form is pretty simple—it only needs a text field for the name and a submit button to submit the form:
<%= form_for [:admin, @state] do |f| %>
 <p>
   <%= f.label :name %>
   <%= f.text_field :name %>
 </p>

<%= f.submit %>
<% end %>
Because the @state variable coming from the new is a new instance of the State model, the submit method will display a submit button with the text Create State, just like your feature needs. Speaking of which, with this form partial done, your feature should run a little further. You should check this now by running bin/cucumber features/creating_states.feature:
And I press "Create State"
  The action 'create' could not be found
  for Admin::StatesController (AbstractController::ActionNotFound)
Right, so you need to create the create action too, which you define inside Admin::StatesController as shown in the following listing.
Listing 10.24. app/controllers/admin/states_controller.rb
def create
  @state = State.new(params[:state])
  if @state.save
    flash[:notice] = "State has been created."
    redirect_to admin_states_path
  else
    flash[:alert] = "State has not been created."
    render :action => "new"
  end
end
With the create action defined in your Admin::StatesController, you’ll now be able to run bin/cucumber features/creating_states.feature and have it pass:
1 scenario (1 passed)
8 steps (8 passed)
Very good! By implementing a feature that lets the admin users of your site create states, you’ve provided a base to build the other state features upon. You shouldn’t have broken anything by these changes but it won’t hurt to run rake cucumber:ok spec to make sure. You should see the following summaries:
50 scenarios (50 passed)
571 steps (571 passed)
# and
25 examples, 0 failures, 9 pending
Good to see everything’s still working. Commit and push this now:
git add .
git commit -m "Added Admin::StatesController for managing states"
git push
With this base defined, you can move on to more exciting things than CRUD, such as defining a default state for your tickets.
10.4.2. Defining a default state
A default state for the tickets in your application will provide a sensible way of grouping tickets that are new to the system, making it easier for them to be found. The easiest way to track which state is the default state is to add a boolean column called default to your states table, which is set to true if the state is the default, false if not.
To get started, you write a feature that covers changing the default status. At the end of this feature, you end up with the default field in the states table, and then you can move on to making the tickets default to this state. Let’s create a new feature called features/managing_states.feature and fill it with the content from the following listing.
Listing 10.25. features/managing_states.feature
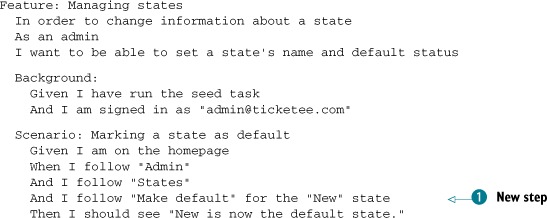
In this scenario you’ve got one new step ![]() , which you need to define for this feature to run. Let’s run this feature now to get the step definitions for these steps
by running bin/cucumber features/managing_states.feature:
, which you need to define for this feature to run. Let’s run this feature now to get the step definitions for these steps
by running bin/cucumber features/managing_states.feature:
When /^I follow "([^"]*)" for the "([^"]*)" state$/ do |arg1, arg2|
  pending # express the regexp above with the code you wish you had
end
You put this step definition inside features/step_definitions/state_steps.rb and work on getting the first definition to pass for now. This definition is used like this:
And I follow "Make default" for the "New" state
Which is a slightly modified version of the following:
And I follow "Make Default" within "#some_state"
You’re not using the within variant here directly because you’re not going to be using a statically set id attribute for the state in the view but rather setting it to something like state_3 using this code:
<li id='state_<%= state.id %>'>
  <%= state.name %>
  <% if state.default? %>
    (Default)
  <% else %>
    <%= link_to "Make Default", make_default_admin_state_path(state) %>
  <% end %>
</li>
But you use this step within your custom step. You’re also not using the step When I follow "Make Default" because this will follow the first Make Default link on the page, which may or may not be the one that you want. With all of this in mind, you can redefine your step as follows:
When /^I follow "([^"]*)" for the "([^"]*)" state$/ do |link, name|
  state = State.find_by_name!(name)
  steps(%Q{When I follow "#{link}" within "#state_#{state.id}"})
end
Now in this step definition you find the state by the name given to you by the step and then find the link using the “When I follow [x] within [y]” step provided by Capybara. When you run this feature again, you’re told that it can’t find the state element you’re referencing:
And I follow "Make default" for the "New" state
  scope '//*[@id = 'state_1']' not found on page (Capybara::ElementNotFound)
This is because you haven’t added the id attribute to your state li tags inside the app/views/admin/states/index.html.erb. You can do this now by changing the following line inside this view; while you’re here, also add the Make Default link:
<li><%= state.name %></li>
To this:
<li id='state_<%= state.id %>'>
  <%= state.name %>
  <%= link_to "Make default", make_default_admin_state_path(state) %>
</li>
When you run your feature again you’ll rightly be told that the make_default_admin_state_path method is undefined. This method should take you to the make_default action in the Admin::StatesController, much like edit_admin_state_path takes you to the edit action. You can define this method as a member route on your states resource. A member route provides the routing helpers and, more important, the route itself, to a custom controller action for a single instance of a resource. To define this, you change the resources :states line inside the admin namespace inside config/routes.rb to the following:
resources :states do
  member do
    get :make_default
  end
end
Inside the member block here, you define that each state resource has a new action called make_default that can be accessed through a GET request. As stated previously, by defining the route in this fashion you also get the make_default_admin_state_path helper which you use in app/views/admin/states/index.html.erb. With this member route now defined, your feature will complain that it’s missing the make_default action:
And I follow "Make default" for the "New" state
  The action 'make_default' could not be found for
  Admin::StatesController (AbstractController::ActionNotFound)
The make_default action will be responsible for making the state you’ve selected the new default state, as well as setting the old default state to not be the default anymore. You can define this action inside app/controllers/admin/states_controller.rb, as shown in the following listing.
Listing 10.26. app/controllers/admin/states_controller.rb
def make_default
  @state = State.find(params[:id])
  @state.default!

  flash[:notice] = "#{@state.name} is now the default state."
  redirect_to admin_states_path
end
Rather than putting the logic to change the selected state to the new default inside the controller, you place it in the model. To trigger a state to become the new default state, you call the default! method on it. It’s best practice to put code that performs functionality like this inside the model.
This default! method can be defined in the State model, as shown in the following listing.
Listing 10.27. app/models/state.rb

The find_by_default ![]() method here is a dynamic finder method from Active Record. The find_by_default will either return the State object for the default state, or nil. If it doesn’t return nil
method here is a dynamic finder method from Active Record. The find_by_default will either return the State object for the default state, or nil. If it doesn’t return nil ![]() then you change its default state to false and save the record.
then you change its default state to false and save the record.
When you run your feature again with bin/cucumber features/creating_states.feature, you see that the find_by_default method isn’t defined:
And I follow "Make default" for the "New" state
  undefined method `find_by_default' for State...
This dynamic method doesn’t exist because you haven’t yet defined the default column on your states table. If you had this column then Rails would have already defined the find_by_default method for you. To do this, you generate a migration that will add this column using the following command:
rails g migration add_default_to_states default:boolean
Don’t run this migration just yet. With the default column being a boolean field, it’s going to need to know what its default value should be: either true or false. To set a default for this column, open your newly created migration and change the line that adds the column to the following:
add_column :states, :default, :boolean, :default => false
With this small change, every State object that’s created will have the default attribute set to false by default. You now run your migration using rake db:migrate and rake db:test:prepare:
When you run bin/cucumber features/managing_states.feature now, it will pass because you’ve got this default column allowing the whole process of making a state the default to complete:
1 scenario (1 passed)
7 steps (7 passed)
Great to see! When a ticket is created, the state of that ticket will default to the State, which is set to default. You should make New the default state in your application by adding a default attribute from where you create it inside db/seeds.rb to the following:
State.create(:name       => "New",
             :background => "#85FF00",
             :color      => "white",
             :default    => true)
When this seeds file is run later on, you’ll have a default state for your tickets so that they display properly in your tickets listing.
You should now commit these change but, before that, you should make sure you haven’t caused anything to break. Let’s run rake cucumber:ok spec to find out:
51 scenarios (51 passed)
531 steps (531 passed)
# and
34 examples, 0 failures, 17 pending
There’s nothing broken, so it’s time to commit:
git add .
git commit -m "Admins can now set a default state for tickets"
git push
You’re close to being done with states. So far, you’ve added the functionality for users to change the state through the comment form, to display the state transition on a comment, and (just recently) for admins to be able to create new states and toggle which state is the default.
At the moment, any user is able to change the state of a ticket, which isn’t a good thing. You’d like some users to have the ability to leave a comment but not to change the state, and you’ll look at creating this feature right now. This is the final feature you’ll be implementing for states.
10.5. Locking down states
This feature is going to take a little more than hiding the State select box on the form; you also need to tell the application to ignore the state parameter if the user doesn’t have permission to change the state. You implement this one piece at a time, beginning with ensuring the State select box is hidden from those who should be unable to change the state.
10.5.1. Hiding a select box
In previous chapters you’ve seen how you can hide links from certain users by using the CanCan-provided can? view helper. You can also use this helper to hide the state field in your comment form from users without the permission to change the state. First, you write a Cucumber scenario to ensure that the State box is always hidden from these users.
You add this particular scenario to the bottom of the features/creating_comments.feature because its operation is based around creating a comment. The scenario to ensure that you don’t see this state field is a short and simple one:
Scenario: A user without permission cannot change the state
  When I follow "Change a ticket's state"
  Then I should not see the "#comment_state_id" element
This scenario contains two simple steps: one to go to the ticket page and another to assert that you don’t see the State select box. When you run this scenario by running bundle exec features/creating_comments.feature:44, you see that the second step isn’t yet defined:
Undefined step: "I should not see the "#comment_state_id" element"
As usual, the definition for this step appears at the bottom of Cucumber’s output:
Then /^I should not see the "([^"]*)" element$/ do |arg1|
  pending # express the regexp above with the code you wish you had
end
To define this step, you put its definition inside of features/step_definitions/application_steps.rb. To make it do the thing you want it to do, you can use one of Capybara’s helper methods called find.
find can take many different forms, but in this case you’ll be using the following form:
find(:css, css)
By passing these two options to find, Capybara will look for any element on the page that matches the CSS selector. In this case, that would be css. If find does find an element or even a collection of elements, it will only return the first element from this list. If it can’t find anything, it will return nil. Using this knowledge, you can implement this step now as shown, putting it inside features/step_definitions/application_steps.rb:
Then /^I should not see the "([^"]*)" element$/ do |css|
  page.should_not(have_css(css),
    "Expected to not see the #{css} element, but did.")
end
Here you use Capybara’s have_css matcher to see if the page has an element matching the CSS selector, which is passed to this step. You also use RSpec’s ability to specify a custom message if this assertion fails, returning “Expected to not see the #comment_state_id element, but did” if this element is visible on the page.
If you run this feature using bin/cucumber features/creating_comments.feature:42, you see that this step is failing because it is seeing the element:
Then I should not see the "#comment_state_id" element
  Expected to not see the #comment_state_id element, but did
Right, now that you’ve got your feature to a good-enough point that it ensures that you shouldn’t see this field, it’s time to hide it and fix the feature. To do this, you use the can? method to check that the user has permission to change states for this project. If the user doesn’t have this permission, then you’ll hide the state field. With this change, the State select box code in app/views/comments/_form.html.erb will now look like the following listing.
Listing 10.28. app/views/comments/_form.html.erb
<% authorized?(:"change states", @project) do %>
  <p>
    <%= f.label :state_id %>
    <%= f.select :state_id, @states.map { |s| [s.name, s.id] },
                            :selected => @ticket.state_id   %>
  </p>
<% end %>
Here you use the authorized? method defined in chapter 8 to only display the fields if the user is authorized to changed the states.
This little change will make your scenario pass because the user you’re signing in as doesn’t have this particular permission set up. Let’s run it now with bin/cucumber features/creating_comments.feature:42 to make sure:
1 scenario (1 passed)
10 steps (10 passed)
Good to see, but this view change has definitely broken the scenario in this feature, which does change the state. You can run this other scenario by running bin/cucumber features/creating_comments.feature:33; when you do that, you see that it’s indeed broken:
cannot select option, no select box with id, name, or label 'State' found
You’ve done something similar to this before in chapter 8. Back then, you used a step that set the current user up with a permission to perform a specific protected action. This is no different. Let’s write a new step underneath the title of the scenario on line 33 of features/creating_comments.feature, which should be the scenario title of “Changing a ticket’s state”:
Given "[email protected]" can change states on the "Ticketee" project
With the step in your scenario using this step definition now, the scenario will pass when you rerun it using bin/cucumber features/creating_comments.feature:33:
1 scenario (1 passed)
16 steps (16 passed)
Good! All the scenarios in this feature should now be passing; you’ll check that in a minute. Your next step was going to be to ensure that the state_id parameter wasn’t passed through if the user doesn’t have access to create a state, but you’ve just added a new permission to the system. You should ensure that this permission is assignable to users before continuing, which you can do by adding a scenario to the Assigning Permissions feature.
10.5.2. Bestowing changing state permissions
The features/assigning_permissions.feature file contains the Assigning Permissions feature, which you’ve used to ensure that permissions are assignable from the permissions page in the backend accessible by admins. Let’s add another scenario now to test that you can assign this “change states” permission, as shown in the following listing.
Listing 10.29. features/assigning_permissions.feature
Scenario: Changing states for a ticket
  When I check "View" for "TextMate 2"
  And I check "Change States" for "TextMate 2"
  And I press "Update"
  And I follow "Sign out"

  Given I am signed in as "[email protected]"
  When I follow "TextMate 2"
  And I follow "Shiny!"
  When I fill in "Text" with "Opening this ticket."
  And I select "Open" from "State"
  And I press "Create Comment"
  Then I should see "Comment has been created."
  And I should see "Open" within "#ticket .state"
When you run this scenario with the command bec features/assigning_permissions.feature:73, you see that it can’t find the Change States select box for the TextMate 2 project:
cannot check field, no checkbox ... 'permissions_1_change_states'
This is fine. You haven’t added it to the list of permissions inside of app/helpers/admin/permissions_helper.rb yet. You can add this now by adding this key-value pair to the Hash object in the permissions method’s hash:
"change states" => "Change States"
With this added to the permissions hash, your scenario will move a little further toward success. When you rerun it, it will complain that it can’t find the Open state from your select box:
And I select "Open" from "State"
  No such option 'Open' in this select box.
Ah, not a problem! This means that the Open state isn’t yet defined in your test database. You need to create this state in the Background for this feature. You can do this by adding the following line at the bottom of the Background:
Given there is a state called "Open"
When you rerun this scenario using bin/cucumber features/assigning_permissions.feature:74,[4] it will now pass:
4 If you get no scenario and no steps running for this feature, are you sure you’re running the right line? Check to make sure you’re running line 75, not 74, which is now a blank line.
1 scenario (1 passed)
22 steps (22 passed)
That’s good! Now admins are able to assign the “Change states” permission and users are able to see and touch the State select box on the comment form if they have this permission.
This is a great halfway point before you go diving into the final stage of this particular set of features to run your Cucumber features and specs to ensure that nothing is broken. Let’s run rake cucumber:ok spec now; you should see that all your tests are passing:
53 scenarios (53 passed)
568 steps (568 passed)
# and
34 examples, 0 failures, 17 pending
Yay! Everything is in working order, which means you can commit and push these changes to GitHub:
git add . git commit -m "Only users with the 'change states' permission
The final piece of your states puzzle is to stop the state parameter from being set in your CommentsController if a user passes it through and doesn’t have permission to set states. First, you’ll investigate how a user can fake this response. Afterward, you’ll write a controller spec that duplicates this and ensures that the state isn’t set.
10.5.3. Hacking a form
Even if your state field is hidden from view, users are still able to submit a form containing this parameter, and your application will accept it. Let’s now see this in practice.
The first things you need to do are to create a user and give it read access to a project, which you can do by starting rails console (or rails c) and running these commands:
user = Factory(:user)
user.confirm!
user.permissions.create(:object => Project.first,
                                 :action => "view")
Let’s quit the console by typing exit and then start up the application with rails server. Now you can sign in with the [email protected] email and password password. Once you’re in, you should see the page shown in figure 10.16.
Figure 10.16. What the user sees

Let’s go into this project and pick any ticket in the list or create your own. It doesn’t matter, you just need a ticket. When you’re on the ticket page, save this page by choosing File and then Save or Save Page As, and save this file in a memorable location. You’re going to be editing this saved file and adding a State select box of your own.
Open this saved file in a text editor, and look for the following lines:
<p>
  <label for="comment_text">Text</label><br>
  <textarea cols="40" id="comment_text" name="comment[text]" rows="20"></
     textarea>
</p>
These lines display the Text label and the associated textarea for a new comment. You’re able to add the state field underneath the text field by adding this code[5] to the page:
5 Assuming you know the IDs of the states.
<p>
  <label for="comment_state">State</label><br>
  <select id="comment_state_id" name="comment[state_id]">
    <option value="1" selected="selected">New</option>
    <option value="2">Open</option>
    <option value="3">Closed</option>
  </select>
</p>
When you save this page, you’ll now be able to choose a state when you open it in a browser. The action of the form tag on this page goes to http://localhost:3000/tickets/[id]/comments (where[id] is the id of the ticket this form will create a comment for), and this route will take you to the create action inside CommentsController.
Let’s open this saved page in a browser now, fill in the text for the comment with anything, and select a value for the state. When you submit this form, it will create a comment and set the state. You should see your comment showing the state transition, as shown in figure 10.17.
Figure 10.17. Hacked state transition

Obviously, hiding the state field isn’t a foolproof way to protect it. A better way to protect this attribute would be to delete it from the parameters before it gets to the method that creates a new comment.
10.5.4. Ignoring a parameter
If you remove the state_id key from the comment parameters before they’re passed to the build method in the create action for CommentsController, then this problem won’t happen. You should write a regression test. Regression tests are tests that save you from causing regressions.
You now open spec/controllers/comments_controller_spec.rb and set up a project, ticket, state, and user for the spec you’re about to write by putting the code from the following listing inside the describe CommentsController block.
Listing 10.30. spec/controllers/comments_controller_spec.rb
let(:user) { create_user! }
let(:project) { Project.create!(:name => "Ticketee") }

let(:ticket) do
  project.tickets.create(:title => "State transitions",
                         :description => "Can't be hacked.",
                         :user => user)
end

let(:state) { State.create!(:name => "New") }
The state you create is the one you’ll attempt to transition to in your spec, with the ticket’s default state being not set, and therefore nil. The user you set up is the user you use to sign in and change the state with. This user has no permissions at the moment and so they won’t be able to change the states.
Your spec needs to make sure that a change doesn’t take place when a user who doesn’t have permission to change the status of a ticket for that ticket’s project submits a state_id parameter. You put this code, shown in the next listing, directly underneath the setup you just wrote.
Listing 10.31. spec/controllers/comments_controller_spec.rb
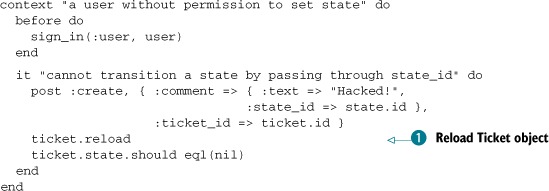
This spec uses a before to sign in as the user before the example runs. Inside the example, you use the post method to make a POST request to the create action inside CommentsController, passing in the specified parameters. It’s this state_id parameter that should be ignored in the action.
After the post method, you use a new method :reload ![]() . When you call reload on an Active Record object, it will fetch the object again from the database and update the attributes for it. You use this
because the create action acts on a different Ticket object and doesn’t touch the one you’ve set up for your spec.
. When you call reload on an Active Record object, it will fetch the object again from the database and update the attributes for it. You use this
because the create action acts on a different Ticket object and doesn’t touch the one you’ve set up for your spec.
The final line here asserts that the ticket.state should be nil. When you run this spec by running bundle exec rspec spec/controllers/comments_controller_spec.rb, this final line will be the one to fail:
Failure/Error: ticket.state.should eql(nil)

expected nil
     got #<State id: 1, name: "New", default: false>
The ticket.state is returning a state object because the user has been able to post it through the parameter hash. With a failing spec now in place, you can go about stopping this state parameter from going unchecked. To ignore this parameter, you can remove it from the params hash if the user doesn’t have permission to change states. At the top of the create action, inside of CommentsController, put the following lines:
if cannot?(:"change states", @ticket.project)
  params[:comment].delete(:state_id)
end
This code will remove the state_id key from the params[:comment] hash if the user doesn’t have permission to change the states on the ticket’s project, thereby preventing them from being able to change the state. If you rerun your spec using bin/rspec spec/controllers/comments_controller_spec.rb, you’ll see that it passes:
1 example, 0 failures
Great! Now nobody without permission will be able to download the ticket page, make modifications to it to add a state field, and then be able to change the states.
You’re done with this feature now so it’s time to make sure you didn’t break anything with your changes by running rake cucumber:ok spec. You should see that everything is squeaky clean:
53 scenarios (53 passed)
615 steps (615 passed)
# and
26 examples, 0 failures, 9 pending
Great! You now commit and push this to Github:
git add .
git commit -m "Protect state_id from users who do
               not have permission to change it"
git push
The CommentsController will now reject the state_id parameter if the user doesn’t have permission to set it, thereby protecting the form from anybody hacking it to add a state_id field when they shouldn’t.
The feature of protecting the state_id field from changes was the final piece of the state features puzzle. You’ve now learned how to stop a user from changing not only a particular record when they don’t have permission to, but also a specific field on a record.
10.6. Summary
You began this chapter by writing the basis for the work later on in the chapter: comments. By letting users posts comments on a ticket, you can let them add further information to it and tell a story.
With the comment base laid down, you implemented the ability for users to be able to change a ticket’s state when they post a comment. For this, you tracked the state of the ticket before the comment was saved and the state assigned to the comment so you could show transitions (as shown in figure 10.18).
Figure 10.18. Replay: state transitions

You finished by limiting the ability to change states to only those who have permission to do so, much as you’ve previously limited the abilities to read projects and create tickets in previous chapters. While doing this, you saw how easy it was for somebody to download the source of your form and alter it to do their bidding and then how to protect it from that.
In chapter 10, you will add tags to your tickets. Tags are words or short phrases that provide categorization for tickets, making them easier for users to manage. Additionally, you’ll implement a search interface that will allow users to find tickets with a given tag or state.