
Chapter 9. Interception
- CROSS-CUTTING CONCERNS
- ASPECT-ORIENTED PROGRAMMING
- Dynamic INTERCEPTION
One of the most interesting things about cooking is the way we can combine many ingredients, some of them not particularly savory in themselves, into a whole that is greater than the parts. Often, we start with a simple ingredient that provides the basis for the meal, and then modify and embellish it until the end result is a delicious dish.
Consider a veal cutlet. If we were desperate, we could eat it raw, but in most cases we’d prefer to fry it. However, if we simply slap it on a hot pan, the result will be less than stellar. Apart from the burned flavor, it won’t taste of much.
Fortunately, there are lots of steps we can take to enhance the experience:
- Frying the cutlet in butter prevents burning the meat, but the taste is likely to remain bland.
- Adding salt enhances the taste of the meat.
- Adding other spices, such as pepper, makes the taste more complex.
- Breading it with a mixture that includes salt and spices not only adds to the taste, but also envelops the original ingredient in a new texture. At this point, we’re getting close to having a Cotoletta.
- Slitting open a pocket in the cutlet and adding ham, cheese, and garlic into the pocket before breading the cutlet takes us over the top. Now we have Cordon Bleu, which is a most excellent dish.
The difference between a burned cutlet and Cordon Bleu is significant, but the basic ingredient is the same. The variation is caused by the things we add to it. Given a veal cutlet, we can embellish it without changing the main ingredient to create a different dish.
With loose coupling, we can perform a similar feat when developing software. When we program to an interface, we can transform or enhance a core implementation by wrapping it in other implementations of that interface. You already saw a bit of this technique in action in section 8.3.6, where we used it to modify an expensive DEPENDENCY’S lifetime by wrapping it in a Proxy.[1]
1 Erich Gamma et al., Design Patterns: Elements of Reusable Object-Oriented Software (New York: Addison-Wesley, 1994), 207.
This approach can be generalized, providing us with the ability to INTERCEPT a call from a consumer to a service; this is what we’ll cover in this chapter. Like the veal cutlet, we start out with a basic ingredient and add more ingredients to make it better, but without changing the core of what it was originally. INTERCEPTION is one of the most powerful abilities that we gain from loose coupling. It enables us to apply the SINGLE RESPONSIBILITY PRINCIPLE and Separation of Concerns with ease.
In the previous chapters, we expended a lot of energy maneuvering our code into a position where it’s truly loosely coupled. In this chapter, we’ll start harvesting the benefits of that investment.
Figure 9.1 shows an outline of the chapter’s structure. When you’re done with the chapter, you should be able to use INTERCEPTION to develop loosely coupled code according to established object-oriented design principles. In particular, you should gain the ability to successfully observe Separation of Concerns and apply CROSS-CUTTING CONCERNS, all while keeping your code in good condition.
Figure 9.1. The overall structure of this chapter is pretty linear. We’ll start with an introduction to INTERCEPTION, including an example. From there we move on to talk about CROSS-CUTTING CONCERNS. This section of the chapter is light on theory and heavy on examples, so if you’re already familiar with this subject, you can consider moving directly to the last section, about aspects. This section serves as the climax of the chapter as it introduces the advanced yet versatile concept of dynamic INTERCEPTION.

Because understanding how INTERCEPTION works isn’t difficult, we’ll start with a quick example to establish the context. To fully appreciate the potential, we must study some related concepts, such as ASPECT-ORIENTED PROGRAMMING (AOP) and SOLID and relate them to INTERCEPTION with examples. Finally, you’ll see how a DI CONTAINER can be used to generalize INTERCEPTION and make it easier to apply.
Because the concepts behind INTERCEPTION are well-known design patterns and object-oriented principles, this chapter is rather heavy on examples. The flow of the chapter is fairly linear, beginning with an introductory example and building to increasingly more complex notions and examples. The final, and most advanced, concept can be quickly explained in the abstract, but, because it will probably only click for you with a solid example, the chapter culminates with a multipage example that demonstrates how it works.
Before we get to that point, we must start at the beginning.
9.1. Introducing Interception
The concept of INTERCEPTION is simple: we wish to be able to intercept the call between a consumer and a service and execute some code before or after the actual service is invoked. In figure 9.2, a normal call from consumer to service is being intercepted by an intermediary that can execute its own code before or after passing the call on to the real service.
Figure 9.2. INTERCEPTION in a nutshell. We can convert a simple call from consumer to service to a more complex interaction by slotting in a piece of intermediate code. It receives the original call and passes it on to the actual implementation, while also acting on the call by doing whatever it needs to do.

In this section, we’re going to get acquainted with INTERCEPTION and learn how, at its core, it’s an application of the Decorator design pattern. If you aren’t familiar with the Decorator pattern, we’ll review it as part of the discussion, and when we’re done, you should have a good understanding of how it works. We’ll begin by looking at a simple example that showcases the pattern, and follow up with a discussion of how INTERCEPTION relates to the Decorator pattern.
9.1.1. Example: implementing auditing
In this example, we’ll be implementing auditing for ProductRepository. Auditing is a common example of a CROSS-CUTTING CONCERN: it may be required, but the core functionality of reading and editing products should not be affected by auditing. Because the SINGLE RESPONSIBILITY PRINCIPLE suggests that we should not let ProductRepository itself implement auditing, using a Decorator is an excellent choice.
Implementing AuditingProductRepository
We can do this by introducing a new AuditingProductRepository class that wraps another ProductRepository and implements auditing. Figure 9.3 illustrates how the types relate to each other.
Figure 9.3. The AuditingProductRepository derives from the abstract ProductRepository class and wraps an instance of any other ProductRepository implementation. It delegates all work to the decorated ProductRepository, but adds auditing in appropriate places. Can you spot the breading?

In addition to a decorated ProductRepository, AuditingProductRepository also needs a service that implements auditing. In the following listing, this is the role of the IAuditor interface.
Listing 9.1. Declaring an AuditingProductRepository
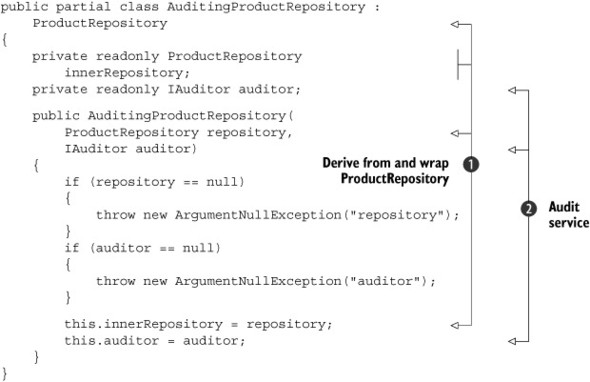
AuditingProductRepository derives from the same ABSTRACTION that it decorates ![]() . It uses standard CONSTRUCTOR INJECTION to request a ProductRepository that it can wrap and to which it can delegate its core implementation. In addition to the decorated repository, it also requests
an IAuditor
. It uses standard CONSTRUCTOR INJECTION to request a ProductRepository that it can wrap and to which it can delegate its core implementation. In addition to the decorated repository, it also requests
an IAuditor ![]() it can use to audit the operations implemented by the decorated repository.
it can use to audit the operations implemented by the decorated repository.
The following listing shows sample implementations of two methods on AuditingProductRepository.
Listing 9.2. Implementing AuditingProductRepository
public override Product SelectProduct(int id)
{
    return this.innerRepository.SelectProduct(id);
}

public override void UpdateProduct(Product product)
{
    this.innerRepository.UpdateProduct(product);
    this.auditor.Record(
        new AuditEvent("ProductUpdated", product));
}
Not all operations need auditing. A common requirement is to audit all Create, Update, and Delete operations while ignoring Read operations. Because the SelectProduct method is a pure Read operation, you delegate the call to the decorated repository and immediately return the result.
The UpdateProduct method, on the other hand, must be audited. You still delegate the implementation to the decorated repository, but after the delegated method returns, you use the injected IAuditor to audit the operation.
A Decorator, like AuditingProductRepository, is like the breading around the veal cutlet: it embellishes the basic ingredient without modifying it. The breading itself isn’t just an empty shell, but comes with its own list of ingredients. Real breading is made from breadcrumbs and spices; similarly, the AuditingProductRepository contains an IAuditor.
Note that the injected IAuditor is itself an ABSTRACTION, which means that you can vary the implementation independently of AuditingProductRepository. All the AuditingProductRepository class does is coordinate the actions of the decorated ProductRepository and the IAuditor.
You can write any implementation of IAuditor you like, but one based on SQL Server is a common choice. Let’s see how you can wire up all relevant DEPENDENCIES to make this work.
Composing AuditingProductRepository
Although many applications use the ProductRepository class to retrieve product information, because the CommerceService WCF web service from section 7.3.2 exposes CRUD operations for Products, this is an appropriate place to start.
In chapter 8, you saw several examples of how to compose a ProductManagementService instance. Listings 8.4 and 8.5 provided the most correct implementation, but, in the following listing, we’ll ignore that SqlProductRepository is disposable in order to focus on composing Decorators.
Listing 9.3. Composing a Decorator

As in listing 7.9, because you wish to use a SQL Server–based ProductRepository, you create a new instance of SqlProductRepository ![]() . But, instead of injecting it directly into a ProductManagementService instance, you’ll wrap it in an AuditingProductRepository.
. But, instead of injecting it directly into a ProductManagementService instance, you’ll wrap it in an AuditingProductRepository.
You inject both the SqlProductRepository ![]() and a SQL Server–based IAuditor implementation into an AuditingProductRepository instance
and a SQL Server–based IAuditor implementation into an AuditingProductRepository instance ![]() . Notice how sqlRepository and auditingRepository are both declared as ProductRepository instances.
. Notice how sqlRepository and auditingRepository are both declared as ProductRepository instances.
You can now inject auditingRepository into a new instance of ProductManagementService ![]() and return it. The ProductManagementServices sees only the auditingRepository and knows nothing about the sqlRepository.
and return it. The ProductManagementServices sees only the auditingRepository and knows nothing about the sqlRepository.
Warning
Listing 9.3 is a simplified example that ignores lifetime issues. Because SqlProductRepository and SqlAuditor are disposable types, the code will cause resource leaks. A more correct implementation would be an interpolation of listing 9.3 with listings 8.4 and 8.5—but I’m sure you’ll appreciate that it starts to get rather complex at that point.
Tip
Use a DI CONTAINER instead of manually dealing with the permutations of OBJECT COMPOSITION, LIFETIME MANAGEMENT, and INTERCEPTION.
Notice that you were able to add behavior to ProductRepository without changing the source code of existing classes. We didn’t have to change SqlProductRepository to add auditing. This is a desirable trait, known as the OPEN/CLOSED PRINCIPLE.
Obligatory Food Analogy
I think this corresponds to covering a veal cutlet in breading. Although we change the cutlet, we keep it in one size instead of chopping it up and making stew out of it.
Now that you’ve seen an example of INTERCEPTING the concrete SqlProductRepository with a decorating AuditingProductRepository, let’s take a step back and study the patterns and principles behind it.
9.1.2. Patterns and principles for Interception
As is the case with many other DI patterns, the Decorator pattern is an old and well-described design pattern that predates DI by several years. It’s such a fundamental part of INTERCEPTION that, whether or not you’re intimately familiar with it, it warrants a refresher.
You may have noticed a denser-than-usual usage of terms such as SINGLE RESPONSIBILITY PRINCIPLE and OPEN/CLOSED PRINCIPLE. These are items on the SOLID five-course menu.
All these patterns and principles are recognized as valuable guidance about clean code. The general purpose of this section is to relate this established guidance to DI to showcase that DI is only a means to an end. We use DI as an enabler of maintainable code.
All consumers of DEPENDENCIES should observe the LISKOV SUBSTITUTION PRINCIPLE when they invoke their DEPENDENCIES. This allows us to replace the originally intended implementation with another implementation of the same ABSTRACTION. Because a Decorator implements the same ABSTRACTION as the class it wraps, we can replace the original with a Decorator.
This was exactly what you did in listing 9.3 when you substituted the original SqlProductRepository with an AuditingProductRepository. You could do this without changing the code of the consuming ProductManagementService because it adheres to the LISKOV SUBSTITUTION PRINCIPLE: it requires an instance of ProductRepository, and any implementation will do.
Being able to extend a class’s behavior without modifying its code is known as the OPEN/CLOSED PRINCIPLE, and this is another of five principles codified as a concept known as SOLID.
Solid
Who doesn’t want to write solid software? Software that can withstand the test of time and provide value to its users sounds like a worthy goal; introducing SOLID[2] as an acronym for building quality software makes sense.
2 Robert C Martin, The Principles of OOD, http://butunclebob.com/ArticleS.UncleBob.PrinciplesOfOod
The Decorator pattern was first described in the book Design Patterns.[3] Its intent is to “attach additional responsibilities to an object dynamically. Decorators provide a flexible alternative to subclassing for extending functionality.”[4]
3 Erich Gamma et al., Design Patterns: Elements of Reusable Object-Oriented Software (New York: Addison-Wesley, 1994).
4 Ibid. p. 175.
A Decorator works by wrapping one implementation of an ABSTRACTION in another implementation. The wrapper delegates operations to the contained implementation, while adding behavior before or after invoking the wrapped object.
A Decorator can wrap another Decorator, which wraps another Decorator, and so on. The following figure shows how Decorators can wrap each other. At the core, there must be a self-contained implementation that performs the desired work.
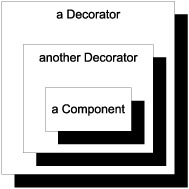
A Decorator wraps another Decorator that wraps a self-contained Component. When a member is invoked on the outmost Decorator, it delegates the call to its wrapped component. Because the wrapped component is itself a Decorator, it delegates the call to its contained component. For each call, a Decorator has the opportunity to use the input or the return value from the contained component to perform additional work.
When a Decorator receives a call to one of the members of the ABSTRACTION it implements, it may choose to simply delegate the call without doing anything at all:
public string Greet(string name)
{
    return this.innerComponent.Greet(name);
}
It may also choose to modify the input before delegating the call:
public string Greet(string name)
{
    var reversed = this.Reverse(name);
    return this.innerComponent.Greet(reversed);
}
In a similar move, it may decide to modify the return value before returning it:
public string Greet(string name)
{
    var returnValue = this.innerComponent.Greet(name);
    return this.Reverse(returnValue);
}
Given the two previous examples, we can wrap the latter around the former to compose a combination that modifies both input and output.
A Decorator may also decide not to invoke the underlying implementation:
public string Greet(string name)
{
    if (name == null)
    {
        return "Hello world!";
    }

    return this.innerComponent.Greet(name);
}
In this example, a Guard Clause provides a default behavior for null input, in which case the wrapped component isn’t invoked at all.
What differentiates a Decorator from any class containing DEPENDENCIES is that the decorated object implements the same ABSTRACTION as the Decorator. This enables a COMPOSER to replace the original component with a Decorator without changing the consumer. The decorated object is often injected into the Decorator declared as the abstract type, in which case the Decorator must adhere to the LISKOV SUBSTITUTION PRINCIPLE and treat all decorated objects equally.
You’ve already seen Decorators in action several places in the book. The example in section 9.1.1 used a Decorator, as did section 4.4.4.
Behind the acronym SOLID, we find five principles for object-oriented design that have all turned out to be helpful in writing maintainable code. Table 9.1 lists those principles.
Table 9.1. The five principles of SOLID
|
Description |
Relation to DI |
|
|---|---|---|
| SINGLE RESPONSIBILITY PRINCIPLE (SRP) | A class should only have a single responsibility. It should do one thing only, but do it well. The opposite of this principle is an anti-pattern known as God Class,[5] where a single class can do everything, including making coffee. | It can be difficult to stick to this principle, but one of the many benefits of CONSTRUCTOR INJECTION is that it makes it obvious every time we violate it. In the auditing example in section 9.1.1, you were able to adhere to the SRP by separating responsibilities into separate types: SqlProductRepository deals only with storing and retrieving product data, whereas SqlAuditor concentrates on persisting the audit trail in the database. The AuditingProductRepository class’s single responsibility is to coordinate the actions of ProductRepository and IAuditor. |
| OPEN/CLOSED PRINCIPLE (OCP) | A class should be open for extensibility, but closed for modification. That is, it should be possible to add behavior to an existing class without modifying its code. This isn’t always easy to achieve, but the SRP at least makes it easier, because the simpler the code is, the easier it is to spot potential SEAMS. | There are many ways you can make a class extensible, including virtual methods, injection of Strategies,[6] and application of Decorators—but no matter the details, DI makes this possible by enabling us to compose objects. |
| LISKOV SUBSTITUTION PRINCIPLE (LSP) | A client should treat all implementations of an ABSTRACTION equally. We should be able to replace any implementation with a different implementation without breaking the consumer. | The LSP is a foundation of DI. When consumers don’t observe it, you can’t replace DEPENDENCIES at will, and we lose any (if not all) benefits of DI. |
| INTERFACE SEGREGATION PRINCIPLE (ISP) | Interfaces should be designed to be fine-grained. We don’t want to lump too many responsibilities together into one interface, because it becomes too cumbersome to implement. I consider the ISP to be the conceptual underpinning of the SRP. The ISP states that interfaces should model only a single concept, whereas the SRP states that implementations should have only one responsibility. | The ISP may at first seem to be only distantly related to DI. But it’s important because an interface that models everything, including the kitchen sink, pulls you in the direction of a particular implementation. It’s often a smell of a LEAKY ABSTRACTION and makes it much harder to replace DEPENDENCIES because some of the interface members may make no sense in a context which is different from what originally drove the design.[7] |
| DEPENDENCY INVERSION PRINCIPLE (DIP) | Another term for the catch-phrase of programming to an interface instead of a concrete implementation. | DIP is the principle that guides DI. |
5 William J Brown et al., AntiPatterns: Refactoring Software, Architectures, and Projects in Crisis (Wiley Computer Publishing, 1998), 73.
6 Erich Gamma et al., Design Patterns: Elements of Reusable Object-Oriented Software (Addison-Wesley, 1994), 315.
7 Mark Seemann, Interfaces are not abstractions, 2010, http://blog.ploeh.dk/2010/12/02/InterfacesAreNotAbstractions.aspx
Note
None of the principles encapsulated by SOLID represent absolutes. They’re guidelines that can help you write clean code. To me, they represent goals that help me decide which direction I should take my APIs. I’m always happy when I succeed, but sometimes I don’t.
Decorator (and design patterns in general) and guidelines such as the SOLID principles have been around now for many years and are generally viewed as being beneficial when applied. In this section I’ve attempted to provide you with a hint of how they relate to DI.
The SOLID principles have been relevant throughout the book’s chapters, and you may have noticed that I’ve mentioned some of them here and there. But it is when we start talking about INTERCEPTION and how it relates to Decorators that the connection with SOLID starts to stand out. Some are more subtle than others, but adding behavior (such as auditing) by using a Decorator is a clear application of the OPEN/CLOSED PRINCIPLE with the SINGLE RESPONSIBILITY PRINCIPLE not far behind, because the first allows us to create implementations that have specifically-defined scopes.
In this section, we took a detour around patterns and principles to understand the relationship DI has with other established guidelines. Armed with this extra knowledge, let’s now turn our attention back to the goal of the chapter, which is to write clean and maintainable code in the face of inconsistent or changing requirements, and the need to address CROSS-CUTTING CONCERNS.
9.2. Implementing Cross-Cutting Concerns
Most applications must address aspects that don’t directly relate to any particular feature, but, rather, addresses a wider matter. These concerns tend to touch many otherwise unrelated areas of code, even in different modules or layers. Because they cut across a wide area of the code base, we call them CROSS-CUTTING CONCERNS. The following table lists some examples. This table isn’t an all-inclusive list of every aspect available; rather, it’s an illustrative sample.
When we draw diagrams of layered application architecture, CROSS-CUTTING CONCERNS are often represented as vertical blocks placed beside the layers, as shown in figure 9.4.
Figure 9.4. We often represent a CROSS-CUTTING CONCERN in application architecture diagrams with vertical blocks that span all layers. In this case, security is a CROSS-CUTTING CONCERN.

In this section, we’ll look at some examples that illustrate how we can use INTERCEPTION in the form of Decorators to implement CROSS-CUTTING CONCERNS. We’ll pick a few aspects from table 9.2 to get a feeling for implementing those using SOLID principles, but we’ll only look at a small subset. As is the case with many other concepts, INTERCEPTION may be easy to understand in the abstract, but the devil is in the details. It takes exposure to properly absorb the technique, and I’d rather provide you with one too many examples than too few. When we’re done with these examples, you should have a clearer picture of what INTERCEPTION is, and how you can apply it.
Table 9.2. Common examples of CROSS-CUTTING CONCERNS
|
Aspect |
Description |
|---|---|
| Auditing | Any data-altering operation should leave an audit trail including timestamp, the identity of the user who performed the change, and information about what changed. You saw an example of this in section 9.1.1. |
| Logging | Slightly different than auditing, logging tends to focus on recording events that reflect the state of the application. This could be events of interest to IT operations staff, but might also be business events. |
| Performance monitoring | Slightly different than logging, because this deals more with recording performance than specific events. If you have specific Service Level Agreements (SLAs) that can’t be monitored via standard infrastructure, you must implement custom performance monitoring. Custom Windows Performance Counters are a good choice for this, but you must still add some code that captures the data. |
| Security | Some operations should only be allowed for certain users, and you must enforce this. |
| Caching | You can often increase performance by implementing caches, but there’s no reason why a specific data access component should deal with this aspect. You may want to be able to enable or disable caching for different data access implementations. We already saw a glimpse of implementing caching with Decorators in section 4.4.4. |
| Error handling | We may want to handle certain exceptions and either log them or show a message to the user. We can use an error-handling Decorator to deal with errors in a proper way. |
| Fault tolerance | Out-of-process resources are guaranteed to be unavailable from time to time. You can implement fault tolerance patterns, such as Circuit Breaker, using a Decorator. |
Because we already saw an introductory example in section 9.1.1, we’ll take a look at a more complex example to illustrate how INTERCEPTION can be used with arbitrarily complex logic. Once we’ve done this, we’ll study an example that leads us towards a more declarative approach.
9.2.1. Intercepting with a Circuit Breaker
Any application that communicates with out-of-process resources will occasionally experience that the resource is unavailable. Network connections go down, databases go offline, and web services get swamped by Distributed Denial of Service (DDOS) attacks. In such cases, the calling application must be able to recover and appropriately deal with the issue.
Most .NET APIs have default timeouts that ensure that an out-of-process call doesn’t block the consuming thread forever. Still, in a situation where you just received a timeout exception, how do you treat the next call to the faulting resource? Do you attempt to call the resource again? Because a timeout often indicates that the other end is either offline or swamped by requests, making a new blocking call may not be a good idea. It would be better to assume the worst and throw an exception immediately. This is the rationale behind the Circuit Breaker pattern.
Circuit Breaker is a stability pattern because it adds robustness to an application by failing fast, instead of hanging and consuming resources while it hangs. This is a good example of a nonfunctional requirement and a true CROSS-CUTTING CONCERN, because it has little to do with the feature implemented with the out-of-process call.
The Circuit Breaker pattern itself is a bit complex and can be intricate to implement, but we only need to make that investment once. We could even implement it in a reusable library if we would like. Once we have a reusable Circuit Breaker, we can easily apply it to multiple components by employing the Decorator pattern.
The Circuit Breaker[8] design pattern takes its name from the electric switch of the same name. It’s designed to cut the connection when a fault occurs, in order to prevent the fault from propagating.
8 Michael T. Nygard, Release It! Design and Deploy Production-Ready Software (Cambridge, Massachusetts: Pragmatic Bookshelf, 2007), 104.
In software applications, once a timeout or similar communications error occurs, it can often make a bad situation worse if you keep hammering on a downed system. If the remote system is swamped, multiple retries may take it over the edge—a pause might give it a chance to recover. On the calling tier, threads blocked waiting for timeouts may make the consuming application unresponsive. It’s better to detect that communications are down and fail fast for a while.
The Circuit Breaker design addresses this by tripping the switch when an error occurs. It usually includes a timeout that makes it retry the connection after a while; this way, it can automatically recover when the remote system comes back up.
The following figure illustrates a simplified view of the state transitions in a Circuit Breaker.

Simplified state transition diagram of the Circuit Breaker pattern. It starts in the Closed state, indicating that the circuit’s closed and messages can flow. When an error occurs, the breaker is tripped and the state switches to Open. In this state, the breaker lets no calls through to the remote system; instead, it throws an exception immediately. After a timeout, the state switches to Half-Open, where a single remote call is allowed to go through. If it succeeds, the state goes back to Closed, but if it fails, the breaker goes back to Open, starting a new timeout.
You may want to make a Circuit Breaker more complex than described here. First, you may not want to trip the breaker every time a sporadic error occurs, but, rather, use a threshold. Second, you should only trip the breaker on certain types of errors. Timeouts and communication exceptions are fine, but a NullReferenceException is likely to indicate a bug instead of an intermittent error.
Let’s look at an example that shows how the Decorator pattern can be used to add Circuit Breaker behavior to an existing out-of-process component. In this example, we’ll focus on applying the reusable Circuit Breaker, but not on how it’s implemented.
Example: implementing a Circuit Breaker
In section 7.4.2, we created a WPF application that communicates with a WCF service using an IProductManagementAgent interface. Although we briefly returned to it in section 8.2.1, we never studied this interface in detail.
In the previous examples, you used a WcfProductManagementAgent that implements the interface by invoking the WCF service operations. Because this implementation has no explicit error handling, any communication error will bubble up to the caller.
This is an excellent case for a Circuit Breaker. You would like to fail fast once exceptions start occurring; this way, you won’t block the calling thread and swamp the service. As figure 9.5 shows, you start by declaring a Decorator for IProductManagementAgent and requesting the necessary DEPENDENCIES via CONSTRUCTOR INJECTION.
Figure 9.5. The CircuitBreakerProductManagementAgent is a Decorator of IProductManagementAgent: notice how it implements the interface and also contains an instance injected through the constructor. The other DEPENDENCY is an ICircuitBreaker that we can use to implement the Circuit Breaker pattern.

You can now wrap any call to the decorated IProductManagementAgent like the example shown in the following listing.
Listing 9.4. Decorating with a Circuit Breaker
public void InsertProduct(ProductEditorViewModel product)
{
    this.breaker.Guard();
    try
    {
        this.innerAgent.InsertProduct(product);
        this.breaker.Succeed();
    }
    catch (Exception e)
    {
        this.breaker.Trip(e);
        throw;
    }
}
The first thing you need to do before you try to invoke the decorated agent is to check the state of the Circuit Breaker. The Guard method will let you through when the state is either Closed or Half-Open, whereas it will throw an exception when the state is Open. This ensures that you fail fast when you have reason to believe that the call isn’t going to succeed.
If you make it past the Guard method, you can attempt to invoke the decorated agent. Notice that the call is wrapped in a try block: if the call fails, you trip the breaker. In this sample, you’re keeping things simple, but in a proper implementation, you should only catch and trip the breaker from a selection of exception types. Because NullReferenceExceptions or similar types of exceptions rarely indicate intermittent errors, there’d be no reason to trip the breaker in such cases.
From both the Closed and Half-Open states, tripping the breaker puts us back in the Open state. From the Open state, a timeout determines when we move back to the Half-Open state.
Conversely, you signal the Circuit Breaker if the call succeeds. If you’re already in the Closed state, you stay in the Closed state. If you’re in the Half-Open state, you transition back to Closed. It’s impossible to signal success when the Circuit Breaker is in the Open state, because the Guard method will ensure that you never get that far.
All other methods of IProductManagementAgent look similar, with the only difference being the method they invoke on innerAgent and an extra line of code for methods that return a value. You can see this variation inside the try block for the SelectAllProducts method:
var products = this.innerAgent.SelectAllProducts();
this.breaker.Succeed();
return products;
Because you must indicate success to the Circuit Breaker, you have to save the return value of the decorated agent before returning it; but that’s the only difference between methods that return a value and methods that don’t.
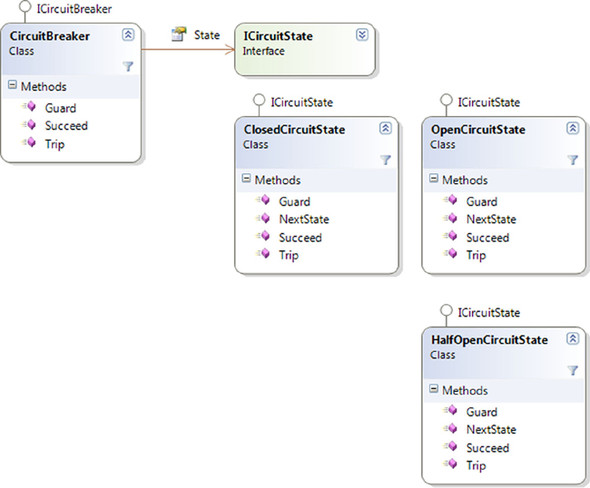
At this point, you’ve left the implementation of ICircuitBreaker open, but the real implementation is a completely reusable complex of classes that employ the State[9] design pattern. Figure 9.6 shows the involved classes.
9 Erich Gamma et al., Design Patterns: Elements of Reusable Object-Oriented Software (New York: Addison-Wesley, 1994), 305.
Figure 9.6. The CircuitBreaker class implements the ICircuitBreaker interface by utilizing the State pattern. All three methods are implemented by delegating to a polymorphic State member that changes as the states transition between each other.
Although we aren’t going to dive deeper into the implementation of CircuitBreaker here in the book, the important message is that you can INTERCEPT with arbitrarily complex code.
Tip
If you’re curious about the implementation of the CircuitBreaker class, it’s available in the code that accompanies this book.
To compose a ProductManagementAgent with the Circuit Breaker functionality added, you can wrap it around another implementation:
var timeout = TimeSpan.FromMinutes(1);
ICircuitBreaker breaker = new CircuitBreaker(timeout);
IProductManagementAgent circuitBreakerAgent =
    new CircuitBreakerProductManagementAgent(wcfAgent, breaker);
In listing 7.10, you composed a WPF application from several DEPENDENCIES, including a WcfProductManagementAgent instance. You can decorate this wcfAgent variable by injecting it into a CircuitBreakerProductManagementAgent instance that implements the same interface. In this particular example, you create a new instance of the CircuitBreaker class every time you resolve DEPENDENCIES, and that corresponds to the TRANSIENT lifestyle.
In a WPF application where you only resolve the DEPENDENCIES once, using a TRANSIENT Circuit Breaker isn’t an issue, but, in general, this isn’t the optimal lifestyle for such functionality. There will only be a single web service at the other end. If this service becomes unavailable, the Circuit Breaker should disconnect all attempts to connect to it. If several instances of CircuitBreakerProductManagementAgent are in use, this should happen for them all.
As presented here, the ICircuitBreaker interface contains three members: Guard, Succeed, and Trip. An alternative interface definition could use continuation passing[10] to reduce the footprint to a few single-use methods:
10 For a good introduction to continuation passing style, see Jeremy Miller, Patterns in practice: Functional Programming for Everyday .NET Development, MSDN Magazine, October 2009. Also available online at http://msdn.microsoft.com/en-us/magazine/ee309512.aspx
public interface ICircuitBreaker
{
    void Execute(Action action);

    T Execute<T>(Func<T> action);
}
This would allow us to more succinctly use ICircuitBreaker in each method, like this:
public void InsertProduct(ProductEditorViewModel product)
{
    this.breaker.Execute(() =>
        this.innerAgent.InsertProduct(product));
}
I chose to use the more explicit and old-fashioned version of ICircuitBreaker because I want you to be able to focus on the current topic of INTERCEPTION. Although I personally like continuation passing, I consider lambdas and generics “advanced” topics in their own right, and I think they might be more distracting than helpful in this context.
Whether we ultimately choose one interface definition over the other doesn’t change the conclusion of the current chapter.
This is an obvious case for setting up CircuitBreaker with the SINGLETON lifetime, but this also means that it must be thread-safe. Due to its very nature, the CircuitBreaker maintains state; thread-safety must be explicitly implemented. This makes the implementation even more complex.
Despite its complexity, you can easily INTERCEPT an IProductManagementAgent instance with a Circuit Breaker. Although the first INTERCEPTION example in section 9.1.1 was fairly simple, the Circuit Breaker example demonstrates that you can INTERCEPT a class with a CROSS-CUTTING CONCERN whose implementation is easily more complex than the original implementation.
The Circuit Breaker pattern ensures that an application fails fast instead of tying up precious resources; but, ideally, the application wouldn’t crash at all. To address this issue, you can implement some kinds of error handling with INTERCEPTION.
9.2.2. Handling exceptions
DEPENDENCIES are likely to throw exceptions from time to time. Even the best-written code will (and should) throw exceptions if it encounters situations it can’t deal with. Clients that consume out-of-process resources fall into that category. A class like the WcfProductManagementAgent class from the sample WPF application is one example. When the web service is unavailable, the agent will start throwing exceptions.
A Circuit Breaker doesn’t change this fundamental trait. Although it INTERCEPTS the WCF client, it still throws exceptions.
Instead of a crashing application, you might prefer a message box that tells you that the operation didn’t succeed and that you should try again later.
You can use INTERCEPTION to add error handling in a SOLID manner. You don’t want to burden a DEPENDENCY with error handling. Because a DEPENDENCY should be viewed as a reusable component that can be consumed in a lot of different scenarios, it wouldn’t be possible to add an exception-handling strategy into the DEPENDENCY itself that would fit all scenarios. It would also be a violation of the SINGLE RESPONSIBILITY PRINCIPLE if you did this.
By using INTERCEPTION to deal with exceptions, you follow the OPEN/CLOSED PRINCIPLE. It allows you to implement the best error-handling strategy for any given situation. Let’s look at an example.
Example: handling exceptions
In the previous example, you wrapped a WcfProductManagementAgent in a Circuit Breaker for use with the Product Management client application originally introduced in section 7.4.2. A Circuit Breaker only deals with errors by making certain that the client fails fast, but it still throws exceptions. If left unhandled, they’ll cause the application to crash, so you should implement a Decorator that knows how to handle some of those errors. When an exception is thrown, it should pop up a message as shown in figure 9.7.
Figure 9.7. The Product Management application handles communication exceptions by showing a message to the user. Notice that in this case the error message originates from the Circuit Breaker instead of the underlying communication failure.

Implementing this behavior is easy to do. The same way you did in section 9.2.1, you add a new ErrorHandlingProductManagementAgent class that decorates the IProductManagementAgent interface. The following listing shows a sample of one of the methods of that interface, but they’re all similar.
Listing 9.5. Handling exceptions
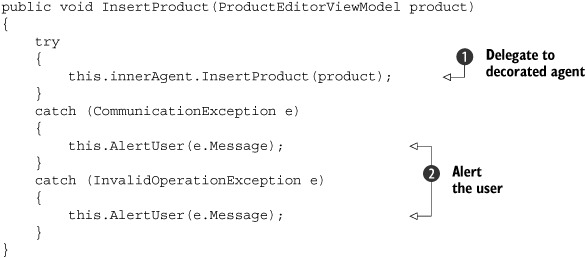
The InsertProduct method is representative of the entire implementation of the ErrorHandlingProductManagementAgent class. You attempt to invoke the decorated agent ![]() and alert the user with the exception message
and alert the user with the exception message ![]() if an exception is thrown. Notice that you only handle a particular set of known exceptions, because it can be dangerous
to suppress all exceptions.
if an exception is thrown. Notice that you only handle a particular set of known exceptions, because it can be dangerous
to suppress all exceptions.
Alerting the user involves formatting a string and showing it to the user using the MessageBox.Show method.
Once again, you added functionality to the original implementation (WcfProductManagementAgent) by implementing a Decorator. You’re solidly following both the SINGLE RESPONSIBILITY PRINCIPLE and the OPEN/CLOSED PRINCIPLE by continually adding new types instead of modifying existing code. By now, you should already begin to see a pattern that suggests a more general arrangement than Decorator.
For a given CROSS-CUTTING CONCERN, the implementation based on a Decorator tends to be repetitive. Implementing a Circuit Breaker involves applying the same code template to all methods of the IProductManagementAgent interface. Had you wanted to add a Circuit Breaker to another ABSTRACTION, you would’ve had to apply the same code to more methods. Although the template is different, the same is true for the exception handling code we just reviewed.
To drive home this point, let’s briefly glance at implementing security. This will suggest a more general approach to composing CROSS-CUTTING CONCERNS that we’ll then examine further in section 9.3.
9.2.3. Adding security
Security is another common CROSS-CUTTING CONCERN. We wish to secure our applications as much as possible to prevent unauthorized access to sensitive functionality.
Note
Security is a big topic[11] that addresses many areas, including the disclosure of sensitive information and breaking into networks. In this section, I only touch briefly on the subject of authorization—that is, making sure that only authorized people (or systems) can perform certain actions.
11 For a thorough treatment of security, you may want to read Michael Howard and David LeBlanc, Writing Secure Code: Second Edition (Cambridge, Massachusetts: Microsoft Press, 2003).
Similar to how we used Circuit Breaker, we’d like to INTERCEPT a method call and check whether the call should be allowed. If not, instead of allowing the call to be made, an exception should be thrown. The principle is the same: the difference lies in the criterion we use to determine the validity of the call.
A common approach to implementing authorization logic is to employ role-based security by using Thread.CurrentPrincipal. You might start out with a SecureProductRepository Decorator. Because, as you’ve seen in the previous sections, all methods look similar, the following listing only shows a sample method implementation.
Listing 9.6. Explicitly checking authorization
public override void InsertProduct(Product product)
{
    if (!Thread.CurrentPrincipal.IsInRole("ProductManager"))
    {
        throw new SecurityException();
    }

    this.innerRepository.InsertProduct(product);
}
The InsertProduct method starts with a Guard Clause that explicitly accesses Thread.CurrentPrincipal and asks whether it has the ProductManager role. If not, it immediately throws an exception. Only if the calling IPrincipal has the required role do you allow it past the Guard Clause to invoke the decorated repository.
Note
Recall that Thread.CurrentPrincipal is an example of the AMBIENT CONTEXT pattern.
This is such a common coding idiom that it’s encapsulated in the System.Security.Permissions.PrincipalPermission class; so you could instead write the previous example a bit more tersely:
public override void InsertProduct(Product product)
{
    new PrincipalPermission(null, "ProductManager").Demand();

    this.innerRepository.InsertProduct(product);
}
The PrincipalPermission class encapsulates the request for the current IPrincipal to have a particular role. Invoking the Demand method will throw an exception if Thread.CurrentPrincipal doesn’t have the ProductManager roles. This example is functionally equivalent to listing 9.6.
When the only thing you do is demand that the current IPrincipal has a particular role, you can move into a purely declarative style:
[PrincipalPermission(SecurityAction.Demand, Role = "ProductManager")]
public override void InsertProduct(Product product)
{
    this.innerRepository.InsertProduct(product);
}
The PrincipalPermission attribute offers the same functionality as the PrincipalPermission class, but exposed as an attribute. Because the .NET Framework understands this attribute, whenever it encounters it, it executes the corresponding PrincipalPermission demand.
At this point, having a separate Decorator only to apply an attribute begins to look a little like overkill. Why not apply the attribute directly on the original class itself?
Although this seems attractive, there are several reasons why you might not want to do that:
- The use of attributes precludes more complex logic. What if you wanted to allow most users to update a product’s description, but only ProductManagers to update the price? Such logic can be expressed in imperative code, but not easily with an attribute.
- What if you want to make sure that the permission rules are in place no matter which ProductRepository implementation you use? Because attributes on concrete classes can’t be reused across implementations, that would violate
the DRY[12] principle.
12 Don’t Repeat Yourself.
- You wouldn’t be able to vary the security logic independently of the ProductRepository.
Still, the idea of addressing a CROSS-CUTTING CONCERN in a declarative fashion isn’t new. Because it’s often employed in ASPECT-ORIENTED PROGRAMMING, it’s only fitting that we take a closer look at this and how it leads us to loosely coupled INTERCEPTION.
9.3. Declaring aspects
In the previous sections, we looked at patterns for INTERCEPTION and how they can help you address CROSS-CUTTING CONCERNS using SOLID principles. In section 9.2.3 you saw how it was possible to reduce the implementation of a security check to a purely declarative approach.
Applying attributes to declare aspects is a common technique in ASPECT-ORIENTED PROGRAMMING (AOP). But, as alluring it may seem at first, the use of attributes comes with several built-in issues that make it a less-than-ideal solution. I’ll use the first part of this section to review this concept and its little known disadvantages.
Note
I occasionally use the term aspect attribute to denote a custom attribute that implements or signifies an aspect.
Once we’ve properly dismissed the idea of using attributes to declare aspects, we’ll spend the rest of this chapter looking at dynamic INTERCEPTION using a DI CONTAINER, which offers a better alternative.
9.3.1. Using attributes to declare aspects
Attributes share a trait with Decorators: although they may add or imply a modification of behavior of a member, they leave the signature unchanged. As you saw in section 9.2.3, you can replace explicit, imperative authorization code with an attribute. Instead of writing one or more lines of explicit code, you could achieve the same result by applying the [PrincipalPermission] attribute.
It sounds attractive to extrapolate this concept to other CROSS-CUTTING CONCERNS. Wouldn’t it be nice if you could decorate a method or class with a [HandleError] attribute, or even a custom [CircuitBreaker] attribute, and, in this way, apply the aspect with a single line of declarative code?
It might be, but there are several issues with this approach that you need to understand and address.
First and foremost is the challenge that arises from the fact that attributes are inherently passive. Although defining a custom attribute and applying it is as easy as deriving a class from System.Attribute and adorning other classes with the custom attribute, it sits there doing nothing.
But wait! Didn’t the [PrincipalPermission] attribute change the behavior of a method? Yes, but this attribute (and some other attributes available in the Base Class Library) is special. The .NET Framework understands and acts upon this attribute, but it won’t do so for any custom attribute you’d like to introduce.
You have two options if you want to enable custom attributes to modify behavior of an application:
- Modify the compilation step
- Introduce a custom runtime host
Let’s briefly investigate each option.
Modifying compilation
One of the most popular AOP frameworks, PostSharp,[13] works exactly by enabling you to add custom attributes to your code. These attributes must derive from a special attribute defined in the PostSharp SDK which supplies virtual methods you can override to define the behavior of the aspect you wish to apply. You can then apply these attributes to your classes or class members. Figure 9.8 shows what happens next.
Figure 9.8. PostSharp works by adding a post-compilation step after normal compilation has completed. Because the custom PostSharp attributes on your code are treated no differently than any other attribute by the normal compiler (for example, csc.exe), the output is a normal assembly with passive attributes. PostSharp includes a post-compilation step where PostSharp picks up the compiled assembly and interleaves the code from your custom attributes directly into the attributed code. The result is a new .NET assembly with the aspects embedded.

PostSharp relies on post-compilation to turn passive attributes into active code. The PostSharp processor looks after attributes that derive from the PostSharp attributes and interleaves the code from those attributes with the code adorned by these attributes. The result is a new assembly with the proper aspect code interleaved with the original code.
This assembly is a perfectly normal assembly that runs wherever all other .NET code runs. It requires no special runtime to work.
Among the advantages of this approach is that it doesn’t require any special design effort on your part. DI isn’t necessary, although not precluded, either. I’m sure that there are other advantages as well.
One disadvantage of this approach is that the code that runs is different from the code you wrote. If you want to debug the code, you’ll need to take special steps, and, although the vendor happily supplies tools that allow you to do just that, it also pulls you towards the Vendor Lock-In[14] anti-pattern.
14 William J. Brown et al., AntiPatterns: Refactoring Software, Architectures, and Projects in Crisis (New York: Wiley Computer Publishing, 1998), 167.
But the greatest disadvantage lies in the use of attributes itself. This disadvantage is shared with using a custom host for activating attributes. Let’s review this option before we examine the disadvantages of attributes.
Using a custom host
Another option for activating attributes is to require all code to be activated or initialized by a custom host or factory. Such a factory will be able to inspect all attributes on the classes it initializes and act accordingly.
We know this technique from numerous .NET technologies that rely on attributes. Examples include the following:
- WCF includes many attributes such as [ServiceContract], [OperationContract], and so on. These attributes only take on behavior when you host a service in a ServiceHost instance (this is also what IIS does for you).
- ASP.NET MVC gives you the option to specify which HTTP verbs you’ll accept with the [AcceptVerbs] attribute, as well as handle exceptions with the [HandleError] attribute, and several others. This works because ASP.NET MVC is one big custom host and it controls the lifetime of your controllers.
- All .NET unit testing frameworks that I’m aware of use attributes to identify test cases. A unit test framework initializes test classes and interprets the attributes to figure out which tests to execute.
Composing objects with a DI CONTAINER is similar to these examples. Because a DI CONTAINER initializes instances of the involved classes, it has the opportunity to inspect each class to look for custom attributes.
It should come as no surprise, then, that many DI CONTAINERS come with features that allow you to do just that. If you’ve already decided to use a DI CONTAINER, shouldn’t you go all the way and define and apply custom attributes?
I can only think of one advantage this gives us over dynamic INTERCEPTION: because an attribute is fairly easy to spot, even though it offers a pretty advanced level of indirection, you still get a valuable hint that something else is going on than the method body you’re looking at.
But there are disadvantages to applying CROSS-CUTTING CONCERNS with attributes. These disadvantages are common for post-compilation and custom hosts.
Disadvantages of aspect attributes
As attractive as it sounds to implement aspects as custom attributes, there are disadvantages.
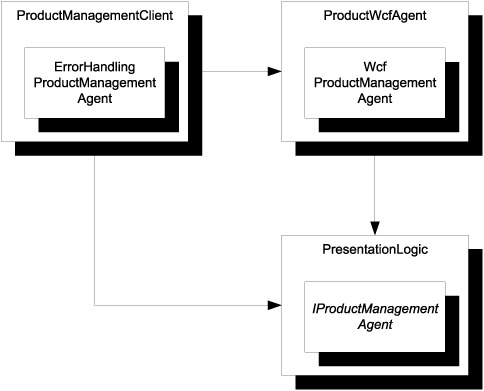
First, attributes are compiled together with the code they adorn. This means that you can’t easily change your mind. Consider error handling as an example. In section 9.2.2, you saw how you can use the Decorator design pattern to implement error handling for any IProductManagementAgent. One interesting point is that the underlying WcfProductManagementAgent knows nothing of the ErrorHandlingProductManagementAgent. As figure 9.9 illustrates, they’re even implemented in two different libraries.
Figure 9.9. ErrorHandlingProductManagementAgent and WcfProductManagementAgent both implement IProductManagementAgent, but are defined in two different libraries. Because the ProductManagementClient assembly contains the COMPOSITION ROOT, it has a DEPENDENCY on ProductWcfAgent and PresentationLogic.
The core implementation offered by WcfProductManagementAgent explicitly doesn’t include error handling because proper exception handling is context-dependent. In a GUI application like the WPF application we’ve been using as an example so far, a dialog message may be a good strategy, but in a console application you might instead prefer writing to the error output stream, and an automated service could move the operation to a retry queue and move on to do something else.
To stay open and flexible, the ProductWcfAgent library must not include error handling. But, if you apply an aspect attribute to WcfProductManagementAgent (or, even worse, IProductManagementAgent), you tightly couple this aspect to the implementation (or even the ABSTRACTION). If you do that, you force a particular error-handling strategy on WcfProductManagementAgent and you lose the ability to vary the aspect independently of the implementation.
A second problem with aspect attributes is that you have limited options when it comes to applying attributes, which can only be used at the following levels:
- Parameters, including return values
- Members, such as methods, properties and fields
- Types, such as classes and interfaces
- Libraries
Although this provides you with a wide range of options, you can’t easily express more convention-based configurations such as “I want to apply the Circuit Breaker aspect to all types whose name starts with Wcf.” Instead, you would have to apply a hypothetical [CircuitBreaker] attribute to all appropriate classes, violating the DRY principle.
The last drawback of aspect attributes is that attributes must have a simple constructor. If you need to consume DEPENDENCIES from the aspect, you can only do so using an AMBIENT CONTEXT. You already saw an example of that in section 9.2.3, where Thread.CurrentPrincipal is an AMBIENT CONTEXT. But, this pattern is rarely the most appropriate, and it makes the LIFETIME MANAGEMENT more difficult. As an example, sharing a single ICircuitBreaker instance across multiple WCF clients suddenly becomes much more difficult.
Despite all these shortcomings, the attraction of aspect attributes is that you only have to implement the aspect code in a single place. In the next section, you’ll see how you can use INTERCEPTION capabilities of DI CONTAINERS to achieve this goal without the tight coupling of aspect attributes.
9.3.2. Applying dynamic Interception
So far you’ve seen how Decorators can be used to address and implement CROSS-CUTTING CONCERNS. This technique satisfies the SOLID principle but violates the DRY principle. It may not have been apparent from the examples in this chapter, but applying an aspect by manually developing decorating classes involves lots of repetitive code.
Repetitiveness of Decorators
The examples in sections 9.1.1 and 9.2.1 show only representative methods because every method is implemented in the same way, and I didn’t want to dump several pages of near-identical code because it would’ve detracted from the point I was making. The following listing shows how similar the methods of CircuitBreakerProductmanagementAgent are. This listing shows only two of the methods of the IProductManagementAgent interface, but I’m confident that you can extrapolate and imagine how the rest of the implementation looks.
Listing 9.7. Violating the DRY principle

Because you’ve already seen the InsertProduct method in listing 9.4, the purpose of this code example is to illustrate the repetitive nature of Decorators used as aspects. The only difference
![]() between the DeleteProduct and InsertProduct methods is that they each invoke their own corresponding method on the decorated agent.
between the DeleteProduct and InsertProduct methods is that they each invoke their own corresponding method on the decorated agent.
Even though we’ve successfully delegated the Circuit Breaker implementation to a separate class via the ICircuitBreaker interface, this plumbing code clearly violates the DRY principle. It may tend to be reasonably unchanging, but it’s still a liability. Every time you want to add a new member to a type you decorate, or when you wish to apply a Circuit Breaker to a new ABSTRACTION, you must apply the same plumbing code.
One way you might consider addressing this issue is by applying code generators like Visual Studio’s Text Template Transformation Toolkit (T4), but many DI CONTAINERS offer a better option with dynamic INTERCEPTION.
Automating Decorators
The code in each method in listing 9.7 looks a lot like a template. The hard part of implementing a Decorator as an aspect is to design this template, but from there it’s a rather mechanical process:
- Create a new class
- Derive from the desired interface
- Implement each interface member by applying the template
This process is so mechanical that you can use a tool to automate it. Such a tool would use Reflection or similar APIs to discover all the members to implement, and then apply the template to all members. Figure 9.10 shows how this procedure can be applied using a T4 template.[15]
15 Read more about Decorators and T4 templates at Oleg Sych, How to use T4 to generate Decorator classes, 2007, www.olegsych.com/2007/12/how-to-use-t4-to-generate-decorator-classes/
Figure 9.10. T4 makes it possible to auto-generate Decorator code from templates. The starting point is a template prototype that understands the basic concept of Decorator. The template prototype contains the code generation code that will generate the frame of the decorating class, but it doesn’t define any aspect code. From the template prototype, an aspect template that describes how a specific aspect (such as Circuit Breaker) should be applied when decorating any interface is developed. The result of that is a specialized template (SomeAspect.tt) for that particular aspect, which can be used to generate Decorators for particular interfaces. The result is a normal code file (SomeAspectDecorator.cs) that compiles normally together with other code files.

Although code generators allow you to address the symptom of repetitive coding, they still leaves a lot of repetitive code in their trail. If you believe that code is a liability,[16] more code incurs a greater cost, auto-generated or not.
16 Tim Ottinger, Code is a Liability, 2007, http://blog.objectmentor.com/articles/2007/04/16/code-is-a-liability
Even if you don’t buy this argument, you’re still left with a static set of auto-generated Decorators. If you want a new Decorator for a given combination of aspect and ABSTRACTION, you must explicitly add this class. It may be auto-generated, but you still need to remember to create it and wire it up. A more convention-based approach isn’t possible in this case.
Some DI CONTAINERS provide you with a better option than automatically generated code: automatically generated classes. This may sound like an esoteric difference, but read on.
Dynamic Interception
Among the many powerful features of the .NET Framework is the ability to dynamically emit types. In addition to automatically generating code at design time, it’s also possible to write code that emits a fully functional class at runtime. Such a class has no underlying source code file, but is compiled directly from some abstract model.
In the same way that you can automate the generation of Decorators to source code files, you can automate the generation of Decorators to be emitted straight into a running process. As figure 9.11 shows, this is what dynamic INTERCEPTION enables you to do.
Figure 9.11. Some DI CONTAINERS allow us to define aspects as Interceptors. The Interceptor is a piece of code that implements the aspect and integrates with the container. Registering the Interceptor with the container enables the container to dynamically create and emit Decorators that contain the aspect behavior. These classes only exist at runtime.

Note
Not all DI CONTAINERS support runtime INTERCEPTION; if you need this feature, be sure to pick your DI CONTAINER accordingly.
To use dynamic INTERCEPTION, you must still write the code that implements the aspect. This could be the plumbing code required for the Circuit Breaker aspect, as shown in listing 9.7. Once you’ve done this, you must tell the DI CONTAINER about the aspect, and when it should apply it.
At runtime, the DI CONTAINER will dynamically emit new classes into the running AppDomain based on the registered aspects. The best part of this approach is that you can use convention-based configuration to define how aspects are applied, and you can decide to use differing conventions in different applications (for example, although you may share a lot of libraries, you may have different error handling strategies in a WPF application and a PowerShell application).
Note
In AOP, a convention that matches aspects to classes and members is called a Pointcut.
Enough with the theory—let’s see an example.
9.3.3. Example: intercepting with Windsor
With their repetitive code, the Circuit Breaker and error handler aspects from sections 9.2.1 and 9.2.2 are excellent candidates for dynamic INTERCEPTION. As an example, let’s see how you can achieve DRY, SOLID code with Castle Windsor’s[17] INTERCEPTION capabilities.
Note
I could’ve chosen another DI CONTAINER than Castle Windsor, but definitely not just any container. Some support INTERCEPTION while others don’t—part 4 covers features of specific DI CONTAINERS.
In this example, you’ll implement and register Interceptors for both error handling and Circuit Breaker. Adding an aspect to Windsor is a three-step process, as shown in figure 9.12.
Figure 9.12. The three steps involved in adding an aspect to Windsor

You’ll do this for both aspects in this example. Error handling is the simplest to implement because it has no DEPENDENCIES; let’s start with that.
Implementing the exception handling Interceptor
Implementing an Interceptor for Windsor requires us to implement the IInterceptor interface, which has only a single method. The following listing shows how to implement the exception handling strategy from listing 9.5, but, contrary to listing 9.5, the following listing shows the entire class.
Listing 9.8. Implementing the exception handling Interceptor

To implement an Interceptor, you must derive from the IInterceptor interface ![]() defined by Windsor. There’s only one method to implement, and you implement it by applying the same code
defined by Windsor. There’s only one method to implement, and you implement it by applying the same code ![]() that you used repeatedly when you implemented the ErrorHandlingProductManagementAgent.
that you used repeatedly when you implemented the ErrorHandlingProductManagementAgent.
The only difference from listing 9.5 is that, instead of delegating the method call to a specific method, you must be more general because you apply this code
to potentially any method. You instruct Windsor to let the call proceed to the decorated item by invoking the Proceed method ![]() on the invocation input parameter.
on the invocation input parameter.
The IInvocation interface passed to the Intercept method as a parameter represents the method call. It might, for example, represent the call to the InsertProduct method. The Proceed method is one of the key members of this interface because it enables us to let the call proceed to the next implementation on the stack.
The IInvocation interface also allows you to assign a return value before letting the call proceed, as well as providing access to detailed information about the method call. From the invocation parameter, you can get information about the name and parameter values of the method, as well as a lot of other information about the current method call.
Implementing the Interceptor is the hard part. The next step is easy.
Registering the exception handling Interceptor
The interceptor must be registered with the container before it can be used. This step doesn’t configure the rules governing how and when the Interceptor is activated (the Pointcut), but only makes it available as a component.
Note
You may consider this step as ceremony to satisfy Windsor. One of Windsor’s quirks is that every component must be explicitly registered, even when it’s a concrete type with a default constructor. Not all DI CONTAINERS work the same way, but in Windsor, this behavior is by design.
Registering the ErrorHandlingInterceptor class is easy (container is an instance of IWindsorContainer):
container.Register(Component.For<ErrorHandlingInterceptor>());
This is no different from registering any other component with Windsor, and you could even choose to use a convention-based approach to register all implementations of IInterceptor found in a particular assembly. This might look similar to the example code in section 3.2.
The last step in activating the Interceptor is to define the rules for when and how it applies, but because this rule should also address the Circuit Breaker Interceptor, we’ll postpone this step until the other Interceptor is ready as well.
Implementing the Circuit Breaker Interceptor
The Circuit Breaker Interceptor is a bit more complex because it requires the ICircuitBreaker DEPENDENCY, but, as the following listing shows, you address this by applying standard CONSTRUCTOR INJECTION. When it comes to composing the class, Windsor treats it like any other component: as long as it can resolve the DEPENDENCY, all is well.
Listing 9.9. Implementing the Circuit Breaker Interceptor

The CircuitBreakerInterceptor requires the ICircuitBreaker DEPENDENCY, and injecting DEPENDENCIES into an IInterceptor is done with CONSTRUCTOR INJECTION ![]() , just like in any other service.
, just like in any other service.
As you saw in listing 9.8, you implement the IInterceptor interface by applying the template ![]() suggested by the previous, repetitive implementation from listing 9.4. Once more, instead of invoking a specific method, you invoke the Proceed method
suggested by the previous, repetitive implementation from listing 9.4. Once more, instead of invoking a specific method, you invoke the Proceed method ![]() to instruct the Interceptor to let processing continue to the next component in the Decorator stack.
to instruct the Interceptor to let processing continue to the next component in the Decorator stack.
By now you should begin to see a pattern forming. Instead of repeating the Circuit Breaker plumbing code for each and every method of an ABSTRACTION, you can state it exactly once, in an Interceptor.
You also need to register the CircuitBreakerInterceptor class with the container; because it has a DEPENDENCY, this requires not one, but two lines of code.
Registering the Circuit Breaker Interceptor
The exception-handling Interceptor required only a single line of registration code, but, because CircuitBreakerInterceptor depends on ICircuitBreaker, you must also register this DEPENDENCY:
container.Register(Component
    .For<ICircuitBreaker>()
    .ImplementedBy<CircuitBreaker>()
    .DependsOn(new
    {
        timeout = TimeSpan.FromMinutes(1)
    }));
container.Register(Component.For<CircuitBreakerInterceptor>());
You map the ICircuitBreaker interface to the concrete CircuitBreaker class, that itself requires a timeout constructor parameter.
With both Interceptors in place, the only thing you still need to do is to define the rules for when they’re activated.
Activating the Interceptors
So far, the Interceptors are implemented and registered with the Windsor container, but you have yet to define when they’re activated. If you don’t do this, they’ll just be passive registrations in the container, without ever getting invoked.
You can think of this step as the equivalent to applying aspect attributes. If we apply a hypothetical [CircuitBreaker] attribute to a method, we connect the Circuit Breaker aspect to that method. Defining and applying custom attributes is one of the ways we can activate Windsor Interceptors, but we also have several other, and better, options available.
The most flexible is to implement and register the IModelInterceptorsSelector interface. This allows us to write imperative code that decides which Interceptor to apply to which types or members. Because we can write arbitrarily complex code, we have the option to apply our aspects in a much more convention-based manner.
In the following listing, you use a simple implementation of such a Pointcut.
Listing 9.10. Implementing a Pointcut

The IModelInterceptorsSelector interface follows the Tester-Doer[18] pattern. Windsor will first call the HasInterceptors method to ask whether the given component it is about to initialize has any Interceptors. In this case, you answer in the
affirmative when the component implements the IProductManagementAgent interface ![]() , but you could’ve written arbitrarily complex code here if you’d wanted to implement a more heuristic approach.
, but you could’ve written arbitrarily complex code here if you’d wanted to implement a more heuristic approach.
18 Krzysztof Cwalina and Brad Abrams, Framework Design Guidelines: Conventions, Idioms, and Patterns for Reusable .NET Libraries (New York, Addison-Wesley 2006), 203.
When the HasInterceptors method returns true, the SelectInterceptors method will be called. From this method you return references to the Interceptors you already registered ![]() . Notice that you don’t return instances of the Interceptors, but, rather, references to the Interceptors you already implemented
and registered.
. Notice that you don’t return instances of the Interceptors, but, rather, references to the Interceptors you already implemented
and registered.
This enables Windsor to AUTO-WIRE any Interceptors that may have DEPENDENCIES on their own (such as the CircuitBreakerInterceptor from listing 9.9).
Guess what! You also need to register the ProductManagementClientInterceptorSelector class with the container. This is done a little differently, but is still a single line of code:
container.Kernel.ProxyFactory.AddInterceptorSelector(
    new ProductManagementClientInterceptorSelector());
This finally activates the Interceptors so that when you resolve the application using Windsor, they automatically kick in whenever they should.
You may think that this multipage walkthrough of Windsor Interceptors seems pretty complex, but you should keep a few things in mind:
- You implemented two, not one, Interceptors.
- I repeated some code from previous examples to show how it fits in. No matter whether you elect to write manual Decorators, use an AOP framework, or use dynamic INTERCEPTION, you’ll always need to write the code that implements the aspect.
Dynamic INTERCEPTION offers a lot of benefits. It enables us to address CROSS-CUTTING CONCERNS following both the SOLID and DRY principles. It gives us truly loosely coupled aspects and an option to apply conventions or complex heuristics to determine when and where to apply which aspects. It’s the ultimate level of freedom and flexibility.
You may be concerned about the performance implications of compiling and emitting custom types on the fly, but as far as I’ve been able to determine, Windsor only does this once and reuses the type for all subsequent invocations. I did a few informal benchmarks without registering any noticeable performance degradation.
Another concern is the added level of indirection. You could argue that, by applying aspect attributes, we still leave a visible trace on the core method that behavior-changing aspects are in place. With Decorators, and dynamic INTERCEPTION in particular, there’s no such clue. Novice developers could potentially run afoul in this semi-magical behavior, ending up stuck for days before someone helps them out by explaining the concept to them.
This is a real concern in some organizations. Consider how you would like to address it if you choose to apply dynamic INTERCEPTION.
9.4. Summary
DI really shines when it comes to applying recognized object-oriented principles such as SOLID. In particular, the loosely coupled nature of DI lets us use the Decorator pattern to follow the OPEN/CLOSED PRINCIPLE as well as the SINGLE RESPONSIBILITY PRINCIPLE. This is valuable in a wide range of situations, because it enables us to keep our code clean and well-organized, but applies especially well when it comes to addressing CROSS-CUTTING CONCERNS.
CROSS-CUTTING CONCERNS traditionally belong in the realm of ASPECT-ORIENTED PROGRAMMING, but can also be addressed with great success using DI. The Decorator design pattern is the central pattern that enables us to wrap existing functionality in additional layers of behavior without changing the original code.
But, despite its many virtues, the main problem with implementing Decorators is that they tend to be verbose and repetitive. Even though we can follow SOLID design principles, we end up violating the DRY principle because we must write the same plumbing code over and over again—for each member of each interface that we wish to decorate with a particular aspect.
Attributes seem like an appealing alternative to Decorators because they allow us to add aspects in a much terser way. But, because attributes are compiled into the code they decorate, they lead to tight coupling and are better avoided.
Some DI CONTAINERS offer a more attractive alternative, with the ability to dynamically emit Decorators at runtime. These dynamic Decorators provide INTERCEPTION that follow both the SOLID and DRY principles.
It’s interesting to note that dynamic INTERCEPTION is the only feature of DI CONTAINERS that have no direct equivalent in POOR MAN’S DI. At this point in part 3, you’ve seen how to address OBJECT COMPOSITION and LIFETIME MANAGEMENT by judicious application of patterns, but when it comes to INTERCEPTION, the closest we get is a lot of Decorators.
Although the concept of a Decorator is comparable to INTERCEPTION, the leap from many hand-coded Decorators to a single, DRY Interceptor is considerable. The first may lead to an explosion of repetitive plumbing code, whereas the other offers to address CROSS-CUTTING CONCERNS in as few lines of code as possible, and with the option to use convention-based application of aspects as an added bonus.
It’s only fitting that here, at the conclusion of part 3, we finally arrive at an area where DI CONTAINERS indisputably leave POOR MAN’S DI behind. Even without INTERCEPTION, a DI CONTAINER can much better manage the complexity involved in mapping ABSTRACTIONS to concrete types and manage their lifetimes; but when we add INTERCEPTION to the mix, we can’t beat the combination.
On that note, we can now happily leave POOR MAN’S DI behind in part 3 and move on to read about specific DI CONTAINERS in part 4.