
Simple Tunneling with tmate
Our cloud server, ssh tunneling, and the SOCKS proxy provide a secure, reliable and lightweight means of connecting to another programmer. The skills required to create this environment are essential—especially when sharing a web server—but they can become cumbersome. As a result, most remote developers write custom tools that make the process easier. These tools range from simple shell scripts to complete applications. One such application is tmate, which makes a remote connection easier, faster, and even more secure.
tmate is a fork of tmux that adds a remote connection feature. We create a tmate session much like a tmux session, but the session immediately connects to a slave server in the cloud making it easy for a remote client to access. The communication between the server and the slave uses msgpack to compress the traffic.[55] Compression improves expensive actions like scrolling in Vim, which can generate massive amounts of data.
tmate can coexist with tmux, and it’s even intended to run alongside it. Thus, we can begin by installing tmate. Follow instructions for your platform from the tmate website.[56] As with tmux, Windows users must do this from a VM.
With tmate installed, start a new session from ted’s terminal by running the following command:
| | ted@localhost$ tmate |
When tmate opens, it will look almost exactly like a tmux session. In fact, it will even obey your ~/.tmux.conf file. But at the bottom of the window, you’ll notice something different. tmate displays a command we can give to our partner so he or she can connect to us, as show in the following figure. By default, it uses a tmate.io server but we’ll reconfigure that in a moment.
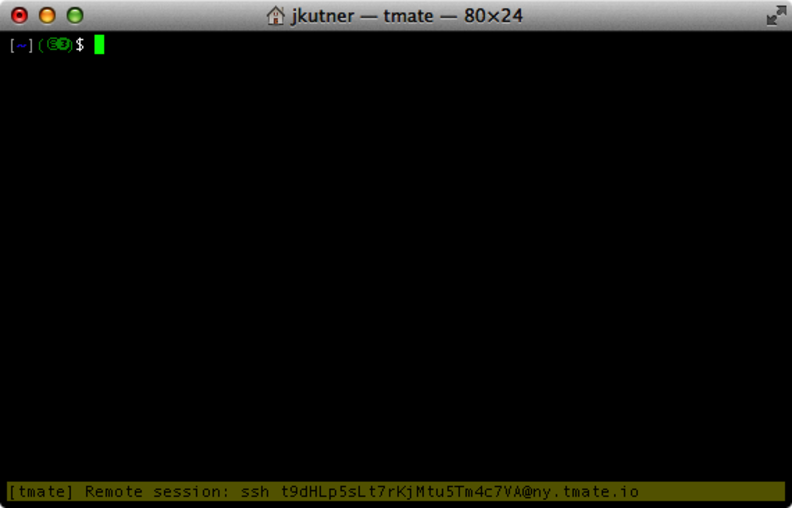
Figure 18. A tmate session
Try to connect from bill’s terminal—it will look something like the following command.
| | bill@localhost$ ssh [email protected] |
A tmate session will open and bill will be connected to ted’s session from across the internet. We can confirm this in ted’s window—at the bottom of the screen we’ll see a message like this:
| | [tmate] Your mate has joined the session (51.120.2.94) |
bill is not directly connected to ted, though. The tmate-slave server, which is running at ny.tmate.io, is a proxy between the two machines. This service is a courtesy of the tmate developers, and its architecture looks like the following figure.
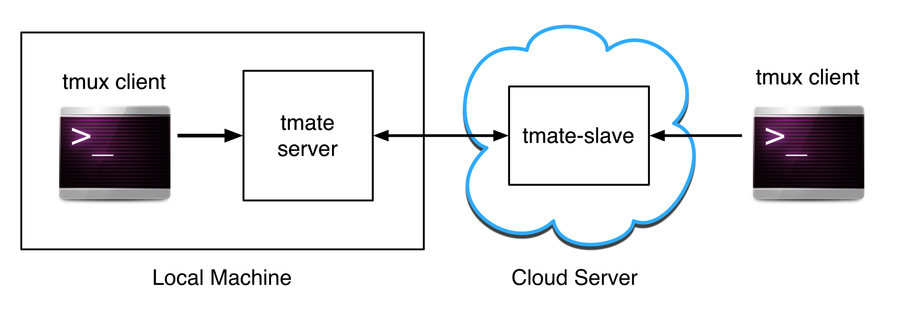
Figure 19. The tmate connection architecture
On ted’s machine, which is acting as the local machine, a regular tmux client is attached to a local tmate server. The tmate server runs in a jail, a Linux term for a process that cannot access directories outside of its root directory. It also has its own process ID namespace and lacks any user privileges. These security measures protect against a potential attacker trying to connect to the session.
While the tmate connection architecture is secure and fast, it has the disadvantage of being dependent on the kindness, availability and trustworthiness of the tmate folks (that is, if the tmate-slave is hacked or crashes, you’ll have to wait for them to fix it). Fortunately, we can create a tmate-slave of our own, and our EC2 server is the perfect place to host it.
Log into the EC2 server with this command, but use our EC2 host name in place of the amazonaws.com address:
| | $ ssh -i ~/.ssh/amazon.pem [email protected] |
Then install the tmate dependencies by running this command:
| | ubuntu@domU-0-0-0-0$ sudo apt-get install git-core build-essential |
| | > pkg-config libtool libevent-dev libncurses-dev zlib1g-dev automake |
| | > libssh-dev cmake ruby |
Next, download the tmate-slave source code and move into the newly created directory by running these commands:
| | ubuntu@domU-0-0-0-0$ git clone https://github.com/nviennot/tmate-slave.git |
| | ubuntu@domU-0-0-0-0$ cd tmate-slave/ |
Now we must create some security keys that tmate will use to authenticate itself. Run this command:
| | ubuntu@domU-0-0-0-0$ ./create_keys.sh |
The output contains three keys that look like the following
| | Generating public/private dsa key pair. |
| | Your identification has been saved in keys/ssh_host_dsa_key. |
| | Your public key has been saved in keys/ssh_host_dsa_key.pub. |
| | The key fingerprint is: |
| | 99:6f:20:fb:93:c1:75:ec:82:57:3c:af:cd:76:1e:d8 ubuntu@domU-0-0-0-0-0-0 |
| | The key's randomart image is: |
| | +--[ DSA 1024]----+ |
| | | | |
| | | | |
| | | o | |
| | | o. * | |
| | | ..So + o | |
| | | o+oo . + | |
| | | . +o. = E | |
| | | .o. . + o| |
| | | .. . o.| |
| | +-----------------+ |
The first key, shown here, is a DSA key. The other two are RSA and ECDSA keys. The important part is the long colons delimited string, which is 99:6f:20:fb:93:c1:75:ec:82:57:3c:af:cd:76:1e:d8 in the preceding example. Make note of these three keys—we will need them in a moment.
Next, compile the tmate-slave source, which may take some time, like so:
| | ubuntu@domU-0-0-0-0$ ./autogen.sh && ./configure && make |
Finally, start the tmate-slave on port 5899 by running the following command (as always, replace the amazonaws.com host name with the name of our server):
| | ubuntu@domU-0-0-0-0$ sudo ./tmate-slave |
| | > -p 5900 -h ec2-0-0-0-0.compute-1.amazonaws.com |
Leave that process running, and return to your local machine with ted’s terminal. We’ll configure tmate to connect to this slave instead of tmate.io. Create a ~/.tmate.conf file and add the following code to it:
| | set -g tmate-server-host "ec2-0-0-0-0.compute-1.amazonaws.com" |
| | set -g tmate-server-port 5900 |
| | set -g tmate-server-dsa-fingerprint "f5:26:31:c3:8a:78:6e:5c:77:74:0f:..." |
| | set -g tmate-server-rsa-fingerprint "af:2d:81:c1:fe:49:70:2d:7f:09:a9:..." |
| | set -g tmate-server-ecdsa-fingerprint "c7:a1:51:36:d2:bb:35:4b:0a:1a:c0:..." |
| | set -g tmate-identity "" |
Replace the tmate-server-host value with the name of your EC2 server, and replace each of the three keys with the key string you noted earlier.
Now, when we create a new tmate session it will pick up our configuration file. Run the tmate command from ted’s terminal like so:
| | ted@localhost$ tmate |
At the bottom of the window, we see the “Remote session” string again, but it will contain an amazonaws.com address instead of the tmate.io address. Run the command in bill’s terminal. It will look something like this:
| | bill@localhost$ ssh -p5900 |
| |
bill and ted are now connected through the tmate-slave, which is functioning as a proxy for the session.
Hosting the tmate-slave on our EC2 server has the advantage of being more secure because we can control its access and protect it from being hacked. We could even host the tmate-slave behind a firewall if we were very paranoid. It is also more reliable. If the slave crashes, we can easily restart it without any assistance from a third party. We can even change its location on a whim.
The disadvantage of using tmate is that it forks tmux. As a result, it may lag behind the future progress of the tmux source code. tmux is very stable, but tmate is very much in its infancy.
Choosing between traditional tmux and the very new tmate is probably an organizational decision. In either case, a cloud server should be an essential part the connection architecture. As our remote pairing environment evolves, the importance of this server will grow. In the next chapter, we’ll use this server to handle more robust kinds of traffic.