
Using NX for Partial Screen Sharing
iOS programming is a unique example because many of the tools needed to run an iOS application work only on a Mac. But now imagine that we’re developing a web application. The interface, a browser, can be run on just about any platform. It can even be run on a virtual machine in the cloud and shared equally with both pairing partners. That’s exactly what we’ll do in this section.
We could do the sharing via VNC, but a better solution is NX. NX makes it possible to share individual windows instead of an entire screen. For example, we can share a browser and nothing else. This reduces the bandwidth needed to share, and minimizes the latency for one-half of the pairing team. The leader in NX technology is NoMachine, and the company sells a number of products, but its core technology is open source. We’ll install it on our EC2 instance and use it to share a browser.
Starting the NoMachine Server
Log into our virtual server with the following command, but replace the ec2-0-0-0-0.compute-1.amazonaws.com address with the host name of the server we created in Creating a Reverse Proxy Server:
| | $ ssh -i ~/.ssh/amazon.pem [email protected] |
We see the ubuntu@domU-0-0-0-0:~$ prompt again, but we’ll represent it here as $ for the sake of brevity.
Since our goal is to share a browser, we’ll begin by installing Firefox. Run this command now:
| | $ sudo apt-get install firefox |
Next download the NoMachine packages for the NX server, client, and node. The node is a sort of core library for the others. Run these commands:
| | $ wget http://64.34.173.142/download/3.5.0/Linux/nxclient_3.5.0-7_amd64.deb |
| | $ wget http://64.34.173.142/download/3.5.0/Linux/nxnode_3.5.0-9_amd64.deb |
| | $ wget http://64.34.173.142/download/3.5.0/Linux/FE/nxserver_3.5.0-11_amd64.deb |
Now install those packages by running this command:
| | $ sudo dpkg -i nxnode_3.5.0-3_i386.deb nxserver_3.5.0-4_i386.deb |
| | > nxclient_3.5.0-7_i386.deb |
To use the NX server, we need to make some adjustments to our SSH settings. They must allow us to connect to the server with a password instead of the pem file we used earlier. This is necessary for the NoMachine client. Open the main SSH configuration file with vi by running this command.
| | $ sudo vi /etc/ssh/sshd_config |
Now find the line containing the text PasswordAuthentication no by pressing / and then typing PasswordAuthentication. As you type, the cursor will be moved to the proper location. Once it’s there, press Return and then dd to delete the line. Then press o to enter editing mode and type these lines:
| | PasswordAuthentication yes |
| | UsePam yes |
When you’ve finished typing, press Esc and then type :x to save the file and close Vi.
By default, the ubuntu user does not have a password. We must create one by running this command:
| | $ sudo passwd ubuntu |
Now we can restart the SSH service and it will pick up the new configuration. Run this command:
| | ubuntu@domU-0-0-0-0:~$ sudo service ssh restart |
| | ssh stop/waiting |
| | ssh start/running, process 19891 |
We also need to restart the NoMachine server by running this command:
| | $ sudo /etc/init.d/nxserver restart |
With the nxserver running we can check that our user is configured properly by running this command:
| | $ sudo /usr/NX/bin/nxserver --usercheck ubuntu |
We’re all set. Let’s exit the SSH session and connect an NX client to our server.
Connecting a NoMachine Client
Download the NoMachine client software for your platform from the NoMachine website.[69] The Player (the client application) and the server may be bundled together in a single distribution.
When we open the NoMachine Player application, we’ll see a dashboard page like the one shown in Figure 22, The NoMachine Player dashboard. Click New Connection, and a form like the one shown in Figure 23, Creating a new NoMachine connection, will appear. Name the connection ec2 and enter the host name of our EC2 instance in the Host field. Then select the radio button for Use NoMachine Login. We’ll use the default NoMachine key when authenticating against the NoMachine server.
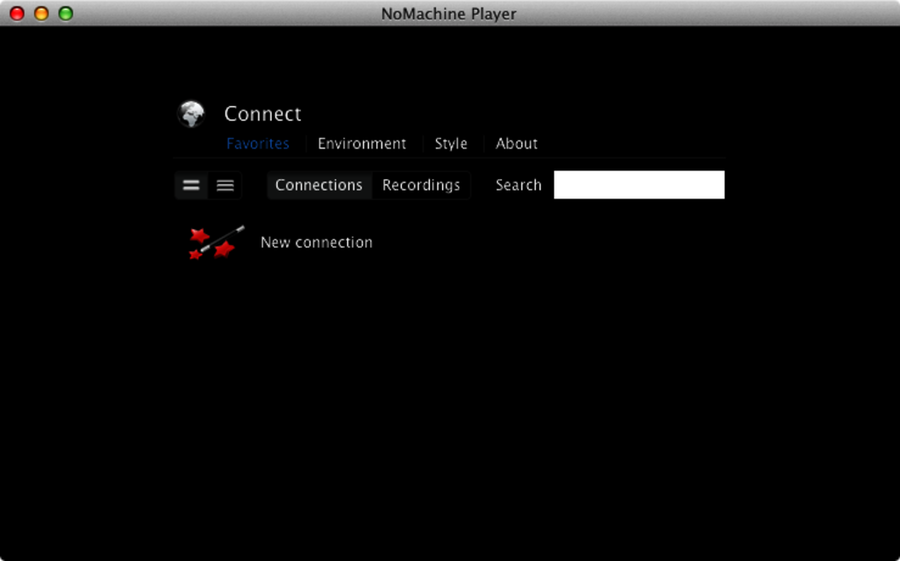
Figure 22. The NoMachine Player dashboard
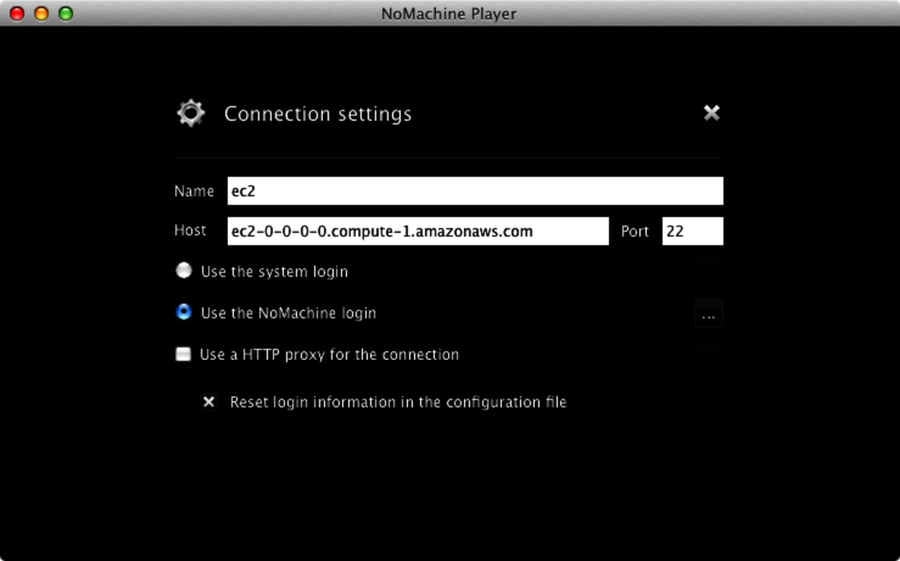
Figure 23. Creating a new NoMachine connection
The NoMachine server and Player ship with a default key that will always be accepted. This means our connection will be encrypted, but not very secure. However, because we’re connecting over an SSH channel we don’t have to worry much. Alternatively, we can create our own keys and register them with both the server and clients.
Click the X on the connection form, and return to the dashboard. Our new ec2 connection will be listed at the bottom. When we select it, the Player connects to our EC2 server, but we won’t get far before it asks for our username and password. Enter ubuntu and the password we set earlier. Then click the OK button.
Now that we’ve connected to the NoMachine server we need to create a session. This is not very different from the concept of tmux sessions. Click the Create a New Session link from the server-management page, and you’ll see a list of options like those shown in Figure 24, Creating a new NoMachine session. Most of these options are for creating a session with a complete desktop environment like Gnome or KDE. But that’s actually what we’re trying to avoid. Scroll down the list until you see Create a New Custom Session and select it.
In the custom session form that opens, select the radio button next to Run the Following Command. Then enter firefox in the text field next to that, and check the box next to Run the Command in a Virtual Desktop, as Figure 25, Creating a new NoMachine session with a custom command shows. Then click the OK button.
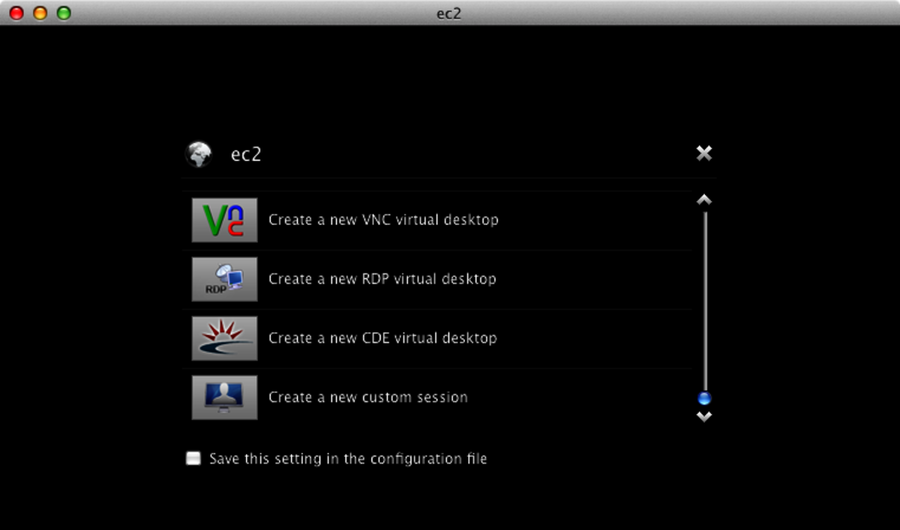
Figure 24. Creating a new NoMachine session
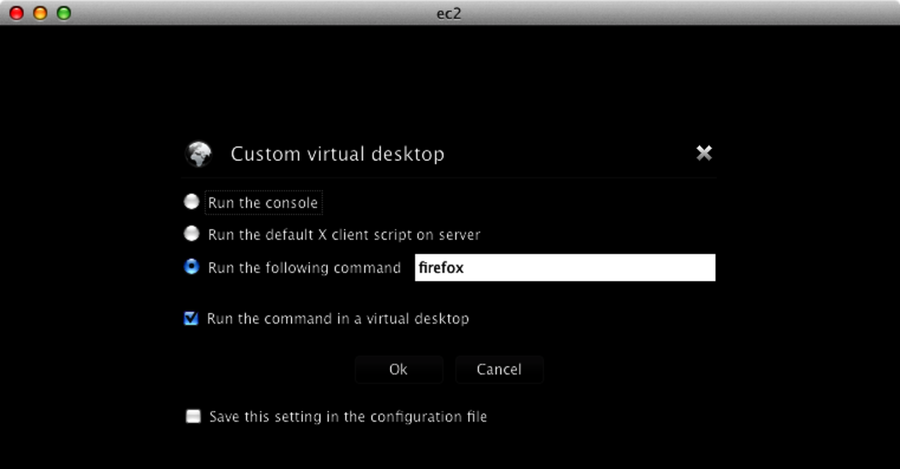
Figure 25. Creating a new NoMachine session with a custom command
After a short while and a splash screen that must be closed, we’ll see the Firefox browser running inside of the NoMachine Player, as the following figure shows. This browser is running on the EC2 instance, and any other NoMachine Player client that can connect to the same server can also take part in this browser session. If you have a second computer, try it out now.
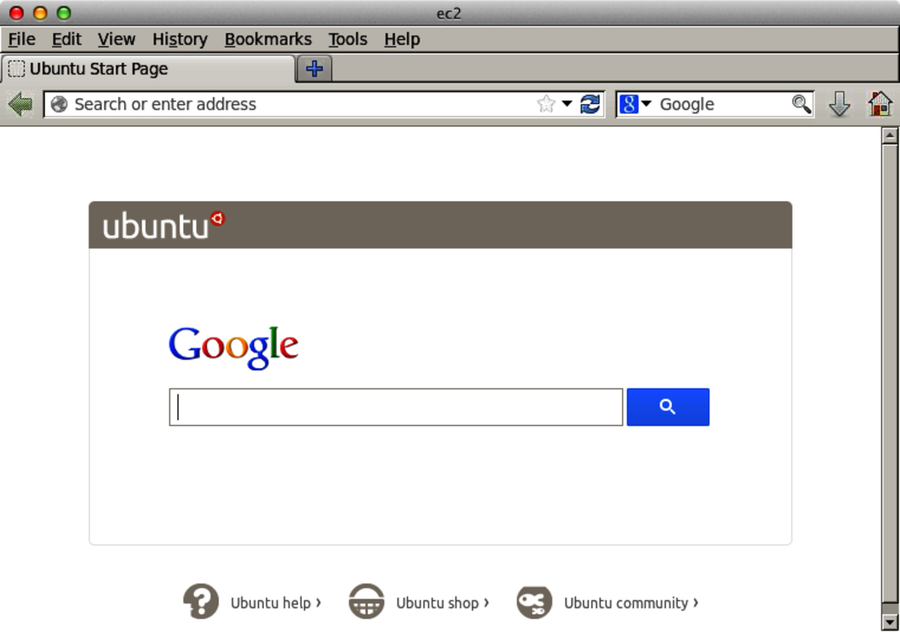
Figure 26. Firefox running in a NoMachine session
We can point this browser to any location on the Internet. If we’re running a reverse proxy for a web server running on our local machine, we can use this browser to access it, and both pairing partners will see the same thing.
But what if we took it one step further? What if this browser didn’t need to make a round-trip? What if it could hit a web server running right on the same EC2 instance it’s running on? That’s what we’ll do in the next chapter.