Set Your Home on Autopilot
At this point, you should be up and running with HomeKit home control, and a master at adding and controlling accessories. But now I’m going to teach you literal automation—objects in your home doing things on their own, directed by your instructions—and that is powerful juju. It offers an incredible amount of power, but it can also make your home a living hell if you don’t set things up thoughtfully.
Set Up a Home Hub
Before you can automate HomeKit, you must have at least one device that can act as a hub: a HomePod, an Apple TV HD or 4K, or an iPad running iOS 10 or later. The hub is necessary because something has to be physically in the house and running 24/7 to trigger automations. Setting up a HomeKit hub confers an additional advantage: it lets you control your accessories while you’re away from home. It also extends the range at which you can use Bluetooth HomeKit devices. You can also set up more than one hub, which is a good thing to do so that you always have a backup. (For best results, I strongly recommend keeping the hub updated with the latest version of its operating system from Apple.)
Make an Apple TV a Hub
If you own an Apple TV HD or 4K, it makes a better hub than the iPad, because it’s unlikely that you’ll take it out of the house. Also, it has better Bluetooth range. However, two-factor authentication must be enabled on your iCloud account to use your Apple TV as a HomeKit hub. Here’s how to do that:
On an iOS device, go to Settings > Your Name > Password & Security
Tap Turn On-Two-Factor Authentication.
Tap Continue.
With two-factor authentication enabled, your username and password are no longer sufficient to log in to your Apple ID—you must also have a six-digit code that Apple sends to another device. You should have two-factor authentication enabled regardless of whether or not you use home automation, as it makes your account safer.
Once you’re past that hurdle, using your Apple TV as a HomeKit hub is as simple as making sure that you’re signed in to your primary iCloud account on the Apple TV (under Settings > Users and Accounts > iCloud). You also need to have iCloud Keychain enabled on any iOS device, iPad, or Mac using the same Apple ID. In iOS and iPadOS, you can do that in Settings > Your Name > iCloud > Keychain. Then on your Apple TV, under Settings > AirPlay and HomeKit, you should see a Home Hub header, and under that, you should see Home: Connected (Figure 29). If you don’t, make sure you’re signed in properly.

Make an iPad a Hub
An iPad is slightly easier than an Apple TV to set up as a hub:
In Settings > Your Name > iCloud, make sure that you’re signed in to your primary iCloud account.
Under Settings > Your Name > iCloud, make sure that Keychain and Home are enabled.
Go to Settings > Home and enable Use this iPad as a Home Hub.
It’s that simple! But here’s the trick: if you want your automations to work while you’re out and about, your iPad must stay home, it must be connected to your home Wi-Fi network, and it must have power (either battery charge or be plugged in)! If you take your iPad hub with you, or its battery dies, the automations won’t work, because your hub won’t be on and connected to your home Wi-Fi network. (This is why an Apple TV or a HomePod is a better hub.)
Test Your Hubs
You can check on your hubs via the iOS or iPadOS Home app. If a hub isn’t responding, you may see that in the status messages on the Home screen of the Home app. To see the status of all your hubs, tap the home  button in the upper-left corner of the Home screen in the Home app (if you have multiple homes, you’ll also need to tap Home Settings). Under Hubs & Bridges, you’ll see your hubs and their statuses.
If you have more than one hub, you should see one marked as connected, with the rest on standby (Figure 30). According to Apple’s documentation, this is normal, since only one hub can be active at a time.
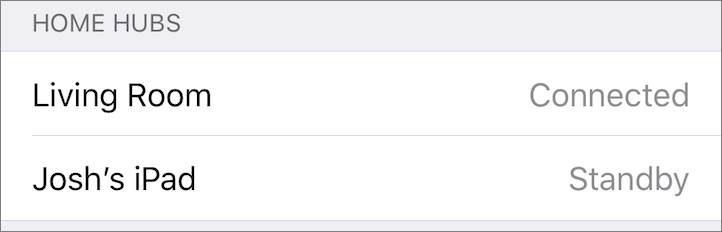
Despite that, the more hubs, the better. I recommend setting up as many as you can, because if one disconnects or flakes out for some reason, you’ll have backups to ensure your automations keep running. I’ve found HomeKit to be much more reliable since I added a second hub. Also, Eve tells me that even when a hub is in standby, it can act as a Bluetooth extender.
Once your hubs are set up, it’s a good idea to test them to confirm that things work as you’d expect while you’re away from home. If you have cellular data connectivity at your house, you can test your hubs by turning off Bluetooth and Wi-Fi on your iPhone temporarily, so you’re connected just via cellular data. Then try controlling your HomeKit accessories. If your hubs are working properly, everything should function just as it normally does. If you don’t have cellular service at your house, try it when you’re away from home and in a coverage area.
You can now control your HomeKit devices from anywhere in the world! This works exactly the same as it does when you control HomeKit devices inside your home, plus you can set up automations, because the hub is always available to invoke them.
Plan Automations Carefully
“When you do things right, people won’t be sure you’ve done anything at all.” —Futurama
Now that you have your HomeKit hubs set up, you’re ready to start considering automations. The actual automation part is easy. What’s tricky is planning them carefully so that they’re a blessing and not a curse.
Here’s an example of the former: You wake up in the morning to a nice, warm bedroom. Your bedside lamp is already on, both to encourage you to wake up and to help you see, but it’s also set to a somewhat dim setting so as to not hurt your eyes. You open your bedroom door to begin your day. The lights in your hallway are already lit, but also set to be a little dim for the sake of your eyes. Later, as you roll away from your house, your lights turn off, your thermostat adjusts itself to use less power, and your door locks itself.
That’s the nice vision of home automation. In the “curse” scenario, you wake up to a cold bedroom. You didn’t sleep well because your stupid bedside lamp turned on at 3 A.M. You stumble out of bed and open the door. The hallway lights are on, but the blinding glare forces you to slam your eyelids shut. After you’re ready for the day, you speed away from the house assuming that your lights will turn off, your thermostat will adjust itself, and your door will lock itself. But they don’t do those things because you didn’t set them up correctly, so your front door is unlocked, the lights never turn off, and the furnace chugs away, heating the house even though no one is at home.
Both of those examples might seem a little extreme, but are entirely realistic. Believe me, I’ve had my share of home automation foibles, especially in the beginning. If you bite off more than you can chew too quickly, or set up a bunch of test automations that you’ve forgotten about, it’s easy to suffer from what I call “haunted house syndrome,” where spooky, unwanted, unexpected things occur around your house. I have ten guidelines for you to follow that will prevent haunted house syndrome, but before I share them with you, you need to have a general idea of how HomeKit automation works.
Understand the Types of Triggers
Put simply, HomeKit automation consists of rules that say “When this happens, do that.” The this part is what’s called a trigger. There are five types of home automation triggers, and two of them are effectively two sides of the same coin:
People Arrive: When you or other designated people arrive at your house, based on location data, something happens. For instance, you pull in the driveway and the I’m Home scene activates.
People Leave: When you or other people leave your house, again based on iPhone location data, something happens, like your I’m Leaving scene activating.
A Time of Day Occurs: When it gets to be a certain time of day, an action takes place.
An Accessory is Controlled: When you do something to one accessory, HomeKit does something to another accessory. For instance, you could have one light turn on when another turns off. Or more practically, you could use one smart switch to control several lights.
A Sensor Detects Something: In theory, this triggers an action when a sensor like a thermometer, motion sensor, or smoke detector detects something. However, Apple’s Home app refuses to see many of my sensors as sensors, so I find myself using third-party HomeKit apps, like the Eve for HomeKit app, to create many of my automations—see Automate with Eve for HomeKit.
Ten Guidelines for Home Automation
Home automation is an incredibly powerful technology, and with great power comes great responsibility (and maybe a snazzy red and blue suit). These following guidelines are merely codified versions of things I’ve said throughout this book, but they will help keep you in charge of home automation, instead of home automation being in charge of you:
Start small: It can be tempting to dive in with a whole mess of automations, but what you’ll probably wind up with is…a mess. Start with just one simple thing, like turning on a light in the morning. As you get more comfortable, you can expand your automations to do more stuff.
Use automations to reduce friction: Focus on how automations can reduce friction in your life. Consider stuff you do every day that would make your life a bit more pleasant if it was automated.
Consider actual usage patterns: One of the biggest mistakes people make, and one often promoted by home automation vendors, is to set up automations based on the way things should be, instead of how they actually are.
For instance, you likely will have a Good Night scene, and maybe you often go to bed at 10 P.M., but does that mean you should set that scene to trigger every day at 10 P.M.? What if you stay up a bit late? What if you go to bed early? Sometimes, especially when it comes to scenes like Good Night, it’s just easier to set them manually. Or sometimes there’s a better trigger to choose.
Choose the correct triggers: Say you want to set up HomeKit to turn your lights off when you go to bed. Unless you run like a Swiss clock, that’s probably not at the exact same time every night. Instead, you could set the automation to trigger based on a lack of activity from a motion detector, or when your bedroom door is closed.
Communicate with your housemates: If things are going to happen automatically around the house, everyone who lives with you needs to understand what’s going to happen and how it’s triggered.
Make natural automations: Even if you’re the person who set up the automation, it’s freaky when the lights suddenly dim without warning.
There are a few different ways to make automations more natural. One of my favorites is to time them so they trigger before you’ll even be in the room. I like to set morning automations to trigger before I even wake up. That way, I walk into a room and the lights are on, instead of the lights turning on when I’m in the room.
Another thing you can do is slowly dim or brighten lights over time using a series of automations. That’s a little too finicky for me, but it’s an option.
If you can make your automations seem natural, it’s truly magical. People won’t know you did anything at all.
Test your automations: Later in this chapter, I explain how to test automations. Be sure to always test your automations so that you’re sure of what they’re going to do!
Adjust your automations: Your needs will change over time, so never be afraid to regularly audit them and readjust them to work better.
Also, be sure to turn off automations when you don’t need them or when they’d be a hindrance! I usually have my Good Morning scene set to turn on every weekday morning, but if we have a snow day, I have to remember to turn it off!
Don’t become overly reliant on automations: Automations are useful tools, and can make your life easier, but never let them totally run the show. If you get things set up right, it can be easy to forget what is running or why, and over time that can make them harder to maintain. But if you make a habit of regularly reviewing and adjusting them, you’ll maintain control.
Don’t implement frivolous automations: You’ll probably make all sorts of experimental automations when you’re starting out that you’ll later find you don’t need. Don’t be afraid to prune them! The last thing you want is an unwieldy, unmanageable list of automations that could be conflicting with each other and making your house a mess.
When set up correctly, home automation helps you feel powerful and in charge of your home. But if you get sloppy, home automation can be a nightmare. Follow these guidelines and you’ll be much more likely to enjoy the benefits of home automation.
Create Automations
Now that you have a Home hub established and you understand the rules to successful home automation, you’re ready to create automations. Open the Home app and go to the Automation screen.
Once you have automations, they are listed here. If you do not have a hub connected, this screen displays a message explaining the benefits of setting one up.
Tap the plus ![]() button to add a new automation; then tap the type of automation you want to create. On macOS, click the + and choose Add Automation. I listed the types in Understand the Types of Triggers; here are instructions for creating each type.
button to add a new automation; then tap the type of automation you want to create. On macOS, click the + and choose Add Automation. I listed the types in Understand the Types of Triggers; here are instructions for creating each type.
People Arrive
This automation triggers when specified people arrive at a location.
Choose Who Triggers the People Arrive Automation
The first setting here is When, and your options are Anyone Arrives and The First Person Arrives. No matter which option you choose, you can click or tap the info ![]() button to see a list of people who can trigger that automation, and see which device each person is using to identify their location. Click or tap a person to remove or add them.
button to see a list of people who can trigger that automation, and see which device each person is using to identify their location. Click or tap a person to remove or add them.
This is the difference between the Anyone and First Person:
Anyone Arrives: When this is selected, the automation will trigger whenever anyone in the list arrives home, regardless of who’s currently home. Here are some situations for when that could be useful:
Turning on exterior lights
Lighting up an entryway
Unlocking the front door
Basically, you should use this option for any situation where it would be useful for something to happen when any person in the list arrives home, but only if that action won’t disturb other people in the home.
Be careful with this option, though. For example, if your front door opens directly to your living room and your spouse regularly falls asleep in there, you probably won’t want to have the lights turn on automatically at night when you arrive home.
The First Person Arrives: When this is selected, the automation is triggered only when the first person arrives home. In other words, it triggers only when someone in the list arrives home but no one else is home.
This is an excellent choice for automations to make an empty home more welcoming, such as lighting up living areas and adjusting the thermostat.
Adjust Automation Location
The next option is Location. The default is Home, which is whatever HomeKit detects your Home’s location to be. I recommend leaving it there, because if you adjust it at all, it removes everyone else from the automation. In other words, the automation triggers only when you arrive at the location.
I find that I use my home to trigger most location-based automations, but sometimes it can be useful to trigger something if you, say, leave work. For example, you may want to turn your porch light or heater on when you’re headed home.
If you do need to adjust the location, tap Location. You’ll see a list of locations recently searched for in the built-in Maps app, and you can also search for others. However, you can’t search for a person you have in the Contacts app to use their address.
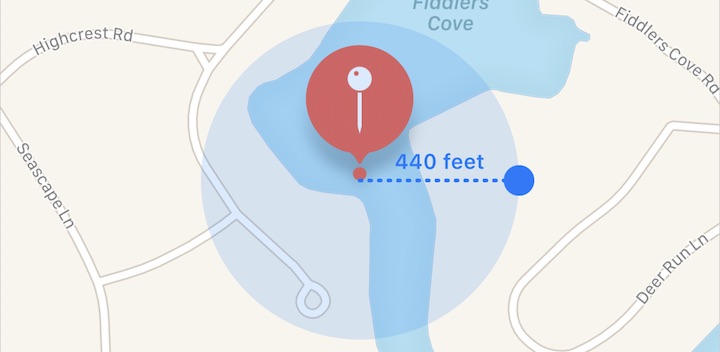
At the bottom of the Choose Location screen is a map of the chosen location. If you choose any location other than Home, you can adjust the radius around that location by holding and dragging the blue dot on the blue circle that surrounds that location’s pin. As you adjust the radius, the map display shows how large that radius is. For example, you can set it so that once you get within 440 feet of a location, the automation turns on the air conditioner (Figure 32).
Click or tap Done once you’re finished.
Choose When Automations Trigger
The Time setting controls the time(s) during which the People Arrive automation will trigger. By default, it’s set to Any Time, but tapping it displays the following options:
Any Time: Just as it says, the automation triggers at any time of day.
During the Day: When this is selected, the automation triggers only, by default, between sunrise and sunset. However, if you tap the info
 button, you can set times up to an hour before or an hour after each, in fifteen-minute increments. For example, you can set your People Arrive automation to trigger only from an hour before sunrise to 15 minutes after sunset.
At Night: This works just like the During the Day setting, but in reverse. So by default, it allows the automation to trigger only between sunset and sunrise; tapping the info
button lets you adjust those times by up to an hour before or after. For example, you can set a People Arrive automation to trigger only from an hour before sunset to 15 minutes before sunrise.Specific Times: With this setting, you can chose any start and end time, in five-minute increments. So you could set it so that an automation triggers only between 2 and 3 P.M.
For the People Arrive automation, the At Night setting makes the most sense, since you likely work during the day and arrive home at or around night; if you arrive home in the daytime, you likely don’t need as many lights on as you do at night.
When you’re done, tap Next in the upper-right corner.
Choose the People Arrive Automation Actions
You’re now prompted to choose scenes and accessories to activate when the automation is triggered. Your scenes are listed at the top, followed by accessories listed by room. Just as when you Make a Scene, you tap scenes and accessories to add them; a checkmark ![]() appears on included items. Don’t worry about adjusting what accessories actually do; you’ll do that on the next screen.
appears on included items. Don’t worry about adjusting what accessories actually do; you’ll do that on the next screen.
The obvious thing to do here is to choose the Arrive Home default scene, assuming you’ve set one up, though your Good Morning scene might work just fine as well. Of course, you can also choose accessories individually and adjust them at will—those settings might become the basis for a scene to create later.
Once things are set as you want them, tap Test This Automation to see what it does! It’s also a good idea to test the automation in its usual setting. For instance, if you’re setting up an automation that triggers after dark, you should try to test it after dark. (Be aware that after you tap Test This Animation, your accessories will be in whatever state the automation put them—it doesn’t toggle them back again after the test is over.)
Finally, if your automation turns things on, there’s one last intriguing setting on this screen: Turn Off. You can set the automation to turn those devices off after anywhere from 1 to 60 minutes. It isn’t the best match for People Arrive, so I’ll cover it in more detail later.
Tap Done in the upper-right corner when you’re finished. Congratulations, your automation is complete!
Consider a People Arrive Example
I’ll walk through a typical “coming home at night” scenario, so you can get a sense of how to approach it. I walk up to my front door, unlock it, and walk inside to my laundry room. I turn right, which leads me into my kitchen. Off to the side of my kitchen is my TV room, which has a large opening without a door. The lights in my kitchen and TV room are fully automated with Hue bulbs and other accessories.
I definitely want my kitchen and TV room lights to come on, if they’re not already. But many times when I’m the first person getting home that late, I have a sleeping baby on my shoulder, so I don’t want to have the lights cranked up, and if too many lights are on, I want to turn them off.
Here are the specific accessories I’m choosing to control:
Kitchen Light: A group of two Hue bulbs in my kitchen’s light fixture.
TV Room Switch: An Eve Light Switch that controls my TV room’s light fixture.
TV Room Couch Lamp: A floor lamp in one corner of my TV room, behind the sectional.
TV Room TV Lamp: A floor lamp in another corner of my TV room, adjacent to the TV.
In my example, here’s what I’ve set each accessory to do:
Kitchen Light: Set to its usual color, at 10% brightness.
TV Room Switch: Turn off.
TV Room Couch Lamp: Turn off.
TV Room TV Lamp: Set to its usual color, at 10% brightness.
People Leave
The People Leave automation works exactly the same as People Arrive, just in reverse. If you’re already well versed with People Leave, feel free to skip this section. Otherwise, I offer full instructions for this automation, as well as specific advice.
Choose Who Triggers the People Leave Automation
The first setting here is When, and your options are Anyone Leaves and The Last Person Leaves. No matter which option you choose, you can click or tap the info ![]() button to see a list of people whose location can trigger the automation. Click or tap a person to remove or add them.
button to see a list of people whose location can trigger the automation. Click or tap a person to remove or add them.
This is the difference between the two options:
Anyone Leaves: When this is selected, the automation triggers whenever anyone in the list leaves home, regardless of who’s currently home. A common scenario where this is useful is if you want to lock a door automatically.
The Last Person Leaves: When this is selected, the automation is triggered only when the last person leaves home. In other words, it triggers only when one of the people in the list leaves home, and no one else is left home.
This is an excellent choice for automations that you want to trigger when the house is empty, such as turning off lights or turning off the thermostat.
The next option is Location. The default is Home, which is whatever HomeKit determines your Home’s location to be. I recommend leaving it there, because if you adjust it at all, it will remove everyone else from the automation. In other words, it will trigger only when you leave.
The next options are Location and Time. Refer back to Adjust Automation Location and Choose When Automations Trigger for the details of these settings.
When you’re done, click or tap Next in the upper-right corner.
Choose the People Leave Automation Actions
Next, you’re prompted to choose scenes and accessories to activate when the automation is triggered. Your scenes are listed at the top, followed by accessories listed by room. Just as when you Make a Scene, you click or tap scenes and accessories to add them; a checkmark ![]() appears on included items. Don’t worry about adjusting what accessories actually do; you’ll do that on the next screen.
appears on included items. Don’t worry about adjusting what accessories actually do; you’ll do that on the next screen.
The obvious thing to do here is to choose the Leave Home default scene, assuming you’ve set one up; your Good Night scene might work just fine as well. Of course, you can also choose accessories individually and adjust them at will—those settings might become the basis for a scene to create later.
(For my first People Leave automation for this house, I created a scene called Lights Out, which simply turns off every automated light in the house, and I set it to trigger only during the day, because I typically like to leave some lights on at night to dissuade ne’er-do-wells.)
Once things are set as you want them, click or tap Test This Automation to see what it does! It’s also a good idea to test the automation in its usual setting. For instance, if you’re setting up an automation that triggers after dark, you should try to test it after dark! (Be aware that after you click or tap Test This Animation, your accessories will be in whatever state the automation put them—it doesn’t toggle them back again after the test is over.)
Finally, if your automation turns things on, there’s one last intriguing setting on this screen: Turn Off. You can set an automation to turn those devices off after anywhere from 1 to 60 minutes. It isn’t the best match for People Leave, so I’ll cover it in more detail later.
Click or tap Done in the upper-right corner when you’re finished. Congratulations, your automation is complete!
A Time of Day Occurs
This is the simplest of the automation options, as it triggers actions based on the time of day.
On the first screen, you’re asked to choose the time of day to trigger the animation—sunrise, sunset, or a specific time of day—and on which days of the week the automation should be triggered. For instance, you may want your Good Morning scene to trigger automatically Monday through Friday, but not on the weekends.
Below that, People lets you choose to trigger the automation only if somebody is home, you are home, nobody is home, or you are not home.
Click or tap Next to continue and choose scenes and/or accessories to activate; a checkmark ![]() appears next to included items.
appears next to included items.
On the final screen, you can review your settings and make adjustments to any accessories you’ve added—as always, click or tap an accessory to have it turned on or off or touch and hold it (Control-click on Mac) to make additional adjustments.
As always, you should click or tap Test This Automation to see what the automation will do when it’s triggered.
The final option, Turn Off, lets you set the automation to turn itself off after anywhere from one to 60 minutes. I’m not sure how useful this setting is combined with the time of day automation, but I suppose you could use it to confuse a potential burglar staking out your house.
My current use of this automation is turning on my Good Morning scene, which I have set to come on at 5 A.M., before we wake up.
At my old house, I had a Time of Day automation configured so that my Good Morning scene came on before my wife woke up, and my Good Night scene (which doubled as a “no one is home” scene) would turn on well after she’d left the house. Half an hour before the earliest time I’d expect her home, the Good Morning scene would trigger again. That way, the house was always lit up for her, but was otherwise dark.
(I don’t set the Good Night scene on a timer at night, because our bedtimes vary from day to day.)
Something else you may consider is setting up automated light timers for security purposes when you’re away from home. One of the cool things about HomeKit is that you have all sorts of options to mix things up so that a dedicated burglar scouting your house may not realize that the lights are set on timers. I’m not sure how useful that would actually be, but there are less rewarding hobbies.
An Accessory Is Controlled
I find this automation to be the most interesting, but also the trickiest to take advantage of.
You might be tempted to use this option so that when you turn on a light in one corner of the room, the automation turns on another light in another corner of the room. If you’re not careful, you could easily set up a weird chain reaction where if you turned on one light, it sets off all sorts of other stuff in your house. Grouping accessories (see Tweak Accessories) or using scenes are better ways to control two accessories at once.
But there are certain accessories for which this kind of automation is extremely useful. One of those is the Eve Door & Window (see Install a Door and Window Sensor), which can trigger actions when a door is opened or closed. Another is a light switch such as the Eve Light Switch (see Install a Light Switch), since you can set the switch to turn multiple lights (or other accessories) on or off.
When you set up an Accessory Is Controlled automation, the first thing you do is select which accessory will trigger the automation. You can choose only one device on this screen; then click or tap Next.
On the next screen, the When header presents different options based on which kind of accessory you selected on the first screen. Here are a couple of examples:
Light Switch, Eve Energy, Hue lights: Turns On or Turns Off triggers the automation.
Eve Door & Window: Opens or Closes triggers the automation.
The next options on this screen are Time (refer back to Choose When Automations Trigger) and People, which lets you restrict the automation so that it works only if somebody is home, you are home, nobody is home, or you are not home. Click or tap Next when you’re ready to move on.
On the next screen, select the scenes and accessories that you want to be triggered by the first accessory; a checkmark ![]() appears next to included items. Click or tap Next when you’re done.
appears next to included items. Click or tap Next when you’re done.
On the next and final screen, you can review the automation, adjust any accessories included, and test the automation.
If your automation turns things on, the final option on this screen is Turn Off, which lets you set the automation to turn off after anywhere from 1 to 60 minutes. Here’s a great use case: install HomeKit bulbs in an entryway and Install a Door and Window Sensor on the door. Then set up an automation to temporarily turn the light on whenever you open the door at night. Never stumble into a dark house again!
A Sensor Detects Something
This automation, at least in theory, is one of the most useful and intuitive. The unfortunate reality is that Apple has screwed up the implementation, so that very few accessories count as sensors. (Fortunately, you can use other automation apps to work around Apple’s implementation failure—see Automate with Eve for HomeKit.) However, for the sake of completeness, I will show you how to set up a sensor automation in the Home app with the Eve Motion motion sensor:
On the first screen, select the accessory that will trigger the automation—in this case, the Eve Motion—and click or tap Next.
On the next screen, you’re prompted to choose what action will trigger the automation. The options here will depend on the accessory; for the Eve Motion, the options are Detects Motion and Stops Detecting Motion. You could configure one automation to turn lights on when motion is detected, and another to turn them off when motion is no longer detected.
The next options are Time (refer back to Choose When Automations Trigger) and People, the latter of which lets you trigger an automation only if somebody is home, you are home, nobody is home, or you are not home. Click or tap Next when you’re ready to move on.
On the next screen, choose the accessories and scenes that will be triggered by the automation; a checkmark
 appears next to included items. The obvious use here is to turn on lights for illumination and/or security. During the holidays, I use this automation to activate my Merry Christmas scene, which turns on the Christmas lights in my house.
On the next and final screen, you can review your automation, adjust any accessories included, test the automation to see what it’ll do, and/or set the automation to turn off after a set amount of time: anywhere from 1 to 60 minutes. (This is another great automation type to use the Turn Off feature with. You can have the lights turn on when anyone walks into a room, and then turn off, say, five minutes after everyone leaves.)
Automate Your Music
If you own an AirPlay 2 speaker, Apple TV, or HomePod, you can include music playback in your automations. When setting up your automation, choose one of those devices to be triggered by the automation.
On the next screen, you can click or tap the tile for the playback accessory to choose whether it will play or pause when triggered. There’s also a new Audio setting. Click or tap the Audio setting to see options to Play Audio, Pause Audio, Resume Audio (which starts playing whatever was last playing on that device), or Adjust Volume Only.
All but Pause Audio offer the option to either use the current volume of the playback device or set a custom volume with a slider.
If you choose Play Audio, a new setting appears: Choose Audio. Click or tap that to choose tracks, playlists, or radio stations from the Music app, either in your library or Apple Music. Tap the plus ![]() button to add items to the playback queue, except for radio stations, which you click or tap to add.
button to add items to the playback queue, except for radio stations, which you click or tap to add.
Convert Automations to Shortcuts
An intriguing option introduced in iOS 13 and iPadOS 13 is the option to convert a home automation into a Shortcut (this feature isn’t available in macOS). The Shortcuts app built into iOS and iPadOS lets you automate actions on your devices, and you can integrate home automations into those. You still have to choose one of the usual automation triggers to activate the shortcut, but you can put many more actions into a shortcut than a regular automation.
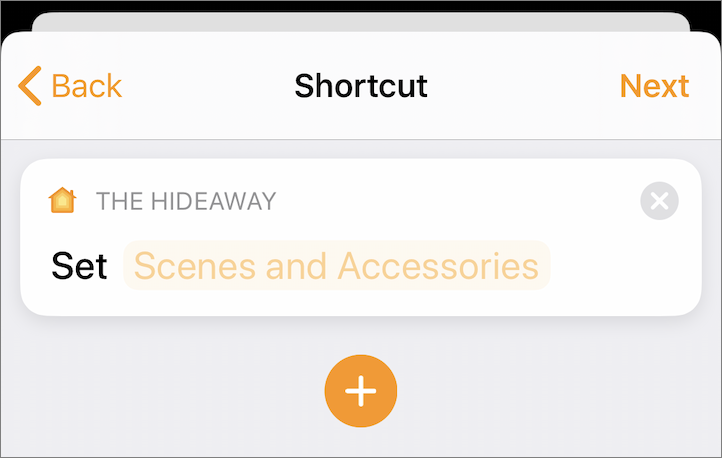
When setting up any type of automation, on the screen where you choose scenes and accessories, scroll all the way to the bottom and tap Convert to Shortcut, which creates a shortcut with one action: Set Scenes and Accessories. Note that Scenes and Accessories is highlighted. Tap that phrase to choose scenes and accessories the shortcut will activate (Figure 33).
Back on the Shortcut screen, tap the plus ![]() button to add additional actions to the shortcut. You can tap one of the suggestions, tap a category button to browse automations, or search for apps and actions.
button to add additional actions to the shortcut. You can tap one of the suggestions, tap a category button to browse automations, or search for apps and actions.
If you’re familiar with Shortcuts, you might find yourself frustrated by all the usually available actions that aren’t available here. Creating shortcuts is beyond the scope of this book, but there are a lot of interesting possibilities. For instance, you could set up an automation that is triggered when it senses motion in a room; the automation then reads the room temperature from a sensor and turns on a fan if it’s above a certain threshold (Figure 34).
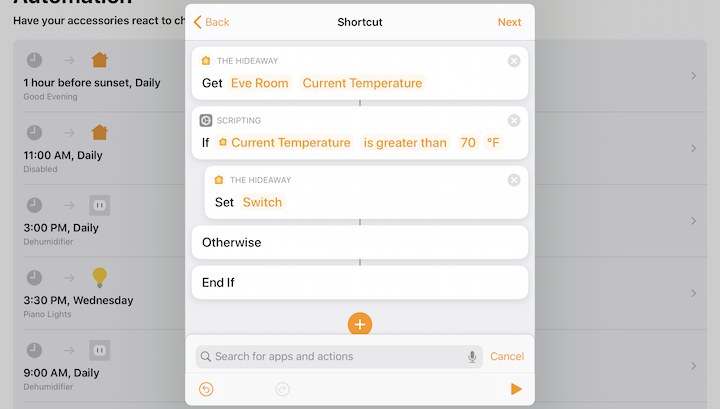
If you don’t have a room sensor, you could instead use the Get Current Weather action to get the outdoor temperature and use that as a secondary trigger for an automation. That’s just one small example.
Once you’ve set up your shortcut actions, tap Next to go to the confirmation screen to see when the automation will be triggered and what it will do. Tap Done to set the automation.
Adjust Automations
From the Automation screen of the Home app, you can edit and delete automations at any time—click or tap any automation to edit it. The resulting screen offers a few options you didn’t see during setup:
Delete an automation: Click or tap Delete Automation to remove the automation permanently. Alternatively, you can swipe its listing in the Automation screen from right to left and click or tap the Delete button that appears (Figure 35). (If you keep swiping the listing all the way to the left-hand side of the screen, you delete the automation without an additional button tap.)
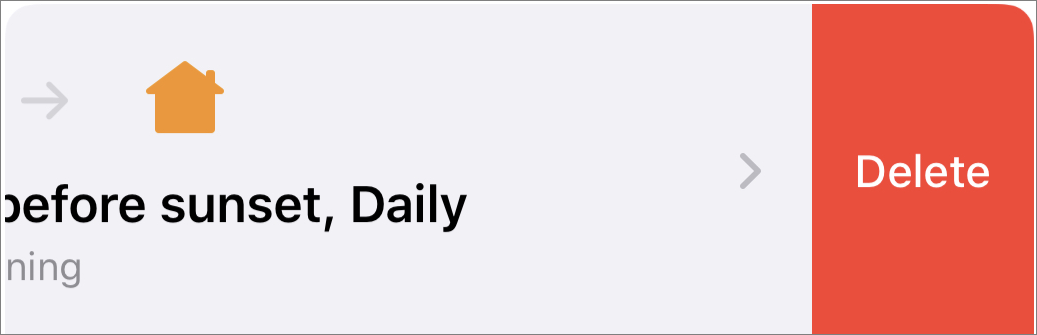
Figure 35: On the main Automations screen, swipe an automation from right to left to delete it. It’s handy to know how to delete an automation when it just isn’t working out. But most of the time, it’s better and easier to temporarily disable an automation until you can edit it to make it work like you want.
Disable an automation: Enable This Automation is obviously enabled by default, but flipping the switch to off disables the automation until you turn it back on.
There are plenty of times when disabling an automation is the right thing to do. For example, if you have an automation that turns the lights on every workday morning, you might want to turn it off if you have a day off. Then you can reenable it later.
It’s also a useful tool for troubleshooting. Are weird things happening in your house? Try disabling automations one by one until you track down the cause.
(Re)select accessories and scenes: The Select Accessories and Scenes option takes you to a screen where you change which accessories and scenes are triggered by the automation.
As before, selected accessories and scenes are marked with a checkmark
. Click or tap Done when you’re finished. When you are back at the automation settings screen, you can tap or touch and hold (click or Control-click on Mac) accessories or scenes included in the automation to adjust what they do when the automation is triggered.
Automate with Eve for HomeKit
Disappointingly, Apple’s Home app doesn’t support every feature of HomeKit. Fortunately, third-party HomeKit apps support features that Apple’s own app misses.
For example, I owned an Eve Room sensor (which monitors temperature, humidity, and air quality) for a few months before I saw its potential: Since Apple’s Home app doesn’t recognize it as a sensor, it just seemed like a glorified paperweight until I realized that I could use Eve’s own app to use the Eve Room to trigger automations.
Here’s a problem I solved with the Eve app, the Eve Room, and an Eve Energy: the TV room in our house is below grade, so we have to run a dehumidifier in the room to prevent mold and mildew. But the dehumidifier is loud, which is particularly annoying given that we watch TV in that room. Although I can adjust the humidity level on the dehumidifier, that setting controls only the compressor; the fan runs continuously. Using the Eve app, I was able to automate this process to keep my humidity down and keep the dehumidifier off during our prime viewing hours.
Create Scenes with the Eve App
The Eve app is attractive, but it isn’t immediately obvious how you use it to create automations, which it calls “rules.” Unlike the Apple Home app, in which automations can trigger individual accessories or scenes, rules in the Eve app can trigger only scenes, so you have to make the scenes you need beforehand.
For example, for my dehumidifier automation, I had to create two scenes: one to turn the Eve Energy connected to my dehumidifier on and another to turn it off. I don’t set these as favorites, because I just need them to power the automation.
I could have created this scene in Apple’s Home app—it automatically appears in the Eve app, because they’re both front ends for the same HomeKit back end—but the Eve app gives me more options. If you’d rather create a scene in the Eve app, here’s how:
Go to the Automation screen and make sure you’re in the Scenes tab (Figure 36).
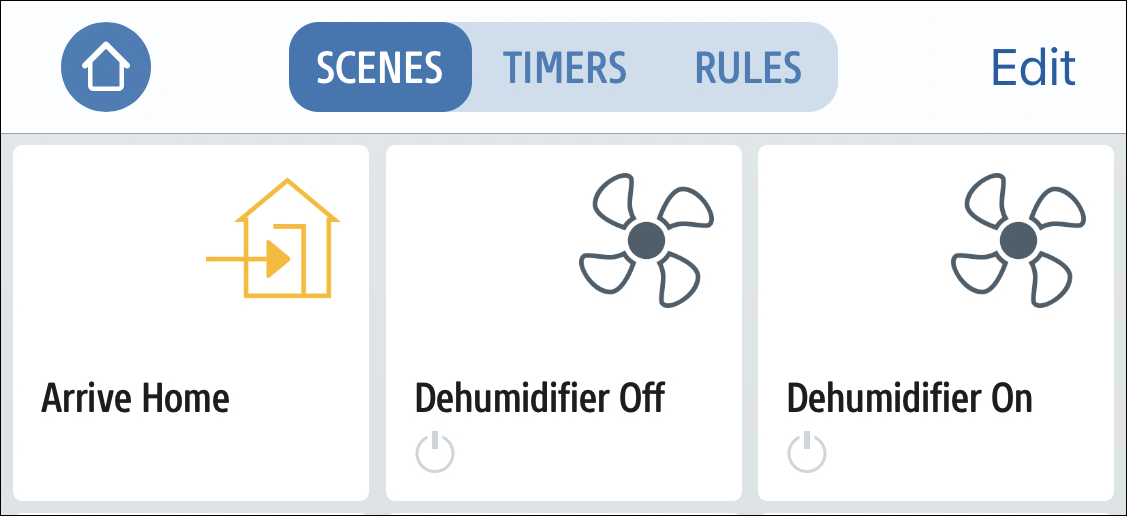
Figure 36: In the Scenes screen, make sure you’re in the Scenes tab. Tap Edit in the upper-right corner, and then tap the Add Scene button which appears at the bottom of the list (Figure 37).
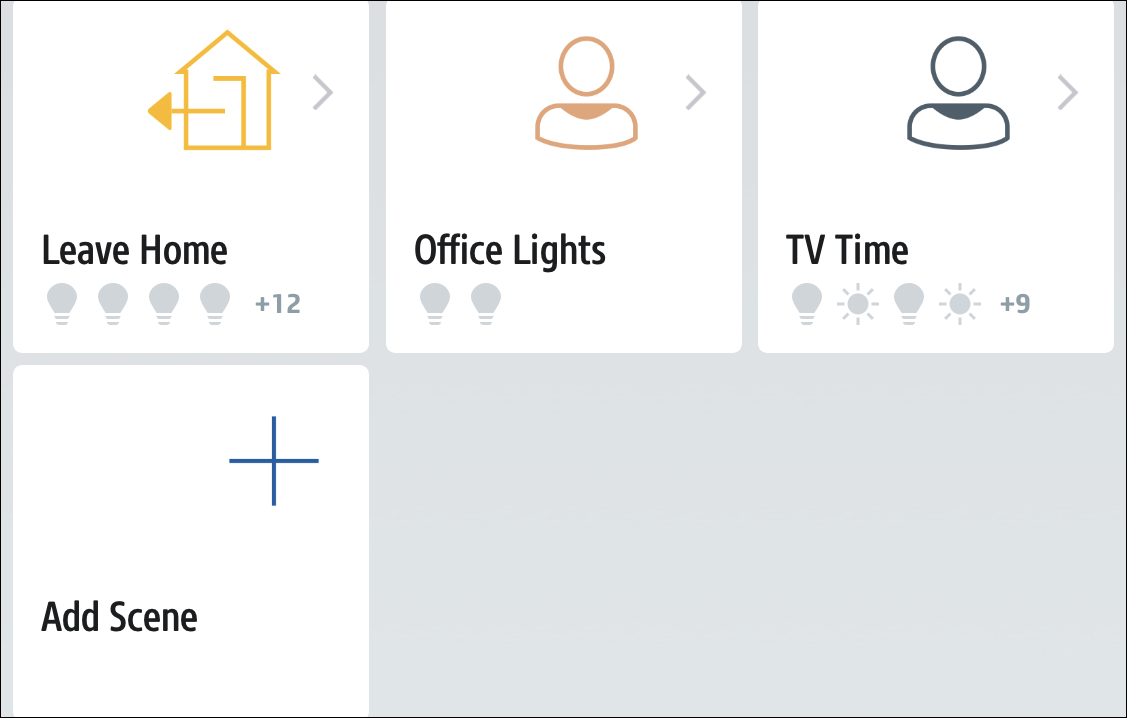
Figure 37: The Add Scene button won’t appear until you tap Edit. On the Add Scene screen, tap Add Actions.
On the Actions screen, accessories are organized by room and type. Choose a room or a type of accessory to see accessories tied to that category. Under each accessory listing, there are switches tied to each accessory value for that accessory. For example, for a Hue bulb, there are switches for power, color, and brightness. Turn the switch on to control that value.
When you enable a control f0r an accessory, a setting—such as an on/off switch, a color wheel, or a brightness slider—appears under the control that lets you adjust its value (Figure 38).
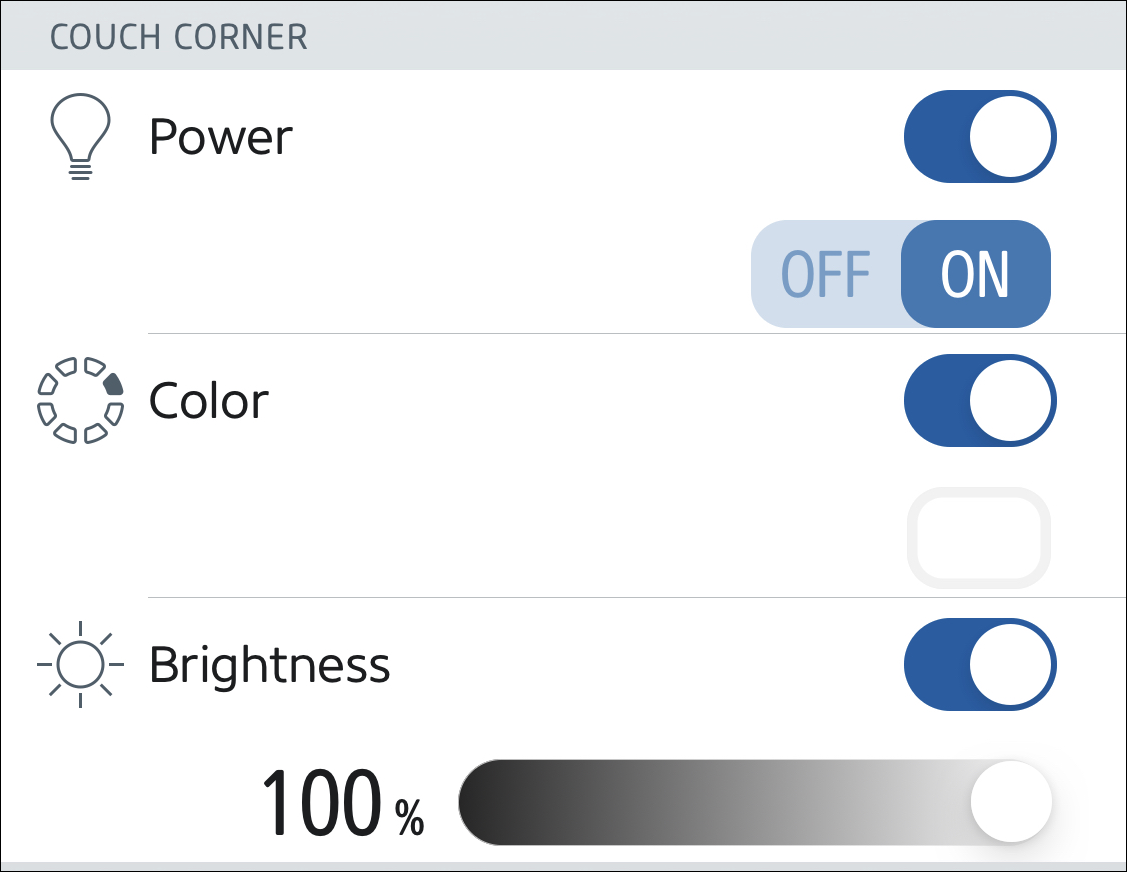
Figure 38: When making a scene in the Eve app, you first enable a specific accessory value, like power, color, or brightness, and then use the controls that appear to adjust it. For example, with my dehumidifier, all I need to do is turn the outlet on or off, so I created two scenes, Dehumidifier On and Dehumidifier Off. For each, I enabled the power control for the Eve Energy, and then set the value to On or Off, respectively.
Tap Add to add that action to the scene.
You’re returned to the Add Scene screen. Tap Add Actions if you want to add additional actions, or tap Next if you’re finished.
On the Scene Name screen, enter a name and choose an icon for the scene. The icon appears only in the Eve app, and you can change it later, so don’t stress too much about it.
Tap Done when you’re finished.
Once your scenes are set up, you’re ready to make rules.
Make Rules in the Eve App
With your scenes established, go to the Automation screen and tap the Rules tab. This view lists your existing rules (if you have any) and lets you create new ones.
Here’s where things can get a little confusing, especially for non-programmers. As the Eve app explains after you tap Add Rule, every rule needs at least one trigger and a scene that it triggers. You can (and probably should) also add conditions that modify the trigger.
For example, I have the trigger set to turn on my dehumidifier whenever the humidity changes, with a Condition of whenever the humidity is at or above 60%. When that trigger is activated and that condition met, HomeKit activates my Dehumidifier On scene.
If this still sounds like gibberish, I’ll walk you through the process to try to clear it up:
After tapping Add Rule and moving past the instruction screen, you’re taken to the Triggers screen.
Tap Add Trigger.
Choose either a Value trigger, Location trigger, or Time trigger. Location triggers are simple: choose either Arriving At Home or Leaving Home, and then choose whether anyone triggers the automation or only you trigger it.
You can also choose Leaving or Arriving at Location. The app tries to automatically detect your location, and if it succeeds, you can tap Add to set that as the location (the first time you do this, it may just show a map, with no options other than tapping Add). Otherwise, use the map and/or search box to find the desired location, choose Arriving At or Leaving, and tap Add.
Since I want to control my dehumidifier based on the humidity value reported by my Eve Room, I chose Humidity. You then need to pick a triggering accessory. I chose Eve Room by turning its switch on.
For the Condition, I needed to choose a humidity level and whether the rule triggers when the room humidity is greater than, less than, or equal to that value. The rule that turns on my dehumidifier is set to trigger when the humidity is greater than or equal to 60% (Figure 39). The rule that turns it off is triggered when the humidity falls below 50%.
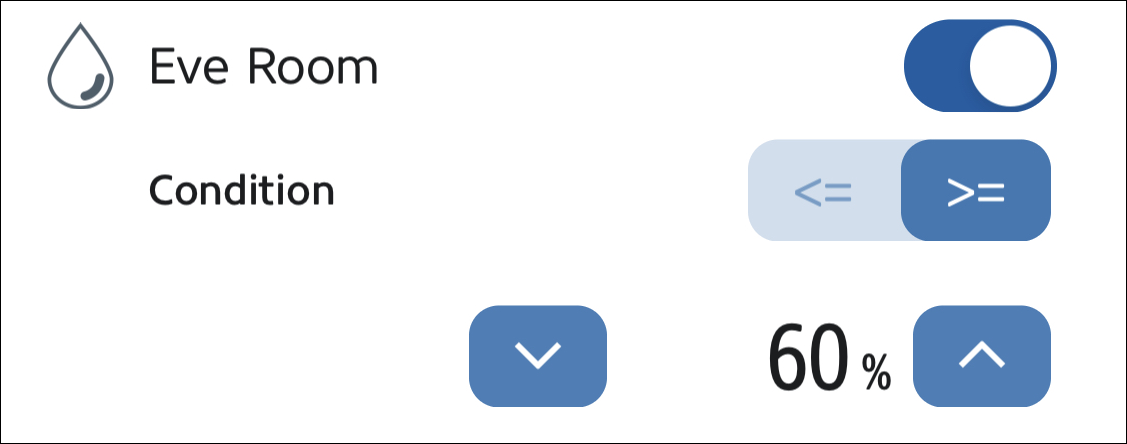
Figure 39: This may seem confusing if you’re used to how Apple Home presents these rules, but it’s pretty self explanatory. The rule is triggered when the detected humidity is equal to or more than 60%. Tap Add when you’re satisfied with the trigger and conditions. You’re returned to the Triggers screen.
Back at the Triggers screen, you can elect to add an additional trigger. When you’re happy with your triggers, tap Next to move on to the Conditions page, where you can choose additional conditions for the rule.
You have two choices on the Conditions page: Value Condition and Time Condition. Value Condition works just like Value Trigger, except that it doesn’t kick off the automation. For example, if Value Trigger is a lightbulb being red, that automation is activated when the bulb turns red. If the Value Condition is a lightbulb being red, then the automation is activated by another action (say, the light being turned on), and is carried out only if the lightbulb is red.
Time Condition simply restricts the rule from being triggered to before, on, or after certain times. Here are the choices on the Time Condition screen:
Type: Exact Time or Day Event? By Day Event, the Eve app means sunrise or sunset.
Relation: Before or after the chosen time?
Time: The actual time that is the condition of the rule. Depending on what you chose for Type, this is either an exact time or sunrise or sunset.
Tap Add whenever your have the condition set as you like. This returns you to the Conditions screen.
Tap Next on the Conditions screen to move on to the Scenes screen. Select the scenes you’d like the rule to activate. (Yes, you can choose more than one!) If you need to make a scene, tap Add Scene and follow the instructions in Create Scenes with the Eve App.
Finish up by naming the rule and tapping Done.
To view your rules, go to the Automation screen and then the Rules tab. Tap one to see its details. For instance, in the “Humidity Below 50%” rule, I have the trigger as Humidity = Any, the condition as Humidity less than 50%, and the scene set to Dehumidifier Off. In plain English, these settings trigger the rule whenever the humidity changes, and if the Eve Room detects that the humidity is less than 50%, they turn off the dehumidifier.
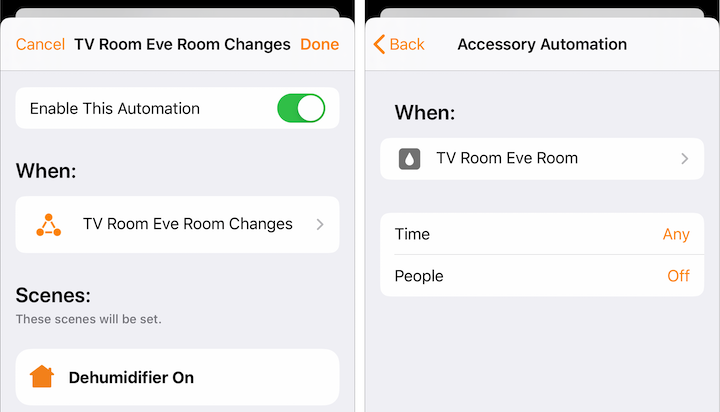
Here’s a HomeKit oddity: even though you cannot set up these rules in Apple’s Home app, you can view them under the Automation tab, and even enable and disable them from there. You can even adjust a few of the automation’s settings (Figure 40). That’s because Home is reading in that HomeKit data, but can’t interact with all of it.
Consider Your Conditions
Creating rules in the Eve app isn’t that hard, but figuring out which rules to make can be. As I’ve noted several times throughout this book, the tricky part of home automation is thinking everything through to create automations that make sense for you. To give you an example, here’s how I came up with the rules that turn my dehumidifier on and off.
My first thought was to set up a rule that turns the dehumidifier on at 60% humidity and off again when it drops to 50%. But that rule turned out to be a harsh mistress. If the dehumidifier kicked on while we were watching TV, I couldn’t shut it off! Well, I could, briefly, but it would kick back on as soon as the humidity changed again.
So I had to rethink my approach. I ended up with two rules: one that turns the dehumidifier off when the relative humidity drops under 50% and another that turns the humidifier on when the humidity rises over 60%, but only when it’s before 6 P.M. That way, it doesn’t kick on during our prime viewing TV hours.
To ensure that the dehumidifier runs after we’re done watching TV, I also set up a rule to turn the dehumidifier on at 3 A.M., regardless of humidity. No one will be watching TV then.
There may also be much better ways to do this. For instance, I could throw an Eve Motion motion detector into the mix to keep the dehumidifier off if someone’s in the room. But that’s a project for another time.
In any case, don’t be afraid to experiment! Fine-tuning automations is part of the fun, and Rome wasn’t built in a day. Just don’t create more than you and your housemates can manage.