
6 DSLIST - Data set lists
Here some chapters begin dealing with the handling of files in ISPF. All chapters above act on the benefits you can gain by skillful use of the possibilities available in ISPF. Make sure you use the opportunity to work with DSLISTs. The DSLISTs are one of the most powerful tools to speed up and optimize your work in ISPF.
Fundamentals to the DSLISTs:
The main using of ISPF is working with data sets. Therefore, the first action that many ISPF users start when they have completed the logon process, and have not read this chapter in this book is the selecting of menu 3.4 in the primary option menu. This means nothing else than they go straightway to the DSLIST Utility to display the DSNs with which they want to start their work. Because the ISPF 3.4 screen represents exactly the DSLIST utility panel. I have heard of people who are not very familiar with ISPF that they do not know anything except the ISPF menu 3.4. In addition, you might get the impression that behind this part of the ISPF a lot of power must exist.
As you will read later in this chapter, DSLISTs are for
– Creating data set lists in many ways.
– Use them to combine the different combinations of data set names and to display them for processing.
– Call them from all panels in ISPF.
The maximum benefit from the DSLISTs is only possible when you can call them directly by using an ISPF command. In the above chapter, you learned the definition of ISPF commands.
For example, when I enter ++, all DSLISTs appear that I have already created.
6.1 The DSLIST panel
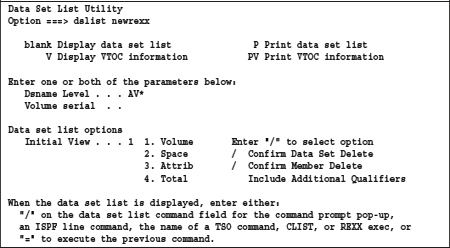
Once we have the 3.4 command entered in the primary option menu of ISPF and pressed ENTER, the following panel appears:
Screen 6.1: The data set list utility panel
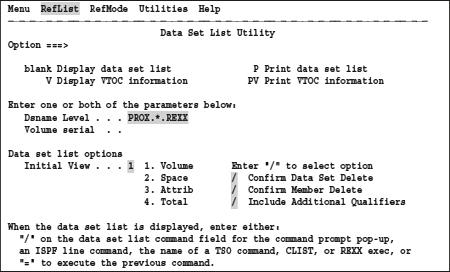
This panel offers some important input fields and selectable options that we want to look at in the sequence from top to bottom now:
6.2 The possibilities of the action bar for DSLISTs
Here we consider only the point RefList precisely:
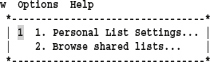
Under RefList, we find one of the most important tools of the entire DSLIST system or even the entire ISPF. This option represents one of the ways, to create and manage Personal Data Set Lists. Another way to manage DSLISTs is later in this chapter explained.
We move the cursor in the text RefList and press ENTER.
Then the following screen appears with which we can call the edit function for DSLISTs:
Screen 6.2: RefList pull down panel
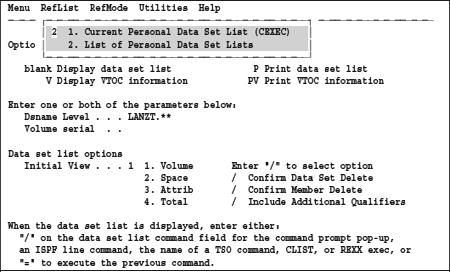
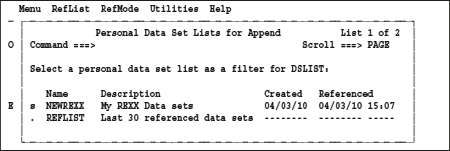
If we now enter a 2 in the frame and press ENTER, then we get the panel for the definition and manipulation of personal data set lists:
Screen 6.3: Personal data set list panel
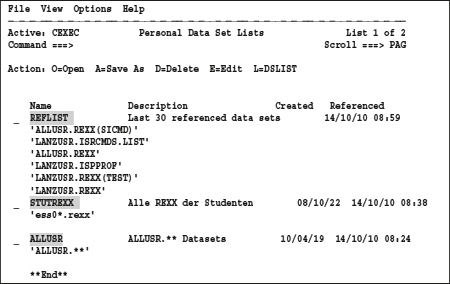
The gray lines show some of my personal data set lists. The list named REFLIST is automatically by ISPF maintained. It contains the names of the 30 last used data sets. The contents of the above panel depend on two option settings in the View andOptions pull down menus. The above panel display appears with the following settings in the View pull down:
Screen 6.4: Pull down menu for DSLIST View selection

Using this selection panel, we can predefine how the DSLIST display panel appears:
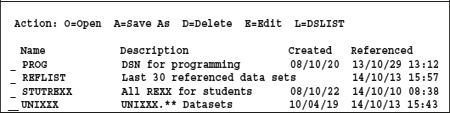
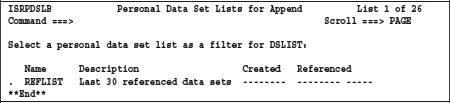
When we set the option to Standard View, there are only the available DSLISTs displayed and we can only see the names of the DSLISTs. See the following display:
When we set the option to Extended View, the DSLIST extended panel will displayed and we can see the DSNs, which are to build the REFLISTs used. See the following display:

The following selection in Options...
… leads to this selection panel:
Screen 6.5: Personal List Settings panel

We will deal with this panel more detailed later when we discuss the creation and editing of personal data set lists.
6.3 The DSLIST panel fields
The following descriptions refer to Screen 6.1: The data set list utility panel on page 86.
First, I would like to explain the various fields of the Standard DSLIST panel that we reach using the selection 3.4 in the Primary Option Menu. Some entries we make here affect the display of DSLISTs generally. Some of these options change in other panels also.
Here we can enter a mask that specifies which DSN the DSLIST Utility searches. The DSNs found by this search appear as DSLISTs. For designing of the DSN mask, you have many options. I want to show you some of these options:
Before we can do that, we still have something very important to discuss!
The display result depends very much on another options that can be set in DSLIST panel. Therefore, we must first look at the importance of the option Include Additional Qualifiers. This option is positioned in the section below the line ![]()
– If we set the slash (/) before include additional qualifiers here, all DSNs resulting from the mask definition of all extensions appear on the display.
– If we omit the slash, the DSNs having additional characters behind the mask do not appear.
Because this affects all ads of DSLIST, this setting must fulfill your needs properly. After all, depending on how this option is set, you must make the selection masks accordingly in the DSLIST panel.
I give you no recommendations for the use of the option Include Additional Qualifiers. You have to decide yourself what setting you like more after you have read the following remarks concerning the settings and benefits of DSLISTs. The following two examples will show you the effect of the Include Additional Qualifiers option:
Example 1:
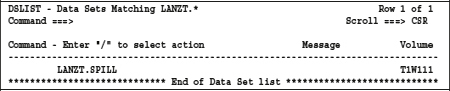
Display a DSLIST with the Include Additional Qualifiers option when set to OFF using the mask PROX.*.REXX:
Screen 6.6: DSLIST display when additional qualifiers option is OFF
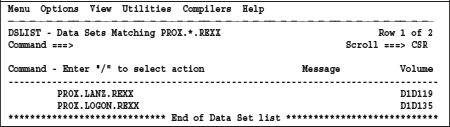
As you can see, in this case only the actual desired DSNs will displayed!
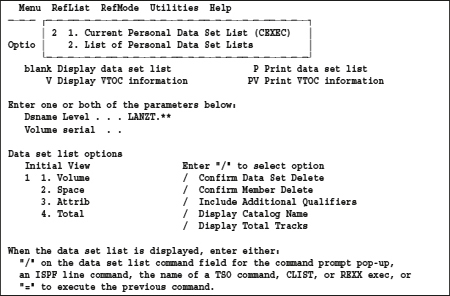
Display a DSLIST with the Include Additional Qualifiers option when set to ON with the mask PROX.*.REXX:
Screen 6.7: DSLIST display when additional qualifiers option is ON
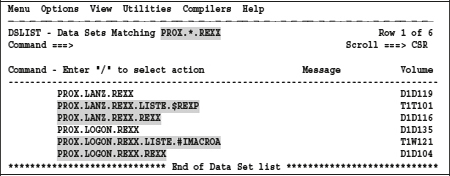
Now, the grayed names appear additionally. Sometimes this extended display is pretty annoying and unnecessary, so I turned this option off. In this example you can see that all data sets are displayed that meet the conditions of the mask from the beginning. Additionally, all files with all sorts of qualifiers that match the mask will displayed.
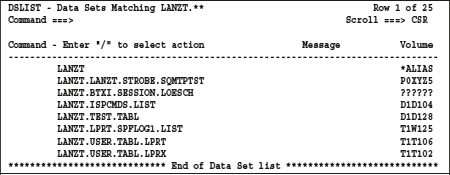
The same effect, which you can reach by setting Include Additional Qualifiers Option to ON, you, can also achieve when you end the selection screen with the generic binary stars. Example: LANZT.**.shows all of DSN beginning with LANZT.
| Remark: The setting of the Include Additional Qualifiers option also influences the ads in the personal data set lists started from the ISPF panel in which this option is set. However, you can apply a little trick: If you changed this option in a 3.4 Panel, then you need to display this panel ONCE with ENTER. Thereafter, this option also works for the personal data set lists called in this ISPF logical screen. I recommend that you run some tests with this option in order to gain experience in dealing with it. Well worth the effort! |
For all further considerations hereafter, we assume that the option include additional qualifiers is set to OFF.
I will now show some examples that make the definition of DSLIST masks significantly.
You can use to control the selection with the two special characters asterisk (*) and percent (%).
– One asterisk acts as a wildcard character. This means that from this point one or more characters can occur within only one qualifier.
– Two asterisks consecutively cause displaying from here DSNs including ALL qualifiers and characters.
Some examples will illustrate this effect:
I only enter my user ID LANZT and get the following display:
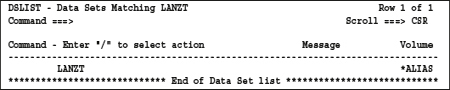
As you can see, only the Alias entry appears. See also chapter 2.1.3.1 The high level qualifier (HLQ) on page 18.
Then I enter the following mask: LANZT.*
Now I get at least the display of a file. However, why only one? The reason is that with the extension (.*) in my mask, only such data sets will be found that have exactly one further qualifier behind the HLQ.
Now let's try it with LANZT.** and we get to see all the data sets which start with the HLQ LANZT.
Examples of DSLIST masks: Include Additional Qualifiers is set to OFF in DSLIST panel.
Table 6.1: Examples of DSLIST masks
Volume serial
We will discuss the use of this field in the section 6.6.2 Using the volume serial field on page 111.
Initial view
Here we should choose option 1 as this allows the display, particularly with very large DSLISTs, very quickly to go on. When the list appears and you need the extra file information, you can use the keys PF10/11 to display the information. If one of the options is 2-4 set, the system collects namely the data set attributes from catalogs and VTOCs. This can take quite a long time.
Enter "/" to select option
The entries in the first two lines are particularly important because they again determine whether we get a security question during DELETE operations. You should always leave both options switched on!
6.4 DSLIST panel processing
The processing options for the files displayed in the DSLIST panel are very extensive. It is a screen similar to an edit display. A detailed description of the opportunities provided by the DSLIST Panel, see the IBM brochure ISPF User’s Guide Volume II in the main chapter Utilities in the subsection Data Set List Utility (option 3.4). In the following sections, I will describe only the, in my opinion, for the daily work important options and commands.
| Remark: These described methods in the following sections apply to ALL DSLIST panels irrespective of whether they were by a simple selection of the Panel 3.4 or by a Personal Data Set List created. |
6.4.1 The DSLIST primary commands
As you will see, there is a large number of sometimes very useful primary commands. The following panel shows these commands:
Screen 6.8: DSLIST primary commands
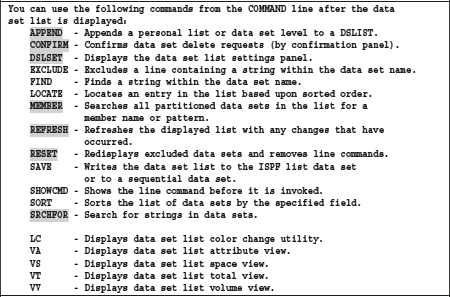
| Remark: The shaded commands are interesting. I recommend doing some practical exercises. The LC function is useful if you do not like the displayed colors and you want to customize it to your taste. The commands VA, VS, VT and VV listed at the end of the panel may ignored because the keys PF10/11 (LEFT/RIGHT) can meet these functions better. |
I would like to address you on two relatively new commands. Namely, the commands MEMBER and SRCHFOR:
6.4.2 The commands MEMBER and SRCHFOR
In a DSLIST display and only then, you can use these commands in the following manner:
Enter the Command MEMBER as Primary Command. That means, enter at the command line MEMBER, MEM or M and add a member name or a mask to search for members in all in this DSLIST displayed PDS. The result will appear directly in the DSLIST panel.
Example for member lookup with MEMBER:
I have searched for the member HUGO by entering M HUGO. Then I get the following display:
Screen 6.9: Member search in a DSLIST display
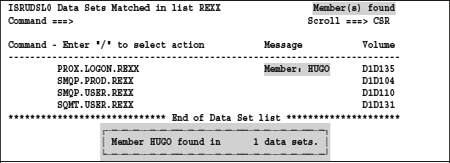
As you can see, the member HUGO stays in the data set PROX.LOGON.REXX.
Example of a text search with SRCHFOR:
When creating a REXX procedure that should run under ISPF, I use the QBASELIB command. Because I do not know exactly how this command can used, but remember to have used it before, I search for it in my REXX data sets by first displaying the DSLIST for REXX procedures and then enter the command SRCHFOR. In contrast to member searches, text searches require more information. For this reason, the following panel appears first after entering the command SRCHFOR: (in the panel, I already filled out the search and display options to save space).
Screen 6.10: Text string search using SRCHFOR
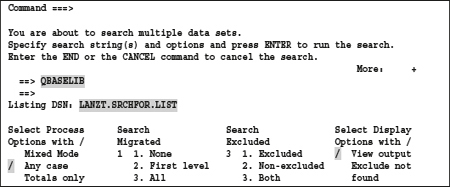 I have entered the grayed lines.
Very important here is that you ENTER in this panel behind the text Listing DSN: a DSN that the system can create. When this panel is for the first time displayed, the DSN SRCHDSL.LIST stands here. However, you can usually not create a file with this name because you have no RACF authorization for the HLQ SRCHDSL. The best is you choose as the DSN name ![]() If the file does not exist, it is automatically by the application created. When you call up the command SRCHFOR next time, DSN will always be available and displayed here. If you put a slash before the view output field, then the file with the search results are conveniently displayed immediately after the end of the search process in View mode. This display follows here:
If the file does not exist, it is automatically by the application created. When you call up the command SRCHFOR next time, DSN will always be available and displayed here. If you put a slash before the view output field, then the file with the search results are conveniently displayed immediately after the end of the search process in View mode. This display follows here:
Screen 6.11: Example of a SRCHFOR list output
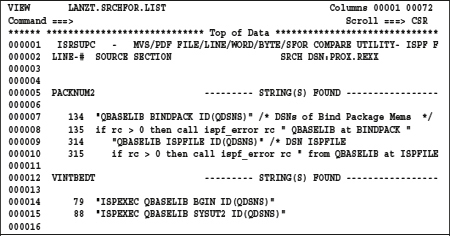
For each data set and each member in which the text found is, the corresponding information is stored in the list data set. You can exactly see in the list what the search has adduced. Also displayed is in how many members and rows the search operation was successful. If the search text will not found in one of the involved data sets or members will this case also logged in the list.
| Conclusion: I think with these two search tools you have good tools available for searching for members or texts. The best part is that you can let the search run over several data sets. If you want to exclude some data sets from the search run, you can exclude displayed DSNs from the screen by using the line command X or even the block command XX. You can redisplay excluded lines using a REFRESH command. |
| Remark: You can now use CUT and PASTE to copy some of the search found lines to another file currently edited in another ISPF logical screen. |
6.4.3 DSLIST line commands
Let us look at the DSLIST help panel by pressing PFl:
Screen 6.12: Table of DSLIST line commands
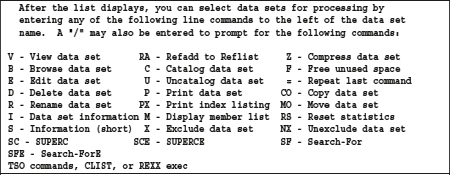
The following input options can be in front of a data set name entered:
You can enter a slash (/) and get the following panel:
Screen 6.13: Data set list actions
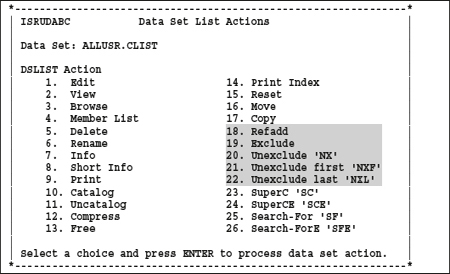
As you can see, many actions can be on the selected file performed. However, I particularly draw attention to the Actions 18-22. These commands allow you to manipulate the list. In particular, the action 18 is interesting. Use this command to add the selected file name to an already existing DSLIST. This DSN remains permanently registered in the specified DSLIST. You should carefully consider whether you want this. The actions 1-17 are self-explanatory so far and I do not need to go into details. I recommend that you simply perform some tests using these options!
You can enter an action character:
The following table shows the most important action characters:
Table 6.2: DSLIST action characters for data sets
You can enter a procedure name:
In this case, the procedure will called up and the DSN will forwarded to the procedure. However, the called up procedure must be able to do something with the DSN. This means the procedure has the DSN take as an argument and will used accordingly.
| Note: You need to know when calling the procedure at which position within the list of parameters the procedure expects the DSN and you must also know if other parameters passed are. |
Suppose the procedure expects the DSN in the first place and it is to provide yet another parameter. Then you have to enter the call as follows:
PROC1 / PARM
Here, the slash represents the DSN. If the procedure expects the DSN as the second parameter, then enter the following:
PROC1 PARM /
To be able to give long parameter lists in such calls, you can overwrite this DSN field. The DSN will then internally correctly to the procedure as parameter passed.
The following panel shows such a call with overwriting the DSN:
Screen 6.14: Example of a command call in a DSLIST display panel
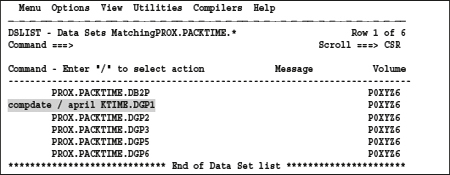
What happens here?
1. The program compdate will start.
2. The parameters 'PEVP.PACKTIME.DGP1' and april are passed to procedure as arguments.
We have here 54 characters available. You may ask now: How can I make such calls if the input requires more than 54 characters? To do so, look at the option Do not show expanded command in the next chapter
6.4.4 DSLIST settings
Already in DSLIST basic menu (selection 3.4), you can specify some options that affect the appearance and working with the DSLIST panels. However, there is another way of setting the DSLIST display panel and the member list panel callable from the DSLIST display panels. In addition, other options for the commands and actions are executable in the panels mentioned above. These options can only be set when a DSLIST panel currently is displayed. To access this panel, proceed as follows:
We position the cursor in the action bar in the options field and press enter. Then the following pull-down menu appears:
Screen 6.15: Options pull down menu in a DSLIST panel
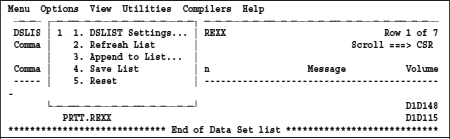
In this pull-down menu, we select option 1 for DSLIST settings and press enter. Then we get the settings menu for the DSLIST options:
Screen 6.16: DSLIST options setting panel
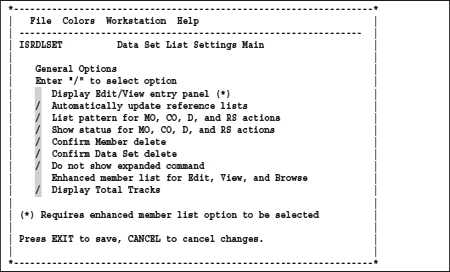
With a (/) in front of their text, the options turn on. When a blank entered is, this option will turned off. The effects and meanings of these options are in the following pages explained:
Display Edit/View entry panel (*)
When a direct edit/view call to a sequential data set or a member will performed and this option is ON, the edit/view entry panel appears before the edit/view session starts. You then have the opportunity to enter additional options. This option has no effect on a call of a member from a member list.
Automatically update reference lists
This option controls the automatic update behavior of ISPF for DSLIST REFLIST. If this option is on, then whenever a data set will edited, the DSN is to the standard DSLIST called REFLIST written.
List pattern for MO, CO, and RS actions
If this option is on, the member list appears before one of the above operations on a PDS executed are so that you can select individual members for the planned operation.
Show status for MO, CO, and RS actions
If this option is on, the process activity of the above operations is in a POP UP panel displayed.
Confirm Member delete
This option has the same effect as the same option in the DSLIST basic panel. Changing this option will automatically update each in both places. This option can be set specifically using the CONFIRM command.
Confirm Data Set delete
This option has the same effect as the same option in the DSLIST basic panel. Changing this option will automatically update each in both places. This option can be set specifically using the CONFIRM command.
Do not show expanded command
If this option is off, then an additional panel appears in which you can modify the command before executing. This facility provides the ability for a program or procedure call of to pass a long parameter list as is possible in a DSLIST panel with its maximum of 54 characters.
Enhanced member list for Edit, View, and Browse
If this option is enabled, all displays of member lists which were called up with e for edit, v for view and b for browse in one line of a DSN appear with a eight character long call box in front of the member name.
Recapitulation:
The advantage of this enhanced member list is that you can perform other functions in the same member list directly after returning from a member.
The disadvantage is that after creating a new member in an editor or view session, the member list will, after returning from the session, not updated automatically. Therefore, if you want to use the new members immediately, you have to rebuild the member list using the REFRESH command.
I set these options in my ISPF as they as can be seen see in the above panel. However, this is a matter of taste. Find out your own favorite setting!
6.4.5 Examples of the data set list settings
On the following pages, I want to show you some examples of the effect regarding the options discussed above. I recommend trying these examples on your system. You may have use for them someday!
The edit/view entry panel:
When edit/view calls a sequential data set and this option is set to ON, then the below panel always appears before the contents of the file displayed is:
Screen 6.17: The edit/view entry panel
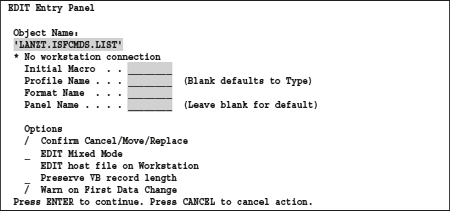
As you see on the panel, you can now set some options before you start with the edit/view session. If you have entered the options, it goes directly to the editor by pressing ENTER.
List Pattern for MO, CO and RS actions
This option is especially important for the application of RS to update the member statistics in a PDS. If you want to edit all members at once with this RS action, then you should disable this option. If you want the member statistics renew only for selected members, then you should enable this option. If the option will turned on, the following panel that is already filled in for the next step appears when you invoke RS in front of a PDS:
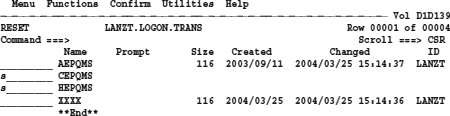
As you see, two of the members currently have no member statistics. The member statistics will by selecting the members with s and pressing ENTER created. Thereafter, the following panel appears, in which we must make the required entries for producing a renewal of the member statistics:
Screen 6.18: The Reset Member Statistics panel
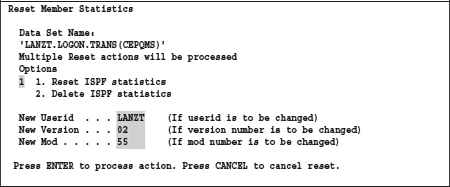
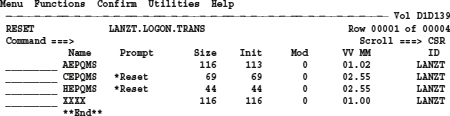
This panel is now filled out in the shaded positions and ENTER is pressed. After a short time, the following panel appears. There we see that the member statistics are set correctly.
| Tip: If you renew with RS many member statistics, I recommend to set Show status for MO, CO, and RS actions to on. You can then track the processing progress on the screen in a POP UP menu by whizzing the names of the members treated. |
Enhanced member list for Edit, View, and Browse:
I want to illustrate to you with the following two figures how this option affects the display of the member list. You can then decide with which you prefer to work. Pros and cons of both displays types were explained above.
Screen 6.19: PDS members list with enhanced option ON
Screen 6.20: PDS members list with enhanced option OFF
One of the advantages of this panel is that it is sufficient to position the cursor in front of a member name and press ENTER to edit this member. This type of display also has a slight advantage in terms of safety. You cannot accidentally enter a d for delete and press ENTER like in the Enhanced panel. This is also one reason why I prefer working with edit/view and browse using the simple panel. Another great advantage of this panel is that after CREATE of a new member in this PDS, the display is immediately refreshed and thus the new members immediately appear in the member list after leaving the current edit session.
Confirm member delete:
Normally, you should always have this option enabled. This means, if you type in an enhanced member list against a member or several members d for delete and press ENTER, the following POP UP appears:
Screen 6.21: Confirm member delete panel
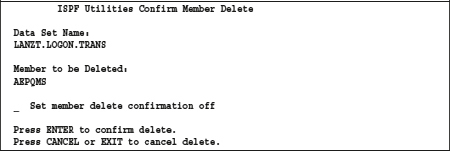
Pressing ENTER deletes the member.
If you even enter before the line set member delete confirmation off an s before you press ENTER, then the delete confirmation fuse remains off for the duration of the DSLIST session. Only when you leave this DSLIST session and call it up again will the general security setting taken up again.
6.5 Personal data set lists
In this chapter, we will deal with one of the most efficient tools in the entire ISPF. First, here are the basics of the personal data set lists:
When working in ISPF we need many data sets and we can usually group them by any rule. For example, it makes sense to group the data sets according to their use as follows:
– Data sets containing procedures.
– Data sets containing panels
– Data sets containing skeletons
– Data sets containing messages
In addition, we have the following groups of data sets:
– Data sets for source codes
– JCL data sets
– Data sets for the maintenance of IMS, CICS, DB2, etc.
– Data sets for test data
In the course of working with the ISPF, we always have ideas for new groups. You
should note that a DSN might appear in several DSLISTs. Create your DSLISTs as
you need for a particular activity.
What are the advantages of using Personal Data Set Lists?
– You only need to remember one command to make a whole group of very different DSNs available.
– You can add or remove additional DSLISTs to the current DSLIST.
– You can install the call to a DSLIST in your private command table and in this way call it up very fast.
– Find DSLISTs using the selection 11 in the Primary Option Menu and hold it permanently available in an ISPF logical screen. Customize and display them directly from the ISPF Workplace.
6.5.1 Creating personal data set lists
For creating your own Personal Data Set List, proceed as follows:
You move the cursor in a DSLIST panel (3.4) to the text RefList in the CUA line and press ENTER. The following panel will displayed:
Screen 6.22: Create a personal data set List
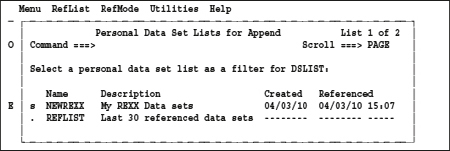
If you now enter 2 and press ENTER, then the menu for the maintenance of your own personal data set lists appears.
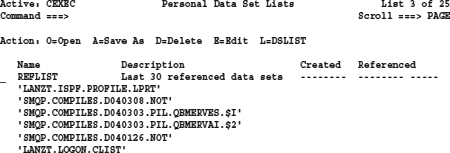
One list called RefList is definitely available. ISPF creates this list automatically and maintains it. This list will at least appear in this panel. If only the RefList list will displayed, then you can use the action Save As to create your own new private DSLIST. The following screen shows the state if no other lists than the default one are available:
If you place the cursor in the line with the name RefList and enter the character a (for Save As) and press ENTER, then you get the following screen:
Screen 6.23: SAVE AS confirmation panel
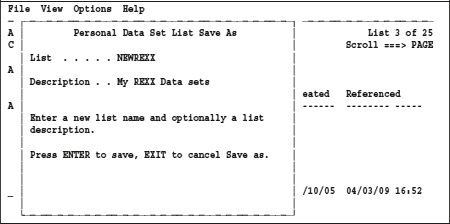
You enter in the List field the maximum 8 characters long name of your new DSLIST and in the line Description an appropriate description for your DSLIST. Then press ENTER.
The panel for editing DSLISTs reappears. In the upper right hand corner, a message appears saying that the new list has been created. Please see the next panel:
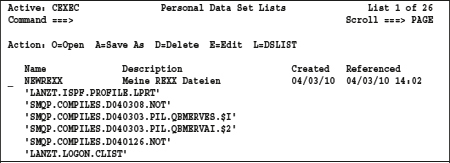
The gray names descends the operation with Save As. You must now replace the DSN through appropriate DSN masks and delete the unneeded rows. The result of these actions might look like this:
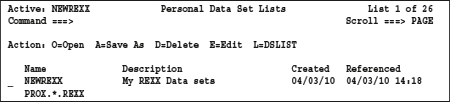
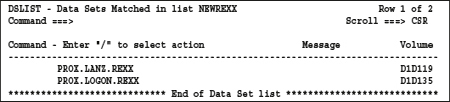
If you now enter in the line of DSLIST NEWREXX an L and press ENTER, then the new DSLIST appears in 3.4 mode displaying the new set of DSNs.
6.5.2 Call DSLISTs
DSLISTs can be in various ways displayed. We must differentiate:
– Views for using one DSLIST.
– Views for maintaining all DSLISTs.
Views of DSLISTs using the command DSLIST.
Here is the description of the DSLIST command from the associated tutorial panel.
Screen 6.24: Description of the DSLIST command
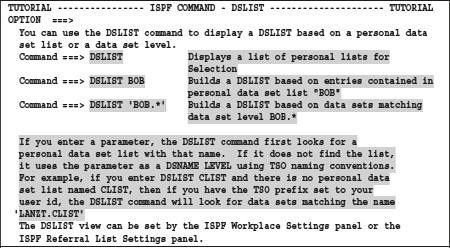
According to the information provided above, you can call individual DSLISTs using three ways. However, there are some other ways to work with DSLISTs.
6.6 Entering the DSLIST command with the name of a DSLIST
Screen 6.25: Direct call of a DSLIST by name
When you type in the gray highlighted command and press ENTER, the DSLIST NEWREXX appears immediately.
6.6.1 Entering the DSLIST command without parameters
Then the following panel appears.
Screen 6.26: DSLIST command without parameters
To display a DSLIST, type in an s before the name of a DSLIST and press ENTER.
6.6.1.1 Integrating a DSLIST call in the command table ISPCMDS
You should use a short and concise name for this entry such as +R. This name may be a good choice. The entry might look like this:
![]()
See the section 6.7 DSLIST optimal use with command tables on page 112.
If you have made the registration in the command table as shown, then you can simply call the DSLIST NEWREXX anywhere in ISPF by typing +r on the command line followed by ENTER. The entry of SCRNAME ($NEWREXX) ensures that when the command SWAP LIST is entered, the name $NEWREXX in the screen as ISPF level appears. This effect shows the following screen:
Screen 6.27: Display of SWAP LIST command
6.6.2 Using the volume serial field
Let us look at the DSLIST basic panel:
Screen 6.28: Using the volume serial field in DSLIST panel

With regard to the entries in the fields Option ===>, DSNAME Level and Volume serial, the following combinations of input are usable:
1. If you enter a mask in Dsname Level and let Volume serial empty, then the system will search for the DSNs in the catalog that match with the selection mask and these DSNs are then displayed. It can happen that DSNs displayed are for which at least in this LPAR no physical data set exists. This happens when file attributes are missing following the filename.
2. If you type in a v behind option ===>, then you must enter in Volume serial a complete volume serial name (disk name). This action then displays the VTOC Summary Information of the disk.
3. If you enter a volume serial number and you leave the DSNAME field empty, then all DSNs contained in this disk are from the VTOC (Volume Table of Contents) read and then displayed. If you enter a generic term as Volume Serial Number, such as HUGO*, all DSNs on all disks that satisfy this selection are displayed. Attention, this can take a long time!
4. If you enter a volume serial number and enter in the DSNAME level field a DSN mask simultaneously, then all DSNs from the VTOC (Volume Table of Contents) corresponding to the DSN mask are displayed.
| Remarks: The setting of the Include Additional Qualifiers option also determines the ads in the data set lists. You must always this setting keep in mind when you use a DSN mask. I would like to repeat that you should always set the Initial View in the Data Set List Utility panel to 1 (Volume). If you have mistakenly used a wrong mask and thus very many DSNs will displayed, this option reduced the wait time considerably. |
6.7 DSLIST optimal use with command tables
After learning how to use DSLISTs and ISPF command tables intelligently, we can simplify and accelerate our work in ISPF significantly. It is probably easiest if I explain my system working with ISPF, in daily work as part of a very complex ISPF application at a customer. The use of the ISPF tools is in my opinion on a very high level and is of course not the same it was at the beginning of the project, but I gradually brought him in the course of about 15 years to this level. Therefore, if you follow this proposal in setting up your ISPF, you get the maximum benefit immediately.
6.7.1 Organization and naming conventions
Before we install the entries in our ISPF command table for calling DSLISTs, we should worry about the command texts we want to define to call our individual DSLISTs. To do so, see the following comments:
– We should distinguish all calls to DSLISTs of the other commands that are indeed in the ISPF command table, preceded by a special character.
– These calls should be as simple as possible and be entered quickly. This special character should not require the shift key and be as close as possible to the ENTER key. Two keys fulfill these conditions for using to build the names for commands (we cannot use any special characters). These characters are the plus sign (+) and the minus sign (-).
I defined the following scheme for myself:
– The plus sign (+) precedes all calls for my own commands to call DSLISTs. The rest of the call name consists of a letter or letters that give an indication of the type of data sets, which this command should display. For example, +R stands for all REXX data sets, +P for all panel data sets, +S for all skeleton data sets etc.
– The minus sign (-) is used to reset. For example, I use the three characters --- to depose the REFRESH command.
6.7.2 Call DSLISTs using the ISPF command table
Calling DSLISTs using an ISPF command table entry is with the secret program ISRDSLST done. See the section 10.2 Program ISRDSLST on page 182.
If no own DSLISTs defined are, we can use the ever-present DSLIST REFLIST as a starting point:
Screen 6.29: Use REFLIST to start defining an own DSLIST
Here is an excerpt from my own ISPF command table as represented by the SMART ISPF utility SICMD where you will find some DSLISTs, corresponding to the naming conventions that we have above discussed:
Screen 6.30: Define ISPF command table entries using the program SICMD
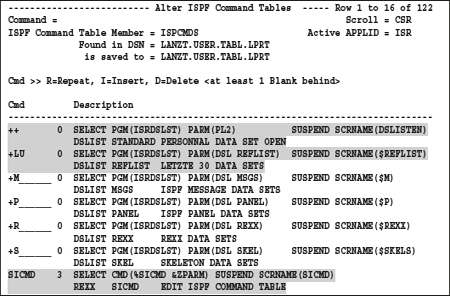 Here follow more entries!
The shaded entries have special significance as explained in the following table:
| Call | Meaning |
| ++ | Calls all available DSLISTs in administration mode. |
| +P | Calls a DSLIST containing all panel definition data sets. |
| +LU | Calls the DSLIST REFLIST containing the last 30 referenced data sets. |
| SICMD | Calls the command SICMD to maintain the ISPF command table. |
– You only need a few key strikes to get the required data sets immediately available.
– If you create your DSLISTs intelligently, you do not need to remember an infinite number of DSNs. You can include a DSN in several DSLISTs.
– You can save yourself a lot of search work. This is especially important if you have to operate under time pressure.
– With the ISPF Workplace, you have a powerful tool to optimize the use of DSLISTs. See the next chapter.
– The commands SRCHFOR and MEMBER offer more possibilities to use DSLISTs.
| Recommendation: If you plan on developing own ISPF applications, you should install a test and a production logical level for each ISPF library. This would especially useful if there are several users working on the same project. The first logical levelcontains your own programming elements and the second logical levelis the group one. |