
8 The ISPF editor
The ISPF editor is the most powerful line-oriented data set editor in the world. It is therefore ideally suited to edit program source code, test data, JCL, and so on. In the following sections, I will give you different examples that show the performance of the ISPF editor. In these examples, the windows clipboard is in different ways used as a passing memory. We work here with the 3270 emulator software from IBM under Windows.
The follow on for the sake of completeness: You reach the editor by selecting option 2 from the primary option menu. Usually, the editor will started directly by entering an e in front of the name of a data set in a DSLIST display. On this occasion, we might as well mention two relatives of the editor, so that we have to consider three tools:
EDIT
The editor itself
VIEW
The VIEW is usable like the editor. The difference is that the data set can be changed but not written back to the original data set of the same name. Of course, it can be under another name saved. The numbering in the left column will in a different color than in the editor displayed. All editor commands and features can used.
BROWSE
BROWSE only displays data. The display structure is completely different than in the editor or view, such as the colors, line numbering, etc. Other than editor and view it does, the BROWSE loads not the entire data set into the memory before the contents displayed are. Only the data part that fills one screen will be loaded. Therefore, use BROWSE if you want to see the contents of very large data set.
8.1 Table of EDIT primary commands
As you already learned in the introduction section, there is a distinction between primary commands entered at the command line and the line commands that will entered in the rows (lines) within the data region of a panel. We now want to turn to the primary commands by telling you this first in the form of a table. For the detailed description of the primary commands, see the IBM brochure: ISPF edit and edit macros, Chapter 10: Edit Primary Commands.
Using rules concerning the syntax of the commands that are in the following tables of the primary commands and line commands listed:
Uppercase letters:
These texts must exactly be entered as they listed are. However, they can be in lowercase entered.
Lowercase letters:
These variables can be by the current values replaced. Lowercase is usable.
Highlighted in grey:
These are the default values (default options).
In square brackets []:
These operands are optional.
In curly braces {}:
These operands may be used alternatively.
Among themselves standing operands:
These operands can be used optionally. If none of these operands are selected then the default operand applies.
The OR symbol (|):
One of the specified operands must entered here.
Table 8.1 on page 125contains the most important primary commands. The shortest possible abbreviation for the commands and the default operands are in grey highlighted:
| Remark: For the sake of simplicity, I copied some of the original command descriptions from the IBM manual Edit and Edit Macros. I have added useful information to some commands. |
Table 8.1: Edit primary commands


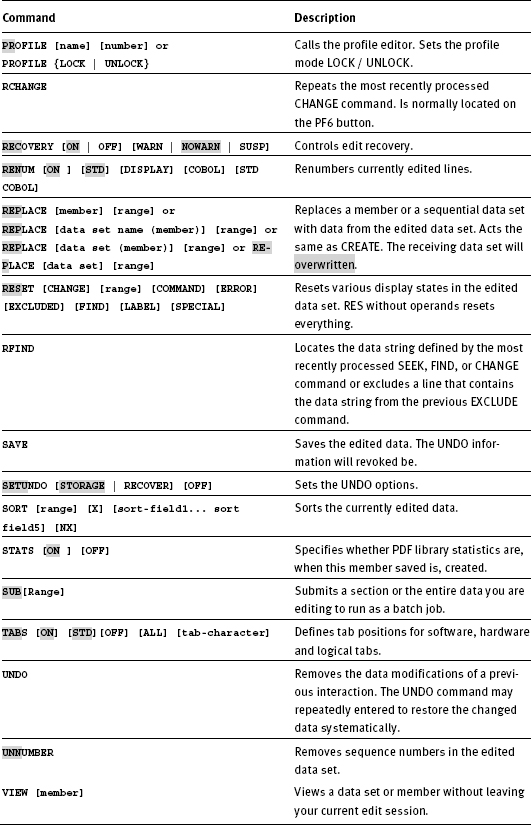
Table 8.2: Operands of edit primary commands
8.2 Table of EDIT line commands
The first six columns of the editor are used for entering line commands. These commands occur separately or in pairs. If they occur in pairs, they are called block commands. A block command consists of two consecutive single-line command characters in one line. Block commands combine multiple lines into a block to be edited together. A block of lines begins with a block command in a line and ends with the same block command in a different line. All operations of both individual line commands and block commands will only pertain to the conditions laid down in the BOUNDS zones! The command syntax is the same as for the primary commands.
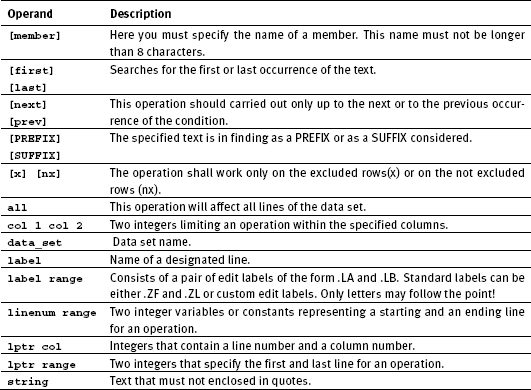
Here is the table of the edit line commands. The default assumptions are highlighted grey:
Table 8.3: Edit line command summary
8.3 Displaying and maintaining an edit profile
Like all complex systems, the editor also has a control element called Profile. You can of course look at these profiles and the options contained therein can to your needs be changed. There are two different commands with which you can control the profile options for the editor. Both commands are only usable if an EDIT or VIEW session is active.
1. Command: EDSET/EDITSET
2. Command: PR/profiles
8.3.1 Setting EDIT options with EDSET/EDITSET
EDSET sets the global settings for the work with the editor within the environment of an ISPF user. These settings then apply for all edit sessions of the ISPF user.
The call to this function is by entering the commands EDSET or EDITSET carried out in the command line of an edit session and pressing ENTER.
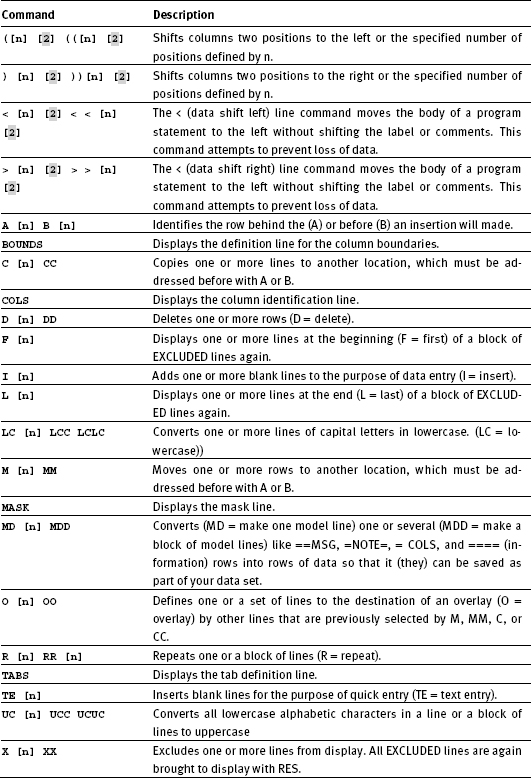
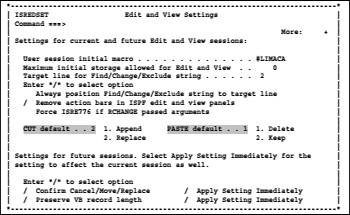
Then, the following POP UP panel appears:
Screen 8.1: Edit and view settings
In this Panel, you can use the following options that apply to all EDIT/VIEW ISPF sessions:
User session initial macro #IMACROA
Here you can enter the name of an edit macro. This macro is in every EDIT/VIEW session called at boot before a possible for the DSN also defined IMACRO called is and before the data appears on the screen.
Maximum initial storage allowed for edit and view ... 0
This number identifies the maximum amount of memory in kilobytes, which the system makes available for EDIT/VIEW sessions. If a called data set is too large for the specified memory size then the system automatically switches to a BROWSE session. If the specified number is zero then the system uses all available memory. If this space is not sufficient then the call attempt ends with an error. I suggest leave this option always on zero.
Target line for find/change/exclude string ... 5
This statement works only when the following option enabled is:
Always position find/change/exclude line string to target
If this is the case, the editor automatically positions the first line found out when the above-mentioned operations performed are, as the fifth row from the top of the display. This option is something for fans of this function. Test the function and decide whether you want to work with it or not.
Always position find/change/exclude line string to target
If this option is set, the pointer will always jump in a seek to the localized position
Remove action bars in ISPF edit and view panel
Through this option, you can set that in the EDIT/VIEW panels the action bars are hidden. As a result, you have a line more in the EDIT/VIEW display available. I like using this option.
CUT default / PASTE default
Understand these entries if you are to do this. See the chapter CUT and PASTE on page 159. Then use this option at your own convenience.
Confirm Cancel/move/replace
This option sets that, if during the execution of one of the above operations, you would overwrite data, you will prompted with a panel for confirmation. Let this option always set to on.
Apply setting immediately
With these two options, you can determine that changes you make in this panel made immediately after pressing the PF3 button to be effective or at the next EDIT session. I let these options always on.
8.3.2 EDIT profile settings and their use
The EDIT profile set specific processing rules for the EDIT sessions. You can name the EDIT profiles and attach them to certain data set types. Then, you can use the name when calling these data set types in the edit panel (option 2 in the ISPF). This is normally unnecessary, however, because the different profiles are automatically associated to the data set types (LLQs) of the ISPF. This automatic function requires that you use a consistent data set name concept however.
We want to look at such a profile. To do this, proceed as follows:
1. We edit a member in a JCL data set.
2. We enter the command profiles 9 in the command line and press ENTER. With the 9 behind the command, we tell the editor to show us all the rows of the profile. The maximum number of lines in the profile display is in fact nine. He would otherwise show only the first five lines.
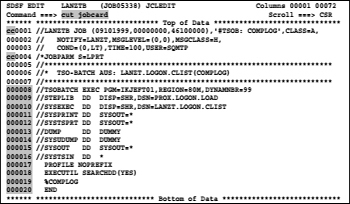
3. And the following screen is displayed:
Screen 8.2: Display the edit profile
In the edit profile, there are two groups of entries:
– The =PROF> lines containing the related profile options.
– Miscellaneous lines.
The most important = PROF> options:
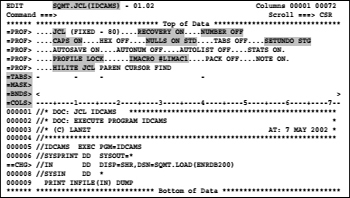
JCL (FIXED - 80)
The data set name type of this data set is JCL. This is from the last qualifier of the DSN SQMT.JCL derived. The records are FIXED and the LRECL is 80 bytes. Starting from this type of data the JCL lines will displayed in cooperation with the option defined with HILITE JCL data according to the type of JCL as colored code.
RECOVERY ON
RECOVERY ON means that all changes are during editing logged. This has two advantages:
– You may withdraw all changes with UNDO while editing systematically.
– If during an edit session a system crash occurs, you can continue this edit session, when the system is running again. This recovery action is automatically by the system offered when you call the editor the first time after a restart.
I recommend to always working with RECOVERY ON.
NUMBER OFF
The lines of the data set are not numbered. NUMBER ON STD would number lines on the columns 73-80.
CAPS ON
When entering text while editing, each ENTER will transfer the entered characters to uppercase. This is of course important for JCL lines because these lines must always be in uppercase created. The editor when calling an edit session of a JCL data set may automatically set this mode. This option works in the following way: When you edit a data set in which CAPS OFF was during the last session used and the editor finds that only text with uppercase letters exist in this data set, the editor uses then CAPS ON autonomous. Conversely, it works the same with CAPS OFF. This effect will be with a warning announced.
NULLS ON STD
NULLS ON means that blanks will with NULLS filled at the end of the text of the line. When NULLS is active, text can be in a row inserted without deleting previously the required number of characters.
PROFILE LOCK
With this option, you can protect the profile from override. If this option is set to LOCK the profile, when leaving an edit session, is not during the profile changes made in the edit session overwritten. You can still change the profile during the session, and these changes remain active during the session. This option prevents that changes in the profile lead at later edit sessions to surprises. Here above all the =BNDS> line is mentioned, which is explained below. When PROFILES LOCK is set, the current contents of the profile will saved.
IMACRO #IMACRO1
MACRO stands for Initial Macro and means that the edit macro #IMACRO1 will executed before the display of the edited data set appears. The macro #IMACRO1 is in Volume 2 in the chapter on the edit macros in detail discussed.
HILITE JCL
This means that the lines in this data set are color designed along the lines of JCL. See the section 8.4 Colored code for EDIT and VIEW on page 135.
SETUNDO STG
The information for undo changes made are stored in the main memory (STG = storage).
The miscellaneous lines:
The miscellaneous lines can be as input and structuring help used. You can as often as needed insert them in the edit text. If you save the data set, they will not save together with the data and will therefore not contain in the data set when it is in the next edit session reused.
=TABS>
They contain tab items that are bound to when entering new lines.
=MASK>
This line contains a mask that is already contained in new inserted rows.
=BNDS>
This line defines the left and right column boundaries within which the edit com mand works.
=COLS>
This line is a mask that contains a column counter.
– You can turn off the display of profile lines with the RESET or RES command.
– When leaving the edit session will the content of the profile only then saved in the profile ISPF pool when PROFILE LOCK is not set.
– The profile definitions apply automatically to all data sets with the same data set type, thus the same LLQ (last level qualifier) within our ISPF sessions. If a different TSO user calls up the same data set it can use entirely different profile options for this data set type.
– You should use the LOCK PROFILE option so that you do not experience through an even leftover incorrectly set =BNDS> line unpleasant surprises.
– PROFILE LOCK does not save the CAPS, NUMBER, STATS and PACK modes. They are set automatically according to the content of the data from the editor.
8.4 Colored code for EDIT and VIEW
After we have briefly handled the topic of the colored design of the lines of specific data set types by the editor in the chapter about the profiles of the editor, we now want to concentrate on this topic. Unfortunately, I cannot demonstrate these beautiful assistant features because colored printing would have pushed up the price of this book significantly. However, I will try to lead you to the benefits of this institution through appropriate references in mind.
8.4.1 Colored code - what is it?
Perhaps you have an editor already in another system seen who has offered the colored code representation for programs in C or Java. If this is not the case, I want to explain what benefits are in the display of the ISPF editor colored code.
– Pairing of brackets will reviewed and if the pairing is not valid, it will be marked with different colors.
– The commands of programming language might appear in a different color than the other texts.
– Comments might be shown in different colors. The beginning and end of comments can be readily detected.
– The pairing of DO-END sections is easily checkable.
– Incorrect continuation lines could be marked.
All this and much more is offers the colored code feature of the ISPF editor! For a comprehensive description of this topic, see the brochure of ISPF edit and edit macros in the chapter: Enhanced and Language-sensitive Edit coloring. On the following pages, I will introduce this technique, and I will give you some tips and tricks.
8.4.2 Setting the colored code
For setting up the colored code the edit command HILITE is used. This command can be in two ways applied:
– As a command to set individual options by typing in the command HILITE in the command line accompanied by one or more operands.
– As a command to invoke the HILITE dialog. To do this, just type in the HILITE command in the command line without operands.
![]() Tip:
Tip:
I recommend to always using the HILITE dialog because this dialog panel offers you more options. You are able to perform your desired settings specifically in this panel.
Now we want to look at this dialog. For this purpose, I have called a REXX procedure in the editor and entered the HILITE command without any operands. The following pop-up panel appears:
Screen 8.3: Edit color settings panel
I have grayed out the important points in this Panel:
REXX
This is the LLQ (last level qualifier) in the data set XYZMSTR.BOOK.REXX(SSC), from which I have called the member SSC in the editor. When I dialog settings in the HILITE dialogue have performed and I press then the PF3 button to leave the edit session, then will these HILITE settings in the ISPF profile data sets saved.. Henceforth these HILITE settings apply to all data sets with LLQ REXX. They are also applied to members who are in the same data set but do not contain REXX program code.
Language:
Here we must specify for which language the colored code is defined. In that case, we select 14 for REXX.
Coloring:
With this choice we set, the kind of monitoring with the corresponding color design we want to have displayed. Best is to choose 3 because we want to get the optimal benefit from colored code facility. For example, I added too many END statements in the following part of the program. This odd END is marked therefore inverse:
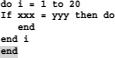
| tip: This test detects however if too many END statements exist, but not if there are too few! However, with nested DO arrangements each new DO is marked with a different color and the pair of the corresponding END with the same color. Thus, it is relatively easily to adjust each new entered do statement with its corresponding END. |
Parentheses matching
If we choose this option, then will the brackets pairing in the source code monitored. The same colors are thereby to the related pairs of parenthesis assigned. When the pairing disrupted is, then will the position where the imbalance begins highlighted in color.
Example:
I added at the end of the second line of the following JCL statement a close bracket too much and in the third row behind (5,5,10,RLSE) I omitted the corresponding close clip. Thus, the last clip of the second row and the first parenthesis of the third row are each displayed inverse. This will here grayed shown.
![]()
Highlight FIND strings
If this option enabled is, then will all texts, which a FIND command finds, shown in highlight inverse.
Example:
In an edit session of a JCL data set, I have entered the command find iefrder. The found bodies will then represented as highlight inverse. Here, they are in grey highlighted:
![]()
Highlight cursor phrase
This option makes the part of the text where the cursor after an ENTER is, represented with highlight invers.
|
Remarks to the colored code and HILITE: |
– The settings you make with the HILITE tool always apply to all data sets that have the same LLQ.
– When you create backups or clones of data sets and a colored code is set up for that, then make sure that the LLQ in the new data set name is maintained. For example, if you create a copy of the USERID.JCL, then name the new data set USERID.SAVE.JCL and not USERID.JCL.SAVE. When I create backup files, I frequently define the DSN of the backup file so that I append the LLQ additionally to the original DSN, regardless of whether the original file already has the same LLQ. E.g. is the name of the original data set USERID.JCL, then I choose for the backup data set USERID.JCL.JCL.
– You can assign the same HILITE options to different LLQs. For example, in the data set LANZT.LOGON.CLIST the most members are REXX procedures. Therefore, here the HILITE options are the same as for the data sets with the LLQ REXX.
– You should define a naming concept for the LLQs of the data sets for which you want to use colored code. Select DSNs as short as possible. This facilitates the overview and saves a lot of typing.
– You should never save your JCL members in the same data sets where the REXX source codes are. When doing so, you must either permanently change the colored code settings or accept a slightly odd colored code representation for one of the two types of data sets.
– On the following page you will find recommendations how to select the LLQs for your program data sets
8.4.3 Uniform last level qualifier
As you can see from the above, it is very important to choose the right LLQs when creating data sets that are for use program libraries and JCL.
The proposals in the following table can be as a guidance used:
Table 8.4: Proposals for last level qualifiers
| HILITE selection | LLQ | Contents of the data sets |
| Assembler | ASM | Assembler programs |
| C | C | C programs |
| COBOL | COBOL, COB | COBOL programs |
| ISPF panel | PANELS | Data sets of the ISPF panels |
| ISPF skeleton | SKELS | Data sets of the ISPF skeletons |
| JCL | PROCLIB, JCL, CNTL | Data sets with JCL members |
| PL/I | PLI, PL1PL1 | programs |
| REXX | REXX, CLIST | REXX programs |
8.5 Edit recovery
We have looked at the treatment of profile options already under option RECOVERY ON/OFF. Now we want to take a closer look at the subject of edit recovery. You probably already worked with text systems in the PC area and what the function of the Edit/Undo offers. Exactly the same function will also found in the IPSF with the establishment of the Edit Recovery.
Establishment of the ISPF edit recovery offers the following possibilities:
– Changes in the current edit operation you may withdraw gradually.
– You can recover the edit after a system crash at the point at which it interrupted was.
The requirement for the availability of this function is that you have in the edit profile option RECOVERY ON set. SETUNDO RECOVERY can switch on the recovery function even indirectly. See the next chapter. What happens when a file is edited, for which RECOVERY ON is already active or re-set?
As soon as a first change is made in the data set and this change is activated through an ENTER or PF button a recovery data set is created. Henceforth, all changes will be logged during the edit session in this data set. It is used as a data source for the UNDO command (in the SETUNDO RECOVERY) and as a backup for the RECOVERY process after a hard crash of the editing session.
Examples of recovery data sets:
I have totally four edit sessions in my TSO user open and carried out a change in each. After that, I could find the following recovery data sets:
![]()
If my TSO user would now be shot down by an operator intervention or by a system crash, I could continue editing, when the ISPF is available again, using my four edit sessions. However, here do you ask How does the system know after a restart that edit recovery data sets are pending? To answer this question, I need to explain the operation of the recovery mechanism:
As soon as the first change of data in an edit session carried out is, happens the following:
– The ISPF editor creates an Edit Recovery Data Set.
– An entry will in the user PROFILE member ISREDRT inserted containing the name of the edited data set and the name of the corresponding recovery data set. Thereafter, the member ISREDRT is immediately to the profile data set ISPPROF saved.
If the edit session terminates, the following normally occurs:
– The entry in the member ISREDRT will deleted and the member will immediately written back into the profile data set ISPPROF.
– The editor deletes the edit recovery data set.
| Caution: With this recovery mechanism, a difficult situation can arise: If your TSO session aborted was and one of the recovery data sets is for whatever reasons no longer available after restarting your ISPF, then ISPF tries on each editor invocation to start the recovery for the aborted edit session, but the corresponding data set cannot be found. In this case, you only have the possibility to abort the recovery process with CANCEL. In this case, the changes contained in the data set recovery are irretrievably lost. |
8.6 The UNDO function
You probably know the UNDO function of systems in the PC area. The almost same functionality is available in the ISPF editor. Just like in PC systems, you can in the ISPF editor with UNDO your last made changes to the edited data set systematically and in reverse order take them back. The main difference is that once redeemed with UNDO, changes cannot be restored as with most PC systems. However, unlike the systems in the PC area, the UNDO function must explicitly activated by enabling it. Nevertheless, when the UNDO function once enabled is, it remains for the edit profile that was in use, permanently on because this status will in the edit profile saved.
The undo function can retrieve the data for canceling the changes from two different sources:
– From the recovery data set.
– From main memory.
Under what circumstances these two possible sources tapped are, depends on the status command, which has been last with the SETUNDO command used.
8.7 Turn the UNDO function on and off
The UNDO state will with the edit primary command SETUNDO changed. This command has some operands:
SETUNDO STORAGE | RECOVER | ON | OFF
The operands:
STORAGE ON
Enables the UNDO function and addresses the main memory for storing the UNDO data. In the edit profile the entry SETUNDO STG appears. As of now, the changes made in the edit session are stored independently of the RECOVERY status in the main memory and retrieved from there when entering the UNDO command.
STORAGE OFF
Disables the main memory as storage location for the undo data and defines the disk storage as memory for the undo information.
Depending on the current recovery status, there are two possibilities:
– The recovery status is OFF. Then SETUNDO will turned OFF and the undo command is no longer applicable.
– The recovery status is ON. Then automatically SET UNDO RECOVER will turned on and the undo information is stored from now on in the recovery data set.
Defines the recovery data set as location for the undo data. If RECOVERY has previously been set to OFF, RECOVERY is automatically set to ON.
You may have noticed while reading the SETUNDO command the operand STORAGE is in italics. The reason is as follows:
The ability to use the main memory as a buffer for the undo data must activated by the system generation for the ISPF in this MVS LPAR by the UNDO_STORAGE_SIZE option set to a nonzero value in the member ISPCONF. When this option not set is then you can use only SETUNDO RECOVERY. If this feature is in your system not enabled, you must not give up using undo. You can always use SETUNDO RECOVERY.
I want to show you in the following examples the contents of some edit profile and explain the situation regarding RECOVERY and UNDO in each case. The explanation of each state is always below the output of the profile options printout:

Recovery is on. The undo data set is the recovery data set REXX (FIXED - 80) RECOVERY ON NUMBER OFF

Recovery is on. Undo data are stored in the main memory.

Recovery off. Undo data are stored in the main memory.

Recovery is off. Undo is not possible.
The following list contains the conditions, under which no UNDO, or after the occur- rence of which UNDO is no longer possible:
– If a SAVE command is by manual input issued or by an edit macro, all undo information will deleted.
– Changes performed by an Initial Edit Macro or a Recovery Edit Macro cannot be restored by undo.
– When a global change is performed using the ALL option, the changed lines are marked with a CHG==> indication in the line command column. These indications can deleted using the RESET or RES command. The display of the CHG==> indication cannot using the undo command be resumed.
– Because all changes during an edit session only refer to the data stored in memory, changes made in other data sets performed by the edit command CREATE, REPLACE, MOVE, cannot be withdrawn using undo.
– However, if you removed some lines just located in the edit data set using the MOVE line command (e.g. CUT or CREATE), you can get them back again using undo. The target content in the other data sets will retained even when you retrieve moved data.
8.8 FIND and CHANGE
The commands FIND and CHANGE only differ by the fact that even the replacement text is behind the search string in the change command specified. Therefore, the following descriptions apply to both commands.
8.8.1 Definition of search operands
The structure of the operands for the following commands is almost the same and can be discussed together. These commands are:
FIND, CHANGE, EXCLUDE with their abbreviations F, C, X
| CHANGE | CHA, CHG, C, |
| FIND | F |
| EXCLUDE | EXC, EX, X |
The command structure looks like this:
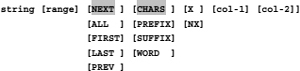
string
For a change command, string consists of two texts, namely the search text and the replacement text. All other commands governed by this structure string only consist of a single text.
[range]
When this operand specified is, it must consist of a pair of line labels (.a .b). The command operates only within the rows specified by the range. The order of the labels is arbitrary. The operation always works from the line with the smaller line number to the line with the higher line number defined by the labels.
[NEXT]
Specifies the operation direction downwards. In repeated executions using RFIND or RCHANGE only one command is executed.
[ALL]
Specifies that the entire edited data set be used by the command. So also the ex- cluded lines.
[FIRST]
Specifies that only the line containing the first occurrence of the search text should be by the command processed.
[LAST]
Specifies that only the line that contains the last occurrence of the search text should be by the command processed.
Specifies the direction upwards. In repeated executions using RFIND or RCHANGE only one command is always executed.
[CHARS]
Use this option to find all characters of the search text.
[PREFIX]
Use this option to find only those texts where the search text at the beginning of a word is contained.
[SUFFIX]
Use this option to find only those texts where the search text at the end of a word is contained.
[WORD]
Use this option to find only those texts where the search text appears as a complete word.
[X]
Use this option to search only in excluded lines.
[NX]
Use this option to search only in NOT excluded lines.
[col-1] [col-2]
It searches only within the specified columns. When only col-1 specified is, only these rows will found, in which the search text starts exactly in this column. When col-2 is greater than the LRECL of the data set col-2 is automatically set to LRECL.
8.8.2 Definition of simple search texts
When a plain text searched is, it is sufficient to specify this in the search text as well as in the replacement text.
Jim is replaced by will in the entire data set, where will is always set in lowercase, even if JIM or jim or Jim is found.
If texts contain blanks or special characters, you should always specify them in quotes.
It is possible to use in string pairs the ' (apostrophe) character as well as the " (quotation mark) character. This opens the possibility also to replace these characters by making use of the respective other character as a delimiter.
Example:
![]()
Result: 'CAFOPEN' will replaced by "CAFOPEN" in the entire edited data set.
8.8.3 Definition of special search texts
As in the following versions to use the change command shown, you can search texts build up so sophisticatedly, that really no wish remains unfulfilled. These specific definitions are into five categories divided.
1. Delimited strings
A delimited string begins and ends with a single apostrophe (') or a single quotation mark ("). There are some special cases, where a delimited string must be used as search or replace text. In case of doubt use delimited strings, then you are always on the safe side.
For the following cases, you must use delimited strings:
– If the search string contains the following characters: blanks, commas, apostro- phes or quotation marks.
– If the text can be interpreted as keyword or column specification.
– If the text contains asterisks (*).
![]()
![]()
![]()
![]()
![]()
![]()
To find or replace hexadecimal characters use hex strings. A hex string is a string enclosed by quotes, front or rear contains an X. The string of hex strings must be consist of an even number of characters and may only contain the characters 0-9 and A-F.
![]()
3. Picture strings
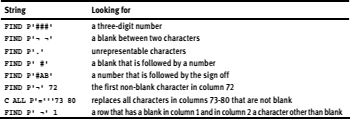
Use picture strings to search for a specific type of character and not for a specific character. A picture string is one character enclosed by quotation marks. The first or last character must be a P. The picture string can contain blanks and other characters that will stand on their own as well as one or more special picture characters, which the following table shows:
Table 8.5: Definition of picture strings for FIND and CHANGE commands

![]() Tip:
Tip:
If the editor find characters in a string when searching, it displays them in the short message line (top right of the screen) in hex representation. It searches only within the specified columns. When only col-1 specified is, only these rows will found, in which the search text starts exactly in this column.
The following example will show that:
The search is looking for four consecutive nonprintable characters.
Screen 8.4: Looking for nonprintable characters

You can also use picture strings in a limited way by the replacement text of a change command. The following rules must observed:
Rules:
The replacement text must be exactly as long as the search text.
Only the characters =, <, and > can be used.
Example:
The command c all p'<' p'>' converts all lowercase letters in a data set to uppercase letters. That goes with this command in any case faster than with the CC block line command in the first and last line.
4. Character strings
Character strings in the search text must be case-sensitive.
8.9 Exclude
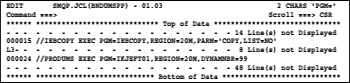
One of the best facilities of the editor is the ability to exclude selected rows from the display or display only certain rows. The remarkable thing is that various commands, and here is mainly the CHANGE command called, are applicable to both the excluded lines and the not excluded lines. The excluded lines must not be in a contiguous area. Furthermore, you can exclude any line groups or individual lines from the display and reinsert them successively in the display. The EXCLUDE command can abbreviated to X. The EXCLUDE command is available as edit primary command and as line command. Let us look at some examples:
I started an edit session of a JCL member and I excluded all lines using the primary command x all. Then the following display appears on the screen:
Screen 8.5: Exclude all lines in an edit
![]()
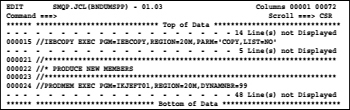
Now I want to know how many steps the job has and what programs called are. To achieve this, I make all lines visible that contain the search string PGM=:
I enter the command f pgm= all. As a result, I get the following display:
Screen 8.6: Display excludes lines selectively
The following commands can used to display the invisible lines immediately before or after a visible line:
Ln This line command makes n lines before a visible line also visible. L means last.
Fn This line command makes n lines after a visible line also visible. F means first.
These line commands must be in the line representing excluded lines entered. In the above screen, the line command L3 makes the last 3 excluded lines of a total of 8 excluded lines visible again on the screen. After entering the above shown line command L3, the following display appears:
![]() Tip: If you want to bring all excluded lines between two lines that are visible on the screen to display, first check out how many rows are excluded, then enter one of the two commands with a number that is equal or higher than the number of excluded lines. This closes the gap completely in the display.
Tip: If you want to bring all excluded lines between two lines that are visible on the screen to display, first check out how many rows are excluded, then enter one of the two commands with a number that is equal or higher than the number of excluded lines. This closes the gap completely in the display.
![]() Remarks concerning excluded lines:
Remarks concerning excluded lines:
– If you want to make all excluded lines in an edited data set visible again, then enter the edit primary command RES or RESET and press ENTER.
– If you want to delete all excluded lines between two visible lines, then you just need to enter a D in the line representing the excluded lines and press ENTER. Use this delete action with care!
![]() Tip:
Tip:
When only such lines should be displayed, which the search string contain, do the following: Exclude all lines with x all and then perform the search.
8.10 SHIFT and OVERLAY
![]() Preliminary remark:
Preliminary remark:
In the next chapters many RENAME statements will generated, which must be by the TSO processor executed. These rename statements are in REXX procedures however. For those of the readers who are not familiar with the REXX programming in z/OS, I must first explain how the rename statements come from the REXX procedure to TSO for execution. However, it is quite simple: If the REXX processor a command line that in quotation marks enclosed is detects, then it assumes that this a TSO command is and it is immediately to the TSO processor for execution sent.
It happens very often that you have to rename several or many data sets or members. This can be done manually. Such a practice is, however, tedious and error prone. Even if there are more than one or two names that need to be changed, it is worthwhile to build a procedure and perform this job by executing only this procedure. A procedure for a rename action has the following advantages:
– It is relatively safe from clerical errors, as the new names were generated using CHANGE commands in the procedure. The accuracy of the new names can be before the procedure runs checked. When you have manually performed a rename, and a character in the new name is typed in wrong and you have pressed ENTER without noticing the error, it may happen that you will never find the renamed element again.
– The procedure is still available after first-time use. This means if something went wrong, you can still detect and correct the error by checking the rename protocol.
– If there is a large number of names to rename, the only practical way is to use a procedure.
8.10.1 Example one for using OVERLAY Task:
Task:
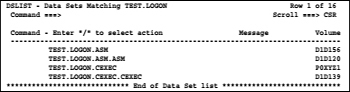
In the course of a reorganization of a collection of data sets, the data set names should be in such a way amended that a further qualifier can be behind the first qualifier inserted. Assume that all data sets named TEST.LOGON.* shall be renamed in TEST.HUGO.LOGON.*.
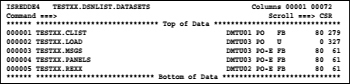
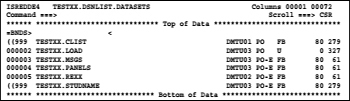
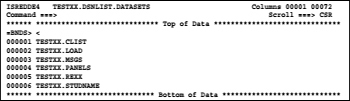
We get the file names of the data sets renamed due to entering a suitable mask to display the data sets involved in the menu 3.4. Thus, we get the following screen:
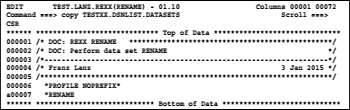
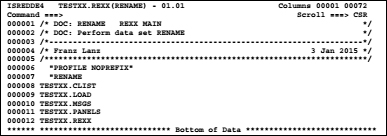
Now we store the data set names using the mouse to the windows clipboard. Then we call in our data set for executable REXX procedures, the prepared member RENAME to carry out rename actions in the editor:
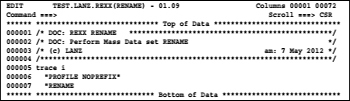
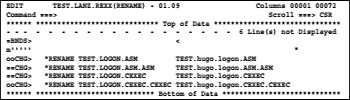
Then we repeat the line 000007 at least as often as we have to edit the data set names. In our example, we repeat the line four times. Now we set by inserting the DSNs from the windows clipboard with a blank interval to the right of the first RENAME and the following screen shows up:
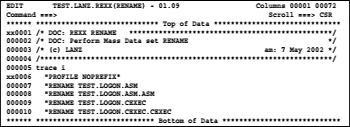
In the next step, we pick the data set name again from the clipboard and insert it as far to the right of the existing names that after the longest name at least one blank space remains.
![]() Caution:
Caution:
To prevent the editor moving up the blanks before the second name to the left in the subsequent ENTER, we must set a NULLS OFF command previously.
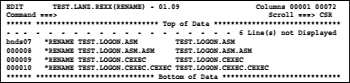
Now, we must ensure that the new names appear in the second column of the names. To do so, we enter in the line 000007 the line command BNDS and press ENTER. Then the BNDS line appears as a data line and the first column contains the character <.
Move this character to the right as far as it is exactly in the column in which the second group of DSNs begins. From now on act all change commands only to the second group of DSNs. Now you can rename the right group of DSNs so that the new names appear due to use the following change command:
![]()
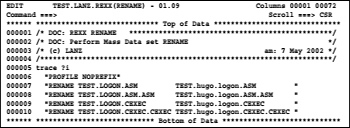
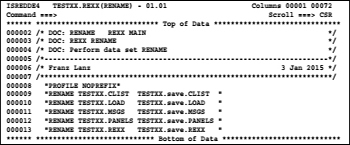
After pressing ENTER, we get the following picture:
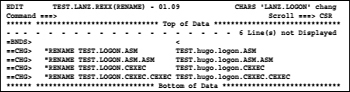
In the lines marked with ==CHG> you can see which lines were by the change action changed. The DSNs in the procedure can stay in lowercase letters. TSO accepts this during the execution of the rename command. Because the procedure is performed as a REXX procedure and RENAME statements are TSO commands, we now need to ensure that any RENAME statement is terminated with a " (quotation mark). To do this, proceed as follows:
1. Enter in the =BNDS> line an I (for insert) and press ENTER.
2. Then position the cursor in the inserted row as far right until it is behind the longest name of the RENAME instructions and enter there a quotation mark (").
3. In the same line, go to the beginning and enter an m (for move).
4. Then put the block command oo into the first and last line of the RENAME statements.
The screen now looks like this:
Now complete the creation of the rename procedure by first pressing ENTER again. Thus, the overlay is running and the rename commands are ready for processing. If you now enter on the command line RES and press ENTER, then you get the following picture:
Now you can submit this procedure as a batch job using the edit macro #TSOB of the SMART ISPF utilities. With a call of SDSF, you can check the correct execution of the rename action.
The use of the windows clipboard is practical if only a few data sets have to be renamed. If very many data sets must be renamed this is a very tedious way because only a small number of lines can be transferred in one-step using the windows clipboard. In the next chapter, I will show you a procedure to build a rename job with many lines.
8.10.2 Example two for using OVERLAY
The first rename example is good if there only a few elements must renamed be and their names can be transferred using copy and paste via the windows clipboard. However, if you have to rename even hundreds of data sets, then you have to use a somewhat different procedure.
These are the steps:
1. Generating a data set that contains all DSNs that are to be renamed.
2. Produce the rename statements using OVERLAY.
We will perform this example with only four names. It also works for 4000 or more names.
Step 1: Create the data set containing the data set names.
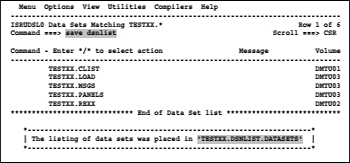
1. Produce in the ISPF menu 3.4 (DSLIST) a display of the data set names that needs to be rename.
2. Type in the command line the command save dsnlist and press ENTER. On the top right of the screen the message appears Data set list saved.
3. Then press the PF1 button. In a frame at the lower area of the screen a line containing the DSN of our listed DSNs appears.
Screen 8.7: Example for the generation of a data set list using a DSLIST panel
To save space, I combined in the above display the two successively displayed screens.
Step 2: Edit the data set containing our DSNs
Bring the name of the list data set via the windows clipboard in the DSLIST panel, press enter and edit this data set. The following screen appears:
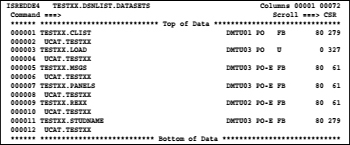
Now you see a display in which not only the DSNs are that we need, but also in a separate line for each of the DSN the name of the catalog in which the DSN is. Remove the catalog lines from the data set first. Two steps are to perform for this:
1. Exclude the catalog lines: Enter the edit command x ucat all and see that all lines containing the text ucat excluded are.
2. Delete the excluded lines: Enter the command del x all. The ucat lines were deleted and the screen looks as follows:
Now remove the additional information contained after each DSN in the data set. Three steps are required:
1. Display the bounds line in the first data line by entering BNDS there.
2. Move the left bounding sign < so far to the right until it is behind the longest DSN.
3. Then enter in the first and the last data line the shift left command ((999 and press ENTER. The following display shows the screen before ENTER is pressed:
After ENTER the unneeded information is cleared away. Our data set now only con- tains the DSNs that we need for further work.
![]() Caution:
Caution:
We must absolutely restore the left BNDS margin to the first data position. This is necessary be- cause the editor saves this setting permanently for all data sets with the LLQ datasets.
Before we continue our work, the edit screen must look like this:
Step 3: Create the rename statements in the rename procedure
Now edit the standard member of rename commands and copy the in step 2 generated data set into the edited data set after the last row.
Because the LRECL of both data sets are inconsistent, a warning screen shows up. Respond to this screen with ENTER. The rows of the renamed DSNs are now posi- tioned after the "RENAME line. Now stay in this edit up until the rename procedure is completed. Perform the following steps:
1. Repeat all lines containing the DSN using the RR block commands on the first and the last line of DSN. We now have all DSN lines twice in the edit data set.
2. Then exclude all lines in the edit except the second group of DSN lines using the XX block command.
3. Change the visible DSNs to the new names used for the rename process using the following command:![]()
4. Then set at each end of the renamed DSN a " (quotation mark) because the re- name command need this.
5. Redisplay all lines of the edited data set using the main command RES (RESET). All lines are now visible again.
6. Then shift all DSN lines using the block command ))10 so far to the right that they are at least one blank behind the "RENAME in line 7.
7. Then shift all changed DSN lines using the block command ))14 so far to the right that they are at least one blank behind the longest DSN of the original ones.
8. No, set the lines containing the new names behind the lines containing the old names so that they each fit by using the OO and the MM block commands. The following screen shows this before the commands are executed:
Screen 8.8: Overlay of many lines

9. A last action brings the "RENAME statement in front of each DSN line. To do this we set in the "RENAME line an M for move and in the DSN lines the OO block command in the first and the last line. After ENTER our rename procedure is ready for execution. See the following screen.
![]() Caution:
Caution:
In this action, you must absolutely be sure that both the OO and the MM block addresses have exactly the same number of rows (and the right ones). If you make a mistake here, this may cause a lot of trouble!
10. We execute the REXX procedure as a batch job by using the edit macro #TSOB.
![]() Notes on this example:
Notes on this example:
– The statement PROFILE NOPREFIX is required urgently because otherwise the TSO would pre- cede each DSN with the user prefix (if it were set). You can avoid the TSO PREFIX problem easi- est by setting the DSNs always in single quotes ('). Especially when you use TSO commands which contain DSNs online.
– We will assume, in this example, that it is necessary to rename a large number of names. Therefore, you should run this REXX procedure as a batch job. You can use the SMART ISPF utility edit macro #TSOB to submit the procedure to run as batch job. Another advantage of this approach is that you get a list output of job execution in which you can control the flow of the procedure very conveniently by using SDSF.
8.11 CUT and PASTE
It often happens while working in the ISPF editor that you want to transfer individual
lines or whole parts of a data set to another one. In this case, you can use two methods:– Copying and pasting via the clipboard of the PC system.
– Using the primary commands CUT and PASTE of the ISPF Editor.
Both methods have their advantages and disadvantages. Therefore, let us take a closer look at the operation of these two methods:
8.11.1 Data transport via the clipboard of the PC system Advantages:
– The data can from any PC components be cut out and be inserted into the edit screen.
– The cuttings need not be carried out line by line. You can snip any blocks from the screen and paste it as a block at any cursor location in the edit screen. Data from ISPF systems of other LPARs that are accessible from the same PC can with this method easily transferred.
Disadvantages:
– With one transmission, only so much data can be as the 3270 screen can insert transferred.
– During transmission, characters, depending on the used code pages, can be wrong when they arrive in the target system.
8.11.2 Data transport via the ISPF clipboard Advantages:
– You can cut a large amount of data from one or more edited data sets and paste them repeatedly in a receiving data set in the same or a different edit session.
– You can define multiple data collections from various sources and then paste them in several places in different edit sessions.
Disadvantages:
– Data can only be CUT and PASTE line by line.
– Data between LPARs cannot directly transferred be. This would work only with a CUT action to a data set on a shared disk, which is in all participating LPARs known.
8.11.2.1 The CUT and PASTE commands
![]()
Copies or moves a selected block of rows from the edited data to the ISPF clipboard. [lprt range]
Here a pair of line labels of the format .a and .b can be specified, which must of course previously be defined. The row selection is normally using the line block commands CC or MM performed. When neither a range is specified, nor a selection has been made by CC or MM, then the completely edited data set is placed in the ISPF clipboard.
[DEFAULT | clipboardname]
You can assign up to nine separately named clipboards. These can then add additional parts using the APPEND option to edit or insert individual PASTE. Additional lines can be added to each clipboard. The shelves can be edited and then into different data sets be inserted.
[REPLACE]
This means that the existing default or named clipboard content is by the data of the current CUT operation overwritten.
[DISPLAY]
Use this option to display the clipboard manager panel. See example below!
PASTE [clipboardname] [AFTER label] [BEFORE label] [DELETE] [KEEP]
Copies or moves the data created with CUT in the edited data set.
[clipboardname]
This is the name of the clipboard data set, which should be inserted. If nothing spec- ified is, the default clipboard is used.
These two options specify whether the data will copied before or after a row with a predefined label. The line where the inserted data copied are is normally defined using an A (after) or a B (before) line command. If neither a label nor a line command A or B are defined, an error message is displayed on the right top of the screen and the PASTE command will be not executed.
[DELETE] [KEEP]
These options determine whether the data will be deleted from the ISPF clipboard or remain there for further copying when the PASTE command is executed.
![]() Note:
Note:
In each edit session, two labels .ZFIRST (addressing the first line of edit) and .ZLAST (addressing the last line of edit) will automatically defined. They are usable without defining them.
8.11.2.2 The CUT and PASTE default settings using EDSET
The present default CUT and PASTE options can be by the corresponding entries in EDSET panel overwritten. The default values, which are set in the EDSET panel, will always use if they are not explicitly overwritten when calling the commands. There- fore, let us look at this panel again here:
Screen 8.9: Setting CUT and PASTE defaults in EDSET panel
8.11.2.3 Example of CUT and PASTE
Task: Create a batch job containing the following steps:
– Use the utility IEBCOPY to copy different PDS.
– Use the TSO processor IKJEFT01 to call procedure HUGO for execution.
I know there are examples of the necessary steps elsewhere in my ISPF data sets. I use this now and put the necessary statements to the clipboard. Therefore, I can illustrate the operation of the ISPF clipboard well. I put each of the required steps to a named clipboard data set that is exactly as the executed programs named.
Step one: Produce the clipboard entries JOBCARD, IEBCOPY and IKJEFT01.
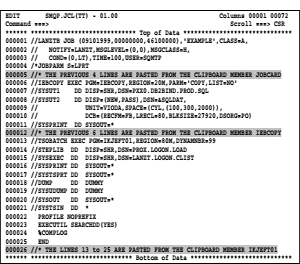
– First, a complete job statement is required. The simplest way is to copy a job statement that is guaranteed correct from a list output of a recently run job found in SDSF. I know that one of the recently submitted and run jobs contains a step with a call for the program IKJEFT01. I call the SDSF hold queue and display the desired job output list by entering the line command SJ in the relevant line. Then the list containing the JCL is in an edit session displayed. I now prepare this list to CUT the lines containing the whole job statement to the clipboard named JOBCARD. The following screen shows this situation before ENTER is press:
JCL 8.1: Example JCL of a TSO execution in batch
– Now press ENTER and the lines 1 through 4 are under the name JOBCARD in the ISPF clipboard written.
– To get the clipboard entry IKJEFT01 now, copy the rows 8 to 20 of the above edit to the clipboard under the name IKJEFT01.
– To produce the IEBCOPY clipboard entry, edit an appropriate member of the JCL data set, which contains an IEBCOPY step and cut the necessary lines.
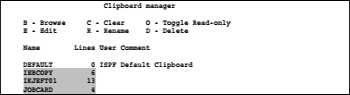
The command CUT DISPLAY displays a panel showing the clipboard contents. The clipboard contains now the following entries:
Screen 8.10: Clipboard containing some entries
Step two: Assemble the new job.
Now all needed parts have been collected for the new job on the clipboard and they now will assembled. In order to get the desired job, start a new edit data set and paste all necessary clipboard entries in. When everything is ready, the edited data set looks as follows:
JCL 8.2: Assembled job using clipboard entries
![]() Note:
Note:
I manually inserted the gray-shaded rows for better identification. Since the option KEEP was not used in the PASTE commands the clipboard is empty now, as the following screen shows:
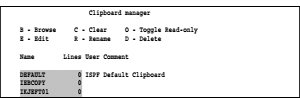
As you can see, the designated clipboard entries are still there. They can be for further actions used.