
4 Customize ISPF
I will show you in this chapter what to do to have a practicable ISPF for optimal use. I will go through the most important ISPF panels and give you my recommendations for the practical use of these panels.
4.1 Available 3270 screen formats
As I mentioned in the section 1.13 The 3270 screen on page 8, there are some possibilities how to customize the ISPF screen layout, as you like within the shown limits.
Available screen layouts:
Table 4.1: 3270 screen layout selection
| Lines / screen | Char. / line | Remark |
| 24 | 80 | Standard layout |
| 32 | 80 | 1. Enlargement |
| 43 | 80 | 2. Enlargement |
| 27 | 132 | Special layout to display print output in SDSF |
If you use HOD (host on demand) the options panel offers the possibility to select the screen layout you want to use. If you use other ways to logon to ISPF there is in most cases the ability to select a screen layout.
| Warning: If you used a screen format and you leave the session without an ISPF logoff (perhaps due to connection interruption), the system memorizes the layout you were using. When you perform a logon again and you select another screen layout as you used in the last (interrupted) session, the ISPF will reject the logon. |
4.2 ISPF options setting
Unfortunately, there is no central point to set all ISPF options. In fact, there are many positions to define options. Now we look into the basic options.
4.3 The ISPF settings panel (Selection 0)
If you call up ISPF for the first time, the Primary Option Menu does not look not very user friendly:
– The Command line ====> appears at bottom of the screen. It is not reachable there by pressing the POS1 key.
– If you press the POS1 key, the cursor jumps to the CUA line. In most cases the cursor should jump to the Command line = when POS1 is pressed.
Fortunately, these options are changeable. In the following panel, I will show you the best practice for ISPF settings:
To do this, enter in Primary Option Menu a 0 → Settings and press enter. You see now the ISPF Settings menu. I recommend setting the options as you can see in the gray lines in the panel below.
Screen 4.1: ISPF options setting
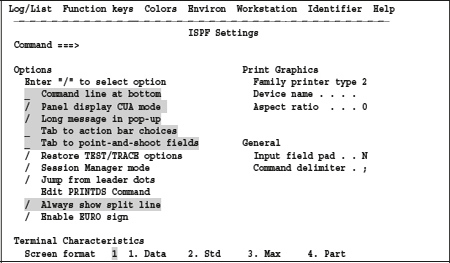
| Remark: A slash (/) sets an option to ON, blank sets it to OFF. |
Explanations concerning some of these options:
Command line at bottom
The standard position for this line is BOTTOM. To bring this line to top, set the option OFF. Additionally, the option Tab to action bar choices must be set OFF. With these two options set as mentioned and pressing the POS1 key brings the cursor to the Command line on each ISPF panel.
To position the CUA line at top, set this option to ON.
Long message in pop-up
ISPF messages consists of two parts: The Short Message Text and the Long Message Text. If this option is set to ON, The Long Message Text always appears in a box instead on the upper region in the panel. Sometimes the long messages are very long (up to 512 characters). In this case, they do not fit into the upper region and are in a box displayed.
Here a comprehensive description of this option in an ISPF manual:
Displaying long messages in pop-ups
ISPF displays short messages at the top right of a panel, next to the panel title. ISPF usually displays long messages in a pop-up window. However, if a long message is less than the screen width, then, by default, ISPF displays it just below or above the command line.
If you always want long messages in a pop-up window:
1. Enter the ISPF settings command to display the ISPF settings panel.
2. Select Long message in pop-up.
Tab to action bar choices
When POS1 is pressed and this option is set to ON, the cursor always jumps to the CUA line. If you want, that the cursor always jumps to the command line when you press POS1, set this option to OFF.
Tab to point-and-shoot fields
There are panels defined with point and shoot fields. In the most cases, these fields are to pre-define actions (e.g. UPDATE or CANCEL) used. To reach these fields using the TAB key set this option to ON.
Always show split line
During working in ISPF, you can define more than one open working logical screen at the same time. To display this situation a dotted line additionally appears on the screen.
Command Delimiter
As I mentioned above in the section 1.14.2 Overview of all commands and functions of ISPF on page 10 ISPF can execute more than one command with one input action.
A Command delimiter character must delimit these commands. By default, this delimiter character is a semicolon (;). However, programs sometimes use a semicolon to delimit their input parameters. If this happens, you should change the ISPF Command delimiter character to another one e.g. Question mark (?).
4.4 Panels and their handling
Panels are into three groups classified:
1. The panels of the ISPF basic system are most important. There are thousands of them. The library ISP.SISPPxxU normally contains these panels. The two characters xx define the language in which the panels appear. xx = EN ^ English. Other languages are available.
2. The panels of the ISPF subsystems are contained in dedicated libraries. They are usually stored in ISPF subsystem libraries. E.g. the panels for SDSF are in the library ISF.SISFPLIB
3. The third is the group of private panels. ISPF users developing themselves and they are stored in the appropriate user libraries.
ISPF loads all panels from the library definition of ISPPLIB.
4.5 The structure of ISPF panels
Unlike the TSO, ISPF works with full-screen menus, so-called panels. These panels are generally freely definable. You can also create panels in order to develop own applications in ISPF.
There are three different types of panels:
The normal full screen panels
These panels replace when called the currently displayed panel completely disregarding how big the previously displayed panel was.
The POP up windows
As the name says, these panels overlay only a part of the current panel. Depending of their format, they let parts of the overplayed panel still displayed.
The following display will illustrate this:
I called a file with VIEW, deleted a line and then I tried to write the file with END (PF3) back.
Screen 4.2: POP UP panel with view warning
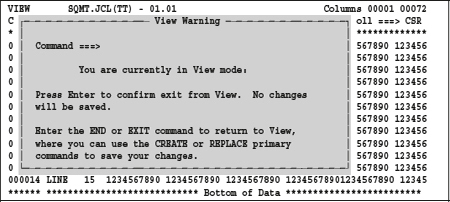
The grayed part is a POP up Panel. It overlays the previous screen. These windows can of course also contain input fields. POP Up panels are very useful for displaying warnings and instructions, or a program requires a confirmation of an impending processing by the operator.
The HELP Panels
A special technique is for creating help panels used. An entry in the definition of a normal panel defines the HELP panel. HELP panels can be defined for an entire panel and for individual input or output fields in a panel.
4.5.1 Using HELP panels
Depending on the HELP definitions in the source code of panels and the position of the cursor, different displays can appear when you press the PF1 key.
– A dedicated description relating the field of the cursor position does appear. In this case a help entry exists in the panel definition for such a field:
![]()
– If the cursor is not in a HELP sensitive field, a dedicated description relating to the panel appears. In this case a help entry exists in the panel definition like this:
![]()
– If the PF1 key is pressed and no HELP definitions are available, neither for the panel nor for the field in which the cursor is currently located then the general ISPF help panel appears.
4.5.1.1 HELP display for a panel field:
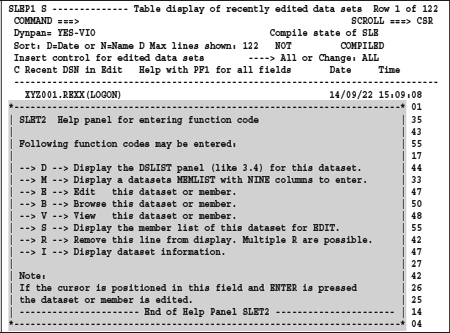
The panel SLEP1 contains the HELP definition for the field “function” as you can see above. To get the display below I did the following:
1. I called up the application SLE (SMART Last Edit). ISPF displays the main panel SLEP1.
2. I positioned the cursor in the underlined column of the line ![]() and pressed PF1 key.
and pressed PF1 key.
3. The POP up HELP panel SLET2 appeared. I grayed out this panel in the figure below.
Screen 4.3: Display a POP up help panel
4.5.1.2 HELP display for a panel
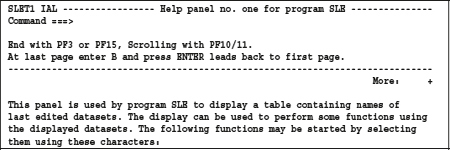
The panel SLEP1 contains the HELP definition for the panel as you can see above. For the display below, I did the following:
1. I called the application SLE (SMART Last Edit). ISPF displays the main panel SLEP1.
2. I positioned the cursor in the first line of the panel and pressed PF1 key.
3. The HELP panel SLET2 appeared. I cut some lines to shorten the text here.
Screen 4.4: Help display of a panel
4.6 The primary option menu
The Primary Option Menu is the first panel that in an online environment appears on your screen after the start of ISPF.
The system programmers department usually adjusts this panel for specific user groups. The panel name can be different depending on the ISPF start method.
See the section 3.3.6 The ISPF start command on page 38.
You see here a typical ISPF Primary Option Menu with CUA line.
Screen 4.5: Primary option menu with CUA line
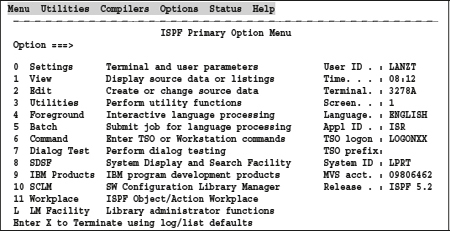
The first line (CUA row) contains individual choices for pull down menus. One of the choices is the Status menu. We use the status menu to control the information that appears in the right area of the ISPF primary options menu.
We now want to see what options the Status menu of the CUA line offer. To do this we position the cursor anywhere in the word Status and press ENTER. Now the following screen with unfolded Status POP up window appears, the cursor is on the first line of the pull down sections positioned. The place where the cursor is, I left white in the gray window.
Screen 4.6: Primary option menu with unfolded Status CUA selection
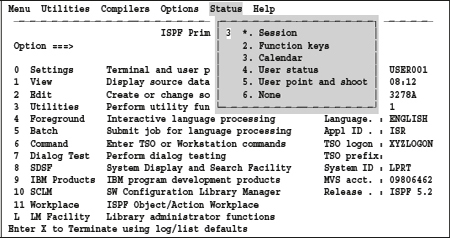
An asterisk instead of a selection number indicates that this display now active is.
We can now select one of the other options. We choose the third → Calendar and press then ENTER. This provides us with a redesigned display of our primary option menu:
Screen 4.7: Primary option menu with calendar display
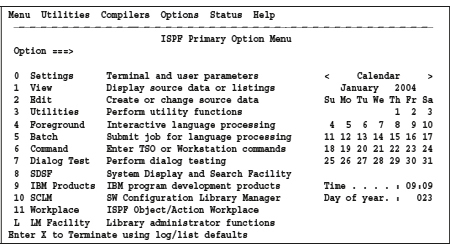
As you can see, we now have the current calendar on the right side. This status indicator looks different for each by SPLIT NEW or START produced panel. The ISPF remembers this setting for each SPLIT logical screen separately in the profile options. These settings are also available after a re-login.
The small example leads us to our next topic, namely the Screen splitting.
4.7 Screen splitting
Imagine you just edited a file and the same time you need at information from another file that you want to take over into the currently edited file.
How does screen splitting work?
There are two ISPF commands to open a new ISPF logical screen.
– The command START always opens, independent of the cursor position, a new logical screen displaying a new ISPF primary option menu as a full screen.
– The command SPLIT NEW opens a new logical screen but the ISPF primary option menu appears below the line where the cursor is. The screen splits and shows two logical screens simultaneously.
Due to this behavior of SPLIT NEW, PF2 should include the command START.
Whenever you need a new ISPF logical screen, press the PF2 key!
A new ISPF Primary Option Menu opens. This indicates the fact that the top or bottom row consists of dotted lines. This line is the Split Screen Indication Line.
| Remark: If this split screen indication line does not appear on your screen, you can use the option Always show split line in Menu 0 of ISPFs primary option menu to switch on the display of this line. |
4.7.1 Essential rules and tips for split screen
– You can work with up to eight or more ISPF logical screens. This depends on customizing of your ISPF in your z/OS system. The ISPF system variable ZSCRMAX contains the information how many logical screens you can open. Use the ISPF menu 7.3 to query this variable.
– By default, the PF9 key contains the text SWAP. I urge you to change the PF9 key to text SWAP NEXT. With SWAP, you can only shuttle between two logical screens. If there are more than two logical screens open, with SWAP, you will never reach all logical screens. If you set up the PF9 key assigned SWAP NEXT, you can jump through all the logical screens by repeatedly pressing the PF9 key.
– If you have the screen somewhere in the middle split with SPLIT NEW and you want to come back to a full screen display with the split-screen indication line at the top or bottom, you can use the following trick:
1. If the PF2 key contains SPLIT NEW, position the cursor on the top line and then press the PF2 key.
2. If the PF2 key contains START, type the text SPLIT NEW in the command line of the active panel without pressing ENTER, move the cursor to the top line of the screen and then press ENTER.
3. Through each of the two operations, you get a new primary option menu in full screen mode.
4. If you leave this new primary option menu now with the PF3 key (END), you again get displays that the Split Screen Indication Line have at top or bottom of the screen. This trick has already stood the test for me very often!
4.7.2 Direct activation of an ISPF logical screen
Let us assume that we have opened more than two logical screens of ISPF. This causes the problem that we can achieve a logical screen that we want to address directly only by pressing the PF9 key repeatedly until the desired logical screen appears.
| Tip: To scroll continuously with the PF9 key through all the logical screens, the PF9 key must in all ISPF applications in all traversed logical screens set to SWAP NEXT and not only to SWAP. If this is not the case, even in one application, then it can happen that you cannot reach some logical screens when leafing through the logical screens. The PF key assignment is application-based. Therefore, if you start a new application in ISPF, a new APPLID opens, and then you need to adjust the PF keys assignment there. By way of example, here is the SDSF with its APPLID ISF. |
In the following chapter, we want to look at a case in which eight levels are open.
4.7.3 Example, with eight logical screens of ISPF
To display a list of all currently available ISPF logical screens enter SWAP LIST in the command line (or press the PF key containing the SWAP LIST command).
The following example shows eight current logical screens with an application started in each logical screen:
Screen 4.8: ISPF task list with eight ISPF logical screens
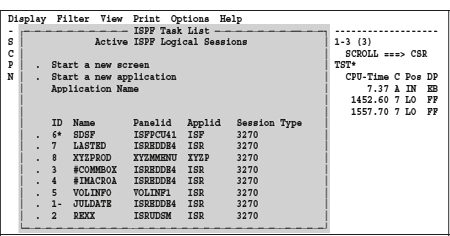
If you want to activate a certain level, then position the cursor just before the appropriate level and press ENTER. You achieve the same effect with a double click with the mouse on the corresponding position.
The columns show the following entries:
ID
The serial number of the logical screen. Behind the number are an asterisk (*) or a hyphen (-). These have the following meanings:
* → This is our current logical screen.
- → This level was with the last SWAP or SWAP NEXT command left.
With a SWAP command, we can only shuttle between these two logical screens.
Only by using SWAP NEXT, we can leave this shuttle cycle.
The ID numbers do not appear continuously from top to bottom, I had closed and reopened some levels in this example during my last work.
Name
The application name. This name is, when available, very helpful, because you can specifically e.g. jump in the SDSF. The application displayed in this level must define the name.
Panelid
This is the name of the ISPF panel, which is currently active in this logical screen. If you are familiar with the panel IDs, you can specifically jump to an application.
Applid
This application starts with this Apple ID. Please note that each ISPF application has its own PF key assignment.
This is normally always 3270
| Tip: If you intend to use more than two logical screens in ISPF, I urge you to perform the following two preparations: Prepare in all applications with a separate ISPF application ID the PF2 key with the command START and the PF9 key with the command SWAP NEXT. Prepare analogous to this the PF15 key with the command SWAP LIST. |
4.8 The program function keys of ISPF
We have now customized a well-functioning ISPF system. For our daily work, we should continue the optimization process to speed up our using of ISPF.
What can and should we do to reach this target?
– We should optimize our PF key assignment.
– We should customize the ISPF command table to optimize repetitive tasks using the assistance of the ISPF command table.
– We should learn to use ISPF Personal Data Set Lists to display frequently needed DSNs with low effort.
4.8.1 Optimize PF key settings
When dealing with the ISPF PF key assignments, you must first make a fundamental decision:
A few years ago, the KEYLISTs in the ISPF came up. I have been experimenting for some time with this new ISPF feature. However, I could not find any significant advantage over the conventional KEYs use and I therefore stayed with the old form of the use of PF keys. What are the differences between KEYLISTs and KEYs? Here a short introduction into both methods.
However, before we deal with the issue KEYLIST versus KEYS, let us look into making the assignment of the PF keys on the screen visible and letting this display disappear again. Especially beginners in the ISPF appreciate it if the PF key assignment is visible on the screen for some time. This technique is in fact the same for both methods of the PF key using.
Full information on the PF key assignments is in the brochure ISPF User’s Guide Volume II in the chapter Settings option (0) explained.
4.8.2 Switching on the PF key setting display
To display the PF key assignment on the screen, we enter the PFSHOW ON command and press ENTER. This command toggles the display of the PF keys for our entire ISPF. With PFSHOW OFF and ENTER, the display can be switched off again.
The display you get by entering the PFSHOW ON command, however, depends on several settings that you can make in a special panel. To access this setting screen, proceed as follows:
Enter into any ISPF panel in the command line the command PFSHOW TAILOR and press ENTER.
The following POP Up panel will appear where you make the white-backed settings and press ENTER.
Screen 4.9: Function key definition panel
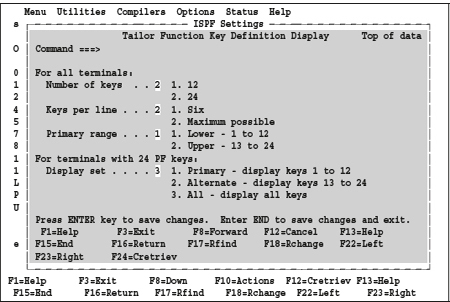
As you can see on the display, the PF key assignments are visible in the POP UP panel as well as in the basic panel. At the same time, you see that the PF key assignment between the two panels is different. If we now leave the POP up Panel by pressing the PF3 key, we see to our surprise that in the basic panel there is still no PF keys displaying because for the PF SHOW TAILOR command only the options of presentation has changed, but not the display of PF key setting was turned on.
Screen 4.10: Example for command PFSHOW ON
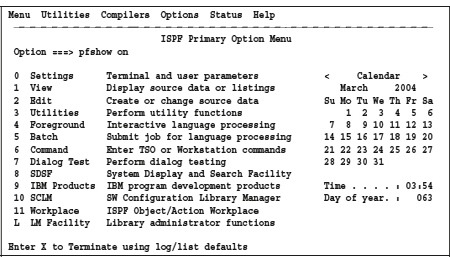
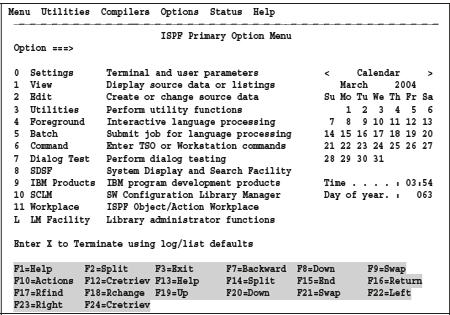
To activate the PF key assignments display, type in the command line PFSHOW ON and press ENTER. Then the following screen display appears.
Screen 4.11: Screen showing the PF key assignment
4.8.3 Utilize KEYLISTs for PF keys
In this type of key assignment, the contents of the PF keys are stored in special KEYLIST members. A panel definition may contain the name of such a member so that the PF keys setting is loaded with the information stored in the key list members at the start of this panel. This means the PF keys contents can change from panel to panel.
However, it also means that you never know what PF key assignment you have going on. Therefore, the use of PFSHOW ON is always necessary. This measure takes four lines of the available screen off. We now want to look how to turn on the use of KEYLIST and what the panels look like:
We activate the KEYLISTs in a panel by typing in the Command Line KEYLIST ON and pressing ENTER. Thus, from now on the use of KEYLISTs turns on for this ISPF application. We use the command PFSHOW ON to switch on the permanent display of the PF key assignment.
| Recommendation: If you work with KEYLISTs always and everywhere, you should enter the command KEYLIST ON in the ISPF primary option menu. If you work without KEYLISTs, then enter KEYLIST OFF. |
4.8.4 Display the PF key assignment in a KEYLIST
Let us now see on the name of the KEYLIST from which definitions the PF keys are loaded when the current panel calls up. To do so, type the command keylist in the command line and press ENTER.
A POP-UP Panel will appear where we scroll down for so long until a line with the text ![]() appears.
appears.
The first word in this line denotes the current KEYLIST.
We see this in the following display:
Screen 4.12: Display the current KEYLIST
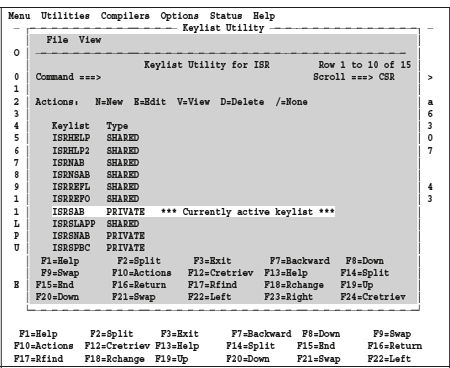
We now see that the KEYLIST ISRSAB is active, which means that the PF key commands defined in this key list are when we press one by this member set PF keys executed.
To display and edit the contents of key list ISRSAB now, position the cursor before this name, there enter an e (for edit) and press ENTER. Further down a key list edit panel appears.
The columns have the following meaning:
Definition
Here the command is defined which executes when pressing the appropriate PF key.
Format
This option sets the display format of the dedicated PF key. Here the original description of this definition from the ISPF help panel: Type LONG to indicate that you want this key label to display only when the user requests the long form of the function key area. Long is the default. Type SHORT to indicate that you want this key label to display when the user requests either the short or the long form of the function key area. Type NO to indicate that the key label should never be in the function key area displayed.
This value is for the dedicated key displayed when the PF key setting display is active.
Screen 4.13: The KEYLIST edit panel
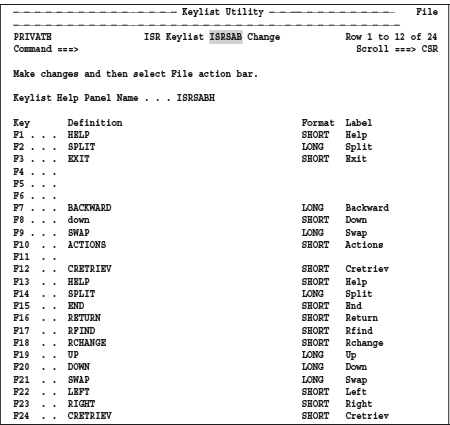
Here we can now make changes to the PF key assignments and save the assignment.
4.8.5 PF keys use without using KEYLIST
If you want to prove PF keys with the old method, then you have to switch off the use of key lists by typing in the command line of an ISPF panel concerned the ISPF application the KEYLIST OFF command and press ENTER. By entering KEYS and ENTER in the command line the current assignment of the PF keys will be displayed. You can then change the PF key assignment here directly and set by pressing the PF3.
The next figure shows the PF key assignment for my ISPF Application ISF, so for the SDSF:
Screen 4.14: My PF key assignment in SDSF
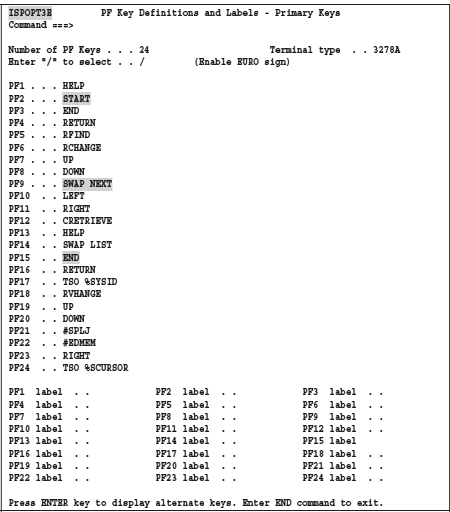
| Note: This key setting will performed when you use the REXX program SPROFVAR of the SMART ISPF utilities to install the ISPF variables that the SMART utilities need to run correctly. Of course, you can change the program so that your own KEY settings are set. |
Mnemonics for PF keys using:
– The on and off switching for the display of the PF keys assignment on the screen using PFSHOW ON/OFF always applies to the entire ISPF. If the programmer in the IBM laboratory would bound this setting to the application that as in the KEYLIST, that would be nice. However, this is unfortunately not the case!
– The on and off setting for KEYLISTs using the KEYLIST ON / OFF command is only valid for the current ISPF application (ISP, ISF, ISR, etc.).
– Individual panels can define their own KEYLISTs.
– The standard PF key setting is used when a panel has the KEYLIST ON set and calls another panel where no KEYLIST available is. This panel will then work as if working with KEYLIST off.
– In this case, the PF Key Definitions from the ZPF variables of the application are used.
– If in an ISPF application there are no KEYLISTS used, e.g., when KEYLIST OFF activated is, the ZPFxx variables from the profile of the ISPF user are used.
– Individual applications can work with their own PF Key Settings. Therefore, for example, use the SDSF always for own PF key assignment.
– The brochure ISPF User’s Guide Volume II contains the chapter Settings (Option 0) a detailed description of the PF key assignment technique.