
In this recipe, we will be looking at how to store data in the ESP8266 filesystem. To do that, we will store data measured by a sensor in the flash filesystem. This will get you started on using SPIFFS to store files on your ESP8266, and give you an idea of how you can use the filesystem in your projects.
Make sure you have the following components before proceeding:
- ESP8266 board
- USB cable
- DHT11 temperature/humidity sensor (https://www.sparkfun.com/products/10167)
- 10 kΩ resistor (https://www.sparkfun.com/products/8374)
- Breadboard
- Jumper wires
Start by mounting the ESP8266 board and the DHT11 sensor onto the breadboard. Connect a 10 kΩ pull up resistor to the DHT11 data pin and connect the VCC pin and GND pin to the 3V pin and GND pin of the ESP8266 board, respectively. Finally, connect the data pin of the DHT11 to GPIO 2 of the ESP8266 board. Use jumper wires to do the connections. The complete setup will look as shown in the following diagram:

Refer to the following steps:
- The first thing we do is create a text file called
log.txtthat will hold the sensor data. There are two ways you can go about it. You can use the Arduino IDE to upload the text file to the ESP8266 filesystem or you can create it using our sketch. - To upload it using the Arduino IDE, you create a directory called
datain theSketchfolder. You can access theSketchfolder as shown in the following screenshot: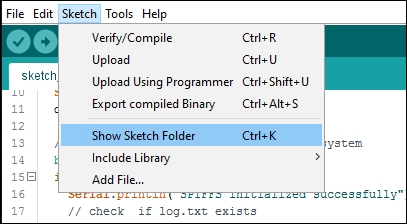
- Then, create the
log.txtfile in thedatafolder:
- With the
log.txtfile successfully created, go back to the Arduino IDE. Select the ESP8266 board you are using and the correct serial port from the tools menu, and click on Tools | ESP8266 Sketch Data Upload.The
log.txtfile will be uploaded to the ESP8266 board filesystem.We designed our sketch such that if the
log.txtfile does not exist, it is created. This is handled using the append mode for file access, which automatically creates the file if the sketch does not find it.To demonstrate saving data to the filesystem, we sampled temperature data from a
DHT11sensor and saved the data into a txt file every 10 seconds:#include "FS.h" #include "DHT.h" #define DHTPIN 2 // the digital pin we are connected to #define DHTTYPE DHT11 // define type of DHT sensor we are using DHT dht(DHTPIN, DHTTYPE); // create DHT object void setup() { Serial.begin(115200); dht.begin(); // intialize DHT object // always use this to "mount" the filesystem bool ok = SPIFFS.begin(); if (ok) { Serial.println("SPIFFS initialized successfully"); } else{ Serial.println("SPIFFS intialization error"); } } void loop() { // Wait a few seconds between measurements. delay(2000); //read temperature as Celcius float t = dht.readTemperature(); // Check if any reads failed and exit early (to try again). if (isnan(t)) { Serial.println("Failed to read from DHT sensor!"); return; } //open log.txt file File f = SPIFFS.open("/log.txt", "a"); if (!f) { Serial.println("file open failed"); } // save temperature reading f.print(t); f.println("deg C"); //close file f.close(); delay(8000); } - Copy the sketch and paste it in your Arduino IDE.
- Check to ensure that the ESP8266 board is connected.
- Select the board that you are using in the Tools | Board menu (in this case it is the Adafruit HUZZAH ESP8266).
- Select the serial port your board is connected to from the Tools | Port menu and then upload the code.
The program includes both the DHT and FS libraries, which provide functions for obtaining data from the sensor and for managing the filesystem, respectively. The DHT object is created. It defines the ESP8266 board GPIO pin that the DHT11 data pin is connected to and the type of DHT sensor that we are using. The GPIO pin is defined as 2 and the DHT type is defined as DHT11.
In the setup section of the sketch, the serial interface, the DHT object, and SPIFFS are initialized. A notification message is displayed on the serial monitor to show whether SPIFFS has been successfully initialized or not.
The loop segment of the sketch starts with a two second delay that gives the sensor time to get readings. The temperature readings are acquired using the dht.readTemperature() function for readings in degrees Celsius. An alert is displayed on the serial monitor if the temperature reading is not obtained and the sensor is read again until valid readings are acquired.
If the obtained readings are OK, the program opens the log.txt file in append mode. If the file does not exist, it is created. This is accomplished in the SPIFFS.open("/log.txt", "a") function. If the file is not successfully opened, an alert is displayed on the serial monitor, otherwise the temperature is saved in the txt file. The file is then closed, followed by an eight second delay.