
The dock is the row of applications that appear at the bottom of your main screen in macOS (Figure 9-1). The dock allows you to see icons for applications you commonly use; applications that are active; and, of course, the lovely trash can. The dock has an option to be hidden, which is a setting some users may choose. When the dock is hidden, you can get the dock to appear by moving your mouse to the area it normally sits. Application icons that appear in the dock can bounce when the application needs your attention. They can also inform you of useful events. For instance, the Mail application icon will show you how many unread email messages there are in your inbox.

Figure 9-1. The dock
Each of these dock features are expected features of your application, and the folks at GitHub have made these features part of Electron. This chapter focuses on features only available with macOS applications. If you are never intending to create applications for macOS, we’ll understand if you choose to skip this chapter.
Getting Started
As with each of these examples, we are using the Electron Quick Start example. We will use git clone to create a new copy of the quick start in a new folder, in this case named electron-dock-example.
Open terminal and navigate to the folder where you would like to place your code:
git clone https://github.com/electron/electron-quick-start electron-dock-exampleChange your active directory to electron-quick-start:
cd electron-dock-exampleInstall the dependencies:
npm installReset Git:
git init
Now that you have our example project installed, type npm start into your terminal application just to make sure the application loads and runs as expected.
Let’s take a moment to modify this package.json file to match our own by updating some nodes.
Change the name node to "electron-dock-example."
Change the version number to "0.0.1" since we are just starting out.
In the description let’s use something like "A sample Electron application to demonstrate macOS dock features."
Remove the repository node. If you decide to put your results in a repository you can re-add this node with the correct path.
Keywords can be "Electron," "macOS," "dock," "example.".
"author": Your name goes here.
Let’s change the “license” node to "MIT."
Now that we have our electron-dock-example project created and have made certain that it runs, let’s start making some changes to the code.
The Application’s Dock Icon
At this point you have the quick start project installed in the electron-dock-example folder and have tested it to make sure it works. Alright, then, let’s get started with the simplest of features: setting the dock icon for your application .
The first thing we need to do is create a few icons. We know we’re terrible for asking a developer to create graphics. But we’re really not asking all that much. We need three icons for this exercise. Apple has guidelines for application icons located at https://developer.apple.com/macos/human-interface-guidelines/icons-and-images/app-icon/ (Figure 9-2).
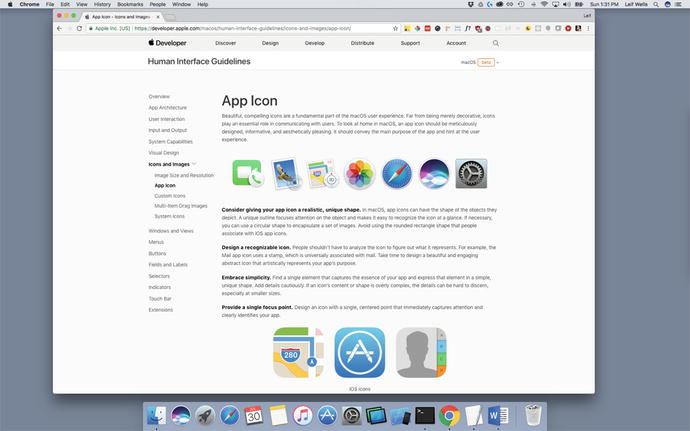
Figure 9-2. Apple’s Human Interface Guidelines Web site
As a side note, if this URL works when you read it, great. Unfortunately, Apple enjoys changing their guidelines web site often. If the link does not work, do a search on the site for “app icon,” and that should get you to a page like this one.
Another side note: you haven’t given Apple’s Human Interface Guidelines site a visit? If you are building applications for Apple’s operating systems, you really should spend some time with this documentation. You could save yourself some heartache.
The guidelines state that graphics for application icons can range in sizes from 16px x 16px to 1024px x 1024px, and you should create graphics for all these sizes for your published application. For our purposes, we need three graphics at 1024px x 1024px. They can be simple, single-color graphics as long as you can tell the difference between each of them.
If you are afraid of making graphics, visit the book's page on apress.com to access the graphics created for this exercise: 1.png, 2.png, and 3.png. Create a new folder on the root of the project named “assets” and place the files there.
Open your favorite code editor and select the main.js file. Inside the createWindow method, find the line where the BrowserWindow object is invoked and add the icon property to the argument object like we show here:
function createWindow () {// Create the browser window.mainWindow = new BrowserWindow({width: 800, height: 600, icon: path.join(__dirname, 'assets/1.png')})
Now, run the npm start command . The result is shown in Figure 9-3.
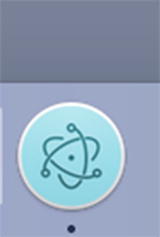
Figure 9-3. Setting the icon property when creating a BrowserWindow object does not set the icon on macOS.
Wait. That’s not our icon, is it? No. That definitely isn’t our icon. What did we do wrong? Nothing, really. If you are working on a Windows or Linux machine, you’ve done nothing wrong. This is how you set the icon for a window on those platforms, but not the icon in the Mac OS X dock. Let’s leave this code as it is.
Now let’s change the code to set the icon in the macOS dock for real. We get access to the dock through Electron’s app module. At the bottom of the createWindow method, place this line of code app.dock.setIcon(path.join(__dirname, 'assets/2.png')) inside the if statement testing whether you are on macOS like it appears below. In this line of code, we are accessing the app module's dock object and setting the icon.
// Emitted when the window is closed.mainWindow.on('closed', function () {// Dereference the window object, usually you would store windows// in an array if your app supports multi windows, this is the time// when you should delete the corresponding element.mainWindow = null})if (process.platform === 'darwin') {app.dock.setIcon(path.join(__dirname, 'assets/2.png'))}}
Run the npm start command and take a look at your dock. If you are using the graphics we provided, you should see a yellow smiley face staring back at you from the dock, as shown in Figure 9-4.

Figure 9-4. The application icon has been set using app.dock.setIcon
Making the Dock Icon Bounce
Now that we have our icon appearing in the dock, let’s make it dance. One of the most important things the dock icon can do is to get the user’s attention by bouncing. A bouncing dock icon can be seen even if the dock is hidden. There are two types of bouncing: informational and critical. The default bouncing type is informational, which means that the icon will bounce for one second. A bounce set for critical will make the icon bounce until either the application becomes active or the bouncing has been canceled.
Let’s make our icon bounce. Add the following line of code in bold to your createWindow method:
app.dock.setIcon(path.join(__dirname, 'assets/2.png'))app.dock.bounce()
Run the npm start command in your terminal and see what happens.
Hang on. Nothing happens. You haven’t done anything wrong. The point of this step in our exercise is that the icon will not bounce if the application is focused. There is no reason for the dock to try to get your attention if the application is active. So, to test bouncing out we need to change some code and rely upon the speed of your reflexes.
First, let’s make the icon bounce inside a setTimeout method. Change the line we just added with the following code:
app.dock.setIcon(path.join(__dirname, 'assets/2.png'))setTimeout(() => {app.dock.bounce()}, 5000)
This code essentially says to make the icon bounce after five seconds.
Second, to see the application’s icon bounce in the dock, we need to make sure that the application is not focused. As in, we need to make sure that our application isn’t the application in the foreground. This is where your reflexes come in. When you run the npm start command this time, as soon as the application is visible, click on your desktop. This will make the macOS Finder come to focus. Then you can see your icon bounce. Give it a try.
How did that work for you? Did you see your application’s icon bounce high once? Awesome, right?
Let’s update our code so we don’t have to speed click anymore. One of the events we have access to for our window is the blur event. That is, the event that is emitted when the application goes out of focus. We can use that event to trigger our bounce call.
Update your code:
app.dock.setIcon(path.join(__dirname, 'assets/2.png'))mainWindow.on('blur', () => {setTimeout(() => {app.dock.bounce('critical')}, 5000)})
So, instead of the bounce call being made after five seconds immediately after the application is launched, the call will be made five seconds after the blur event is fired. We’ve also added the 'critical' argument to our bounce call. This means that when the icon starts bouncing, it won’t stop until the application becomes focused again.
This change makes our example more like a real application scenario: our application becomes inactive (you’ll still have to activate the Finder by clicking the desktop), and an activity inside our application needs the user’s attention (in this case, the timer is triggered). When you run the npm start command in the terminal and click the desktop, after five seconds the icon will bounce and continue to bounce. Click on the application or the dock icon to activate the application. The icon stops bouncing. Click on the desktop again, and after five seconds the icon will begin bouncing again. Give it a try.
Earlier we mentioned canceling a bouncing dock icon, so we should mention that you typically will not need to manually cancel a bouncing dock icon. Getting the user’s attention typically results in the user activating the application, which automatically cancels a bouncing dock icon. Nevertheless, there is one scenario where canceling a bouncing icon could be necessary. Suppose your application is reliant upon a connection to the network, and while your application is in the background the network connection is severed. After the change in connection is detected, the application will make the dock icon bounce using the critical argument so the dock icon will bounce until the application comes to the foreground. Suppose the application continued to detect the connection status and the connection is restored. In this case, when the connection is reestablished the app.dock.cancelBounce method is called to stop the bouncing. If you choose to use cancelBounce, be aware that you will need to capture the id of the dock icon when you create it and pass that id as an argument for the cancelBounce method. While we won’t be using the cancel method in this example, we wanted to inform you of how to cancel a bouncing dock icon when necessary.
Changing the Dock Icon
Now let’s take one more step that can be helpful. Remember that third image we put into our assets folder? Let’s put that to use. Make the following updates to your code using the code in bold:
app.dock.setIcon(path.join(__dirname, 'assets/2.png'))mainWindow.on('blur', () => {setTimeout(() => {app.dock.setIcon(path.join(__dirname, 'assets/3.png'))app.dock.bounce('critical')}, 5000)})mainWindow.on('focus', () => {app.dock.setIcon(path.join(__dirname, 'assets/2.png'))})
These changes allow us to change the icon when we make the icon bounce. See where we set the icon to the 3.png file? Changing the icon is another way to let the user know the application needs their attention, but it can also be used to show that the application has entered a specific condition. For instance, when the Cisco AnyConnect Secure Mobility Client application, a virtual private network (VPN) application, connects to a network, the application icon can change from a normal icon to one that indicates you are connected to the VPN (Figure 9-5).
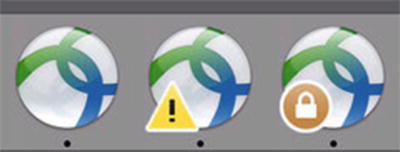
Figure 9-5. Images captured of different dock icons used by a popular VPN application
Give this code a try by entering npm start into your terminal; click the desktop; and in five seconds you will see our red, sad face icon bouncing in the dock.
Dock Icon Badges
Great. Now we know how to set the application icon in the dock and make it bounce. What else can we make it do? How about show a badge ? You’ve seen badges before. On macOS, they appear as a red dot atop your dock icon, typically showing a number. The Mail application will show a badge to indicate how many unread messages are in your inbox. Slack will show a badge to indicate you have new messages in one of your channels.
The Electron team have made it fairly simple to add a badge to your application icon. The app.dock.setBadge method takes a string argument to set the text in your badge. Let’s give this a try by updating our code:
app.dock.setIcon(path.join(__dirname, 'assets/2.png'))mainWindow.on('blur', () => {setTimeout(() => {app.dock.setBadge('!')app.dock.setIcon(path.join(__dirname, 'assets/3.png'))app.dock.bounce('critical')}, 5000)})mainWindow.on('focus', () => {app.dock.setBadge('')app.dock.setIcon(path.join(__dirname, 'assets/2.png'))})
This code sets the badge to show with an exclamation point inside our ‘blur’ event listener and resets it inside the ‘focus’ event listener. Note that we pass an empty string - app.dock.setBadge('') - to reset the badge and make the red dot disappear. You can experiment with other text if you like, but Apple’s guidelines suggest keeping it simple and to use one character or a number. If your application needs to let the user know that there are hundreds of messages waiting for them, for instance, you may wish to make the badge text “99+”, or do what the folks at Slack do and set the badge to “*”.
Let’s take this example one step further and change the badge text based on reading the current badge text. Update the code to match the following code:
app.dock.setIcon(path.join(__dirname, 'assets/2.png'))mainWindow.on('blur', () => {setTimeout(() => {let badgeString = app.dock.getBadge()if(badgeString === '') {app.dock.setBadge('1')} else {app.dock.setBadge((parseInt(badgeString) + 1).toString())}app.dock.setIcon(path.join(__dirname, 'assets/3.png'))app.dock.bounce('critical')}, 5000)})mainWindow.on('focus', () => { app.dock.setIcon(path.join(__dirname, 'assets/2.png'))})
Inside the "blur" event listener we are setting a badgeString variable to be equal to the text of the current badge using the app.dock.getBadge method. Then we change the badge based on that text in the if…else statement. If the app.dock.getBadge returns an empty string, we set the badge to a string containing the number 1. Otherwise, we run app.dock.setBadge((parseInt(badgeString) + 1).toString()) that updates the badge by converting the current badge string to a number adding 1 to that number and then converting that number to a string. Keep in mind that setBadge expects an argument and that argument must be a string.
The expected behavior for this updated code is that we will start off without a badge showing, and every time the application receives a blur event, the badge count will update by one. Run the npm start command in the terminal and see this code in action! When the application is not the focused application, your dock should have an icon that looks like Figure 9-6.
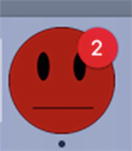
Figure 9-6. Our dock icon as it appears with the application in the background and with a badge set to 2
Did it work as expected? Great. If not, make sure your blur and focus listeners are properly set as they are in the code sample above. You may debug your code by adding some console.log statements to make it clear that your listeners are working. Remember, the results of console.log statements placed in the Main Process appear in the terminal window.
Summary
Dock icons do more than just show macOS users that your application is running. They bounce to get the user’s attention. They change to indicate a change in application state. They give users more information about the application by showing badges. These application features are expected if you are building an application for macOS, so knowing how to properly use the dock icon is important.