

1
WHAT IS ELECTRICITY?
Push a button on a music player, and a song suddenly comes out of the speakers. Push a button on a TV’s remote control, and your favorite shows come to life instantly. These wonders happen thanks to the magic of electricity, a type of energy that powers all the technology in your home. By the time you finish this book, you’ll be an electronics wizard, and then you can try using your powers to build any invention you can imagine!
This book is all about understanding electricity and using it to make amazing things. In this chapter, we’ll explore how electricity works, and then you’ll build a complete electronics project: a burglar alarm that warns you if intruders have entered a room. Once you get the hang of using electricity, you can build all sorts of fun contraptions, like a musical instrument or a light-up game to play with your friends. In fact, you’ll build these in this book.
PROJECT #1: TURN ON A LIGHT!
When you flip the light switch in a room, the bulb brightens right away. Let’s look at how electricity makes that bulb shine, starting with a little experiment.
Shopping List
For this project, you’ll need the following parts:
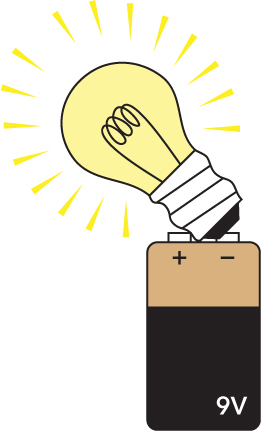
![]() A standard 9 V battery to power the circuit.
A standard 9 V battery to power the circuit.
![]() A small, incandescent light bulb rated for 9 to 12 V (DigiKey #CM394-ND, Bitsbox #OP037, or a similar light bulb from a hardware store).
A small, incandescent light bulb rated for 9 to 12 V (DigiKey #CM394-ND, Bitsbox #OP037, or a similar light bulb from a hardware store).
Step 1: Inspect the Light Bulb
Look closely at your light bulb; you should see a thin metal wire filament inside the glass. One end of this filament is connected to the metal side of the base, and the other end is connected to the metal contact on the bottom.

Step 2: Connect the Light Bulb to the Battery
Place your 9 V battery upright on a table. Take the light bulb and gently place it so that the bottom point touches one battery terminal and the metal side touches the other battery terminal. When both the bottom and the side are touching the battery, the bulb should light up.
Congratulations: you just generated light with electricity! The bulb lights because when you touch it to the battery contacts, electricity runs through the wire filament inside. The filament then heats and starts to glow, creating light.
HOW DOES ELECTRICITY LIGHT A BULB?
But how does electricity cause the wire to heat up, and why does the light turn on instantly? There are four concepts that combine to make that happen:
![]() Electrons
Electrons
![]() Current
Current
![]() Voltage
Voltage
![]() Resistance
Resistance
These fundamental concepts of electricity all depend on each other, and we’ll explore them in this section.
What Is an Electron?
Everything you see around you is made of atoms, which are particles so small you can’t see them without a special type of microscope. But atoms are made of even smaller particles, called protons, neutrons, and electrons.
Protons and neutrons form an atom’s nucleus (its center), and electrons orbit the nucleus like planets orbiting the sun. Protons and electrons are both electrically charged: protons have a positive charge, and electrons have a negative charge. That’s why the electrons stick with an atom in the first place. The positive and negative charges act like opposite sides of a magnet and attract each other.

Certain materials are conductive, which means that if you apply energy to them (like the energy stored in a battery), the electrons will start moving from one atom to the next!
The filament inside your light bulb is made of a conductive metal, meaning it’s full of electrons just waiting for a push to move them.
Voltage Pushes Electrons
When you attach a battery to the light bulb, you’re applying a voltage across the filament inside. Voltage pushes electrons through the wire and is measured in volts (V). The higher the voltage, the more electrons will flow through the wire.
Think of a wire like a tube filled with marbles: when you put a marble in on one side, a marble pops out on the other side at the exact same time, with no delay.

The more marbles you push in one side, the more pop out of the other. That’s how electrons behave inside a wire, when a voltage is applied to them.
Current Flows
Current is the amount of electrons flowing through a wire, and it’s measured in amperes (A), which we usually shorten to amps. You might have also heard the word current used to describe a river, as in “This river has a strong current.” That means there’s a lot of water moving down the river.
Electrical current is similar: a strong current means there are a lot of electrons flowing through a wire. When you increase the voltage in a circuit, the current also increases.
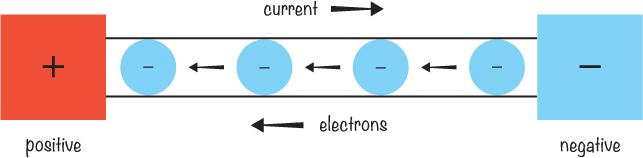
Just as water flows downhill due to gravity, electric current flows from the positive battery terminal toward the negative battery terminal. Actually, the electrons themselves flow in the opposite direction, from the negative side of your battery to the positive side.* But when we talk about electrical current, we say that it flows from positive (+) to negative (–).
Resistance Reduces Current
Voltage pushes electrons to form a current, and resistance restricts the current. It’s like playing with a garden hose: if you squeeze the hose, you add resistance to the flow of water so that less water comes out. But if you turn the tap more (like increasing the voltage), the pressure increases, and more water flows even though you’re still squeezing the hose in the same way. Resistance in electricity works just like this, and it’s measured in ohms (Ω).

Now that you know about electrons, current, voltage, and resistance, I’ll explain how they work together to turn on your light bulb.
Lighting the Bulb
The two ends of the wire filament inside your light bulb are connected to the outside of the bulb: one end is connected to the metal side of the base, and the other end is connected to the metal contact on the bottom. When you connect a battery to the light bulb, you create what’s called a circuit. A circuit is just a closed path that allows current to flow from the positive terminal of your voltage source to the negative terminal.
The voltage on the battery pushes electrons through the circuit, including the filament inside your light bulb. The filament has resistance and restricts the current in your circuit. As the electrons struggle to make their way through the resistance of the filament, the filament becomes so hot that it starts to glow and generate light. For the battery to be able to push the electrons, there must be a closed loop going from the positive terminal on the battery to the negative terminal.
Electricity always needs a closed circuit to work. If you disconnect even one of the sides, the light bulb turns off right away! Let’s look at circuits in a little more detail.

HOW IS A CIRCUIT LIKE A PIPE SYSTEM?
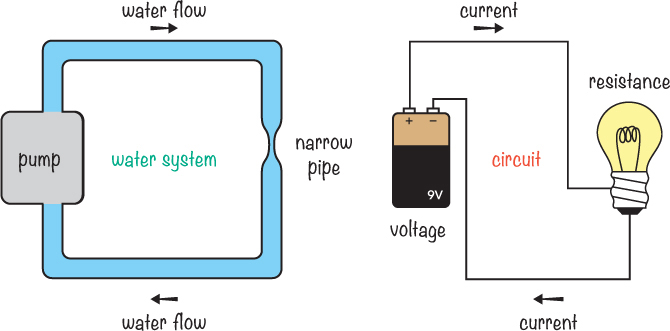
Let’s continue to think about electricity by comparing it to water. Imagine a pipe system in a loop with a pump, and imagine the pipe is always totally filled with water. At one point, the pipe is narrower.
The pump is like a battery that gives power to a circuit. The narrow part of the pipe reduces the flow of water. This narrow pipe is the resistance. The amount of water that flows through the pipes is the current.
Now imagine that you could insert a measuring device somewhere in the pipe system that tells you how much water is flowing through it per second. Note that I’m talking only about how much water flows through one randomly selected point in the pipes, not the total amount of water in the pipes. This is how we’ll talk about current in an electric circuit, too: it’s the amount of electrons flowing through a certain point per second.
MEET THE SWITCH
When you look around your home, you probably see switches everywhere. You use them all the time to turn lights on and off! When the light in a room is turned on, it must be part of a closed loop because the bulb has current running through it. But what happens when you flip the switch off? Flipping the switch off is the same as disconnecting a wire in the loop: it stops current from flowing and turns the light off, just like the disconnected circuit we saw earlier.
What other switches can you find around you? You might find a switch that turns a computer on and off, a switch to ring a doorbell, a switch to determine whether a refrigerator door is open, and more.
Switches control electricity, and they’re very simple devices. They connect two wires to close a loop or disconnect two wires to open a loop. Inside, a switch is just some pieces of metal that connect or disconnect.
When the switch is open, the light is off. When the switch is closed, the light turns on! It’s very simple, but very useful. With only this knowledge, you can create some nifty circuits, and that’s what we’re going to do next.

PROJECT #2: INTRUDER ALARM
In this chapter, we learned that electricity needs a closed circuit to make a circuit do anything interesting, and we’ve looked at how a switch works. Let’s build a circuit with a switch!
You can build a switch out of a lot of different things—even a door. In this project, you’ll turn a door into a gigantic switch and use it to build an intruder alarm that tells you when someone tries to enter the room.
To create the alarm, we’ll attach some wires and aluminum foil to your door so that when the door is closed, your circuit is open and nothing happens. But when the door opens, the loop closes and a buzzer sounds to set off a red alert.
We’ll hang an exposed wire down from above the door, place a strip of aluminum foil on top of the door, and connect each of these parts to a different side of the circuit. Then, when the door opens, the exposed hanging wire will touch the aluminum foil and close the loop so that the buzzer will sound.
Shopping List
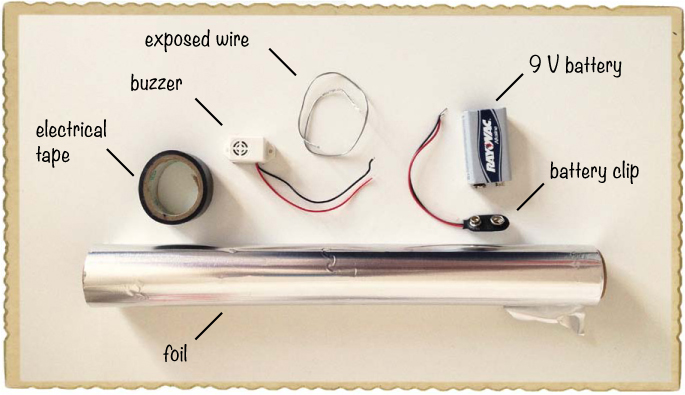
![]() A buzzer (Jameco #2173870, Bitsbox #ST016) that beeps. Buzzers come in both passive and active versions. Passive buzzers need an audio frequency input, while active buzzers need only a voltage. For this project, you need an active buzzer that works with 9 V.
A buzzer (Jameco #2173870, Bitsbox #ST016) that beeps. Buzzers come in both passive and active versions. Passive buzzers need an audio frequency input, while active buzzers need only a voltage. For this project, you need an active buzzer that works with 9 V.
![]() A standard 9 V battery to power the circuit.
A standard 9 V battery to power the circuit.
![]() A 9 V battery clip (Jameco #11280, Bitsbox #BAT033) to connect the battery to the circuit.
A 9 V battery clip (Jameco #11280, Bitsbox #BAT033) to connect the battery to the circuit.
![]() Aluminum foil
Aluminum foil
![]() Exposed wire (Jameco #2098478, Rapidonline.com #05-0320), like some soft electrical wires, an old steel guitar string, or something similar.
Exposed wire (Jameco #2098478, Rapidonline.com #05-0320), like some soft electrical wires, an old steel guitar string, or something similar.
![]() Tape to fasten everything. You can use masking tape, electrical tape, or whatever you have.
Tape to fasten everything. You can use masking tape, electrical tape, or whatever you have.
Tools

![]() A wire cutter (Jameco #35482, Bitsbox #TL008) to cut or remove the insulation from wire.
A wire cutter (Jameco #35482, Bitsbox #TL008) to cut or remove the insulation from wire.
![]() A pair of scissors (optional) is useful for cutting the aluminum foil nicely.
A pair of scissors (optional) is useful for cutting the aluminum foil nicely.
TIP
If you want to make stripping wires even easier, you could buy a pair of actual wire strippers, like Jameco #78992, which are slotted so that you won’t cut through the wire by accident.
Step 1: Does the Buzzer Beep?
First, test the buzzer to see that it beeps. Hold the red wire from the buzzer to the positive terminal on your battery (marked +) and touch the black wire to the negative terminal on your battery (marked –).

The buzzer should now make a loud, clear buzz or beep. If you disconnect one of the wires from the battery, the buzzer should stop making a sound because the circuit won’t have a closed loop anymore.
NOTE
If your buzzer just made a click or didn’t make any sound at all, you might have a passive buzzer. A passive buzzer can’t create sound by itself, so you need an active buzzer for this project. The buzzer recommended in this project’s Shopping List (page 12) should do the trick.
Step 2: Prepare the Aluminum
Use a pair of scissors to cut a big, shiny strip of aluminum foil to go on the top of the door. Cut a straight piece of foil, about 1 inch wide and as long as the roll of aluminum foil is wide.

Step 3: Foil Your Door
Fasten the strip of aluminum foil on the top of the door by using a piece of tape on each side of the strip. The foil will act as a contact for the battery and buzzer wire.

Step 4: Prepare a Trigger Wire
Get a piece of exposed soft wire about 10 inches long. An exposed wire is a wire that doesn’t have any plastic around it, as opposed to insulated wire, which is metal enclosed in plastic. Just find some wire that is already exposed, such as a steel string from a guitar, or use your wire cutters to snip a piece from the spool in the Shopping List (page 12). This is going to be your trigger wire.
NOTE
You could also use a wire cutter to remove, or strip, the plastic from insulated wires. If you want to do that, ask an adult for help!
Step 5: Connect the Buzzer and Trigger Wire
Connect one side of the exposed trigger wire to the exposed metal end of the battery clip’s black wire with some tape. Connecting two wires is easy. Here’s how you do it: Pick up the two wires you want to connect and twist their ends together. Make sure the two pieces of metal are touching! Then wrap them inside the tape together.

Following the same process, connect the red wire from the battery clip to the red wire on your buzzer.
Step 6: Mount the Buzzer and Trigger Wire
Now, let’s place the trigger wire and the buzzer above the door. First, tape the trigger wire onto the door frame above the door so that it’s hanging in front of the door when the door is closed and lying on top of the door and the aluminum strip when the door is open.
Next, tape the buzzer to the door frame in such a way that the black wire can touch the aluminum foil on top of the door. Tape the black wire onto the foil so that the exposed part of the wire touches the foil.
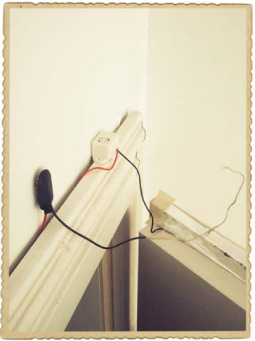
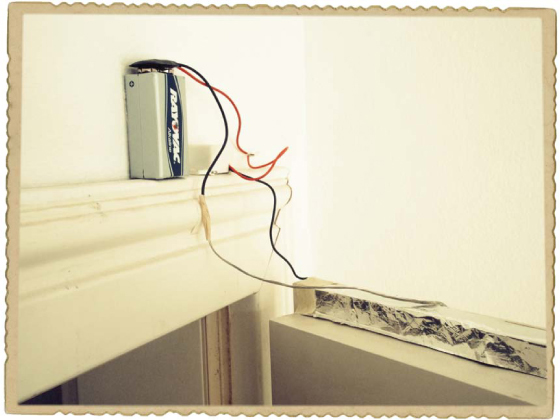
Step 7: Add a Power Source
Place the battery on top of the door frame, close to the battery clip. Use some tape to hold it in place if necessary. Then connect the battery clip to the battery.
Once the battery is connected, your finished intruder alarm should look something like this:
Step 8: Stage an Intruder Alert!
Test the alarm by opening and closing the door. As the door opens, the exposed wire should hit the foil, causing the buzzer to sound a loud alarm. For a more realistic test, invite someone else to open the door instead!
Step 9: What If the Intruder Alarm Doesn’t Work?
If the buzzer doesn’t go off, you might need to adjust the position of the trigger wire a bit, just to make sure the wire touches the strip of aluminum foil when the door opens. If the trigger wire touches the foil just fine, try a different battery. If that doesn’t work, you might need to retape your battery leads to their wires.