

HANDY RESOURCES
Here are some resources that you’ll find useful when building projects with electronics. Use this as a reference when, for example, you need to figure out what the color bands of a specific resistor mean. I’ve also listed some websites where you can continue learning and find more projects to build.
COMPONENT AND UNIT VALUE CHEAT SHEETS
Throughout this book, you’ll use lots of components, and there are as many ways to read those components as there are component types. Here are some handy cheat sheets to help you read resistors and capacitors and to help you remember what the different prefixes on units like volts and amperes mean.
Resistor Color Codes
Most of the resistors in this book have four color bands. To determine a resistor’s value, just look up its colors in the following diagram and multiply accordingly. For example, to get 470 Ω, you’d multiply the number 47 (given by the yellow and purple bands) by 10 (given by the brown band). For more details on resistors, see “Meet the Resistor” on page 70.

Capacitor Codes
In the following table, I’ve listed the most common capacitor codes. Refer to this table when you’re using ceramic or tantalum capacitors because, unlike the electrolytic capacitors used in much of this book, those won’t have their capacitance written straight out for you.
Code |
Picofarad (pF) |
Nanofarad (nF) |
Microfarad (µF) |
101 |
100 |
0.1 |
0.0001 |
102 |
1,000 |
1 |
0.001 |
103 |
10,000 |
10 |
0.01 |
104 |
100,000 |
100 |
0.1 |
105 |
1,000,000 |
1,000 |
1 |
If you have a capacitor with a different code from those listed here, you can find the value in picofarads by taking the first two digits and adding the number of zeros of the third digit.
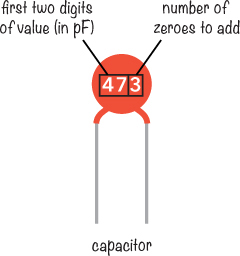
In this example, the capacitor has the code 473. Take the first two digits, 47, and add the number of zeros specified by the third digit, 3. That gives you 47,000 pF, which is 47 nF, or 0.047 µF.
Standard Prefixes
When building electronics projects, as in many areas of science, we sometimes have to deal with really small or really big numbers. Fortunately, there’s a set of standard prefixes in the International System of Units to make those numbers easier to write. The prefixes are multipliers, as shown in the table.
Prefix |
Name |
Multiply value by |
Example usage |
p |
pico |
× 0.000 000 000 001 |
Capacitor values |
n |
nano |
× 0.000 000 001 |
Capacitor values |
µ |
micro |
× 0.000 001 |
Capacitor values |
m |
milli |
× 0.001 |
Currents in a circuit |
- |
- |
× 1 |
Voltages often don’t have a prefix (example: 9 V battery) |
k |
kilo |
× 1,000 |
Resistor values above 1,000 |
M |
mega |
× 1,000,000 |
File sizes |
G |
giga |
× 100,0000,000 |
File sizes |
T |
tera |
× 1,000,000,000,000 |
Hard disk sizes |
A QUICK REVIEW OF OHM’S LAW
Ohm’s law is such an essential part of calculating values in circuits that you’ll keep coming back to it again and again as you build more projects. Whenever you need a refresher on figuring out a voltage, current, or resistance in a circuit, just flip to this section.
V = I × R |
Voltage (in volts) equals the current (in amps) multiplied by the resistance (in ohms) |
|
Current (in amps) equals the voltage (in volts) divided by the resistance (in ohms) |
|
Resistance (in ohms) equals the voltage (in volts) divided by the current (in amps) |


In the Ohm’s law equation, you must use volts (V), amps (A), and ohms (Ω), so remember to convert units if necessary: 1 mA = 0.001 A and 1 kΩ = 1,000 Ω.
A BASIC VOLTAGE DIVIDER CIRCUIT
The voltage divider is a circuit that is very useful, for example, when you have a sensor based on resistance, such as a thermistor, which senses temperature, or a photoresistor, which senses light. See “Project #15: Build a Sunrise Wake-Up Alarm” on page 148 for a project that uses a voltage divider like this. You can also use your knowledge of the voltage divider to calculate voltages within a circuit in order to understand what’s going on.
When you have two resistors in series, they form a voltage divider. The input voltage gets divided between the two resistors, and the output voltage (across R2) is given by the formula:

ONLINE ELECTRONICS SHOPS
Throughout the book, I recommend shops where you can buy your parts, but those aren’t the only great electronics stores in the world! Try these, too:
![]() Adafruit (US) www.adafruit.com
Adafruit (US) www.adafruit.com
![]() DigiKey (US) www.digikey.com
DigiKey (US) www.digikey.com
![]() Jameco (US) www.jameco.com
Jameco (US) www.jameco.com
![]() SparkFun (US) www.sparkfun.com
SparkFun (US) www.sparkfun.com
![]() Bitsbox (UK) www.bitsbox.co.uk
Bitsbox (UK) www.bitsbox.co.uk
![]() Quasar Electronics (UK) www.quasarelectronics.co.uk
Quasar Electronics (UK) www.quasarelectronics.co.uk
![]() Rapid Electronics (UK) www.rapidonline.com
Rapid Electronics (UK) www.rapidonline.com
![]() Spiratronics (UK) www.spiratronics.com
Spiratronics (UK) www.spiratronics.com
![]() Farnell (worldwide) www.farnell.com
Farnell (worldwide) www.farnell.com
![]() Protostack (Australia) www.protostack.com
Protostack (Australia) www.protostack.com
![]() Seeed Studio (China) www.seeedstudio.com
Seeed Studio (China) www.seeedstudio.com
![]() Tayda Electronics (Thailand, US) www.taydaelectronics.com
Tayda Electronics (Thailand, US) www.taydaelectronics.com
ONLINE RESOURCES
When you’re done with this book, you can keep learning about electronics online. (Ask your parents first!) You’ll find tons of fun tutorials and other projects at these sites:
Adafruit (https://learn.adafruit.com/) Lots of guides based on the components they sell.
Build Electronic Circuits (http://www.build-electronic-circuits.com/) My personal blog where I post tutorials, videos, articles, and so on—all about electronics. I also have a free newsletter with useful tips and tricks for your projects.
Electronics Club (http://www.electronicsclub.info/) A website for anyone wishing to learn about electronics or build simple projects, created and maintained by John Hewes, the technical reviewer of this book.
Ohmify (http://www.ohmify.com/) My online learning platform with courses, project tutorials, discussion forums, and more. Get cool step-by-step project tutorials, ask questions, make friends, and learn. Owners of this book get a special offer by going to http://www.ohmify.com/e4k/.
SparkFun (https://learn.sparkfun.com/) Lots of guides based on the components they sell.
You can also visit this book’s website at https://www.nostarch.com/electronicsforkids/ for additional resources, updates, and more.