There are several factors to consider when choosing a CPU for your next system on chip (SoC) design. If you consider that the CPU is to the SoC what an engine is to an automobile, you would not put a Volkswagen engine into a Hummer and expect it to perform. Similarly, a Ferrari engine would also be unsuitable in a Hummer. Although it may deliver similar horsepower to the Hummer engine, it would fail due to a lack of torque. Simple assessments of “horsepower” are just as misleading in CPU selection as they are in the automobile world. There is an optimal solution for the desired functionality. The same holds true for the CPU choice in an SoC. Many times the CPU is chosen based purely on the system architect’s knowledge of, and past experience with, a particular device. The decision of which CPU to use should also consider the overall system metrics: complexity of overall design, design reuse, protection, performance, power, size, cost, tools, and middleware availability.
The design’s complexity is critical to the choice of CPU. For example, if the design calls for a single-state machine to be executed with interrupts from a small set of peripherals, then you may be better off with a small CPU and/or microcontroller, such as the 8051 or the Z80. Many systems may fit this category initially. An example might be a pager. The memory footprint is small, the signal is slow, and battery consumption is required to be extremely low.
The algorithms and their interaction will dictate the complexity. They may or may not also dictate the need for an RTOS. Typically, as the application complexity increases, the need for a greater bit-width processor increases.
Designs are continuing to be reused and are growing in complexity; that pager designed in 2000 may have to be upgraded to play MP3s in 2007. Now the 8-bit CPU may not be enough to keep up with the task at hand. How many interfaces a design contains is a good indicator of the amount of processor power required. In our pager example, initially there were two main interfaces: the user interface and the radio link. For the new design, which adds an MP3 player, we will need to add a memory interface for storing and transferring the data, and an audio interface for playing the data. Now the system complexity is greatly increased from its initial conception, and if we have taken a forward-looking approach to the design, we can reuse much of this earlier work. Make sure that you have room for growth. Today your 8-bit design may be good for the MP3 player, but when the design gets reused and placed in a set-top box application, which has a much higher bandwidth peripheral set, you may need to reengineer the complete solution to migrate to an ARM-, MIPS-, or PowerPC-based architecture to deal with the new constraints.
The system may need to protect itself from outside attack or even from itself. This causes us to look at CPUs that include (or can include) memory management units (MMUs) to address this issue. Virtual memory will allow trusted programs access to the entire system, and untrusted ones to access just the memory they have been allocated. A 3-G cell phone—a phone with Internet connectivity—is a prime example of the need for protection. No longer can you use a CPU that lacks an MMU, since a rogue program will crash your phone. Although an MMU does not eliminate the possibility of system crashes, it reduces the likelihood of hard-to-resolve system failures.
Three main CPU architectures center around 8-, 16-, and 32-bit data registers with 16-, 24-, and 32-bit address buses. The main difference between these CPUs is how much information one particular register can hold and how much it can address directly:
8-bit data/16-bit address = (0 . . . 256), with 64-K address space
16-bit data/24-bit address = (0 . . . 65,536), with 16-M address space
32-bit data/32-bit address = (0 . . . 4 billion), with 4-G address space
Why would an embedded system ever need to access 4 G of address space? The answer is simple: as the system is asked to perform more complex tasks, the size and complexity of the code it runs increases. In the early days, CPM on a Z80 utilized a process of banking memory and page swapping in order to run programs that are more complex on an 8-bit machine. Space of 64 K was not sufficient, and a solution was to make the system more complex by overlaying memory and pages to get more out of the CPU.
It seems like a 24-bit address bus would be adequate for many designs. A couple of factors drive us to a 32-bit address space: protection and pointers. For protection, the CPU with virtual memory can use the entire address range to divide up the physical memory into separate virtual spaces, thus providing protection from bad pointers. And the ability for any register to become a pointer to memory without the need for indexing simplifies the software.
The performance of the overall system will be greatly impacted by the selection of CPU. Specifically, features like cache, MMU, pipelining, branch prediction, and superscalar architecture all affect the speed of a system. Depending on the needs of the SoC, these features may be necessary to achieve system performance.
The end use of the SoC will determine how much power your design can consume. If your design is battery operated, the CPU will need to be as power conscious as possible. For instance, some CPUs have the ability to sleep, doze, or snooze. These modes allow the CPU, when idle, to suspend operation and consume less power by shutting down various parts of the CPU. Different CPUs perform the same task with different results.
The cost of the CPU can be measured in several ways. First the intellectual property (IP) cost, which is the cost to acquire the IP for your SoC and any derivative products. Then there is the system integration cost. Which tools are available for design and implementation of your SoC? Finally, is the CPU variant silicon proven, and is it available on the bus architecture that your SoC is utilizing?
The availability of an RTOS and middleware may dictate your choice as well. For instance, in designing a PDA, you may want the middleware that is available for Linux, but the choice of a virtual operating system will dictate that you migrate away from small non-MMU CPUs.
Is there a graphics system or a file system necessary in the design? If so, then the choice of RTOS will dictate the type of CPU that is needed as well. Many RTOS vendors target specific families, leaving others untouched. Most 8-bit CPUs have simple schedulers that are adequate for small designs that utilize little outsourced code. They are not likely to be adequate for designs that consume any quantity of outsourced code. The outsourcing of the solution will strongly influence the RTOS choice, which, in turn, dictates what types of CPU are possible.
The tools necessary to do the design: are they available for the standard ANSI C/C++ compiler that you may use? How will you debug your design, either in the hardware/software co-simulation environment or on the SoC after it exists? Does a JTAG port exist, and is the CPU using this channel for debug, or is a dedicated serial port necessary? The choice of a higher level language like C++ or code generated from a design in UML may also dictate the need for a higher bus width and clock frequency to deal with the code size and complexity.
The SoC may be better off if partitioned into several processor subsystems that communicate via a loosely connected FIFO or serial channel. Many designs incorporate a DSP (digital signal processor) and a RISC CPU to share the workload and simplify the design of each processor domain. But this further complicates the CPU choice, which may now be multiplied several times over.
Modern SoC design has presented new challenges for the system architect. No longer is the choice of CPU trivial. Utilizing metrics such as the complexity of overall design, design reuse, protection, performance, power, size, cost, tools, and middleware availability can simplify the decision.
It is easy to think of embedded systems development as state of the art and leading edge. However, since microprocessors were first introduced in the early 1970s and the business has been developing more than 30 years—more than a quarter of a century—it is now a mature technology. By “mature,” I do not mean “stagnant” or “boring.” Embedded systems software development is far from boring. It is hard to identify any other business that is more dynamic, fast moving, and forward looking.
That maturity may be used to real advantage. After 30 years of growing, it is possible to identify a number of clear trends in the evolution of embedded systems development as a whole. Those trends point to the emergence of key technologies, upon which we may confidently focus to address the challenges ahead.
In this chapter, we endeavor to identify some of those trends and single out the technologies that they drive, resulting in an agenda for our attention over the coming months and years.
The earliest microprocessors were 4- and 8-bit devices. As fabrication techniques became more sophisticated, integrated 8-bit microcontrollers began to appear and the first 16-bit microprocessors came into use. Once again, silicon technology moved on, and 16-bit microcontrollers were introduced and widely applied, as demand grew for more sophisticated embedded systems. Devices with 32-bit architecture gradually took hold in higher-end applications, and these too were complemented by highly integrated microcontrollers. The first 32-bit devices were all CISC architecture, but increasingly RISC chips are providing even higher performance.
It would be easy to interpret this “potted history” of the embedded microprocessor, as illustrated in Figure 10.1, as a description of a timeline: 8-bit micros were yesterday; 32-bit RISC is today. However, this is not the case. As the more powerful devices have become available and found application, they have not, for the most part, replaced the earlier parts but have augmented the range of options available to the designer. An embedded systems designer has a wider choice of microprocessors than ever before and must make a choice based on functionality, specification, support, availability, and price.

This increasingly wide range of devices has a number of possible impacts on the software designer. Obviously, suitable programming tools must be available to support this array of processors; it is preferable that the tools are consistent from one device to another. More importantly, the necessity of migrating both code and programming expertise from one device to another is becoming commonplace. This need not present major problems. By careful code design, use of off-the-shelf components, and adherence to recognized standards, porting may be quite straightforward.
As microprocessors have evolved, the architecture of the systems in which they are used has progressed as well. The earliest systems were comprised of the CPU and a selection of logic devices. More highly integrated devices reduced the chip count, and higher-performance devices presented many design challenges to the hardware developer. From the software engineer’s point of view, nothing really changed. For many years, the same debugging techniques could be employed as the system became more complex: in-circuit emulation, on-chip debug, ROM monitors, and instruction set simulation. This situation began to change.
As embedded systems become more powerful, with ever-increasing levels of demanded functionality, many designers are taking a fresh look at their use of microprocessors and microcontrollers. In many cases, instead of following the obvious path of simply incorporating more powerful devices, an alternate choice is made: the application of multiple processors. This choice may be driven simply by a desire to distribute the processing power (which would be typical in a telephone switch, for example). Alternatively, an additional processor may be added to provide specific functionality (e.g., a DSP—digital signal processor—in a mobile phone).
One of the biggest challenges faced by software developers when confronted with a multiprocessor system is debugging. It is, of course, possible to simply run one debugger for each device. However, that is not really addressing the problem. What is needed is the means to debug the system, the functioning of each processor and the interaction between them needs to be debugged. The requirement is for a debug technology that supports multiple processors in a single debug session, even when a variety of architectures are represented.
In the earliest days of embedded systems, all of the development—both hardware and software design—was typically undertaken by a single engineer. The software element represented a small part of the entire effort: perhaps 5–10%. As illustrated in Figure 10.2, over time, the proportion of the engineering time dedicated to software development increased substantially. By the mid-1980s, this work was done by software specialists and comprised more like 50% of the development effort.

In the last few years, although hardware design has become more complex, the amount of software has grown drastically, now often being 70–80% of the total design effort. The result is that teams of software engineers are involved and new challenges arise. Among these is the availability of hardware to facilitate software testing. Since more software needs to be developed (in a shorter time), an environment for testing is required sooner. Various solutions are available, including native code execution prototyping environments, instruction set simulation, and the use of standard, low-cost, off-the-shelf evaluation boards. In addition, low-cost host-target connection technologies are becoming common, typically using a JTAG interface.
This climate represents an ideal opportunity for hardware and software teams to work together. By using codesign and, in particular, co-verification techniques, software engineers can test on “real” hardware sooner, and the hardware designers are able to prove their designs earlier, with less prototyping cycles.
The proportion of development time dedicated to software has been increasing. Meanwhile, under pressure from worldwide trade and truly global competition, time to market has been decreasing. This has radically influenced the design strategy. The earliest designs were quite simple, being comprised solely of in-house designed applications code. As systems became more complex, a multitasking model was widely adopted for software development, and many developers opted for standard, commercial real-time operating system (RTOS) products.
As shown in Figure 10.3, the proportion of bought-in software, or “intellectual property” (a term borrowed from the hardware design world), has steadily increased, as further standards are adopted.

This trend has a number of implications for the software developer. The integration of standard software components—with the applications code and with one another—are a matter of concern. Debugging in a multitasking context is another issue. The business decision associated with the selection of intellectual property is particularly complex, future (e.g., migration to different processors) as well as immediate requirements must be taken into consideration.
For the first 4- and 8-bit microprocessors, there was no choice of programming language. Assembler was the only option. Since the applications were relatively simple, this was not a big problem.
As 16-bit technology became viable, the need for a practical high-level language became apparent, and several options emerged. Pascal and C were both in use on the desktop, and these languages were adapted for embedded systems. Intel developed PL/M specifically for this kind of application. Forth was also very popular for certain types of systems. Over time, with the increasing use of 32-bit technology, the two languages that persisted were C and Ada. The latter is prevalent in defense-oriented systems.
It has been known for some years that C++ would start to replace C for embedded software development. Now, between one-quarter and one-third of embedded systems code is written in C++. What was not anticipated a few years ago was the emergence of new languages and approaches, which are set to play a strong role in applications development in the future. The Java language was developed specifically for embedded applications and has found a niche where runtime reconfigurability is demanded. The Unified Modeling Language (UML) has become the most popular choice for a higher-level design methodology.
As discussed earlier, the initial embedded system designs were one-man efforts. In due course, specialization resulted in engineers being dedicated to software development. The next step was the establishment of embedded software development teams. Managing software development is challenging in any context; embedded systems development is no exception and brings its own nuances. Using conventional programming techniques—procedural languages like C and assembler—most members of the team need to have a thorough knowledge of the whole system. As the team grows, this becomes less and less feasible. Typically, specific members of the team have expertise in particular areas. To manage the team effectively, a strategy must be in place that permits the encapsulation of their expertise. It must be possible for the work of an expert to be applied by the nonspecialist in a safe, secure, and straightforward manner. Object-oriented programming techniques find application in this context.
With many very large companies, the software teams are not simply growing; they are becoming distributed. Some members of the team are located at one site, while others are elsewhere. The sites may even be in different countries. This arrangement is common in Europe, where (spoken) language may be a concern. Elsewhere, time zones may be an issue (or an advantage, as a distributed team can work around the clock). This is increasingly the case as emerging technology centers (e.g., in India) are widely utilized. The need for reusable software components becomes even more apparent in this context.
The UML has become a key design methodology in recent years, which goes hand in hand with increasing embedded software team size. There are broadly two ways to use a design tool: either as a guide to writing the actual code or as a means of generating the code directly. Code generation is controversial for embedded software, as it may be argued, quite validly, that every system is different and has very specific needs in this respect. This is where xtUML (executable and translatable UML) is attractive because it enables the application and architecture to be clearly separated. This follows the same philosophy as object-oriented programming—leveraging expertise through tools and technology.
All of these trends, which have become established over 30 years of embedded systems development, point to some key technologies:
Microprocessor technology—. Leading to a proliferation in devices that involved the consideration of migration issues and writing portable code. That, in turn, drives a requirement for compatible tools and RTOS products across microprocessor families.
System architecture—. Progressing so that multiprocessor embedded systems are becoming commonplace. This drives a requirement for a debug technology that addresses these needs.
Design composition—. Changing, with a much greater part of the design effort being expended on software. This drives a requirement for instruction set simulator technology and host-based prototyping and the application of on-chip debug facilities and hardware/software co-verification.
Software content—. Moving from entirely in-house design to the wide use of intellectual property. This drives a requirement for standards-based RTOS technology and appropriate debug technology.
Programming language—. Narrowing choices somewhat. Although a strong requirement for C tools still prevails, compatible C++ products are in strong demand.
Software team size and composition—. Changing from one engineer (or less) to the employment of large, evenly distributed teams. This drives a requirement for tools to support object-oriented programming and RTOS technology with a familiar or standard API. There is also an increasing demand for modeling and design tools.
Tracking all the emerging technologies, which are driven by the ongoing trends in embedded systems development, is no easy task. Taking any one in isolation is also fruitless because of the many interrelationships. For example, multitasking and multiprocessor debugging go hand in hand; standards-based RTOS technology is a real boon to processor migration; using a design methodology that flows naturally toward an implementation makes complete sense.
This chapter is a review of available tools and techniques for program development in embedded systems, and it discusses the implications of the availability of development tools on selection of a target microprocessor and real-time operating system. This chapter addresses the following questions regarding the selection process:
A useful way to view software development tools for this purpose is from the perspective of a tool chain, where each component forms a tight link to the next: from a high-level language, through the assembler, linker, and so on, to one or more debugger variants. (See Figure 10.4.)
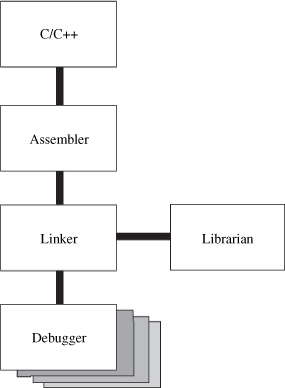
There are two distinct parts to the tool chain:
The body of the chain consists of the tools that take source code and generate an executable: the build tools.
The base of the chain includes the tools used to execute and verify the executable program: the debug tools.
Almost without exception, the use of the build tools (options, controls, formats, and so on) should be quite unaffected by the proposed execution environment and the variant of debug tool employed. For example, it should not be necessary to build using a special library in order to use a particular debug tool. The clear requirement is to test exactly the same code at all stages of the development process.
The options, with respect to the execution environment, offered by debug tools are numerous. These options will be reviewed in turn, but let us first consider the build tools.
Most commonly, software for embedded systems is written in C. However, C++ is increasing in popularity, as object-oriented design becomes the norm. The main parameters governing the choice of cross-compiler are similar to those applied to native products, but other factors must be taken into consideration, such as:
Programming language accepted—. The primary requirement in a compiler is that it accept the programming language in use. For both C and C++, full compliance with the ANSI specifications is essential.
Libraries provided—. An ANSI-compliant C compiler need not, according to the specification, include a full runtime library. In reality, such a library is very useful, and its absence would hinder efficient program development. Unfortunately, a number of the standard library functions, as specified by ANSI, are intrinsically nonreentrant, which may be a problem for some embedded system designs. Because particular demands may be placed on library code by an embedded system, access to the library source code is particularly desirable. A common reason for using C++ is to facilitate code reuse and to be able to employ standard class libraries. It is, therefore, reasonable to expect a compiler to be supplied with such a library as standard.
Build tools that support an entire microprocessor family—. Typically, an engineer selects a cross-compiler to support development for a specific target microprocessor that will be used for the current project. It is quite likely that future projects will use a different device, but it is commonly another member of the same family. With this in mind, choose build tools that support an entire microprocessor family. This support should, of course, go beyond the generation of code for the “baseline” device. For example, a Freescale 68000 family toolkit should feature specific code-generation capabilities for, say, 68332, 68020, and 68040 and not generate “plain vanilla” 68000 instructions at all times.
Manufacturer support—. Beyond the technical requirements of the build tools, it is at least as important to look at the “pedigree” of the build tools: consider the reputation of the company who produces them, their technical support facilities, and the size of the current user base.
A cross-compiler is intrinsically a more complex tool than its native equivalent. This primarily comes about because very few assumptions about the target environment may be made by the compiler developer. To maintain the appropriate level of flexibility, the compiler manufacturer must implement a number of special features.
In particular, embedded systems usually have complex memory configurations. The simplest have read-only memory (ROM) for code and constant data and random access (read/write) memory (RAM) for variable data. To accommodate this, the minimum required of the compiler is the generation of ROMable code, with the data clearly separated from the code. In most systems, a greater degree of control is needed, and being limited to this simple memory model would be a serious restriction.
A further implication of the memory structure of embedded systems is a clash with a language construct in C. In C, a static variable may be given an initial value. This was intended to avoid the necessity for initialization code for variables whose location in memory could be predicted at compile time. The intention was that such variables would be preset to their starting value in the executable file (memory image) on disk and loaded into memory with the program. For an embedded system, where the program is already in ROM, this mechanism does not work. This situation has three possible outcomes:
Static variables cannot be initialized.
Initialized statics can only be used as constants because they must be stored in ROM.
The build tools must readily accommodate the copying of data from ROM to RAM at startup.
Since the C and C++ languages permit direct access to specific memory addresses, these languages are often useful for embedded system development, particularly for code that is closely associated with the hardware. Naturally, the compiler should not restrict this capability in any way.
As for assembler code, even though nowadays a high-level language is usually chosen for software development, it is inevitable that, at some time, the programmer will write some assembler code. The use of assembler code may be necessary to permit the programmer to extract the last ounce of performance from the target chip, but, more likely, the programmer uses assembler code to access some microprocessor facility that does not map into C (for example, enabling or disabling of interrupts). In the interests of efficiency and code portability, the use of assembler should be minimized, and the facilities for its development should be as flexible as possible. The ability to write a complete assembler module should be augmented by the means to include one or more lines of low-level code among the C language.
The majority of embedded microprocessors are employed in real-time systems, and this puts further demands on the build tools. A real-time system tends to include interrupt service routines (ISRs); it should be possible to code these in C or C++ by adding an additional keyword interrupt declaring that a specific function is an ISR. This performs the necessary context saving and restoring and the return from interrupt sequence. The interrupt vector may usually be defined in C using an array of pointers to functions.
Furthermore, in a real-time system, it is common for code to be shared between the mainline program and ISRs or between tasks in a multitasking system. For code to be shared, it must be reentrant. C and C++ intrinsically permit reentrant code to be written, because data may be localized to the instance of the program (since it is stored on the stack or in a register). Although the programmer may compromise this capability (by using static storage, for example), the build tools need to support reentrancy. As mentioned previously, some ANSI-standard library functions are intrinsically nonreentrant, and some care is required in their use.
Since memory may be in short supply in an embedded system, cross-compilers generally offer a high level of control over its usage. A good example is a language extension supporting the packed keyword, which permits arrays and structures to be stored more efficiently. Of course, more memory-efficient storage may result in an access time increase, but such trade-offs are typical challenges of real-time system design.
One of the enhancements added to the C language during the ANSI standardization was the volatile keyword. Applying this qualifier to a variable declaration advises the compiler that the value of the variable may change in an unexpected manner. The compiler is thus prevented from optimizing access to that variable. Such a situation may arise if two tasks share a variable or if the variable represents a control or data register of an I/O device. It should be noted that the volatile keyword is not included in the standard C++ language. Many compilers do, however, include it as a language extension. The usefulness of a C++ cross-compiler without this extension is dubious.
All modern compilers make use of optimization techniques to generate good quality code. These optimization techniques can result in software that rivals handcrafted assembler code for size and efficiency. Optimizations can be local to a function or global across a whole module.
Many optimizations may be applied in a generalized way, regardless of the target. More interesting are those that take specific advantage of the architectural characteristics of a specific microprocessor. These include instruction scheduling, function inlining, and switch statement tuning.
Instruction scheduling is a mechanism by which instructions are presented to the microprocessor in a sequence that ensures optimal usage of the CPU. This technique is a common requirement for getting the best out of RISC architectures. However, CISC devices can benefit from such a treatment.
The inlining of functions is the procedure whereby the actual code of a (small) function is included instead of a call. This is useful to maximize execution speed of the compiled code. Some compilers require specific functions to be nominated for this treatment, but automatic selection by the compiler is preferable. The optimization can yield very dramatic improvements in runtime performance.
In C, switch statements lend themselves to optimal code generation. Depending upon the values and sequence of the case constants, quite different code-generation techniques may be appropriate. Explicit tests, lookup tables, or indexed jump tables are all possible, depending on the number and contiguousness of the case constants. It may even be efficient to generate a table with dummy entries if the constants are not quite contiguous. Since the compiler can “rewrite” the code each time it is run, efficiency rather than future flexibility can be the sole priority. This example gives a compiler a distinct advantage over a human assembler code writer.
Manufacturers of development tools for embedded systems have very limited knowledge of the architecture of individual configurations—every system is unique. As a result, fine control over the optimization process is essential. At a minimum, there should be a user-specified bias toward either execution time or memory usage.
In selecting build tools for embedded system software development, consider these two key issues:
Do the tools provide extensive accommodation for the special needs of embedded system development?
Does the compiler perform a high standard of optimization, with extensive user control of the process?
Having designed and written a program and succeeded in getting it compiled and built, the programmer’s next challenge is to verify the program’s operation during execution. This is a challenge for any programming activity and never more than when working on an embedded system. In this context, many external influences on the debugging process and stringent requirements dictate the selection of tools.
Some debugger features are desirable or vital in any context; others are specific to embedded systems work. We will concentrate on the latter.
A key capability of a debugger is the ability to debug fully optimized code. Although this sounds quite straightforward, it is not a facility offered by all debuggers. Often, there is a straight choice: ship optimized code or fully debugged code. It is common to select a microprocessor based on its performance and to rely on the compiler to deliver this performance. This is particularly true of high-performance RISC devices. It is unacceptable to be limited by available debugging technology.
In reality, debugging fully optimized code may be challenging for the programmer. The results of some optimizations (e.g., code motion and register coloring) can make it difficult to follow the execution process. It is, therefore, common to perform initial debugging with optimization “reigned in.” However, for the final stages of testing, the debugger should not preclude the use of maximum optimization.
Programmers write software in a high-level language (usually C or C++) primarily in the interests of efficiency. The debugger should pursue this philosophy fully and operate entirely in high-level terms. Code execution should be viewed on a statement-by-statement basis; line-by-line is not good enough. Data should be accessible in appropriate terms. Expression evaluation, structure expansion, and the following of pointers should all be straightforward. On the other hand, low-level access to code and data should also be available, when required.
C++ presents additional requirements: function names should always be shown “unmangled” and constructors and destructors should be visible, for example.
Since the suppliers of tools for embedded systems development cannot predict exactly what a given embedded system is like, they are unable to predict the precise functional requirements of the debugger. In the same way as with the build tools, this problem may be circumvented by providing enough flexibility to the user. For a debugger, this flexibility is manifest in the availability of a powerful scripting language. This might permit I/O device modeling, test automation, and code patching, for example.
The user interface of a debugger is of primary concern, because its design can directly affect the user’s productivity. It must be powerful, consistent, and intuitive, which is particularly important when debuggers are to be used in a variety of execution environments. It is clear that if a single debugger family can fulfill all the differing requirements, hours of operator training time can be saved.
Before considering how code debugging can be performed, it is useful to review the total development cycle of the embedded system. This process can be divided into five phases, as illustrated in Figure 10.5. At each phase, work on the software may progress, but the scope for progress and the techniques employed change as the system development continues.

In phase 1, although the system hardware is undefined, initial work developing algorithms and trying ideas can proceed. At this stage, it is wise to train the engineers who are going to use the debugger in the use of the software development tools.
At phase 2, since the hardware configuration is known, the engineer performs detailed software design and a large part of the implementation.
In phase 3, although hardware is available, a software engineer may often wish that it was not because the hardware will probably be unstable. However, the engineer can now begin the software/hardware integration.
In phase 4, the availability of stable hardware, maybe in multiple units, permits the engineer to complete final integration and testing.
Some development projects can be completed entirely within the factory, without requiring phase 5. Commonly, however, on-site installation requires final tuning of the software. At some later time, enhancements to the system may necessitate on-site work on the software.
Each development phase calls for a particular type of debugger, as described in the sections that follow.
At first sight, a native debugger (i.e., one running on the host computer, executing code in that environment) seems inappropriate for embedded systems development. However, there are two contexts in which such a tool may be useful.
During phase 1 of the project, with no clear idea of the target hardware configuration, a native debugger can provide a useful environment in which to develop ideas and formulate algorithms, particularly for sections of code that are not time critical. This idea can be extended further if a host-based prototyping environment is available. This permits a significant amount of development to proceed on parts of the application that interact with the hardware.
If a native debugger is available, one that has the same (or very similar) user interface to debuggers being used at later stages of the project, the native debugger can offer an ideal training ground, since even if the target hardware is available for training purposes, it may not be the safest place to “play around.” The worst that can happen with a native debugger is to crash the computer. The consequences of some embedded systems going out of control may be more dire.
The simulation of the target chip, instruction by instruction, on the host computer provides a very useful environment for software testing at almost any phase of the project. In particular, at phase 2, when the hardware is known but unavailable, a simulator will make rapid progress possible.
A simulator allows very detailed debugging to be performed. Although not running at anything like full speed, the simulator keeps track of execution time and permits accurate timings to be taken. This means the engineer can fine-tune critical code sections early in the development cycle. Since the simulator can effectively add functionality to the microprocessor it is simulating, the execution of the code may be monitored in great detail without any intrusion at all. This facilitates 100% performance analysis and code coverage, which is not possible using other techniques.
Of course, a simulator limited to the simulation of just the core CPU would be of limited utility. The simulator must also address the interrupt and I/O systems.
An in-circuit emulator (ICE) for the microprocessor is a very powerful tool for software/hardware integration, particularly when the hardware is exhibiting instability. An ICE enables the software to be run at full speed on the target, while permitting a real-time trace and the specification of complex breakpoint conditions.
Unfortunately, while they were once a ubiquitous tool in any embedded development lab, ICEs are no longer available for most high-end processors. The clock speed of processors made the devices more difficult and expensive to produce, and other technologies have become accepted alternatives.
If one is available, the usefulness of an ICE is influenced critically by the user interface, whose operation in high-level language terms is assumed. However, an interface that is compatible with other debuggers in use during the project is a real bonus. An important parameter in the selection of a debugger is support for industry-standard ICEs.
Once stable and fully-functional hardware is available, the exceptional power of an ICE is less necessary. This is partly because ICEs can be overkill once the hardware is working reliably. Additionally, a cost-effective means of performing on-target debugging for large teams is increasingly required.
This situation led to the development of monitor debuggers where the target hardware is connected to the host computer by a communications link (serial line, Ethernet, and so on) and the target runs a small (<10 K) monitor program that provides a debug environment to the debugger itself, which runs on the host. The result is a low-cost, highly functional debugging solution that enables code to be run at full speed on the target with very little overhead. The ICE may be retained for use in particularly tricky situations.
For a monitor debugger to be viable, the monitor itself must be highly configurable. Standard boards (VME cards and evaluation boards) should be supported “out of the box.” Tools and services must be available to facilitate the rapid accommodation of custom hardware.
Although the use of a monitor debugger is most common during phase 4 of a project, it can also be used in phase 5. If the target monitor is included in the shipped software (after all, its memory overhead is likely to be very small), on-site debugging may be possible using just a laptop computer running the debugger.
As the speed and complexity of microprocessors increases, the likely cost (and lack of feasibility) of in-circuit emulators increases. As a result, semiconductor manufacturers are increasingly adding debug facilities to the silicon itself. This may vary from the provision of hardware breakpoints (address/data comparators), which should be supported by a monitor debugger, to a special “debug mode” that requires specific debugger support.
An early example of such a debug mode is background debug mode (BDM), which is featured in Freescale 683xx (CPU32) series devices. Most commonly, devices use a JTAG connection to provide on-chip debug (OCD). Assertion of OCD mode stops the processor and enables a debugger to read and write information to and from the machine registers and memory. To utilize OCD, an appropriate connector must be included on the target board, but this low-cost connector does not represent a significant overhead. Between the host computer and the target board, an OCD adapter is required. Like a monitor, a debugger with OCD (also termed “hardware assist”) provides some ICE functionality at a much lower cost. Unlike a monitor, such a technique does not require an additional debug communications port(s) or code on the target.
As embedded applications become more complex, the use of a real-time operating system (RTOS) is increasingly common. Debugging such a system has its own challenges, and they dictate specific requirements in a debugger. Two particular areas of functionality are required in an RTOS debugger:
Code debugging must be “task aware.” Setting a breakpoint on a line of code should result in a break only when the code is being executed by the task being debugged. Code shared between tasks is very common, so this requirement can easily arise. Similarly, data belonging to a specific task instance must be accessible to the engineer.
Information about the multitasking environment (system data) is required: task status, queues, intertask communications, and so on.
It is clearly desirable that both these requirements are addressed in the same debug tool. If an in-house designed RTOS is used, particular debug challenges arise.
RTOS awareness may be implemented using all of the previously mentioned debug technologies. In particular, OCD and monitor debuggers are most commonly adapted. It is, however, quite possible to enhance simulators or even native debug environments to be RTOS aware.
In selecting debug tools for embedded systems software development, there are two key issues:
Does the debugger permit the use of fully optimized code?
Do the tools provide support for a wide selection of execution environments used in various phases of the development?
When selecting development tools, attention to standards is essential. For build and debug tools, it is worth investigating the tools that colleagues and associates are using. Industry standards are likely to enjoy long-term support and “grow” with the target chip. Apart from the development tools themselves, integration with standard version management systems is increasingly a requirement with larger project teams. Similarly, clear links to design techniques must be sought.
Beyond industry standards, attention should be paid to the adherence to “real” standards; that is, those set by international standards bodies. An obvious starting point is the programming language itself. Although the use of pure ANSI C/C++ is desirable, in reality a few specific language extensions are essential to make the language useful and efficient for embedded systems development. Such extensions are provided by suppliers of appropriate compilers (i.e., compilers specifically designed for working with embedded systems), and their use is, of course, very reasonable. A good example of an essential extension to the C language is the keyword interrupt, which enables a C function to be declared an interrupt service routine. Then the compiler can take care of the necessary context saving and restoring. However, some nonessential language extensions, provided by a few suppliers, should be avoided to aid code portability between compilers. Similarly, the use of a standard object module format (OMF) for relocatable and absolute binary files may remove the necessity of using build and debug tools from a single source.
In broad terms, choosing tools developed with open interfaces ensures interoperability with other products now and in the future.
Although selection of the software development tools is important in itself, it is one of a number of such selections that must be made during the development of an embedded system. Other selections include the target microprocessor, the development host computer, and the RTOS. It is important to appreciate the interaction between these various selection processes, some of which may be less obvious than others.
Many reasons can be cited for the selection of a particular microprocessor:
It has the right range of features.
The price was right.
Low power consumption.
It is fast.
I have used it before.
A colleague is using it.
I liked the salesman.
These reasons are all valid, and a combination of them may be justification for selecting a device. However, another criterion should also be applied:
A good range of software development tools is available.
Purchasing something from a single, unique source rarely is an acceptable decision. Why should it be the case with software tools? If a microprocessor is supported by a very limited range of tools—perhaps from a single vendor—its use should be called into question.
The choice of development platform is largely driven by the local culture. It is likely to be a PC (Windows or Linux) or a UNIX workstation. Software tools vendors offering support on an incredibly wide selection of hosts may be guilty of redefining the word “support.” Often, on the less-popular platforms, the product versions on offer are extremely old and have not been maintained.
The choice of an RTOS (along with the decision to use one or not) is influenced by a number of factors. This topic is worthy of a chapter by itself; however, the availability of development tools is a significant factor, which I address here.
An RTOS with a suitably open architecture makes the most sense. It should accept the output generated by a range of build tools. Suitable debugging tools must also be available.
An option, which is considered under some circumstances, is the use of an in-house developed RTOS. This often represents the worst case in terms of tool availability and compatibility.
Development tools are widely known to be key to the success of microprocessors. Although powerful embedded tools have been developed over the last two decades, little progress has been made in integrating multivendor tools on multiple hosts. Without good integration, communication between tools is restricted, and the full potential of the tools is untapped.
Proprietary IDEs (integrated development environments) limit integration and prevent use of best in class or preferred tools. This inflexibility frustrates developers and curbs productivity. De facto proprietary standards partially address this problem but are restricted to a single host. Thus, embedded developers have long wished for a host-agnostic open IDE that they can enhance with their own or third party tools.
The new Eclipse platform, an open host-independent, industry-standard base, makes this possible. On the desktop, the Eclipse platform is already noted for its excellence and is used in numerous business applications. The benefits seen on the desktop—a common tool interface and integration platform—can be brought to the embedded world.
During the Internet boom days, the availability of tools mushroomed for the various Internet business applications. Since these tools were built by diverse organizations, most of them had their own GUI paradigms and rarely worked well with each other. It became apparent that a standard IDE and framework were required. To address this need, IBM started the Eclipse project to build a well-designed tool integration platform so that independently built tools could be part of a single environment. The result was the Eclipse platform.
Originally, IBM released the Eclipse platform into Eclipse Open Source, and later, on February 2, 2004, the Eclipse Foundation reorganized into a not-for-profit corporation. “Eclipse became an independent body that would drive the platform’s evolution to benefit the providers of software development offerings and end-users. All technology and source code provided to this fast-growing ecosystem will remain openly available and royalty-free.”
Unlike other open source organizations, the Eclipse Foundation is driven by business needs; hence, it is also known as the “directed” open source organization.
A major goal for Eclipse is to provide a well-planned and secure platform for commercial tool vendors. In addition, the Eclipse Foundation constantly works to remove hurdles in licensing the platform for commercial use. Contributed code is thoroughly scrubbed before it is committed; to ensure ease of licensing, there are plans to replace the existing CPL (Common Public License), which is already much simpler than the GPL (General Public License), with a more relaxed EPL (Eclipse Public License).
The Eclipse design focuses on a new paradigm—an open platform to integrate tools. In the old paradigm, individual tools are integrated, one at a time, either into an IDE or with another tool. This is a workable patch for a small set of proprietary tools but fails to scale in the larger multivendor context.
To address scalability, the Eclipse platform uses the innovative plug-in architecture. The platform, developed from the ground up, comprises well-defined GUI and framework mechanisms that provide a standard interface, facilitate integration, and are extensible. Tool developers, who no longer have to worry about GUI and framework issues, can concentrate on their tool-specific advancements—for example, multicore debug.
Extension points, extensions, and plug-ins form the underlying mechanisms of the plug-in architecture. Plug-ins are the smallest functional entities. Eclipse plug-ins from any source can be plugged into the platform for a single integrated environment. Except for the platform runtime, Eclipse itself is implemented as a set of plug-ins as shown in Figure 10.6.

The core of Eclipse is its user interface made up of the Workbench, JFace, and the Standard Widget Toolkit (SWT). The combination of these plug-ins is known as the Rich Client Platform (RCP).
SWT and JFace—. SWT and JFace take care of the windowing system in an OS independent way allowing portability across hosts.
Workbench—. The Workbench is the Eclipse UI. It is a collection of editors, views, perspectives, and dialogs provided as a common base for tools to use and extend.
Workspace—. Resources (projects, folders, and files) reside in the Eclipse Workspace where you can navigate them at will. The manipulation of resources, of course, provokes automatic incremental builds.
Team—. The Team plug-in takes care of source control. CVS (Concurrent Versions System) is the default, but other source control systems, including ClearCase, Source Integrity, and Visual SourceSafe, can be plugged in.
Help—. The Help plug-in does what the name implies. Integrated tools can extend help for tool-specific needs.
As many in the Eclipse community have said, “The Eclipse platform by itself is an IDE for everything and nothing in particular.” CDT (C/C++ Development Tools) and JDT (Java Development Tools) are open source incarnations of the Eclipse platform for the desktop C++ and Java developer, respectively. They do not address the complexities of embedded development.
An Eclipse-based embedded IDE is a powerful, self-contained environment for building and debugging embedded systems, integrating program management and debug tools, and allowing users to drop in their favorite Eclipse plug-ins—for example, an editor or source control system.
It is important that such a development strictly adheres to Eclipse principles and is itself implemented as a set of plug-ins. This methodology allows the inheriting of today’s key features in Eclipse, but also future ones as they become available. For example, platform runtime changes made in Eclipse 3.0 would be automatically reflected in the embedded IDE.
The key embedded development technologies that need to be made available as Eclipse plug-ins include:
Build tools—. To accommodate the great variability between embedded systems, compilers, assemblers, linkers, and so on, build tools tend to be significantly more complex than their native development counterparts are. The return, in terms of improved usability, of their incorporation into an IDE is very significant.
Debug—. Software engineers spend more time debugging than anything else, and embedded programmers tend to use a variety of debug tools, which may accommodate different execution environments, RTOS awareness, or multicore debug capabilities.
Target connection—. An embedded development environment generally consists of a host computer with one or more target devices connected to it. These targets may be local, or they may be located remotely and reached via a network; they may be “real” targets (i.e., actual boards) or “virtual” (i.e., provided by some kind of simulation or emulation facility). Selecting and configuring the connections to multiple targets is another complex matter that may be readily simplified in this way.
Simulation—. Availability (or, rather, nonavailability) of hardware is an increasingly difficult challenge for embedded software developers, as the beginning stages of software development are brought forward to an earlier point in the project cycle. A number of simulation tools may be employed: native execution, instruction-set simulation, and hardware/software co-verification are all options. These also need to be brought into the IDE.
Profiling—. Ensuring that an embedded application functions correctly is the first priority, but since resources are always scarce, profiling tools are employed and need to be contained within the IDE. These tools analyze how resources, time, and memory primarily, are used by the application (and any associated RTOS).
Yes—why? For all the usual reasons: to reduce costs, time to market, and unnecessary redevelopment and to increase productivity, quality, and maintainability. How can UML models do all that?
That depends on what a model is, and how it relates to the systems development process. There are at least three meanings of “model,” and each meaning has different uses and implications. Let’s take a look at each meaning.
One meaning for the word “model” is a “sketch.” For example, we might sketch out a hardware configuration on the back of a beer mat, showing a few boxes for processors and lines for communication or adding a few numbers to indicate bandwidth or expected usage. The sketch is not precise or complete, nor is it intended to be. Often, a sketch of this nature is “talked to” by pointing at various boxes to explain what is happening there and how it relates to other elements. The purpose is to communicate a rough idea, or to try one out just to see if it will work. The sketch is neither maintained nor delivered.
A second meaning for “model” is “blueprint”—a classical example is the set of plans for a house. The blueprint lays out what must be done, describing properties needed to build the real thing, as determined by an architect. Because blueprints are intended to be plans for construction, they often map closely to the artifact that is to be built, so for each important element in construction, there is a “symbol.” Because software is a complex beast, the set of symbols—the vocabulary—can become quite large, and without standards, chaos can ensue.
Enter the Unified Modeling Language (UML), which is a language that can be used for building software blueprints. (It has other uses too, as we shall see.) The UML is the result of an effort to reduce needless differences between different systems development methods and establish a common vocabulary for software modeling.
Why would you want to use UML? For all the reasons we outlined previously. Thinking about what you intend to build carefully—to the point of defining it exactly so that someone else can build it—will reduce costs and decrease defects, similar to the efficiency of writing a detailed, reviewed shopping list that avoids all the effort involved in returning a wrong item and getting the right one.
However, as anyone who has built a house knows, the blueprint is rarely followed to the letter. Instead, as the builder (in contrast to the architect) constructs the house, the facts on the ground cause some modifications to be made.
The same argument can be applied to models: as we write code, we discover that our design wasn’t as clever as we thought. This critique has led to the deprecation of models as “paper mills” that deliver pictures but not working systems. Instead, it has been argued, we should just hack—sorry, write—code because it executes.
Execution is important because it closes the verification gap between a concept on paper and a reality that either works or not. Code either runs right or it doesn’t. You can’t be certain of that one way or the other with a blueprint, even with the best review team in the world.
The third meaning for “model” then, is an “executable.” When we build an executable model, we have described the behavior of our system just as surely as if we had written a program in C. Indeed, when you have a software model that can be compiled and executed, there’s no need to distinguish between the model and the “real thing.” It is the software.
So does this mean we should “program in UML”? In addition, if so, why should that reduce costs, time to market, and unnecessary redevelopment, as well as increase productivity, quality, and maintainability?
The answer to the first question is “Yes, but at a higher level of abstraction.” For example, when you declare an association between two classes, you do not say whether that will be implemented by a pointer, a reference, or a list (just as when you program in C, you don’t think about allocating registers). Therefore, while you are “programming,” when you build an executable UML model, you don’t have to think about a lot of things you normally worry about when programming in a language at a lower level of abstraction.
This approach reduces costs (the first of our reasons for modeling) because the cost of writing a line of code is the same irrespective of language. Studies as far back as 30 years ago showed that, on average, a developer produces 8 to 12 lines of assembly code, or C, or FORTRAN, or whatever per day. These numbers are “fully loaded,” meaning that we’re taking into account the time we spend in meetings, unjamming the printer, dealing with performance reviews, fighting the configuration management system, running tests, and all that other stuff. Although some programmers are much more productive, their productivity is also the same irrespective of language.
When we program in an executable UML, we write at a higher level of abstraction, thus reducing costs and increasing productivity. One user of executable UML generates 7 to 10 lines of C++ for each line of logic written in UML; the amount of code would be greater if this user’s projects were written in C. Because the number of lines of code per day is the same, this translates directly into a decrease in time to market and an increase in productivity. For these reasons, we developed higher-level programming languages as sketched in Figure 10.7.

Using an executable UML also increases quality. Not only is the number of defects reduced, but the errors are found earlier, providing time to react. It is better to know you have a problem when you have six months to go on the project than six weeks! Figure 10.8 shows the effect of applying this methodology.

Early error identification is achieved by building test cases and running them against the executable model. Because the model is executable, we can provide real values and get real results immediately, using a model executer that interprets the models. You and other experts can see immediately whether the model is doing the right thing. If it is not, you make the change in the models, then and there, and run the tests again.
We must emphasize that model testing occurs early in the life cycle, thus removing downstream defects. In turn, this reduces the effort involved in implementing the wrong thing, just as with that shopping list. The combination of removing defects early and avoiding wasted effort implementing the wrong thing reduces costs and time to market, while increasing productivity and quality.
Models are also more maintainable than code because it is easier to manipulate concepts at a high level of abstraction than a lower one. The careful reader will have noted that we have discussed all of our reasons to model except reduction of unnecessary development, or—putting it in the positive—maximizing reuse. While it is certainly easier to reuse models than code (that higher level of abstraction argument again), the main reason you can reuse models is the same reason you are more likely to reuse a C program than one written in M68000 assembly code—namely, you can port the C program across multiple hardware platforms.
The same concept applies to executable models. When we built an association, we did not specify whether it was implemented as a pointer, a reference, or a list. This allows us to decide later, once we better understand the speed and performance constraints of our system. In other words, executable models confer independence from the software platform, just as writing in C made us independent of the hardware platform. We can then redeploy the executable model onto different software platforms and implementation environments. This is actually something of an understatement. Models can be translated into just about any form, so long as their application behavior, as defined in the executable model, is preserved.
This brings us to a concern. When we moved from assembly code to C, we lost control of, for example, register allocation, which could lead to a reduction in the performance of the system—a killer concern in an embedded system. The keyword here is “control.” If the compiler does a good enough job we don’t care, but if the compiler doesn’t know enough about our environment to make sound decisions, and we have no control over those decisions, we’re in trouble.
For this reason, models need not only to be executable, but also to be translatable onto any software platform, and you, the developer, have to have control of how that translation process takes place, reducing performance concerns to zero. After all, if you can write the code, you can also describe how to go from a concept, as expressed in an executable model, to that code. A translatable UML also offers complete control of how that code is produced.
It is for this reason that we support executable and translatable UML, or xtUML, for short. xtUML models are both executable and translatable to any target software platform in an open manner. We do this by using a trick that differentiates blueprint models from executable models: separation of application from architecture.
The separation of the application from the architecture differentiates blueprint-type models from executable ones. To understand that, we first need to understand how “blueprint” model-driven developers do their work.
After some initial requirements work, which can be supported by models such as use cases, the blueprint developer builds an analysis model, in UML, that captures the problem domain under study. This model will use various elements of the UML, but there is no universal agreement as to what those elements should be. As a simple example, the UML allows for attributes to be tagged with a visibility (public, private, and so on). Should an analysis model include this information? That depends upon taste—some do, some don’t. Everyone is agreed that an analysis model should not contain design details, but there is little agreement on what that means exactly.
The next stage is to build a design model that does incorporate all that design detail. The design model is a blueprint that captures the software structure of the intended implementation. The work of transforming the analysis model to a design model exercises embedded systems design expertise. For example, we know, as embedded system designers, that a good way to store fixed-size data elements in a memory-limited environment is to pre-allocate memory—or whatever your expertise tells you to do. This expertise is applied to the analysis model to produce the design blueprint.
The next step is to code it up from the blueprint. Putting aside possible errors in the design, this means filling in code bodies. There are two ways to do that. One is to add the code directly to the model, and have a tool generate code according to the software structure. Another way is to code up the software structure suggested by the blueprint, adding in coding details. The process is sketched in Figure 10.9.

Nothing, if you like doing all that work over and over every time the technology—and therefore the software structure—changes. And if you like reinventing and reapplying the same programming constructs when you add new system functionality.
This approach to software development is rather like using C-like pseudo code to outline your design, then hand coding the assembler. Each time you add new application functionality, you have to decide over again how to pass parameters to a function, how to allocate registers to compute an expression, and so on. Each time you port to a new hardware platform, you have to work out what the assembly code meant (you wouldn’t trust the pseudo code, would you?) and rewrite it for a new processor.
At root, you have failed to leverage and capture the embedded systems design expertise represented by going from analysis to design to code. Alternatively, to use the pseudo code analogy, you have failed to leverage and capture the expertise involved in assembly coding.
The solution, of course, is to build a compiler from a more formalized pseudo code (which we may call C) for each of the various processors. Certain parts of the compilers are common, such as building an abstract syntax tree. Others are specialized to the target processor, though they may share common techniques for register allocation, expression ordering, or peephole optimization. The expertise is captured in an artifact (a compiler) that can be reused as required.
The same concept applies to xtUML model compilers. We can build model compilers for each software platform. (Note the adjective: each software platform.) A software platform is simply that set of technology that defines the software structure, such as choice of data structure and access to it; concurrency, threads, and tasking; and processor structure and allocation. All these details are filled in by the model compiler, just as a programming language compiler fills in all the details of register allocation, parameter passing, and so on, as determined by the hardware platform.
This approach captures the expertise involved in making embedded software design decisions and allows you to leverage it across a project and across many projects. Model compilers, like programming language compilers, can be bought.
Figure 10.10 illustrates the separation between application and architecture. The element to focus on is the dotted line that separates the two.

When we build an xtUML model, it is represented in a simple form for translation, as sets of data that are to be manipulated, states the elements of the problem go through, and some functions that execute to access data, synchronize the behavior of the elements, and carry out computation. The UML is just an accessible graphical front end for those simple elements. When you build a “class” in xtUML, such as CookingStep in a microwave oven, it represents a set of possible cooking steps you might execute, each with a cooking time and power level. Similarly, when you describe the life cycle of a cooking step using a state chart diagram, it follows a sequence of states as synchronized by other state machines (when you open the microwave door, it had better stop cooking!), external signals (such as a stop button), and timers. In addition, in each state, we execute some functions.
Naturally, it’s a bit more complicated than that, but the point is that any xtUML model can be represented in terms of these primitive concepts. And once that’s done, we can manipulate those primitive concepts completely independently of the application details.
The ability to perform this independent manipulation allows us to write rules. One rule might take a “class” represented as a set CookingStep(cookingTime, powerLevel) and produce a C++ class declaration. Crucially, the rule could just as easily produce a struct for a C program, or even a COMMON block in FORTRAN. Similarly, we may define rules that turn states into arrays, lists, switch statements, or follow the state pattern from the Design Patterns community. (This is why I put “class” in quotation marks. A “class” in an executable model represents the set of data that can be transformed into anything that captures that data; in a blueprint-type model, a class is an instruction to construct a class in the software.)
These rules let us separate the application from the architecture. The xtUML model captures the problem domain graphically and represents it in terms of sets, states, and functions. The rules read the application as stored in terms of sets, states, and functions, and turn that into code. This leads to the process shown in Figure 10.10.
The value here is that application models can be reused by applying different sets of rules (a different model compiler) to target a new software platform. Similarly, the model compiler can be reused in any project that requires the same architecture. The applications and the model compilers can each evolve separately, reducing costs, and increasing productivity and reuse.
There is one critical difference between today’s programming language compilers and model compilers. With a programming language compiler, you have limited control over the output. Sure, you can apply a few flags and switches, but if you truly dislike the generated code for any reason, you’re out of luck unless you persuade the vendor to make the changes to the compiler you require. With a model compiler, the translation rules are completely open. If you can see a better way to generate code because of the particular pattern of access to data, say, you can change the rule to generate exactly what you want. This completely removes any concerns about optimization. It is totally under your control.
I should emphasize that you rarely need to change the model compiler, still less write one of your own. But the knowledge that you can change it should increase your confidence in the technology. Another analogy to programming languages: when they were new, people were concerned about the quality of the output and having some control over it. Over time, of course, those concerns have diminished, even in the embedded space.
We will now take a look at the code that will be produced from xtUML models. Obviously, what we want is executable code. For an example, we will look at the safety-related logic of a simple microwave oven. The oven components are the door, which must be closed while cooking, and the actual cooking element. There will be some code to manage the cooking times and power levels.
Take a look at some representative code for such a microwave oven:
struct Oven_s
{
     ArbitraryID_t OvenID;

     /* Association storage */
     Door_s *Door_R1;
     Cooking_Step_s *Cooking_Step_R2;
     Cooking_Step_s *Cooking_Step_R3;
     Magnetron_s *Magnetron_R4;

     /* State machine current state */
     StateNumber_t current_state;
}; |
The C struct captures information about the oven, which has an arbitrary ID (an identifier to distinguish a particular instance) and some pointers that reference its components. The oven struct also has a current_state that captures the—well—current state of the oven.
The “Cooking step” in Figure 10.10 allows the microwave oven to be programmed to cook in steps, each at a different power level for a certain time. Each step describes cooking parameters for the oven. Typical uses are to program a cooking step to defrost by pushing one button (Time 1, say) with low power and a long time, followed by pushing another button (Time 2, for a second unimaginative name, say) to cook ready to eat at high power for a shorter time. There are twin steps because there are two buttons.
Here is the code for Cooking_Step_s:
struct Cooking_Step_s
{
     i_t stepNumber;
     i_t cookingTime;
     i_t powerLevel;
     Timer_s *executionTimer;

     /* Association storage */
     Oven_s *Oven_R2;
     Oven_s *Oven_R3;

     /* State machine current state */
     StateNumber_t current_state;
}; |
This structure includes a step number (used also as an identifier), cooking time, and power level. In the scenario described previously, there could be two instances of this struct, say:
Step Number | Cooking Time | Power Level |
|---|---|---|
1 | 10 mins | 20% |
2 | 3 mins | 100% |
An execution timer is also used to refer to one of several potential timers. This reference is required so the timer can be interrogated, reset, or deleted. In addition, association storage refers back to the oven. There are two associations because we can program two cooking steps.
Again, the cooking step has a current state attribute to capture whether the cooking step is ready (i.e., has been programmed), executing, or complete.
We need to understand the conceptual entities in the problem and how they are described by data. Figure 10.11 shows a so-called “class diagram,” which does just that.

This diagram declares four conceptual entities (the oven and the cooking step we have already discussed, plus a door interlock and a magnetron tube), with several associations identified with “R numbers.” The numbers are simply a way to identify each association uniquely; the “R” comes from the real-world relationship captured by the associations. The associations also have names that capture the real-world relationship. R2, for example, is read: Oven executes first CookingStep and CookingStep describes first cooking parameters for Oven.
The associations also have a multiplicity that indicates how many instances participate in each association. For R2, each oven may have zero or one (0, 1) first cooking steps. And each cooking step may or may not be the first cooking step for this oven (hence the 0, 1 again). The association (R4) between the oven and the magnetron is “1” in both directions because one Oven houses one Magnetron, and one Magnetron is housed in one Oven. In general, an association can have many instances, as when a dog owner owns (one or more) dogs, which would be written “1. . . *”. A person, on the other hand, owns “0. . . *” dogs, because you have to own at least one dog to be considered a dog owner, but a person is free to choose not to own any.
Let’s compare now the “class diagram” of Figure 10.11 with the declaration of Oven_s. We can see that the name of the struct is the same as the name of the box but with a suffix _s, and the OvenID has a type ArbitraryID with a suffix _t; both these coding conventions remind us of the purpose of the name symbols.
The second section of the code, marked “Association storage,” has a pointer of type Door_s, named Door_R1, which implements the R1 association. Remember, the _s indicates the pointer is to a struct capturing information about the door. Similarly, the other pointers implement the other associations, R2, R3, and R4.
The current_state attribute is part of an underlying state machine mechanism; it’s a little special and deserves its own type—state_number_t. It happens to be an integer, but because we know something about its likely values, we may choose to implement it as an unsigned char, for instance.
The primary observation to make here is the close correlation between the oven diagram and the corresponding declaration. Note that the declaration of Cooking_Step_s and the Cooking Step “class” have the same close correspondence too.
So, why do we put quotation marks around “class”? We do so because the class oven isn’t a class at all. It’s a C struct! This goes back to the separation between application and architecture we discussed earlier. The application model describes the fundamentals of the solution, while the architecture defines the mapping to the implementation—just as we showed here in this extended example.
Moreover, the C we showed illustrates the point we made right at the beginning. The models we build are executable and translated into the implementation. This is in contrast to “blueprint-type” models that are intended to direct the implementation. There, a “class” means that we should build a class in the code. Here a “class” simply declares important data and houses behavior as defined by a state machine, the trace of which is the current-state attribute.
Modeling and the use of the UML mean different things to different people; the terminology can be confusing and is often misused or abused. There are various possible goals that come out of the use of modeling, but an approach that reduces rework and leverages the diverse expertise of the embedded development team must be a clear winner.
Developers of embedded systems have always faced a number of challenges. From determining the hardware/software partition to meeting performance and cost objectives, the job of building these systems has never been easy. With ever-increasing demand for more functionality packed into smaller spaces consuming less power, building embedded systems definitely is becoming more complex every day. Add to these demands the need to shrink development cycles and reduce the overall cost of the system, and you have the state of the embedded systems industry today.
This brief chapter provides a glimpse at a new way to overcome many of the challenges confronting embedded systems developers today.
Perhaps because it involves the coordination of at least two very creative and rather complex disciplines: software engineering and logic design. Maybe because it often involves creating something new—something nobody has ever built before. Or it may simply be the multitude of choices to be made: allocation of function among logic and software, which processor to use, how to arrange the bus, which programming language to employ, and whether or not to use an operating system. Most of these choices interact with one another in interesting ways, making the prospect of building a new product more than a little daunting.
By their very nature, embedded systems meld software and hardware together to form a coherent solution. The user of the resulting product never fully appreciates the effort that goes into getting the partition between the two right. With current development practices, getting it wrong is very costly at best and disastrous at worst.
Verifying the hardware/software partition requires the ability to test the system, and producing a version of the system that can represent the real thing accurately enough to verify the partition requires a huge intellectual investment. First, a hardware/software interface specification must be painstakingly written (or scratched out on a bar napkin, as the case may be). Then, the logic designers and the software engineers must construct, using implementation languages like VHDL and C, behavioral models of the function to be mapped to hardware and software. In most cases, the software engineers are not building models at all, but instead are writing the application code for the system.
Working at a level of abstraction somewhere between that of C and assembly language, the logic designers toil away to produce behavioral models of the hardware, often writing small test drivers and diagnostics to test their models along the way.
After months of effort, the two teams are ready to test their prototype system. Most folks do this in one of two ways: simulation or prototype hardware. With recent advances in FPGA technology, it has become significantly easier to test a logic design on an actual chip rather than resorting to simulation on the development workstation. Regardless of the test bed, the integration effort is always interesting.
Recall the development process started with two separate teams, each with different skills, heading off in parallel. The only thing connecting them is that hardware/software interface specification, written in natural language. You know where this is heading.
Two teams with disparate disciplines working against an ambiguous document to produce a coherent system. Sounds like a line from a cheap novel.
Invariably, the two components do not mesh properly. The reasons are myriad: the logic designers didn’t really mean what they said about that register in the document; the software engineers didn’t read all of the document, especially that part about waiting a microsecond between whacking those two particular bits; and of course, the most common failure mode of all, logic interface changes that came about during the construction of the behavioral models that (horrors!) didn’t make it into the interface specification.
Nothing really. Just time and money. And market share. We’ve been doing it this way for years. It’s nothing a few days (well, weeks) in the lab won’t solve. Besides, shooting these bugs is fun, and everyone is always so happy when it finally works. It’s a great bonding experience.
Eventually, the teams manage to get the prototype running, at least well enough that they can begin measuring the performance of the system. Keep in mind here that “performance” has a number of connotations in this context: along with the obvious execution time and latency issues, memory usage, gate count, power consumption, and its evil twin, heat dissipation, top the list of performance concerns in many of today’s handheld devices.
There’s nothing like a performance bottleneck to throw a bucket of cold water on the bonding rituals of the integration heroes. Unlike interface problems, you don’t fix hardware/software partition problems with a few long nights in the lab. No, this is when the engineers head back to their desks to ponder why they didn’t pursue that career as a long-haul truck driver.
Partition changes are expensive, and they are difficult to do correctly. Since the system is represented only in terms of implementation languages, knowledge of the partition is distributed throughout the software and the logic design. While it’s simple enough to say, “Let’s move this function into logic,” it’s quite another matter to make it happen. Remember, we have months invested in the construction of the prototype system. Making fundamental architectural changes cannot be done in a matter of days, at least not with the traditional approach previously described.
Getting the hardware and software to mesh properly and making the right partition between them are two significant challenges faced by all embedded systems developers. Certainly, many others exist, but we promised a short chapter.
So, it takes months of effort to produce a prototype that can be executed, but we need to execute it before we will know whether or not the logic designers and the software engineers agree on the hardware/software interface. We need to run the prototype system before we can measure its performance, but if the performance is unacceptable, we’ll spend weeks changing the hardware/software partition. That’s the state of the practice.
So, what if we had a way to eliminate completely the hardware/software interface problems that are discovered during the initial integration? What if we also had a way to change the partition between the hardware and software in a matter of hours?
We have just such a solution. First, we build abstract models of the system using an executable and translatable UML (xtUML). These models have sufficient detail that they are executable, so we can test the behavior of the system early and continuously before investing in the construction of an actual implementation in C and VHDL. The models are also translatable; that is, they are completely independent of design and implementation concerns. Testing at this level is therefore concerned only with ensuring that the models accurately represent the application to be constructed.
When the models are complete, we can specify an initial partition between hardware and software. A model compiler then translates the models into logic designs (VHDL, Verilog, SystemC, and so on) and software (C, C++, Java, assembler, and so on) according to the specified partitioning.
The interface between the hardware and software is defined by the model compiler. Because the implementation is generated, there can be no interface mismatches. Because we no longer have two separate teams of people working from a natural language interface specification, the generated implementation is guaranteed to have exactly zero interface problems. (This does have the unfortunate side effect of reducing the number of opportunities for logic designers and software engineers to spend long nights together in the integration lab working around interface problems.)
Because the xtUML models accurately and precisely represent the application, and the implementation is generated, with absolute fidelity, from these models, the partition can easily be changed, and a new implementation can then be generated. This replaces weeks of tedious manual changes to an implementation with a few hours of automatic generation.
With the ability to change the partition and regenerate the implementation, the developers can explore much more of the design space, measuring the performance of various allocation arrangements that would otherwise be prohibitively expensive to produce.
Our vision is to provide a complete system-level development environment that allows embedded developers to construct abstract models of their systems and then automatically translate those models into an optimized implementation that includes software and custom logic components. Of course, without the interface problems and the partition issues, we’ll need to find another excuse to spend long nights and weekends in the lab.