
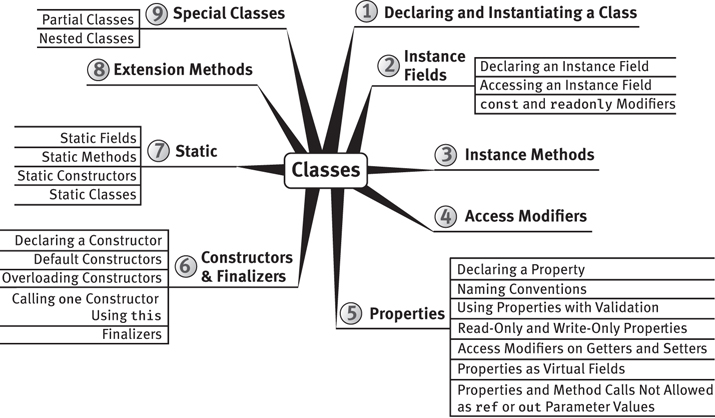
6. Classes
You briefly saw in Chapter 1 how to declare a new class called HelloWorld. In Chapters 2 and 3, you learned about the built-in primitive types included with C#. Since you have now also learned about control flow and how to declare methods, it is time to discuss defining your own types. Type definition is a core construct of any C# program; this support for classes and the objects created from them is what makes C# an object-oriented language.
This chapter introduces the basics of object-oriented programming using C#. A key focus is on how to define classes, which are the templates for objects themselves.
All the constructs of structured, control-flow-based programming from the previous chapters still apply within object-oriented programming. However, by wrapping those constructs within classes, you can create much larger, more organized programs, significantly increasing maintainability.
One of the key advantages of object-oriented programming is that instead of creating new programs entirely from scratch, you can assemble a collection of existing objects from prior work, extending the classes with new features, adding more classes, and thereby providing new functionality.
Readers unfamiliar with object-oriented programming should read the Beginner Topic blocks for an introduction. The general text outside the Beginner Topics focuses on using C# for object-oriented programming, under the assumption that readers are already familiar with object-oriented concepts.
This chapter delves into how C# supports encapsulation through constructs such as classes, properties, and access modifiers; we covered methods in Chapter 5. Chapter 7 builds on this foundation by introducing inheritance and the polymorphism that object-oriented programming enables.
Declaring and Instantiating a Class
Defining a class involves first specifying the keyword class, followed by an identifier, as shown in Listing 6.1.
Listing 6.1: Defining a Class
public class Employee
{
}
All code that belongs to the class will appear between the curly braces following the class declaration. Although not a requirement, generally you place each class into its own file. This makes it easier to find the code that defines a particular class, because the convention is to name the file using the class name.
Once you have defined a new class, you can use that class as though it were built into the framework. In other words, you can declare a variable of that type or define a method that takes a parameter of the new class type. Listing 6.2 demonstrates such declarations.
Listing 6.2: Declaring Variables of the Class Type
class Program
{
  static void Main()
  {
      Employee employee1, employee2;
      // ...
  }

  static void IncreaseSalary(Employee employee)
  {
      // ...
  }
}
Now that you have defined a new class type, it is time to instantiate an object of that type. Mimicking its predecessors, C# uses the new keyword to instantiate an object (see Listing 6.3).
Listing 6.3: Instantiating a Class
class Program
{
  static void Main()
  {
      Employee employee1 = new Employee();
      Employee employee2;
      employee2 = new Employee();

      IncreaseSalary(employee1);
      IncreaseSalary(employee2);
  }
}
Not surprisingly, the assignment can occur either in the same statement as the declaration or in a separate statement.
Unlike the primitive types you have worked with so far, there is no literal way to specify an Employee. Instead, the new operator provides an instruction to the runtime to allocate memory for an Employee object, initialize the object, and return a reference to the instance.
Although an explicit operator for allocating memory exists, there is no such operator for de-allocating the memory. Instead, the runtime automatically reclaims the memory sometime after the object becomes inaccessible. The garbage collector is responsible for the automatic de-allocation. It determines which objects are no longer referenced by other active objects and then de-allocates the memory for those objects. As a result, there is no compile-time–determined program location where the memory will be collected and restored to the system.
In this trivial example, no explicit data or methods are associated with an Employee, which renders the object essentially useless. The next section focuses on adding data to an object.
Instance Fields
One of the key aspects of object-oriented design is the grouping of data to provide structure. This section discusses how to add data to the Employee class. The general object-oriented term for a variable that stores data within a class is member variable. This term is well understood in C#, but the more standard term—and the one used in the specification—is field, which is a named unit of storage associated with the containing type. Instance fields are variables declared at the class level to store data associated with an object. Hence, association is the relationship between the field data type and the containing field.
Declaring an Instance Field
In Listing 6.4, the class Employee has been modified to include three fields: FirstName, LastName, and Salary (For elucidation, this listing and the related listings throughout the example are not marked as C# 8.0, even though Salary is declared as a C# 8.0 nullable reference type.).
Listing 6.4: Declaring Fields
public class Employee
{
  public string FirstName;
  public string LastName;
  public string? Salary;
}
With these fields added, it is possible to store some fundamental data with every Employee instance. In this case, you prefix the fields with an access modifier of public. The use of public on a field indicates that the data within the field is accessible from classes other than Employee (see the section “Access Modifiers” later in this chapter).
Like a local variable declaration, a field declaration includes the data type to which the field refers. Furthermore, it is possible to assign fields an initial value at declaration time, as demonstrated with the Salary field in Listing 6.5.
Listing 6.5: Setting Initial Values of Fields at Declaration Time
// Non-nullable field uninitialized warning disabled while code is
incomplete
#pragma warning disable CS8618
public class Employee
{
  public string FirstName;
  public string LastName;
  public string? Salary = "Not enough";
}
We delay the guidelines of naming and coding fields until later in the chapter, after C# properties and constructors have been introduced. Suffice it to say, until then the listings frequently do not follow the standard coding guidelines. In fact, there is a preponderance of the following warnings:
“CS0649: Field is never assigned to, and will always have its default value null.”
“CS8618: Non-nullable field is uninitialized. Consider declaring as nullable.”
In this case, since FirstName and LastName are not initialized, they trigger the CS8618 warning.
For purposes of elucidation, these warnings are ignored and, in fact, disabled with #pragma directives in the accompanying source code until the concepts are fully developed later in the chapter.
Accessing an Instance Field
You can set and retrieve the data within fields. However, the fact that a field does not include a static modifier indicates that it is an instance field. You can access an instance field only from an instance of the containing class (an object). You cannot access it from the class directly (without first creating an instance, in other words).
Listing 6.6 shows an updated look at the Program class and its utilization of the Employee class, and Output 6.1 shows the results.
Listing 6.6: Accessing Fields
class Program
{
  static void Main()
  {
      Employee employee1 = new Employee();
      Employee employee2;
      employee2 = new Employee();

      employee1.FirstName = "Inigo";
      employee1.LastName = "Montoya";
      employee1.Salary = "Too Little";
      IncreaseSalary(employee1);
      Console.WriteLine(
          "{0} {1}: {2}",
          employee1.FirstName,
          employee1.LastName,
          employee1.Salary);
      // ...
  }
      static void IncreaseSalary(Employee employee)
      {
          employee.Salary = "Enough to survive on";
      }
}
Output 6.1
Inigo Montoya: Enough to survive on
Listing 6.6 instantiates two Employee objects, as you saw earlier. It then sets each field, calls IncreaseSalary() to change the salary, and displays each field associated with the object referenced by employee1.
Notice that you first have to specify which Employee instance you are working with. Therefore, the employee1 variable appears as a prefix to the field name when assigning and accessing the field.
Instance Methods
One alternative to formatting the names in the WriteLine() method call within Main() is to provide a method in the Employee class that takes care of the formatting. Changing the functionality to be within the Employee class rather than a member of Program is consistent with the encapsulation of a class. Why not group the methods relating to the employee’s full name with the class that contains the data that forms the name? Listing 6.7 demonstrates the creation of such a method.
Listing 6.7: Accessing Fields from within the Containing Class
public class Employee
{
  public string FirstName;
  public string LastName;
  public string? Salary;

  public string GetName()
  {
      return $"{ FirstName }   { LastName }";
  }
}
There is nothing particularly special about this method compared to what you learned in Chapter 5, except that now the GetName() method accesses fields on the object instead of just local variables. In addition, the method declaration is not marked with static. As you will see later in this chapter, static methods cannot directly access instance fields within a class. Instead, it is necessary to obtain an instance of the class to call any instance member, whether a method or a field.
Given the addition of the GetName() method, you can update Program.Main() to use the method, as shown in Listing 6.8 and Output 6.2.
Listing 6.8: Accessing Fields from outside the Containing Class
class Program
{
  static void Main()
  {
      Employee employee1 = new Employee();
      Employee employee2;
      employee2 = new Employee();
      employee1.FirstName = "Inigo";
      employee1.LastName = "Montoya";
      employee1.Salary = "Too Little";
      IncreaseSalary(employee1);
      Console.WriteLine(
          $"{ employee1.GetName() }: { employee1.Salary }");
      // ...
  }
  // ...
}
Output 6.2
Inigo Montoya: Enough to survive on
Using the this Keyword
You can obtain the reference to a class from within instance members that belong to the class. To indicate explicitly that the field or method accessed is an instance member of the containing class in C#, you use the keyword this. Use of this is implicit when calling any instance member, and it returns an instance of the object itself.
For example, consider the SetName() method shown in Listing 6.9.
Listing 6.9: Using this to Identify the Field’s Owner Explicitly
public class Employee
{
  public string FirstName;
  public string LastName;
  public string? Salary;
  public string GetName()
  {
      return $"{ FirstName }  { LastName }";
  }

  public void SetName(
      string newFirstName, string newLastName)
  {
      this.FirstName = newFirstName;
      this.LastName = newLastName;
  }
}
This example uses the keyword this to indicate that the fields FirstName and LastName are instance members of the class.
Although the this keyword can prefix any and all references to local class members, the general guideline is not to clutter code when there is no additional value. Therefore, you should avoid using the this keyword unless it is required. Listing 6.12 (later in this chapter) is an example of one of the few circumstances when such a requirement exists. Listings 6.9 and 6.10, however, are not good examples. In Listing 6.9, this can be dropped entirely without changing the meaning of the code. And in Listing 6.10 (presented next), by changing the naming convention for fields and following the naming convention for parameters, we can avoid any ambiguity between local variables and fields.
In Listings 6.9 and 6.10, the this keyword is not used in the GetName() method—it is optional. However, if local variables or parameters exist with the same name as the field (see the SetName() method in Listing 6.10), omitting this would result in accessing the local variable/parameter when the intention was to access the field; given this scenario, use of this is required.
You also can use the keyword this to access a class’s methods explicitly. For example, this.GetName() is allowed within the SetName() method, permitting you to print out the newly assigned name (see Listing 6.11 and Output 6.3).
Listing 6.11: Using this with a Method
public class Employee
{
  // ...

  public string GetName()
  {
      return $"{ FirstName }  { LastName }";
  }

  public void SetName(string newFirstName, string newLastName)
  {
      this.FirstName = newFirstName;
      this.LastName = newLastName;
      Console.WriteLine(
          $"Name changed to '{ this.GetName() }'");
  }
}
class Program
{
  static void Main()
  {
      Employee employee = new Employee();

      employee.SetName("Inigo", "Montoya");
      // ...
  }
  // ...
}
Output 6.3
Name changed to 'Inigo Montoya'
Sometimes it may be necessary to use this to pass a reference to the currently executing object. Consider the Save() method in Listing 6.12.
Listing 6.12: Passing this in a Method Call
public class Employee
{
  public string FirstName;
  public string LastName;
  public string? Salary;

  public void Save()
  {
      DataStorage.Store(this);
  }
}
class DataStorage
{
  // Save an employee object to a file
  // named with the Employee name
  public static void Store(Employee employee)
  {
      // ...
  }
}
The Save() method in Listing 6.12 calls a method on the DataStorage class, called Store(). The Store() method, however, needs to be passed the Employee object, which needs to be persisted. This is done using the keyword this, which passes the instance of the Employee object on which Save() was called.
Storing and Loading with Files
The actual implementation of the Store() method inside DataStorage involves classes within the System.IO namespace, as shown in Listing 6.13. Inside Store(), you begin by instantiating a FileStream object that you associate with a file corresponding to the employee’s full name. The FileMode.Create parameter indicates that you want a new file to be created if there isn’t already one with the <firstname><lastname>.dat name; if the file exists already, it will be overwritten. Next, you create a StreamWriter class, which is responsible for writing text into the FileStream. You write the data using WriteLine() methods, just as though writing to the console.
Listing 6.13: Data Persistence to a File
using System;
// IO namespace
using System.IO;

class DataStorage
{
  // Save an employee object to a file
  // named with the Employee name.
  // Error handling not shown.
  public static void Store(Employee employee)
  {
      // Instantiate a FileStream using FirstNameLastName.dat
      // for the filename. FileMode.Create will force
      // a new file to be created or override an
      // existing file.
      FileStream stream = new FileStream(
          employee.FirstName + employee.LastName + ".dat",
          FileMode.Create);1

      // Create a StreamWriter object for writing text
      // into the FileStream
      StreamWriter writer = new StreamWriter(stream);

      // Write all the data associated with the employee
      writer.WriteLine(employee.FirstName);
      writer.WriteLine(employee.LastName);
      writer.WriteLine(employee.Salary);

      // Close the StreamWriter and its stream
      writer.Dispose();// Automatically closes the stream
  }
  // ...
}
1. This code could be improved with a using statement—a construct that we have avoided because it has not yet been introduced.
Once the write operations are completed, both the FileStream and the StreamWriter need to be closed so that they are not left open indefinitely while waiting for the garbage collector to run. Listing 6.13 does not include any error handling, so if an exception is thrown, neither Close() method will be called.
The load process is similar (see Listing 6.14).
Listing 6.14: Data Retrieval from a File
public class Employee
{
  // ...
}
// IO namespace
using System;
using System.IO;

class DataStorage
{
  // ...

  public static Employee Load(string firstName, string lastName)
  {
      Employee employee = new Employee();

      // Instantiate a FileStream using FirstNameLastName.dat
      // for the filename. FileMode.Open will open
      // an existing file or else report an error.
      FileStream stream = new FileStream(
          firstName + lastName + ".dat", FileMode.Open);2

      // Create a StreamReader for reading text from the file
      StreamReader reader = new StreamReader(stream);

      // Read each line from the file and place it into
      // the associated property
      employee.FirstName = reader.ReadLine()??
          throw new InvalidOperationException("FirstName cannot be null");
      employee.LastName = reader.ReadLine()??
          throw new InvalidOperationException("LastName cannot be null");
      employee.Salary = reader.ReadLine();

      // Close the StreamReader and its stream
      reader.Dispose();  // Automatically closes the stream

      return employee;
  }
}
class Program
{
  static void Main()
  {
        Employee employee1;
        Employee employee2 = new Employee();
        employee2.SetName("Inigo", "Montoya");
        employee2.Save();

       // Modify employee2 after saving
        IncreaseSalary(employee2);

        // Load employee1 from the saved version of employee2
        employee1 = DataStorage.Load("Inigo", "Montoya");

        Console.WriteLine(
            $"{ employee1.GetName() }: { employee1.Salary }");

        // ...
  }
  // ...
}
2. This code could be improved with a using statement—again, a construct that we have avoided because it has not yet been introduced.
Output 6.4 shows the results.
Output 6.4
Name changed to 'Inigo Montoya'
Inigo Montoya:
The reverse of the save process appears in Listing 6.14, which uses a StreamReader rather than a StreamWriter. Again, Close() needs to be called on both FileStream and StreamReader once the data has been read.
Output 6.4 does not show any salary after Inigo Montoya: because Salary was not set to Enough to survive on by a call to IncreaseSalary() until after the call to Save().
Notice in Main() that we can call Save() from an instance of an employee, but to load a new employee we call DataStorage.Load(). To load an employee, we generally don’t already have an employee instance to load into, so an instance method on Employee would be less than ideal. An alternative to calling Load on DataStorage would be to add a static Load() method (see the section “Static Members” later in this chapter) to Employee so that it would be possible to call Employee.Load() (using the Employee class, not an instance of Employee).
Notice the inclusion of the using System.IO directive at the top of the listing. This directive makes each IO class accessible without prefixing it with the full namespace.
Access Modifiers
When declaring a field earlier in the chapter, you prefixed the field declaration with the keyword public. public is an access modifier that identifies the level of encapsulation associated with the member it decorates. Six access modifiers are available: public, private, protected, internal, protected internal, and private protected. This section considers the first two.
The purpose of an access modifier is to provide encapsulation. By using public, you explicitly indicate that it is acceptable that the modified fields are accessible from outside the Employee class—that they are accessible from the Program class, for example.
But consider an Employee class that includes a Password field. It should be possible to call an Employee object and verify the password using a Logon() method. Conversely, it should not be possible to access the Password field on an Employee object from outside the class.
To define a Password field as hidden and inaccessible from outside the containing class, you use the keyword private for the access modifier, in place of public (see Listing 6.15). As a result, the Password field is only accessible from inside the Employee class, for example.
Listing 6.15: Using the private Access Modifier
public class Employee
{
  public string FirstName;
  public string LastName;
  public string? Salary;
// Working with decrypted passwords for elucidation
// only – this is not recommended.
private string Password;
private bool IsAuthenticated;

  public bool Logon(string password)
  {
      if(Password == password)
      {
          IsAuthenticated = true;
      }
      return IsAuthenticated;
  }
  public bool GetIsAuthenticated()
  {
      return IsAuthenticated;
  }
  // ...
}
class Program
{
  static void Main()
  {
      Employee employee = new Employee();

      employee.FirstName = "Inigo";
      employee.LastName = "Montoya";

      // ...

      // Password is private, so it cannot be
      // accessed from outside the class
      // Console.WriteLine(
      //    $"Password = { employee.Password}");
  }
  // ...
}
Although this option is not shown in Listing 6.15, it is possible to decorate a method with an access modifier of private as well.
If no access modifier is placed on a class member, the declaration defaults to private. In other words, members are private by default and programmers need to specify explicitly that a member is to be public.
Properties
The preceding section, “Access Modifiers,” demonstrated how you can use the private keyword to encapsulate a password, preventing access from outside the class. This type of encapsulation is often too strict, however. For example, sometimes you might need to define fields that external classes can only read but whose values you can change internally. Alternatively, perhaps you want to allow access to write some data in a class, but you need to be able to validate changes made to the data. In yet another scenario, perhaps you need to construct the data on the fly. Traditionally, languages enabled the features found in these examples by marking fields as private and then providing getter and setter methods for accessing and modifying the data. The code in Listing 6.16 changes both FirstName and LastName to private fields. Public getter and setter methods for each field allow their values to be accessed and changed.
Listing 6.16: Declaring Getter and Setter Methods
public class Employee
{

  private string FirstName;
  // FirstName getter
  public string GetFirstName()
  {
      return FirstName;
  }
  // FirstName setter
  public void SetFirstName(string newFirstName)
  {
      if(newFirstName != null && newFirstName != "")
      {
          FirstName = newFirstName;
      }
  }

  private string LastName;
  // LastName getter
  public string GetLastName()
  {
      return LastName;
  }
  // LastName setter
  public void SetLastName(string newLastName)
  {
      if(newLastName != null && newLastName != "")
      {
          LastName = newLastName;
      }
  }
  // ...
}
Unfortunately, this change affects the programmability of the Employee class. You can no longer use the assignment operator to set data within the class, nor can you access the data without calling a method.
Declaring a Property
Recognizing the frequency of this type of pattern, the C# designers provided explicit syntax for it. This syntax is called a property (see Listing 6.17 and Output 6.5).
Listing 6.17: Defining Properties
class Program
{
  static void Main()
  {
      Employee employee = new Employee();

      // Call the FirstName property's setter
      employee.FirstName = "Inigo";

      // Call the FirstName property's getter
      System.Console.WriteLine(employee.FirstName);
  }
}
public class Employee
{
  // FirstName property
  public string FirstName
  {
      get
      {
          return _FirstName;
      }
      set
      {
          _FirstName = value;
      }
  }
  private string _FirstName;
  // ...
}
Output 6.5
Inigo
The first thing to notice in Listing 6.17 is not the property code itself, but rather the code within the Program class. Although you no longer have the fields with the FirstName and LastName identifiers, you cannot see this by looking at the Program class. The syntax for accessing an employee’s first and last names has not changed at all. It is still possible to assign the parts of the name using a simple assignment operator—for example, employee.FirstName = "Inigo".
The key feature is that properties provide a syntax that looks programmatically like a field. In actuality, no such fields exist. A property declaration looks exactly like a field declaration, but following it are curly braces in which to place the property implementation. Two optional parts make up the property implementation. The get part defines the getter portion of the property. It corresponds directly to the GetFirstName() and GetLastName() functions defined in Listing 6.16. To access the FirstName property, you call employee.FirstName. Similarly, setters (the set portion of the implementation) enable the calling syntax of the field assignment:
employee.FirstName = "Inigo";
Property definition syntax uses three contextual keywords. You use the get and set keywords to identify either the retrieval or the assignment portion of the property, respectively. In addition, the setter uses the value keyword to refer to the right side of the assignment operation. When Program.Main() calls employee.FirstName = "Inigo", therefore, value is set to "Inigo" inside the setter and can be used to assign _FirstName. Listing 6.17’s property implementations are the most commonly used. When the getter is called (such as in Console.WriteLine(employee.FirstName)), the value from the field (_FirstName) is obtained and written to the console.
Begin 7.0Starting with C# 7.0, it is also possible to declare property getters and setters using expression bodied members, as shown in Listing 6.18.
Listing 6.18: Defining Properties with Expression Bodied Members
public class Employee
{
  // FirstName property
  public string FirstName
  {
      get
      {
          return _FirstName;
      }
      set
      {
          _FirstName = value;
      }
  }
  private string _FirstName;
  // LastName property
  public string LastName
  {
      get => _LastName;
      set => _LastName = value;
  }
  private string _LastName;
  // ...
}
End 7.0Listing 6.18 uses two different syntaxes for an identical property implementation. In real-world code, you should try to be consistent in your choice of syntax.
Begin 3.0Automatically Implemented Properties
In C# 3.0, property syntax included another syntax shortcut. Since a property with a single backing field that is assigned and retrieved by the get and set accessors is so trivial and common (see the implementations of FirstName and LastName), the C# 3.0 (and higher) compiler allows the declaration of a property without any accessor implementation or backing field declaration. Listing 6.19 demonstrates the syntax with the Title and Manager properties, and Output 6.6 shows the results.
Listing 6.19: Automatically Implemented Properties
class Program
{
  static void Main()
  {
        Employee employee1 =
            new Employee();
        Employee employee2 =
            new Employee();

        // Call the FirstName property's setter
        employee1.FirstName = "Inigo";

        // Call the FirstName property's getter
        System.Console.WriteLine(employee1.FirstName);

        // Assign an auto-implemented property
        employee2.Title = "Computer Nerd";
        employee1.Manager = employee2;

        // Print employee1's manager's title
        System.Console.WriteLine(employee1.Manager.Title);
  }
}
public class Employee
{
  // FirstName property
  public string FirstName
  {
      get
      {
          return _FirstName;
      }
      set
      {
          _FirstName = value;
      }
  }
  private string _FirstName;

  // LastName property
  public string LastName
  {
      get => _LastName;
      set => _LastName = value;
  }
  private string _LastName;

  public string? Title { get; set; }

  public Employee? Manager { get; set; }

  public string? Salary { get; set; } = "Not Enough";
  // ...
}
Output 6.6
Inigo
Computer Nerd
Auto-implemented properties provide for a simpler way of writing properties in addition to reading them. Furthermore, when it comes time to add something such as validation to the setter, any existing code that calls the property will not have to change, even though the property declaration will have changed to include an implementation.
End 3.0Begin 6.0Throughout the remainder of the book, we frequently use this C# 3.0 or later syntax without indicating that it is a feature introduced in C# 3.0.
One final thing to note about automatically declared properties is that in C# 6.0, it is possible to initialize them as Listing 6.19 does for Salary:
public string? Salary { get; set; } = "Not Enough";
Prior to C# 6.0, property initialization was possible only via a method (including the constructor, as we discuss later in the chapter). However, with C# 6.0, you can initialize automatically implemented properties at declaration time using a syntax much like that used for field initialization.
End 6.0Property and Field Guidelines
Given that it is possible to write explicit setter and getter methods rather than properties, on occasion a question may arise as to whether it is better to use a property or a method. The general guideline is that methods should represent actions and properties should represent data. Properties are intended to provide simple access to simple data with a simple computation. The expectation is that invoking a property will not be significantly more expensive than accessing a field.
With regard to naming, notice that in Listing 6.19 the property name is FirstName, and the field name changed from earlier listings to _FirstName—that is, PascalCase with an underscore prefix. Other common naming conventions for the private field that backs a property are _firstName and, on occasion, the camelCase convention, just like with local variables.3 The camelCase convention should be avoided, however. The camelCase used for property names is the same as the naming convention used for local variables and parameters, meaning that overlaps in names become highly probable. Also, to respect the principles of encapsulation, fields should not be declared as public or protected.
3. I prefer _FirstName because the m in front of the name is unnecessary when compared with an underscore (_). Also, by using the same casing as the property, it is possible to have only one string within the Visual Studio code template expansion tools instead of having one for both the property name and the field name.
Regardless of which naming pattern you use for private fields, the coding standard for properties is PascalCase. Therefore, properties should use the LastName and FirstName pattern with names that represent nouns, noun phrases, or adjectives. It is not uncommon, in fact, for the property name to be the same as the type name. Consider an Address property of type Address on a Person object, for example.
Using Properties with Validation
Notice in Listing 6.20 that the Initialize() method of Employee uses the property rather than the field for assignment as well. Although this is not required, the result is that any validation within the property setter will be invoked both inside and outside the class. Consider, for example, what would happen if you changed the LastName property so that it checked value for null or an empty string before assigning it to _LastName. (Recall that this step is necessary because even though the data type is a non-nullable string, the caller may have nullable reference types disabled, or the method may be invoked from C# 7.0 or earlier—before nullable reference types existed.)
Listing 6.20: Providing Property Validation
public class Employee
{
  // ...
  public void Initialize(
      string newFirstName, string newLastName)
  {
      // Use property inside the Employee
      // class as well
      FirstName = newFirstName;
      LastName = newLastName;
  }


  // LastName property
  public string LastName
  {
      get => _LastName;
      set
      {
          // Validate LastName assignment
          if(value is null)
          {
              // Report error
              // In C# 6.0 replace "value" with nameof(value)
              throw new ArgumentNullException("value");
          }
          else
          {
              // Remove any whitespace around
              // the new last name
              value = value.Trim();
              if(value == "")
              {
                  // Report error
                  throw new ArgumentException(
                       // Use "value" rather than nameof(value)
                       // prior to C# 6.0.
                      "LastName cannot be blank.", nameof(value));
              }
              else
                  _LastName = value;
          }
      }
  }
  private string _LastName;
  // ...
}
With this new implementation, the code throws an exception if LastName is assigned an invalid value, either from another member of the same class or via a direct assignment to LastName from inside Program.Main(). The ability to intercept an assignment and validate the parameters by providing a field-like API is one of the advantages of properties.
It is a good practice to access a property-backing field only from inside the property implementation. In other words, you should always use the property rather than calling the field directly. In many cases, this principle holds even from code within the same class as the property. If you follow this practice, when you add code such as validation code, the entire class immediately takes advantage of it.4
4. As described later in the chapter, one exception to this occurs when the field is marked as read-only, because then the value can be set only in the constructor. In C# 6.0, you can directly assign the value of a read-only property, completely eliminating the need for the read-only field.
Although rare, it is possible to assign value inside the setter, as Listing 6.20 does. In this case, the call to value.Trim() removes any whitespace surrounding the new last name value.
Begin 6.0Prior to C# 6.0, you would specify "value" for the paramName value of the exception. However, in C# 6.0, you can instead use nameof(value)—see Advanced Topic: nameof Operator for more information. I use nameof(value) for the remainder of the chapter, so you will need to switch the code back to "value" when compiling for C# 5.0 or earlier.
Read-Only and Write-Only Properties
By removing either the getter or the setter portion of a property, you can change a property’s accessibility. Properties with only a setter are write-only, which is a relatively rare occurrence. Similarly, providing only a getter will cause the property to be read-only; any attempts to assign a value will cause a compile error. To make Id read-only, for example, you would use the code shown in Listing 6.21.
Listing 6.21: Defining a Read-Only Property Prior to C# 6.0
class Program
{
  static void Main()
  {
      Employee employee1 = new Employee();
      employee1.Initialize(42);

      // ERROR:  Property or indexer 'Employee.Id'
      // cannot be assigned to; it is read-only
      // employee1.Id = "490";
  }
}

public class Employee
{
  public void Initialize(int id)
  {
      // Use field because Id property has no setter;
      // it is read-only
      _Id = id.ToString();
  }

  // ...
  // Id property declaration
  public string Id
  {
      get => _Id;
      // No setter provided
  }
  private string _Id;
}
Listing 6.21 assigns the field from within the Employee Initialize() method rather than the property (_Id = id). Assigning via the property causes a compile error, as it does in Program.Main().
Begin 6.0Starting in C# 6.0, there is also support for read-only, automatically implemented properties as follows:
public bool[,,] Cells { get; } = new bool[2, 3, 3];
This is clearly a significant improvement over the pre–C# 6.0 approach, especially given the commonality of read-only properties for something like an array of items or the Id in Listing 6.21.
One important note about a read-only automatically implemented property is that, like read-only fields, the compiler requires that such a property be initialized via an initializer (or in the constructor). In the preceding snippet we use an initializer, but the assignment of Cells from within the constructor is also permitted, as we shall see shortly.
Given the guideline that fields should not be accessed from outside their wrapping property, those programming in a C# 6.0 world will discover that there is almost never a need to use pre–C# 6.0 syntax for read-only properties; instead, the programmer can almost always use a read-only, automatically implemented property. The only exception might be when the data type of the read-only modified field does not match the data type of the property—for example, if the field was of type int and the read-only property was of type double.
End 6.0Calculated Properties
In some instances, you do not need a backing field at all. Instead, the property getter returns a calculated value, while the setter parses the value and persists it to some other member fields (if it even exists). Consider, for example, the Name property implementation shown in Listing 6.22. Output 6.7 shows the results.
Listing 6.22: Defining Calculated Properties
class Program
{
  static void Main()
  {
      Employee employee1 = new Employee();

      employee1.Name = "Inigo Montoya";
      System.Console.WriteLine(employee1.Name);

      // ...

  }
}
public class Employee
{
  // ...

  // FirstName property
  public string FirstName
  {
      get
      {
          return _FirstName;
      }
      set
      {
          _FirstName = value;
      }
  }
  private string _FirstName;

  // LastName property
  public string LastName
  {
      get => _LastName;
      set => _LastName = value;
  }
  private string _LastName;
  // ...

  // Name property
  public string Name
  {
      get
      {
          return $"{ FirstName } { LastName }";
      }
      set
      {
          // Split the assigned value into
          // first and last names
          string[] names;
          names = value.Split(new char[]{' '});
          if(names.Length == 2)
          {
              FirstName = names[0];
              LastName = names[1];
          }
          else
          {
              // Throw an exception if the full
              // name was not assigned
             throw new System. ArgumentException (
                  $"Assigned value '{ value }' is invalid",
                  nameof(value));5
          }
      }
  }
  public string Initials => $"{ FirstName[0] } { LastName[0] }";
  // ...
}
5. See Advanced Block: nameof Operator earlier in the chapter or the full explanation in Chapter 18.
Output 6.7
Inigo Montoya
The getter for the Name property concatenates the values returned from the FirstName and LastName properties. In fact, the name value assigned is not actually stored. When the Name property is assigned, the value on the right side is parsed into its first and last name parts.
Begin 2.0Access Modifiers on Getters and Setters
As previously mentioned, it is a good practice not to access fields from outside their properties because doing so circumvents any validation or additional logic that may be inserted.
An access modifier can appear on either the get or the set portion of the property implementation6 (not on both), thereby overriding the access modifier specified on the property declaration. Listing 6.23 demonstrates how to do this.
6. Introduced in C# 2.0. C# 1.0 did not allow different levels of encapsulation between the getter and setter portions of a property. It was not possible, therefore, to create a public getter and a private setter so that external classes would have read-only access to the property while code within the class could write to the property.
Listing 6.23: Placing Access Modifiers on the Setter
class Program
{
  static void Main()
  {
      Employee employee1 = new Employee();
      employee1.Initialize(42);
      // ERROR: The property or indexer 'Employee.Id'
      // cannot be used in this context because the set
      // accessor is inaccessible
      // employee1.Id = "490";
  }
}
public class Employee
{
  public void Initialize(int id)
  {
      // Set Id property
      Id = id.ToString();
  }

  // ...
  // Id property declaration
  public string Id
  {
      get => _Id;
      // Providing an access modifier is possible in C# 2.0
      // and higher only
      private set => _Id = value;
  }
  private string _Id;
}
By using private on the setter, the property appears as read-only to classes other than Employee. From within Employee, the property appears as read/write, so you can assign the property within the class itself. When specifying an access modifier on the getter or setter, take care that the access modifier is more restrictive than the access modifier on the property as a whole. It is a compile error, for example, to declare the property as private and the setter as public.
End 2.0Properties and Method Calls Not Allowed as ref or out Parameter Values
C# allows properties to be used identically to fields, except when they are passed as ref or out parameter values. ref and out parameter values are internally implemented by passing the memory address to the target method. However, because properties can be virtual fields that have no backing field or can be read-only or write-only, it is not possible to pass the address for the underlying storage. As a result, you cannot pass properties as ref or out parameter values. The same is true for method calls. Instead, when code needs to pass a property or method call as a ref or out parameter value, the code must first copy the value into a variable and then pass the variable. Once the method call has completed, the code must assign the variable back into the property.
Constructors
Now that you have added fields to a class and can store data, you need to consider the validity of that data. As you saw in Listing 6.3, it is possible to instantiate an object using the new operator. The result, however, is the ability to create an employee with invalid data. Immediately following the assignment of employee, you have an Employee object whose name and salary are not initialized. In Listing 6.3, you assigned the uninitialized fields immediately following the instantiation of an employee—but if you failed to do the initialization, you would not receive a warning from the compiler. As a result, you could end up with an Employee object with an invalid name. (Technically, in C# 8.0, non-nullable reference types will trigger a warning suggesting that the data type be switched to nullable to avoid a default of null. Regardless, initialization is required to avoid instantiating objects whose fields contain invalid data.)
End 8.0Declaring a Constructor
To correct this problem, you need to provide a means of specifying the required data when the object is created. You do this using a constructor, as demonstrated in Listing 6.26.
Listing 6.26: Defining a Constructor
public class Employee
{
  // Employee constructor
  public Employee(string firstName, string lastName)
  {
    FirstName = firstName;
    LastName = lastName;
  }

  public string FirstName{ get; set; }
  public string LastName{ get; set; }
  public string? Salary{ get; set; } = "Not Enough";

  // ...
}
As shown here, to define a constructor, you create a method with no return type, whose method name is identical to the class name. The constructor is the method that the runtime calls to initialize an instance of the object. In this case, the constructor takes the first name and the last name as parameters, allowing the programmer to specify these names when instantiating the Employee object. Listing 6.27 is an example of how to call a constructor.
Listing 6.27: Calling a Constructor
class Program
{
  static void Main()
  {
      Employee employee;
      employee = new Employee("Inigo", "Montoya");
      employee.Salary = "Too Little";

      System.Console.WriteLine(
          "{0} {1}: {2}",
          employee.FirstName,
          employee.LastName,
          employee.Salary);
  }
  // ...
}
Notice that the new operator returns the type of the object being instantiated (even though no return type or return statement was specified explicitly in the constructor’s declaration or implementation). In addition, you have removed the initialization code for the first and last names because that initialization takes place within the constructor. In this example, you don’t initialize Salary within the constructor, so the code assigning the salary still appears.
Developers should take care when using both assignment at declaration time and assignment within constructors. Assignments within the constructor will occur after any assignments are made when a field is declared (such as string Salary = "Not enough" in Listing 6.5). Therefore, assignment within a constructor will override any value assigned at declaration time. This subtlety can lead to a misinterpretation of the code by a casual reader who assumes the value after instantiation is the one assigned in the field declaration. Therefore, it is worth considering a coding style that does not mix both declaration assignment and constructor assignment within the same class.
Default Constructors
When you add a constructor explicitly, you can no longer instantiate an Employee from within Main() without specifying the first and last names. The code shown in Listing 6.28, therefore, will not compile.
Listing 6.28: Default Constructor No Longer Available
class Program
{
  static void Main()
  {
      Employee employee;
      // ERROR: No overload because method 'Employee'
      // takes '0' arguments
      employee = new Employee();

      // ...
  }
}
If a class has no explicitly defined constructor, the C# compiler adds one during compilation. This constructor takes no parameters so, by definition, it is the default constructor. As soon as you add an explicit constructor to a class, the C# compiler no longer provides a default constructor. Therefore, with Employee(string firstName, string lastName) defined, the default constructor, Employee(), is not added by the compiler. You could manually add such a constructor, but then you would again be allowing construction of an Employee without specifying the employee name.
It is not necessary to rely on the default constructor defined by the compiler. That is, programmers can define a default constructor explicitly—perhaps one that initializes some fields to particular values. Defining the default constructor simply involves declaring a constructor that takes no parameters.
Begin 3.0Object Initializers
Starting with C# 3.0, the C# language team added functionality to initialize an object’s accessible fields and properties. To do so, you can use the concept of an object initializer—a set of member initializers enclosed in curly braces following the constructor call to create the object. Each member initializer is the assignment of an accessible field or property name with a value (see Listing 6.29).
Listing 6.29: Calling an Object Initializer with Explicit Member Assignment
class Program
{
  static void Main()
  {
        Employee employee1 = new Employee("Inigo", "Montoya")
            { Title = "Computer Nerd", Salary = "Not enough"};
      // ...
  }
}
Notice that the same constructor rules apply even when using an object initializer. In fact, the resultant CIL is exactly the same as it would be if the fields or properties were assigned within separate statements immediately following the constructor call. The order of member initializers in C# provides the sequence for property and field assignment in the statements following the constructor call within CIL.
In general, all properties should be initialized to reasonable default values by the time the constructor exits. Moreover, by using validation logic on the setter, it is possible to restrict the assignment of invalid data to a property. On occasion, the values on one or more properties may cause other properties on the same object to contain invalid values. When this occurs, exceptions from the invalid state should be postponed until the invalid interrelated property values become relevant.
3.0Listing 6.30: Calling an Object Initializer
class Program
{
  static void Main()
  {
      List<Employee> employees = new List<Employee>()
         {
            new Employee("Inigo", "Montoya"),
            new Employee("Kevin", "Bost")
         };
      // ...
  }
}
End 3.0After the assignment of a new collection instance, the compiler-generated code instantiates each object in sequence and adds them to the collection via the Add() method.
Overloading Constructors
Constructors can be overloaded—you can have more than one constructor as long as the number or types of the parameters vary. For example, as Listing 6.31 shows, you could provide a constructor that has an employee ID with first and last names, or even just the employee ID.
Listing 6.31: Overloading a Constructor
public class Employee
{
  public Employee(string firstName, string lastName)
  {
      FirstName = firstName;
      LastName = lastName;
  }

  public Employee(
      int id, string firstName, string lastName )
  {
      Id = id;
      FirstName = firstName;
      LastName = lastName;
  }

// FirstName&LastName set inside Id property setter.
#pragma warning disable CS8618
public Employee(int id) => Id = id;
#pragma warning restore CS8618

  public int Id
  {
      get => Id;
      private set
      {
          // Look up employee name...
          // ...
      }
  }
  public string FirstName { get; set; }
  public string LastName { get; set; }
  public string? Salary { get; set; } = "Not Enough";

  // ...
}
This approach enables Program.Main() to instantiate an employee from the first and last names either by passing in the employee ID only or by passing both the names and the IDs. You would use the constructor with both the names and the IDs when creating a new employee in the system. You would use the constructor with only the ID to load the employee data from a file or a database.
As is the case with method overloading, multiple constructors are used to both support simple scenarios using a small number of parameters and complex scenarios with additional parameters. Consider using optional parameters in favor of overloading so that the default values for “defaulted” properties are visible in the API. For example, a constructor signature of Person(string firstName, string lastName, int? age = null) provides signature documentation that if the Age of a Person is not specified, it will default to null.
Begin 7.0Begin 8.0Notice also that, starting with C# 7.0, it is possible to have expression bodied member implementations of constructors, as in
// FirstName&LastName set inside Id property setter.
#pragma warning disable CS8618
public Employee(int id) => Id = id;
End 7.0End 8.0In this case, we invoke the Id property to assign FirstName and LastName. Unfortunately, the compiler doesn’t detect the assignment and, starting with C# 8.0, issues a warning to consider marking those properties as nullable. Since we are, in fact, setting them, the warning is disabled.
Constructor Chaining: Calling Another Constructor Using this
Notice in Listing 6.31 that the initialization code for the Employee object is now duplicated in multiple places, so it also has to be maintained in multiple places. The amount of code is small, but there are ways to eliminate the duplication by calling one constructor from another—a practice known as constructor chaining—using constructor initializers. Constructor initializers determine which constructor to call before executing the implementation of the current constructor (see Listing 6.32).
Listing 6.32: Calling One Constructor from Another
public class Employee
{
  public Employee(string firstName, string lastName)
  {
      FirstName = firstName;
      LastName = lastName;
  }

  public Employee(
      int id, string firstName, string lastName )
      : this(firstName, lastName)
  {
      Id = id;
  }

  // FirstName&LastName set inside Id property setter.
  #pragma warning disable CS8618
  public Employee(int id)
  {
      Id = id;

      // Look up employee name...
      // ...

      // NOTE: Member constructors cannot be
      // called explicitly inline
      // this(id, firstName, lastName);
  }
  #pragma warning restore CS8618

  public int Id { get; private set; }
  public string FirstName { get; set; }
  public string LastName { get; set; }
  public string? Salary { get; set; } = "Not Enough";

  // ...
}
To call one constructor from another within the same class (for the same object instance), C# uses a colon followed by the this keyword, followed by the parameter list on the called constructor’s declaration. In this case, the constructor that takes all three parameters calls the constructor that takes two parameters. Often, this calling pattern is reversed—that is, the constructor with the fewest parameters calls the constructor with the most parameters, passing defaults for the parameters that are not known.
Begin 8.0Non-Nullable Reference Type Properties with Constructors
Throughout this chapter, we have consistently disabled the C# nullable warning:
CS8618: Non-nullable field/property is uninitialized. Consider declaring as
nullable.
When you declare reference type (1) non-nullable fields or (2) non-nullable automatically implemented properties, it is obvious that these fields and properties need to be initialized before the containing object is fully instantiated. Not doing so would leave those fields and properties with a default null value—so they shouldn’t be declared as non-nullable.
The problem is that frequently the non-nullable fields and properties are initialized indirectly, outside the immediate scope of the constructor and therefore beyond the scope of the compiler’s code analysis, even if they are still, in fact, initialized, perhaps via a method or property that the constructor invokes.7 Following are some examples of this practice:
7. Or potentially via an external agent like reflection, see Chapter 18.
A simple property with validation that checks the value to be assigned to a field is not
nullbefore assigning it to the backing field that the compiler reports is uninitialized (see Listing 6.20).The calculated
Nameproperty (such as Listing 6.22) sets other non-nullable properties or fields within the class.The centralized initialization occurs in the manner shown in Listings 6.32 and 6.33.
Public properties are initialized by external agents that trigger the instantiation and then initialize the properties.8
8. Examples include the TestContext property in MSTest or objects initialized through dependency injection.
In most cases, the reference type non-nullable field or non-nullable automatically implemented property (referred to as a non-nullable field/property in this section—“reference type” is implied) is assigned indirectly via properties or methods that the constructor invokes. Unfortunately, the C# compiler doesn’t recognize an indirect assignment of a non-nullable field/property.
Furthermore, all non-nullable fields/properties need to ensure that they are not assigned a value of null. In the case of fields, they need to be wrapped in properties with the setter validation ensuring that a null value will not be assigned. (Remember that field validation relies on the guideline that we do not access fields outside of the property that wraps them.) The result is that non-nullable read-write fully implemented reference-type properties should have validation preventing null assignment.
Non-nullable automatically implemented properties need to be limited to read-only encapsulation, with any values assigned during instantiation and validated as not null prior to assignment. Read-write non-nullable reference type automatically implemented properties should be avoided, especially with public setters, since preventing null assignment is problematic. Although the uninitialized non-null property compiler warning can be avoided by assigning the property from the constructor, this is not enough: The property is read-write, so it could be assigned null after instantiation, thereby voiding your intent for it to be non-nullable.
Read/Write Non-Nullable Reference Type Properties
Listing 6.34 demonstrates how to inform the compiler and avoid the false warning that a non-nullable field/property is uninitialized. The end goal is to allow the programmer to inform the compiler that the properties/fields are non-nullable so that the compiler can inform callers about the (non-) nullability of those properties/fields.
Listing 6.34: Providing Validation On Non-Nullable Property
public class Employee
{
  public Employee(string name)
  {
      Name = name;
  }

  public string Name
  {
      get => _Name!;
      set => _Name =
          value ?? throw new ArgumentNullException(nameof(value));
  }
  private string? _Name;
  // ...
}
The code snippet to handle a non-nullable properties/fields that are not directly initialized by the constructor has several important qualities (listed in no particular order here):
The property setter includes a check for
nullthat occurs before setting the value of the non-nullable field. In Listing 6.34, this is done by using the null-coalescing operator and throwing anArgumentNullExceptionif the new value isnull.The constructor invokes a method or property that indirectly assigns the non-nullable field but fails to recognize that the field is initialized to a value other than
null.The backing field is declared as nullable to avoid the compiler warning that the field is uninitialized.
The getter returns the field with a null-forgiving operator—declaring that it is not
nullthanks to the setter validation.
For a non-nullable property, it is seemingly nonsensical to declare the backing field as nullable. This is necessary, however, since the compiler is oblivious to non-nullable field/property assignments outside from the constructor. Fortunately, this is a case where you, as the programmer, are justified in using the null-forgiving operator when returning the field because of the not-null check in the setter that ensures the field is never null.
Read-Only Automatically Implemented Reference-Type Properties
As pointed out earlier in this section, non-nullable automatically implemented reference-type properties need to be read-only to avoid invalid null assignments. However, you still need to validate any parameters that may be assigned during instantiation, as shown in Listing 6.35.
Listing 6.35: Validation of Non-Null Reference Type Automatically Implemented Properties
public class Employee
{
  public Employee(string name)
  {
      Name = name?? throw new ArgumentNullException(nameof(name));
  }

  public string Name { get; }
}
One could debate whether a private setter should be allowed on non-nullable automatically implemented reference-type properties. While possible, the more appropriate question to ask is whether your class could mistakenly assign null to the property. If you don’t encapsulate the field with validation in a setter, can you be sure you won’t mistakenly assign a null value? While the compiler will verify your intent during instantiation, it is questionable that the developer will always remember to check for null in values coming into your class that should be non-nullable—as occurs in the constructor shown in Listing 6.35.
Nullable Attributes
Rather than disable nullable or nullable warnings, occasionally it is helpful to provide the compiler with hints about your nullable intent. This is possible using metadata that you can place directly into your code with a construct called an attribute (see Chapter 18). There are seven different nullable attributes, each defined in the System.Diagnostics.CodeAnalysis namespace, and identified as either pre-conditions or post-conditions (Table 6.1).
It is helpful to have such attributes because occasionally, the nullability of the data type is insufficient. You can overcome this insufficiency with an attribute that decorates either incoming (a pre-condition nullable attribute) or outgoing (a post-condition nullable attribute) data on a method. The pre-condition communicates with the caller about whether the value specified is intended to be null, whereas the post-condition communicates with the caller about the nullability of the outgoing data. Consider, for example, the methods that follow the try-get pattern shown in Listing 6.36.
Table 6.1: Nullable Attributes
Attribute |
Category |
Description |
|
precondition |
Non-nullable input argument may be |
|
precondition |
Nullable input argument should never be |
|
postcondition |
Non-nullable return value may be |
|
postcondition |
Nullable return value will never be |
|
postcondition |
A non-nullable input argument may be |
|
postcondition |
Nullable input argument will not be |
|
postcondition |
Return value isn’t |
|
||
Listing 6.36: Using NotNullWhen and NotNullIfNotNull Attributes
using System.Diagnostics.CodeAnalysis;
// ...
static bool TryGetDigitAsText(
  char number, [NotNullWhen(true)]out string? text) =>
      (text = number switch
      {
          '1' => "one",
          '2' => "two",
          // ...
          '9' => "nine",
          _ => null
      }) is string;

[return: NotNullIfNotNull("text")]
static public string? TryGetDigitsAsText(string? text)
{
    if (text is null) return null;

    string result = "";
    foreach (char character in text)
    {
        if (TryGetDigitAsText(character, out string? digitText))
        {
            if (result != "") result += '-';
            result += digitText.ToLower();
        }
    }
    return result;
}
Notice that the call to digitText.ToLower() from TryGetDigitAsText() has no coalescing operator and does not issue a warning even though text is declared as nullable. This is possible because the text parameter in TryGetDigitAsText() is decorated with the NotNullWhen(true) attribute, which informs the compiler that, if the method returns true (the value specified with the NotNullWhen attribute), then your intent is that digitText will not be null. The NotNullWhen attribute is a post-condition declaration, informing the caller that output (text) is not null if the method returns true.
Similarly, for TryGetDigitsAsText(), if the value specified for the text parameter is not null, then the value return will not be null. This is possible because the pre-condition nullable attribute, NotNullIfNotNull, uses whether the input value of the text parameter is null to determine whether the return value may potentially be null.
Deconstructors
Constructors allow you to take multiple parameters and encapsulate them all into a single object. Up until C# 7.0, there was no explicit construct for implementing the reverse—unwrapping the encapsulated item into its constituent parts. Sure, you could manually assign each property to a variable; however, if there were a significant number of such variables, it would require many separate statements. With C#’s 7.0 syntax for tuples, this becomes significantly easier. You could, for example, declare a method like the Deconstruct() method shown in Listing 6.38.
Listing 6.38: Defining and Using a Deconstructor
public class Employee
{
   public void Deconstruct(
       out int id, out string firstName,
       out string lastName, out string salary)
  {
       (id, firstName, lastName, salary) =
            (Id, FirstName, LastName, Salary);
  }
  // ...
}
class Program
{
  static void Main()
  {
      Employee employee;
      employee = new Employee("Inigo", "Montoya");
      employee.Salary = "Too Little";
      employee.Deconstruct(out _, out string firstName,
         out string lastName, out string salary)
      System.Console.WriteLine(
          "{0} {1}: {2}",
          firstName, lastName, salary);
  }
}
Such a method could be invoked directly, as one would expect from Chapter 5, by declaring the out parameters inline.
Starting with C# 7.0, it became possible to invoke the Deconstruct() method—the deconstructor—implicitly by assigning the object instance to a tuple directly (this time assuming the assigned variables are already declared):
(_, firstName, lastName, salary) = employee;
The syntax results in the identical CIL code as that highlighted in Listing 6.38—it is just a simpler syntax (and a little less indicative that the Deconstruct() method is invoked). Note that the syntax allows for variables matching the out parameter assignments using tuple syntax. It does not allow for the assignment of a tuple type, either
(int, string, string, string) tuple = employee;
or with named items as in
(int id, string firstName, string lastName, string salary) tuple = employee
End 7.0To declare a deconstructor, the method name must be Deconstruct and have a signature that returns void and exclusively accepts two or more out parameters. And, given such a signature, it is possible to assign an object instance directly to a tuple without the explicit method invocation.
Static Members
The HelloWorld example in Chapter 1 briefly touched on the keyword static. This section defines the static keyword more fully.
First, let’s consider an example. Assume that the employee Id value needs to be unique for each employee. One way to accomplish this is to store a counter to track each employee ID. If the value is stored as an instance field, however, every time you instantiate an object, a new NextId field will be created such that every instance of the Employee object will consume memory for that field. The biggest problem is that each time an Employee object is instantiated, the NextId value on all of the previously instantiated Employee objects needs to be updated with the next ID value. In this case, what you need is a single field that all Employee object instances share.
Static Fields
To define data that is available across multiple instances, you use the static keyword, as demonstrated in Listing 6.39.
Listing 6.39: Declaring a Static Field
public class Employee
{
  public Employee(string firstName, string lastName)
  {
      FirstName = firstName;
      LastName = lastName;
      Id = NextId;
      NextId++;
  }

  // ...

  public static int NextId;
  public int Id { get; set; }
  public string FirstName { get; set; }
  public string LastName { get; set; }
  public string? Salary { get; set; } = "Not Enough";

  // ...
}
In this example, the NextId field declaration includes the static modifier and therefore is called a static field. Unlike Id, a single storage location for NextId is shared across all instances of Employee. Inside the Employee constructor, you assign the new Employee object’s Id the value of NextId immediately before incrementing the Id. When another Employee class is created, NextId will be incremented and the new Employee object’s Id field will hold a different value.
Just as instance fields (nonstatic fields) can be initialized at declaration time, so can static fields, as demonstrated in Listing 6.40.
Listing 6.40: Assigning a Static Field at Declaration
public class Employee
{
  // ...
  public static int NextId = 42;
  // ...
}
Unlike with instance fields, if no initialization for a static field is provided, the static field will automatically be assigned its default value (0, null, false, and so on)—the equivalent of default(T), where T is the name of the type. As a result, it will be possible to access the static field even if it has never been explicitly assigned in the C# code.
Nonstatic fields, or instance fields, provide a new storage location for each object to which they belong. In contrast, static fields don’t belong to the instance, but rather to the class itself. As a result, you access a static field from outside a class via the class name. Consider the new Program class shown in Listing 6.41 (using the Employee class from Listing 6.39).
Listing 6.41: Accessing a Static Field
using System;

class Program
{
  static void Main()
  {
      Employee.NextId = 1000000;

      Employee employee1 = new Employee(
          "Inigo", "Montoya");
      Employee employee2 = new Employee(
          "Princess", "Buttercup");

      Console.WriteLine(
          "{0} {1} ({2})",
          employee1.FirstName,
          employee1.LastName,
          employee1.Id);
      Console.WriteLine(
          "{0} {1} ({2})",
          employee2.FirstName,
          employee2.LastName,
          employee2.Id);

      Console.WriteLine(
          $"NextId = { Employee.NextId }");
  }

  // ...
}
Output 6.8 shows the results of Listing 6.41.
Output 6.8
Inigo Montoya (1000000)
Princess Buttercup (1000001)
NextId = 1000002
To set and retrieve the initial value of the NextId static field, you use the class name, Employee, rather than a reference to an instance of the type. The only place you can omit the class name is within the class itself (or a derived class). In other words, the Employee(...) constructor did not need to use Employee.NextId because the code appeared within the context of the Employee class itself, and therefore, the context was already understood. The scope of a variable is the program text in which the variable can be referred to by its unqualified name; the scope of a static field is the text of the class (and any derived classes).
Even though you refer to static fields slightly differently than you refer to instance fields, it is not possible to define a static field and an instance field with the same name in the same class. The possibility of mistakenly referring to the wrong field is high, so the C# designers decided to prevent such code. Overlap in names, therefore, introduces conflict within the declaration space.
Static Methods
Just as with static fields, you access static methods directly off the class name—for example, as Console.ReadLine(). Furthermore, it is not necessary to have an instance to access the method.
Listing 6.42 provides another example of both declaring and calling a static method.
Listing 6.42: Defining a Static Method on DirectoryInfoExtension
public static class DirectoryInfoExtension
{
  public static void CopyTo(
      DirectoryInfo sourceDirectory, string target,
      SearchOption option, string searchPattern)
  {
      if (target[target.Length - 1] !=
            Path.DirectorySeparatorChar)
      {
          target += Path.DirectorySeparatorChar;
      }
      if (!Directory.Exists(target))
      {
          Directory.CreateDirectory(target);

      }

      for (int i = 0; i < searchPattern.Length; i++)
      {
          foreach (string file in
              Directory.GetFiles(
                  sourceDirectory.FullName, searchPattern))
          {
              File.Copy(file,
                  target + Path.GetFileName(file), true);
          }
      }

      // Copy subdirectories (recursively)
      if (option == SearchOption.AllDirectories)
      {
          foreach(string element in
              Directory.GetDirectories(
                  sourceDirectory.FullName))
          {
              Copy(element,
                  target + Path.GetFileName(element),
                  searchPattern);
          }
      }
  }
}
      // ...
      DirectoryInfo directory = new DirectoryInfo(".\Source");
      directory.MoveTo(".\Root");
      DirectoryInfoExtension.CopyTo(
          directory, ".\Target",
          SearchOption.AllDirectories, "*");
      // ...
In Listing 6.42, the DirectoryInfoExtension.CopyTo() method takes a DirectoryInfo object and copies the underlying directory structure to a new location.
Because static methods are not referenced through a particular instance, the this keyword is invalid inside a static method. In addition, it is not possible to access either an instance field or an instance method directly from within a static method without a reference to the particular instance to which the field or method belongs. (Note that Main() is another example of a static method.)
One might have expected this method on the System.IO.Directory class or as an instance method on System.IO.DirectoryInfo. Since neither exists, Listing 6.42 defines such a method on an entirely new class. In the section “Extension Methods” later in this chapter, we show how to make it appear as an instance method on DirectoryInfo.
Static Constructors
In addition to static fields and methods, C# supports static constructors. Static constructors are provided as a means to initialize the class itself rather than the instances of a class. Such constructors are not called explicitly; instead, the runtime calls static constructors automatically upon first access to the class, whether by calling a regular constructor or by accessing a static method or field on the class. Because the static constructor cannot be called explicitly, no parameters are allowed on static constructors.
You use static constructors to initialize the static data within the class to a particular value, primarily when the initial value involves more complexity than a simple assignment at declaration time. Consider Listing 6.43.
Listing 6.43: Declaring a Static Constructor
public class Employee
{
  static Employee()
  {
      Random randomGenerator = new Random();
      NextId = randomGenerator.Next(101, 999);
  }

  // ...
  public static int NextId = 42;
  // ...
}
Listing 6.43 assigns the initial value of NextId to be a random integer between 100 and 1,000. Because the initial value involves a method call, the NextId initialization code appears within a static constructor and not as part of the declaration.
If assignment of NextId occurs within both the static constructor and the declaration, it is not obvious what the value will be when initialization concludes. The C# compiler generates CIL in which the declaration assignment is moved to be the first statement within the static constructor. Therefore, NextId will contain the value returned by randomGenerator.Next(101, 999) instead of a value assigned during NextId’s declaration. Assignments within the static constructor, therefore, will take precedence over assignments that occur as part of the field declaration, as was the case with instance fields. Note that there is no support for defining a static finalizer.
Be careful not to throw an exception from a static constructor, as this will render the type unusable for the remainder of the application’s lifetime.9
9. Technically the application domain’s lifetime—the Common Language Runtime’s virtual equivalent of an operating system process.
Begin 2.0Static Properties
You also can declare properties as static. For example, Listing 6.44 wraps the data for the next ID into a property.
Listing 6.44: Declaring a Static Property
public class Employee
{
  // ...
  public static int NextId
  {
      get
      {
          return _NextId;
      }
      private set
      {
          _NextId = value;
      }
  }
  public static int _NextId = 42;
  // ...
}
It is almost always better to use a static property rather than a public static field, because public static fields are callable from anywhere, whereas a static property offers at least some level of encapsulation.
Begin 6.0In C# 6.0, the entire NextId implementation—including an inaccessible backing field—can be simplified down to an automatically implemented property with an initializer:
End 6.0public static int NextId { get; private set; } = 42;
Static Classes
Some classes do not contain any instance fields. Consider, for example, a Math class that has functions corresponding to the mathematical operations Max() and Min(), as shown in Listing 6.45.
Listing 6.45: Declaring a Static Class
// Static classes were introduced in C# 2.0
public static class SimpleMath
{
  // params allows the number of parameters to vary
  public static int Max(params int[] numbers)
  {
      // Check that there is at least one item in numbers
      if(numbers.Length == 0)
      {
          throw new ArgumentException(
              "numbers cannot be empty", "numbers");

      }

      int result;
      result = numbers[0];
      foreach (int number in numbers)
      {
          if(number > result)
          {
              result = number;
          }
      }
      return result;
  }

  // params allows the number of parameters to vary
  public static int Min(params int[] numbers)
  {
      // Check that there is at least one item in numbers
      if(numbers.Length == 0)
      {
          throw new ArgumentException(
              "numbers cannot be empty", "numbers");
      }
      int result;
      result = numbers[0];
      foreach (int number in numbers)
      {
          if(number < result)
          {
              result = number;
          }
      }
      return result;
  }
}
public class Program
{
  public static void Main(string[] args)
  {
      int[] numbers = new int[args.Length];
      for (int count = 0; count < args.Length; count++)
      {
          numbers[count] = args[count].Length;
      }

      Console.WriteLine(
          $@"Longest argument length = {
              SimpleMath.Max(numbers) }");
      Console.WriteLine(
          $@"Shortest argument length = {
              SimpleMath.Min(numbers) }");
  }
}
End 2.0This class does not have any instance fields (or methods), so the creation of such a class would be pointless. Consequently, the class is decorated with the static keyword. The static keyword on a class provides two benefits. First, it prevents a programmer from writing code that instantiates the SimpleMath class. Second, it prevents the declaration of any instance fields or methods within the class. Because the class cannot be instantiated, instance members would be pointless. The Program class in prior listings is another good candidate for a static class because it, too, contains only static members.
Another distinguishing characteristic of the static class is that the C# compiler automatically marks it as abstract and sealed within the CIL. This designates the class as inextensible; in other words, no class can be derived from this class or even instantiate it.
Begin 3.0Begin 6.0In Chapter 5, we saw that the using static directive can be used with static classes such as SimpleMath. For example, adding a using static SimpleMath; declarative at the top of Listing 6.45 would allow you to invoke Max without the SimpleMath prefix:
      Console.WriteLine(
          $@"Longest argument length = { Max(numbers) }");
End 6.0Extension Methods
Consider the System.IO.DirectoryInfo class, which is used to manipulate filesystem directories. This class supports functionality to list the files and subdirectories (DirectoryInfo.GetFiles()), as well as the capability to move the directory (DirectoryInfo.Move()). One feature it doesn’t support directly is the copy feature. If you needed such a method, you would have to implement it, as shown earlier in Listing 6.42.
The DirectoryInfoExtension.CopyTo() method is a standard static method declaration. However, notice that calling this CopyTo() method is different from calling the DirectoryInfo.Move() method. This is unfortunate. Ideally, we want to add a method to DirectoryInfo so that, given an instance, we could call CopyTo() as an instance method: directory.CopyTo().
C# 3.0 simulates the creation of an instance method on a different class via extension methods. To do this, we simply change the signature of our static method so that the first parameter—that is, the data type we are extending—is prefixed with the this keyword (see Listing 6.46).
Listing 6.46: Static Copy Method for DirectoryInfoExtension
public static class DirectoryInfoExtension
{
  public static void CopyTo(
      this DirectoryInfo sourceDirectory, string target,
      SearchOption option, string searchPattern)
  {
      // ...
  }
}
  // ...
      DirectoryInfo directory = new DirectoryInfo(".\Source");
      directory.CopyTo(".\Target",
          SearchOption.AllDirectories, "*");
  // ...
With extension methods, it is now possible to add “instance methods” to any class, including classes outside of your assembly. The resultant CIL code, however, is identical to what the compiler creates when calling the extension method as a normal static method.
Extension method requirements are as follows:
The first parameter corresponds to the type that the method extends or on which it operates.
To designate the extension method, prefix the first parameter with the
thismodifier.To access the method as an extension method, import the extending type’s namespace via a
usingdirective (or place the extending class in the same namespace as the calling code).
If the extension method signature matches a signature already found on the extended type (i.e., if CopyTo() already existed on DirectoryInfo), the extension method will never be called except as a normal static method.
Note that specializing a type via inheritance (covered in detail in Chapter 7) is generally preferable to using an extension method. Extension methods do not provide a clean versioning mechanism, because the addition of a matching signature to the extended type will take precedence over the extension method without warning of the change. The subtlety of this behavior is more pronounced for extended classes whose source code you don’t control. Another minor point is that although development IDEs support IntelliSense for extension methods, simply reading through the calling code does not make it obvious that a method is an extension method.
In general, you should use extension methods sparingly. Do not, for example, define them on type object. Chapter 8 discusses how to use extension methods in association with an interface. Without such an association, defining extension methods is rare.
End 3.0Encapsulating the Data
In addition to properties and the access modifiers we examined earlier in the chapter, there are several other specialized ways to encapsulate the data within a class. For instance, there are two more field modifiers. The first is the const modifier, which you encountered when declaring local variables. The second is the ability to define fields as read-only.
const
Just as with const values, a const field contains a compile-time–determined value that cannot be changed at runtime. Values such as pi make good candidates for constant field declarations. Listing 6.47 shows an example of declaring a const field.
Listing 6.47: Declaring a Constant Field
class ConvertUnits
{
   public const float CentimetersPerInch = 2.54F;
   public const int CupsPerGallon = 16;
   // ...
}
Constant fields are static automatically, since no new field instance is required for each object instance. Declaring a constant field as static explicitly will cause a compile error. Also, constant fields are usually declared only for types that have literal values (e.g., string, int, and double). Types such as Program or System.Guid cannot be used for constant fields.
It is important that the types of values used in public constant expressions are permanent in time. Values such as pi, Avogadro’s number, and Earth’s circumference are good examples. However, values that could potentially change over time are not. For example, population counts, the poorest country, and exchange rates would be poor choices for constants.
readonly
Unlike const, the readonly modifier is available only for fields (not for local variables). It declares that the field value is modifiable only from inside the constructor or via an initializer during declaration. Listing 6.48 demonstrates how to declare a read-only field.
Listing 6.48: Declaring a Field as readonly
public class Employee
{
  public Employee(int id)
  {
      _Id = id;
  }

  // ...

  public readonly int _Id;
  public int Id
  {
      get { return _Id; }
  }

  // Error: A readonly field cannot be assigned to (except
  // in a constructor or a variable initializer)
  // public void SetId(int id) =>
  //          _Id = id;

  // ...
}
Unlike constant fields, readonly-decorated fields can vary from one instance to the next. In fact, a read-only field’s value can change within the constructor. Furthermore, read-only fields occur as either instance or static fields. Another key distinction is that you can assign the value of a read-only field at execution time rather than just at compile time. Given that read-only fields must be set in the constructor or initializer, such fields are the one case where the compiler requires the fields to be accessed from code outside their corresponding property. Besides this one exception, you should avoid accessing a backing field from anywhere other than its wrapping property.
Another important feature of readonly-decorated fields over const fields is that read-only fields are not limited to types with literal values. It is possible, for example, to declare a readonly System.Guid instance field:
public static readonly Guid ComIUnknownGuid =
      new Guid("00000000-0000-0000-C000-000000000046");
In contrast, this is not possible using a constant, because there is no C# literal representation of a GUID.
Begin 6.0Given the guideline that fields should not be accessed from outside their wrapping property, those programming in a C# 6.0 (or later) world will discover that that there is almost never a need to use the readonly modifier. Instead, it is preferable to use a read-only automatically implemented property, as discussed earlier in the chapter.
Listing 6.49 shows one more read-only example.
Listing 6.49: Declaring a Read-Only Automatically Implemented Property
class TicTacToeBoard
{
   // Set both players' moves to all false (blank)
   //    |   |
   // ---+---+---
   //    |   |
   // ---+---+---
   //    |   |
      public bool[,,] Cells { get; } = new bool[2, 3, 3];
   // Error: The property Cells cannot
   // be assigned to because it is read-only
   // public void SetCells(bool[,,] value) =>
   //          Cells = new bool[2, 3, 3];
  // ...
}
Whether implemented using C# 6.0 read-only automatically implemented properties or the readonly modifier on a field, ensuring immutability of the array reference is a useful defensive coding technique. It ensures that the array instance remains the same, while allowing the elements within the array to change. Without the read-only constraint, it would be all too easy to mistakenly assign a new array to the member, thereby discarding the existing array rather than updating individual array elements. In other words, using a read-only approach with an array does not freeze the contents of the array. Rather, it freezes the array instance (and therefore the number of elements in the array) because it is not possible to reassign the value to a new instance. The elements of the array are still writeable.
End 6.0Nested Classes
In addition to defining methods and fields within a class, it is possible to define a class within a class. Such classes are called nested classes. You use a nested class when the class makes little sense outside the context of its containing class.
Consider a class that handles the command-line options of a program. Such a class is generally unique to each program, so there is no reason to make a CommandLine class accessible from outside the class that contains Main(). Listing 6.50 demonstrates such a nested class.
Listing 6.50: Defining a Nested Class
// CommandLine is nested within Program
class Program
{
  // Define a nested class for processing the command line
  private class CommandLine
  {
      public CommandLine(string[] arguments)
      {
          for(int argumentCounter=0;
              argumentCounter<arguments.Length;
              argumentCounter++)
          {
              switch (argumentCounter)
              {
                  case 0:
                      Action = arguments[0].ToLower();
                      break;
                  case 1:
                      Id = arguments[1];
                      break;
                  case 2:
                      FirstName = arguments[2];
                      break;
                  case 3:
                      LastName = arguments[3];
                      break;
              }
          }
      }
      public string? Action { get; };
      public string? Id { get; };
      public string? FirstName { get; };
      public string? LastName { get; };
  }
  static void Main(string[] args)
  {
    CommandLine commandLine = new CommandLine(args);

    switch (commandLine.Action)
    {
        case "new":
            // Create a new employee
            // ...
            break;
        case "update":
            // Update an existing employee's data
            // ...
            break;
        case "delete":
            // Remove an existing employee's file
            // ...
            break;
        default:
            Console.WriteLine(
                "Employee.exe " +
         "new|update|delete <id> [firstname] [lastname]");
            break;
    }
  }
}
The nested class in this example is Program.CommandLine. As with all class members, no containing class identifier is needed from inside the containing class, so you can simply refer to it as CommandLine.
One unique characteristic of nested classes is the ability to specify private as an access modifier for the class itself. Because the purpose of this class is to parse the command line and place each argument into a separate field, Program.CommandLine is relevant only to the Program class in this application. The use of the private access modifier defines the intended accessibility of the class and prevents access from outside the class. You can do this only if the class is nested.
The this member within a nested class refers to an instance of the nested class, not the containing class. One way for a nested class to access an instance of the containing class is if the containing class instance is explicitly passed, such as via a constructor or a method parameter.
Another interesting characteristic of nested classes is that they can access any member on the containing class, including private members. The converse is not true, however: It is not possible for the containing class to access a private member of the nested class.
Nested classes are rare. They should not be defined if they are likely to be referenced outside the containing type. Furthermore, treat public nested classes with suspicion; they indicate potentially poor code that is likely to be confusing and hard to discover.
Begin 2.0Partial Classes
Partial classes10 are portions of a class that the compiler can combine to form a complete class. Although you could define two or more partial classes within the same file, the general purpose of a partial class is to allow the splitting of a class definition across multiple files. Primarily this is useful for tools that are generating or modifying code. With partial classes, the tools can work on a file separate from the one the developer is manually coding.
10. Introduced with C# 2.0.
Defining a Partial Class
C# allows declaration of a partial class by prepending a contextual keyword, partial, immediately before class, as Listing 6.51 shows.
Listing 6.51: Defining a Partial Class
// File: Program1.cs
partial class Program
{
}
// File: Program2.cs
partial class Program
{
}
In this case, each portion of Program is placed into a separate file, as identified by the comment.
Besides their use with code generators, another common use of partial classes is to place any nested classes into their own files. This is in accordance with the coding convention that places each class definition within its own file. For example, Listing 6.52 places the Program.CommandLine class into a file separate from the core Program members.
Listing 6.52: Defining a Nested Class in a Separate Partial Class
// File: Program.cs
partial class Program
{
  static void Main(string[] args)
  {
    CommandLine commandLine = new CommandLine(args);
    switch (commandLine.Action)
    {
       // ...
    }
  }
}
// File: Program+CommandLine.cs
partial class Program
{
  // Define a nested class for processing the command line
  private class CommandLine
  {
     // ...
  }
}
End 2.0Partial classes do not allow for extending compiled classes or classes in other assemblies. They are simply a means of splitting a class implementation across multiple files within the same assembly.
Begin 3.0Partial Methods
Extending the concept of partial classes is the concept of partial methods,11 which are allowed only within partial classes. Like partial classes, their primary purpose is to accommodate code generation.
11. Introduced with C# 3.0.
Consider a code generation tool that generates the Person.Designer.cs file for the Person class based on a Person table within a database. This tool examines the table and creates properties for each column in the table. The problem, however, is that frequently the tool cannot generate any validation logic that may be required because this logic is based on business rules that are not embedded into the database table definition. To overcome this difficulty, the developer of the Person class needs to add the validation logic. It is undesirable to modify Person.Designer.cs directly, because if the file is regenerated (e.g., to accommodate an additional column in the database), the changes would be lost. Instead, the structure of the code for Person needs to be separated out so that the generated code appears in one file, and the custom code (with business rules) is placed into a separate file, unaffected by any regeneration. As we saw in the preceding section, partial classes are well suited for the task of splitting a class across multiple files, but they are not always sufficient. In many cases, we also need partial methods.
Partial methods allow for a declaration of a method without requiring an implementation. However, when the optional implementation is included, it can be located in one of the sister partial class definitions—likely in a separate file. Listing 6.53 shows the partial method declaration and the implementation for the Person class.
Listing 6.53: Defining a Partial Method to Access Its Implementation
// File: Person.Designer.cs
public partial class Person
{
    #region Extensibility Method Definitions
    partial void OnLastNameChanging(string value);
    partial void OnFirstNameChanging(string value);
       #endregion
    // ...
    public string LastName
    {
        get
        {
            return _LastName;
        }
        set
        {
            if (_LastName != value)
            {
                OnLastNameChanging(value);
                _LastName = value;
            }
        }
    }
    private string _LastName;
    // ...
    public string FirstName
    {
        get
        {
            return _FirstName;
        }
        set
        {
            if (_FirstName != value)
            {
                OnFirstNameChanging(value);
                _FirstName = value;
            }
        }
    }
    private string _FirstName;
}
// File: Person.cs
partial class Person
{
  partial void OnLastNameChanging(string value)
  {
      if (value is null)
      {
          throw new ArgumentNullException(nameof(value));
      }
      if(value.Trim().Length == 0)
      {
          throw new ArgumentException(
              "LastName cannot be empty.",
              nameof(value));
      }
  }
}
In the listing of Person.Designer.cs are declarations for the OnLastNameChanging() and OnFirstNameChanging() methods. Furthermore, the properties for the last and first names make calls to their corresponding changing methods. Even though the declarations of the changing methods contain no implementation, this code will successfully compile. The key is that the method declarations are prefixed with the contextual keyword partial, in addition to the class that contains such methods.
In Listing 6.53, only the OnLastNameChanging() method is implemented. In this case, the implementation checks the suggested new LastName value and throws an exception if it is not valid. Notice that the signatures for OnLastNameChanging() between the two locations match.
Partial methods must return void. If the method didn’t return void and the implementation was not provided, what would the expected return be from a call to a nonimplemented method? To avoid any invalid assumptions about the return, the C# designers decided to prohibit methods with returns other than void. Similarly, out parameters are not allowed on partial methods. If a return value is required, ref parameters may be used.
End 3.0In summary, partial methods allow generated code to call methods that have not necessarily been implemented. Furthermore, if no implementation is provided for a partial method, no trace of the partial method appears in the CIL. This helps keep code size small while keeping flexibility high.
Summary
This chapter explained C# constructs for classes and object orientation in C#. Its coverage included a discussion of declaring fields and how to access them on a class instance.
This chapter also discussed the key decision of whether to store data on a per-instance basis or across all instances of a type. Static data is associated with the class, whereas instance data is stored on each object.
In addition, the chapter explored encapsulation in the context of access modifiers for methods and data. The C# construct of properties was introduced, and you saw how to use it to encapsulate private fields.
The next chapter focuses on how to associate classes with each other via inheritance and explores the benefits derived from this object-oriented construct.