Software
Once again, I’ve separated instructions for Windows and Linux. If you’re using Linux, feel free to skip ahead.
Windows
In addition to SDRSharp, you’ll need both a program called dsd (which stands for digital speech decoding) and a way of sending the output from SDRSharp to the dsd application, via software running inside your computer.
Ordinarily, when you tune your dongle and listen to the radio frequencies with a program like SDRSharp, the output is being piped (obviously) to your computer’s speakers. It’s really no different than listening to the radio in your car. If you want to decode digital speech signals, however, you need a way of sending the output of SDRSharp to a digital speech decoding program instead, and then sending that output to your speakers.
This is where a device called a virtual audio cable comes in. Picture it as connecting a cable to the "output" of SDRSharp and plugging it into the "input" of dsd—except that it’s all happening virtually, completely in software. Two commonly used programs for Windows users are Virtual Audio Cable and VB Cable. Virtual Audio Cable has both a free and a paid version, while VB Cable is completely free.
Virtual Audio Cable can be found at http://software.muzychenko.net/eng/vac.htm, and VB Cable can be downloaded from https://www.vb-audio.com/Cable/index.htm. I experimented extensively with both programs, and while I had no luck at all with Virtual Audio Cable, I had no problems with VB Cable. I must specify here that I didn’t try the paid version of Virtual Audio Cable, so it’s possible that the paid version works just fine. Thus, your results may vary if you decide to try it, but my instructions going forward will be for VB Cable.
Once you’ve downloaded VB Cable, extract everything from the downloaded zip file. Navigate inside the resulting folder and you should see, among a bunch of other files, a VBCABLESetup and a VBCABLESetupx64 application.
Choose the version right for your architecture, right-click it and choose Run as Administrator. All of the drivers should install, and if you check your Windows settings, you should see a new device, Cable Input, listed under your sound playback devices, and a Cable Output device under the recording tab.
While you have these settings open to check, set the VB-Audio Virtual Cable as your default recording device. This is because dsd—the program we’re installing next—will automatically use the default recording device as its input.
Once VB Audio is installed, you’ll need to download and install dsd. Ordinarily, this might be a tricky situation because the program is designed to run on Linux, and to run it on a Windows machine it needs to be compiled and installed using a Windows-based Linux emulator called Cygwin. Installing and running Cygwin can be instructive if you’re interested in compiling and running dsd yourself, but it can also be problematic if you don’t install it with all of the correct libraries, extensions, and compilers. It’s a rabbit hole that many hobbyists may not want to follow.
We’re fortunate that there are enough enthusiasts around that someone has done the hard work for us by compiling all of the necessary libraries and dsd itself, and then releasing the resulting Windows binary. This allows you to avoid the entire Cygwin-based rigamarole. You can download the binary from my github repo here: https://github.com/wdonat/jumpstarting_sdr.
Once you’ve downloaded the zip file, extract the contents, which will give you a directory called dsd-1.7.0. Inside that folder you’ll find the dsd application; don’t open it just yet, as it’s not something you just double-click and open. Just remember where you put it.
Now, open up SDRSharp and tune to a digitally encoded channel. In my experience, this can be one of the most problematic portions of the project, as there doesn’t seem to be a central listing of broadcast frequencies—digital or otherwise—sorted by area. Try Googling your local police department and public safety organizations, or http://www.radioreference.com has a pretty comprehensive database. If all else fails, you may need to (as I did) simply start scrolling through the frequency dial and looking for a digital signal. They’re pretty easy to distinguish, as they tend to be a digital “hum” sound and they’re often broadcast either sporadically or in regularly spaced bursts. However, it’s a large spectrum, and scrolling through it can take a long time, so you may want to save this option as a last resort. I wish there was a way to narrow it down, but all of my research up to now hasn’t revealed a general area of the spectrum where these frequencies tend to reside. If you’re aware of any such area, please let me know! I can say that in my area of southern California, I had my best results around 500 MHz. Obviously, your results may vary greatly.
Once you’ve found a digitally broadcasting candidate frequency, you’ll need to adjust your SDRSharp settings. First, set the audio output to VB Audio. Then set the receiving mode to NFM (Narrow Band FM), and then set the bandwidth to about 12 KHz. When you’ve tuned to the strongest part of the signal, press the Play button.
Of course, you shouldn’t hear anything, because instead of sending the output to your speakers as you did before, you’re piping the output to your VB Audio installation, which in turn is piping to the dsd application (which hasn’t started yet). Open a windows command prompt, and in that window, navigate to your extracted dsd-1.7.0 directory. Once you’re inside that folder, enter
dsd -i /dev/dsp -o /dev/dsp -fa
This command tells dsd to listen to the default audio recording device, which you’ve set to be the VB Audio output, and pipe it to the default audio output device, which is most likely your speakers. Finally, the -fa flag tells it not to discriminate and to scan for all sorts of encodings.
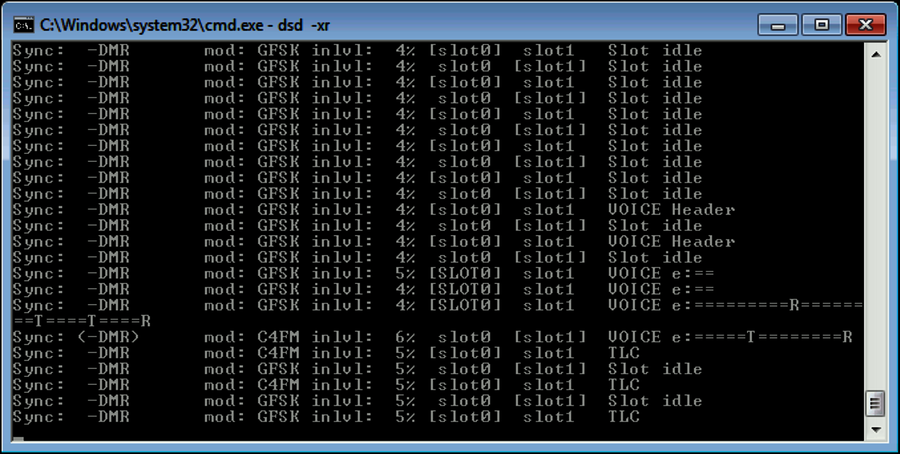
If you’ve found a dsd-encoded frequency, the terminal window should begin scrolling text, which will change when speech is detected. The text scrolls (adds an additional line) every time the signal updates; for example, when a user presses their TALK button, that will show as a status update of text.
If nothing happens, there are two options: either the frequency you’re listening to is not dsd-encoded or your settings are wrong. Double-check your settings and keep trying, including scanning the dial for likely signals.
One of the most important settings to play with is your gain—both in SDRSharp and in your Windows sound settings. Try different values in your SDRSharp output, and then open your Windows sound recording settings and adjust the microphone sensitivity. Once you’ve found a good digital speech frequency, it’s unmistakable, and you’ll really be able to hear a difference when you adjust either one of those settings.
Linux
Linux users will be using the same software as Windows users, but it’s a bit more involved to build and install the program in Linux since there are no precompiled binaries to use.
That software is called dsd (for digital speech decoder), and in addition to your GQRX software, you’ll need it and the packages it relies on. Windows users need to either install it using Cygwin or to download a pre-compiled binary, but Linux users will compile it for their particular platform. Start by visiting https://github.com/szechyjs/dsd and cloning the repository to your computer with the git clone command. Then visit https://github.com/szechyjs/mbelib and clone that repository as well.
Starting with the mbelib library, cd into the source folder and enter the following commands in your terminal:
mkdir build
cd build
cmake ..
make
sudo make install
This will install the mbelib application to your computer, which dsd depends on. When it’s done, install the other needed precursors for dsd with the following command:
sudo apt-get install libitpp-dev libsndfile1-dev portaudio19-dev
When those are finished installing, go to the dsd directory in your terminal and type in the following:
mkdir build
cd build
cmake ..
make
sudo make install
That should install all of the necessary dependencies to your machine.
Now, unlike Windows, you will not need a virtual audio cable to pipe the output of GQRX to dsd. Instead, you’ll need to use a program called Pulseaudio. It should be installed on most recent Linux distributions, but if it’s not,
sudo apt-get install pavucontrol
will install it.
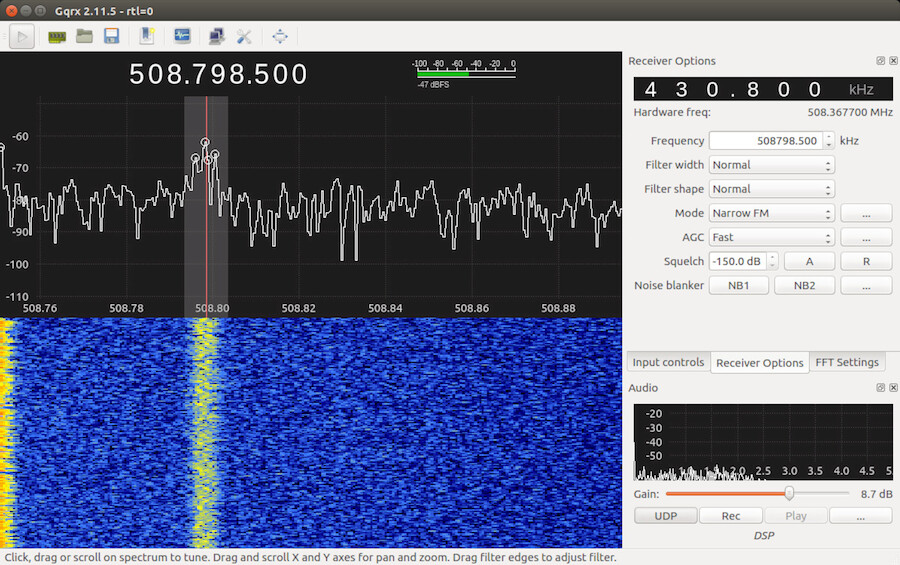
After installing these three applications—dsd, mbelib, and Pulseaudio, you’re finally ready to start. Start up GQRX by typing gqrx in your terminal.
You’ll need some specific settings to give dsd the sort of signal it can read, so set GQRX with the following parameters.
In the Receiver Options tab, set the mode to Narrow FM, choose the AGC setting of Fast, and set Squelch to about 60.
In the FFT Options tab, set your FFT size to 2048 and the sampling rate to 15 fps. You can increase these values if you have a particularly fast machine, but you shouldn’t have any problems decoding with these settings.
Then open the options window in GQRX by clicking the settings icon (the one that looks like an IC just to the right of the Start button). Set your audio output to Default and click OK.
Finally, before you start GQRX, open another terminal window, navigate to the dsd/build/bin directory and enter the following command:
padsp -- dsd -i /dev/dsp -o /dev/dsp -fa -ma
This starts dsd, using as input (and output) the /dev/dsp device, which is a virtual device being written to by the Pulseaudio program. If you would like to see what other options are available to you, enter
./dsd -h
in your terminal to see the manual page.
Back in the dsd terminal, you should be greeted with the following text:
Digital Speech Decoder 1.7.0-dev (build:v1.6.0-xx-xxxxxx)
mbelib version 1.3.0
Audio In/Out Device: /dev/dsp
After that, the terminal window should remain empty, since you’re not actually piping anything into it yet.

To start doing that, go back to your gqrx window. The main thing left to do is to find a digital voice signal, which is actually where I had the most trouble. You can search for dsd frequencies in your area, or http://www.radioreference.com has a pretty comprehensive database. If all else fails, you may need to (as I did) simply start scrolling through the frequency dial and looking for a digital signal. As you may have read previously in the Windows section, they’re easy to distinguish, as they tend to be a digital “hum” sound and they’re often broadcast either sporadically or in regularly spaced bursts. However, it’s a large spectrum, and scrolling through it can take a long time, so you may want to save this option as a last resort.
You’ll know when you find one because the terminal window in which dsd is running will suddenly start to scroll text as signals come in and are decoded.

It will, however, only scroll when digital voice data is being received; that is, if you’re listening to an active channel, you’re likely to hear only silence until someone actively presses the Send button on their radio. At that point, you’ll see the word Voice in the dsd window and will hear the voice coming through your speakers.
Congratulations! You’re now listening to digital voice signals, which should greatly expand your SDR horizons! Once you’ve found a channel, it becomes easier to find others, as you know what you’re looking for.
For our final project, in the next chapter we’ll track some weather satellites and grab some images sent over the airwaves.