Software
Ah, the software. Here’s where things can get a bit sticky, so bear with me while I attempt to lead you through the jungle. In a nutshell, you’ll be finding and installing a new device driver and a tuning program. Sounds simple, right?
Using your USB dongle for SDR experiments requires, at a minimum, a device driver that is more adaptable than the standard manufacturer’s or Windows or Linux drivers. Once you get the new driver(s) installed and working, you’ll also need software that enables you to tune the dongle to your choice of frequency. This is often called RTL-SDR software. Windows users most often use a program called SDRSharp, while Linux users tend to use a package called GQRX.
Windows
For simplicity’s sake, all the Windows work you see here will be done on the latest build of Windows 10. It’s likely, though not guaranteed, that the packages you see will also work with Windows 7 and 8. A newer computer is also a good idea, but anything as powerful as a dual-processor or better should be fine.
SDRSharp, the most common Windows program, requires Microsoft’s .NET version 4.6 or newer to be installed. If you’re using Windows 10, this may already be installed, but don’t count on it—I tested this process using a brand new install of Windows 10 Home edition and .NET 4.6 was missing. You may also need the Visual C++ runtime. (Don’t worry—you won’t be doing any C++ or .NET programming; those libraries are just necessary to compile and run the software.)
To install .NET, go to https://www.microsoft.com/en-us/download/details.aspx?id=55167 and choose your language from the pull-down menu. Click the big red Download button and follow the instructions to install it. The Visual C++ package is very similar; go to https://www.microsoft.com/en-us/download/details.aspx?id=8328 and again choose your language. Click the Download button and follow the instructions to install the package.
When the installation is finished, you should now have all of the operating system tools you’ll need. Now, point your browser to https://airspy.com/download. Click the Download button next to Windows SDR Software Package (as shown in the image).

When the download is finished, you’ll have a file named sdrsharp.zip in your Downloads folder. Move that file to a directory of your choosing and extract it by right-clicking and selecting Extract Here. You’ll end up with a new directory called sdrsharp-x86. (Don’t worry if you’re running a 64-bit system; the software will install and run just fine.)
Navigate inside that directory and run install-rtlsdr.bat. Make sure you’re connected to the Internet before you run the bat file. A command prompt should open, which will then attempt to download two new files to your directory: rtlsdr.dll and zadig.exe. Both of these files are necessary to proceed. The file rtlsdr.dll is the modified driver for your SDR dongle, and zadig.exe is a handy tool for telling Windows to use the new driver instead of the old one (because the old one won’t work for SDR experiments).
Although zadig.exe downloaded for me without any problems, rtlsdr.dll did not. If this happens to you, you’ll need to download that file manually. Point your browser to http://osmocom.org/attachments/download/2242/RelWithDebInfo.zip, which will put a new RelWithDebInfo.zip file in your Downloads folder. Unzip the file the same way you did the sdrsharp.zip folder, and you should have a new directory named rtl-sdr-release.
Navigate inside that folder to either the x32 or x64 directory, depending on what version of Windows you’re running (most likely 64-bit). Copy this new rtlsdr.dll file into the sdrsharp-x86 directory.
If by chance the zadig.exe file didn’t download correctly, enter https://github.com/pbatard/libwdi/releases/download/b730/zadig-2.5.exe into your browser window and copy the resulting exe file into your sdrsharp-x86 directory.
That finishes off the software you need to download. Now you need to run everything. Plug in your dongle and wait for Windows to try to find or install drivers for it. Don’t worry whether it succeeds or not, since you’ll be replacing those drivers in a moment.
When it’s finished, open your sdrsharp-x86 directory, right-click the zadig.exe file, and select Run as Administrator. This will open the following window:
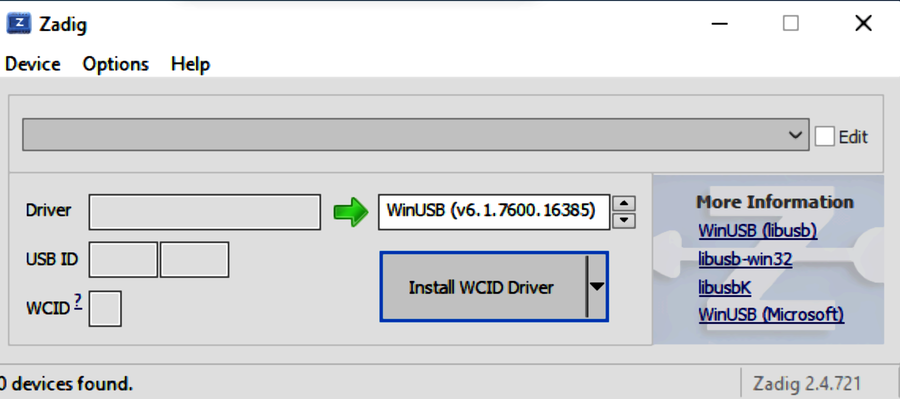
Zadig is a nifty little tool that lets you choose what drivers you want to use for a particular device—in our case, the SDR dongle. In the menu bar, select Options and make sure that there’s a check mark next to List All Devices. Also, uncheck Ignore Hubs or Composite Parents to make sure that you can see everything connected to your computer.
Now, in the main drop-down menu, you’ll need to select your dongle. It should appear in one of two ways: as Bulk-In, Interface (Interface 0), or as something like RTL2832UHIDIR or RTL2832U. Choose whichever one shows up in your menu. You’ll know you have the right device when the USB ID showing is 0BDA 2838 00. Oddly enough, every tuner dongle will have this USB ID, no matter the manufacturer. Do not select anything else, because this can severely screw up your USB drivers.
Underneath the drop-down menu, you’ll see a box labeled Driver, which is prepopulated with whatever driver Windows happened to select for your dongle. In the box next to it (which the big green arrow is pointing to), make sure WinUSB (vX.X.XXXX.XXXXX) is selected. This is the driver you’re going to use to replace the Windows default. Click the big blue Replace Driver button.
You’re almost guaranteed to get a warning about unverified publishers and unsigned drivers; just ignore it and install the software anyway.
You should now have the drivers necessary for your SDR dongle to work. It’s possible that if you unplug your dongle or move it to another USB port, you may need to run zadig.exe again, so don’t delete it from your sdrsharp folder.
On to the next chapter for your first radio reception.
Linux
If you prefer working with the penguin, you’re in luck, since there is SDR software out there for you, though it’s not as easy to install and use as AirSpy is for Windows. I’m using Ubuntu, because it’s what I’m most familiar with and its distribution is most widely supported in the SDR community. If you’re using Fedora, RedHat, Debian, or something else, your results may vary. I’m using Ubuntu 16.04, but feel free to use the most recent release which, as of this writing, is 19.10.
We’ll be using both the rtl-sdr package from the Ubuntu repos and a program called GQRX. To install the rtl drivers, simply open a terminal and enter
sudo apt-get update
sudo apt-get install rtl-sdr
After installing the package, you’ll need to see if your distribution is using the DVB-T drivers, which some have loaded by default. To check, enter
sudo rmmod dvb_usb_rtl28xxu
in your terminal. If you get the response rmmod: ERROR: Module dvb_usb_rtl28xxu is not currently loaded, you’re golden. If, on the other hand, you get a different response stating that the command was successful (or no response at all, which also means it was successful), you’ll need to permanently disable the drivers, since you’ll be replacing them with something else and the rmmod command is only temporary until you plug in the dongle again or reboot.
To disable them, create a file called rtlsdr.conf inside the /etc/modprobe.d directory (you’ll have to do it as sudo). In that file, enter
blacklist dvb_usb_rtl28xxu
and save it. Reboot your computer and you should be good to go.
To test that everything is working so far, open your terminal and enter
rtl_test
at the prompt. You should be greeted by something similar to the terminal screen.

If you’re unable to get the rtl_sdr packages working, you may need to install the drivers from source. To do that, first install the necessary dependencies:
sudo apt-get install libusb-1.0.0-dev git cmake
Then clone the rtl-sdr repo:
git clone git://git.osmocom.org/rtl-sdr.git
Once it’s cloned, make a build directory, build it, and install it:
cd rtl-sdr
mkdir build
cd build
cmake ../ -DINSTALL_UDEV_RULES=ON
make
sudo make install
sudo cp ../rtl-sdr.rules /etc/udev/rules.d
sudo ldconfig
When it’s finished, follow the preceding instructions about the Linux DVB-T drivers and then test with the rtl_test command.
Now you can install GQRX. As I said, I’m using Ubuntu, and the easiest way to install it is using the aptitude package manager (apt-get. However, you’ll have to add the correct repositories to your sources.list file first. To do that, enter the following in your terminal:
sudo add-apt-repository -y ppa:bladerf/bladerf
sudo add-apt-repository -y ppa:myriadrf/drivers
sudo add-apt-repository -y ppa:myriadrf/gnuradio
sudo add-apt-repository -y ppa:gqrx/gqrx-sdr
sudo apt-get update
Follow that with
sudo apt-get install gqrx-sdr
You should now be able to open it by typing
gqrx
in your terminal. Assuming everything installed without issue, you should now optimize it by installing the libvolk1-bin package and running the volk_profile tool by entering
sudo apt-get install libvolk1-bin
volk_profile
It’ll take a few minutes to run. When it’s finished, on to the next chapter for your first radio reception.