CHAPTER 7
Cross‐Compilation and the Eclipse IDE
To this point in the book, all of the code is built and executed directly on the BeagleBone. However, for larger projects this can be impractical, as you may need to manage many source files within a single project. In addition, compilation times can be slow on the BBB for building large projects. This chapter first describes how you can use your desktop computer to develop applications that can be deployed directly to the BBB. The Eclipse integrated development environment (IDE) is then introduced, which allows for advanced development capabilities, such as remote debugging. The chapter finishes by outlining how you can build a custom Linux kernel.
Equipment Required for This Chapter:
- A desktop computer running Linux (ideally Debian) or Debian running in a virtual machine
- BeagleBone Black for deployment and debugging
Further details on this chapter are available at www.exploringbeaglebone.com/chapter7/.
Setting Up a Cross‐Compilation Toolchain
This section describes how you can establish a fully featured cross‐compilation environment for building code for the BBB using your desktop computer. A typical C/C++ compiler that is executed on a desktop computer (e.g., Intel x86) will build executable machine code for that platform only. Therefore, a cross‐compiler is required, as it is capable of creating executable code for the BBB ARM platform directly from your desktop computer, even though it has a different hardware architecture.
Linux is generally used on the desktop computer for this task, as cross‐compiling code that is written on Windows/Mac devices to run on an ARM device is an incredibly challenging process, particularly when integrating third‐party libraries. Therefore, if you are using a Windows/Mac OS X environment, you can use the VirtualBox configuration that is described in Chapter 3. In fact, a VirtualBox Debian 64‐bit VM is used for all of the examples in this chapter.
The environment and configuration for cross‐platform development is an ever‐evolving process. While all of the steps in this chapter work at the time of publication, it is entirely possible that some steps in this chapter will change as updates are performed on the Linux kernel, to the toolchain, and to the Eclipse development environment. Please visit the web page associated with this chapter to check for updates: www.exploringbeaglebone.com/chapter7/. The primary aim of this chapter is to ensure that you grasp the concepts behind cross‐compilation and that you see practical examples of the various tools in use.
If you wish to cross‐compile Linux applications, the first step is to install a Linux toolchain. A toolchain is suitably named, as it is a set of software development tools and libraries (such as gcc, gdb, glibc) that are chained together to enable you to build executable code on one operating system on one type of machine, such as a 64‐bit Linux OS on an Intel x86 machine, but execute them on a different operating system and/or a different architecture, such as a 32‐bit Linux OS on an ARM device.
I have previously created a full video on integrating a soft float cross‐compilation toolchain with Ångström under Ubuntu; while there have been changes (including problems with access to the Ångström distribution website), the instructions in the video are largely valid (see tiny.cc/ebb701). It is not possible to cover absolutely everything in just one book, so here I focus on a toolchain for hard floats under Debian. Please use the following discussion, combined with the YouTube video that is available on the chapter web page to complete the installation of either toolchain.
A Toolchain for Debian
To begin, you can discover detailed information about your Linux version by typing the following commands individually or together using &&:
molloyd@beaglebone:~$ uname ‐a && cat /etc/os‐release && cat /proc/version
Linux beaglebone 3.8.13-bone50 #1 SMP Tue May 13 2014 armv7l GNU/Linux
PRETTY_NAME="Debian GNU/Linux 7 (wheezy)"
NAME="Debian GNU/Linux" . . .
In this example, a Debian 7.x image is used on the desktop machine. The steps in this description are based on the work at tiny.cc/ebb702. A Debian 64‐bit “Wheezy” VirtualBox VM is used on the desktop machine, so required tools need to be installed using the following steps (on the desktop machine):
-
Change to a root shell:
molloyd@debian:~$ sudo sh ‐ -
Go to the
/etc/aptdirectory and add any necessary repositories to yoursources.listfile:root@debian:~# cd /etc/apt root@debian:/etc/apt# nano sources.list -
Check the repositories that are needed for your distribution. In this case, the following entries need to be added to the bottom of the
sources.listfile:#Emdebian entries deb http://www.emdebian.org/debian unstable main deb http://ftp.us.debian.org/debian unstable main contrib non-free -
Save the file and return to the shell and install
emdebian‐archive‐keyring, which provides Debian key signatures for release files, in order to make it easier to use the Debian installer:root@debian:~# apt‐get install emdebian‐archive‐keyring root@debian:~# apt‐get update
Use apt‐get update to download the latest package lists from the repositories and update the local lists to contain information on the latest versions of packages and their dependencies. Use apt‐cache to search for the latest ARM compiler. The BBB with its Debian distribution supports hard floats (hf), so use hard‐float tools if they are available:
root@debian:~# apt‐cache search gnueabihf
binutils-arm-linux-gnueabihf - GNU binary utilities, arm-linux-gnueabihf . . .
g++-4.7-arm-linux-gnueabihf - GNU C++ compiler
gcc-4.7-arm-linux-gnueabihf - GNU C compiler
gcc-4.7-arm-linux-gnueabihf-base - GCC, the GNU Compiler Collection . . .
You can see from this list that the latest g++ compiler number available that supports hard floats, at the time of writing, is g++‐4.7‐arm‐linux‐gnueabihf. Install the latest version available to you and any dependencies, which should be automatically identified. You may have already installed some of these dependencies in earlier steps (e.g., adding Guest Additions to the Debian VM), but here is the list that was required for this installation:
~# apt‐get install build‐essential libc6‐armhf‐cross libc6‐dev‐armhf‐cross
~# apt‐get install binutils‐arm‐linux‐gnueabihf linux‐libc‐dev‐armhf‐cross
~# apt‐get install libstdc++6‐armhf‐cross
~# apt‐get install gcc‐4.7‐arm‐linux‐gnueabihf g++‐4.7‐arm‐linux‐gnueabihf
Please note that hard floats are being used here. If you wished to use soft floats for a different platform, then you would replace armhf with armel and gnueabihf with gnueabi in the preceding list. If you are having problems with dependencies, type sudo apt‐get autoremove and try an older version of the gcc and g++ compilers.
If all goes well, you should be able to execute the cross‐compiler at this point; however, you may have multiple versions installed, or you may wish to install multiple versions in the future. If you change directory to /usr/bin and perform ls arm* you might see something like the following:
root@debian:/usr/bin# ls arm*
arm-linux-gnueabihf-g++-4.7    arm-linux-gnueabi-readelf
arm-linux-gnueabihf-gcc-4.6    arm-linux-gnueabi-strings
arm-linux-gnueabihf-gcc-4.7    arm-linux-gnueabi-strip . . .
For convenience, you can create generic symbolic links to the version of the compilers that you wish to use. In this case symbolic links are created to the gXX‐4.7 compilers. This generic symbolic link is used when the Eclipse build settings are configured in the next section:
. . ./usr/bin# ln ‐s arm‐linux‐gnueabihf‐gcc‐4.7 arm‐linux‐gnueabihf‐gcc
. . ./usr/bin# ln ‐s arm‐linux‐gnueabihf‐g++‐4.7 arm‐linux‐gnueabihf‐g++
You can test that these symbolic links work, from any location (as /usr/bin is in the PATH by default), by using the following:
molloyd@debian:~$ arm‐linux‐gnueabihf‐g++ ‐v
gcc version 4.7.2 (Debian 4.7.2-5) . . .
Testing the Toolchain
At this point, you can build a test application to check that everything is working before you begin configuring Eclipse. You should write a small C++ program, build it on your desktop machine, and then deploy it to the BBB. For example, enter the following on the desktop machine:
molloyd@debian:~$ nano testARM.cpp
molloyd@debian:~$ more testARM.cpp
#include<iostream>
int main(){
   std::cout << "Testing Toolchain" << std::endl;
   return 0;
}
molloyd@debian:~$ arm‐linux‐gnueabihf‐g++ testARM.cpp ‐o testARM
molloyd@debian:~$ ./testARM
bash: ./testARM: cannot execute binary file
At this point, the binary executable will not execute on your desktop machine, as it contains ARM hard float instructions. However, please note that if you install QEMU (in the Installing a Change Root section of this chapter), then the program will execute. Next, transfer the binary executable to the BBB:
molloyd@debian:~$ sftp [email protected]
BeagleBoard.org BeagleBone Debian Image 2014-05-14
Connected to 192.168.7.2.
sftp> put testARM
Uploading testARM to /root/testARM . . .
sftp> exit
Finally, SSH to the BBB to confirm that the new binary works correctly:
molloyd@debian:~$ ssh [email protected]
BeagleBoard.org BeagleBone Debian Image 2014-05-14 . . .
molloyd@beaglebone:~$ ./testARM
Testing Toolchain
Success! If you see this output, then you are able to build a binary on the desktop machine that can be executed directly on the BBB. The next section is an advanced topic and is required if you wish to use third‐party libraries with your cross‐compilation environment. If you wish, you can skip this section for the moment and go directly to the Cross‐Compilation Using Eclipse section.
Cross‐Compilation with Third‐Party Libraries (Multiarch)
This section is not necessary in order to cross‐compile C/C++ applications; however, it is likely that you will need to add third‐party libraries in the future for tasks such as image and numerical processing. Traditionally, this has been a very difficult topic, but thanks to very recent releases in Debian and Ubuntu, this problem has become much more manageable.
For the purpose of this discussion, you should have your cross‐compiler in place and you should currently be able to cross‐compile applications that use the standard C/C++ libraries. However, what if you wish to build a C/C++ application that uses a third‐party library? If you install the library on your x86 desktop machine, then that library code will contain native x86 instructions. If you wish to use the third‐party library and deploy it to your BBB, then you need to use a library that contains ARM machine code instructions.
Traditionally, we have used tools like xapt, which converts Debian packages to a cross‐platform version on‐the‐fly (e.g., xapt ‐a armhf ‐m libopencv‐dev). However, recent releases of Debian (Wheezy+) now support multiarch—multi‐architecture package installs.
Here is an example of how you can use a multiarch‐capable package installer to install a BBB armhf library on a desktop machine. You can determine the current architecture (on the x86 64‐bit desktop machine) using:
molloyd@debian:~$ dpkg --print‐architecture
amd64
molloyd@debian:~$ dpkg --version
Debian 'dpkg' package management program version 1.16.15 (amd64).
The version of dpkg has to be greater than 1.16.2 for multiarch support. You can add the armhf target architecture for the BBB Debian image using:
molloyd@debian:~$ sudo dpkg --add‐architecture armhf
molloyd@debian:~$ dpkg --print‐foreign‐architectures
armhf
Install a sample third‐party library package after performing an update (note the armhf after the package name):
molloyd@debian:~$ sudo apt‐get update
molloyd@debian:~$ sudo apt‐get install libicu‐dev:armhf
Reading package lists. . . Done
Building dependency tree       . . .
Setting up libicu-dev:armhf (52.1-6) . . .
These third‐party libraries for utilizing Unicode are installed in the /usr/lib/arm‐linux‐gnueabihf directory. This keeps them separate from the x86 libraries that are stored in the /usr/lib directory, as otherwise you would likely overwrite your current x86 libraries with the armhf libraries:
molloyd@debian:/usr/lib/arm‐linux‐gnueabihf$ ls libicu*
libicudata.a      libicuio.so.52.1     libicutest.so.52 . . .
And you are done! You can now configure your C++ build environment to use the libraries in the /usr/lib/arm‐linux‐gnueabihf directory. This procedure works well and it is reasonably straightforward; however, it is new to Linux, and interdependency problems currently arise. See wiki.debian.org/Multiarch/HOWTO for more information on multiarch packages. An alternative to multiarch package installations is to mirror the entire Linux root of your ARM target platform, and to do this you can use a change root.
Installing a Change Root
A change root allows you to change the apparent Linux root directory to another directory on your system. Why would you do this? The most common reason is that you might like to try a new Linux kernel, use new tools, or install a new library on your Linux installation; and you would like to test it first in case it brings down the entire system. A change root enables you to replicate your Linux installation in a subdirectory (e.g., have a subdirectory of the root directory called “newroot” that has /etc, /bin, /home, /usr, etc.) that has a full Linux distribution. You can then install your new libraries and tools in this new (possibly temporary) root directory.
You can instruct your Linux system to change the root temporarily to this new root directory. Once started, you enter chroot jail and do not have access to any files outside the new root directory. You can test all of the new features of your new Linux installation, and when you are finished you can type exit to return to your “real” root, leaving the chroot jail.
This structure is useful for the BBB because this new root directory does not have to have the same flavor of Linux or even the same architecture as your main desktop Linux installation. You can install an armhf version of Linux in the new change root directory and then use a tool called QEMU (Quick Emulator) to emulate that the Linux OS is running on an ARM platform. Working through an example should help make this concept clear.
Installing an armhf Change Root
The debootstrap (Debian bootstrap) tool enables you to install a Debian base system into a subdirectory of your current desktop Debian system. You can do this using the following instructions, where you choose the architecture as armhf, the initial package, the distribution name (wheezy in this case), the installation directory (/BBBchroot in this case), and the source for install files (ftp.us.debian.org). Type the following (noting that the third command is all typed on one line and there are no spaces beside the commas):
molloyd@debian:~$ sudo mkdir /BBBchroot
molloyd@debian:~$ sudo apt‐get install debootstrap
molloyd@debian:~$ sudo debootstrap --foreign --verbose --arch=armhf
--include=aptitude,iputils‐ping,module‐init‐tools,ifupdown,iproute,
nano,wget,udev wheezy /BBBchroot http://ftp.us.debian.org/debian
I: Retrieving Release . . .
You now have a root file system for ARM hard floats just off the main root directory of your desktop machine (/BBBchroot in this case). You can view the files in this directory and even try to execute commands, but they will fail because they contain ARM machine instructions:
molloyd@debian:~$ cd /BBBchroot/
molloyd@debian:/BBBchroot$ ls
bin   debootstrap  etc   lib  proc  run   selinux  tmp  var
boot  dev          home  mnt  root  sbin  sys      usr
molloyd@debian:/BBBchroot$ cd bin
molloyd@debian:/BBBchroot/bin$ ls
. . .     findmnt     mkdir     rbash        sync     which     . . .
molloyd@debian:/BBBchroot/bin$ ./mkdir
bash: ./mkdir: cannot execute binary file
Emulating the armhf Architecture
To emulate the armhf architecture, you can install a package called QEMU that enables you to emulate the ARM microprocessor on your x86 machine. This is called user‐mode emulation. QEMU can also perform full computer‐mode emulation, just like VirtualBox. You can install the QEMU user‐mode emulation package by typing the following:
molloyd@debian:~$ sudo apt‐get install qemu‐user‐staticNext, place the statically compiled emulator within the change root directory. Once you perform the chroot command, you do not have access to any of the files outside the new root directory, including dynamic libraries (remember that you will be in chroot jail). The steps are as follows:
molloyd@debian:~$ cd /usr/bin
molloyd@debian:/usr/bin$ sudo cp qemu‐arm‐static /BBBchroot/usr/bin
Now you can change root to the /BBBchroot directory:
molloyd@debian:~$ sudo chroot /BBBchroot/You should see the following shell prompt, which results from the fact that there is no passwd file. You need to complete the installation of the packages that are specified in the earlier call to the debootstrap command and set a password for the root account:
I have no name!@debian:/# uname ‐a
Linux debian 3.2.0-4 #1 SMP Debian 3.2.60-1+deb7u3 armv7l GNU/Linux
I have no name!@debian:/# cd /debootstrap
I have no name!@debian:/debootstrap# ./debootstrap --second‐stage
I have no name!@debian:/debootstrap# passwd
I have no name!@debian:/debootstrap# exit
When you call the chroot command again you should now have a “root” prompt and the packages are now installed, for example:
molloyd@debian:~$ sudo chroot /BBBchroot/
root@debian:~# ping 8.8.8.8
PING 8.8.8.8 (8.8.8.8) 56(84) bytes of data. . . .
You can now build code on the chroot and deploy it to the BBB, but to do this you need to install the build‐essential package on your chroot, even though you have already installed it on your main root. First you must identify the package sources as follows:
root@debian:~# nano /etc/apt/sources.list
root@debian:~# more /etc/apt/sources.list
deb http://ftp.us.debian.org/debian wheezy main
deb-src http://ftp.us.debian.org/debian wheezy main
root@debian:~# apt‐get update
root@debian:~# apt‐get install build‐essential
Then you can write a simple C++ example, which can be executed on the chroot using QEMU and remotely deployed to the BBB:
root@debian:~# more test.cpp
#include<iostream>
int main(){
   std::cout<<"Hello World running on armhf
";
}
root@debian:~# g++ test.cpp ‐o testARM
root@debian:~# ./testARM
Hello World running on armhf
Despite this message, it has not yet been sent to the BBB. It is being emulated on the desktop machine using QEMU. Transfer this binary file to the BBB to test that it works there too. To do this, you can install the openssh‐client package on your change root. Of course, you could exit the change root and transfer it directly, but this step provides you with the facility to transfer the file directly from within the change root from now on:
root@debian:~# apt‐get install openssh‐client
root@debian:~# sftp [email protected]
[email protected]'s password: . . .
sftp> put testARM
Uploading testARM to /home/molloyd/testARM
sftp> exit
Then connect to the BBB and test the code on the BBB:
root@debian:~# ssh [email protected]
molloyd@beaglebone:~$ ./testARM
Hello World running on armhf
As you can see, the executable also worked on the BBB; therefore it is clear that the change root compilation process is working correctly. Applications can be built on the desktop machine with the ARM hard float instruction set and ARM‐specific libraries can be installed on the chroot by simply using the apt‐get command. You are now emulating ARMv71 on your desktop Linux installation (yes, in a VirtualBox instance under Windows!). You can use this environment to cross‐build code for your BBB, using the power of your desktop machine. Remember that you can type exit to return to your regular root at any stage.
Cross‐Compilation Using Eclipse
Eclipse is an integrated development environment (IDE) that enables you to manage your code and integrate cross‐compilation tools, debuggers, and other plug‐ins to create a sophisticated development platform. It can even be extended to provide full remote debugging support for applications that are physically running on your BBB. This is a powerful feature that enables you to debug software applications that are interfacing with the real hardware in your projects, but view the debug values within your desktop Eclipse environment.
Eclipse is written in Java and was initially focused on Java software development. However, Eclipse has excellent support for C/C++ development using the C/C++ Development Tooling (CDT) extension.
Installing Eclipse on Desktop Linux
Using a web browser on your Linux desktop or Linux desktop VM running under Windows (see Chapter 3), download Eclipse from www.eclipse.org. There is a version that has CDT (C/C++ Development Tooling) integration (e.g., Eclipse IDE for C/C++ Developers), which you should install. The version of Eclipse that is used in this guide is Luna.
After you have downloaded Eclipse, decide if you wish to install it for all users or just for the main user, by extracting the archive in a suitable location (such as the user home directory in the following example). Chromium will download the file to the user ~/Downloads directory by default. Therefore, use the following steps to install eclipse in the user account, and execute it directly (in the background using &):
~/Downloads$ mv eclipse* ~/
~/Downloads$ cd ~/
~$ tar ‐xvf eclipse‐cpp‐luna‐SR1‐linux‐gtk‐x86_64.tar.gz
~$ cd eclipse
~/eclipse$ ./eclipse &
At this point you can create C++ applications on the desktop machine that are deployed to the desktop machine using Eclipse. However, since the target platform is the BBB, Eclipse must be configured for cross‐compilation.
Configuring Eclipse for Cross‐Compilation
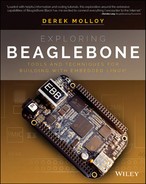
When Eclipse starts you should see a brief guide that describes C/C++ development. Close it when you are ready and then test that the environment works by creating a new project using File ➢ New ➢ C++ project. As illustrated in Figure 7-1(a), set the project name to “BBBTest,” pick the project type “Hello World C++ Project,” and the Toolchain to be “Cross GCC.” Then click Finish. Repeatedly click Next until you see the “Cross GCC Command,” as illustrated in Figure 7-1(b). Enter arm‐linux‐gnueabihf‐ for the cross-compiler prefix and set the path to /usr/bin. Finally, click Finish.
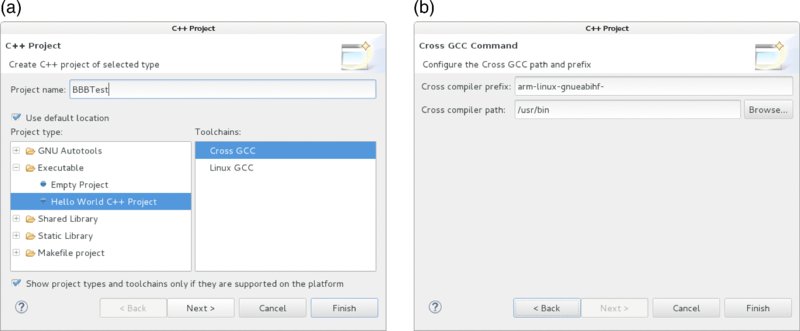
Figure 7-1 Creating a new C++ project in Eclipse: (a) the project settings, and (b) the cross-compiler prefix
The Eclipse IDE is now configured for cross‐compilation using the cross‐compilation toolchain that was set up at the beginning of this chapter. You can choose Project ➢ Build All and then run on the desktop machine by clicking the green arrow or (Run ➢ Run). In Figure 7-2 this results in the message !!!Hello World!!! appearing in the Console window. This only appears on the desktop computer if you have installed QEMU, as the executable contains ARM machine code, which is clear from the binary name “BBBTest ‐ [arm/le]” that is highlighted on the top left of Figure 7-2.
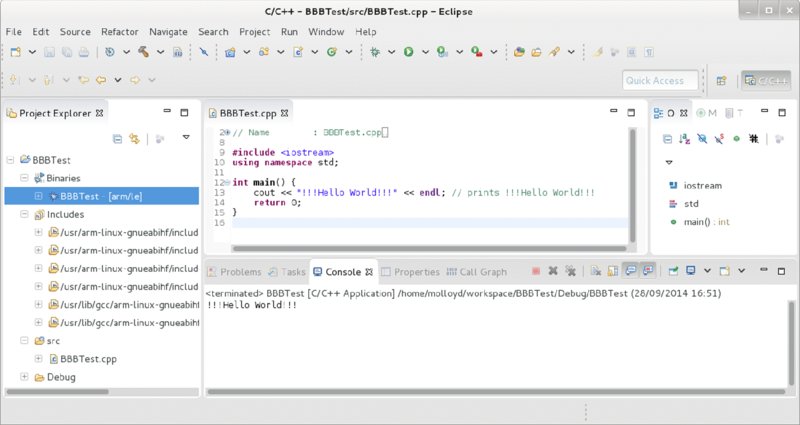
Figure 7-2 The Eclipse IDE cross‐compiling a Hello World C++ example application
The preceding steps provide a quick way of configuring the cross‐compilation settings within Luna. Older versions of Eclipse (e.g., Kepler) require you to configure the cross‐compiler using the project settings. That option is still available within Eclipse Luna—select the project that was just created, and then go to Project ➢ Properties (If the option is grayed out, it likely means that the project is not selected). Go to C/C++ Build ➢ Settings and under the Tool Settings tab you should see the Cross Settings as illustrated in Figure 7-3. Effectively, these settings mean that the arm‐linux‐gnueabihf‐g++ command (a symbolic link that is described at the beginning of this chapter) is used to compile the project code.
Figure 7-3 Eclipse Luna settings for cross‐compilation
While it may not be necessary to set the C/C++ includes and library settings explicitly, it may be necessary at a later stage, particularly when using third‐party libraries. To do this, go to Project ➢ Properties ➢ C/C++ General ➢ Paths and Symbols, and set the following (according to your version of gcc and g++):
- Includes (tab) ➢ GNU C (Include directories) ➢ Add ➢ File System ➢ File System ➢
/usr/arm‐linux‐gnueabihf/includeand click Add - Includes (tab) ➢ GNU C++ (Include directories) ➢ Add ➢ File System ➢ File System ➢
/usr/arm‐linux‐gnueabihf/include/c++/4.7.2or your current version. - Library Paths (not Libraries) ➢ Add ➢ File System ➢ File System ➢
/usr/arm‐linux‐gnueabihf/lib - Click OK to apply the configuration.
Now you should be able to deploy the binary application directly to the BBB, as it contains ARM machine code instructions. You can transfer the binary application to the BBB using sftp, but it would be better in the longer term if you had a direct link to the BBB from within Eclipse—for this you can use the Remote System Explorer plug‐in.
Remote System Explorer
The Remote System Explorer (RSE) plug‐in enables you to establish a direct connection between your Eclipse environment and the BBB, over a network connection, by using the SSH server on your BBB. You can install the RSE within Eclipse using Help ➢ Install New Software. Choose “Luna . . .” in the Work with: section and then select General Purpose Tools ➢ Remote System Explorer User Actions. Click Next, follow the steps, then restart Eclipse.
You should now have RSE functionality within Eclipse. Go to Window ➢ Show View ➢ Other ➢ Remote Systems ➢ Remote Systems. In the Remote Systems frame that appears, click the icon for Define a Connection to a Remote System, and in the New Connection dialog, select the following:
- Choose Linux Type ➢ Next.
- Host Name: Enter your BBB IP address—e.g., 192.168.7.2
- Connection Name: Change it to “BeagleBone Black” ➢ Next
- [Files] Configuration ➢ ssh.files ➢ Next
- [Processes] Configuration ➢ processes.shell.linux ➢ Next
- [Shells] Configuration ➢ ssh.shells ➢ Next
- [Ssh Terminals] (no change) ➢ Finish
You can then right‐click BeagleBone Black in the bottom frame and choose Connect. Recent versions of Eclipse use a master password system to manage passwords for all of your connections. You should see the dialog shown in Figure 7-4. In this example, the molloyd user account is used on the BBB as the account into which the executable code is deployed.
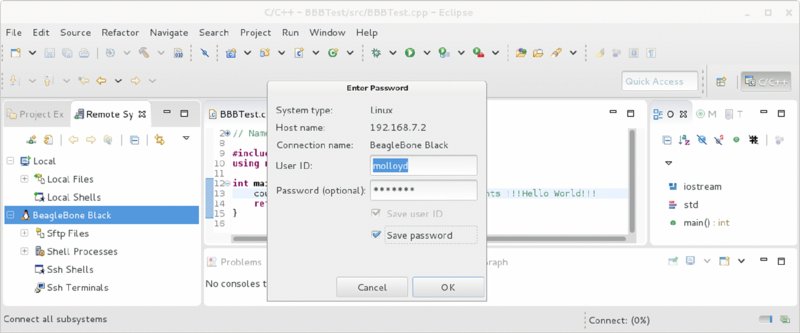
Figure 7-4 Connecting to the BBB for the first time
Once you are connected to the BBB you can go to the Project Explorer window, right‐click the executable that you just built (BBBTest [arm/le]) and choose Copy. Then go to a directory on the Remote Explorer, such as tmp (see Figure 7-5). Right‐click it and choose Paste. The file is now on the BBB and can be executed from the built‐in Terminals window, as captured in Figure 7-5, once you have changed the permissions for the file to be executable.
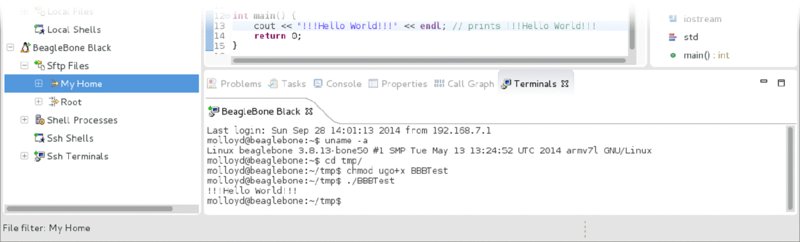
Figure 7-5 The built‐in Terminals window, connected to the BBB and executing the cross‐compiled BBBTest C++ application
One way to automate the process of copying the files from the desktop computer to the BBB is by using the secure copy command scp (described in detail in Chapter 11). You can set up your desktop computer so that it does not need to use a password to ssh to the BBB by using the following steps on the desktop computer (when prompted you should leave the passphrase blank):
molloyd@debian:~$ ssh‐keygen
molloyd@debian:~$ ssh‐copy‐id [email protected]
molloyd@debian:~$ ssh‐add
molloyd@debian:~$ ssh [email protected]
You should now be able to ssh to the BBB without requiring a password. You can then configure Eclipse to deploy the executable automatically by setting the Command to be scp BBBTest [email protected]:/home/molloyd/tmp/ under Project ➢ Properties ➢ C/C++ Build ➢ Settings ➢ Build Steps ➢ Post‐build steps.
Integrating GitHub into Eclipse
There is a very useful plug‐in that can be installed into Eclipse that allows for full GitHub integration, enabling you to link to your own GitHub repositories or to get easy access to the example code and resources for this book. To install it, open Help ➢ Install New Software and choose “Luna . . .” in the Work with: section. Then, under the tree item Collaboration, choose “Eclipse GitHub integration with task focused interface.”
Once this plug‐in is installed, you can open Window ➢ Show View ➢ Other ➢ Git, and there are several options, such as Git Interactive Rebase, Git Reflog, Git Repositories, Git Staging, and Git Tree Compare. If you choose Git Repositories, you then get a dialog with the option to “Clone a Git repository” ➢ GitHub, and you can search for “exploringBB.” You should find the repository “derekmolloy/ExploringBB.” If not, you can add the repository directly using the full URL: https://github.com/DerekMolloy/ExploringBB.git. You will then have full access to the source code in this book directly from within the Eclipse IDE, as captured in Figure 7-6. Because there are so many projects in this repository, the easiest way to use this code repository is to copy the files that you need into a new project.

Figure 7-6 Eclipse GitHub integration, displaying the exploringBB repository
Remote Debugging
Remote debugging is the next step in developing a full‐featured, cross‐development platform configuration. As you are likely planning to interact with hardware modules that are physically connected to the BBB, it would be ideal if you could debug your code live on the BBB. Remote debugging with Eclipse enables you to control the execution steps and even view debug messages and memory values directly from within Eclipse on your desktop machine.
For this example you can use the makeLED.cpp example that you cloned from the Git repository. Select the makeLED.cpp file in the editor (refer to Figure 7-6), and use File ➢ Save As to add this file to the current project (~/workspace/BBBTest in this case). Comment out the main() function in the HelloWorld example, as you cannot have two main() functions in a single C/C++ project.
On the BBB you need the debug server gdbserver to run in order for the Eclipse installation to connect to the debugger. This tool is installed by default on the Debian BBB image, but you can install or update it using the following command:
molloyd@beaglebone:~$ sudo apt‐get install gdbserverThe gdbserver executes on the BBB when it is called by the Eclipse IDE on the desktop machine using RSE. On the Linux desktop machine you need to install the GNU multi‐architecture debugger, as follows:
molloyd@debian:~/$ sudo apt‐get install gdb‐multiarchThen on the desktop machine, create a file called .gdbinit in the project folder using nano and add the line set architecture arm:
molloyd@debian:~/workspace/BBBTest$ more .gdbinit
set architecture arm
Eclipse needs to be configured to use the multiarch debugger. Go to Run ➢ Debug Configurations ➢ Debugger, and delete any current debug configurations. Select C/C++ Remote Applications on the left‐hand side and right‐click it to create a new configuration. In this example it is called “BBBTest Debug” as captured in Figure 7-7.
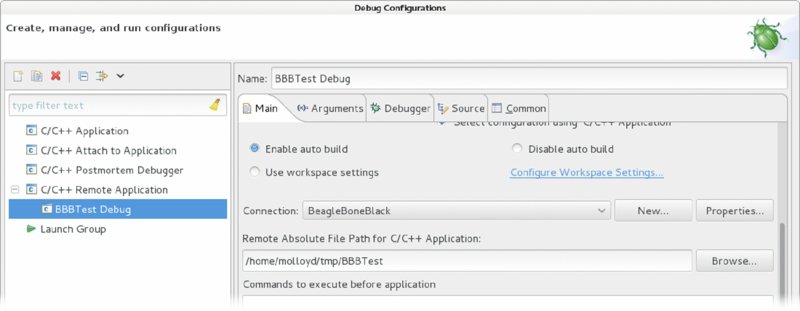
Figure 7-7 Setting the debug configuration
Change the debugger command from gdb to gdb‐multiarch, as illustrated in Figure 7-8. You also need to attach the .gdbinit file that was just created. Click the Browse button to the right of “GDB command File” and locate your workspace directory. You may have to right‐click the File Explorer window and choose Show hidden files to find the file .gdbinit. That configuration file can be used to set many more configuration options. For example, it can be used to configure the remote server and choose different breakpoints.
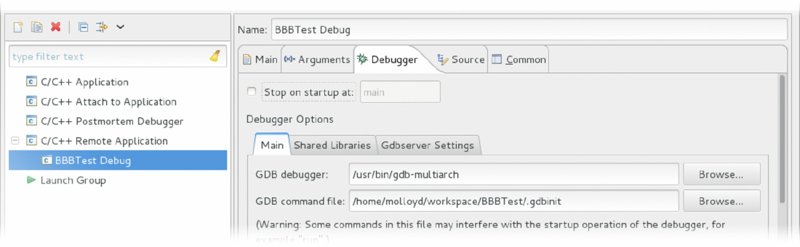
Figure 7-8 Setting up gdb‐multiarch
Any program arguments can be added to the Arguments tab in Figure 7-8. In this example the string “flash” is used. The argument is passed to the application that is executing on the BBB when the gdbserver command executes.
Finally, under the Gdbserver Settings tab (see Figure 7-9), set the executable path and an arbitrary port number for the gdbserver command. This allows the desktop computer to remotely invoke the gdbserver command on the BBB and to connect to it over TCP using its port number.

Figure 7-9 Setting the BBB gdbserver port
Start the debugger by using the down arrow to the right of the green “bug” on the main window, which is circled in Figure 7-10, and select the “DebugBBBTest Debug” option.
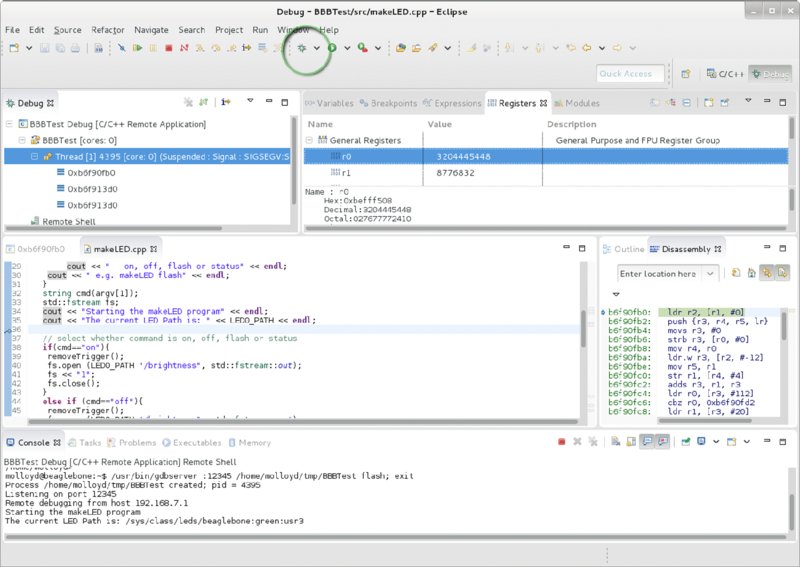
Figure 7-10 The Debug Perspective view
Figure 7-10 is a screen capture of the Debug Perspective view in action. You can see that the program is currently halted at a breakpoint on line 36 of the program code. The output at this point is visible in the Console window at the bottom. This type of debug view can be invaluable when developing complex applications, especially when the BBB is connected to electronic circuits and modules. At this point you can use the Step Over button to step through each line of your code, watching the variable values, while seeing how the program interacts with physically connected circuits.
Automatic Documentation (Doxygen)
As your BBB projects grow in capability and complexity, it will become especially important that your code is self‐documenting. If you follow good programming practice when naming variables and methods, as discussed in Chapter 5, then you will not have to document every single line of code. Rather, you should write inline documentation comments, using automatic documentation tools like Doxygen or Javadoc, for every class, method, and state. This will enable other programmers to have an immediate understanding of what your code does and how it is structured.
Javadoc is an automatic documentation generator that generates HTML code directly from Java source code. Likewise, Doxygen is a tool that can be used for generating documentation from annotated C++ source files in HTML, LaTeX, and other formats. Doxygen can also generate documentation for the other programming languages that were discussed in Chapter 5, but the following discussion focuses on how it can be used for C++ documentation and how it can be integrated with the Eclipse IDE. An example output, which documents the C++ GPIO class from Chapter 6, is displayed in Figure 7-11.
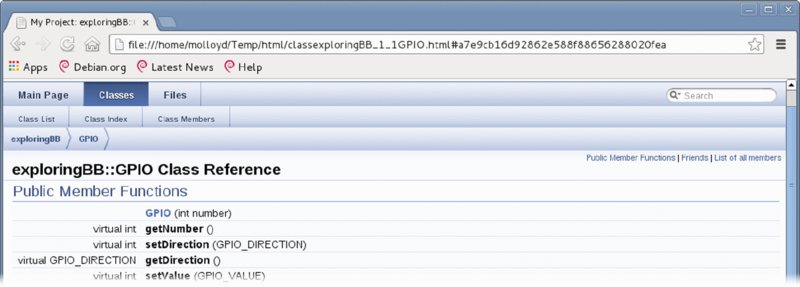
Figure 7-11 Example Doxygen HTML output
First, you need to install Doxygen on the Linux desktop machine using the following command:
molloyd@debian:~/eclipse$ sudo apt‐get install doxygenDepending on your desktop installation, it may download many additional dependencies (as much as 1 GB of files). Once installed, you can immediately begin generating documentation for your project. For example, copy the GPIO.h and GPIO.cpp files from the Git repository in the chp06/GPIO/ directory into a temporary directory such as ~/Temp and then build the documentation as follows:
molloyd@debian:~/Temp$ ls
GPIO.cpp  GPIO.h
molloyd@debian:~/Temp$ doxygen ‐g
Configuration file 'Doxyfile' created . . .
molloyd@debian:~/Temp$ ls
Doxyfile  GPIO.cpp  GPIO.h
molloyd@debian:~/Temp$ doxygen ‐w html header.html footer.html stylesheet.css
molloyd@debian:~/Temp$ ls
Doxyfile  footer.html  GPIO.cpp  GPIO.h  header.html  stylesheet.css
This automatically generates HTML files that you can customize for your project, adding headers, footers, and style sheets to suit your needs. Next, call the doxygen command on the Doxyfile configuration:
molloyd@debian:~/Temp$ doxygen Doxyfile
Searching for include files . . .
Searching for example files. . . .
molloyd@debian:~/Temp$ ls
Doxyfile     GPIO.cpp  header.html  latex
footer.html  GPIO.h    html         stylesheet.css
You can see that there are html and latex folders containing the automatically generated documentation. You can view the output by browsing (e.g., in Chromium, type file:// and press Enter in the address bar) to the ~/Temp/html/ directory and opening the index.html file. There is a comprehensive manual on the features of Doxygen at www.doxygen.org.
Adding Doxygen Support in Eclipse
The documentation that results from the previous steps is reasonably limited. It is hyperlinked and captures the methods and states of the class, but there is no deeper description. By integrating Doxygen into Eclipse, you can configure and execute the Doxygen tools directly, and you can also provide inline commentary that is integrated into your generated documentation output. The first step is to enable Doxygen in the editor.
In Eclipse, go to Window ➢ Preferences ➢ C/C++ ➢ Editor. In the window at the bottom, under “Workspace default” select Doxygen. Apply the settings, and then in the editor type /** followed by the Return key above any method, and the IDE will automatically generate a comment as follows:
/**
 * @param number
 */
GPIO::GPIO(int number) {
You can then add a description of what the method does, as shown in the following example:
/**
 * Constructor for the General Purpose Input/Output (GPIO) class. It
 * will export the GPIO automatically.
 * @param number The GPIO number for the BBB pin
 */
GPIO::GPIO(int number) {
To complete the installation, you can install the Eclox plug‐in for Eclipse by going to Help ➢ Install New Software and, using the steps outlined earlier, add a new site http://download.gna.org/eclox/update/ and then select and install the Eclox plug‐in. After restarting Eclipse, select File ➢ New ➢ Other ➢ Other ➢ Doxyfile to add a Doxygen configuration file (Doxyfile) to your src/ directory.
There is now a new file in your project with a Doxyfile .doxyfile extension that you will be able to configure as shown in Figure 7-12. You can also see a blue @ sign in the top bar of Eclipse. Click this button to build the Doxyfile in order to generate the documentation for your project. You can then browse to the Documentation directory and open the html/index.html file directly within Eclipse.
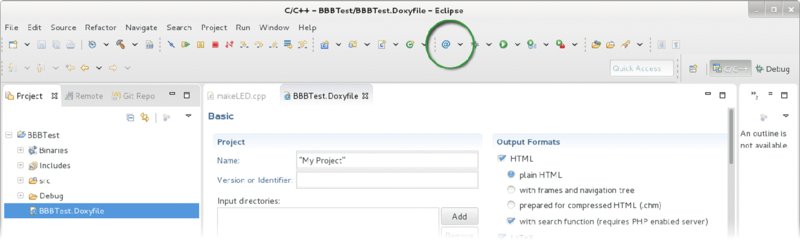
Figure 7-12 Doxygen Eclox plug‐in running within Eclipse
At this point you have everything you need to cross‐compile applications for your BBB. The next part of this chapter outlines how you can cross‐compile the Linux kernel itself and deploy a custom Linux distribution.
Building Debian for the BBB
The BBB contains a full Linux distribution when it is shipped; however, advanced users may wish to replace this image with a lean image and/or they may wish to install a Linux kernel that supports specific functionality (e.g., real‐time kernel support). The tools that are described in this chapter can be used to build a Linux kernel for your BBB using a desktop Linux installation. The steps involved in this process are constantly undergoing change, so they have been presented on the chapter web page at www.exploringbeaglebone.com/chapter7 and a summary of the steps is presented in this section.
Robert C. Nelson is an applications engineer at Digi‐Key Corporation, a large electronic component distributor in North America. He is a self‐professed kernel hacker and he has been instrumental in developing the Debian Linux image for the BBB and many other embedded Linux devices. He has provided a comprehensive set of scripts for building Linux for the BBB. Robert has developed a script to enable you to build the Debian image directly on your desktop computer. The scripts and a full guide to their usage are available at: tiny.cc/ebb703.
Here is a summary of the steps involved in building and writing a new Linux image to the BBB:
- Build Das U‐Boot: Download the source code for the bootloader from
git.denx.deand apply the latest u‐boot patches for the AM335x processor. Build the bootloader using the cross‐compilation toolchain that is described at the beginning of this chapter. After the build process you will have an x‐loaderMLOfile and theu‐bootfile that allow you to boot your custom Linux kernel. - Build the Linux kernel: Clone the source code for the Linux kernel using a script from the “
RobertCNelson”GitHub account. Start the build process by calling the./build_kernel.shscript. This will prompt you to install any missing dependencies. After the build process begins you will be invited to customize the kernel settings using the Kernel Configuration tool, which is illustrated in Figure 7-13. The build process will complete after several hours and will result in a compressed kernel image (in thedeploydirectory). - Download a root file system: At this point you only have a Linux kernel and not a Linux distribution—there are no commands or utilities (e.g., those in the
/bindirectory). A minimal file system can be downloaded from:tiny.cc/ebb704. - Prepare an SD card: An SD card must be formatted and a boot and root partition added. The kernel image,
MLOfile,u‐bootfile, and auEnv.txtfile are placed on the boot partition. The minimal file system should be extracted to the root partition. - Configure the Linux image startup settings: You can edit the configuration files on the Linux file system before you boot the BBB for the first time with the new Linux image. For example, you can configure the file system (using
/etc/fstab) and configure the network settings (using/etc/network/interfaces). - Boot the BBB: The BBB can then be booted using the new image on the SD card. Remember to hold the BBB’s boot button. Finally, you can use Robert’s eMMC flasher script to write this new image to the BBB’s eMMC.
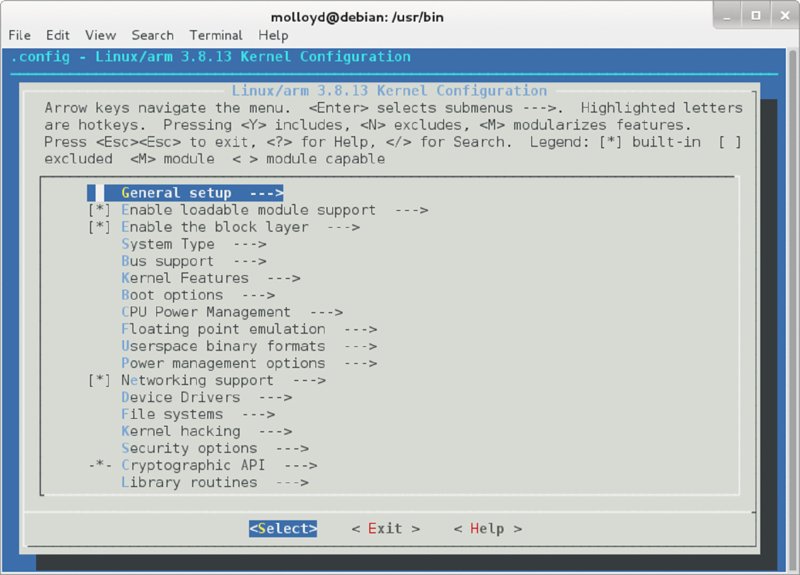
Figure 7-13 The Kernel Configuration tool
Summary
After completing this chapter, you should be able to:
- Install a cross‐compilation toolchain on desktop Linux that can be used to build applications for the BBB using your desktop PC.
- Use a multiarch package manager to install multi‐architecture third party libraries that may be required for cross‐compilation.
- Set up a change root on a Linux desktop computer that can be used to maintain an ARM Linux distribution.
- Emulate the ARM architecture on the desktop PC using QEMU.
- Install and configure the Eclipse integrated development environment (IDE) for cross‐compilation to build BBB applications.
- Configure Eclipse for remote deployment of applications, remote debugging, GitHub integration, and automated documentation.
- Describe the steps involved in building a custom Linux distribution and use external resources on the chapter web page to build a custom kernel.
Further Reading
The steps in this chapter are prone to changes in terms of the Linux distribution, the Eclipse version, and the kernel configuration. If you are experiencing difficulties with this configuration or wish to contribute information that will make it easier for others to do the same tasks that are presented in this chapter, then please go to www.exploringbeaglebone/chapter7/.