
CHAPTER 5
Practical BeagleBone Programming
This chapter describes several different programming options for the BeagleBone, including scripted and compiled languages. An LED flashing example is provided in all of the languages so that you can investigate each language’s structure and syntax. The advantages and disadvantages of each language are discussed along with example uses. The chapter then focuses on the C/C++ programming languages, describing the principles of these languages, and why object‐oriented programming (OOP) is appropriate and necessary for the development of scalable embedded systems applications. Finally, the chapter details how you can interface directly to the Linux kernel using the GNU C Library. A single chapter can only touch the surface of programming languages, but this one is focused on programming the BeagleBone. I have made my module notes about OOP available at ee402.eeng.dcu.ie to support this chapter.
Equipment Required for This Chapter:
- BeagleBone Black with console connection (see Chapter 2)
- Desktop Linux Installation (e.g., Debian in a VM—see Chapter 3)
Introduction
As discussed in Chapter 3, embedded Linux is essentially “Linux on an embedded system.” If your favorite programming language is available under Linux, then it is also likely to be available for the BBB. So, is your favorite language suitable for programming the BBB? That depends on what you intend to do with the board. Are you interfacing to electronics devices/modules? Do you plan to write rich user interfaces? Are you planning to write a device driver for Linux? Is performance very important, or are you developing an early pre‐prototype? Each of the answers to these questions will impact your decision regarding which language you should use. In this chapter, you are introduced to several different languages, and the advantages and disadvantages of each category of language are outlined. As you read through the chapter, try to avoid focusing on a favorite language, but instead use the correct language for the job at hand.
How does programming on embedded systems compare to programming on desktop computers? Here are some points to consider:
- You should always write the clearest and cleanest code that is as maintainable as possible, just as you would on a desktop PC.
- Don’t optimize your code until you are certain that it is complete.
- You typically have to be more aware of how you are consuming resources than when programming on the desktop computer. The size of data types matters, and passing data correctly really matters. You have to be concerned with memory availability, file system size, and data communication availability/bandwidth.
- You often have to learn about the underlying hardware platform. How does it handle the connected hardware? What data buses are available? How do you interface with the operating system and low‐level libraries? Are there any real‐time constraints?
For the upcoming discussion, it is assumed that you are planning to do some type of physical computing—that is, interfacing to the different input or outputs on the BBB. Therefore, the example that is used to describe the structure and syntax of the different languages is a simple interfacing example. Before looking at the languages themselves, we will begin with a brief performance evaluation of different languages running on the BBB, in order to put the following discussions in context.
Performance of Different Languages
Which language is the fastest on the BBB? Well, that is an incredibly emotive and difficult question to answer. Different languages perform better on different benchmarks and different tasks. In addition, a program written in a particular language can be optimized for that language to the point that it is barely recognizable as the original code. Nor is speed of execution always an important factor; you may be more concerned with memory usage, the portability of the code, or the ability to quickly apply changes.
However, if you are planning to develop high‐speed or real‐time number‐crunching applications, then performance may be a key factor in your choice of programming language. In addition, if you are setting out to learn a new language, and you may possibly be developing algorithmically rich programs in the future, then it may be useful to keep performance in mind.
A simple test has been put in place on the BBB to determine the performance of the languages discussed in this chapter. The test uses the n‐body benchmark (gravitational interaction of planets in the solar system) code from benchmarksgame.alioth.debian.org. The code uses the exact same algorithm for all languages and the BBB is running in the exact same state in all cases. The test uses 5 million iterations of the algorithm to ensure that the script used for timing does not have to be highly accurate. All of the programs gave the same correct result, indicating that they all ran correctly and to completion. The test is available in the book’s Git repository in the directory chp05/performance/. Note that you must have installed Java on the BBB in order to run all of the tests. That is discussed later in this chapter. Use the following call to execute the test:
/chp05/performance$ ./run
Running the Tests:
The C/C++ Code Example
-0.169075164  -0.169083134
It took 33 seconds to run the C/C++ test ...
Finished Running the Benchmarks
The results of the tests are displayed in Table 5-1. In the first column you can see the results for the BBB, running at its top processor frequency of 1 GHz. For this number‐crunching application, C++ performs the task in the shortest time, taking 33 seconds to complete. This time has been weighted as one unit. Therefore, Java takes 1.18 times longer to complete the same task, Node.js (for BoneScript) 2.36 times longer, Perl 27.8 times longer, and Python 32.2 times longer. The processing durations are provided in parentheses. As you move across the columns you can see that this performance is relatively consistent, even as the processor frequency is adjusted (discussed in the next section) or a desktop i7 64‐bit processor is used.
Table 5-1 Numerical Computation Time for 5,000,000 Iterations of the n‐Body Algorithm on a BBB Debian Hard‐float Image
| VALUE | BBB@1GHZ | BBB@800MHZ | BBB@300MHZ | DEBIAN 64‐BIT I7 PC |
| C++ | 1.00× (33s) | 1.00× (42s) | 1.00× (114s) | 1.00× (0.821s) |
| C++11 | 1.15× (38s) | 1.16× (48s) | 1.16× (132s) | 0.91× (0.746s) |
| Java | 1.18× (39s) | 1.16× (49s) | 1.19× (134s) | 1.24× (1.023s) |
| Node.js | 2.36× (78s) | 2.21× (93s) | 2.19× (248s) | 5.78× (4.523s) |
| Perl | 27.8× (917s) | 27.9× (1170s) | 28.7× (3244s) | 75.64× (62.1s) |
| Python | 32.2× (1063s) | 30.8× (1294s) | 31.7× (3586s) | 83.92× (68.9s) |
All of the programs use between 98% and 99% of the CPU while they are executing. In addition, the C++ program used ∼0.1% of memory, the Java and Node.js programs used ∼2.3% of memory, and the Python application used ∼0.8% of memory while executing. The relative performance of Java and Node.js is impressive given that code is compiled dynamically (“just‐in‐time”), which is discussed later in this chapter. Any dynamic compilation latency is included in the timings, as the test script includes the following Bash script code to calculate the execution duration of each program:
Duration="5000000"
echo -e "
The C/C++ Code Example"
T="$(date +%s%N)"
./n-body $Duration
T="$(($(date +%s%N)-T))"
T=$((T/1000000))
echo "It took ${T} milliseconds to run the C/C++ test"
The C++11 code is the version of the C++ programming language that was approved in mid‐2011 (needs gcc 4.7+). This is discussed again in Chapter 7. The program contains optimizations that are specific to this release of C++ and interestingly, while this version performs better on the desktop computer, it underperforms on the BBB. The Java program uses the +AgressiveOpts flag to enable performance optimization, and it was used because it did not involve modifying the source code.
The results for Python are particularly poor due to the algorithmic nature of the problem. However, the benchmarks at (debian.org, 2013),1 indicate that the range will be 9 to 100 times slower than the optimized C++ code for general processing to algorithm‐rich code, respectively. If you are very comfortable with Python and you would like to improve upon its performance, then you can investigate Cython, which is a Python compiler that automatically removes the dynamic typing capability and enables you to generate C code directly from your Python code. On the Debian image you can enter apt‐get install cython and apt‐get install python‐dev.
The final column provides the results for the same code running on a desktop computer virtual machine (a 64‐bit Ubuntu 3.11.0 kernel in a VirtualBox VM, allocated one thread on one core of an Intel [email protected] GHz processor and 10 GB of RAM, with no processing cap). You can see that the relative performance of the applications is broadly in line, but also note that the C++ program runs 40 times faster on the single i7 thread than it does on the BBB at 1 GHz. Hopefully that will help you frame your expectations with respect to the type of numerical processing that is possible on a standard BBB, particularly when investigating computationally expensive applications like signal processing and computer vision.
As previously discussed, this is only one numerically-oriented benchmark test, but it is somewhat indicative of the type of performance you should expect from each language. There have been many studies on the performance of languages; however, a recent and well‐specified analysis by Hundt (2011) has found that in terms of performance, “C++ wins out by a large margin. However, it also required the most extensive tuning efforts, many of which were done at a level of sophistication that would not be available to the average programmer” (Hundt, 2011).2
Setting the BBB CPU Frequency
In the previous section, the clock frequency of the BBB was adjusted dynamically at run time. The BBB has various governors that can be used to profile the performance/power usage ratio. For example, if you were building a battery‐powered BBB application that has low processing requirements, you could reduce the clock frequency to conserve power. You can find out information about the current state of the BBB by typing the following:
root@beaglebone:~# cpufreq‐info
... available frequency steps: 300 MHz, 600 MHz, 800 MHz, 1000 MHz
    governors: conservative, ondemand, userspace, powersave, performance
    current CPU frequency is 1000 MHz (asserted by call to hardware).
    cpufreq stats: 300 MHz:95.04%, 600 MHz:0.15%, 800 MHz:0.05%,
       1000 MHz:4.76%  (159)
You can see that different governors are available, with the profile names conservative, ondemand, userspace, powersave, and performance. To enable one of these governors type the following:
root@beaglebone:~# cpufreq‐set ‐g performance
root@beaglebone:~# cpufreq‐info
     current policy: frequency should be within 300 MHz and 1000 MHz.
             The governor "performance" may decide which speed to use
root@beaglebone:~# cpufreq‐set ‐f 800MHz
root@beaglebone:~# cpufreq‐info
  current CPU frequency is 800 MHz (asserted by call to hardware)
These commands need to be executed with root privileges. If these tools are not installed on your BBB, you can install the cpufrequtils package. The default governor is ondemand, which will dynamically switch CPU frequencies if the BBB reaches 95% of CPU load.
Scripting Languages
A scripting language is a computer programming language that is used to specify script files, which are interpreted directly by a run‐time environment to perform tasks. Many scripting languages are available, such as Bash, Perl, and Python, and these can be used to automate the execution of tasks on the BBB, such as system administration, interaction, and even interfacing to electronic components.
Scripting Language Options
Which scripting language should you choose for the BBB? There are many strong opinions and it is a difficult topic, as Linux users tend to have a favorite scripting language; however, you should choose the scripting language with features that suit the task at hand. For example:
- Bash scripting: Is a great choice for short scripts that do not require advanced programming structures. Bash scripts are used extensively in this book for small, well‐defined tasks, such as the timing code in the previous section. You can use the Linux commands discussed in Chapter 3 in your Bash scripts.
- Perl: Is a great choice for scripts that parse text documents or process streams of data. It enables you to write straightforward scripts and even supports the object‐oriented programming (OOP) paradigm, which is discussed later in this chapter.
- Python: Is great for scripts that need more complex structure and are likely to be built upon or modified in the future. Python supports the OOP paradigm and dynamic typing, which is discussed shortly.
These three scripting languages are available pre‐configured on the BBB standard Debian image. It would be very useful to have some knowledge of all of these scripting languages, as you may find third‐party tools or libraries that make your current project very straightforward. This section provides a brief overview of each of these languages, including a concise segment of code that performs the same function in each language. It finishes with a discussion about the advantages and disadvantages of scripting languages in general.
In Chapter 2 an approach is described for changing the state of the on‐board LEDs using Linux shell commands. It is possible to turn an LED on or off, and even make it flash. For example, you can use:
root@beaglebone:/sys/class/leds/beaglebone:green:usr3# echo none > trigger
root@beaglebone:/sys/class/leds/beaglebone:green:usr3# echo 1 > brightness
root@beaglebone:/sys/class/leds/beaglebone:green:usr3# echo 0 > brightness
to turn a user LED on and off. This section examines how it is possible to do the same tasks but in a structured programmatic form.
Bash
Bash scripts are a great choice for short scripts that do not require advanced programming structures, and that is exactly the application to be developed here. The first program leverages the Linux console commands such as echo and cat to create the concise script in Listing 5‐1 that enables you to choose, using command‐line arguments, whether you wish to turn USR3 LED on or off, or place it in a flashing mode. For example, using this script by calling ./bashLED on would turn the USR3 LED on. It also provides you with the trigger status information:
The script is available in the directory /chp05/bashLED. If you entered the script manually using the nano editor, then the file needs to have the executable flag set before it can be executed (the Git repository retains executable flags). Therefore, to allow all users to execute this script, use the following:
/chp05/bashLED$ chmod ugo+x bashLEDWhat is happening within this script? First, all of these command scripts begin with a sha‐bang #! followed by the name and location of the interpreter to be used, so #!/bin/bash in this case. The file is just a regular text file, but the sha‐bang is a magic‐number code to inform the OS that the file is an executable. Next, the script defines the path to the LED for which you wish to change state using the variable LED3_PATH. This allows the default value to be easily altered if you wish to use a different user LED or path.
The script contains a function called removeTrigger, mainly to demonstrate how functions are structured within Bash scripting. This function is called later in the script. Each if is terminated by a fi. The ; after the if statement terminates that statement and allows the statement then to be placed on the same line. The elif keyword means else if, which allows you to have multiple comparisons within the one if block. The newline character
terminates statements.
The first if statement confirms that the number of arguments passed to the script ($#) is not equal to 1. Remember that the correct way to call this script is of the form ./bashLED on. Therefore, on will be the first user argument that is passed ($1) and there will be one argument in total. If there are no arguments, then the correct usage will be displayed and the script will exit with the return code 2. This value is consistent with Linux system commands, where an exit value of 2 indicates incorrect usage. Success is indicated by a return value of 0, so any other non‐zero return value generally indicates the failure of a script.
If the argument that was passed is on then the code displays a message; calls the removeTrigger function; and writes the string “1” to the brightness file in the LED3 /sys directory. The remaining functions modify the USR3 LED values in the same way as described in Chapter 2. You can execute the script as follows:
/chp05/bashLED$ ./bashLED
There are no arguments. Usage is:
 bashLED Command, where command is one of
   on, off, flash or status e.g., bashLED on
/chp05/bashLED$ ./bashLED status
The LED Command that was passed is: status
[none] rc-feedback mmc0 mmc1 timer oneshot heartbeat backlight gpio cpu0
/chp05/bashLED$ sudo ./bashLED on
The LED Command that was passed is: on
Turning the LED on
/chp05/bashLED$ sudo ./bashLED flash
/chp05/bashLED$ sudo ./bashLED off
Notice that the script was prefixed by sudo when it was called. This is required, as the script was executed by the molloyd user account. The LED sysfs directory is owned by the root account and regular users do not have write access to change the state. For security reasons, you cannot use the setuid bit on a script to set it to execute as root. If users had write access to this script and its setuid bit was set as root, then they could inject any command that they wished into the script and would have de facto superuser access to the system.
A short script restoreDefaultLEDs is available in the repository chp05 directory. It returns the BBB LEDs back to their default states. For a comprehensive online guide to Bash scripting, please see Mendel Cooper’s “Advanced Bash‐Scripting Guide”: www.tldp.org/LDP/abs/html/.
Perl
Perl is a feature‐rich scripting language that provides you with access to a huge library of reusable modules and portability to other OSs (including Windows). Perl is best known for its text processing and regular expressions modules. In the late 1990s it was a very popular language for server‐side scripting for the dynamic generation of web pages. Later it was superseded by technologies such as Java servlets, Java Server Pages (JSP), and PHP. The language has evolved since its birth in the 1980s and now includes support for the OOP paradigm. Perl 5 (v14+) is installed by default on the BBB Debian Linux image. Listing 5‐2 provides a segment of a Perl example that has the same structure as the Bash script, so it is not necessary to discuss it in detail. Apart from the syntax, very little has actually changed in the translation to Perl.
A few small points are worth noting in the code: The “<” or “>” sign on the filename indicates whether the file is being opened for read or write access, respectively; the arguments are passed as $ARGV[0...n] and the number of arguments is available as the value $#ARGV; a file open, followed by a read or write, and a file close are necessary to write the values to /sys; and the arguments are passed to the subroutine writeLED3 and these are received as the values $_[0] and $_[1], which is not the most beautiful programming syntax, but it works perfectly well. To execute this code, simply type sudo ./perlLED.pl on, as the sha‐bang identifies the Perl interpreter. You could also execute it by typing perl perlLED.pl status.
For a good resource about getting started with installing and using Perl 5, see the guide “Learning Perl” at learn.perl.org.
Python
Python is a dynamic and strongly typed OOP language that was designed to be easy to learn and understand. Dynamic typing means that you do not have to associate a type (e.g., integer, character, string) with a variable; rather, the value of the variable “remembers” its own type. Therefore, if you were to create a variable x=5, the variable x would behave as an integer; but if you subsequently assign it using x=“test”, it would then behave like a string. Statically typed languages such as C/C++ or Java would not allow the re‐definition of a variable in this way (within the same scope). Strongly typed means that the conversion of a variable from one type to another requires an explicit conversion. The advantages of object‐oriented programming structures are discussed later in this chapter. Python is installed by default on the Debian BBB image. The Python example to flash the LED is provided in Listing 5‐3.
The formatting of this code is important—in fact, Python enforces the layout of your code by making indentation a structural element. For example, after the line “if len(sys.argv)!=2:” the next few lines are “tabbed” in. If you did not tab in one of the lines—for example, the sys.exit(2) line—then it would not be part of the conditional if statement and the code would always exit at this point in the program. To execute this example, in the pythonLED directory enter the following:
/chp05/pythonLED$ sudo ./pythonLED.py flash
Flashing the LED
/chp05/pythonLED$ ./pythonLED.py status
Getting the LED trigger status
none rc-feedback mmc0 mmc1 [timer] oneshot heartbeat backlight gpio cpu0
Python is very popular on the BBB, and most of the other books currently available on the BBB use Python as the core programming language. A list of books is provided at the end of this chapter. Compared to Perl, the syntax is very straightforward and there is not too much to explain about the preceding code, having explained the Bash and Perl versions.
To conclude this discussion of scripting, there are several strong choices for applications on the BBB. Table 5-2 lists some of the key advantages and disadvantages of command scripting on the BBB, when considered in the context of the compiled languages which are discussed shortly.
Table 5-2 Advantages and Disadvantages of Command Scripting on the BBB
| ADVANTAGES | DISADVANTAGES |
| Perfect for automating Linux system administration tasks that require calls to Linux commands. | Performance is poor for complex numerical or algorithmic tasks. |
Easy to modify and adapt to changes. Source code is always present and complex toolchains (see Chapter 7) are not required in order to make modifications. Generally, nano is the only tool that you need. |
Generally, relatively poor/slow programming support for data structures, graphical user interfaces, sockets, threads, etc. |
| Generally, straightforward programming syntax and structure that is reasonably easy to learn when compared to languages like C++ and Java. | Generally, poor support for complex applications involving multiple, user‐developed modules or components (Python and Perl do support OOP). |
| Generally, quick turnaround in coding solutions by occasional programmers. | Code is in the open. Direct access to view your code can be an intellectual property or a security concern. |
| Lack of development tools (e.g., refactoring). |
JavaScript and Java
With the interpreted languages just discussed, the source code text file is “executed” by the user passing it to a run‐time interpreter, which then translates or executes each line of code. JavaScript and Java have different life cycles and are quite distinct languages.
JavaScript and Node.js on the BBB
As discussed in Chapter 2, in the section “Node.js, Cloud9, and BoneScript,” Node.js is JavaScript that is run on the server side. JavaScript is an interpreted language by design; however, thanks to the V8 engine that was developed by Google for their Chrome web browser, Node.js actually compiles JavaScript into native machine instructions as it is loaded by the engine. This is called just‐in‐time (JIT) compilation or dynamic translation. As demonstrated at the beginning of this chapter, Node.js’s performance for the numerical computation tasks is very impressive for an interpreted language.
Listing 5-4 shows the same LED code example written using JavaScript and executed by calling the nodejs executable:
The code is available in the /chp05/nodejsLED/ directory and it can be executed by typing nodejs nodejsLED.js [option]. The code has been structured in the same way as the previous examples and there are not too many syntactical differences; however, there is one major difference between Node.js and other languages: functions are called asynchronously. Up to this point, all of the languages discussed followed a sequential‐execution mode. Therefore, when a function is called, the program counter (also known as the instruction pointer) enters that function and does not reemerge until the function is complete. Consider, for example, code like this:
functionA();
functionB();
The functionA() is called and functionB() will not be called until functionA() is fully complete. This is not the case in Node.js! In Node.js, functionA() is called first and then Node.js continues executing the subsequent code, including entering functionB(), while the code in functionA() is still being executed. This presents a serious difficulty for the current application, with this segment of code in particular:
case 'flash':
      console.log("Making the LED Flash");
      writeLED("/trigger", "timer", LED3_PATH);
      writeLED("/delay_on", "50", LED3_PATH);
      writeLED("/delay_off", "50", LED3_PATH);
      break;
The first call to writeLED() sets up the sysfs file system (as described in Chapter 2) to now contain new delay_on and delay_off file entries. However, due to the asynchronous nature of the calls, the first writeLED() call has not finished setting up the file system before the next two writeLED() calls are performed. This means that the delay_on and delay_off file system entries are not found, and the code to write to them fails. You should test this by changing the call near the top of the program from fs.writeFileSync(...) to fs.writeFile(...).
To combat this issue you can synchronize (prevent threads from being interrupted) the block of code where the three writeLED() functions are called, ensuring that the functions are called sequentially. Alternatively, as shown in this code example, you can use a special version of the Node.js writeFile() function called writeFileSync() to ensure that the first function call to modify the file system blocks the other writeFileSync() calls from taking place.
Node.js allows asynchronous calls because they help ensure that your code is “lively.” For example, if you performed a database query, your code may be able to do something else useful while awaiting the result. When the result is available, a callback function is executed in order to process the received data. This asynchronous structure is perfect for Internet‐attached applications, where posts and requests are being made of websites and web services, and it is not clear when a response will be received (if at all). Node.js has an event loop that manages all the asynchronous calls, creating threads for each call as required, and ensuring that the callback functions are executed when an asynchronous call completes its assigned tasks.
Java on the BBB
Up to this point in the chapter, interpreted languages are examined, meaning the source code file (a text file) is executed using an interpreter or dynamic translator at run time. Importantly, the code exists in source code form, right up to the point when it is executed using the interpreter.
With traditional compiled languages, the source code (a text file) is translated directly into machine code for a particular platform using a set of tools, which we will call a compiler for the moment. The translation happens when the code is being developed; once compiled, the code can be executed without needing any additional run‐time tools.
Java is a hybrid language: You write your Java code in a source file, e.g., example.java, which is a regular text file. The Java compiler (javac) compiles and translates this source code into machine code instructions (called bytecodes) for a Java virtual machine (VM). Regular compiled code is not portable between hardware architectures, but bytecode files (.class files) can be executed on any platform that has an implementation of the Java VM. Originally, the Java VM interpreted the bytecode files at run time; however, more recently, dynamic translation is employed by the VM to convert the bytecodes into native machine instructions at run time.
The key advantage of this life cycle is that the compiled bytecode is portable between platforms; and because it is compiled to a generic machine instruction code, the dynamic translation to “real” machine code is very efficient. The downside of this structure when compared to compiled languages is that the VM adds overhead to the execution of the final executable.
Presently, there is no version of the Java Development Kit for embedded Linux, which prevents you from compiling code directly on the BBB. In addition, the Java Runtime Environment (JRE), which provides the Java virtual machine (JVM), is not installed on the BBB by default.
There is a full guide to installing the JRE on the BBB and the JDK on a desktop Linux machine at the chapter web page. Listing 5‐5 provides a source code example that is also available in the GitHub repository in bytecode form.
Early versions of Java suffered from poor computational performance; however, more recent versions take advantage of dynamic translation at run time (just‐in‐time, or JIT, compilation) and, as demonstrated at the start of this chapter, the performance was less than 20% slower (including dynamic translation) than that of the natively compiled C++ code, with only a minor additional memory overhead. Table 5-3 lists some of the advantages and disadvantages of using Java for development on the BBB.
Table 5-3 Advantages and Disadvantages of Java on the BBB
| ADVANTAGES | DISADVANTAGES |
| Code is portable. Code compiled on the PC can be executed on the BBB or another embedded Linux platform. | You cannot currently build your Java applications directly on the BBB. |
| There is a vast and extensive library of code available that can be fully integrated in your project. | Executing as root is slightly difficult due to required environment variables. |
| Full OOP support. | It’s not suitable for scripting. |
| Can be used for user‐interface application development on the BBB when it is attached to a display. | Computational performance is very respectable, but slower than optimized C/C++ programs. Slightly heavier on memory. |
| Strong support for multi‐threading. | Strictly typed and no unsigned integer types. |
| Has automatic memory allocation and de‐allocation using a garbage collector, removing memory leak concerns. | Royalty payment required if deployed to a platform that “involves or controls hardware” (Oracle, 2014).3 |
| Sandboxed applications do not have access to system memory, registers or system calls (except through /proc) or JNI (Java Native Interface). |
To execute a Java application under Debian/Ubuntu, where it needs access to the /sys directory, you need the application to run with root access. Unfortunately, because you need to pass the bytecode (.class) file to the Java VM, you have to call sudo and create a temporary shell of the form sudo sh ‐c 'java myClass'. However, because you set the environment variables for PATH and JAVA_HOME within the user account, these will not be present in the root account. For example:
/chp05/javaLED$ export TEST=test
/chp05/javaLED$ sudo sh ‐c 'echo $TEST'
/chp05/javaLED$ sudo ‐E sh ‐c 'echo $TEST'
testIn the first case, there was no output, as the TEST environment variable is not passed to the root shell; however, the addition of ‐E means that the variable is passed. Unfortunately, this will not work for PATH, because to prevent Trojan horse application attacks, the root PATH is set in the /etc/sudoers file. Therefore, to execute your Java application, you have to modify the sudoers configuration file using sudo visudo and add the following modifications:
- Change
secure_pathto include/usr/java/jre/bin/. - Add the line
Defaults env_keep += “JAVA_HOME”.
The application can eventually be executed using the following:
/chp05/javaLED$ sudo sh ‐c 'java exploringBB.LEDExample On'
/chp05/javaLED$ sudo sh ‐c 'java exploringBB.LEDExample Off'
C and C++ on the BeagleBone
C++ was developed by Bjarne Stroustrup at Bell Labs (now AT&T Labs) during 1983–1985. It is based on the C language (named in 1972) that was developed at AT&T for UNIX systems in the early 1970s (1969–1973) by Dennis Ritchie. As well as adding an object‐oriented (OO) framework (originally called “C with Classes”), C++ also improves the C language by adding features such as better type checking. It quickly gained widespread usage, which was largely due to its similarity to the C programming language syntax, and the fact that it allowed existing C code to be used when possible. C++ is not a pure OO language but rather a hybrid, having the organizational structure of OO languages but retaining the efficiencies of C, such as typed variables and pointers.
Unlike Java, C++ is not “owned” by a single company. In 1998 the ISO (International Organization for Standardization) committee adopted a worldwide uniform language specification that aimed to remove inconsistencies between the various C++ compilers (Stroustrup, 1998).4 This standardization continues today with C++11 approved by the ISO in 2011 (gcc 4.7+ supports the flag ‐std=c++11) and more new features appearing in compilers today with the approval of C++14 in August 2014.
Why am I covering C and C++ in more detail than other languages in this book?
- First, I believe that if you can understand the workings of C and C++, then you can understand the workings of any language. In fact, most compilers (Java native methods, Java virtual machine, JavaScript) and interpreters (Bash, Perl, Python) are written in C.
- At the beginning of this chapter, a significant performance advantage of C/C++ over other languages was described (yes, it was demonstrated using only one random test!). It is also important to remember that the same code running on the BBB at 1 GHz was 40 times slower than the same code running on only one thread (two available on each core) of one core (four available) of an Intel i7 3.5 GHz processor. Resources on the BBB are not so plentiful that they can be wasted with inefficiencies.
- If you are to build upon the content of this book and develop your own device drivers, or contribute to Linux kernel development, you need to understand C and/or C++. Later in this chapter, code is provided that demonstrates how you can communicate directly with Linux kernel space using the GNU C Library (glibc).
- Many of the application examples in this book such as streaming network data and image processing use C++ and a comprehensive library of C++ code called Qt.
Table 5-4 lists some advantages and disadvantages of using C/C++ on the BBB. The next section reviews some of the fundamentals of C and C++ programming, in order to ensure that you have the skills necessary for the remaining chapters in this book. It is not possible to cover every aspect of C and C++ programming in just one chapter of one book. The Further Reading section at the end of this chapter directs you to recommended texts.
Table 5-4 Advantages and Disadvantages of C/C++ on the BBB
| ADVANTAGES | DISADVANTAGES |
| You can build code directly on the BBB or you can cross‐compile code. The C/C++ languages are ISO standards, not owned by a single vendor. | Compiled code is not portable. Code compiled for your x86 desktop will not run on the BBB ARM processor. |
| C++ has full support for procedural programming, OOP, and support for generics through the use of STL (Standard Template Library). | Many consider the languages to be complex to master. There is a tendency to need to know everything before you can do anything. |
| It gives the best computational performance, especially if optimized; however, optimization can be difficult and can reduce the portability of your code. | The use of pointers and the low‐level control available makes code prone to memory leaks. With careful coding these can be avoided and can lead to efficiencies over dynamic memory management schemes. |
| Can be used for user‐interface application development on the BBB using third‐party libraries. Libraries such as Qt and Boost provide extensive additional libraries for components, networking, etc. | By default, C and C++ do not support graphical user interfaces, network sockets, etc. Third‐party libraries are required. |
Offers low‐level access to glibc for integrating with the Linux system. Programs can be setuid to root. |
Not suitable for scripting (there is a C shell, csh, that does have syntax like C). Not ideal for web development either. |
| The Linux kernel is written in C and having knowledge of C/C++ can help if you ever have to write device drivers or contribute to Linux kernel development. | C++ attempts to span from low‐level to high‐level programming tasks, but it can be difficult to write very scalable enterprise or web applications. |
The next section provides a revision of the core principles that have been applied to examples on the BBB. It is intended to serve as an overview and a set of reference examples that you can come back to again and again. It also focuses on topics that cause my students difficulties, pointing out common mistakes. Also, please remember that course notes for my OOP module are publicly available at ee402.eeng.dcu.ie along with further support materials.
C and C++ Language Overview
The following examples can be edited using the nano editor and compiled on the BBB directly using the gcc and g++ compilers, which are installed by default. The code is in the directory chp05/overview.
The first example you should always write in any new language is “Hello World.” Listing 5‐6 and 5‐7 provide C and C++ code respectively, for the purpose of a direct comparison of the two languages.
The #include call is a pre‐processor directive that effectively loads the contents of the stdio.h file (/usr/include/stdio.h) in the C case, and the iostream header (/usr/include/c++/4.X/iostream) file in the C++ case, and copies and pastes the code in at this exact point in your source code file. These header files contain the function prototypes, enabling the compiler to link to and understand the format of functions such as printf() in stdio.h and streams like cout in iostream. The actual implementation of these functions is in shared library dependencies. The angular brackets (< >) around the include filename means that it is a standard, rather than a user‐defined include (which would use double quotes).
The main() function is the starting point of your application code. There can only be one function called main() in your application. The int in front of main() indicates that the program will return a number back to the shell prompt. As stated before, it is good to use 0 for successful completion, 2 for invalid usage, and any other set of numbers to indicate failure conditions. This value is returned to the shell prompt using the line return 0 in this case. The main() function will return 0 by default. Remember that you can use echo $? at the shell prompt to see the last value that was returned.
The parameters of the main() function are int argc and char *argv[]. As you saw in the scripting examples, the shell can pass arguments to your application, providing the number of arguments (argc) and an array of strings (*argv[]). In C/C++ the first argument passed is argv[0] and it contains the name and full path used to execute the application.
The C code line printf(“Hello World!
”); allows you to write to the Linux shell, with the
representing a new line. The printf() function provides you with additional formatting instructions for outputting numbers, strings, etc. Note that every statement is terminated by a semicolon.
The C++ code line std::cout << "Hello World!" << std::endl; outputs a string just like the printf() function. In this case cout represents the output stream; and the function used is actually the <<, which is called the output stream operator. The syntax is discussed later, but std::cout means the output stream in the namespace std. The endl (end line) representation is the same as
. This may seem more verbose, but you will see why it is useful later in the discussion on C++ classes. These programs can be compiled and executed directly on the BBB by typing the following:
/chp05/overview$ gcc helloworld.c ‐o helloworldc
/chp05/overview$ ./helloworldc
Hello World!
/chp05/overview$ g++ helloworld.cpp ‐o helloworldcpp
/chp05/overview$ ./helloworldcpp
Hello World!
The sizes of the C and C++ executables are different to account for the different header files, output functions, and exact compilers that are used:
/chp05/overview$ ls ‐l helloworldc*
‐rwxr‐xr‐x 1 molloyd users 5053 Mar 14 12:23 helloworldc
‐rwxr‐xr‐x 1 molloyd users 6559 Mar 14 12:24 helloworldcpp
Compiling and Linking
You just saw how to build a C or C++ application, but there are a few intermediate steps that are not obvious in the preceding example, as the intermediate stage outputs are not retained by default. Figure 5-1 illustrates the full build process from preprocessing right through to linking.
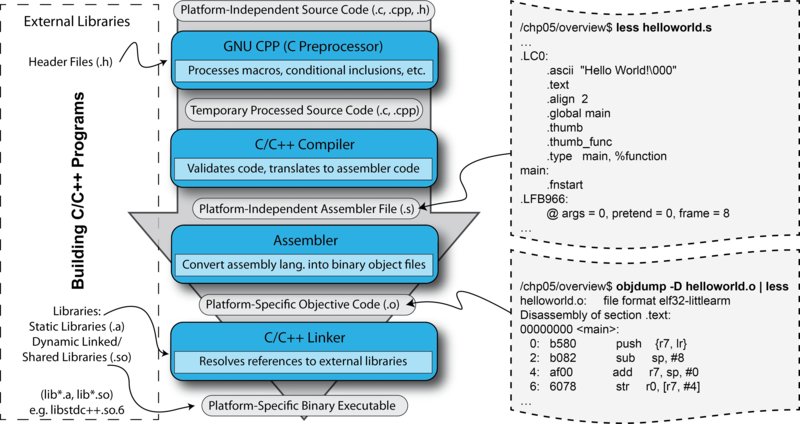
Figure 5-1 Building C/C++ applications on the BBB
You can perform the steps in Figure 5-1 yourself. Here is an example of the actual steps that were performed using the Helloworld.cpp code example. The steps can be performed explicitly as follows, so that you can view the output at each stage:
/chp05/overview$ ls
helloworld.cpp
/chp05/overview$ g++ ‐E helloworld.cpp > processed.cpp
/chp05/overview$ ls
helloworld.cpp  processed.cpp
/chp05/overview$ g++ ‐S processed.cpp ‐o helloworld.s
/chp05/overview$ ls
helloworld.cpp  helloworld.s  processed.cpp
/chp05/overview$ g++ ‐c helloworld.s
/chp05/overview$ ls
helloworld.cpp  helloworld.o  helloworld.s  processed.cpp
/chp05/overview$ g++ helloworld.o ‐o helloworld
/chp05/overview$ ls
helloworld  helloworld.cpp  helloworld.o  helloworld.s  processed.cpp
/chp05/overview$ ./helloworld
Hello World!
You can see the text format output after preprocessing by typing less processed.cpp, where you will see the necessary header files pasted in at the top of your code. At the very bottom of the file you will find your code. This file is passed to the C/C++ compiler, which validates the code and generates platform‐independent assembler code (.s). You can view this code by typing less helloworld.s, as illustrated in Figure 5-1.
This .s text file is then passed to the assembler, which converts the platform‐independent instructions into binary instructions for the BBB platform (the .o file). You can see the assembly language code that was generated if you use the objdump (object file dump) tool on the BBB by typing objdump ‐D helloworld.o, as illustrated in Figure 5-1.
Object files contain generalized binary assembly code that does not yet provide enough information to be executed on the BBB. However, after linking the final executable code, helloworld contains the target‐specific assembly language code that has been combined with the libraries, statically and dynamically as required—you can use the objdump tool again on the executable, which results in the following output:
/chp05/overview$ objdump ‐D helloworld | less
helloworldcpp:     file format elf32-littlearm
Disassembly of section .interp:
00008134 <.interp>:
    8134:    62696c2f     rsbvs   r6, r9, #12032  ; 0x2f00
    8138:    2d646c2f     stclcs  12, cr6, [r4, #-188]! ; 0xffffff44
    813c:    756e696c     strbvc  r6, [lr, #-2412]!     ; 0x96c
...
The meaning of these instructions is another book in and of itself (see infocenter.arm.com for reference documentation), but for example in this case the mnemonic rsbvs refers to a type of reverse subtraction on the two of the ARM processor’s 16, 32‐bit registers (labeled r0–r15). Finally, just so you are aware, it is possible to disassemble executable code, in order that the source code can be reverse engineered. For example:
/chp05/overview$ objdump ‐S --disassemble helloworld > test.dump
/chp05/overview$ less test.dump
Writing the Shortest C/C++ Program
Is the HelloWorld example the shortest program that can be written in C or C++? No, Listing 5‐8 is the shortest valid C and C++ program.
This is a fully functional C and C++ program that compiles with no errors and works perfectly, albeit with no output. Therefore, in building a C/C++ program, there is no need for libraries; there is no need to specify a return type for main(), as it defaults to int; the main() function returns 0 by default in C++ and a random number in C (see echo $? call below); and an empty function is a valid function. This program will compile as a C or C++ program as follows:
/chp05/overview$ gcc short.c ‐o shortc
/chp05/overview$ g++ short.c ‐o shortcpp
/chp05/overview$ ls ‐l short*
-rw-r--r-- 1 molloyd users    9 Mar 14 12:34 short.c
-rwxr-xr-x 1 molloyd users 4912 Mar 14 12:40 shortc
-rwxr-xr-x 1 molloyd users 5040 Mar 14 12:40 shortcpp
/chp05/overview$ ./shortc
/chp05/overview$ echo $?
97
/chp05/overview$ ./shortcpp
/chp05/overview$ echo $?
0
This is one of the greatest weaknesses of C and C++. There is an assumption that you know everything about the way the language works before you write anything. In fact, aspects of the preceding example might be used by a programmer to demonstrate how clever they are, but they are actually demonstrating poor practice in making their code unreadable by less “expert” programmers. For example, if you rewrite the C++ code in short.cpp to include comments and explicit statements, to create short2.cpp, and then compile both using the ‐O3 optimization flag, the output will be as follows:
/chp05/overview$ more short.cpp
main(){}
/chp05/overview$ more short2.cpp
// A really useless program, but a program nevertheless
int main(int argc, char **argv){
   return 0;
}
/chp05/overview$ g++ ‐O3 short.cpp ‐o short1
/chp05/overview$ g++ ‐O3 short2.cpp ‐o short2
/chp05/overview$ ls ‐l short*
-rw-r--r-- 1 molloyd users    9 Mar 14 13:20 short.cpp
‐rwxr‐xr‐x 1 molloyd users 5030 Mar 14 13:28 short1
‐rwxr‐xr‐x 1 molloyd users 5031 Mar 14 13:28 short2
-rw-r--r-- 1 molloyd users  107 Mar 14 12:59 short2.cpp
Note that the difference in the executable size is only one byte! Adding the comment, the explicit return statement, the explicit return type, and explicit arguments has had no impact on the size of the final binary application. The binary executable is one byte longer because the source filename is one byte longer (i.e., short2.cpp rather than short.cpp). However, the benefit is that the actual functionality of the code is much more readily understood by a novice programmer.
You can build with the flag ‐static to statically link the libraries, rather than the default form of linking dynamically with shared libraries. This means that the compiler and linker effectively place all the library routines required by your code directly within the program executable:
/chp05/overview$ g++ ‐O3 short.cpp ‐static ‐o shortst
/chp05/overview$ ls ‐l shortst
-rwxr-xr-x 1 molloyd users 455914 Mar 14 12:46 shortst
It is clear that the program executable size has grown significantly. One advantage of this form is that the program can be executed by ARM systems on which the C++ standard libraries are not installed.
With dynamic linking, it is useful to note that you can discover which shared library dependencies your compiled code is using, by calling ldd:
/chp05/overview$ ldd short1
   libstdc++.so.6 => /usr/lib/arm‐linux‐gnueabihf/libstdc++.so.6 (0xb...)
   libm.so.6 => /lib/arm-linux-gnueabihf/libm.so.6 (0xb6ea4000)
   libgcc_s.so.1 => /lib/arm-linux-gnueabihf/libgcc_s.so.1 (0xb6e80000)
   libc.so.6 => /lib/arm-linux-gnueabihf/libc.so.6 (0xb6d9b000)
   /lib/ld-linux-armhf.so.3 (0xb6fc9000)
You can see that the g++ compiler (and glibc) on the Debian image for the BBB has been patched to support the generation of hard floating‐point (HardFP) instructions by default. This allows for faster code execution with floating‐point numbers than if it used the soft floating‐point ABI (application binary interface) to emulate floating‐point support in software (SoftFP ABI).
Variables and Operators in C/C++
A variable is a data item stored in a block of memory that has been reserved for it. The type of the variable defines the amount of memory reserved and how it should behave (see Figure 5-2). This figure describes the output of the code example sizeofvariables.c in Listing 5‐9.
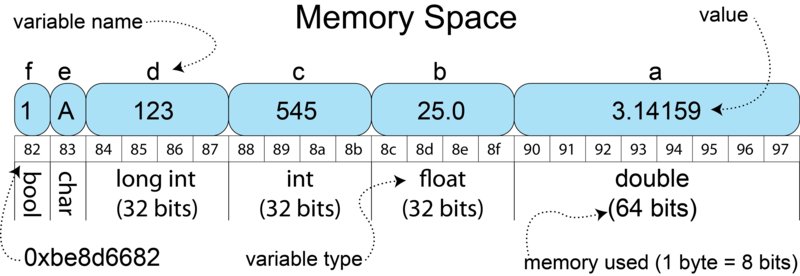
Figure 5-2 Memory allocation for variables running on the 32‐bit BBB
Listing 5‐9 details various variables available in C/C++. When you create a local variable c below, it is allocated a box/block of memory on the stack (predetermined reserved fast memory) depending on its type. In this case, c is an int value; therefore, four bytes (32 bits) of memory is allocated to store the value. Assume that variables in C/C++ are initialized with random values; therefore, in this case c = 545; replaces that initial random value by placing the number 545 in the box. It does not matter if you store the number 0 or 2,147,483,647 in this box: it will still occupy 32 bits of memory! Please note that there is no guarantee regarding the ordering of local variable memory—it was fortuitously linear in this particular example.
The function sizeof(c) returns the size of the type of the variable in bytes. In this example, it will return 4 for the size of the int type. The &c call can be read as the “address of” c. This provides the address of the first byte that stores the variable c, in this case returning 0xbe8d6688. The %.4f on the first line means display the floating‐point number to four decimal places. Executing this program on the BBB gives the following:
/chp05/overview$ ./sizeofvariables
a val 3.1416 & size 8 bytes (@addr 0xbe8d6690).
b val 25.00 & size 4 bytes (@addr 0xbe8d668c).
c val 545 (oct 1041, hex 221) & size 4 bytes (@addr 0xbe8d6688).
d val 123 & size 4 bytes (@addr 0xbe8d6684).
e val A & size 1 bytes (@addr 0xbe8d6683).
f val     1 and size 1 bytes (@addr 0xbe8d6682).
The BBB has a 32‐bit microcontroller, so you are using four bytes to represent the int type. The smallest unit of memory that you can allocate is one byte, so, yes, you are representing a Boolean value with one byte, which could actually store eight unique Boolean values. You can operate directly on variables using operators. The program operators.c in Listing 5‐10 contains some points that often cause difficulty in C/C++:
This will give the following output:
/chp05/overview$ ./operators
The value of c=2 and a=2.
The value of d=2 and b=3.
The value of f=10.00 and e=9.
The value of g=65 and g=A.
On the line c=++a; the value of a is pre‐incremented before the equals assignment to c on the left‐hand side. Therefore, a was increased to 2 before assigning the value to c, so this line is equivalent to two lines: a=a+1; c=a;. However, on the line d=b++; the value of b is post‐incremented and is equivalent to two lines: d=b; b=b+1; The value of d is assigned the value of b, which is 2, before the value of b is incremented to 3.
On the line e=(int)f; a C‐style cast is being used to convert a floating‐point number into an integer value. Effectively, when programmers use a cast they are notifying the compiler that they are aware that there will be a loss of precision in the conversion of a floating‐point number to an int. The fractional part will be truncated, so 9.9999 will be converted to e=9, as the.9999 is removed by the truncation. One other point to note is that the printf(“%.2f”,f) will display the floating‐point variable to two decimal places, in contrast, rounding the value.
On the line g='A', g is assigned the ASCII equivalent value of capital A, which is 65. The printf(“%d %c”, g, g); will display either the int value of g if %d is used, or the ASCII character value of g if %c is used.
A const keyword can be used to prevent a variable from being changed. There is also a volatile keyword that is useful for notifying the compiler that a particular variable might be changed outside its control, and that the compiler should not apply any type of optimization to that value. This notification is useful on the BBB if the variable in question is shared with another process or physical input/output.
It is possible to define your own type in C/C++ using the typedef keyword. For example, if you did not want to include the header file stdbool.h in the sizeofvariables.c previous example, it would be possible to define it in this way instead:
typedef char bool;
#define true 1
#define false 0
Probably the most common and most misunderstood mistake in C/C++ programming is present in the following code segment:
if (x=y){
   // perform a body statement Z
}
When will the body statement Z be performed? The answer is whenever y is not equal to 0 (the current value of x is irrelevant!). The mistake is placing a single = (assignment) instead of == (comparison) in the if statement. The assignment operator returns the value on the RHS, which will be automatically converted to true if y is not equal to 0. If y is equal to zero, then a false value will be returned. Java does not allow this error, as there is no implicit conversion between 0 and false and 1 and true.
Pointers in C/C++
A pointer is a special type of variable that stores the address of another variable in memory—we say that the pointer is “pointing at” that variable. Listing 5‐11 is a code example that demonstrates how you can create a pointer p and make it point at the variable y:
When this code is compiled and executed, it will give the following output:
/chp05/overview$ ./pointers
The variable has value 1000 and the address 0xbede26bc.
The pointer stores 0xbede26bc and points at value 1000.
The pointer has address 0xbede26b8 and size 4.
So, what is happening in this example? Figure 5-3 illustrates the memory locations and the steps involved. In Step 1, the variable y is created and assigned the initial value of 1000. A pointer p is then created with the dereference type of int. In essence, this means that the pointer p is being established to point at int values. In Step 2, the statement p = &y; means “let p equal the address of y,” which sets the value of p to be the 32‐bit address 0xbede26bc. We now say that p is pointing at y. These two steps could have been combined using the call int *p = &y; (i.e., create a pointer p of dereference type int and assign it to the address of y).
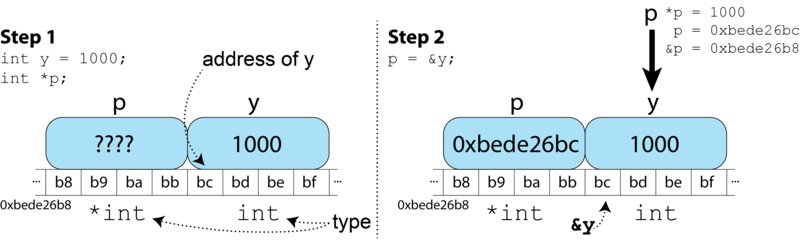
Figure 5-3 Example of pointers in C/C++ on the BBB (with 32‐bit addresses)
Why does a pointer need a dereference type? For one example, if a pointer needs to move to the next element in an array, then it needs to know whether it should move by four bytes, eight bytes, etc. Also, in C++ you need to be able to know how to deal with the data at the pointer based on its type. Listing 5‐12 is an example of working with pointers and arrays.
This will give the output as follows:
/chp05/overview$ ./pointerarray
The value of x[0] is 101
The value of x[1] is 201
The value of x[2] is 301
The value of x[3] is 401
The value of x[4] is 501
In this example, the pointer p is of dereference type int and it is set to point at the first element in an array of five int values using the statement int *p = &x[0];. The line of code to focus on here is (*(p++))++; (this is why pointers have a bad name!). Please note that the () are very important, as they set the order of operations. In this case the inner (p++) makes the pointer point at the next element in the array; however, because it is a post‐increment, the increment happens after the end of this line. Therefore, this entire line could be written as :(*p)++; p++;. The (*p)++ means increment the value stored at the address, changing 100 to 101 on the first iteration of the for loop. Pointer notation can be complex, but remember that the dereference type is needed because in this case the p++ call needs to know to move four bytes forward in memory. If p were of dereference type double (i.e., double *p;), then the pointer would move by eight bytes when p++; is called.
Part of the difficulty of using pointers in C/C++ is understanding the order of operations in C/C++, called the precedence of the operations. For example, if you write the statement
int x = 1 + 2 * 3;what will the value of x be? In this case it will be 7, because in C/C++ the multiplication operator has a higher level of precedence than the addition operator. The same issue occurs if you believe that you are incrementing the value at x by the statement *x++, as the ++ operator will be applied before the dereference operator, incrementing the pointer and uselessly dereferencing x.
There are approximately 58 operators in C++, with 18 different major precedence levels. Even if you know the precedence table, you should still make it clear for other users what you intend in a statement by using round brackets (()), which have the highest precedence level after the scope resolution (::), increment (++), and decrement (--) operators. Therefore, you should always write the following:
int x = 1 + (2 * 3);Finally, on the topic of C pointers, there is also a void* pointer that can be declared as void *p;, which effectively states that the pointer p does not have a dereference type and it will have to be assigned at a later stage (see /chp05/overview/void.c) using the following syntax:
int a = 5;
void *p = &a;
printf("p points at address %p and value %d
", p, *((int *)p));
When executed, this code will give an output like the following:
The pointer p points at address 0xbea546c8 and value 5Therefore, it is possible to cast a pointer from one deference type to another and the void pointer can potentially be used to store a pointer of any dereference type. In Chapter 6 void pointers are used to develop an enhanced GPIO interface.
C‐Style Strings
The C language has no built‐in string type but rather uses an array of the character type, terminated by the null character (�), to represent a string. There is a standard C library for strings that can be used as shown in Listing 5-13:
The code is explained by the comments within the example. When executed, this code will give the following output:
/chp05/overview$ ./cstrings
The string c is: Hello world!
The length of c is: 12
The string c is now: Hello World!
cat comes before dog (lexiographically)
The cd string is: Hello to the World
Token:Hello
Token:to
Token:the
Token:World
LED Flashing Application in C
Now that you have covered enough C programming to get by, you can look at how to write the LED flashing application in C. In Listing 5-14 the same structure as the other examples has been retained:
The only topic that you have not seen before is the use of files in C, but the worked example should provide you with the information you need in the writeLED() function. The FILE pointer fp points to a description of the file that identifies the stream, the read/write position, and its state. The file is opened using the fopen() function that is defined in stdio.h, which returns a FILE pointer. In this case it is being opened for write/update (w+). The alternatives would be as follows: read (r), write (w), append (a), read/update (r+), and append/update (a+). If you are working with binary files you would append a b to the state—e.g., “w+b” would open a new binary file for update (write and read). Also, “t” can be used to explicitly state that the file is in text format.
For a full reference of C functions available in the standard libraries, see www.cplusplus.com/reference/.
The C of C++
As discussed previously, the C++ language was built on the C language, adding support for OOP classes; however, a few other differences are immediately apparent when you start working with general C++ programming. Initially, the biggest change that you will notice is the use of input/output streams and the general use of strings.
First Example and Strings in C++
Listing 5-15 shows is the string example, rewritten to use the C++ string library:
Build this code by typing g++ cppstrings.cpp ‐o cppstrings. When executed, this code gives the same output as the cstrings.c example. Some aspects are more straightforward in C++ but there are some points worth mentioning.
The code uses the iostream and sstream header files, which are C++ headers. If you wish to use a C header file, you need to prepend the name with a “c”; therefore, to use the C string.h header file you would use #include<cstring>. There is a concept called namespaces in C++ that enables a programmer to limit a function or class to a particular scope. In C++ all the standard library functions and classes are limited to the standard namespace. You can explicitly identify that you wish to use a class from the std namespace by using std::string. However, that is quite verbose. The alternative is to use the statement using namespace std;, which brings the entire namespace into your code. Do not do this in one of your C++ header files, as it will pollute the namespace for anyone who uses your header file.
The code uses cout, which is the standard output stream, and the output stream operator (<<) to display strings. There is an equivalent standard input stream (cin) and the input stream operator (>>). The output stream operator “looks to” its right and identifies the type of the data. It will display the data depending on its type, so there is no need for %s, %d, %p, and so on, as you would use in the printf() function. The endl stream manipulation function inserts a newline character and flushes the stream.
The string objects are manipulated in this example using + to append two strings, and < or == to compare two strings. These operators are essentially functions like append() and strcmp(). In C++ you can define what these operators do for your own data types (operator overloading).
Passing by Value, Pointer, and Reference
As you have seen with the code samples, functions enable us to write a section of code that can be called several times, from different locations in our code. There are three key ways of passing a value to a function:
- Pass by value: This will create a new variable (
valin the following code example) and will store a copy of the value of the source variable (a) in this new variable. Any changes to the variablevalwill not have any impact on the source variable a. Pass by value can be used if you want to prevent the original data from being modified; however, a copy of the data has to be made, and if you are passing a large array of data, such as an image, then copying will have a memory and computational cost. An alternative to pass by value is to pass by constant reference. In the following example,ais also passed as the second argument to the function by constant reference and is received as the valuecr. The valuecrcan be read in the function, but it cannot be modified. - Pass by pointer: You can pass a pointer to the source data. Any modifications to the value at the pointer (
ptr) will affect the source data. The call to the function must pass an address (&b—address ofb). - Pass by reference: In C++ you can pass a value by reference. The function determines whether an argument is to be passed by value or passed by reference, through the use of the ampersand symbol. In the following example,
&refindicates that the valuecis to be passed by reference. Any modifications torefin the function will affect the value ofc.
Here is a function with all four examples (passing.cpp):
int afunction(int val, const int &cr, int *ptr, int &ref){
   val+=cr;
// cr+=val; // not allowed because it is constant
   *ptr+=10;
   ref+=10;
   return val;
}

int main(){
   int a=100, b=200, c=300;
   int ret;
   ret = afunction(a, a, &b, c);
   cout << "The value of a = " << a << endl;
   cout << "The value of b = " << b << endl;
   cout << "The value of c = " << c << endl;
   cout << "The return value is = " << ret << endl;
   return 0;
}
When executed, this code will result in the following output:
/chp05/overview$ ./passing
The value of a = 100
The value of b = 210
The value of c = 310
The return value is = 200
If you wish to pass a value to a function that is to be modified by that function in C++, then you can pass it by pointer or by reference; however, unless you are passing a value that could be NULL, or you need to re‐assign the pointer in the function (e.g., iterate over an array), then always use pass by reference. Now you are ready to write the LED code in C++!
Flashing the LEDs Using C++ (non‐OO)
The C++ LED flashing code is available in makeLED.cpp in the /chp05/makeLED/ directory. As most of the code is very similar to the C example, it is not repeated here. However, it is worth displaying the following segment, which is used to open the file using the fstream file stream class. The output stream operator (<<) in this case sends the string to fstream:
void writeLED(string filename, string value){
   fstream fs;
   string path(LED3_PATH);
   fs.open((path + filename).c_str(), fstream::out);
   fs << value;
   fs.close();
}
The c_str() method returns a C++ string as a C string. Once again, this code can be executed with root privileges.
Writing Your Own Multi‐Call Binary
In Chapter 3, you saw how multi‐call binaries can be used in Linux to build a single application that does the job of many. BusyBox was listed as an example of one of these binaries. There is an example in the chp05/makeLEDmulti directory called makeLEDmulti.cpp that uses the very first command‐line argument to switch the functionality of the application based on the command name that was called. The code has been modified to add a small function:
bool endsWith(string const &in, string const &comp){
   return (0==in.compare(in.length()-comp.length(),comp.length(),comp));
}
This function checks to see if the in string ends with the contents of the comp string. This is important, because the application could be called using ./flashled or ./chp05/makeLEDmulti/flashled, depending on its location. The switching comparison then looks like the following:
if(endsWith(cmd,"onled")){
   cout << "Turning the LED on" << endl;
   removeTrigger();
   writeLED("/brightness", "1");
}
If you list the files in the directory after calling ./build you will see the following files and symbolic links:
/chp05/makeLEDmulti$ ls ‐l
-rwxr-xr-x 1 molloyd users   542 Mar  8 02:37 build
lrwxrwxrwx 1 molloyd users    12 Mar  8 02:44 flashled -> makeLEDmulti
lrwxrwxrwx 1 molloyd users    12 Mar  8 02:44 ledstatus -> makeLEDmulti
-rwxr-xr-x 1 molloyd users 11888 Mar  8 02:44 makeLEDmulti
-rw-r--r-- 1 molloyd users  2477 Mar  8 02:43 makeLEDmulti.cpp
lrwxrwxrwx 1 molloyd users    12 Mar  8 02:44 offled -> makeLEDmulti
lrwxrwxrwx 1 molloyd users    12 Mar  8 02:44 onled -> makeLEDmulti
Each one of these symbolic links looks like an individual command, even though they link back to the same executable makeLEDmulti. The makeLEDmulti parses argv[0] to determine which symbolic link was used. You can see the impact of that here, where the symbolic links are called:
/chp05/makeLEDmulti$ sudo ./onled
The current LED Path is: /sys/class/leds/beaglebone:green:usr3
Turning the LED on
/chp05/makeLEDmulti$ ./ledstatus
The current LED Path is: /sys/class/leds/beaglebone:green:usr3
Current trigger details:
[none] rc-feedback mmc0 mmc1 timer oneshot heartbeat ...
C++ with Classes
Object‐oriented programming is a programming approach (or paradigm) that enables organizing software as a collection of objects, which consist of both data and behavior. In contrast to the functional programming examples you have seen to this point, you don’t ask the question “what does it do?” first, but rather, “what is it?” In theory, this means that your code is written to allow for future changes to the functionality, without having to redesign the structure of your code. In addition, it should also mean that you can decompose your code into modules that can be reused by you and others in future projects.
Overview of Object‐Oriented Programming
The following sections discuss a few key ideas that you have to understand before you can write object‐oriented code.
Classes and Objects
Think about the concept of a television: You do not have to remove the case to use it, as there are controls on the front and on the remote; you can still understand the television, even if it is connected to a games console; it is complete when you purchase it, with well‐defined external requirements, such as power supply and signal inputs; and your television should not crash! In many ways that description captures the properties that should be present in a class.
A class is a description. It should describe a well‐defined interface to your code; represent a clear concept; be complete and well documented; and be robust, with built‐in error checking. Class descriptions are built using two building blocks:
- States (or data): The state values of the class.
- Methods (or behavior): How the class interacts with its data. Method names usually include an action verb (e.g.,
setX()).
For example, here is pseudo‐code (i.e., not real C++ code) for an illustrative Television class:
class Television{
   int channelNumber;
   bool on;
   powerOn() { on = true; }
   powerOff(){ on = false;}
   changeChannel(int x) { channelNumber = x; }
};
Therefore, the example Television class has two states and three methods. The benefit of this structure is that you have tightly bound the states and methods together within a class structure. The powerOn() method means nothing outside this class. In fact, you can write a powerOn() method in many different classes without worrying about naming collisions.
An object is the realization of the class description—an instance of a class. To continue the analogy, the Television class is the blueprint that describes how you would build a television, and a Television object is the physical realization of those plans into a physical television. In pseudo‐code this realization might look like this:
void main(){
   Television dereksTV();
   Television johnsTV();
   dereksTV.powerOn();
   dereksTV.changeChannel(52);
   johnsTV.powerOn();
   johnsTV.changeChannel(1);
}
Therefore, dereksTV and johnsTV are objects of the Television class. Each has its own independent state, so changing the channel on dereksTV has no impact on johnsTV. To call a method, it must be prefixed by the object name on which it is to be called (e.g., johnsTV.powerOn()); calling the changeChannel() method on johnsTV objects does not have any impact on the dereksTV object.
In this book, a class name generally begins with a capital letter, e.g., Television, and an object generally begins with a lowercase letter, e.g., dereksTV. This is consistent with the notation used in many languages, such as Java. Unfortunately, the C++ standard library classes (e.g., string, sstream) do not follow this naming convention.
Encapsulation
Encapsulation is used to hide the mechanics of an object. In the physical television analogy, encapsulation is provided by the box that protects the inner electronic systems. However, you still have the remote control that will have a direct impact on the way the inner workings function.
In OOP, you can decide what workings are to be hidden (e.g., TV electronics) using an access specifier keyword called private, and what is to be part of the interface (TV remote control) using the access specifier keyword public. It is good practice to always set the states of your class to be private, so that you can control how they are modified by public interface methods of your own design. For example, the pseudo‐code might become the following:
class Television{
   private:
      int channelNumber;
      bool on;
      remodulate_tuner();
   public:
      powerOn() { on = true; }
      powerOff(){ on = false;}
      changeChannel(int x) {
         channelNumber = x;
         remodulate_tuner();
      }
};
Now the Television class has private state data (on, channelNumber) that is affected only by the public interface methods (powerOn(), powerOff(), changeChannel()) and a private implementation method remodulate_tuner() that cannot be called from outside the class.
There are a number of advantages of this approach: First, users of this class (another programmer) need not understand the inner workings of the Television class; they just need to understand the public interface. Second, the author of the Television class can modify and/or perfect the inner workings of the class without affecting other programmers’ code.
Inheritance
Inheritance is a feature of OOP that enables building class descriptions from other class descriptions. Humans do this all the time; for, example, if you were asked, “What is a duck?” you might respond with, “It’s a bird that swims, and it has a bill instead of a beak.” This description is reasonably accurate, but it assumes that the concept of a bird is also understood. Importantly, the description states that the duck has the additional behavior of swimming, but also that it has the replacement behavior of having a bill instead of a beak. You could loosely code this with pseudo‐code as follows:
class Bird{
   public:
     void fly();
     void describe() { cout << "Has a beak and can fly"; }
};

class Duck: public Bird{   // Duck IS-A Bird
      Bill bill;
   public:
      void swim();
      void describe() { cout << "Has a bill and can fly and swim"; }
};
In this case, you can create an object of the Duck class:
int main(){
   Duck d;        //creates the Duck instance object d
   d.swim();      //specific to the Duck class
   d.fly();       //inherited from the parent Bird class
   d.describe();  //describe() is inheritated and over-ridden in Duck
                  //so, "Has a bill and can fly and swim" would appear
}
The example here illustrates why inheritance is so important. You can build code by inheriting from, and adding to, a class description (e.g., swim()), or inheriting from a parent class and replacing a behavior (e.g., describe()) to provide a more specific implementation—this is called overriding a method, which is a type of polymorphism (multiple forms). Another form of polymorphism is called overloading, which means multiple methods can have the same name, in the same class, disambiguated by the compiler by having different parameter types.
You can check that you have an inheritance relationship by the IS‐A test; for example, a “duck is a bird” is valid, but a “bird is a duck” would be invalid because not all birds are ducks. This contrasts to the IS‐A‐PART‐OF relationship; for example, a “bill is a part of a duck.” An IS‐A‐PART‐OF relationship indicates that the bill is a member/state of the class. Using this simple check can be very useful when the class relationships become complex.
You can also use pointers with objects of a class; for example, to dynamically allocate memory for two Duck objects, you can use:
int main(){
   Duck *a = new Duck();
   Bird *b = new Duck(); //a pointer of the parent can point to a child object
   b->describe();        //will actually describe a duck (if virtual)
   //b->swim();          //not allowed! Bird does not ‘know' swim()
}
Interestingly, the Bird pointer b is permitted to point at a Duck object. As the Duck class is a child of a Bird class, all of the methods that the Bird pointer can call are “known” by the Duck object. Therefore the describe() method can be called. The arrow notation (b‐>describe()) is simply a neater way of writing (*b).describe(). In this case the Bird pointer b has the static type Bird and the dynamic type Duck.
One last point is that an additional access specifier called protected can be used through inheritance. If you wish to create a method or state in the parent class that you want to be available to the child class but you do not want to make public, then use the protected access specifier.
Object‐Oriented LED Flashing Code
These OOP concepts can now be applied a real C++ application on the BBB, by restructuring the functionally oriented C++ code into a class called LED, which contains states and methods. One difference with the code that is presented in Listing 5-16 is that it allows you to control the four user LEDs using the same OO code. Therefore, using the LED class, four different LED instance objects are created, each controlling one of the BBB’s four physical user LEDs.
/chp05/makeLEDOOP$ ./build
/chp05/makeLEDOOP$ ./makeLEDs status
/chp05/makeLEDOOP$ sudo ./makeLEDs flash
/chp05/makeLEDOOP$ sudo ./makeLEDs off
There is a script in the directory /chp05 to return the LEDs to their standard state, called restoreDefaultLEDs:
/chp05$ sudo ./restoreDefaultLEDsThis code is structured as a single class LED with private states for the path and the number, and private implementation methods writeLED() and removeTrigger(). These states and helper methods are not accessible outside the class. The public interface methods are turnOn(), turnOff(), flash(), and outputState(). There are two more public methods:
- The first is a constructor, which enables you to initialize the state of the object. It is called by
LED led(0)to create the objectledof theLEDclass with number0. This is very similar to the way that you assign initial values to anint, e.g.,int x = 5;. A constructor must have the exact same name as the class name (LEDin this case) and it cannot return anything, not evenvoid. - The last is a destructor (
∼LED()). Like a constructor, it must have the exact same name as the class name and is prefixed by the tilde (∼) character. This method is called automatically when the object is being destroyed. You can see this happening when you run the code sample.
The keyword virtual is also new. You can think of this keyword as “allowing overriding to take place when an object is dynamically bound.” It should always be there (except for the constructor), unless you know that there will definitely be no child class. Removing the virtual keyword will result in a slight improvement in the performance of your code.
The syntax void LED::turnOn(){...} is simply used to state that the turnOn() method is the one associated with the LED class. It is possible to have many classes in the one .cpp file, and it would be possible for two classes to have a turnOn() method; therefore, the explicit association allows you to inform the compiler of the correct relationship. I have written this code in a single file, as it is the first example. However, you will see in later examples that it is better practice to break your code into header files (.h) and implementation files (.cpp).
Hopefully the layout of the C++ version of the LED flashing code is clear at this point. The advantage of this OOP version is that you now have a structure that can be built upon when you wish to provide additional functionality to interact with the system LEDs. In a later chapter you will see how you can build similar structures to wrap electronic modules such as accelerometers and temperature sensors, and how to use the encapsulation property of OOP to hide some of the more complex calculations from programmers that interface to the code.
/Proc—Process Information File System
In Chapter 3, the Linux directory structure is discussed and one of the directories discussed is the /proc directory—the process information virtual file system. It provides you with information about the run‐time state of the kernel and it enables you to send control information to the kernel. In effect, it provides you with a file‐based interface from user space to kernel space. There is a Linux kernel guide to the /proc file system at tiny.cc/ebb501. For example, if you type
/proc# cat cpuinfo
processor       : 0
model name      : ARMv7 Processor rev 2 (v7l) ...
it provides you with information on the CPU. Try some of the following: cat uptime, cat interrupts, cat version in the same directory. The example, chp05/proc/readUptime.cpp, provides an example program to read the system uptime and calculate the percentage of system idle time.
A program that is executed with superuser privileges can read or write to files in /proc. However, you have to be careful with the consistency of files in the /proc directory. The Linux kernel provides for atomic operations—instructions that execute without interruption. Certain “files” within /proc (such as /proc/uptime) are totally atomic and cannot be interrupted while they are being read; however, other files such as /proc/net/tcp are only atomic within each row of the file, meaning that the file will change as it is being read, and therefore simply reading the file may not provide a consistent snapshot.
GLIBC and Syscall
The Linux GNU C Library, glibc, provides an extensive set of wrapper functions for system calls. It includes functionality for handling files, signals, mathematics, processes, users, and much, much more. See tiny.cc/ebb502 for a full description of the GNU C Library. If there is an equivalent glibc function it is much more straightforward to call this function than to parse the /proc entries. Here is a simple C example that uses glibc:
/chp05/proc$ more whologgedin.c
#include<unistd.h>
#include<stdio.h>
int main(){
   printf("The user logged in is %s
", getlogin());
   return 0;
}
/chp05/proc$ gcc whologgedin.c ‐o who
/chp05/proc$ ./who
The user logged in is molloyd
There are many, many glibc functions, but one function in particular deserves some attention, and that is the syscall function, as it performs a general system call using the arguments that you pass to the function. The first argument is a system call number, all of which are defined in /sys/syscall.h. You can open this file (/usr/include/arm‐linux‐gnueabihf/sys/syscall.h) and search for the numbers or you can use syscalls.kernelgrok.com to search for numbers on your Linux kernel architecture. As illustrated in Listing 5‐17, the syscall function can pass one or more arguments depending on the type of syscall function.
When executed, this code will result in the output
/chp05/syscall$ ./syscall
The GNU libc version is 2.13
The Current PID is: 3625
The Current PID is: 3625
It is being run by user with ID: 1001
It is being run by user with ID: 1001
You can find out which user account is 1001 as follows:
/chp05/syscall$ cat /etc/passwd|grep "1001"
molloyd:x:1001:100::/home/molloyd:/bin/bash
Therefore, you can use C/C++ to make calls directly to Linux to using the syscall function. You can call functions like chmod (see /chp05/syscall/callchmod.cpp) by passing the required properties as second and third arguments:
int ret = syscall(SYS_chmod, "test.txt", 0777);Use syscalls.kernelgrok.com and search for chmod. You will see the eax is 0x0f (i.e., SYS_chmod defined in syscall.h), const char __user *filename is “test.txt”, and mode_t mode is 0777, which sets the text file to be executable (‐rwxrwxrwx)—not a great idea!
Summary
After completing this chapter, you should be able to:
- Describe the multitude of issues that would impact on your choice of programming languages to use in building applications for the BBB.
- Write basic scripting language program code on the BBB that interfaces to the on‐board LEDs.
- Compare and contrast scripting, hybrid, and compiled programming languages, and their application to the BBB.
- Write C code examples that interface to the BBB’s on‐board LEDs.
- Wrap C code in C++ classes to provide greater program structure.
- Write advanced C/C++ code that is capable of interfacing to Linux operating system commands.
Further Reading
Most of the sections in this chapter contain links to the relevant websites for further reading and reference materials. Here is a list of some books on programming that are relevant to the materials in this chapter:
- Bad to the Bone: Crafting Electronics Systems with BeagleBone and BeagleBone Black, Steven Barrett and Jason Kridner (Morgan & Claypool, 2013).
- Getting Started with BeagleBone: Linux‐Powered Electronic Projects with Python and JavaScript, Matt Richardson (MakerMedia, 2013).
- Programming the BeagleBone Black: Getting Started with JavaScript and BoneScript, Simon Monk (McGraw‐Hill/TAB Electronics, 2014).