
10. Advanced Techniques
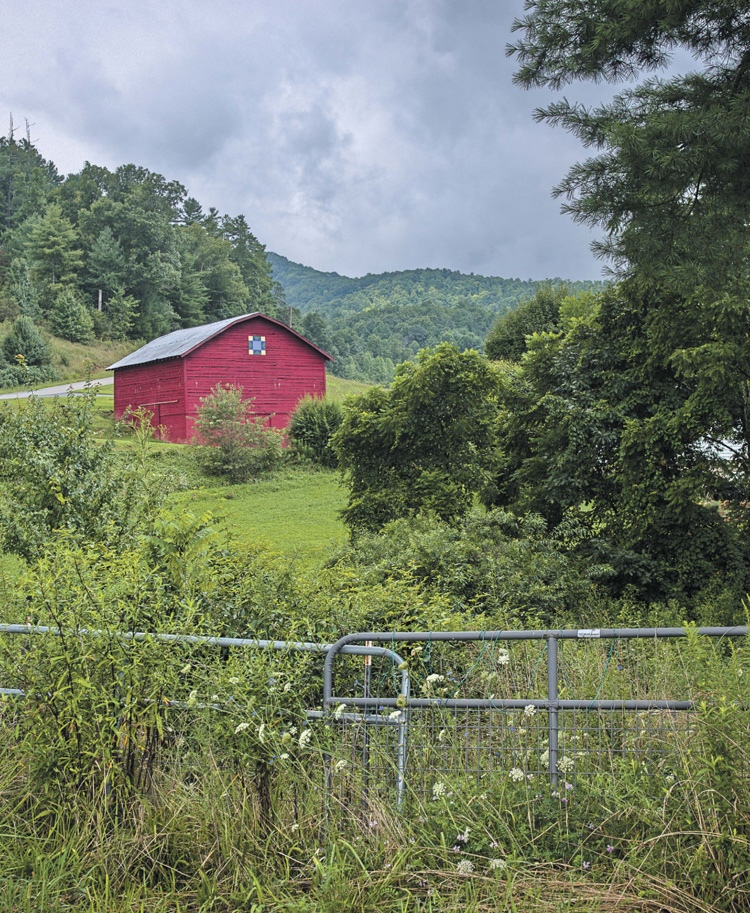
ISO 200 • 1/80 sec. • f/5.6 • 35mm lens
Impress Your Family and Friends
We’ve covered a lot of ground in the previous chapters, especially on the general photographic concepts that apply to most, if not all, shooting situations. There are, however, some specific tools and techniques that will give you an added advantage in obtaining a great shot.
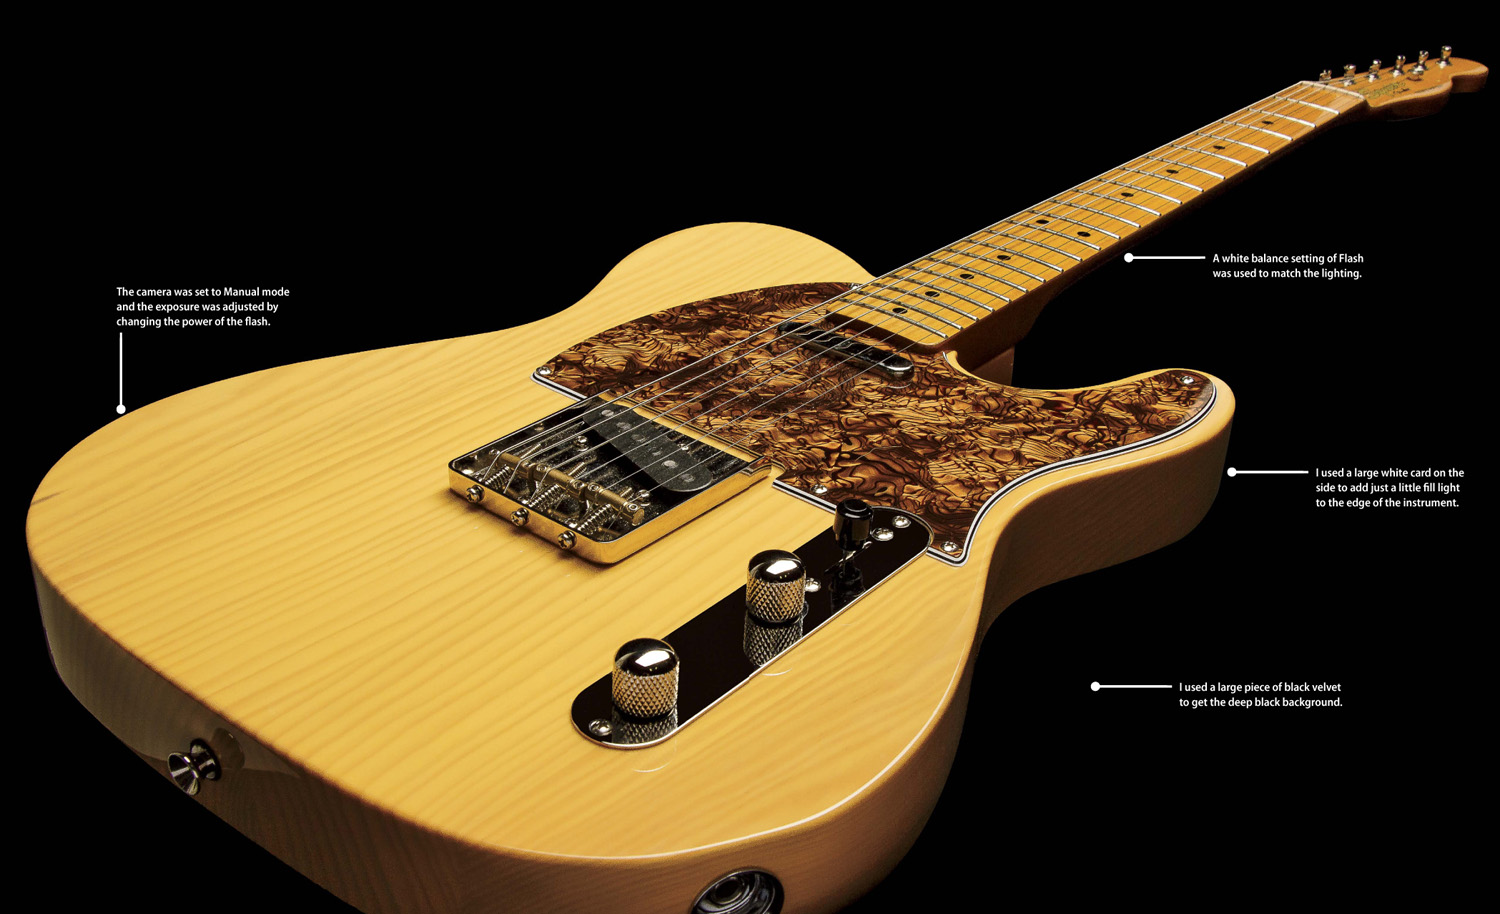
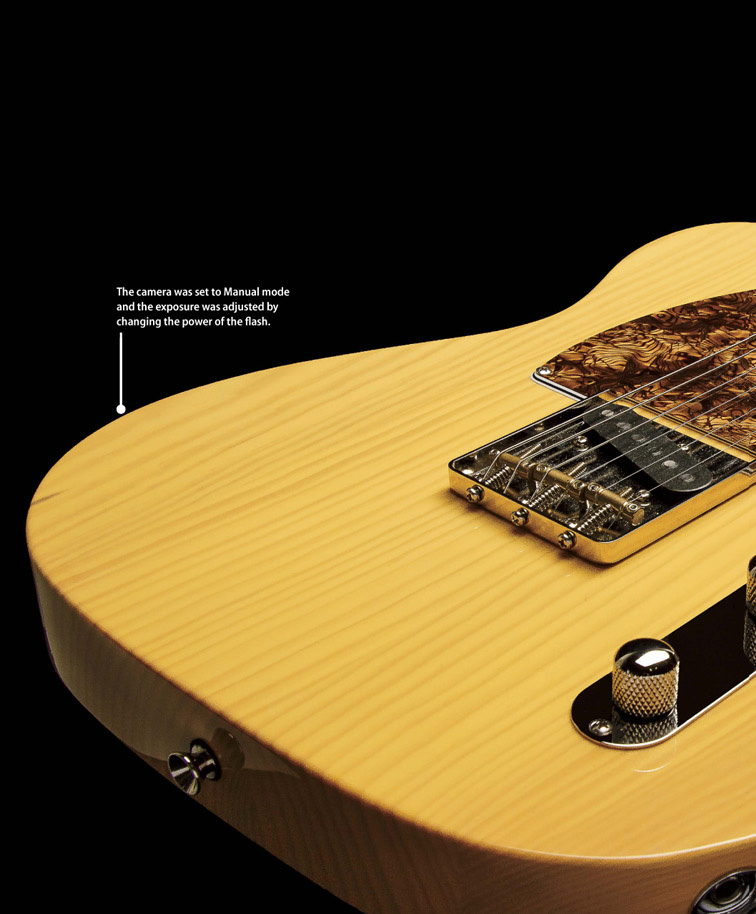
Most of my studio work consists of photographing cameras for my other books. Not long ago I decided to try something a little different by combining my love of photography with my latest recreational pursuit, playing the guitar. I think there is something really magical and kind of sexy about an electric guitar, so I set up my Telecaster on a black cloth and started playing with lights until I got something that really shows off the beauty of the instrument. By the way, this is just one flash in a softbox. It just goes to show that you don’t have to get complicated to create great images.

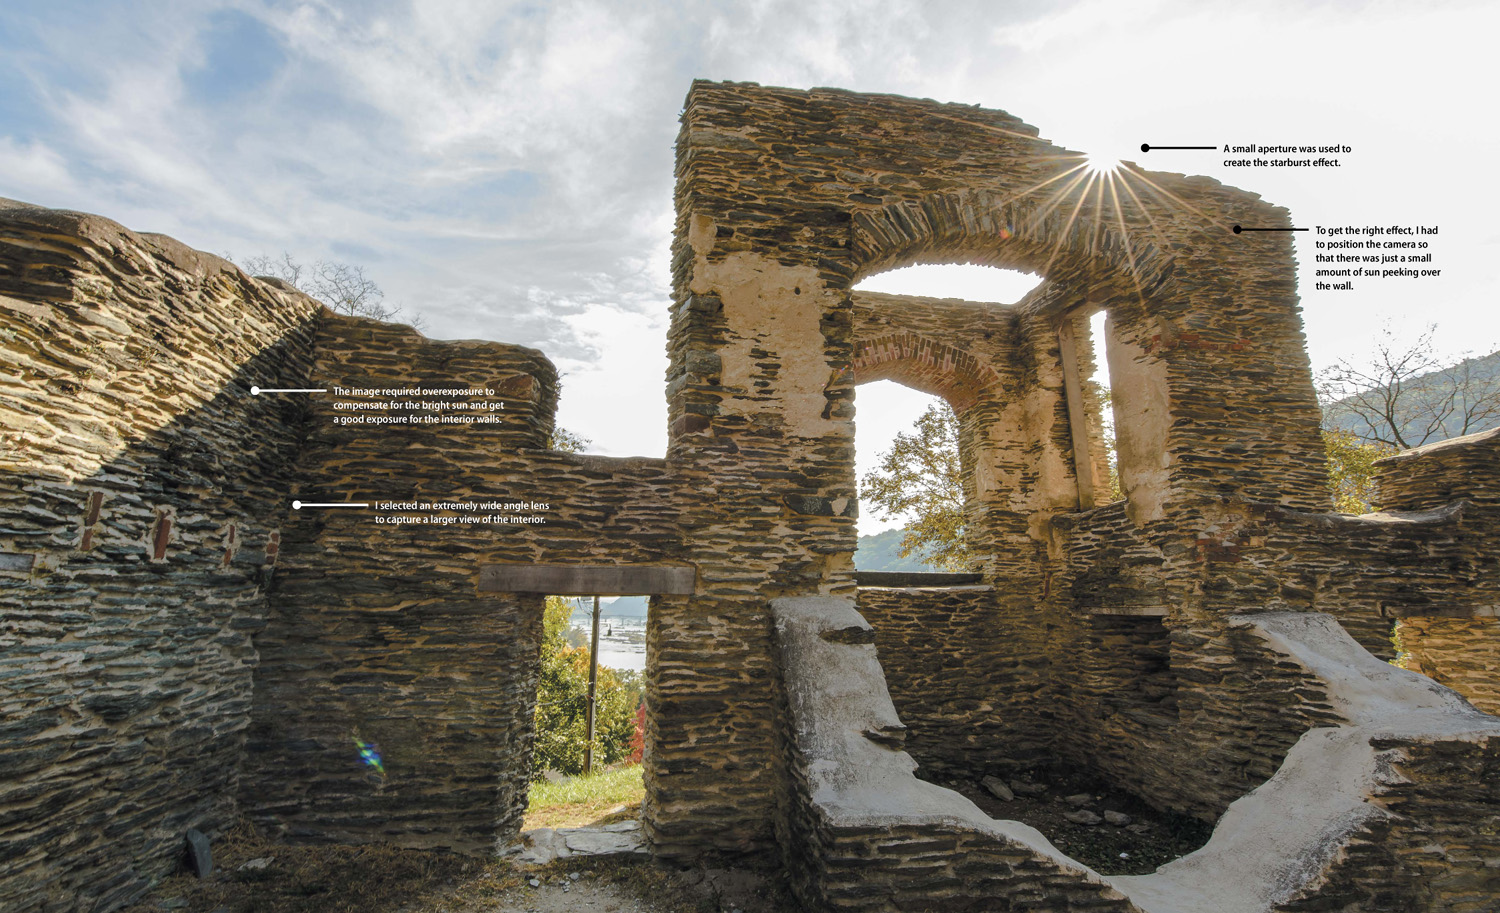
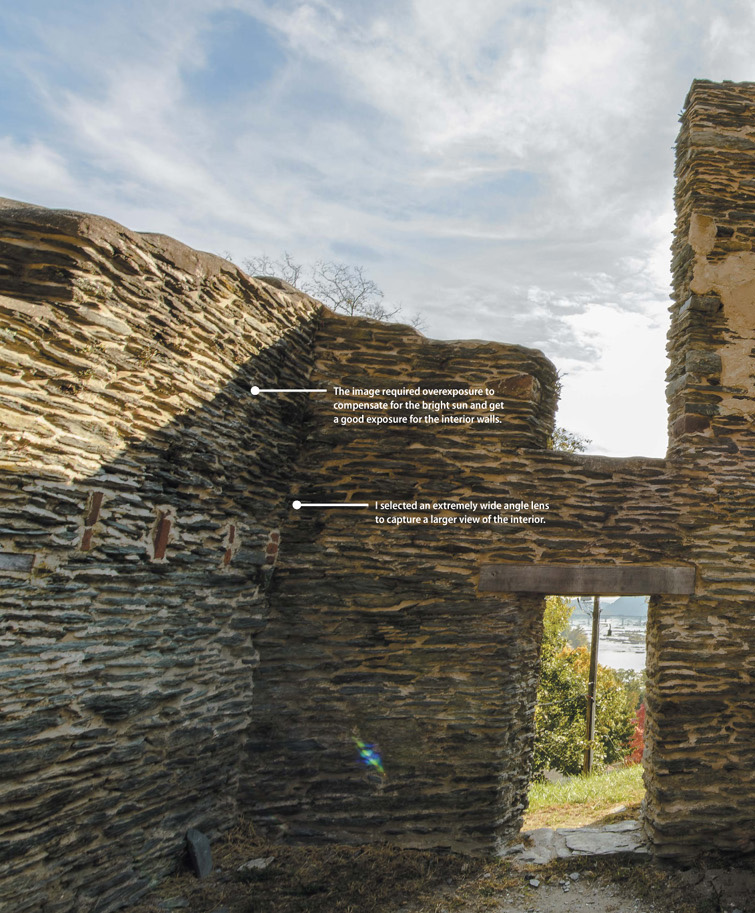
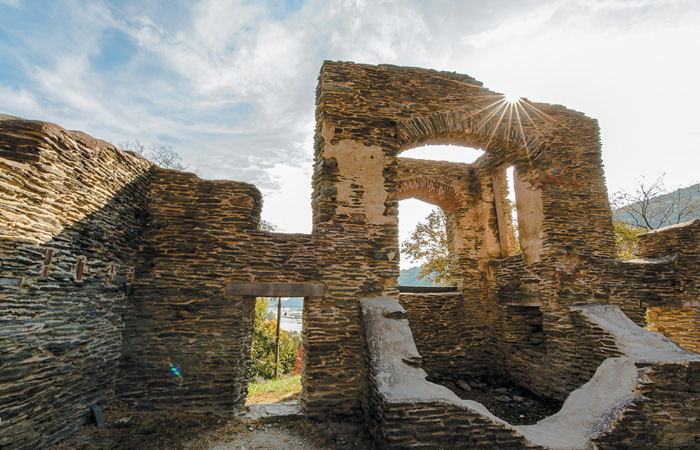
One of my favorite special effects is the starburst. It doesn’t require any special equipment, just the right circumstances and subject to make it work. In this instance, I had been looking for an interesting angle to photograph the old church ruins in Harpers Ferry, WV, and as I walked around inside, I saw the sun peeking over the top edge of the wall. I knew this might just be the right spot for a starburst. It took me several exposures but in the end, my persistence got me the look I was after.
Spot Meter for More Exposure Control
Generally speaking, Matrix metering mode provides accurate metering information for the majority of your photography. It does an excellent job of evaluating the scene and then relaying the proper exposure information to you. The only problem with this mode is that, like any metering mode on the camera, it doesn’t know what it is looking at. There will be specific circumstances where you want to get an accurate reading from just a portion of a scene and discount all of the remaining area in the viewfinder. To give you greater control of the metering operation, you can switch the camera to Spot metering mode. This allows you to take a meter reading from a very small circle (usually about 1 to 10 degrees) while ignoring the rest of the viewfinder area. You need to check in your camera manual to see how your Spot meter function works, but usually the meter will be using the center focus point to gather exposure information.
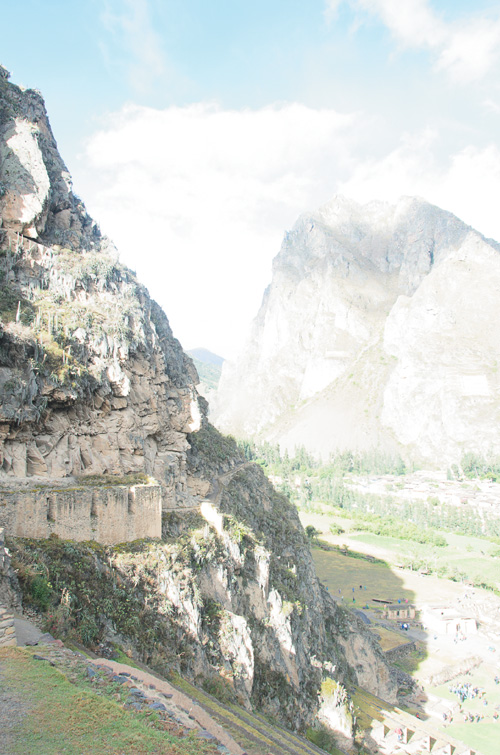
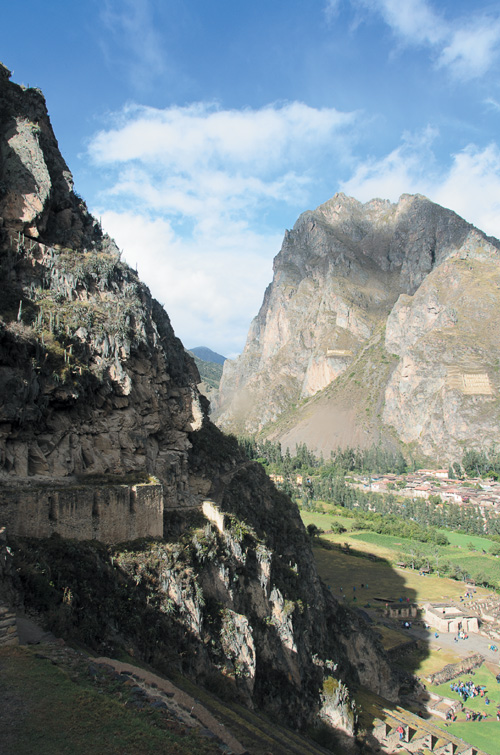
So when would you need to use this? Think of a person standing in front of a very light wall. In Matrix metering mode, the camera would see the entire scene and try to adjust the exposure information so that the background is exposed to render a darker wall in your image. This means that the scene would actually be underexposed and your subject would then appear too dark (Figure 10.1). To correct this, you can place the camera in Spot metering mode and take a meter reading right off of—and only off of—your subject, ignoring the white wall altogether. (As discussed in Chapter 6, you could also use Center-weighted metering mode to take a reading off of a larger portion of your subject.) The Spot metering will read the light levels from a very small circle, placing all of the exposure information right on your point of interest (Figure 10.2).
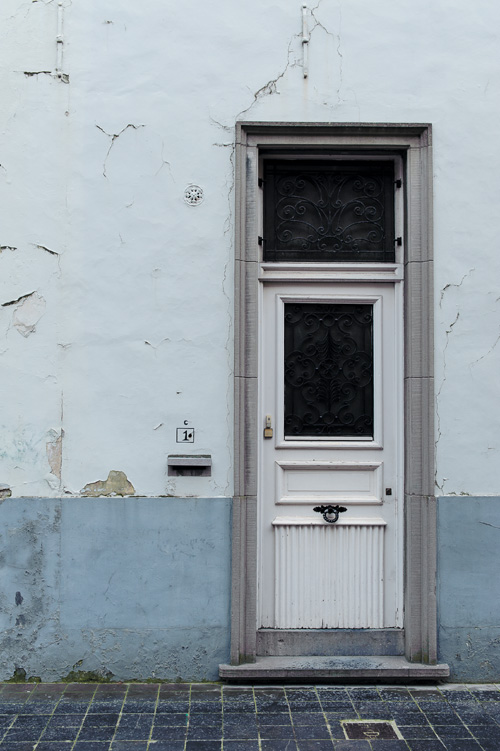
ISO 800 • 1/125 sec. • f/8 • 40mm lens
Figure 10.1 I was trying to get a good exposure of the doorway, but the light-colored wall was fooling the meter into underexposing.
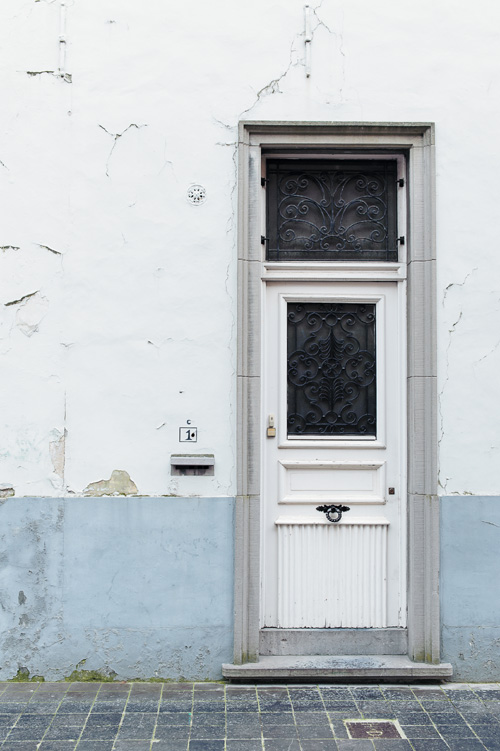
ISO 800 • 1/60 sec. • f/8 • 40mm lens
Figure 10.2 By switching to Spot metering and metering off the doorframe, I was able to get a more accurate exposure.
Some camera models allow you to use whatever the current focus point is so that you can move the Spot metering to somewhere in the frame other than the middle.
When using Spot metering mode, remember that the meter believes it is looking at a middle gray value, so you might need to incorporate some exposure compensation of your own to the reading that you are getting from your subject. This will come from experience as you use the meter.
Other situations that would benefit from Spot metering include:
• Snow or beach environments where the overall brightness level of the scene could fool the meter
• Strongly backlit subjects that are leaving the subject underexposed
• Cases where the overall feel of a photo is too light or too dark
Metering for Sunrise or Sunset
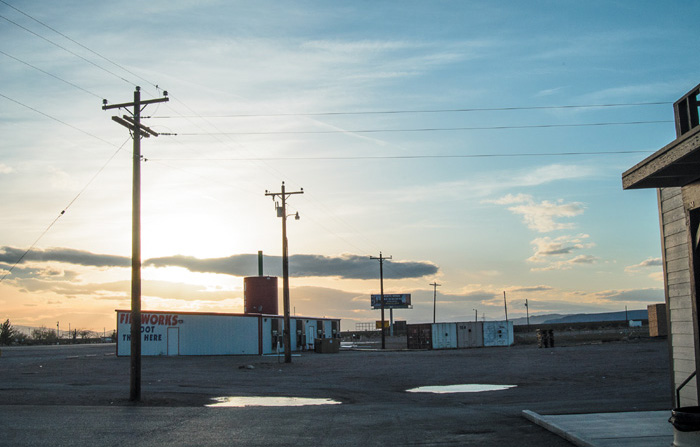
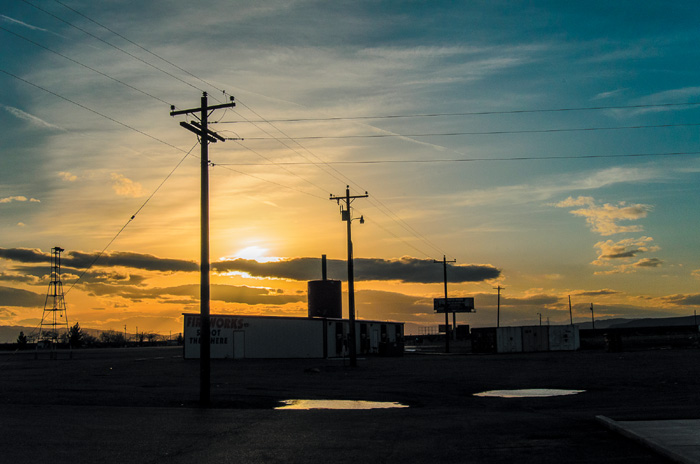
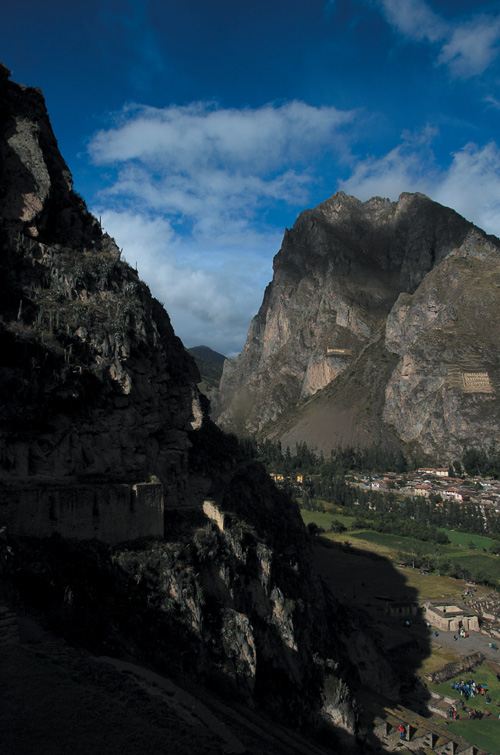
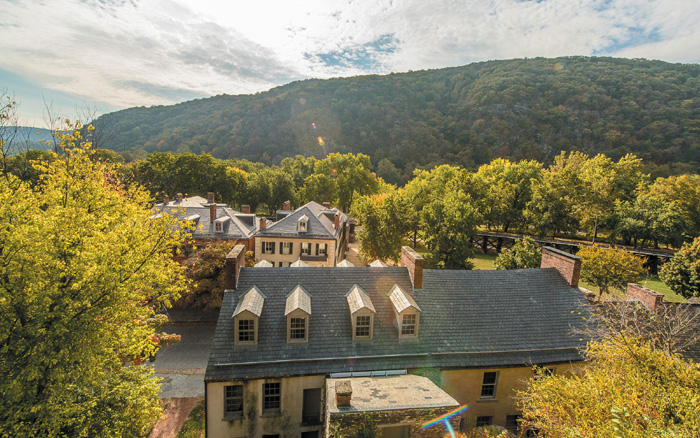
Capturing a beautiful sunrise or sunset is all about the sky. If there is too much foreground in the viewfinder, the camera’s meter will deliver an exposure setting that is accurate for the darker foreground areas but leaves the sky looking overexposed, undersaturated, and generally just not very interesting (Figure 10.3 on the next page). To gain more emphasis on the colorful sky, point your camera at the brightest part of it and take your meter reading there. Use the Exposure Lock feature to meter for the brightest part of the sky and then recompose. The result will be an exposure setting that underexposes the foreground but provides a darker, more dramatic sky (Figure 10.4 on the next page).
ISO 400 • 1/25 sec. • f/22 • 24mm lens
Figure 10.3 By metering all the information in the frame, you get bright skies and more detail in the ground.
ISO 400 • 1/125 sec. • f/22 • 24mm lens
Figure 10.4 By taking the meter reading from the brightest part of the sky, you will get darker, more colorful sunsets.
Using Exposure Lock
1. Point your camera toward a bright portion of the sky.
2. Press and hold your Exposure Lock button with your thumb to activate the meter and lock the exposure.
3. While holding the button, recompose your photo and then take the shot with the shutter release button. As long as you keep the Exposure Lock button pressed, your exposure will not change.
Check your owner’s manual for more information about using the Exposure Lock button.
Shooting High Dynamic Range (HDR) Images
One of the more recent trends in digital photography is the use of high dynamic range (HDR) imaging to capture the full range of tonal values in your final image. Typically, when you photograph a scene that has a wide range of tones from shadows to highlights, you have to make a decision regarding which tonal values you are going to emphasize and then adjust your exposure accordingly. This is because your camera has a limited dynamic range, at least as compared to the human eye. HDR photography allows you to capture multiple exposures for the highlights, shadows, and midtones, and then combine them into a single image using software (Figures 10.5–10.8). A number of software applications allow you to combine the images and then perform a process called “tonemapping,” whereby the complete range of exposures is represented in a single image. I will not be covering the software applications, but I will explore the process of shooting a scene to help you render properly captured images for the HDR process. Note that using a tripod is absolutely necessary for this technique, since you need to have perfect alignment of each image when they are combined.
ISO 400 • 1/60 sec. • f/11 • 18mm lens
Figure 10.5 Overexposing by two stops ensures that the darker areas are exposed for detail in the shadows.
ISO 400 • 1/250 sec. • f/11 • 18mm lens
Figure 10.6 This is the normal exposure as dictated by the camera meter.
ISO 400 • 1/1000 sec. • f/11 • 18mm lens
Figure 10.7 Underexposing two stops will render more detail in the highlight areas of the clouds.
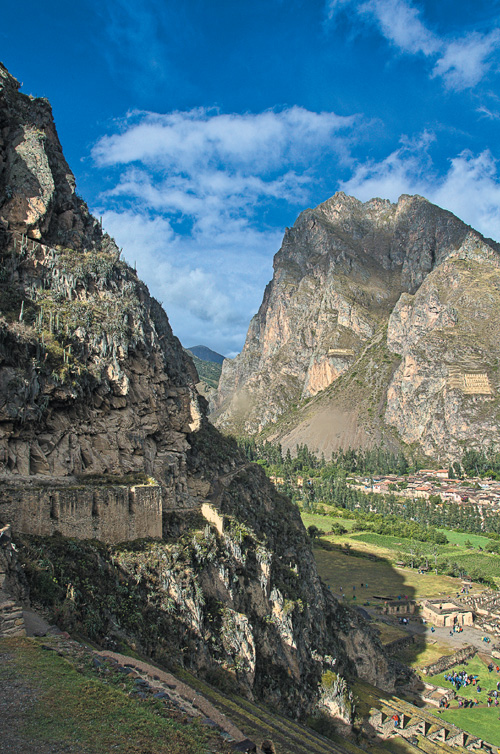
Figure 10.8 This is the final HDR image that was rendered from the three other exposures you see here.
2. Set your shooting mode to Aperture Priority. During the shooting process, you will be taking three shots of the same scene, creating an overexposed image, an underexposed image, and a normal exposure. Since the camera is going to be adjusting the exposure, you want it to make changes to the shutter speed, not the aperture, so that your depth of field is consistent.
3. Set your camera file format to RAW. This is extremely important because the RAW format contains a much larger range of exposure values than a JPEG file and the HDR software needs this information.
4. Focus the camera using the manual focus method discussed earlier in Chapter 7, compose your shot, and secure the tripod.
5. Press the shutter button halfway to activate the meter and then set your exposure.
6. Use the Exposure Compensation on your camera to get your first exposure of –2 stops. Take one photo.
7. Now use the Exposure Compensation again and set the exposure to normal and take a picture.
8. Finally, repeat the last step and use Exposure Compensation to get your two stops of overexposure and take a shot.
This is just one way to actually capture the necessary images. Some cameras have auto-bracketing features built in that allow you to set the amount of over- and underexposure. Then the camera will calculate the exposure changes as you take three images.
Some folks prefer to use the Manual shooting mode. Then once they have computed a normal exposure using the camera meter they simply dial in the necessary shutter speed changes for over- and underexposure. There really is no wrong or right way as long as you get the exposures you need.
Once you have the images, you need a software program, such as Photoshop CC, Photomatix Pro, Nik HDR Efex Pro 2, HDR Expose 3, or any of the dozen other programs that can process your exposure-bracketed images into a single HDR file. You can find more information on HDR photography and creating HDR images in the Tutorials section at www.photowalkpro.com.
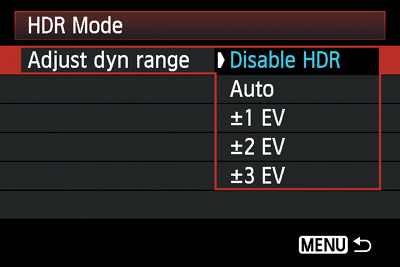
Built-in HDR
When HDR photography first became popular a couple of years ago, the only option for capture was the multiple exposure method described above. Recently, camera manufacturers have been building HDR capture capability directly into the camera’s processing engine. Cameras like the Canon EOS 70D, Sony Alpha 77, Nikon D5300, and others have settings that will have the camera take two or three separate frames from one push of the shutter release button. The images are captured at varying exposure values just like the manual method, but then it goes a step further by processing the exposures into a single high dynamic range image (Figure 10.9).
There are a few things to consider if you are going to use this function. First, since the camera will be taking multiple exposures, you should take extra care to stabilize the camera. If you are handholding, try and keep the focus point on the same spot during the exposure process. Better yet, place the camera on a tripod. Probably the greatest consideration is that when the camera has completed the process, you are left with a single JPEG file that has been processed by your camera. You may be able to tweak the processing settings for the strength of the HDR, but once the JPEG is made there is no way to go back and process it again.
Manual Mode
Probably one of the most advanced and yet most basic skills to master is shooting in Manual mode. With the power and utility of most of the automatic modes, Manual mode almost never sees the light of day. I have to admit that I don’t select it for use very often, but there are times when no other mode will do. One of the situations that works well with Manual is studio work with external flashes. I know that when I work with studio lights, my exposure will not change, so I use Manual to eliminate any automatic changes that might happen from shooting in Program, Shutter Priority, or Aperture Priority mode (Figure 10.10).

ISO 100 • 1/125 sec. • f/11 • 24mm lens
Figure 10.10 When working with studio lights, it’s easier to use the Manual mode and make exposure adjustments with the flash.
Since you probably aren’t too concerned with studio strobes at this point, I will concentrate on one of the ways in which you will want to use Manual mode for your photography: using the Bulb setting for nighttime exposures.
Bulb photography
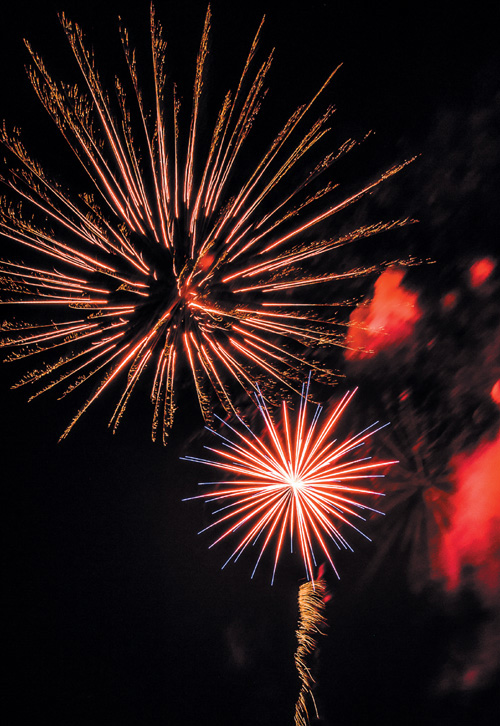
If you want to work with long shutter speeds that don’t quite fit into one of the selectable shutter speeds, you can select Bulb. This setting is only available in Manual mode, and its sole purpose is to open the shutter at your command and then close it again when you decide. I can think of three scenarios where this would come in handy: shooting fireworks, shooting lightning, and painting with light.
If you are photographing fireworks, you could certainly use one of the longer shutter speeds available in Shutter Priority mode, since they are available for exposure times up to 30 seconds. That is fine, but sometimes you don’t need 30 seconds’ worth of exposure and sometimes you need more.
If you open the shutter and then see a great burst of fireworks, you might decide that that is all you want for that particular frame, so you click the button to end the exposure (Figure 10.11). Set the camera to 30 seconds and you might get too many bursts, but if you shorten it to 10 seconds you might not get the one you want.
ISO 400 • 2.5 sec. • f/20 • 24mm lens
Figure 10.11 A great use for the Bulb setting is for capturing fireworks.
The same can be said for photographing a lightning storm. I have a friend who loves electrical storms, and he has some amazing shots that he captured using the Bulb setting. Lightning can be very tricky to capture, and using the Bulb setting to open and then close the shutter at will allows for more creativity, as well as more opportunity to get the shot.
Painting with light is a process where you set your camera to Bulb, open the shutter, and then use a light source to “paint” your subject with light. This can be done with a handheld flash or even a flashlight.
When you’re using the Bulb setting, the shutter will only stay open for the duration that you are holding down the shutter button. You should also be using a sturdy tripod or shooting surface to eliminate any self-induced vibration while using the Bulb setting.
I want to point out that using your finger on the shutter button for a bulb exposure will definitely increase the chances of getting some camera shake in your images. To get the most benefit from the Bulb setting, I suggest using a cable release or wireless remote. You’ll also want to turn on the Noise Reduction, as covered in Chapter 8.
Avoiding Lens Flare
Lens flare is one of the problems you will encounter when shooting in the bright sun. Lens flare will show itself as bright circles on the image (Figure 10.12). Often you will see multiple circles in a line leading from a very bright light source such as the sun. The flare is a result of the sun bouncing off the multiple pieces of optical glass in the lens and then being reflected back onto the sensor. You can avoid the problem using one of these methods:
• Try to shoot with the sun coming from over your shoulder, not in front of you or in your scene.
• Use a lens shade to block the unwanted light from striking the lens. You don’t have to have the sun in your viewfinder for lens flare to be an issue. All it has to do is strike the front glass of the lens to make it happen.
• If you don’t have a lens shade, just try using your hand or some other element to block the light.
ISO 100 • 1/40 sec. • f/22 • 14mm lens
Figure 10.12 There is some very visible lens flare in this image due to the sun being near the top of the frame.
Using the Sun Creatively
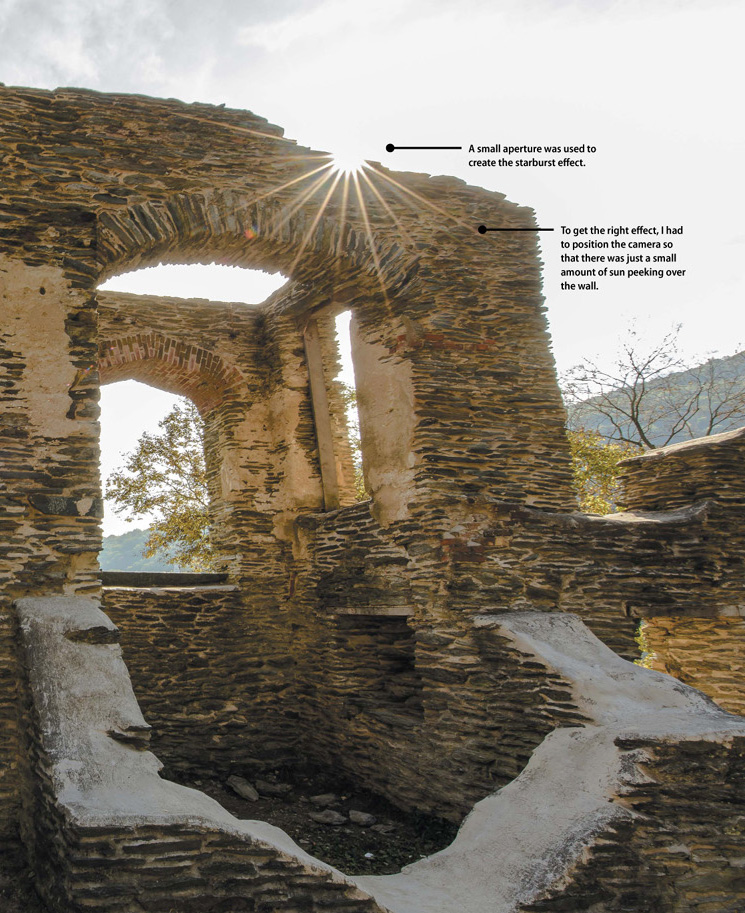
Have you ever seen photographs where the sun is peeking through a small hole and it creates a very cool starburst effect (Figure 10.13)? There is actually a little trick to pulling it off and it’s fairly easy once you know how. The real key is to be shooting at f/22 (or whatever your smallest aperture is). Then you need to have just a small bit of the sunlight in your frame, either peeking over an edge or through a small hole. The other thing you need to do is make sure that you are properly exposing for the rest of your scene, not the bright bit of sunlight that you are allowing in. With a little practice, you can really make some very cool shots.
ISO 100 • 1/10 sec. • f/22 • 15mm lens
Figure 10.13 By letting the sun peek into my shot and using f/22, I was able to capture this cool starburst.
Macro Photography
Put simply, macro photography is close-up photography. Depending on the lens or lenses that you got with your camera, you may have the perfect tool for macro work. Some lenses are made to shoot in a macro mode, but you don’t have to feel left out if you don’t have one of those. Check the spec sheet that came with your lens to see what the minimum focusing distance is for your lens.
If you have a zoom, you should work with the lens at its longest focal length. Also, work with a tripod because handholding will make focusing difficult. The easiest way to make sure that your focus is precisely where you want it to be is to use Manual focus mode.
Since I am recommending a tripod for your macro work, I will also recommend using Aperture Priority mode so that you can achieve differing levels of depth of field. Long lenses at close range can make for some very shallow depth of field, so you will need to work with apertures that are probably much smaller than you might normally use. If you are shooting outside, try shading the subject from direct sunlight by using some sort of diffusion material, such as a white sheet or a diffusion panel. By diffusing the light, you will see much greater detail because you will have a lower contrast ratio (softer shadows), and detail is often what macro photography is all about (Figure 10.14).
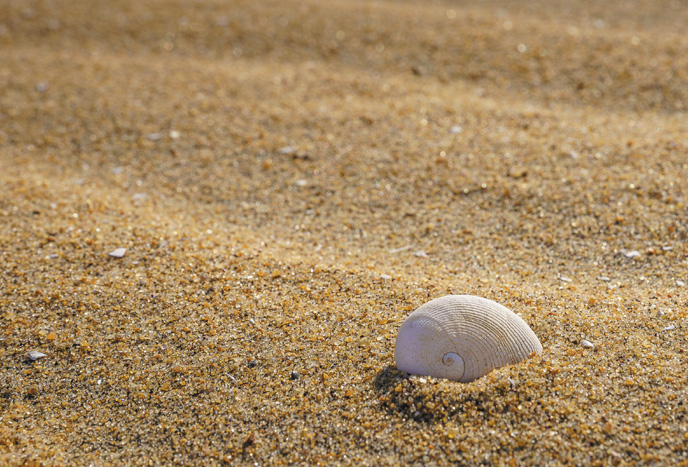
ISO 100 • 1/100 sec. • f/16 • 70mm lens
Figure 10.14 This tiny shell was captured using a long focal length combined with a close-up filter.
Customize Your White Balance
Previous chapters have addressed the issue of setting your white balance, but what if you are in a situation that doesn’t really fall neatly into one of the existing categories like Daylight or Tungsten? You might want to consider creating a custom white balance. This is especially helpful if you are working in a mixed lighting scenario where you have more than one kind of light source that is shining on your subject. A perfect example might be inside with fluorescent lighting fixtures overhead and daylight coming in through a window. To ensure that you are getting the best possible results in a situation like this, you can perform a quick white balance customization by using the Preset Manual option. Don’t worry, though; it’s easier than you might think. Typically, the only thing you will need is a white piece of paper (Figure 10.15).

You camera manual will guide you through the process of creating the custom or preset white balance. There are also devices available whose sole purpose is creating a custom balance. Typically, they look like a white filter that screws or snaps on to your lens. Much like photographing a white piece of paper, they allow your camera to analyze the color temperature of the light and then create a customized white balance setting. Most of them come with directions based on the type of camera you are using. Check out www.expoimaging.com for more info.
Shoot in Bursts for Steadier Images
If you ever watch a pro taking photos, you might wonder why they shoot so many photos of a non-action subject. It seems like the camera is always set to continuous burst mode, but why? The answer is that they are looking to capture the sharpest image possible. By shooting three- or four-shot bursts, they are giving themselves a chance to let the camera settle in their hands while firing, helping to get a more stable shot. The mere act of pressing the shutter release button can infuse a little camera shake, but when you hold it down, you are more likely to get a better image on the second or third frame. It’s not a huge difference, but it can save a slightly burry shot, especially if you are using a slightly longer shutter speed or a long focal length lens.
Shooting through Obstructions
One of my favorite places to shoot is the zoo. I am fortunate enough to have a great zoo that is not too far from home, so I try to get there at least once or twice a year. One of the things I try to do is to capture images of the animals in such a way that they don’t look like they are in a zoo. This can be difficult if there are things like wire mesh between you and the subject. There is a way, though, to get rid of the obstructions, or at least blur them to the point that you can’t tell they are there.
There are two things to do to make this little trick work. The first thing is to put your camera in Aperture Priority mode and set the aperture to the largest opening. The second thing you will need to do is to move as close as possible to the fence or whatever the obstruction is. If you look at Figure 10.16 you will see that the small aperture setting of f/25 has extended the depth of field to the point where the wire mesh is visible and creates a bit of a distraction.

ISO 1600 • 1/10 sec. • f/25 • 300mm lens
Figure 10.16 The small aperture is extending the depth of field to the point that the wire mesh is visible in the image.
By doing nothing more than changing the aperture to f/5.6 (the maximum opening for the particular lens I was using), the mesh fence becomes so out of focus that you can’t even tell that it is there (Figure 10.17).
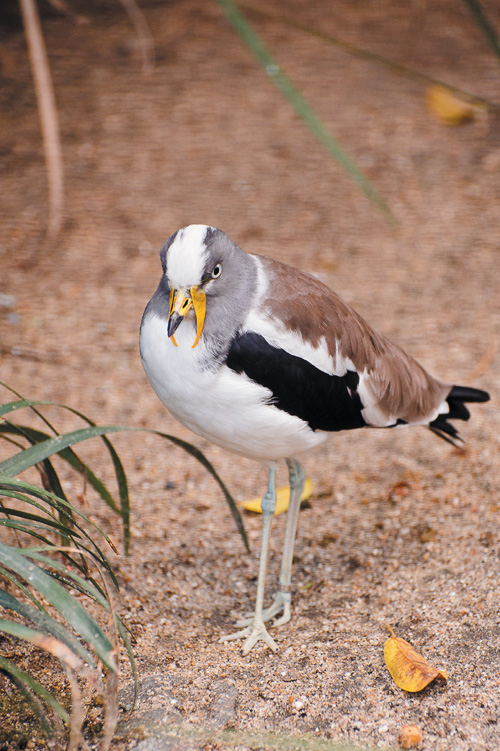
ISO 1600 • 1/250 sec. • f/5.6 • 300mm lens
Figure 10.17 Using a large aperture combined with a long lens that is close to the fence can make the obstruction disappear.
Zoom During Exposure
Zoom lenses are great for giving you a lot of different shooting angles without having to change lenses. There’s also another benefit to using them that you just don’t have with a prime lens: zooming for effect. That’s right, you can actually zoom your lens during an exposure to create some very cool special effects. The key is that you need to be using a long enough exposure for the zoom to really make an impact (Figure 10.18). Also, it takes some practice and a little trial and error until you achieve just the look you want.
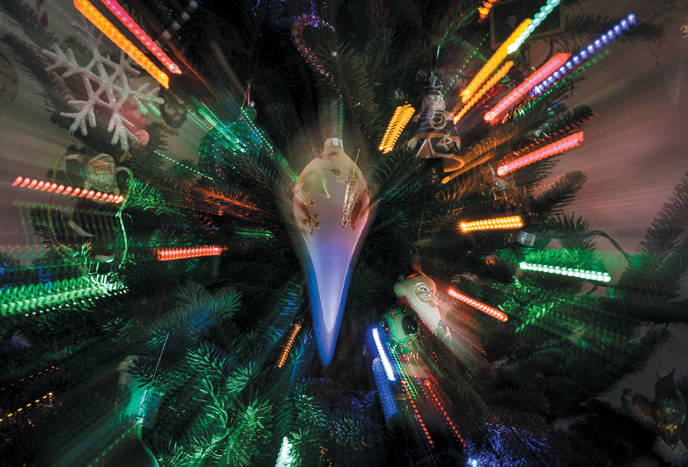
ISO 400 • 0.4 sec. • f/5.6 • 22mm lens
Figure 10.18 Zooming during exposure turned an average scene into something much more interesting.
Another way to use this is with your flash. Try setting the flash to a rear or 2nd curtain sync mode, and then use a long shutter speed. When you press the shutter release, start zooming the lens as smoothly and quickly as possible. The flash will go off at the end of your exposure, leaving you with some really interesting results.
Chapter 10 Assignments
Many of the techniques covered in this chapter are specific to certain shooting situations that may not come about very often. This is even more reason to practice them so that when the situation does present itself you will be ready.
Adding some drama to the end of the day
Most sunset photos don’t reflect what the photographer saw because they didn’t meter correctly for them. The next time you see a colorful sunset, pull out your camera and take a meter reading from the sky and then one without and see what a difference it makes.
Making your exposure spot on
Using the Spot meter mode can give accurate results but only when pointed at something that has a middle tone. Try adding something gray to the scene and taking a reading off it. Now switch back to your regular metering mode and see if the exposure isn’t slightly different.
Using the Bulb setting to capture the moment
This is definitely one of those settings that you won’t use often, but it’s pretty handy when you need it. If you have the opportunity to shoot a fireworks display or a distant storm, try setting the camera to Bulb and then play with some long exposures to capture just the moments that you want.
Moving in for a close-up
Macro photography is best practiced on stationary subjects, which is why I like flowers. If you have a zoom lens, check the minimum focusing distance and then try to get right to that spot to squeeze the most from your subject. Try using a diffuse light source as well to minimize shadows.
Share your results with the book’s Flickr group!
Join the group here: flickr.com/groups/exposure_fromsnapshotstogreatshots