
Chapter 11. Advertising on Facebook
In Facebook’s early days, “advertising” meant college students looking to sell their old textbooks or find new roommates. But now that the site is open to the public and has a few hundred million members, things have changed. Facebook’s ability to comb through gazillions of personal details at a practically unheard-of level of granularity (“Show me all the conservative male college students who live in Portland, have mobile phones, and enjoy watching vintage Bugs Bunny reruns”) and tap directly into each member’s circle of friends is an advertiser’s dream come true.
These days, big companies with big ad budgets are placing ads on Facebook. As the site has grown, marketing strategies have changed, too, from simple network-targeted banner ads to social ads, which mine members’ personal details and Friend Lists to hawk products. This chapter explores your options for advertising on Facebook, which range from free to affordable to don’t even think about it.
Note
If you’ve been away from Facebook for a while and are wondering what happened to the polls you used to be able to conduct on the site, they’re gone—the built-in ones, anyway. Fortunately, if you’re dying to set up a poll, several third-party Facebook applications have your back. To find the latest polling applications: In the Search box at the top of any Facebook page, type poll, press Enter, and then click the Applications link on the left side of the screen to see a list of polling applications.
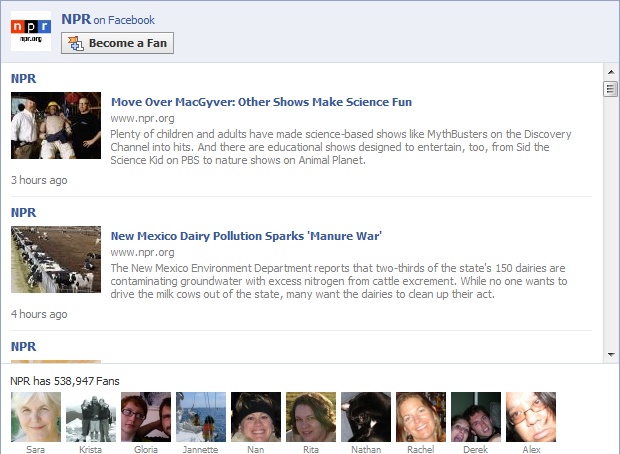
Facebook Pages: Profiles for Bands, Brands, and More
The unfortunately named Pages (could the Facebook team have possibly come up with a more generic name?) are basically Facebook profiles for things other than people, like TV shows, bands, and companies. Relatively new to Facebook (they’ve been around only since fall 2007), Pages combine the detailed info of a personal profile with interactive features and a pretty amazing marketing scheme. And best of all, they’re free.
Geared toward freelancers, business owners, musicians, politicians, nonprofits, and other small- to large-sized organizations, Pages:
Are tailored to meet your needs. For example, say you set up a band Page (Creating a Page shows you how). Your Page automatically comes with the standard discussion board, Wall, and photo album features. But wait, there’s more: It also includes sections for posting video clips and listing upcoming events, and a built-in music player so people can check out your tunes.
Aren’t subject to the 5,000-member limit Facebook places on Groups. Pages can have an unlimited number of fans.
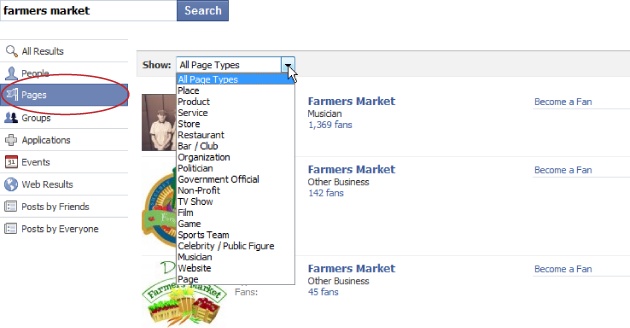
Give your organization visibility. Because people searching Facebook can browse through Pages by clicking the Pages tab in their search results, they’re more likely to find your Page than if it was grouped in with a million personal profiles.
Don’t cost you anything. If you want to shoot social ads (Social Ads (Targeted Announcements)) to all your Page’s fans, you’ll need to get out your credit card; but for now, creating a Page is completely free.
How Pages Work
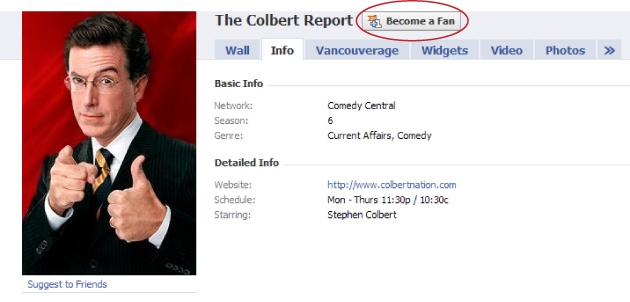
Word of mouth is an effective marketing scheme offline, and it works online, too. When a Facebook member surfs to a Page—by searching, browsing, or following a link he finds on another Facebook member’s profile—and likes what he sees, he signs up as a fan of the Page (see Liking Pages), and then all kinds of interesting things happen:
Facebook lists the Page on his profile. Everyone who visits the Info section of his profile will now see that he’s cuckoo for Cocoa Puffs (or likes the band, brand, or nonprofit he declared himself a fan of).
News of his fan status appears in his friends’ News Feeds (Types of Updates).
The person or company who created the Page gets to see who’s viewing it and how often via Insights (Creating and Running a Social Ad). The Page’s creator also gets the option of sending news blasts called updates (Sending Gifts) to the fan. For a fee, the Page’s creator can also send targeted social ads (Social Ads (Targeted Announcements)) to the fan and to everyone on the fan’s Friend List (Inviting People to Be Your Friend).
Creating a Page
Here’s how to create a free Facebook Page for your business, band, or nonprofit:
Scroll to the bottom of any Facebook screen and click the Advertising link. Then, near the top of the Facebook Advertising page that appears, click the Pages link. On the Facebook Pages screen, click the “Create a Page” button.
In the Create New Facebook Page form, choose a category and Page name. The Local drop-down list is where you indicate what kind of business you are; it includes options like Restaurant, Park, and Religious Center. Turn on the “Brand, Product or Organization” radio button if you’re selling products such as pharmaceuticals or food, or if you’re in a business with a national reach such as travel or communications. Turning on the “Artist, Band, or Public Figure” radio button gives you freelance options such as writer, politician, and athlete. After you’ve picked the appropriate category and given your Page a name, click Create Page.
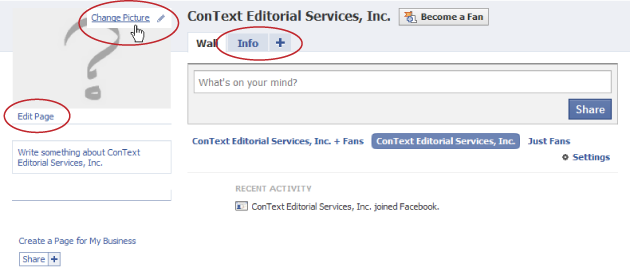
Flesh out your Page. On the screen that appears, the first thing you want to do is scroll over the giant question mark and click the Change Picture link that appears, to replace the question mark with a picture of your band, your product, or whatever. Next, click the Info tab and then the Edit Information link to build a profile similar to the personal profile you created when you joined Facebook (see Step 1: Finding Your Friends on Facebook) by filling in Basic Info as well as Detailed Info. When you finish building your Page’s profile, click the Edit Page link to see a list of all the different applications you can upload tidbits to (such as album info, concert dates, and music clips if you’re in a band) and settings you can adjust (such as requiring your fans to be over 18).
If you haven’t already, publish your Page. Your Page is already online unless you turned on the “Do not make Page publicly visible at this time” checkbox. If you turned on that checkbox but have now packed your Page with as much info, photos, media clips, and other goodies as you can think of and it looks great, click the Publish Page link. That’s it: Your Page is online.

Now that you’ve got a Page up, you might want to spend some money to make sure it gets noticed. Surprise! Facebook makes spending money easy. On the left side of your Page, click the “Promote with an Ad” link. Make sure you also check out Social Ads (Targeted Announcements) to learn how to add social actions to your Page.
Note
As this book was going to press, Facebook was in the process of introducing Community Pages, which are a subset of regular Pages. Community Pages are for general topics like cooking, movie genres, and cities. When such a Page becomes popular enough, Facebook takes it over and links it to the Wikipedia entry about that topic. If you’re a fan of that Community Page (see the next section), you’ll start seeing items related to it showing up in your News Feed (see page 82). Because of that, it’s a good idea to only become a fan of Community Pages you’re really interested in so your New Feed doesn’t fill up with stuff you don’t care about.
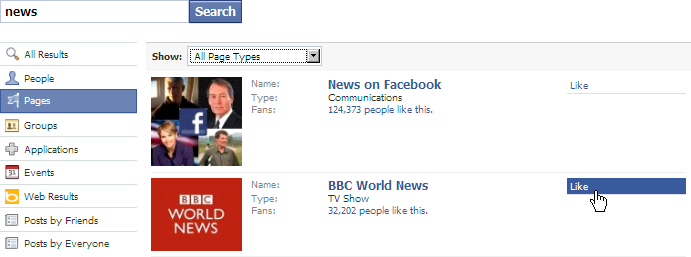
Liking Pages
Similar to wearing name-brand clothes and rooting for your favorite sports team, liking a Page (becoming a fan of it) tells people in your social circle what you’re into and what’s important to you.
Declaring that you like a Page is easy. Simply find the Page you’re interested in (type the name in the Search box, and then click the Pages tab on the results page), and then click the “Like” link. (This link appears on the Page itself and on the Page’s listing in your search results.) After you click that link, Facebook lists the Page in the Pages section on your profile, and news of your newfound fandom appears in your friends’ News Feeds.
Note
You can’t hide the Pages section that appears on the Info tab of your profile, and you can’t prevent Facebook from displaying a Page in that section, but you can un-fan yourself. To do so, head to the Page you want to disassociate yourself from (an easy way is to head to the Pages section of your profile and click the name of the Page), and then, on the Page itself, scroll to the bottom and click the “Unlike” link
Tip
If you like (become a fan of) a Page and later decide you don’t want to get updates from it after all, go to the top of any Facebook screen and click the Messages icon (the one that looks like two little speech bubbles—see Receiving Messages). Click See All Messages at the bottom of the drop-down list that appears. Then, on the Messages page that appears, head to the left side of the page and click the Updates link. Simply turn on the checkboxes next to any Pages you don’t want to hear from and then click the Unsubscribe button.
Social Ads (Targeted Announcements)
A social ad is an announcement you can broadcast to specific groups of Facebook members, such as men in their 20s, women with college degrees, or married people who work at Wal-Mart and like Beanie Babies. Every social ad consists of a graphic and a little text, and each appears either in Facebook’s ad space (the right-hand side of each screen), or in people’s News Feeds (Types of Updates), or both, depending on how much you pay.

Note
Facebook’s social actions feature and Connect program let you track people who interact with your Facebook Page or application—or with your company’s non-Facebook website—and then shoot your ad out to all their friends. The result? An ad that’s a little more personal and relevant—and, hopefully, more effective—than the average ad. Keep reading this section for the scoop on social actions, or hop to Connect Facebook to Your Website with Widgets for more on Connect.
Create your ad and tell Facebook when to run it and which members to target. You can get pretty darned specific when it comes to who sees your ad. For example, you can have Facebook show the ad only to single people aged 31 to 36 who have conservative political views and degrees in biology.
Pay for the ad. The amount you pay depends on how long you want your ad to run and how many people you want to see it.
Optionally, you can tie your social ad to social actions, which are the things people do on your Facebook Page or on your company’s website. If you’ve already created a Facebook Page (Signing Up for an Account) or already have a website, you can combine your ad with the “news” headline that someone’s friend just became a fan, for example.
Facebook runs your ad. Depending on factors like how much money you coughed up and how many other ads Facebook has in the hopper, your ad appears either in people’s News Feeds or in the space Facebook reserves for ads on the right-hand side of each screen.
Get feedback that helps you assess your ad’s effectiveness. Facebook’s Insights program generates charts that show you the kind of response your ad is getting (the next section shows an example). If you know how to analyze them (they’re pretty straightforward), these charts can help you figure out whether your ad is working or whether you need to tweak it. You get to use Insights for free when you pay for a social ad.
Tip
You also get to use Insights if you create a free Facebook Page (Signing Up for an Account).
Creating and Running a Social Ad
If you’ve got a graphic and a couple lines of copy, creating a social ad is nearly as easy as creating a Marketplace ad (The Marketplace Application). Expect to spend somewhere between $5 and $50 per day, depending on who you want to reach and how long you want your ad to run.
Tip
Before you even think about creating a social ad, check out Facebook’s Advertising Guidelines (www.facebook.com/ad_guidelines.php), which lay out rules for the kind of content your ad can contain, the type of website you’re allowed to drive traffic to, and more. (You also get a chance to review Facebook’s advertising guidelines and advertising terms and conditions when you place an ad; see The Marketplace Application.)
Here’s how to create and run a social ad:
Scroll to the bottom of any Facebook screen and click the Advertising link. Then, on the page that appears, click the “Create an Ad” button.
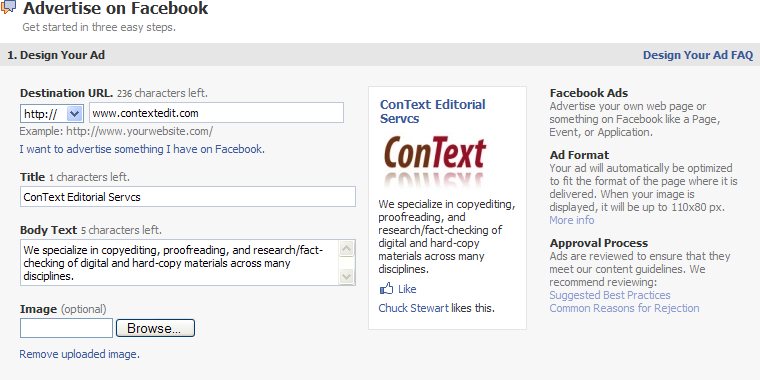
Tell Facebook what you want your ad to look like. In the Design Your Ad section of the “Advertise on Facebook” page, type in the click-through URL (the website or Facebook Page you want your ad to drive folks to). Then type in your ad’s title (up to 25 characters), ad copy (up to 135 characters), and, if you like, click the Image button to upload a product photo or logo. Facebook displays your ad-in-progress for you as you build it.
Note
If your image file is bigger than 4 KB or is animated, Facebook won’t let you upload it. If your image is larger than 110 x 80 pixels, Facebook will upload it, but will shrink it down to 110 x 80 pixels, so the image will be squished and people won’t be able to make out any details. (See the Tip on Sharing Pictures to learn how to check an image’s file format; the info box that appears also shows your file’s size and pixel measurements.)
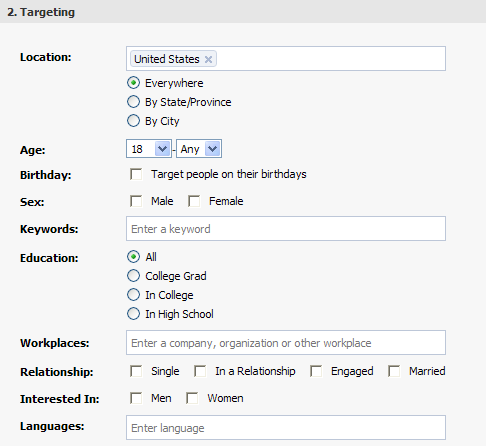
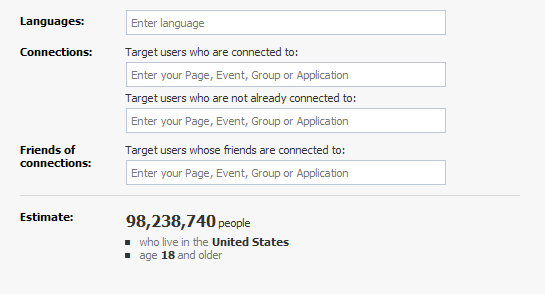
Tell Facebook who you want to see your ad. As you select options on the Targeting section, Facebook updates the number at the bottom of the screen to give you a rough idea of how many members are in the demographic you’ve chosen. (Turn on the Male checkbox, for example, and Facebook cuts the figure in half, since about half its members are female.) When you’re done, scroll down to the next section.
Note
If you create a social ad after you’ve created a Facebook Page, Group, event, or application, you can specify that you want to target Facebook members who are fans or friends of those fans. (You can also tell Facebook not to advertise to fans—or fans’ friends—of one of your Pages, Groups, events, or applications.) To tweak which fans and friends get to see your ad, from the Targeting section of the “Advertise on Facebook” page, head down to the “Connections” and “Friends of connections” fields.
Decide whether you want to pay Facebook based on how many people see your ad but don’t necessarily click on it (pay for views) or based on how many people it actually drives to your site or Page (pay for clicks). Then type in how much you want to pay—per 1,000 impressions if you chose the "Pay for Views” route, or per click if you chose the "Pay for Clicks” route. The higher the amount you type in the Bid field, the more often your ad appears (in relation to whatever other ads Facebook needs to run the same day as yours; in other words, the highest bidder gets her ads run more often). Because site traffic and the total number of ads Facebook sells on any given day fluctuate, you also need to type the total amount of money you want to pay Facebook in any 24-hour period in the Budget field. After you tell Facebook which days you want your ad to run, click Create to preview your ad.
Check your ad for errors and then enter your credit card info. (You may soon be able to pay for Facebook ads using a PayPal account, but that option wasn’t available yet as this book went to press.) If you spot a mistake, click Change Ad to go back and fix the error. You should check out Facebook’s advertising terms and conditions, too. Basically, by running your ad, you certify that you’re not lying to people or trying to sell something objectionable or illegal, like drugs or porn or copyright-protected music. (Just to make sure, your ad isn’t published until Facebook approves it, typically an hour or so after you submit it.) Then head to the bottom of the Review Ad page and click the Place Order button.
Note
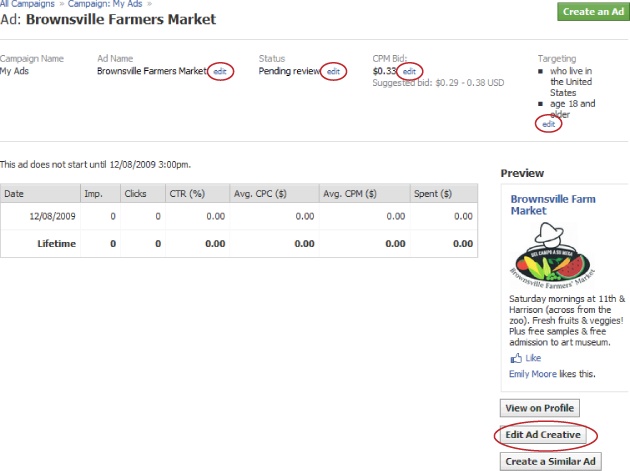
After you create your ad, you can change it. But if your ad is already running, changing it tells Facebook to stop running it and your ad goes back in the queue to be approved all over again. To change an existing ad, head to the left side of your Home page, click the “Ads and Pages” link, and then click the name of the ad campaign containing the ad you want to change. On the list of ads that appears, click the name of the ad you want to edit. Then click the “edit” link next to the field you want to change, or (to tweak the way the ad looks) click the Edit Ad Creative button.
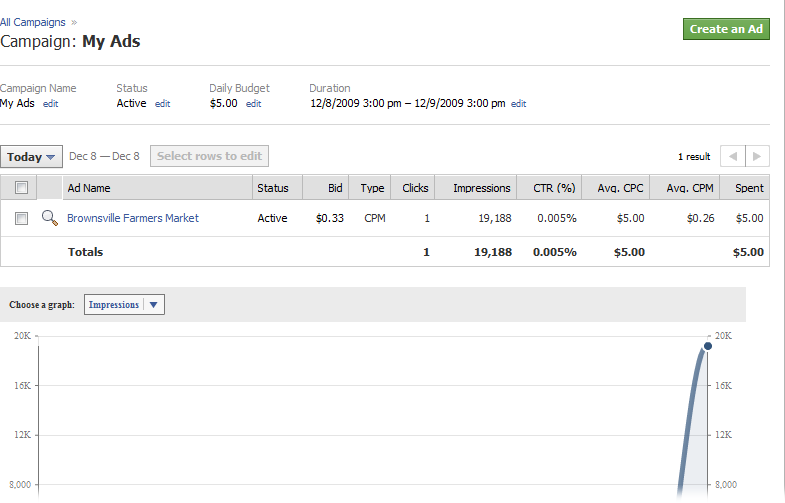
Check on your ad. You can see daily statistics as well as in-depth demographics (through Facebook’s Insights program—Creating and Running a Social Ad) in as little as a few hours after Facebook starts running your ad. To do so, on the left side of your Home page, click the “Ads and Pages” link and then click the name of the ad campaign you want to check out.
Tip
To see the ad info in easy-to-interpret graph form, head to the "Choose a graph” drop-down menu and select Clicks, Impressions, or CTR.
Here’s a quick rundown of the stats you see:
Bid is the amount you bid for this ad (Creating and Running a Social Ad).
Type reminds you whether you chose to pay on a cost-per-click or cost-per-thousand-impressions basis (Creating and Running a Social Ad).
Clicks refers to the number of people who’ve actually clicked your ad so far.
Impressions tells you how many people have seen your ad.
CTR (%) stands for "click-through rate”; this is the percentage of the people who’ve seen your ad who’ve actually clicked it.
Avg. CPC ($) and Avg. CPM ($) show you the amount of money you’re spending, on average, per click and per thousand impressions, respectively.
Spent ($) keeps track of how much you’ve spent on the ad so far based on the amount you bid, the number of clicks or impressions your ad gets, and how many days your ad runs.
Note
If you bought a long-running ad, you can see day-by-day stats by heading to the menu on the left side of the Campaigns page, clicking Reports, typing in a date range, and then clicking Generate Report.
To dispense with the columns of numbers and see a chart of how your ad is performing, head to the “Choose a graph” drop-down menu and select Clicks, Impressions, or CTR.

Connect Facebook to Your Website with Widgets
Back in 2007, Facebook debuted a feature called Beacon, which was created to bring people’s Web-surfing actions together with their Facebook friends. A lot of people didn’t like Beacon, so Facebook retired it in 2009. But they’ve since replaced it with a feature called Connect. Using Connect, folks who design applications create programs that let Facebook members tie their Facebook accounts to certain websites. This is fabulous news if you’ve got a corporate website because it lets you tap into your site visitors’ network of friends to drive additional traffic to your site and help keep these folks on your site longer, which—theoretically, at least—will lead to better sales. (In marketing speak, Connect helps you engage your visitors.)
Connect comes in two flavors:
Quick-and-dirty Connect-based programs, a.k.a. widgets, such as Share buttons and Fan Boxes. These pre-built widgets are so simple to use that even folks with little to no programming experience can add them to their web pages. You’ll learn how to add a widget to your web page in a moment.
Guidelines (technically, application programming interfaces and specifications) that webmasters and other programmer-types can use to build their own widgets or even more complicated programs for exchanging website visitor info with Facebook info. This option isn’t for the average joe; you want to leave it to programming professionals. For more info on this topic, see High-Dollar Options.
To add a widget to your website:
Point your web browser to www.facebook.com/facebook-widgets.
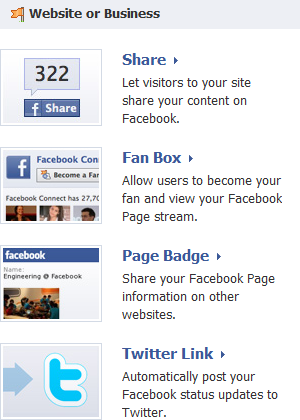
Click the “Website or Business” widget you want to add to your site. Currently, your choices include:
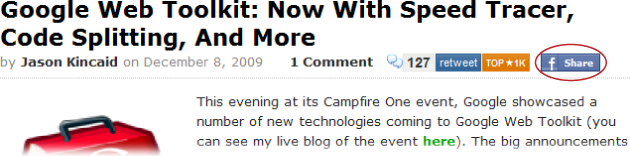
Share. When folks who visit your site click your Share widget, the Facebook Links application takes over. Up pops a Facebook “Post to Profile” dialog box your site visitors can use to post your site’s web address, a thumbnail photo and description, and a personal comment to their friends’ News Feeds.
Fan Box. When folks who visit your site click your Fan Box widget, they get to see (and automatically become fans of) your Facebook Page. If you like, they can also get to see a list of your Page’s fans and a streaming commentary of your fans’ posts to your Page.
Page Badge. After you add it to your Facebook Page, this widget appears as a thumbnail of your Page. No instant “fanning” here, à la the Fan Box; instead, clicking your website’s Page Badge whisks your site visitors to your Facebook Page, where they can become fans or otherwise interact with your Page.
Twitter Link. This widget is a little different than the others: It’s not something you add to your website. Instead, it’s a short set of steps that let you connect your Facebook Page to a Twitter account. After you follow the steps, every time you update your Facebook Page, the updates simultaneously go out to your Twitter followers.
Note
There are a handful of additional, developer-targeted widgets, including one that lets your site visitors add comments (and then turn around and share these comments with their Facebook friends). These widgets require a bit more tech-savvy than cutting and pasting, though. You can find a list of them in the Developers section of www.facebook.com/facebook-widgets.
Follow the instructions that appear to add a line or three of HTML code to a page of your website. Depending on the widget you choose and what kind of website you’ve got, you may have to cut-and-paste HTML code directly to your web page’s source file. (The process is a bit easier if you’re dropping a Fan Box widget into a blog hosted by Blogger or Typepad.) Don’t worry: The widgets were designed to be as simple to add as possible, and Facebook’s instructions give you all the details.
High-Dollar Options
Facebook’s free and inexpensive Pages, widgets, and social ads are great for small businesses and freelancers. But companies with a little more dough to throw around can choose from even more advertising options.
Connect is a customizable feature that does for regular websites what social actions (Social Ads (Targeted Announcements)) do for Facebook Pages. Connect lets you offer your site visitors the option to (what else?) connect with your site, and after they give their go-ahead, their Facebook profiles and Friend Lists are available to you to use as you wish. For example, if you sell music CDs on your website, you might want to serve up different display ads to the folks whose Facebook profiles mark them as jazz hounds vs. the ones whose profiles list classical compositions.
The connection works the other way, too—from your site to Facebook. Not only can you link your site directly to your Facebook Page, you can also incorporate the actions your visitors take on your website into customized “stories” (ads) that Facebook then shoots out to the News Feeds of your site visitors’ Facebook friends.
Note
Facebook’s earlier stab at a program to link Facebook to the wider Web, called Beacon (which is widely expected to disappear soon), stirred up quite a bit of controversy thanks to the surprise some Facebook members felt when they realized their Web-surfing exploits were being announced to their nearest and dearest Facebook friends. While there’s a lot of overlap between Connect and Beacon, one difference is that with Connect, Facebook members have to choose to connect to your website. You can’t gather people’s Facebook profile info using Connect, use it without their knowledge or permission, and then claim it’s okay because you gave them a chance to opt out. (You wouldn’t dream of doing this anyway, though, because you’re a nice person.)
Unless you’re talking about one of the simple pre-built widgets Facebook makes available (Connect Facebook to Your Website with Widgets), adding Connect to your website takes some doing. First, you have to register your website as a Connect application. Then, you either have to use pre-built HTML code snippets (if you’re going with one of Facebook’s developer widgets), or write your own HTML code from scratch based on the Connect guidelines. Facebook doesn’t charge for any of these activities, but depending on what you have in mind, you may have to pay your website developers a pretty penny to get the Connect-enabled version of your website up and running. To see what’s involved, head to http://developers.facebook.com/connect.php.