
Chapter 4
Night Light
Ingredients
- 1 Arduino
- 1 Arduino USB cable
- 1 Arduino power supply
- 1 breadboard
- 1 photoresistor (also called a “photocell”)
- 1 LED (white, if you have one)
- 3 jumper wires
- Your computer
Optional Items
- 2 extension jumper wires (male-to-female)
- 1 hollow, translucent toy
Night lights are awesome and useful, and the best ones save power by only lighting up when it’s dark in the room. That’s what we’ll make with this project.
Concepts: Sensing Light, Taking Action
We’ll use a photoresistor to detect light. But this time, we’ll also check the amount of light we’re detecting and then do something with that information.
The circuit for this project is almost exactly the same as in “A Dark-Detecting Light.” The code, however, is quite different. It includes “if-then” commands: If the room is dark, then send power to the light.
The concept of “if this happens, then take action” is very common in the code for smart objects, and programming in general.
Almost all of these parts come in most Arduino starter kits. The optional male-to-female jumper wires often do not, though. To get your hands on those, or any of the other parts in this project, visit http://keefe.cc/night-light.
As for the optional hollow toy, you can use anything that would glow with an LED inside. I’ll use a plastic sheep, because that seems appropriate.
Steps
Wire Up the Parts
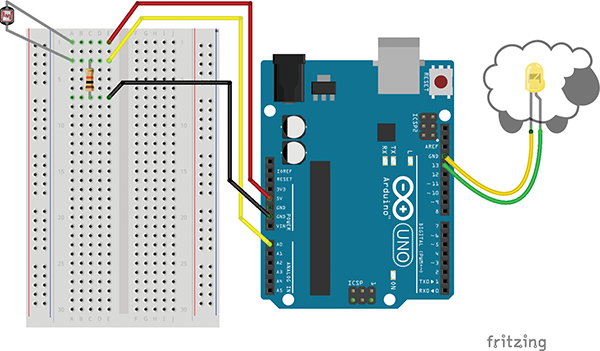
Figure 4-1: Wiring diagram for the Night Light project, including optional extension cables and hollow toy
Wire up the circuit just as I described in the previous chapter. If you’ve got a few different LEDs handy, feel free to pick a color you’d like for your night light. Come back here when you’re done.
Great! You’re ready to go.
If you’d like to glow a toy instead of just your LED, follow these additional (and optional) steps:
- Take the LED out of its spot on the Arduino.
- Grab two of the “extension” jumper wires. These have an (actual) pin on one end, and a hole on the other. Often these wires come attached to each other in a ribbon, side by side. If yours came that way, peel off two jumpers at a time, so your two wires stay attached to each other.
- Put the pin ends of two jumper wires into the Arduino where the LED was (pins
13andGND). - Put the LED legs into the hole ends of the “extension” jumper wires, remembering that LEDs have polarity—the long leg needs to be wired back to Arduino Pin
13. - Cut a hole in the hollow toy.
- Slide the LED inside.
- Use tape to hold it into place, if necessary.
If you have extra jumper wires, you can make a chain of them so the toy is even farther from the Arduino and breadboard. Just remember that the long leg of the LED needs to connect back to Arduino Pin 13.
Load Up the Code
Unlike the previous projects, the code for the Nght Light project doesn’t come with your Arduino software (alas). But there are a few ways you can get it, and they’re all free.
From the Web
I’ve set up a website full of useful links and the code you’ll need for every project. Here’s how to use that site to get what you need:
- Use a web browser to visit http://keefe.cc/night-light.
- Click the “Copy Code to Clipboard” button.
- Switch back to your Arduino software.
- Start a new Arduino sketch using File → New.
- You’ll get a mostly blank sketch window. Delete the little code that’s there.
- Click anywhere inside the blank window.
- Paste the code you copied from the website using Edit → Paste from the menu.
- Save your work using File → Save.
From the Bundle
Every sketch used in “Family Projects for Smart Objects” is also available as a zipped-up bundle you can download for free. Here’s how to get the bundle.
- Use a web browser to visit http://keefe.cc/sketches.
- Your browser should start downloading the file right away.
- Once it’s done, navigate to your “Downloads” folder.
- Unzip the file called
family-projects-sketches-master.zip, which is usually done just by clicking or double-clicking its icon. - Now you’ll have a bunch of “chapter” folders with short names relating to a project in this book. Click on the
night_lightfolder to open it. - Inside, you’ll see a file of the same name, but ending in .ino (for Arduino):
night_light.ino. It’ll have a blue Arduino icon. - To use it, just double-click the file name and it should open in your Arduino software.
Now you’re also set to run the code for every other project in this book!
From the Back of This Book
The code for every project is also printed in the back as “Appendix B.” If you’re reading an electronic version of the book on your computer, you may be able to copy it from there and paste it into your Arduino software. This code happens to be pretty short, so you could actually type it, too.
- On your computer, start up your Arduino software and start a new sketch from the menu bar: File → New.
- Delete what’s in the window that pops up.
- Either type the code exactly as it appears in Appendix B or, if you have an electronic version of this book on your computer, copy-and-paste the entire code block for this chapter.
No matter how you get the code, once you have it save your sketch with a new name and then upload it to your Arduino by pressing the arrow button at the top of the blue window or using Sketch → Upload. For more on how to get the code into your Arduino, including tips on what to do if the Arduino complains, see the “Load Up Your Code” section of the “Hello Blinky World” project.
At this point, the LED will stay off regardless of the light in the room. We still need to teach the Arduino what “dark” looks like where you are.
It’s a Calibration
First, turn on the Serial Monitor on your Arduino software: Tools → Serial Monitor. This lets you see communications from the Arduino.
You should see a new window with a bunch of numbers scrolling up. If you don’t, be sure the drop-down menus at the bottom of the Serial Monitor window are set to “Both NL & CR” and “9600 baud.”
The numbers scrolling by are the readings straight from the light sensor. The values should get smaller when you put your hand over the photoresistor, and larger when there’s more light. In my setup, I see values around 780 in the bright room where I’m sitting, and values around 90 when I cup my hand over the sensor.
Your numbers will be different, but they should change noticeably when you shield the sensor from light. If they don’t, walk through the wiring steps again, paying close attention to the holes you are using on the Arduino and on the breadboard.
Now we need to figure out what number is a good threshold for “dark” where you are. Make the room as dark as it’ll be when the light should go on. (You also can also keep simulating a dark room by cupping your hands over the photoresistor; it’s not hard to change the threshold later.)
With the sensor in the “dark,” watch the numbers in the screen, and pick a number that roughly represents the point at which it’s “dark.” The LED will glow at any value less than the number you pick.
In the code, find this line near the top:
int darkPoint = 0;Change the value after the equals sign from 0 to your “dark” value. Be sure to leave the semicolon.
Make It Go
You’ve changed the code, so upload it to the Arduino again (Sketch → Upload).
Now, when your project is in the dark, the light should glow! When the lights are back on, it should go out again. If you need to adjust darkPoint, feel free to change the value and re-upload your code onto the Arduino.
You probably don’t want your computer sitting next to your glowing toy all night, so once you’re happy with the settings you can unplug your Arduino from the computer and plug the Arduino power supply into both the Arduino and a wall socket. Your program will restart once the Arduino has power again.
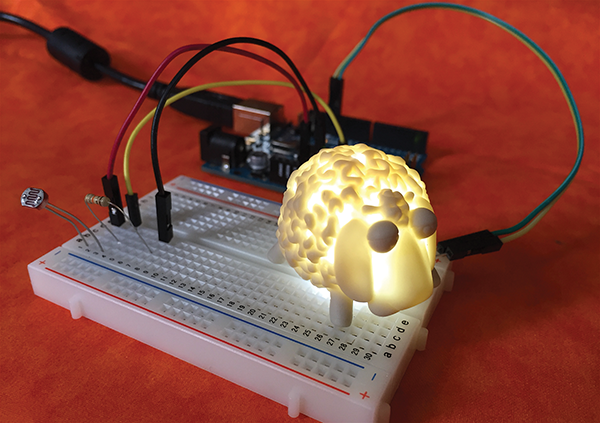
Figure 4-2: A sheep glows in the night!
Fixes
If the light doesn’t reliably douse in the dark, it’s possible that the glow from the LED is shining on the light sensor, tricking the photoresistor into thinking the room is still lit. Here are some possible fixes:
- Try to point the sensor away from the LED. Don’t be afraid to bend the legs; just make sure they don’t touch each other.
- If you’re using the extension jumper wires, arrange your project so the LED is as far from the Arduino as possible.
- Make a tiny tube of dark tape or paper and place it around the sensor so it can only “see” light in one direction. Then point the tube and resistor away from the LED.
- Hook up your computer to the Arduino again and check the light values using the Serial Monitor (Tools → Serial Monitor). See if there’s a higher number that still represents “dark.”
Code Corner
Remember, the code in the void loop() section just keeps running over and over again—checking the sensor value all day long.
In that loop, we use an “if-then” statement. There’s a version of this statement in practically every computer language. In Arduino-speak, if-then statements look like this:
if (something here is true) {
  then do whatever is here
}
In the night light code, there are two spots where we do an if-then check.
If the room is dark, and the sensor reading is less than our “dark point,” then send power to the LED, by setting Pin 13 to HIGH:
if (sensorValue < darkPoint) {
  digitalWrite(ledPin, HIGH);
}
If the room is bright, meaning the sensor value is greater than or equal to our “dark point,” then don’t power the LED, by setting hole 13 to LOW:
if (sensorValue >= darkPoint) {
  digitalWrite(ledPin, LOW);
}
You can put a lot of stuff between the brackets of an if statement, including more if statements! We’ll see this used a lot in the projects to come.
Taking It Further
Gently Fading Night Light
Whenever I make projects like this, I like to add some warm flair by actually fading up the LED instead of just turning it on abruptly (and gently fading it out, when daylight returns). This requires a little extra code to keep track of whether the LED is presently on or not and adjusting the if-then test slightly. In English, we might write this:
Take out a notebook to keep track of whether the LED is on or off.
Sense the light in the room.
If the room is dark and the LED is currently off then
   fade the LED to full power,
   and make a note that the LED is on.
If the room is bright and the LED is currently on then
   fade the LED to zero power,
   and make a note that the LED is off.
Repeat forever.
Notice that in the case that the room is dark and the LED is already on, we don’t do anything. Because it’s already on! Same for when the room is bright and the LED is already off.
To get the fading code for your project, visit http://keefe.cc/night-light.