
Transitions are a small, but essential, part of film grammar. Over the years, transitions have developed an important role in film story language. Filmmakers rely on the audience’s knowledge of the transition “code.” This grammar of transitions and what they signify in movie language has grown up with the movies. These days, viewers are hardly aware of the translations that they make while watching film: fade-out/fade-in means the passage of time, a ripple dissolve means “it was all a dream,” and a heart-shaped iris wipe means you’re watching reruns of The Dating Game.
Final Cut Express offers a library of more than 50 transition effects, which range from simple dissolves to complex 3D transitions. This chapter introduces the procedures for working with transitions in an editing context. For information on modifying effects settings to sculpt transitions, see Chapter 14, “Compositing and Effects Overview.”
You can add transitions along with clips as you assemble your sequence by performing one of the two transition edit types available in the Canvas edit overlay, or you can apply transitions to edit points after you have assembled your sequence. Once you’ve applied transitions, you can go back and modify them as you refine your cut.
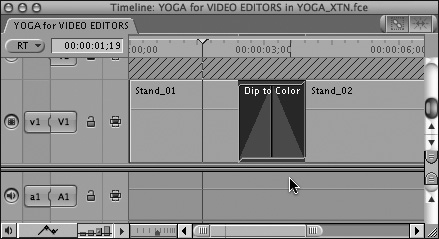
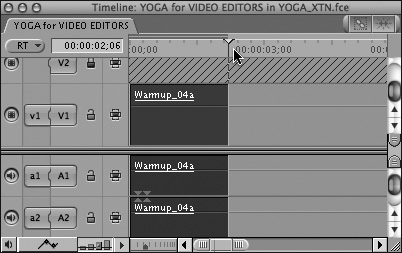
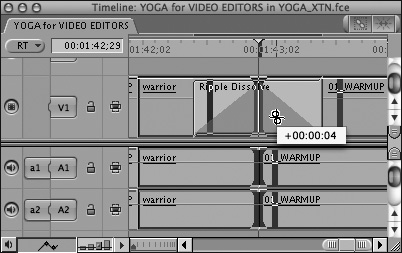
Final Cut Express displays transitions as overlays within a single Timeline track—an efficient use of screen real estate (Figure 13.1). You can adjust a transition directly in the Timeline window, or you can make more complex adjustments in the Transition Editor. The following procedures for adding a transition to a sequence are performed in the Timeline.
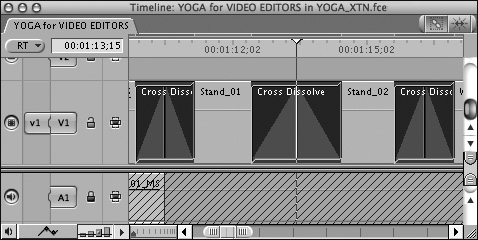
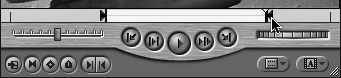
Figure 13.1. Transitions appear as overlays within a single Timeline track. The dark gray diagonal shading on the transition’s Timeline icon indicates the transition’s direction, alignment, and speed.
To add a transition effect that’s centered on a cut:
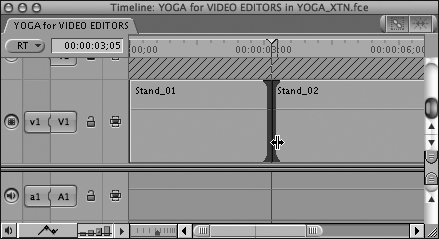
In the Timeline, select the edit point between two clips on the same Timeline track (Figure 13.2).
To add the transition effect, do one of the following:
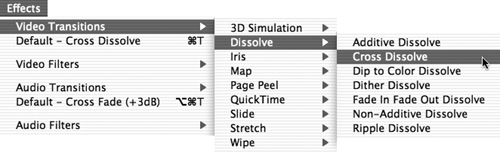
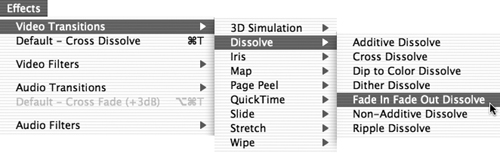
Choose Effects > Video Transitions; then select from the submenu’s list of effects (Figure 13.3).
Drag a transition effect from the Effects tab in the Browser onto the cut, centering it over the cut.
To add the default transition, Control-click the edit point; then choose Add Transition from the shortcut menu.
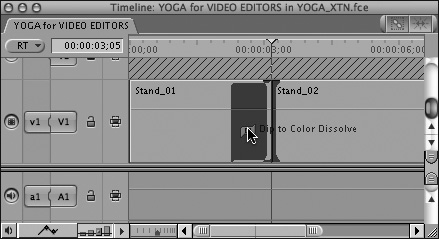
The transition is applied to the selected edit point (Figure 13.4).

Tip
You can change the alignment of an existing transition by Control-clicking the selected transition in the Timeline and then choosing a different alignment from the shortcut menu.
To add a transition effect that starts or ends at a cut:
Drag a transition effect from the Effects tab in the Browser onto the edit point in the Timeline, aligning it so that it starts or ends at the cut (Figure 13.5).
Tips
Create a fade-to-black transition by dragging the Cross Dissolve transition from the Effects tab of the Browser to the final clip in your sequence, aligning it so that it ends at the cut.
To fade up from black, drag the Cross Dissolve transition onto the beginning of the first clip in your sequence, aligning it to start at the first frame of the sequence.
To delete a transition from a sequence:
In the Timeline, select the transition; then press the Delete key.
To replace one transition with another:
In the Timeline, select the transition you are replacing (Figure 13.6).
Choose Effects > Video (or Audio) Transitions; then select a replacement transition from a submenu (Figure 13.7).
To copy a transition and paste it in another location:
In the Timeline, select the transition you want to copy; then press Command-C.
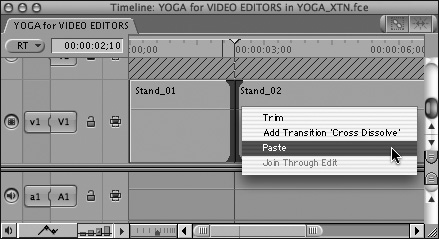
Control-click the edit point where you want to paste the transition; then choose Paste from the shortcut menu (Figure 13.8).
Final Cut Express offers one default video transition—a 1-second cross-dissolve (Figure 13.9)—and one default audio transition—a 1-second cross-fade (Figure 13.10). The default transitions are available from the Effects menu, the edit point’s shortcut menu, and as keyboard commands. A transition edit, available in the Canvas edit overlay, automatically includes the default transition at the time you perform the edit. You can also designate a transition (or any other type of effect) as a Favorite by dragging the effect from the Browser, Viewer, or Timeline and placing it in the Favorites folder on the Effects tab in the Browser. Using Favorites is an easy way to save a transition’s settings so you can reproduce the effect later. You can build up a small group of favorite transitions for a particular project.
To apply the default video transition:
Do one of the following:
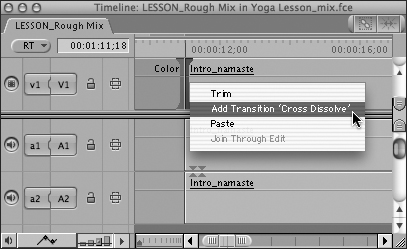
Select the edit point where you want to place the transition; then choose Effects > Default - Cross Dissolve.
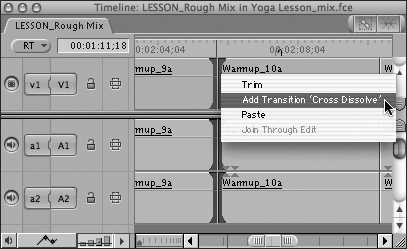
Control-click the edit point; then choose Add Transition ‘Cross Dissolve’ from the shortcut menu (Figure 13.11).
Select the edit point; then press Command-T.
To apply the default audio transition:
Do one of the following:
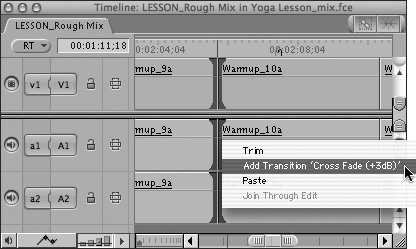
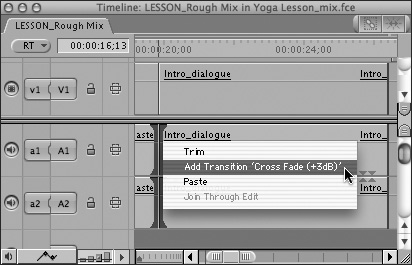
Select the audio edit point where you want to place the transition; then choose Effects > Default - Cross Fade (+3dB).
Control-click the edit point; then choose Add Transition ‘Cross Fade (+3dB)’ from the shortcut menu (Figure 13.12).
To create a favorite transition by saving its settings:
In the Transition Editor or the Timeline, drag the transition icon to the Favorites folder on the Effects tab in the Browser (Figure 13.13).
To create a favorite transition before using it in a sequence:
On the Effects tab in the Browser, double-click the transition (Figure 13.14).
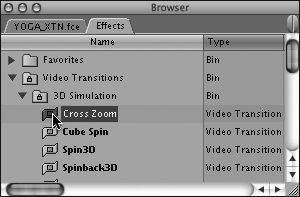
Figure 13.14. Double-click the transition you want to customize to open it in the Transition Editor.
The transition opens in the Transition Editor.
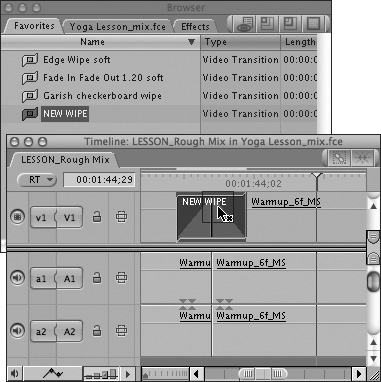
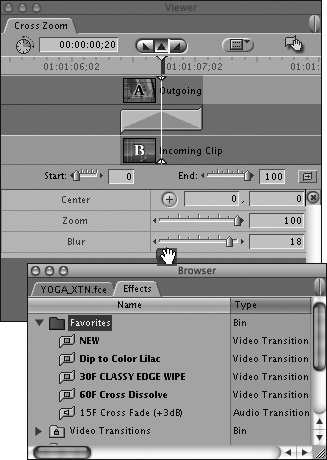
Adjust the transition’s settings in the Transition Editor; then use the drag handle to drag the modified transition into the Favorites folder (Figure 13.15).
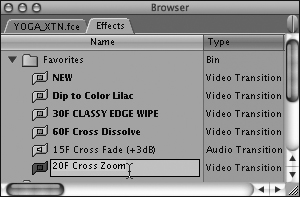
In the Favorites folder, rename the new transition (Figure 13.16).
To delete a favorite transition from the Favorites folder:
There are two types of transition edits: Insert with Transition and Overwrite with Transition. A transition edit automatically places your default transition at the head of the edit. When using either of the transition edit types, you’ll need enough footage in your source clip to create the transition. Each source clip will need additional frames equal to half of the transition’s duration.
To perform a transition edit:
Set the sequence In point by positioning the Timeline playhead where you want the edit to occur (Figure 13.17).
In the Viewer, set source In and Out points to define the part of the source clip you want to add to the sequence (Figure 13.18).
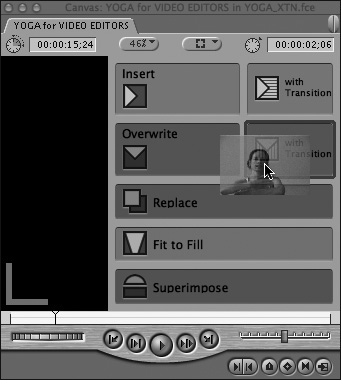
Drag the clip from the Viewer to either the Insert with Transition or the Overwrite with Transition edit overlay in the Canvas (Figure 13.19).
Tip
Scenario: You need to apply the same 1-second dissolve to 101 sequence clips before your client arrives for a screening, and she just pulled into the parking lot. Don’t panic. Here’s a slick trick: Use the Group Select tool to select all 101 sequence clips; then drag the whole group of clips from the Timeline to the Canvas edit overlay and drop them on the Overwrite with Transition area. Final Cut Express will apply the default cross-dissolve transition to all 101 clips in a glorious display of computer automation—that is, if you remembered to allow handles on your clips. Try it sometime.
You can make dramatic changes to a video transition even after you have added it to your sequence. You can adjust its duration and placement and customize its appearance. Opening your transition in the Transition Editor will give you maximum access to the transition’s settings, but you can perform many adjustments directly in the Timeline.
Figure 13.20 shows an overview of the Transition Editor interface.

The Transition Editor (sometimes called the Transition Viewer) is a special version of the Viewer window that you use to make detailed adjustments to transition settings. Use the Transition Editor to do the following:
Adjust the duration of the transition.
Reverse the direction of the transition.
Trim the edit point underlying the transition.
Adjust the placement of the transition relative to the edit point. You can set a transition to end on the cut, center on the cut, begin on the cut, or occur anywhere in between.
Adjust the starting and ending effect percentages. The default settings of a simple cross-dissolve would range from 0 to 100 percent. However, in a transition effect that incorporates a motion path, effect percentages specify the portion of the full path that will be included in the transition.
The Timeline’s Thumbnail Display option controls the way clips appear in the Transition Editor (Figure 13.21). You can adjust the thumbnail display on the Timeline Options tab of the Sequence Settings window.
To open a transition in the Transition Editor:
Do one of the following:
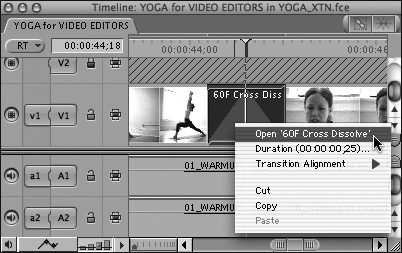
Control-click the transition; then choose Open ‘name of the transition’ from the shortcut menu (Figure 13.22).
In the Timeline, double-click the transition to open it in the Transition Editor.
Select the transition’s icon in the Timeline; then choose View > Transition in Editor.
To change the duration of a transition in the Transition Editor:
Do one of the following:
Type a new duration in the Duration field; then press Enter (Figure 13.23).
Drag either end of the transition (Figure 13.24).
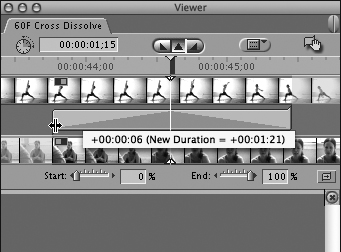
The change in duration applies equally to both sides of the transition.
Tip
FCE transitions apply equally to both sides of an edit point, so if you need an asymmetrical effect—where the transition effect is not applied to an equal number of frames on either side of the edit point—you must build it yourself. Here’s how to build an asymmetrical dissolve. Place the incoming and outgoing clips on separate Timeline tracks and allow the areas you want to include in the dissolve to overlap. Then ramp the opacity levels to cross-dissolve from one clip to the other.
To perform a Ripple edit on a transition in the Transition Editor:
Position the pointer on the edit point you want to trim (Figure 13.25).
In the Transition Editor, the edit points appear on the clip icons displayed in the tracks above and below the transition icon.
The pointer changes to the Ripple Edit tool.
Drag the edit point (Figure 13.26).
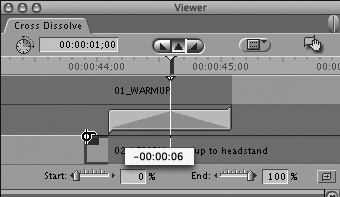
Figure 13.26. Performing a Ripple edit on the incoming clip’s In point. Drag the edge of the clip to ripple the edit point underlying the transition.
A Ripple edit is performed on the edit point underlying the transition as the Canvas display changes to show your new In point.

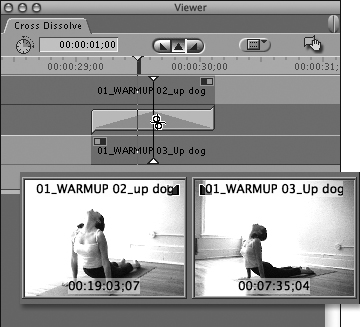
To perform a Roll edit on a transition in the Transition Editor:
Place the pointer anywhere on the transition. When the pointer changes to the Roll Edit tool, drag it on the transition to perform a Roll edit on the edit point underlying the transition.
As the Roll edit is performed, a two-up display in the Canvas changes to show the two frames adjacent to your new edit point (Figure 13.27).
To change the settings for a transition:
Do one or more of the following:
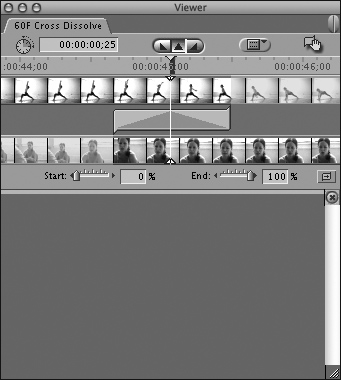
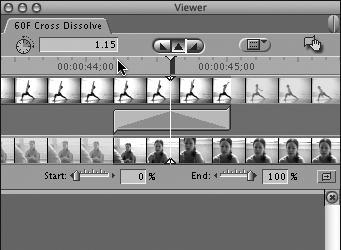
To change the starting and ending effect percentages, drag the Start and End sliders (Figure 13.28) or type percentage values in the text boxes.
To change the direction of the effect, click the Reverse button.
To have the transition center on, start on, or end on the edit, click the corresponding placement button at the top center of the Transition Editor. Once you’ve changed the center point of a transition, these controls won’t remember the original edit point.
Make other settings as desired for the transition. For more information on modifying effects settings, see Chapter 14, “Compositing and Effects Overview.”
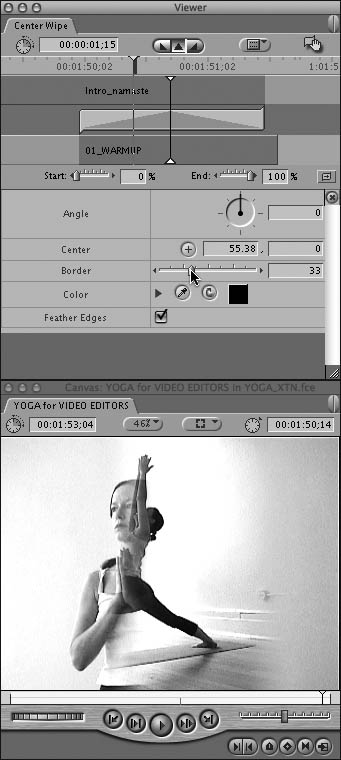
To preview a transition in the Canvas:
Open the transition in the Transition Editor.
Position the Transition Editor’s play-head at any point in the transition (Figure 13.29).
Adjust the transition settings.
The Canvas display updates to reflect any adjustments made to the transition settings (Figure 13.30).
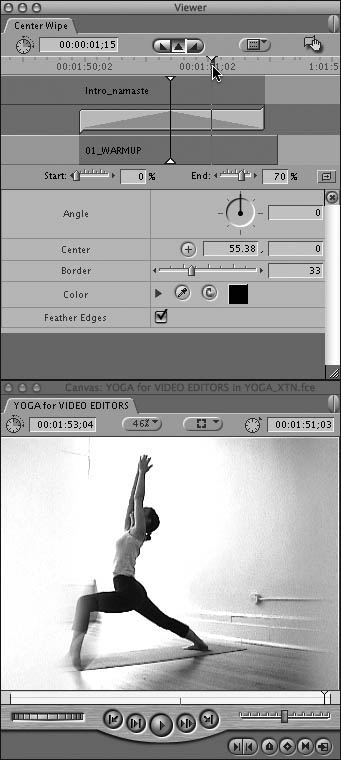
To preview a frame at another point in the transition, reposition the Transition Editor playhead (Figure 13.31).

Tip
Hold down the Option key as you scrub the Canvas’s Scrubber bar to preview your transition. You can also step through a transition one frame at a time by pressing the Right Arrow key to advance the transition by single frames. Press the Left Arrow key to step backward. A slow-motion view of the transition appears in the Canvas.
You can streamline transition editing in the Timeline by using the shortcut menus. Control-clicking the transition itself opens one of the shortcut menus. A different shortcut menu is available for the edit point underlying the transition. Edit points that have transitions applied to them can still be trimmed in the same way as other edits; you can use the Trim Edit or Viewer windows or drag directly in the Timeline. For more information about trimming operations, see Chapter 11, “Fine Cut: Trimming Edits.”
To adjust the duration of a transition in the Timeline:
With the Selection tool, drag one edge of the transition to adjust its length.
Or do this:
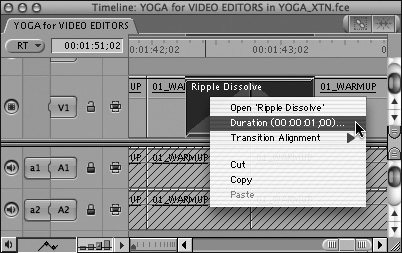
Control-click the transition; then choose Duration from the shortcut menu (Figure 13.32).
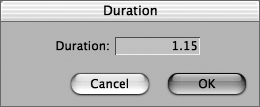
In the Duration dialog box, enter a new duration (Figure 13.33); then click OK.
Tip
Control-D is the keyboard shortcut to open the Duration dialog box for a selected clip or transition.
To trim an edit point underlying a transition:
Do one of the following:
From the Tool palette, select the appropriate edit tool; then drag the edit point underlying the transition (Figure 13.34).
Double-click an edit point with any edit tool to open the Trim Edit window.
Final Cut Express offers only two audio transitions; both are cross-fades. One is a 0 dB (decibel) cross-fade. The standard default is a +3 dB cross-fade. The +3 dB amplitude increase of the default cross-fade is designed to compensate for any perceived volume drop during the transition, but the only way to decide which cross-fade works best to finesse your audio edit is to try them both and trust your ears. You can adjust only the duration of audio transitions.
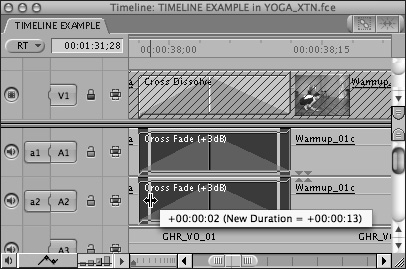
To modify the duration of an audio transition:
With the Selection tool, drag one edge of the transition to adjust its length (Figure 13.35).
Or do this:
Control-click the transition; then choose Duration from the shortcut menu.
In the Duration dialog box, enter a new duration.
Click OK.
Tip

Duration is the only adjustable parameter for the audio cross-fade transitions in Final Cut Express, but you can build your own cross-fades. Set up the audio clips you want to transition between on adjacent tracks. You can adjust the clips’ overlap and then set Level keyframes to sculpt your special-purpose cross-fade.
If you are using a real-time FCE system, you can preview many transitions without rendering, but you’ll also find many transitions you must render before you can play them back. With the advent of FCE scalable Real Time architecture, your rendering options have become a bit more complex: before you can render, you must specify which of the six video and two audio Timeline playback states you want to include in the render operation (Figure 13.36). Thank goodness for real-time preview, eh? For more information, see Chapter 18, “Real Time and Rendering.”
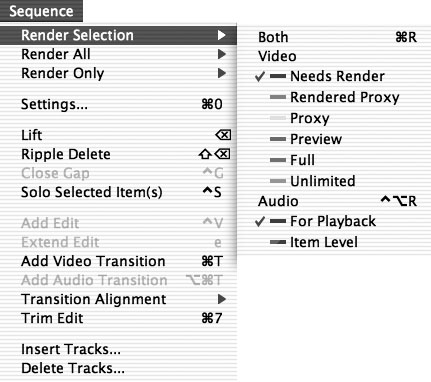
Figure 13.36. In FCE’s render menus, you’ll encounter six video and two audio render categories. You can specify which render categories you want to include in your render operations.
Real-Time Transitions
If your Final Cut Express system supports real-time effects, you can play certain transitions without rendering them first. The real-time transitions available on your particular system appear in bold type in the Effects menu (Figure 13.37) and on the Browser’s Effects tab. For more information on real-time systems and rendering, see Chapter 18, “Real Time and Rendering.
