
Chapter 6. Audio
Picture is important, but good audio is essential.
People will happily watch low-quality images as long as the audio is good. YouTube is the classic proof of that.
Yet, far too often, audio is given short shrift during production. “Oh, we’ll fix that in post” is a statement heard all too often on the set. Taking a couple of extra minutes to get a good clean recording on set can save hours of expensive repair work later—and often yields far better results.
But since this book is written for editors, you already know that. So now the question becomes, “How do I get my audio to sound good in Final Cut Pro?”
That’s what this chapter is all about.
Two Types of Audio Files
You can capture audio into Final Cut Pro in one of two ways.
There are two ways you can capture, or ingest, audio into Final Cut Pro:
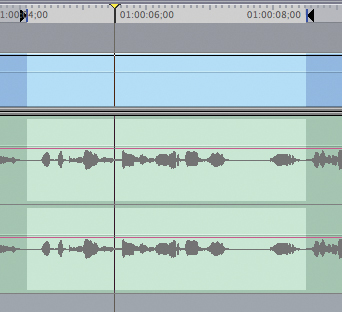
• Dual-channel mono (tracks 1 and 2 in the screen shot) means there is no audio level link between the two tracks. Both tracks are panned center and the audio levels between the two clips are independent. Both tracks are, however, locked together for sync.
• Stereo (tracks 3 and 4) means there is a link between the two tracks. The top track is panned left, the bottom track is panned right, and the audio levels of the two tracks are linked so that as you raise or lower one, the other moves by the same amount.
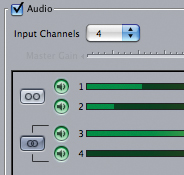
You can easily change the mode by clicking the little “cassette” icon, to the left of the tracks, to toggle from one mode to the other.
You should use dual-channel mono audio for interviews; this puts one person speaking on one channel, with the interviewer on the other channel. For most interviews, narration, and other one-person audio, there is no need for stereo.
You should use stereo settings for music, or sound effects, or in those situations where you care about the placement of sound in space.
Monitoring Audio and Video in Sync
Before you start blaming Final Cut Pro, read this first.
Although there are a few reasons why your audio and video may be playing out of sync, the most common reason is operator error. The golden rule of monitoring is: be sure you are listening to your audio and video from the same point.
If you send video out Final Cut via FireWire to an external deck or camera, you must monitor audio from the same deck or camera. This is because FireWire—and interconnection cards from companies like AJA, Blackmagic Design, Matrox, and Aurora—creates a signal-processing delay going through your gear that can range from three to nine frames.
If you plug your speakers into your computer and watch your video on a monitor attached to your deck, the sound will be out of sync. The way to fix this is to be sure audio and video monitors are both connected to the same source.
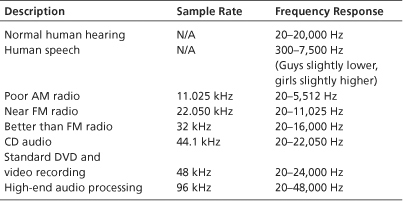
Understanding Sample Rates
Sample rates determine the frequency response of your audio.
Frequency response is the ability of your audio recordings to accurately capture all the different sounds in your recording. Normal human hearing is described as ranging from 20 cycles per second (extremely deep bass) to 20,000 cycles (extremely high pitch). Twenty cycles is so deep it sounds more like a vibration than a tone; 20,000 cycles is so high it sounds more like wind in the trees than a pitch.
Note
Your ear will not hear frequencies greater than 20,000 Hz.
Audio is analog, and in almost all cases it is created from something vibrating, setting up pressure waves that float through the air until heard by your ear. However, computers are digital and dislike all things analog.
We use sampling, which means capturing and measuring very small time slices of sound, to convert an analog signal into a digital format. According to the Nyquist Theorem (which I know you remember from high school physics), if you divide the sample rate by 2, you get the maximum frequency response supported by a particular sample rate.
All sample rates adequately capture low-frequency sounds—provided they can be picked up by your microphone. The following table illustrates frequency ranges of popular sample rates.
FREQUENCY RANGES FOR POPULAR SAMPLE RATES
Understanding Bit Depth
Bit depth determines dynamic range.
Dynamic range is the difference between the loudest and softest portions of your audio. When dynamic range is great, there is a large difference between volume levels.
Note
The larger the bit depth, the larger the file size.
Bit depth determines how much volume information the computer can record. All bit depths set the maximum level at the same point. Varying the bit depth determines how soft the quietest portions can be.
Note
Final Cut Pro displays audio using dBFS, where 0 is as loud as your audio can go. All audio levels below that are represented as negative numbers.
Final Cut Pro supports four principal bit depth settings:
• 8-bit depth allows a dynamic range from 0 dB (as loud as your audio can be) to −96 dB. This range creates smaller file sizes and is a common format for the Web.
• 16-bit depth allows a dynamic range from 0 dB (which is the same level as 8-bit) to −124 dB. This is the standard for almost all video-recording gear.
• 24-bit depth allows a dynamic range from 0 dB to −143 dB. This is currently common in professional audio gear and high-end mixing.
• 32-bit depth is the internal resolution of the Final Cut Pro mixer.
In all cases, increased bit depth does not change how loud your audio can be. Instead, it allows softer and softer sounds to be recorded.
Is Your Audio Slowly Drifting Out of Sync?
The problem is not in your set—it’s in your capture.
If your audio starts in sync with your video and then slowly drifts more and more out of sync, the problem isn’t your ears. It’s how you shot and captured the clip.
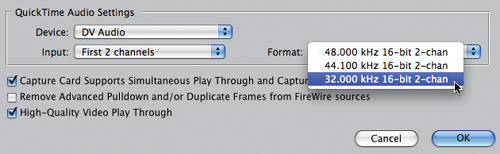
By default, Final Cut Pro expects all audio to be recorded by a camera with a 48 kHz sample rate (48,000 cycles per second). The problem is that many of the less expensive consumer cameras record audio at 32 kHz. When Final Cut Pro captures the clip, it flags the audio at the wrong sample rate, which causes the drift.
You need to do two things:
• Change your audio capture settings and recapture the clip.
• Change your camera settings so that all future recordings are done at the proper 48 kHz sample rate.
To change your capture settings, make sure your camera or deck is connected and turned on; then follow these steps:
1. Choose Final Cut Pro > Audio/Video Settings and click the Capture Preset tab.
2. Select the preset that has a check mark (meaning it is your currently active setting) and duplicate it.
3. If the Settings dialog box does not open, click the Edit button.
4. At the top, give this setting a name you’ll remember, like “Capture 32 kHz audio.” At the bottom, under QuickTime Audio Settings, change Format to 32.000 kHz.
5. Click OK.
6. In the Capture Presets tab, select your newly created setting and click OK.
Remember to use Easy Setup to change back to your normal capture setting when you are done capturing this footage.
To change your camera record settings, select the Camera menu and change it to record audio at either 48 kHz or, for some cameras, 16-bit.
Adjusting for Playback Latency
Here’s the fix when your external monitor is out of sync with your computer.
The Power Skill on page 154 mentioned that you need to connect your audio and video to the same monitoring point. However, it’s still possible for your computer and external monitor to be out of sync.
Note
Frame Offset adjusts audio and video equally. If your audio is out of sync, changing the frame offset will not bring it back into sync.
That’s because there’s an inherent delay, called latency, present in any digital signal path. Final Cut Pro compensates for this inside the computer. But you may need to adjust this for monitoring outside the computer.
For example, if your video monitor shows your program six frames later than your computer display, a Frame Offset value of 6 will synchronize the computer screen with your external video monitor.
Extra Credit
A quick way to test for sync is to put a short, one-frame pop of bars and tone every few seconds in the Timeline. Play this test sequence back and adjust the Frame Offset setting until the bars and tone sound in sync between the computer and external monitors.
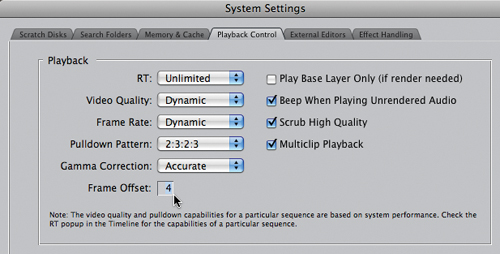
Adjust for the delay between your computer and an external device by choosing Final Cut Pro > System Settings and selecting the Playback Control tab. On this tab, you’ll see the Frame Offset setting. (Frame Offset is only active when Final Cut Pro is handling real-time effects.)
The default value is 4, but Frame Offset can be any whole number between 0 and 30. Set a value that compensates for any delay in your setup. For example, if your video monitor shows your program six frames later than your computer display, a Frame Offset value of 6 will synchronize the two.
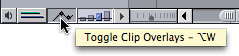
Toggling Audio Waveforms
Waveforms display visually the volume of your audio. Here’s how to turn them on or off.
The keyboard shortcut to show, or hide, audio waveforms in the Timeline is Option+Command+W. This toggles waveform display on or off.
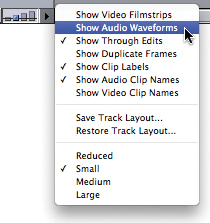
Displaying audio waveforms in your Timeline takes time because Final Cut Pro must redraw them on your screen. This means that when you are working with longer and longer sequences, every time you zoom the Timeline, or scroll it to a different position, audio waveforms will need time to redraw.
So when you’re not editing audio, or if you’re displaying a very large sequence, screen redraws will take place faster with waveforms turned off.
Extra Credit
You can also toggle audio waveforms on or off with the mouse by clicking the small, right-pointing arrow next to the bar chart at the bottom left of the Timeline and selecting the option from the pop-up menu.
Note
Toggling waveforms on or off has no effect on audio quality.
Sync Audio to Video in Real Time
Here’s a fast way to sync sound to picture.
They shot double system—your audio is in one file and the video is in another. They didn’t use clapper slates, so you can’t line up the clapper slate video with the sound of the clapper in the audio. “You can fix it in post,” they said.
Here’s how to marry up the audio between the two files—in real time:
1. Select the clip, audio or video, that you want to move; generally, we slip the audio clip. (Press the Option key to select just the audio clip.)
2. Select the Slip tool by pressing S.
3. Mark In and Out points in the Timeline that includes a good sync point, like a hand clap or something dropping—in other words, something that generates a sharp sound.
Extra Credit
You can also use the period and comma keys, or Shift-period and Shift-comma to move the clip.
4. Select View > Loop Playback (or press Control+L).
5. Press Shift+ to play from the In to the Out point. The selected range loops playback while you adjust the position of the audio.
6. Press [ and ] to slip the selected clip one frame at a time until the audio and video are in sync. Press Shift+[ or Shift+] to slip five frames at a time.
Note
It’s a good idea to use Clip markers to keep track of where you started.
It’s Becoming Visible
What’s the difference between the green visibility light and the Mute/Solo buttons?
Ever wonder why both these sets of buttons exist on the left of the Timeline? Well, it’s because they do different things. The green visibility lights permanently affect output. If the light is on (green), the track will play back and output normally. If the light is dark, the track acts as though it’s invisible. Clips on invisible tracks don’t output to tape, export, render, or play back during editing.
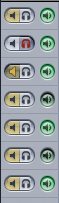
Changing the status of one of these lights permanently deletes all render files associated with that track. (Yes, you can get them back with an Undo—and there is a warning message—but aside from that, the deletion is permanent.)
Note
Can’t see the Mute or Solo buttons? Click the tiny, little speaker icon in the extreme lower-left corner of the Timeline.
The Mute and Solo buttons are only temporary for editing playback purposes. They don’t affect output or export or render files. Click the Mute button (the speaker icon) to make an audio track inaudible. Click the Solo button (the headset icon) to make every track except the track(s) soloed inaudible.
You can mute or solo as many different tracks as you need. If you forget to turn one of these buttons off, that track will still export with your project.
Extra Credit
Try Option-clicking one of the green visibility lights. This is a very fast way to turn all other tracks off, or turn them all on again.
More on Mute and Solo Audio Buttons
The Mute and Solo buttons make tracks audible or inaudible.
Yes, you can turn off, or on, the green visibility lights to the left of the Timeline to make an audio track inaudible. You can also choose Modify > Clip Enable. But whenever you change these green lights, they delete all render files associated with the clips on that track.
That’s because you’re making a permanent change to the output settings for that sequence. Render files are associated with the sequence, not the clips in the sequence.
Extra Credit
Pressing Option while clicking the Mute (or Solo) button quickly turns all Mute (or Solo) buttons on or off. This is a fast way to reset these settings.
However, the Mute and Solo buttons only affect playback settings during editing. Since they don’t permanently change output settings, no render files are lost.
To mute all the clips on a track, click the small speaker button.
To solo all clips on a track, click the small headset button.
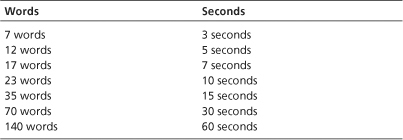
Counting Words to Estimate Voice-Over Timing
This chart helps you figure out how long a script will take to read.
Gregory Ikens sent me this tip. The following word count timings can assist you in determining how many words will comfortably fit within a specified amount of time in a spot. This guide assumes a “normal” rate of speech (neither fast nor slow) and a basic “announcer” read.
Note that for phone numbers, each spoken number equals one word (i.e., 1-877-000-0000 = 11 words).
WORD COUNT TIMINGS
Shortcut to Solo a Track
Here’s a fast way to solo an entire audio track with one keyboard shortcut.
Soloing is the process of making all audio tracks inaudible except the one you solo. You can do this with the Mute and Solo buttons, as already discussed, but here’s a fast way to do it with a keyboard shortcut.
Note
Using this keyboard shortcut does not change the Mute and Solo indicators on the left side of the Timeline.
Select a clip in the track you want to solo (that is, the tracks you want to hear) and press Control+S. This is similar to turning off clip visibility for a video clip (Control+B).
Note
This also makes any linked video clips invisible.
To toggle everything back to normal, select something in the same track and press Control+S again.
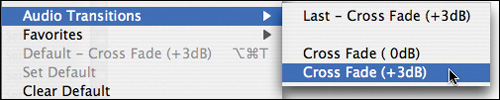
Picking the Best Audio Transition
0 dB or +3 dB Cross-Fade—which is better?
Final Cut Pro has a vast plethora of visual transitions... and exactly two transitions for audio. Both of these audio transitions have names. The 0 dB transition is called Equal Power, while the +3 dB transition is called Equal Gain. Here’s how to pick.
Extra Credit
Final Cut Pro has two audio transitions, but Soundtrack Pro has four. Even better, you can change the transition shape at each end of the clip. For most purposes, these two in Final Cut Pro will be fine. But for greater control, Soundtrack Pro is the better choice.
Audio gain, also called audio level, is logarithmic—as volume increases it has the shape of a hockey stick, not a straight line. When you cross-fade between two clips, if you don’t compensate for this, there will be a slight decrease in audio gain in the middle of the cross-fade. Specifically, the audio level drops 3 dB.
So, if you’re dissolving from one audio clip to the next, and both have fairly constant levels of sound (such as machine noise or enthusiastic crickets), use the +3 dB cross-fade to smooth out the levels and make the transition seamless.
Note
It’s because of the logarithmic nature of audio gain that when we use keyframes to set clip audio levels using the red bands in the Timeline, the lines between audio keyframes are curved. This is also the reason we can’t add Beziér curves to audio keyframes.
If you’re fading to or from black, you will probably find that the 0 dB cross-fade sounds the smoothest.
That Hidden Voice Over Tool
The Voice Over tool in Final Cut Pro helps you make quick recordings.
Built into Final Cut Pro is a voice-over recorder. This is a great tool for recording narration scratch tracks or quick reports in the field. To use it:
1. Set In and Out points in your Timeline where you want the new recording to go.
2. Select Tools > Voice Over (press Option+0).
3. Set your audio source using the Source and Input pop-ups.
4. If you are using headsets, check Sound Cues; otherwise deselect this option to keep your audio clean. (Sound cues are audible beeps that help you time your reading.)
5. Click the red Record button to start recording. The tool counts you down to the In point and then again to the Out. During recording it plays your sequence so you can watch what you are talking about.
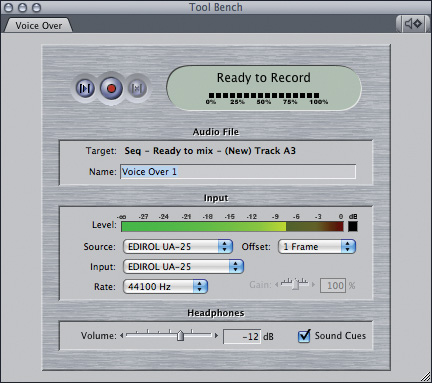
Note
The Voice Over tool records several seconds before and one second after the In and Out points. That way, in case you blew the cue your complete audio is still recorded.
Final Cut puts the audio file between the In and Out points on the first open audio track in your project.
Extra Credit
Ever wonder where those voice-over recordings are stored? Well, you can find them in your scratch disk—specifically, in your Capture Scratch folder in the folder named after your project. The path is... Final Cut Pro Documents > Capture Scratch > Project folder > [Voice-Over Recording File].
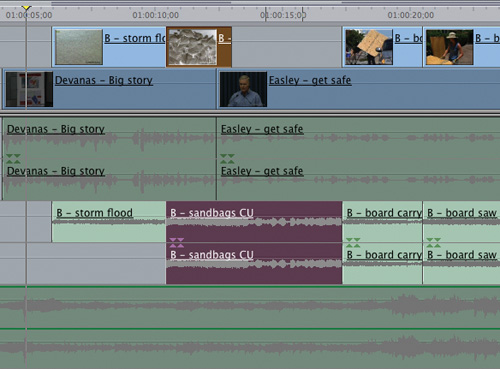
Checkerboard Your Audio Clips
You have to edit your clips into the Timeline someplace—why not edit them in an organized fashion?
Audio checkerboarding is the process of putting similar clips on the same track. The benefit to checkerboarding is that, while Final Cut Pro doesn’t particularly care which tracks your clips are on, ProTools and Soundtrack Pro care a lot. For this reason, get into the habit of following the same organizational structure for your audio clips.
Extra Credit
If you don’t have a particular audio source, such as sound effects, simply move the lower tracks higher. But keep this stacking order intact.
There are three benefits to this:
1. You’ll never need to invent a new system. You’ll know exactly how you structured your audio even on projects that are several years old.
2. Your audio will be laid out properly for transfer to ProTools or Soundtrack Pro, if you need a professional mix.
3. This system fits well with the way Final Cut Pro works.
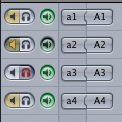
Here’s the layout:
• A1 & A2: Sync sound linked to the video clips on V1. This is the audio from your main speaker, the main talking head.
• A3 & A4: Sync sound linked to the B-roll on V2; natural sound.
• A5: Narrator. The narrator only needs one track because they have only one voice.
• A6–A8: Sound effects. These are wild sounds, not linked to any track. (Wild means not synced to video. That doesn’t mean they are placed haphazardly.)
• A9 & A10: Music cue #1.
• A11 & A12: Music cue #2. Alternating music cues between tracks allows you to easily control the speed of fade-ins and fade-outs independently.
Setting Audio Levels
There’s no one perfect set of levels, but these are a good place to start.
Camera people like arguing about cameras. Lighting people like arguing about lights. And audio people really like, ah, “discussing” audio levels. Different programs are mixed to different levels, and there’s plenty of room for disagreement.
Note
How quiet your audio goes is an aesthetic decision you get to make. Just remember that at no time can your audio levels exceed 0 dB.
Mixing to the right audio levels is critical to the sound of your project. Over the years, I’ve taught this system and it works. If you’re given specific written instructions on how to mix your project, please follow them. If not, use these:
• Rule 1: Audio levels must not, ever, for any reason, exceed 0 dB.
• Rule 2: Reread Rule #1.
• Rule 3: Audio levels should be as loud as possible, without violating Rule #1.
Note
Exceeding 0 dB is indicated on your VU meters by red clip lights at the top of the meter. Clipping creates distortion, which makes your audio sound awful. Always avoid distortion and keep your levels below 0 dB.
Audio levels are additive. The more audio clips that are playing at the same time, the louder your total audio will be. Given that fact, here are the levels I mix to.
GUIDELINE FOR AUDIO MIXING
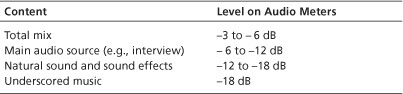
The only level that’s critical is the Total Mix. I use these other levels to roughly adjust my audio during editing. Then, I use my good speakers, my good ears, and my good common sense to tweak all these settings to make it all sound right, within the range of the Total Mix.
No Red Lights
Final Cut Pro has three technical settings that you must get right. Audio levels are one of them...
... and the other two are white levels and chroma levels. You’ll learn about those in the next chapter.
In this chapter, though, we are talking about audio.
![]()
In Final Cut, all audio levels are clip-based. That is, you set levels individually for each clip. By contrast, professional audio mixing software, such as Soundtrack Pro or ProTools, sets audio levels by track, not clip.
In the last Power Skill you learned that the number one rule for audio is that levels must not exceed 0 dB. We have many ways of measuring audio. Final Cut’s audio meters use the dBFS (Decibel Full Scale) method, which is typically used in digital audio. The good thing about this scale is that it consistently, and reliably, measures audio levels. The bad thing is that any audio that exceeds 0 dB is thrown away. Lost. Destroyed.
The result of losing this audio is distortion. In an analog system, distortion has a nice buzz that sounds good on guitars. In a digital environment, distortion pops, clicks, crackles, and gives the same feeling as fingernails scraping across a blackboard.
Worse, if you output or export distorted audio there is not a technology on the planet that can fix it. The data is lost; your audio has been permanently destroyed.
To prevent this problem, pay attention to your levels and always keep them below 0 dB.
Note
Audio levels are measured by the audio meter. If the red clip indicators at the top of the meter light, as shown here, your audio is too loud (this is also known as audio that is too “hot”). Adjust the audio levels of your clips to make sure the red indicators never light.
Boosting Low Audio: Method 1
Here’s a quick tip to boost soft audio.
This trick has been around for a long time because it works (though, as you’ll see next, more recent versions of Final Cut offer an easier way).
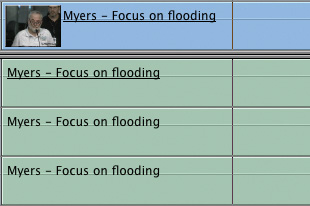
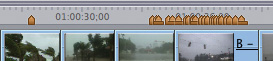
If you have an audio clip that was recorded at too low a level, simply cranking up the volume won’t give you the loudness you’re looking for. Instead, try “stacking” the audio clip(s) to bring up the overall volume level. The easiest way to do this is to Shift+Option-drag the audio clip you want to improve.
In the screen shot, notice how the upper clip is underlined, meaning it’s linked to the video clip. The other two copies are not, meaning they are copies of the linked clip. Holding the Shift key constrains movement so the clip doesn’t shift from side to side, creating an echo effect.
Note
Recently, Apple added a Normalize command that does a better job. The next Power Skill talks about that.
Boosting Low Audio: Method 2
Normalizing audio is faster than duplicating clips and does a safer job.
Remember Rule #1—that audio levels must never exceed 0 dB?
Well, if you’re raising or lowering volume levels, or duplicating clips to make audio levels louder, there’s nothing to prevent you from pushing the gain so hard (translation: “raising the audio level to such an amount”) that your audio distorts.
Note
Final Cut Pro applies a Gain filter to each clip, which is why you don’t see the waveforms change, as you’d expect.
This would be bad.
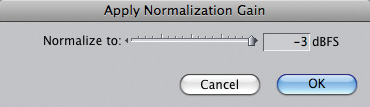
Recent versions of Final Cut Pro added a new feature: normalization. Normalization is defined as raising the level of the entire audio clip by the same amount so that the loudest portion of the clip does not exceed the level that you specify.
Normalization is designed so that it’s impossible for your clip to distort. This means you can quickly raise the level of an entire range of clips so they all have the same level without worry. Here’s how:
1. Select all the audio clips you want to normalize. Generally, you only normalize talking head audio. I recommend against normalizing sound effects or music.
2. Select Modify > Audio > Apply Normalization Gain.
3. Here’s the tricky part:
• If the clips you are normalizing are the only clips playing at that moment in your sequence, for example, and there are no sound effects or music playing at the same time, normalize to −3 dBFS.
• If the clips you are normalizing are part of a mix, with many clips playing at once, then normalize to − 4.5 dBFS. This lower level allows room in the mix for other audio to be heard.
4. Click OK, and almost instantly the levels of all your selected clips are normalized to the same level.
Changing Audio Levels Fast!
This keyboard shortcut lets you change audio levels in the Timeline.
Here’s a quick way to adjust audio levels using only the keyboard:
1. Select the clip, or clips, you want to adjust. (You can even do this for clips on multiple tracks.)
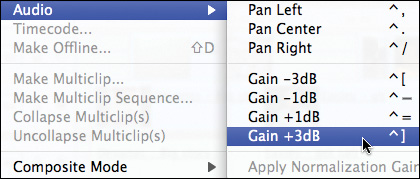
2. Press one of the following four keyboard shortcuts:
Raise audio levels +3 dB Control+]
Raise audio levels +1 dB Control+=
Lower audio levels −1 dB Control+−
Lower audio levels −3 dB Control+[
Note
Remember, after adjusting levels listen to your clips and watch the audio meters to be sure your levels aren’t too loud.
Changing Audio Levels Faster!
Here’s another quick way to adjust the audio levels of multiple clips.
The last Power Skill used keyboard shortcuts; this one uses a menu:
1. Select the audio clips whose level you want to adjust.
2. Choose Modify > Level (or press Option+Command+L).
3. Select Relative if you want to adjust the levels of each clip based on the current settings of the clip. Select Absolute if you want to set the level of all clips to the same setting, regardless of where the audio is set now.
4. Enter the amount you want to change the audio (negative numbers make sounds quieter; positive numbers make it louder).
5. Click OK.

Note
This is a good way to drop the level of all the selected clips, such as sound effects, in a sequence by the same amount.
In general, the Relative setting should be tried first.
One More Way to Adjust Levels
Just in case you were wondering...
You can also adjust audio levels directly in the Timeline. To turn on Timeline audio levels, click the small black mountain range in the lower-left corner (Apple calls this the Clip Overlay button).
This displays red rubber bands over all your audio clips. Drag the rubber bands up or down to set levels for each clip.
Extra Credit
You can also adjust audio levels for a clip in the Viewer by double-clicking a timeline clip to load it into the Viewer, then dragging the red rubber band; adjusting the Level slider; or entering a value in the Level data entry box.
This is the audio level setting technique that I use the most.
Note
You can use the Pen tool (press P) to set keyframes for these audio levels.
Locate Audio Levels That Are Too Loud
Here’s how to spot problems.
Remember Rule #1: Audio levels in Final Cut should never go above 0 dB. The red clip lights in the audio meters must not glow. But how can you be sure without listening to your sequence over and over?
Note
The cool thing about this technique is that you see your audio problems instantly, and the audio markers are easily cleared from the Timeline without disturbing your other markers.
Here’s a quick way to check your sequence.
1. Either select the Timeline containing your sequence or drag the sequence from the Browser into the Viewer.
2. Choose Mark > Audio Peaks > Mark.
3. Final Cut quickly scans your sequence and puts either an orange (Final Cut Pro 7) or a green marker (Final Cut Pro 6) wherever it finds audio levels that are too loud.
4. These markers are stored in the sequence. If it isn’t already in the Timeline, open the sequence in the Timeline.
5. Press Shift+M or Option+M to jump from marker to marker and adjust the audio levels accordingly.
6. To delete all these audio markers in the Timeline, choose Mark > Audio Peaks > Clear.
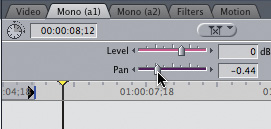
What Do Pan Numbers Mean?
Panning adjusts the amount of audio that comes out of the left or right speaker.
Panning determines the balance between sounds coming out the left speaker and the right speaker. As you know, there are two types of audio clips inside Final Cut Pro: stereo and mono.
A stereo clip consists of two linked clips stored on two separate tracks. (Final Cut always places multitrack audio on separate tracks.) The top clip, the left channel, plays exclusively from the left speaker. The bottom clip, the right channel, plays exclusively from the right speaker. The audio levels between the two clips are linked, meaning that if you adjust one clip, the other side adjusts by the same amount. A stereo clip is indicated by the two small green “bowties” pointing between the two tracks.
A mono clip consists of at least one track of audio. By default, a mono track plays equally from both the left and right speaker (we call this “panned center”).
For a stereo clip:
• A Pan setting of −1 means the left channel comes out the left speaker and the right channel comes out the right speaker—the channels are normal.
• A Pan setting of 0 means both channels emanate equally from both speakers—thus giving the illusion of all audio placed in the center.
• A Pan setting of +1 means the left channel comes out the right speaker and the right channel comes out the left speaker—the channels cross.
Note
Both stereo and mono audio tracks can be synced to a video clip. The audio setting has no effect on sync.
For a mono clip:
• A Pan setting of −1 means the track comes exclusively out the left speaker.
• A Pan setting of 0 means the track comes equally out both left and right speakers.
• A Pan setting of +1 means the track comes exclusively out the right speaker.
Sliding the Pan setting between these extremes moves your sound around the sonic field between the two speakers.
The Quickest Way to Pan Audio for Multiple Clips
Blindingly fast, super easy.
In Final Cut Pro, you can only incrementally adjust Pan settings clip by clip.

However, here’s a neat trick to shift the pan absolutely to the full left, right, or center for a single clip or group of clips.
Note
If you looked at your keyboard and discovered that the comma key is on the left, the period key is in the middle, and the slash key is on the right, give yourself a gold star.
Open your sequence in the Timeline and select all the clips you want to pan to one side. Then choose Modify > Audio and then select:
• Pan Left (or press Control+,) to pan all select clips fully to the left.
• Pan Center (or press Control+.) to pan all select clips fully to the center.
• Pan Right (or press Control+/) to pan all select clips fully to the right.
Mixed Panning on Multiple Clips
Here’s a fast way to adjust Pan or Gain across a selection of clips.
All audio settings in Final Cut Pro are clip based. This is both a great strength, because working with individual clips is easy, and a serious weakness, because working with lots of individual clips is time-consuming.
Unless you know this trick...
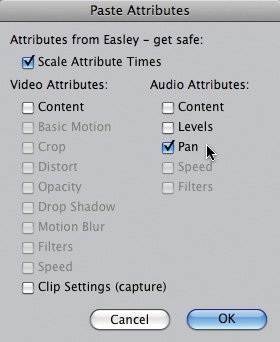
Once you have the audio mix set for one clip that you want to apply equally to other clips, select the clip with the correct settings and then choose Edit > Copy (or press Command+C) to copy the attributes of the clip.
Next, select the clips you want to apply these audio settings to and choose Edit > Paste Attributes (or press Option+V), select the Pan check box under Audio Attributes, and then click OK.
Extra Credit
You can use the same technique of pasting attributes to set matching audio levels across multiple clips. Just remember to select the Levels check box in Paste Attributes.
Discover the Final Cut Pro Audio Mixer
Did you know there’s an audio mixer buried in Final Cut Pro?
Final Cut has an audio mixer complete with audio meters, level sliders, and pan controls hidden in it that can greatly simplify mixing your projects. The only problem is that it’s hidden.
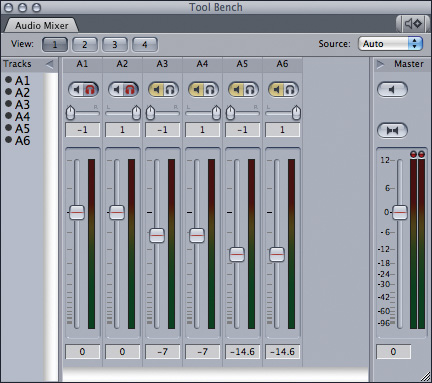
To access the mixer you can select Tools > Audio Mixer, which places the mixer on top of the Viewer. But a much better way is to choose Window > Arrange > Audio Mixing because this rearranges all your windows to make room for the mixer.
The benefit to using the mixer is that you can adjust levels in real time, which you can’t do when adjusting the red rubber bands. With the mixer, you can mix sound on the fly like you would with a mixing board!
Note
The Mute and Solo buttons are duplicated from the side of the Timeline into the top of the Mixer. They work exactly the same way.
Automatically Record Audio-Level Keyframes
Tired of creating audio keyframes by hand? You don’t have to!
The greatest strength in using the audio mixer is almost impossible to find. It has the ability to automatically record audio-level keyframes in real time during playback!
1. Choose Window > Arrange > Audio Mixing.

Extra Credit
You can adjust, move, and delete any keyframes recorded this way the same as always—by grabbing them in the Timeline with your mouse and moving them, or by using the Pen tool.
2. In the top-right corner of the audio mixer is a gray button with a speaker and a diamond keyframe icon. When you click it (so it turns green), auto-keyframing is turned on.
3. Play your sequence and move the audio sliders in the mixer as you listen to your project. Final Cut automatically records keyframes based on how you move the sliders.
Note
Final Cut Pro also supports using external control surfaces for mixing. Similar to a traditional mixer, but connected to the computer, you can move faders and dials on the control surface to mix your audio in Final Cut. The Mackie Control Universal Pro (www.mackie.com) is probably the best known of these control surfaces.
4. To turn off auto-keyframing, click the button again so it goes gray.
Being able to hear your mix while mixing it is a great time-saver!
The Hidden Value of Mixdown
When nesting sequences, this is an essential audio step.
Final Cut Pro allows up to eight levels of nesting, or putting sequences inside other sequences. However, when you nest your audio Final Cut sometimes gets confused, resulting in missing audio or bad audio levels.
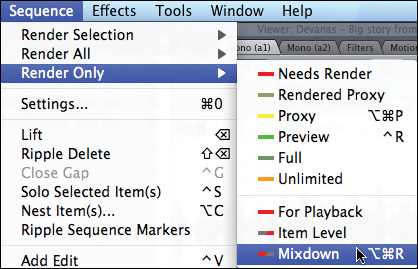
Whenever you start creating nests composed of both audio and video, make a point to select Sequence > Render Only > Mixdown (or press Option+Command+R).
What this does is mix all the audio in all sequences into a single stereo pair. This reduces the load on the processor and results in cleaner audio playback.
Extra Credit
Feel free to use Mixdown whenever you have lots of audio tracks in a project, even if you don’t nest. Mixdown will always result in smoother playback.
Note
Mixdowns are temporary. If you change any audio clips or settings, all existing mixdown files are automatically deleted. There’s nothing you need to manage—Final Cut Pro does it for you.
Adjusting Audio Filters in Real Time
Setting audio filter parameters during playback is easy.
Is there an audio filter you want to try, but you’re not sure of the best setting to use?
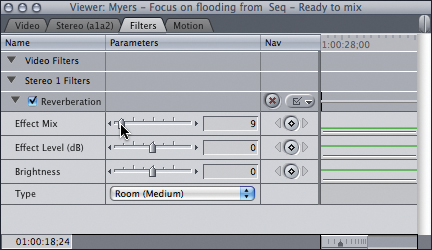
Well, this is a great way to experiment—in real time:
1. For better audio “visibility,” press Option+Command+W to see the waveforms for your audio clip.
2. Select the clip and choose Effects > Audio Filters > Final Cut Pro > Reverberation (or whatever effect you want to apply to the clip).
Note
Given a choice, I prefer the quality of audio filters from the Final Cut Pro group rather than those from Apple. However, if I have the time, I will always do significant audio processing in Soundtrack Pro, which has far superior audio filters and controls compared to Final Cut Pro.
3. Set In and Out points to represent the duration you want to review.
4. Double-click the clip to load it into the Viewer and click the Filters tab.
5. Choose View > Loop Playback and make sure Loop Playback has a check mark beside it.
6. Press Shift+ to start your sequence. Adjust the effect parameters of your choice in the Viewer, in real time, while listening to your clip.
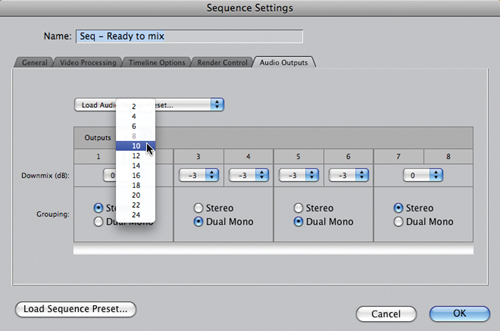
Creating Multiple Track Audio Output
Final Cut Pro supports up to 24 audio tracks for output.
By default, Final Cut creates a single stereo pair for audio output of our finished projects. However, Final Cut allows us to create up to 24 discrete tracks for audio output using Sequence > Settings > Audio Outputs. In this example, I’ve switched from the default setting of stereo (2 tracks) to 8 tracks for output.
Note
A good example of when to use multichannel output is when you need to output a finished mix as stems, where the dialogue is on one stereo pair, effects on a second stereo pair, and music on a third stereo pair.
Final Cut always creates audio output tracks in pairs. Once you’ve set the number of tracks in this dialog box, you also need to set whether each track is a stereo pair or a dual-channel mono.
Note
Notice how the level setting changes in this dialog box depending on whether you are outputting stereo or dual-channel mono. This 3 dB setting change is correct and compensates for the differences in the combined signal strength of a stereo pair versus individual tracks. My suggestion is to leave these settings alone.
When you click OK, a dialog box pops up asking if you want to downmix. This means that you will output multiple tracks, but monitor them during editing as a single stereo pair. If you don’t have multichannel hardware to hear all these tracks, downmixing is a good idea.
Once you’ve created the number of output tracks you need, you still must assign each Final Cut Pro audio track to an output—which you’ll learn in the next Power Skill.
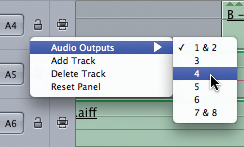
Assigning Tracks to Audio Channels
For multichannel output, you need to assign each track to an output channel.
Once we set up multiple track output, we now need to assign each audio track in the Timeline to a specific output channel. Finding this setting, however, is completely unintuitive.
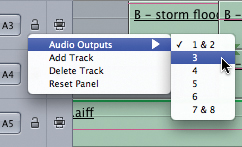
Control-click in the gray area between the audio patch and the track lock for each track. There’s no yellow tool tip to warn you; you just do this on faith.
From the pop-up menu, select Audio Output, then select the output channel(s) you want to assign that track to. This pop-up menu changes depending on how you configure the Audio Output settings we showed you in the last Power Skill.
Note
Final Cut Pro does not allow you to assign the same track to more than one output. If you need to do that, you have to move your project over to Soundtrack Pro for mixing. You can, however, assign multiple audio tracks to the same output.
Can’t Hear Audio on Even-Numbered Tracks?
It’s simply a setting in the wrong place.
Peter Koeleman sent me this tip. He was having a problem with hearing the audio on even tracks (2, 4, 6,...), no matter which camera he used.
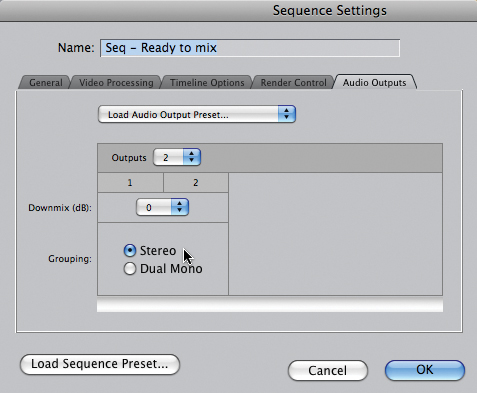
Peter determined that it was simply a sequence setting that was incorrectly set to Mono. To fix this, he says, simply choose Sequence > Settings > Audio Output > Stereo. To get the output you expect, be sure Outputs is set to 2 tracks and Grouping is set to Stereo.
It’s great to hear what you were missing.
Creating Split Track Audio
Here’s how to create a split-track audio output from Final Cut Pro.
If you need to create split track audio where, say, dialogue is on the odd track with music and effects on the even track (which simplifies dialogue editing, or for news archiving), Final Cut makes it easy:
1. Open the sequence you want to change.
Extra Credit
If you plan to do this on a regular basis, you can make this a preference setting so that every new sequence is configured this way. The Power Skill on the next page shows you how.
2. Choose Sequence > Settings > Audio Output.
3. From the pop-up menu, select the number of tracks you need to output.
4. Set each track to Dual Mono, which pans both tracks center, as opposed to the default setting of Stereo. (By the way, the gain reduction on each track of −3 dB is appropriate and should be left alone.)
5. Output your sequence.
Resetting Multiple Audio Outputs
Resetting audio output tracks is time-consuming, unless...
Shane Ross sent me this tip. Let’s say you have a source file with eight tracks of audio, and you mapped a1 and a2 to A7 and A8 on the Timeline, and a5 is pointing to A6... In other words, the track assignments are all over the place.

To get your tracks back to the proper order could take dozens of clicks; which is very time consuming! But you can just Control-click in the gray area anywhere in the left side of the Timeline and select the Reset Panel option.
Note
This same pop-up menu allows you add and delete tracks as well. There is all kinds of hidden stuff in this application.
All audio outputs pop back into order, and everything is properly connected.
Changing Preferences for Split Track Audio
You can modify preferences to create multichannel audio.
So far, all our audio output changes are for individual sequences. But, if you need all your sequences to have the same value, it makes more sense to change this in preferences.

For example, to create split track audio where, say, dialogue is on the odd track with music and effects on the even track (or any other non-stereo track output), Final Cut’s Preferences make it possible. Here’s how:
1. Select Final Cut Pro > User Preferences > Audio Output.
2. Click the Duplicate button to make a copy of whatever sequence is highlighted. (Apple does not allow us to change their default Stereo Monitoring setting.)
3. Give the new setting a name and a description so you can remember what you did later.
4. Make the audio output changes you need.
5. When done, click OK, which saves the settings.
6. In the main preferences window, select the audio output setting you want to use for all new projects.
Note
There’s no limit to the number of different settings you can create. Keep in mind, however, that changing a preference affects only sequences which have not been created, not existing sequences.
Destructive or Nondestructive Audio Editing
How you Send an audio file makes a difference.
Destructive audio editing means you are changing the source audio file stored on your hard disk. Nondestructive audio editing means you are not changing the source audio file—either because you are working on a copy of it, or your changes are not permanently attached to the file.
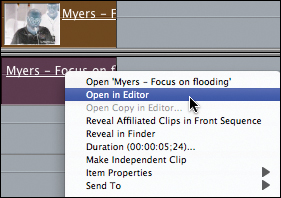
If you Control-click an audio clip and choose Send to Soundtrack Pro Audio File Project, you create a duplicate audio file using a name that you supply. When you open that file in Soundtrack Pro, you are doing nondestructive editing because the source clip on your hard disk does not change.
Note
Sending clips to a Soundtrack Pro Multitrack Project only sends pointers to files, which means your audio is edited and mixed non-destructively.
If you Control-click the clip and choose Open in Editor, Soundtrack Pro opens the source clip on your hard disk for editing, which makes all your changes destructive.
Note
Because of its destructive nature, I don’t like Soundtrack Pro scripts. Unless you pay close attention to a warning dialog box, it is very easy to destructively edit your source audio. If you make a mistake, you have permanently damaged your source audio and your only option is to recapture the clip.