
Chapter 4. Working in the Application
One thing that Apple is very proud of is the interface for Final Cut Pro. The word interface, however, covers a lot of territory. It’s what we work in for hours at a time. It’s how we interact with our project. And based on how well we understand it, it can determine whether we are happy or frustrated, productive or panicking.
This chapter is filled with dozens of Power Skills you can use to turn yourself into an interface master.
Change the Size of Text in the Browser and Timeline
We can’t change the font, but we can change the size. Here’s how.
It seems to be an unwritten rule in Apple’s interface guidelines that text needs to be so small and tasteful as to be almost unreadable.

Which is a real problem when you’re actually trying to read it.
Not to worry, though, there’s a fast solution to tiny text. Control-click in the gray area of the Name column of the Browser and change the text size from Small to Medium (my favorite) or Large.
The text changes size in both the Browser and Timeline. Sadly, this only affects Browser text and Timeline filenames. But even this goes a long way to reducing eyestrain.
Extra Credit
You can also change these settings by choosing Final Cut Pro > User Preferences, clicking the General tab, and using the Text Size pop-up menu.
Extra Credit
If you own Final Cut Pro 7, choose Tools > Timecode and celebrate that you can finally put your reading glasses away!
Note
Final Cut will remember these text size settings until you change them, or you trash your preferences.
Zooming the Timeline
Here’s a quick way to zoom the Timeline.
Everyone knows that Command+= zooms into and Command+− zooms out of the Timeline horizontally.

But what they really do is zoom the active window. (The active window is the window that’s currently selected.) This often means that when you press these keys and expect to zoom into the Timeline, instead the image in the Viewer explodes into fat pixels! What if you want to zoom into the Timeline and it isn’t active?
Extra Credit
In Final Cut Pro 7, there are two new hidden shortcuts, not assigned to any button or keystroke, that allow you to zoom into, or out of, the position of the playhead in the Timeline. To see them, choose Tools > Button List and search for “on playhead.” These are the two new choices. Skills later in this chapter illustrate how to create custom buttons or keyboard shortcuts for them.
What we need is another option. This is exactly what I have for you...
Press Option+= (Option and the equal key) to zoom into the Timeline. Press Option+- (Option and the minus key) to zoom out. These work whether or not the Timeline is selected.
Zooming Faster
There are more ways to zoom than you might expect. Here’s a new one.
So, Option-zooming isn’t fast enough for you?
Note
Don’t have a trackpad? Hmm... then read the next Power Skill.
Well, here’s a faster way to zoom into anything—if you have the latest version of Final Cut Studio and a late-model laptop that supports multi-touch gestures.
You can use gestures to zoom in and out:
• Pinch two fingers together on the trackpad to zoom in.
• Spread two fingers apart to zoom out.
The Two Fastest Ways to Zoom
These two keyboard shortcuts do a blindingly fast za-za-zoom.
I use these two keyboard shortcuts constantly:
• To compress or expand the contents of any window to fill the window, press Shift+Z.
• To compress or expand any selected area of your sequence to fill the Timeline window, press Shift+Option+Z.

These are flat-out the two fastest ways to zoom in and out that I’ve ever discovered. Wow!
Extra Credit
Shift+Option+Z is a great way to zoom into a transition or just a small group of clips. Just select what you want to magnify and press the magic keys.
Vertical Movement
The ability to scroll vertically is built in, but that doesn’t mean it’s easy to find.
There are multiple ways to scroll vertically in the Timeline in Final Cut Pro. Choose your favorite!
• If your mouse has a scroll wheel, place the cursor in the middle of the Timeline and roll the wheel up or down.
• Drag either of the blue scroll bars, one for video and one for audio, up or down at the right side of the Timeline.
• Use the up and down arrows at the right side of the Timeline.
• Although not technically scrolling, you can grab the heavy, gray bar in the middle of the Timeline and drag it up or down to reveal more or less of either the video or audio tracks.

Extra Credit
Press H to select the Hand tool. You can drag vertically or horizontally in the Timeline to move. This is the only tool that allows you to move both horizontally and vertically at the same time.
Image Quality in the Viewer vs. the Canvas
The two windows don’t display the same quality—here’s why.
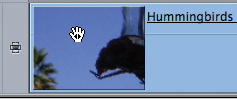
Ever wonder why the same image in the Viewer and the Canvas doesn’t look the same?
The image in the Viewer is displayed in its source resolution. The image in the Canvas is displayed based on the codec you’ve selected for the sequence.
For instance, in this illustration both images are the same TIFF and displayed in both monitors at 50 percent. The sequence is set to DV NSTC 4:3, which, when displayed in the Canvas, definitely has less detail than the source image in the Viewer. This illustrates how the choice of a video codec impacts the detail in your finished sequence.

Monitor Your Video Full Screen
Turn your computer monitor into a full-screen video monitor.
First, a very important warning: Using your computer monitor to make color decisions about video can be dangerous because the color, black, mid-tone gray, and white levels of your computer monitor don’t match a video monitor.
Extra Credit
All the keyboard shortcuts you use in the Timeline also work in full-screen mode: J, K, L, Up/Down arrow keys, Left/Right arrow keys, and so on.
Given that, there are many times where we want to look more closely at our images. As Academy Award–winning film editor/sound designer Walter Murch once said, “We look at television, we look into film.”
Note
While this technique works for both SD and HD video, SD will look really grainy when enlarged to fill a large computer screen.
As our images move from SD to HD, there’s more detail to examine, and the small Viewer and Canvas screens in Final Cut Pro don’t make that detail easy to see.
Note
If you have two computer monitors, you’ll see other choices in the View > Video Playback menu: Preview and Raw. Preview displays video on the second monitor and scales it to fill the screen. Raw displays the video on the second monitor and displays its pixels accurately without scaling, which means it may not fill the frame, or it may be so large you can’t see the entire image.
To turn on full-screen display, choose View > Video Playback > Digital Cinema Desktop Preview – Main.
Your screen will likely go black and you’ll think you’ve just destroyed everything. Not to panic! Press the spacebar and your Timeline will begin to play—full screen!
To switch back to Final Cut, press Esc. To toggle back to the full-screen display, press Command+F12. (If nothing happens, it’s because the operating system is messing with your keyboard shortcuts again. See page 23 in Chapter 1 to learn how to fix this.)

Remove Scroll Bars for Better Playback
Scroll bars cause choppy playback.
Final Cut allows you to zoom into the picture within both the Canvas and Viewer. While this is very helpful for effects work, it is not a good idea for playback.

Even with today’s fast machines, Final Cut has problems playing clips smoothly—especially HD clips—when you have scroll bars displayed in either the Canvas or the Viewer.
To solve this problem, select whichever window has scroll bars and press Shift+Z. This resets the image size so that it properly fills the window and makes the scroll bars disappear.
Get in the habit of pressing Shift+Z whenever you finish working with an enlarged image, and before starting playback.
Back to Square One
Here’s a keyboard shortcut that resets all your windows.
Are you one of those editors who constantly rearranges her window layout while editing? Do you yearn for a quick way to resize your windows back into a layout that makes sense?
Extra Credit
You could do the same thing by selecting Window > Arrange > Standard. But life is too short.
Shhh.... Here’s the secret: press Control+U. This shortcut automatically resets all your windows to the default layout.
Isn’t that convenient?
iChat Theater
Here’s a great way to collaborate on your project by sharing the video.
New with Final Cut Pro 7 is the ability to share your video with others via iChat. Apple calls this the iChat Theater. Here’s how it works:
1. Start iChat.
2. Connect to the person you want to collaborate with. The person at the other end needs a camera-equipped system. This technique won’t work if the other person has only audio.
3. Switch back to Final Cut.
4. Load the sequence you want to have that person view.
5. Select View > iChat Theater > Start Sharing. Starting playing your sequence. The other person will see and hear your sequence play on her system, while you will see and hear her. Your video will also appear in a small window in your iChat screen.
6. Navigate around your Timeline as normal; the other person will see everything that’s displayed on your Canvas. However, she won’t see you until you select View > iChat Theater > Stop Sharing.

Extra Credit
To display the sequence timecode as part of the playback, select View > iChat Theater > Show Timecode.
Note
iChat Theater is for the Mac only (PCs are not supported). The Mac must be running OS X 10.5 or later and have video cameras installed; however, only the system originating the video needs to have Final Cut Studio (3).
Green Is Not Just for Stoplights
What those green buttons can show you.
On the left side of the Timeline is a series of green buttons, which I’ll call “green visibility lights.” There is one light for each track. These buttons are enormously powerful, but quite shy—they rarely tell us how much power they have.
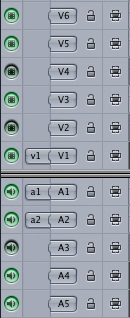
When a green light is lit, everything on that track is visible (or audible). When a green light is dark, everything on that track is invisible (or inaudible).
But the impact of these buttons is much deeper than this. These buttons control output and export. If the light is dark, nothing on that track will be seen, heard, rendered, output, or exported.
You can use these buttons in a variety of ways:
• To see a clip hidden below another clip
• To keep source audio files in the Timeline but only hear the final mix
• To switch between displaying, say, English title keys (on track 4) and Spanish title keys (on track 5)
• To display/hide clips that you move from one section of a sequence to another, as you figure out which clip you want to use
These visibility lights give you the power to control exactly what is displayed and what is hidden.
Note
When you change the visibility of a track, you lose your render files. (Yes, Final Cut warns you.) This is because render files are associated with the sequence, not the clip, and since you’re changing what is visible in the sequence, the render files need to change.
Visibility Lights and the Arrow Keys
Those green lights control more than audio and video.
Did you know that the visibility lights also have an effect on the behavior of the Up/Down arrow keys?

Normally, when the visibility lights are on, the video is visible, the audio is audible, and pressing the Up/Down arrow keys jumps to the next/previous edit point on every track.
However, when the visibility lights are off, the video on that track becomes invisible, the audio on that track becomes inaudible, and pressing the Up/Down arrow keys skips all edit points on the now-hidden track.
More Visibility Shortcuts
This keyboard shortcut quickly makes a clip invisible—or the opposite.
To quickly toggle clip visibility on and off, select the clip, or clips, you want to hide and press Control+B.

While you can hide an entire track using the green visibility lights, sometimes you only need to hide a clip or two. Also, this method means that you don’t lose your render files for an entire track, but just the render files for the clips you’re hiding, or revealing.
This is a handy trick for comparing cutaways, B-roll, or alternative shots by simply toggling their visibility.
Extra Credit
When you’re done comparing clips, because they’re all gathered on a single track, you can cut and paste the clips into another sequence labeled Unused Clips. That way, they’ll be handy in case you want them for later versions.
The Secrets of the Right-Pointing Arrow
It’s almost impossible to see... and equally impossible to live without.
A great deal of the look of the Timeline is controlled from an itty-bitty right-pointing arrow at the bottom of the Timeline. It is certainly not obvious, so look closely just to the right of the four-column track height bar chart.
![]()
Click the arrow and look at all the choices you have. Each of these is a toggle. Select, or deselect, each one and watch what happens.
Note
Some of these options have their own keyboard shortcut, but most don’t. Without knowing about this arrow, you couldn’t access many of these features.
Displaying Audio or Video Clip Names
Discover another use for that little arrow.
Remember that small, right-pointing arrow I just mentioned? Well, here’s why it’s nice to know.

Starting with Final Cut Pro 6.0.2, you can now toggle the display of audio or video clip names in the Timeline. This is useful when you’re trying to set audio levels or opacity keyframes and the clip name keeps getting in the way.
The only problem is that this toggle is darn near impossible to find.
At the bottom of the Timeline, just to the right of the small bar chart, is that tiny right-pointing arrow. Click it and check, or uncheck, the clip names you want to hide.
They can be turned back on by repeating this same process.
Extra Credit
You can also use this pop-up menu to turn on, or off, the display of audio waveforms in the Timeline.
Display a Filmstrip of Images in the Timeline
One mouse click and your Timeline displays your clip as a filmstrip of images.
Normally, the default display of the Timeline is a thumbnail image of the In point, followed by a bar of solid color. Most of the time this is fine for editing.
Note
Your Timeline images will look better the taller the track height. Also, the more you zoom into a clip, the more individual frames you’ll see.
But, every so often, it would be great to see more of the images contained in a clip. Showing them is easy but not intuitive. (Although by now, I suspect you know where to look.)
In the bottom of the Timeline is that small right-pointing arrow, just to the right of the bar chart that allows you to change the Timeline track height.
Click and hold the arrow until a pop-up menu appears. Select Show Video Filmstrips to display images of all your clips in the Timeline.

Displaying Source or Auxiliary Timecode
Here’s a fast way to switch your display between timecode tracks.
Every QuickTime video clip can have up to three timecode tracks. These tracks are called Source, Aux 1, and Aux 2.

Most of the time, your video files will only have one timecode track. Sometimes, though, you may need to have the same video clip relate to two different timecodes—for instance, the timecode of the video recorded by the camera, and the timecode of an audio track playing off a separate device for a music video. This process of recording on two different devices—one for video and one for audio—is called double-system recording.
By default, only the source timecode is displayed in the Viewer or the Timeline. However, you can change this with a mouse click. Here’s how:
Control-click the numbers inside the timecode box in the top-right corner of either the Viewer or Canvas. At the bottom of the pop-up menu you’ll be able to select between all the timecode tracks available in that clip.
Note
In order for this option to appear, the video clip must contain more than one timecode track. I say “video clip,” because, except for Broadcast WAV audio files, audio files don’t contain timecode. Chapter 3 shows how to add or change timecode.
Display Field Interlacing
By default, Final Cut Pro hides interlacing. Here’s how to turn it on.
Interlacing is a fact of life for NTSC, PAL, and some HD formats. The problem is that Final Cut Pro keeps it hidden—which is fine until you have a flicker problem or need to export a freeze frame. At that point, it would be great to see what the interlacing looks like.

Interlacing was invented back in the mid-1930s when TV was developed. It solved problems with video camera imaging and analog broadcast transmission. But, as we move into all-digital video editing, it drives us completely nuts.
An interlaced image displays every other video scan line (2-4-6-8...), then overlays it with the remaining scan lines (1-3-5-7-9...). The first field is called the even (or lower) field, because it contains all the even lines. The second field is called the odd (or upper) field, because, as you’ve probably guessed, it contains all the odd-numbered lines. They are shot and displayed a fraction of a second apart.
It’s that fraction of a second that causes the problem. If you have a rapidly moving object, this difference in time causes thin horizontal lines to radiate from all moving edges when you superimpose the earlier field on the later one.
To see interlacing, go to the rightmost of the three pop-up menus in the top center of the Viewer or Canvas and set the zoom percentage to 100%.
There’s nothing inherently wrong about interlacing—it’s a part of the video format. TV sets don’t show it at all. However, when viewing video on a computer monitor, interlacing can be very distracting, which is why Final Cut hides it in the first place.
Extra Credit
Don’t remove interlacing during your video edit; doing so will remove half your video resolution. The best time to remove interlacing is when you are compressing your finished movie for the Web. (See Chapter 8.)
Duplicating Browser Clips
Four tips to faster copies!
Here are four quick and easy ways to make a copy of a clip or sequence in the Browser:
• Control-click your clip(s), or sequence(s), and select Duplicate as New Master from the context menu.
• Select the clips(s) you want to duplicate, then choose Edit > Duplicate.
• Select the clips(s) you want to duplicate, then press Option+D.
• Grab the clip in the Browser, drag it up on top of the Name column header, and let go.
Instant duplication!

Extra Credit
You can also duplicate a clip by dragging it from the Browser of one project to the Browser of a second project.
Sorting Browser Columns
Ever wanted to reorganize the data in a Browser column?
The Final Cut Pro Browser is, at its core, a database. This means that sorting your data is easy—if you know where to click.
• To sort on any column, click the column name in the header of the column. This sorts everything in that column in ascending order. See the pointed triangle? That indicates the order of the sort.
• To sort in descending order, click the column header again.

Note
Final Cut remembers the sort order of every Browser column when you quit the application. The next time you open it, everything will be sorted the same way.
Sorting Out Multiple Issues
You can sort on more than one column in the Browser—here’s how.
The Browser is a database. This means we can search for stuff, examine stuff, and sort on stuff. (Stuff is, as you know, a technical term that means a “collection of somewhat related material that never contains exactly what you are looking for.”)

Maybe you want to group all your media by Reel ID, then sort it alphabetically by clip name. Or group all the good takes by day shot.
You can. As you just learned, to sort on a column you click the header of the column. But to sort on two columns, you need to know the secret handshake: the Shift key.
Click the first column you want to sort. It sorts alphabetically, with a small arrow on the right in the header indicating the direction of the sort. Then, hold the Shift key and click the second column header. Now you’re sorting by two columns. Both columns now have arrows indicating the direction of the sort.
To change the sort in either column from ascending to descending, click the appropriate column header again. To cancel the sort, click any column header except one of the two columns you are sorting.
Note
Final Cut Pro 7 allows sorting on at least three columns.
Here, for instance, I’m sorting first on Reel ID (it’s highlighted with a down-pointing arrow), then by File Name (it also has an arrow).
Extra Credit
To make it easier to sort on two widely separated columns, grab a column header and drag it to move the columns closer together.
A Faster Way to Move Columns
Here’s a neat trick for moving columns in the Browser.
The Browser displays 37 columns. And, if you know where to look, there are another 30 columns hidden not too far away.

A column that I find useful, especially when capturing material, is the Reel ID. However, it’s buried way out in the wilderness of the Browser.
Here’s a fast way to move it, or any other column:
1. Scroll over to the Reel ID column.
2. Control-click the column header and select Hide Column.
3. Scroll to where you want that column to appear.
4. Control-click the column header that you want on the right of the moved column. (In our example, to put the Reel ID column to the left of the Duration column, we click the Duration column header.)
5. Select the name of the column you just hid from the pop-up menu; in our example, it’s Reel ID.
Poof! The new column is instantly displayed to the left of the column header you just clicked.
Extra Credit
To display any one of the 30 hidden columns, Control-click any column header and select it from the pop-up menu. You can also use this menu to hide any column.
Customize Browser Columns
You can customize Browser columns—discover how here.
Final Cut Pro allows you to rename any Browser column heading that has the word Comment in the heading. Four of these (Master Comment 1, Master Comment 2, Comment A, and Comment B) are easy to find—just scroll to the right in the Browser.

You can also display two more hidden comment fields (Master Comment 3 and Master Comment 4) by Control-clicking any column heading except the Name column.
Extra Credit
Should you press Enter on the keypad or Return on the keyboard? I’ve discovered that for locking in the contents of a field, using the Enter key works more reliably, as the two keys are not always programmed the same. The good news is that both laptops and standard keyboards contain an Enter key. I recommend using it.
To rename any of these column headers, Control-click the header and select Edit Column Name. Double-click the highlighted column name to select it, type the new name, and press Enter to lock it in.
Searching Browser Columns
The best thing about a database is searchability. The Browser has it, too!
Looking for something in an overcrowded Browser?

To find the information you want:
1 Select the Browser (or press Command+4).
2. Choose Edit > Find (or press Command+F).
3. Select the column(s) you want to search. (Any Column is always a good place to start.)
4. Type the keyword or phrase you want to locate and click Find All.
Note
If you’ve renamed a Comment column header in the Browser, as we did in the previous Power Skill, you need to search using the column’s original name. Final Cut Pro does not display the new column name in the column pop-up list.
Final Cut Pro displays all the clips that match your criteria in a separate Find Results window.
Searching Effects
The Browser is searchable—and so is the Effects tab.
While we’re on the subject of finding stuff... did you know the Effects tab in the Browser is searchable as well?

Select the Effects tab, then choose Edit > Find.
Type in a few letters of whatever you’re looking for.
The results will appear in a separate Find Results dialog window once you click Find All.
Viewing Thumbnails in the Browser
Not just view, but scrub them, too... and without going into Light Table view.
By default, thumbnails are hidden in the Browser. But like many features inside Final Cut Pro, they’re lurking just beneath the surface.

Here’s how to get them to stop hiding:
1. Control-click any column header except the Name column.
2. From the pop-up menu, select Show Thumbnails.
Extra Credit
Using the Arrow tool, click and drag any thumbnail in the Browser to scrub through it.
Extra Credit
To change the image displayed in the thumbnail, called the Poster Frame, use the Arrow tool to drag to the frame you want to use, press the Control key, and let go of the mouse. Poof! Instant new poster frame.
Note
Thumbnails in the Timeline are always based on the In point. Poster frames are only displayed in the Browser.
Display Images Instead of Names in the Browser
Lurking beneath the lists of files in the Browser is a digital light table just waiting to glow.
Most of the time, the alphanumeric name listings of files in the Browser work great. But when you’re cutting action or images, it would be great to see the pictures all laid out nice and pretty.

You can.
In the Browser, Control-click in the gray area of the Name column and select the size icon you want to view. I generally choose Large Icons. (There’s a cool keyboard shortcut that does this. Select the Browser and type Shift+H over and over and watch what happens!)
Grab the “thumb” in the lower-right corner of the Browser window and drag the entire window much bigger. All your clips are displayed as images rather than filenames. This is called the “Light Table” view.
Extra Credit
You can change the poster frame (the initial image) of a clip by dragging the image with the Hand tool. When you find the frame you want, press the Control key and let go of the mouse.
Select the Hand tool (there’s no keyboard shortcut when you’re working in the Browser) from the Tool palette and drag a thumbnail to scrub an image.
Double-click an image to load it into the Viewer to set an In or Out point.
You’ll find this method of working can help a lot when you’re selecting images based on what the images look like, as opposed to how the clips are named.
Fancy Light Table Tricks
You can edit a group of clips directly from the light table.
While we’re looking at our clips in Light Table mode in the Browser, there’s another interesting trick I can show you: how to edit a group of clips directly from the Browser into the Timeline.

First, drag the Browser so it’s big enough to work in. Then, as you’re looking at your clips, drag them into a rough tic-tac-toe shape. Put the starting clip at the top left, then build out the first row in the order you want your clips to edit to the Timeline.
If you need to set an In or Out point, double-click a clip to load it into the Viewer and mark the clip as you would normally.
When you’re satisfied with the order and durations of your clips, drag a rectangle around them to select the entire group. Then, either drag the entire group to the Timeline, or—and this is my preference—drag the group to the Canvas and drop it on the red Overwrite overlay button. Either technique instantly edits all your clips into the Timeline. Dragging to the Overwrite button has the added benefit of editing the clips so that the group starts at the position of the playhead in the Timeline.
Note
The order of the clips is determined by their position. The highest clip to the left is first, followed by the first row. If a clip in the middle of a row is higher than those to the left of it, Final Cut Pro considers it a row unto itself and edits it before others in the row. For this reason, consider setting your clips so their position runs slightly downhill to the right for each row.
More Browser Fun
New in Final Cut Pro 7, we can color-code, move, and close Browser bins and tabs.
We’ve been able to color-code clips using labels for a while. Now we can do the same with bins. In the Browser, Control-click the icon for a bin and select the label and color for the bin.

Double-click a bin to open it into a separate window. Drag the tab for a bin up next to other tabs at the top of the Browser. This docks it at the top of the Browser. Yes, we’ve been able to move bins for a while too—but putting them back is new. What is also new is that the color of the bin is displayed in the tab at the top of the Browser.
Note
The Project tab now has its own unique icon so you can tell the difference between a project and a bin.
Control-click the name of any bin docked at the top of the Browser, and select Close Bin to close the bin and put it back into the main Browser window.
Note
Final Cut Pro 7 also displays color tabs in the Viewer if you’ve applied a label to a clip. Also in Final Cut Pro 7, if you apply a label to a sequence in the Browser, the color of the sequence tab in the Timeline reflects the color of the label you applied. (I only mention these here because I’m not talking about labels anywhere else in the book.)
Control-click the name of any bin docked at the top of the Browser, and select Close All Bins to close all open bins and return all of them to the main Browser window.
Extra Credit
No, we can’t change the color. We’ve been working with these same tacky colors for some time now. You can change label names, however, by choosing Final Cut Pro > User Preferences > Labels.
Browser Keyboard Shortcuts
In the latest version, Apple added new keyboard shortcuts for bins.
To create a new bin, press Command+B.
Extra Credit
To jump to a clip in a selected bin, just type the first few letters of its filename.
To open a bin in a new Browser tab, select the bin and press Option+Enter (not Return).
To move between tabs, press Shift+Command+[ (left square bracket) to move left one tab or Shift+Command+] (right square bracket) to move right one tab.
To close a selected tab, press Control+W.
Hidden Tricks with Tabs
Learn the deepest secrets of tabs.
When in doubt, grab something and drag it. As an interface rule, it works, but how déclassé (um, “low class”).

We need something cooler. So, here’s a small flock of stuff to try:
• You can move a tab, like the Motion tab or Frame Viewer, by dragging it into another window.
• You can reorder tabs in the Timeline, or other window, by dragging them to a new position in the same window.
• You can enlarge a tab by selecting it and clicking the Expand Window button in the top-left corner of any window (see the screen shot).
• You can jump between tabs in the active window by pressing Shift+Command+[ or Shift+Command+].
• You can drag a window by pulling on its title bar or by pressing Option+Command and dragging the window from anywhere inside it.
• You can close a tab by Control-clicking it and selecting Close Tab.
Jumping Between Tabs
Here’s a great keyboard shortcut that isn’t just for the Browser.
This keyboard shortcut jumps between tabs in any open window, not just the Browser.
Note
While it’s cool to quickly move between tabs, when it comes to the Timeline, the more sequences you have open at once, the slower your system will run. Keep open sequences to a minimum.
Press Shift+Command+[ (left square bracket) to move to the tab on the left.
or
Press Shift+Command+] (right square bracket) to move to the tab on the right.
Riddle Me a Riddle
When can you select something with no risk of moving it?
Answer: When you use the correct tool.
In this case, the Group Selection tool does exactly that.

It selects just like the Arrow selection tool. However, using the Arrow tool you can select and move things. With the Group Selection tool, you can select but not move things.
Try it and see.
Extra Credit
The Group Selection tool’s keyboard shortcut is GG.
Selecting Multiple Clips
The number one interface rule for Final Cut Pro is “Select Something, then Do Something to It.”
While this may not be as deep as “I think, therefore I am” this interface rule will stand you in good stead as you figure out how to do something.

For instance, you can click, Shift-click, and Command-click clips to select them. This is cool, but there is a whole raft of little-used track selection tools that can make this process even easier.
The five track selection tools allow you to select multiple clips on one or more tracks:
When you use the first tool (press T), it selects all clips in a single track to the right of where you click.
Extra Credit
Holding the Shift key when clicking switches a tool between selecting a single track and selecting multiple tracks.
The second tool (press TT) selects all clips in a single track to the left of where you click.
The third tool (press TTT) selects all clips in a single track, regardless of where you click.
Note
These tools select entire clips. So, if a clip extends into the range selected by the tool, the entire clip is selected.
The fourth tool (press TTTT) selects all clips in all tracks to the right of where you click.
The fifth tool (press TTTTT) selects all clips in all tracks to the left of where you click.
Selecting an Edit Point
Wouldn’t it be great if we had a tool that just selected edit points? We do!
And it’s called the Edit Selection tool (press G to access it).

Grab this tool and drag a rectangle around the edit points you want to select. As you do, only the edit points, and not the clips, are selected.
Here’s an added bonus: As soon as you select your edit points, the Trim Edit window opens, allowing you to quickly trim your clips.
Extra Credit
Final Cut allows you to select only one edit point per track. For this reason, this tool is best used when you have multiple tracks with clips. Otherwise, just click an edit point with the Selection (Arrow) tool to select it.
Using Range Selection
Selecting a portion of a clip is easy—if you know where to click.
Sometimes, you need to select just a portion of a clip—say, to apply a filter to one part of a clip—without chopping the clip into multiple pieces.

You can do so using the Range Selection tool (press GGG to access it). Use this tool to drag across a portion of a clip to select a range within a clip. You can then delete a portion of the clip, or apply a filter to just that portion of the clip.
Extra Credit
You can have an unlimited number of ranges in each clip, each with its own filter applied. To create multiple ranges, drag to select a portion of a clip, apply a filter, and then select another range and apply another filter.
Get Moving with Timecode
Timecode offsets get things to move quickly with precision. Here’s how.
Here’s a technique I use all the time to move things by a precise amount.

On the keypad, press + (plus) or − (minus), followed by a number, and then press the Enter key. Here’s what happens:
• If nothing is selected, the playhead moves by the amount you entered.
• If a clip is selected, the clip moves, provided it isn’t blocked by another clip.
• If an edit point is selected, the edit point moves, provided the clips on both sides of it have sufficient handles for the movement.
The direction in which something moves depends on the sign. Plus moves to the right; minus moves to the left.
The distance something moves depends on the number you type in. If the number you enter is two digits or less, Final Cut Pro considers it to be frames. If the number is four digits or less, it’s considered to be seconds and frames. If it’s six digits or less, it’s considered to be minutes, seconds, and frames. Punctuation is not necessary.
So, typing −20 and pressing Enter with nothing selected moves the playhead 20 frames to the left. Typing +1200 and pressing Enter with a clip selected moves the clip 12 seconds to the right, provided it isn’t blocked by another clip. Typing +6 and pressing Enter with an edit point selected moves the selected edit point six frames to the right.
I use this technique all the time for trimming and positioning effects, because it’s both fast and accurate.
Locking Tracks
Have you ever wanted to lock a track to prevent accidental changes?
Final Cut Pro has little padlock icons you can use to lock tracks to prevent accidental changes.

These are not for security—there are no passwords. Rather, these are intended to prevent the “Oh-my-GOSH, I-can’t-believe-I-just-deleted-that! My-life-is-over!” feeling.
To lock a track, simply click the padlock icon. To unlock a track, click it again.
Hold the Option key while clicking a lock and every track except the track you click will lock. Option-click again and all tracks unlock.
Note
I generally don’t use track locks because I don’t want to run the risk of knocking audio and video out of sync. However, when editing to a music track, I lock the audio tracks to avoid accidentally shifting the audio.
For the keyboard obsessed:
1. Press F4, followed by [a number] locks, or unlocks, that video track.
2. Press F5, followed by [a number] locks, or unlocks, that audio track.
3. Shift+F4 locks, or unlocks, all video tracks.
4. Shift+F5 locks, or unlocks, all audio tracks.
Toggling Display Modes
Here’s a quick way to toggle between display modes in either the Canvas or Viewer.
There are three display modes for both the Canvas and Viewer:
• Image
• Image+Wireframe
• Wireframe

Image displays the image, but allows no effects adjustment, such as scaling.
Image+Wireframe both displays the image and the wireframe; it’s most often used when you want to create motion effects for a clip by adjusting the clip in the Canvas.
Extra Credit
You can select these modes from the pop-up menu at the top of each window, but it’s faster to toggle between them by pressing W.
Wireframe displays your image as an object outline; the key benefit is that it always displays in real time, no matter how complex your effects.
Scrolling the Timeline
You have two ways to scroll the Timeline during playback.
It would be great if Final Cut’s Timeline would scroll as our sequence plays... but it doesn’t. Will that stop us when we can share another Power Skill that solves this problem? Certainly not.
Note
Both these shortcuts work whether the Timeline is playing or paused.
If you don’t have a scroll-wheel mouse, select the Hand tool (press H) and drag the Timeline up, down, left, or right as the playhead is rolling along.
Extra Credit
Put the cursor at the bottom of the Timeline, where the zoom slider is located. Scroll and watch what happens. Yep, when you are at the bottom of the Timeline you don’t even need to press the Shift key to scroll horizontally.
If you do have a scroll-wheel mouse, put the cursor anywhere in the Timeline. Press Shift and roll the scroll wheel on your mouse to scroll the Timeline wherever you want.
Note
If you have an Apple Mighty Mouse, rolling the scroll wheel left or right will scroll the Final Cut Timeline.
Scrubbing the Playhead
Here’s a fast way to scroll the playhead in the Timeline, Viewer, or Canvas.
Normally we just let the playhead play. But sometimes it would be nice if we could scrub it manually. Well, yes, you can grab the playhead and drag it, but how much fun is that?

If you have a scroll-wheel mouse, here’s something else you can do.
Put the Arrow tool in the timecode numbers at the top-left of the Timeline. Roll your scroll wheel, and shazaam! The playhead is scrubbing on its own.
The same technique works if you put the Arrow tool anywhere in either the Viewer or the Canvas. Roll the scroll wheel on your mouse and watch the playhead move on its own.
Note
It could be argued that there are better ways to move the playhead. Perhaps. But you can always use this trick to impress people at parties.
Find the Missing Playhead
The playhead doesn’t play hide-and-seek. Sometimes, it just gets lost.
Can’t figure out where the playhead went?
![]()
Just click once on the small vertical purple line at the bottom of the Timeline to jump to the location of the playhead in the Timeline.
Extra Credit
To scroll the Timeline horizontally, roll your scroll wheel in the area occupied by the purple line.
Scrubbing Timeline Thumbnails
I’m not sure why you’d do this, but it’s a great party trick!
The thumbnails in the Timeline always display the image of the frame at the In point. However, you can scrub the thumbnail to see what’s in the clip.
(Now, I realize some among you would point out that you can easily drag the playhead through the clip. But you’d be missing the larger point—this is a cool trick!)
Note
Unlike with a Browser thumbnail, you can’t change the still image the Timeline displays—it always displays the image of the frame at the In point.
Set the track height large enough that you can clearly see the Timeline thumbnails. Click the Scrubber tool (press HH) in the Tool palette. Then drag the hand inside the thumbnail image.
Discover Project Properties
Projects have properties, too. Here’s where to find and change them.
We normally think of projects in terms of their video format. You say, for instance, that you’re “working on a RED project,” or “finishing a P2 project.”

However, projects have more properties than that. To see what your project properties look like, select Edit > Project Properties. The resulting properties dialog box is a great place to change Comment column header names, marker names, or marker visibility.
Note
Although you can change the Comment column header names in this window, you still need to enter the original column header name when using Edit > Find.
Markers Got Spiffed Up
Final Cut Pro 7 adds new capabilities to markers.
Final Cut Pro has two types of markers: Clip markers and Timeline markers. While their basic operation hasn’t changed, the latest version of Final Cut Pro adds some welcome new features.
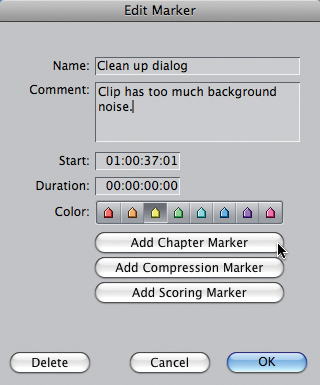
To create a marker, press M. If a clip is selected, the marker is created at the position of the playhead in the clip. If no clip is selected, the marker is placed on the Timeline at the position of the playhead.
With your playhead parked on a marker, press M again, and the Edit Marker dialog box opens. Here you can change the name of a marker, add a comment, and, for the first time, add a color to a marker. These colors show up in markers in both the Browser and the Timeline.
Here’s the other cool thing. Timeline markers now have the option to reflect changes that ripple clips in the Timeline. If you delete a clip, or ripple an edit, that changes the duration of the Timeline, all downstream markers move up to remain in sync with the clips that just moved.
Extra Credit
If you don’t want markers to move as you make changes, click the new button to the left of the Link Selection button in the top-right corner of the Timeline. If this button (called Ripple Sequence Markers) is green, markers will shift position as clips move. If it’s gray, markers will remain unchanged in the Timeline even if clips move.
Extra Credit
If you want to create a marker and open the Edit Marker dialog box at the same time, press Shift+Option+M. You can use this during playback to quickly add a note to a clip or sequence without stopping.
Markers Can Be Moved!
Final Cut Pro 7 makes it easy to move markers.
Since the dawn of Final Cut Pro, editors have wanted to move markers manually. With the latest release we can—well, at least markers in the Timeline can be moved. In fact, Apple added a whole lot of marker tricks. Here’s a quick list:
• To move a Timeline marker, press the Command key and drag the marker sideways.
• To delete a Timeline marker, press the Command key and drag the marker down into the Timeline.
• To open the Edit Marker dialog box, either double-click the marker while holding the Command key or place the playhead on the marker and press M.
• To add a marker and open the Edit Marker dialog box at the same time, press Shift+Option+M.

Extra Credit
To open the Edit Marker dialog box for a Clip marker in the Browser, Control-click the marker icon or name and select Edit from the pop-up menu.
A Better Way to Move Between Markers
Using markers makes jumping around the Timeline extremely fast.
You probably recall that you can jump between markers using Shift+M (to jump to the next marker) and Option+M (to jump to the previous marker). These shortcuts work great if your Timeline is small.

But as the Timeline gets longer, or as it includes more markers, using keyboard shortcuts isn’t as fast as we’d like. So, here’s the secret: Control-click in the timecode bar at the top of the Timeline. A pop-up menu appears and your marker names are all listed at the bottom. Select the marker you want and the playhead instantly jumps to it.
This trick makes navigating even huge sequences a piece of cake.
Extra Credit
Name your markers clearly. Then, when you Control-click on the timecode numbers at the top of the Timeline, a list of all your markers appears at the bottom of the pop-up menu. Good names make it easy to know to which marker you want to jump.
Reading Clip Markers
Here’s a great way to read comments in Clip markers.
Thanks to Stephen Kanter for the following tip:
Here’s the scenario: An editor puts markers on her clips with detailed notes. She then edits the clips and markers into a sequence. What’s the best way to read the comments in the Clip markers?
Here’s one way to do it:
1. Select the entire sequence by pressing Command+A.
2. Set Playhead Sync to Open.

3. Use the jump to the next/previous marker shortcuts (Shift+M/Option+M) to jump from marker to marker. The source clips will automatically open in the Viewer (i.e., Match Frame is always “on” in Open Sync mode), and you can read the overlays in the Viewer as you step through the sequence markers.
Very cool!
Using Markers to Log Footage
Here’s another great use for markers.
The first thing to keep in mind is that all editors hate to log footage. The process is both time consuming and depressing. Anything that speeds this up is a good thing.

This tip was sent to me by Dave Isser. Dave provides a fast way to review and log footage after you’ve captured it: “Far and away my favorite thing is to use markers to log footage. The great thing about this system is that you can play clips continuously without having to pause them, and it really expedites your workflow.
“To get the best results, I watch clips in the Viewer and mark them with an M. Then, while the clip is still playing, double-click the name of the marker in the Browser, rename it to whatever description you want, and then click back into the Viewer, all without having to stop the continuously playing clip!”
Note
Earlier versions of Final Cut Pro sometimes had problems displaying more than 25 markers in a clip.
Deleting Multiple Clip Markers
Here’s an easy way to delete a range of markers attached to Browser clips.
To delete all the markers in the Timeline, or in a selected clip, choose Mark > Markers > Delete All.
Unfortunately, since Final Cut Pro doesn’t allow you to select markers, you can’t delete a range of markers in the Timeline. But what if you want to delete some of a clip’s markers without getting rid of them all?
In the last Power Skill, we loaded a clip into the Viewer to use markers to log the clip. When you load a clip in the Viewer and then add markers to it, a small triangle appears next to the clip name in the Browser. Twirl this arrow down to see a list of all the markers in the clip.
In the Browser, select the markers you want to delete for each clip. Press the Delete key and watch all of the selected markers disappear.
Note
This trick doesn’t work for Timeline markers or clips that have been edited to the Timeline.
Markers Have Default Colors
Track what markers mean using their default colors.
Not only can we add color to our markers, but some markers have default colors, which we can use to keep track of what markers mean:
• DVD Chapter markers are purple.
• Compression markers are blue.
• Audio scoring markers are orange.
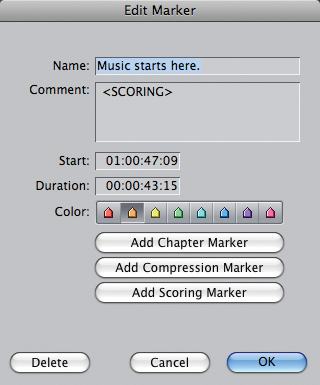
Marker colors also show up as color backgrounds when markers are displayed in either the Viewer or Canvas.
Extra Credit
You can determine which markers appear in the Timeline by choosing Edit > Project Properties. In the Properties dialog box, you can change the marker name, or make all markers of one color invisible. You’re not deleting markers; you’re just hiding (or showing) them.
Using Markers in Multiclips
Here’s another new marker feature in Final Cut Pro 7.
Another new use for markers is with multiclips.

Before creating a multiclip, you can review the individual clips you are about to edit. Add markers and marker comments. Assign colors to indicate something special about that marker.
Then, when you build the multiclip, the individual clip markers are retained in the multiclip. If a portion of a clip that contains the marker is edited into the final version in the Timeline, the marker appears as well.
You’ll find this tip useful if you use your markers for making notes about a particular portion of a clip.
Option Means Opposite
It’s Option key magic—all contained in one simple rule.
Final Cut Pro trainer Andrew Balis once described the Option key as the “opposite” key. Holding the Option key while doing something often (though not always) does just the opposite.
For example, Option-clicking an Audio Mute, Audio Solo, Visibility, or Auto-Select button turns on, or off, all the buttons, except the one you click.
Option-clicking with the Pen tool deletes a keyframe.
Option-clicking a linked clip selects just one side of the clip, either the audio or the video.
Option-clicking an edit point selects just the video or just the audio side of the edit.
Thinking of the Option key as an opposite key can open up a whole new way of speeding up your work.
Other Option Key Tricks
The Option key does duplication—watch!
The Option key offers the near-miraculous ability to duplicate just about anything.

For example, press the Option key and drag a clip. You are making a copy of the clip. Now it gets tricky.
If you release the mouse before you release the Option key, you will duplicate the clip and make an Insert edit, pushing everything downstream to make room for the duplicated clip. (The indicator is that the cursor points to the right.)
If you release the mouse after you release the Option key, you will duplicate the clip and make an Overwrite edit, replacing everything to make room for the duplicated clip. (The indicator is that the cursor points down.)
Hold Shift+Option and drag a clip up or down. This makes a copy of the clip and constrains the movement of the clip so that it only moves vertically. This prevents a clip from getting out of sync. (This trick won’t work if the audio and video of a clip are linked.) If more than one clip is selected, all selected clips are duplicated.
Extra Credit
You can also use the Option key to move a clip. Start to drag a clip and don’t release the mouse. Hold the Option key down and drag the clip so the left edge is where you want the clip to start. Release the mouse, then release the Option key. If you follow this order, your clip moves into its new position and all the clips between the old and new position shuffle to make room. When you do this correctly, the shape of the cursor turns into a curved, down-pointing arrow during the move.
The Fastest Way to Find a Keyboard Shortcut
The latest version of Final Cut Pro documentation doesn’t provide a summary of keyboard shortcuts.
However, never fear... there’s a much better way to see if a menu choice has a keyboard shortcut assigned to it.
Choose Tools > Button List. In the search box, type the first few letters of the menu choice.
Or just type a keyboard shortcut in the search box and see what it’s linked to.
Or just type a letter to see all the different keyboard shortcuts assigned to that letter.
This is one place that I check regularly—it’s sort of like reading a book for its plot—because this dialog box has an amazing cast of characters!
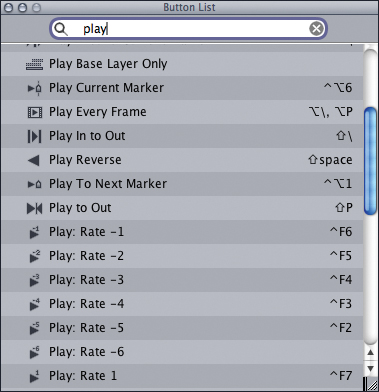
I Feel the Need—for Speed!
Eleven ways to make your Timeline play faster.
I was looking through the Button List menu a while back and discovered 11 keyboard shortcuts you may not know about that can make your Timeline play faster:
Control+F2: Play in reverse at 5x speed
Control+F3: Play in reverse at 4x speed
Control+F4: Play in reverse at 3x speed
Control+F5: Play in reverse at 2x speed
Control+F6: Play in reverse at 1x speed
Control+F7: Play forward at 1x speed
Control+F8: Play forward at 2x speed
Control+F9: Play forward at 3x speed
Control+F10: Play forward at 4x speed
Control+F11: Play forward at 5x speed
Control+F12: Play forward at 6x speed
Extra Credit
Here are two more keyboard shortcuts that are relevant: Press K+L to move forward at one-third speed. Press K+J to move in reverse at one-third speed.
Some of these are similar to pressing J multiple times to go in reverse, or L multiple times to go forward.
Don’t you love discovering new things!
Extra Credit
Some of these keyboard shortcuts may be blocked by the OS or other software. To see a complete list of keyboard shortcuts for playback, select Tools > Button List and enter Play in the search box.
Create a Custom Keyboard Shortcut
Customize your own keyboard shortcuts.
Just as you can customize buttons, you can create customized keyboard shortcuts and save them to disk.
The process is simple:
1. Select Tools > Keyboard Layout > Customize.
2. Click the lock in the lower-left corner to unlock it.
3. In the search box in the top right, enter a portion of the menu text you want to search for. (Use lowercase to prevent confusion during the search.)
4. Click a tab at the top that corresponds to the modifier key you want to press when invoking the shortcut—for example, Control.
5. Drag the icon from the search list to the key you want to associate with that shortcut. In the figure, I’m dragging the Two-up window menu command into the Control+Shift tab and onto the letter U. This creates a new keyboard shortcut to switch my window layout to a larger Canvas and Viewer using Control+Shift+U.
6. To save your newly revised keyboard shortcuts, choose Tools > Keyboard Layout > Save.
Extra Credit
There is no limit to the number of keyboard shortcuts you can create. You can even save different collections into different files and switch between them using Tools > Keyboard Layout and picking from the list at the bottom of the menu.
Note
Saved keyboard layouts are portable. As long as you store them in the same folder and location on each computer, you can easily transfer layouts.

“A”—An Amazing Authority
One letter—eight keyboard shortcuts!
Here are some of the nifty keyboard shortcuts using the letter A:
Command+A: Selects everything in the active window.
Shift+Command+A: Deselects everything in the active window.
Shift+A: Sets In and Out points for whatever clip, or range of clips, is selected.
Option+A: Selects whatever clip, or range of clips, is marked by an In and Out point.
Control+A: Sets In and Out points between two markers containing the playhead.

Extra Credit
And, pressing the letter A, all by itself, selects the Arrow (Selection) tool.
Wonderful, Wacky, W
Wonder What Wonders W Works?
The letter W is very talented, depending on what you need done. I use almost all of these daily.

Select either the Canvas or the Viewer and press W. Each time you press W, the selected window will change its display from Image Only, to Image + Wireframe, to Wireframe Only.
Control+W closes the selected tab in the active window.
Command+W closes the selected window.
Option+W toggles clip overlays in the Timeline (the red rubber bands and black opacity lines).
Control+Option+W toggles overlays on or off in the Canvas and Viewer.
Option+Command+W toggles audio waveforms on and off in the Timeline.
Shift+W toggles color channels in the Canvas or Viewer (RGB, Alpha, or Alpha+RGB).
Control+Shift+W applies the second favorite video filter.
There are many useful keyboard shortcuts in Final Cut, but none that revolve so closely around a single letter—W.
Wow!
How to Remove a Button
...in a massive puff of smoke!
Removing a button from a menu or window is easy. Just grab the button and drag it out of the button bar.

Poof! It’s gone.
Note
OK. I confess. Whenever I demo this to my classes, I always make the sound of an explosion. It helps get the point across. Really.
Creating a Custom Button
Every window can have its own buttons.
Just as you can customize the keyboard, you can also customize buttons. You can create individual buttons or build them into a complete button list that can be stored and reused.
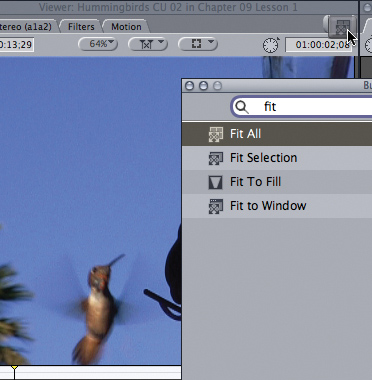
Buttons can only be used to replicate menu items. You can’t assign clips to buttons or create AppleScripts. Buttons in Final Cut don’t allow you to create programmable sequences, like Photoshop Actions.
To create a button, choose Tools > Button List (or press Option+J) and enter the menu text, or keyboard shortcut, you want to turn into a button. It prevents confusing the search if you type in lowercase; so, for example, here I typed fit.
From the list of possible menu options, grab the icon for the one you want and drag it into the button bar in the top-right corner of the window you want it to appear.
Extra Credit
To save the buttons you’ve created, select Tools > Button Bar > Save and give the current collection of buttons a name.
Reset/Remove All Buttons in a Button Bar
It’s easy, if you know where to click.
Removing all the buttons from a single window can be done with a single click of the mouse:
1. Control-click any button.
2. From the pop-up menu, select either Remove > All or Remove > Restore Default (depends on the window you are in).

Note
Only the Timeline button bar provides All/Restore Default as a choice. All other windows just display Remove All.
Additional Thoughts
Here’s a collection of completely unrelated, but useful, things to know.
Each of these Power Skills is supposed to fill a single page of this book. But some are so simple and so short, they just can’t be stretched to fill a page.
On the other hand, they’re so useful, I can’t, in good conscience, leave them out. So here they are—some of my favorite goodies.
• To play a portion of a sequence that requires rendering, without first rendering it, press Option+P.
• To load a clip from the Canvas into the Viewer, double-click it in the Canvas.
• To reset your windows to the default layout, press Control+U.
• To fit something into a window, press Shift+Z.
• To fit the selection into the Timeline, press Shift+Option+Z.
• To start Final Cut Pro without loading a project, hold the Shift key while Final Cut Pro starts up.
• To cancel any dialog box, press the Esc key.