
Chapter 3. Ingesting Media
Whether you record your images to tape or to flash memory, or draw them with crayons on paper and scan them into a digital image sequence, at some point you need to get your files into Final Cut Pro. That’s what this chapter is all about.
You can bring images into Final Cut Pro in one of three ways: capture your images from videotape, transfer them from tapeless media, or import images that the computer can already read, such as Photoshop documents.
This chapter starts by looking at still images—typically a complete snake pit of confusion and conflicting advice. Using the information provided here will make your life a whole lot easier.
Using Cover Flow to Find Shots
Here’s a handy way to find stuff fast.
Have you explored how useful Cover Flow is in OS X 10.5 (Leopard) for finding a missing shot?
Adam Lloyd Connell wrote me about this recently: “I am currently working on a long project with around 500 takes, and the cinematographer had only supplied one take of a particular cutaway to an object on a table. Trying to find that specific clip without the continuity notes easily at hand was a pain, and using FCP’s thumbnail view was slow.
“However, opening folders with footage from the XDCAM and selecting Cover Flow mode made it so easy to flash past all the hundreds of (quite large) thumbnails, and we found the shot in minutes. I’ve gotten into the habit of finding my missing shots in Finder this way. Try it next time you’re trying to find that elusive shot.”
Just open your media folder, select all the images you want to review, and press the spacebar. Ta-da!

Picking the Best Format for Still Images
Not all image formats are created equal.
The general rule for working with still images is to keep them at the highest quality possible at all times. However, not all image formats are designed for high-quality work. Some are designed for very small file sizes, or reduced colors, or even no colors at all.
Note
PICT images, though older and Mac-only, are also fine. There are other image formats that fulfill specialized needs for video editing, such as Targa and DPX files. These are most often used when exporting images from 3D software packages.
For instance, JPEGs and GIFs are designed to generate small file sizes optimized for the Web. But the compression they use decreases the quality of the image.
LAB and CMYK images are designed for print work. Final Cut Pro won’t even import them.
Others, like EPS, are optimized for maximum resolution, providing extremely high quality with a small file size by employing vector-based mathematics. However, since all video images are bitmapped, this format needs to be converted to bitmaps before it can be used, which reduces the value of using vectors.
Image formats that work best for video are bitmapped, uncompressed, and high quality. The two formats I recommend for single-layer images that don’t contain transparency are PNG and TIFF.
If you’re creating an image that contains transparency, save it as a PSD.
Importing TIFF Images in Final Cut Pro
Not all TIFFs are created equal.
When creating images for importing into Final Cut Pro, you can use the TIFF or PNG format. Both are excellent choices.

When saving your TIFF files, be sure to use LZW compression. Files saved using ZIP compression often refuse to import properly into Final Cut Pro.
Also, be sure to save TIFF images using Macintosh byte order. Final Cut Pro has trouble importing TIFFs saved using IBM byte order.
Note
Where possible, avoid JPEGs, as they contain image compression artifacts, which degrade your image.
Stills Don’t Have to Be 10 Seconds Long
You can change the duration of imported images. Here’s how.
By default, Final Cut Pro imports all still images and creates freeze frames, applying a 10-second duration.

You can change this by selecting Final Cut Pro > User Preferences, selecting the Editing tab, and adjusting the Still/Freeze Duration setting.
Extra Credit
When creating a slide montage, measure the time between downbeats of the music, then change this Duration setting to match that time. This way, all your stills import perfectly timed to match the music.
Note
This setting affects imported image files, including PSDs, and freeze frames that you create in Final Cut Pro. It does not affect any imported video clips.
Sometimes, Mid-Tone Gray Isn’t
Mid-tone gray is determined by the gamma setting. Here’s how to set it.
Macs, PCs, and video set the value for mid-tone gray at different points. This setting is called Gamma (think “G” for gray and gamma).

The Mac sets Gamma at 1.8, while PCs and video set it at 2.2. This means that an image that looks perfect on the Mac looks light and washed out in video. Conversely, an image that looks great in video looks dark and muddy on a Mac using standard Mac Gamma.
Final Cut Pro adjusts for this by changing the default Gamma setting to 2.2 while the program is running. Most of the time, that’s fine. However, if you import a file that just doesn’t look right, you can correct it—either before importing the image or afterward in the Browser.
Note
File formats for which Final Cut Pro can adjust gamma include JPEG, PNG, TIFF, SGI, PlanarRGB, MacPaint, and layered or flattened Photoshop (PSD) files. It can also adjust gamma for QuickTime movie files compressed using the None or Animation codec.
To set the Gamma setting automatically on import, select Final Cut Pro > User Preferences, click the Editing tab, and adjust the gamma in the Gamma pop-up menu.
To change the Gamma setting in the Browser, select the clip, and then scroll right until you see the Gamma column heading. Setting Gamma to 1.8 will lighten an image; setting it to 2.2 darkens it.
Extra Credit
Snow Leopard (OS X 10.6) changes the default gamma setting of your Mac to 2.2. So, this problem essentially goes away once you upgrade.
Playing Still Images in Real Time
You can control how many images play in real time.
One of the exciting challenges in documentary editing is trying to bring a sequence to life when all you have to work with are still images.
Note
The RAM allocations in Memory & Cache do not need to total 100 percent.
Normally, adding a few stills to your sequence causes no problems. But, as you start to add more and more images, real-time playback can suffer.
Final Cut Pro offers a preference setting that allows you to allocate more RAM to your still images. It’s called the Still Image Cache and here’s how to set it.
Note
If you’re working with more than one sequence, whenever you switch sequences, the still image cache switches to the new sequence.
Choose Final Cut Pro > System Settings and click the Memory & Cache tab. By default, Memory & Cache is set to 10%. If you’re working with lots of images, bump this up to 15%, or maybe as high as 20%. I would not recommend going higher than that.
The size of the still cache is limited by the total amount of unused physical RAM installed in your computer within the standard 4 GB memory allocation used by Final Cut Pro. The larger the still cache, the more still images can be played back in real time in the currently selected sequence.

Sizing Still Images for Import into Final Cut Pro
Create images that look good both on the computer and in video.
Nothing drives editors crazier than trying to figure out how to make still images look good. The problem is that video uses rectangles for all its pixel shapes, while computers use square pixels; this is called the Pixel Aspect Ratio.
Extra Credit
Because video uses a fixed resolution for each video format, changing the dpi (dots per inch) doesn’t improve your images. Create all images at 72 dpi.
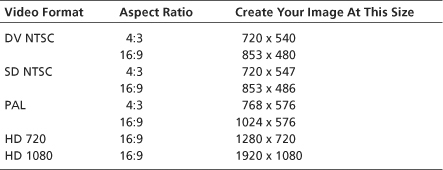
Hundreds of pages have been written about this, but let’s keep this simple. If you are creating a full-screen, still image in Photoshop to import into Final Cut Pro, use the following table.
This table assumes you want the image to display full screen, without transparency, and without movement on the image. To use it, find your video format, pick your aspect ratio, and then create your image to match these specs.
GUIDE TO SIZING IMAGES CORRECTLY
Note
Yes, Photoshop has prebuilt image aspect ratios you can use to create stills. However, Adobe and Apple calculate the Pixel Aspect Ratio differently. You can use Photoshop’s presets, but they’re designed for Adobe Premiere Pro, not Final Cut Pro. Therefore, for the greatest accuracy, use the numbers shown here.
Sizing Images for Moves
If you want movement on your images, use this table.
The previous Power Skill provided sizes for still images that won’t contain movement.
Note
Use the Scale parameter on the Motion tab in Final Cut Pro to adjust image size.
But what if you want to pan, tilt, or zoom an image? Well, the one thing you don’t want to do is enlarge any image more than 100 percent. That just makes it soft, grainy, and unpleasant to look at.
Instead, create the image larger than you need so that it gets reduced in size inside Final Cut Pro. That way, your images will have great-looking quality, even when you zoom into them.
Note
Final Cut Pro often has problems with images greater than 4000 pixels in size. Keep your image dimensions below this limit if possible.
The sizes in this table are designed only for single-layer images (TIFF or PNG; PSD images are covered in the next Power Skill). Remember to always create your images at 72 dpi.
These image dimensions will allow you to pan as much as you want and zoom in up to 2.5 times without any loss of image quality.
GUIDE TO SIZING IMAGES THAT WILL CONTAIN MOVEMENT

PSD Images Are a Special Case
PSD images are treated as sequences, not as images.
Sizing single-layer images is easy compared to sizing PSD files. This is because Final Cut Pro imports PSD images containing transparency as though they were sequences. This just confuses everybody because PSD files still use square pixels while video uses rectangles—so after you import the image, it doesn’t look the way you expect.
Note
Every video format is different. Unlike single-layer images, with PSD files you need to know the exact number of pixels your video camera is shooting. While this table lists some of the most popular formats, if your camera format isn’t listed here, check with the manufacturer for its specs. Use those image size numbers to create the Squished Image Size.
Here’s the solution. From the following table, create your image sized from the Master Image Size column based on the video format and aspect ratio you’re using. When all the design work is complete, save your file as a PSD. This becomes your “Master” file.
Using this Master file, in Photoshop, choose Image > Image Size. Turn off Constrain Proportions and then resize the image to the specs in the Squished Image Size column. Save this resized file. This is the “Squished” file that you’ll import into Final Cut. Next, and this is a critical step, in Final Cut Pro make sure your Easy Setup settings match the sequence you plan to edit this image into. If they don’t, your PSD files won’t import properly.
Finally, import your images. If you follow these steps, everything will look great.
SELECTING IMAGE SIZE

Note
Some HD video formats record their images using square pixels; in which case, creating a “squished” version of the PSD file is not necessary.
Working with Long Image Sequences
Too many images gum up the system.
An image sequence is a number, generally a very large number, of still images that you want to build into a movie. They’re most often created in stop-motion animation or exported from 3D packages during rendering.
It’s a bad idea to load large numbers of individual images into Final Cut Pro. The frames are loaded into RAM, which fills up quickly. Even if you adjust the Still Image Cache setting, it’s easy to bring your system to its knees if you’re using thousands of images.
Instead, open a long image sequence in QuickTime Pro by selecting File > Open Image Sequence. Pointing to the folder containing your images, open them as a single file.

Then select File > Export to export this sequence as a QuickTime movie. For highest quality, set the codec to either ProRes 4444, or QuickTime Animation if you are on an earlier version of the software; or you can match the codec you plan to use for your Final Cut Pro sequence to save rendering time.
A Faster Import
Here’s a fast way to import a gaggle of clips into a folder in the Browser.
Yes, you can drag clips from the Desktop into the Browser. But dragging a slew of clips and trying to accurately hit an itty-bitty Bin folder depends too much on my fatigue factor. Instead, my preferred method is to Control-click the Bin in the Browser that I want the imported clips to land in and choose Import Files.
In the Choose a File window, you can preview clips and Command-click to select the ones you want. Click Choose and all your chosen files show up in the Bin you wanted them to land in. No chance of missing the Bin—slick!
![]()
Extra Credit
You can use this same technique to import an entire folder of files by choosing Folder, rather than Files, from the Import menu.
Working with PowerPoint Slides
You can easily integrate PowerPoint or Keynote slides into Final Cut Pro.
Need to integrate Microsoft PowerPoint or Apple Keynote slides into a video presentation?
Note
Keynote provides the option of exporting animated slides as video. Exporting as a QuickTime movie makes it easy to create transitions in Keynote, but it exports every slide that doesn’t have movement using a duration of a single frame. You’ll need to change the duration of this exported frame once you edit the QuickTime movie into Final Cut Pro’s Timeline.
The trick is to create and design your PowerPoint or Keynote slides to match, as closely as possible, the image size of video. For example, with SD, create them at 800×600. For HD, try 1280×720. You’ll still experience a loss in quality, because video is lower in resolution than the images you create on your computer, but doing this will minimize the quality loss.
Remind your artists to decrease the amount of text on the slide and make the font size bigger. Also, export the slides as either TIFF or PNG images to get the best quality possible to import into Final Cut Pro.

Importing Text for Text Clips
You don’t have to type text into text clips—you can import it.
Normally, you create a text clip and type your text into it. But what if that text exists in another file. Can’t you just import it?

Well, yes and no.
Let’s say you have your text stored in a Microsoft Word document. If you simply copy and try to paste it into a Final Cut Pro text clip, it won’t work. That’s because text stored in any rich text program like Word has hidden formatting codes embedded into it.
The key is to get rid of those codes before pasting it into Final Cut Pro. Here’s how.
Note
TextEdit has two modes: simple text and rich text. For this technique to work, TextEdit must be in simple text mode. You can verify the setting in Text Edit by opening the Format menu. If you see the option Make Rich Text, the file is in the correct mode. If you see the option Make Simple Text, select it to switch formats.
After you create your text clip in Final Cut Pro, copy the text from Word and paste it into TextEdit (a simple word processing program that ships with your Mac). TextEdit strips out all the hidden codes and displays just the text.
Next, in TextEdit reselect your text and choose Edit > Copy (press Command+C). This step is critical; otherwise, the old Word-formatted text is still in the clipboard.
Switch over to Final Cut and paste your text into the Text field for your clip.
Reconnecting Media
It isn’t hard, provided you follow a few simple precautions.
Final Cut Pro is designed so that you can store your project file anywhere. However, Final Cut expects that once you capture, transfer, ingest, or import media, that source file is going to stay put. Even more important, Final Cut expects that you will not rename any files or folders containing files.
If files get moved or renamed, that worrisome red line appears in the missing clip in the Browser and the Timeline displays the red Media Offline warning.
You can reconnect three types of media: offline, online, and render files. First, never reconnect render files. Their naming convention is obtuse beyond words. Just give them up for lost and re-render. Life is too short.
Second, the only reason to reconnect an online file is if, in a fit of editorial passion, you connected the Browser clip to the wrong media file on your hard disk. While not unheard of, this is pretty rare.

Third, and most common, is when a media file gets moved or renamed on your hard disk.
Whatever the cause, select all the Browser or Timeline clips you want to reconnect and choose File > Reconnect Media. Here you have essentially two choices: Locate and Search.
Use Locate if you have changed the name of the file and you need to find it.
Use Search if you have moved the file, but not changed the name, and you want Final Cut to find it. Search is much faster.
Note
Final Cut Pro now uses Spotlight indexes to find media during searches. You’ll find this helpful when searching for media stored on servers.
Note
Final Cut Pro 7 now sorts clips displayed in the Log & Transfer window to show only the clips that require recapturing. If you have a lot of clips, this can make your screen a lot less messy.
Setting the Reel ID
The Reel ID tracks where your media came from. Here’s how to change it.
Whether you’re using tape or tapeless media, Final Cut Pro uses the Reel ID to keep track of the source of your media.
To digress for a minute, there are four key pieces of data that Final Cut uses to link clips in the Timeline and the Browser with the source media on your hard disk: the filename, source timecode, Aux 1 timecode, and Reel ID. Change any one of these and they are changed everywhere—in your project, in your sequences, and on your hard disk.
Originally, the Reel ID linked the box of videotape your media was recorded on with the clip in Final Cut’s Browser, which made recapturing clips from videotape possible. Now, with tapeless media, the Reel ID also links to the name of the folder containing your source media. This means that if you ever need to recapture tapeless media, Final Cut will know what folder(s) to look in to find the source material.
Extra Credit
In addition to changing the Reel ID in the Browser, you can change it by choosing Edit > Item Properties > Logging or by choosing Modify > Timecode. Wow! What a lot of choices.
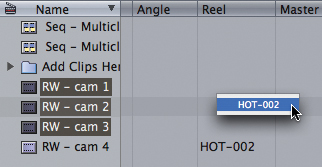
You can change the Reel ID in several places. Probably the easiest is the Browser. Select the clip, or clips, you want to adjust, and then scroll right until you find the Reel column.
If the Reel ID already exists, Control-click the column and pick the Reel ID from the pop-up list. Otherwise, just double-click the column entry and type the ID you want to use.
Final Cut displays a warning just to make sure your changes are correct. When you click OK, the Reel ID will be changed in the Browser, in every related clip in the Timeline, and in the media file recorded on your hard disk.
Only Capture the Audio Tracks You Need
Select which audio tracks you capture or ingest.
In both the Log & Capture window and the Log & Transfer window, you can specify which audio tracks you want to bring into Final Cut.

In both cases, reducing the number of audio tracks you capture reduces the storage space needed for the file.
In Log & Capture, click the Clip Settings tab in the top-right corner.
In Log & Transfer, click the Import Settings tab below the Preview window.
Toggling the green visibility light determines whether the audio is captured. In either screen, an illuminated green visibility light indicates an active track that will capture audio. Dark green means an inactive track that won’t capture audio.
Extra Credit
To capture your audio as a stereo pair, click the cassette icon to put a bracket around your audio. To capture audio as dual-channel mono, click the cassette icon to remove the bracket. In the screenshot, tracks 1 and 2 are stereo, while tracks 3 and 4 are dual-channel mono. Capturing audio from track 4 has been turned off.
Monitoring Audio During Capture
You are not going deaf—the audio is off by default.
Audio monitoring during capture first appeared with Final Cut Pro 5.

Open the Log & Capture window and click the Clip Settings tab. Make sure Preview is checked. This turns on audio play-through during capture.
Extra Credit
Keep in mind that monitoring the audio during capture adds to system overhead. Occasionally this creates problems in the captured file, usually manifested as random clicking. Where possible, monitor your audio directly off the camera or deck rather than through the computer during capture.
Note
The Preview button will be grayed out if you don’t have a deck or camera attached to your system.
The Fastest Way to Control a Tape Deck
The world may be going tapeless, but tape decks still exist.
Here’s a great little Power Skill that makes controlling a tape deck a piece of cake. When in the Log & Capture mode/window:
• Press L to play the deck going forward.
• Press J to play the deck in reverse.
• Press K to stop playback.
Extra Credit
If you have an In or an Out set on the deck, you can quickly shuttle the deck to the In by pressing Shift+I, or shuttle to the Out by pressing Shift+O. This also works great in the Preview window of Log & Transfer, too. (Well, it also works in the Viewer, Canvas, and Timeline... but don’t tell anyone.)
With that as background, let’s see what else we can do:
• Press L up to six times to go forward up to six times faster than real time.
• Press J up to six times to go in reverse up to six times faster than real time.
• Press K+L at the same time to go in slow-motion forward.
• Press K+J at the same time to go in slow-motion reverse.
Converting Media
Final Cut Pro does not like compressed media. Here’s how to convert it.
Final Cut Pro was designed to work with original source media. It really doesn’t like media that’s been compressed. For instance, putting MP3 or AAC audio in Final Cut Pro’s Timeline often results in audio with clicks, pops, and drop-outs.
Trying to play MPEG-2, or M2T, or other compressed video files will frequently bring Final Cut to its knees. A much better approach is to convert your media into something Final Cut Pro can work with before bringing it into the program.
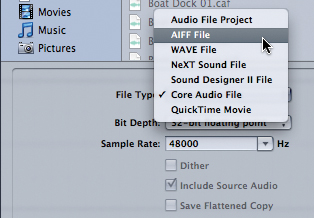
iTunes is a great conversion utility for audio. So is Soundtrack Pro, or QuickTime Pro. In Soundtrack, open the file you want to convert as an Audio File project. Choose File > Save As Copy and select AIFF from the Format menu at the bottom.
For converting video, Squared 5 Software’s MPEG Streamclip is the acknowledged master. You can find the current version of this free utility at www.squared5.com.
Extra Credit
Final Cut Pro allows you to mix both 44.1 kHz and 48 kHz audio on the same Timeline, without requiring rendering. However, if you also add 32 kHz audio, Final Cut will need to render it.
Log & Transfer Beefs Up
Working with tapeless media is improved in the latest version of Final Cut Pro.
Log & Capture is how we bring in media from tape. Log & Transfer is how we bring in media that is tapeless. And the latest version of Final Cut Pro has made this process much more robust.
Extra Credit
A very cool feature about Log & Transfer is that you can rename any clip and Final Cut will remember the original name of the file. If you ever need to recapture media, you don’t need to worry that you renamed your clips prior to bringing them into Final Cut.
Most times, for safety, we store the original source media on hard disks that are not attached to our computer. That way, we can’t erase files by mistake. Final Cut Pro 7 makes it easy to find and mount missing volumes when you need to recapture clips.
In addition, the Logging section has been improved to make it simpler to log clips with an improved naming section.

Batch Capturing Media After Disaster
I know you didn’t mean to erase your hard disk, but, well, accidents happen.
OK. The worst has happened. Some or all of your media just disappeared. Gone. Permanently. Missing.
Clearly, the first thing you need to do is stand up, swear, and blame the computer. Because this certainly wasn’t your fault! However, this is only a temporary solution, because it won’t bring your media back.
Recapturing can... provided, that is, you’ve been obsessive and made sure every clip has a Reel ID—whether tape or tapeless. With the ID, everything is possible. Without it, it’s gonna be a loooong night. (If clips are missing a Reel ID, you can still add them, even if they are offline. I covered this earlier in this chapter.)
All the missing clips have a red line through them in the Browser, so select all the clips you want to recapture. These can be from different tapes or folders; Final Cut is really good at tracking all this stuff. It processes tape-based media first, then tapeless.
Choose File > Batch Capture. If you need to recapture tape media, the Batch Capture window appears. This is the same window we use during regular capture. The cool part is the next window. This is a list of all the different tapes Final Cut Pro needs to recapture your media. As long as your Reel IDs are accurate, all you need to do is load each tape when Final Cut Pro asks for it, and poof! All your media gets recaptured. (I love watching the computer capture all my clips automatically.)

If you’re working with tapeless media, be sure to mount the hard disk containing the source files before starting this process. Final Cut automatically opens the folder in which you stored the original media. (The folder name is used as the Reel ID during transfer.) It asks permission to start, and then pulls all your media back in.
Note
Renaming tapeless media is not a problem. Final Cut Pro remembers the original name of the media assigned by the camera during recording. The key is the Reel ID.
Working with AVC Media
A new family of video codecs provides more options.
AVCHD (Advanced Video Codec High Definition) is a video format jointly developed by Sony and Panasonic. There are, currently, three varieties: AVCHD, AVCCAM, and AVC-Intra. The first two use GOP (Group of Pictures) encoding, while the latter uses I-frame encoding. GOP files are smaller, while I-frame files edit without requiring conforming.

Final Cut Pro does not support native editing of AVCHD or AVCCAM. Instead, when you ingest them using the Log & Transfer window, it transcodes (converts) it to ProRes 422. The benefit to this conversion is that ProRes edits, renders, and outputs faster than any GOP-based video codec. Plus, ProRes provides equal or greater quality for clips, transitions, and effects.
Note
Once AVCHD or AVC-Intra has been transcoded into ProRes, it cannot be exported back into its original AVC format.
The latest release of Final Cut Pro now supports AVC-Intra video natively. Currently, AVC-Intra is only recorded on Panasonic cameras. Now you have two choices: You can play, edit, and apply effects to AVC-Intra footage natively, or you can transcode during ingest into ProRes 422.
The question of what to do depends on where you want to spend your time. The advantage to working with AVC-Intra natively is that you can ingest quickly and start editing faster. However, you can’t export back into the AVC-Intra format, which means you need to transcode into ProRes, or some other codec, during final export.
Transcoding into ProRes takes longer at the beginning of a project, and it also increases your storage requirements because you need to duplicate all the media. However, output is very fast because you don’t need to convert the media during export.
Before ingesting AVC-Intra media natively, you need to select the P2 AVC-Intra plug-in. To do this, open Log & Transfer, click the small gear to open the preferences window, and select P2 AVC-Intra in the Source Format column.