
Chapter 8. Export and Output
It’s time for the final stage. With editing and effects complete, we need to get our project out of Final Cut Pro so the world can see it.
In the past, most projects would output to tape. Today the majority of projects are outputting to files—files that post to the Web, are placed on a DVD, or are broadcast via a playout server at the network.
The latest version of Final Cut Studio reflects this trend. Apple made few changes to their ability to output to tape, but they totally overhauled and improved exporting.
In this chapter, we’ll take a look at some of the less-obvious techniques you can use to get your projects out of Final Cut Pro and send them on their way.
Share the Good News
Final Cut Pro 7 offers sharing.
The two biggest problems with exporting from previous versions of Final Cut were that it took forever and unless you had a degree in rocket science you could never be sure your settings were correct. In any case, you were rarely happy with the results.

Apple fixed both these problems with Share in Final Cut Pro 7. Share is a one-stop system for compressing and publishing your files based on a set of prebuilt templates that Apple provides.
The biggest news with Share is that it runs in the background. This means that you can export a project while editing it at the same time. In fact, you can even be editing the exact same project you are exporting.
The other news is that Share only outputs one Timeline sequence to one destination. But there’s a big workaround: the Browser. Before selecting Share, go into the Browser and select one clip, a range of clips, a bin, a range of bins, a sequence, or a range of sequences.
Note
Contrary to what you might think, Share does not allow multiple users to share the same files. Instead, it allows you to easily share your files with others.
Share will build these into your choice of separate sources, or one large clip. And, if you select one large clip, Share can add Chapter markers at the start of each clip that transfer into the exported QuickTime movie, standard DVD, or Blu-ray Disc.
Send To Compressor
Sometimes, Share isn’t enough.
The benefit of using Share is that it is fast and easy. However, it isn’t flexible. All the settings are fixed. If you need to customize your compression settings, that’s where Send to Compressor comes in.
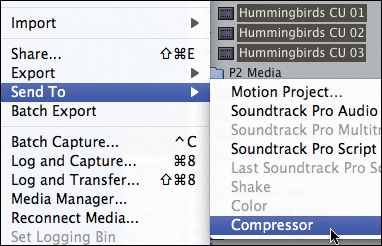
You can Send files to Compressor in two ways:
• From the Share window (File > Share)
• From the File menu (File > Send To > Compressor)
The benefits to using the Share window are that you can apply a compression preset and destination setting to all your files before sending them to Compressor. This saves time configuring them in Compressor.
Note
You can also access the Send to Compressor option by Control-clicking a clip in the Timeline or Browser.
The benefit to using File > Send To > Compressor is that you bypass the Share window, which means exports start faster.
In both cases, exporting happens in the background and the export quality is determined by the settings you use. If the settings are the same, the quality will be the same.
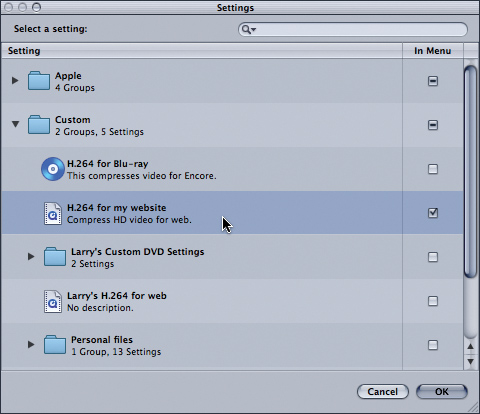
Accessing Custom Compressor Presets from Share
You aren’t locked into Share’s presets—provided you know where to look.
The simplicity of Share is that you have a limited number of choices to make. You pick the preset and click Export. But what if you want to add a watermark, or scale the image to a different size. You can’t modify Share’s presets. Does that mean you are out of luck?
Extra Credit
When displaying the Custom Setting menu, select the Menu check box and your custom Compressor setting shows up in the Share Preset pop-up menu.
No, you just need to look a bit deeper into the Share window. The bottom choice in the Preset pop-up is Custom. Select this, and the Settings window from Compressor is displayed.
Here you can select from any Apple preset for Compressor, or choose any custom setting you previously created and saved. This means that unless you need to modify a preset, you don’t need to go into Compressor, as you can access all your settings from the Share menu.
Share vs. Send vs. Export
Four ways to export your files—which should you pick?
If you have an earlier version of Final Cut Pro, your best export option is File > Export > QuickTime Movie. So that decision is easy. With Final Cut Pro 7, other choices appear.
File > Share provides a fast way to assign a compression setting and destination for one or more files. It can build all your selected files into a single master movie or output them as separate files. However, it limits you to one destination per share window and requires a preset compression setting.
File > Send to Compressor is the best choice when you want to create a customized compression setting that you have not yet saved as a preset. It is also the best choice when you want to send a file or files to multiple destinations.
Both Send and Share do their exporting in the background, making them very fast. Actually, the exporting process still takes a long time, but since Final Cut Pro is ready for you to continue editing almost immediately after you click Export, these give you the appearance of exporting instantly. Don’t be surprised if your compressed files take a while to appear.

Note
When you Send a file to Compressor using a destination of Source, the compressed file will be stored at the root level of your startup disk.
File > Export > QuickTime Movie is the fastest way to get your movie out of Final Cut Pro. This approach is best used when you need a stand-alone file with outstanding image quality. Use this when you want to create a master file you can store, transfer to another computer, or process separately through Compressor.
File > Export > Using QuickTime Conversion is the best choice for exporting freeze frames or compressing video using third-party software that doesn’t work with Compressor.
Batch Export: Is It Still Worth Doing?
Yes, Batch Export still has its uses.
With the advent of Share, does Batch Export still make sense? In short, yes. Batch Export is particularly useful when you have a lot of clips or sequences to export at once, or if you need to export the same sequence to multiple formats and settings. You can select as many clips, bins, and sequences as you need to export. Exported items are grouped into batches. It is the batch that determines the export setting, rather than the clips in it.
To use Batch Export:
1. Select the items—clips, bins, sequences—you want to export.
2. Choose File > Batch Export. Notice that all your selected items are grouped into the same bin. All items in the same batch export with the same settings.
3. Repeat this process as necessary. Each group of selected files is placed into a new batch every time you select File > Batch Export.
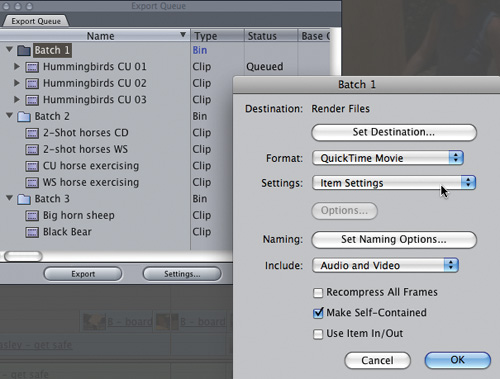
4. Select a Batch folder in the Batch Export window.
5. Click the Settings button.
6. Adjust the export settings as necessary for each batch.
7. When all batches are configured, click Export to start the process.
Note
Items that you place in the Batch Export Queue disappear when you quit Final Cut. If that happens, you’ll need to rebatch them when you restart the program.
Extra Credit
You can drag files from one batch to another. Also, you can delete files from a batch by highlighting the file and pressing Delete, and you can make a copy of a file by Option-dragging.
Creating a Blu-ray Disc
There are two ways to record Blu-ray media. Here’s how to decide.
With the latest release of Final Cut Pro, Apple is taking the first tentative steps to supporting Blu-ray. In fact, Final Cut Pro, via Share, can now create Blu-ray Discs. Sort of...
Extra Credit
To configure the interface settings for a high-def disc, click Create Blu-ray Disc when selecting the Blu-ray option in Share.
Blu-ray is two things: a format for compressing high-definition video and a format for storing those compressed files onto optical media. Currently the Macintosh operating system does not support playing back Blu-ray Discs—which means that you need to purchase a separate Blu-ray player, such as a Sony PlayStation 3, in order to view the discs you create.
However, there are two ways to burn a Blu-ray Disc: using existing DVD burners, such as a SuperDrive, or using Blu-ray burners. Apple calls Blu-ray media burned to a standard DVD an AVCHD (Advanced Video Codec High Definition) disc. Only Blu-ray media burned to a Blu-ray Disc can be called a Blu-ray Disc.
The good news about AVCHD discs is that you can burn them, but not view them, on your current DVD burner. They don’t hold as much media—30–60 minutes worth—nor does it have the same quality as Blu-ray Disc because the AVCHD disc doesn’t support the same high data rate. However, Apple has done a great job in optimizing the compression settings to make the Blu-ray media you create look really good.
So, if you are looking for an easy way to create high-def discs, AVCHD is the way to go.

Send To vs. Open In Editor
How do you decide which to use?
When you want to send a file from Final Cut Pro to another application, you have two choices: Send To, or Open in Editor.
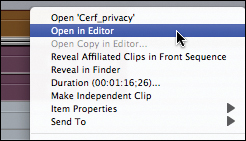
You use Send To when you are sending a file that was created in Final Cut Pro to another application for the first time. For instance, you use it to send a clip that was captured in Final Cut to Motion.
You use Open in Editor when you are opening a file that was created in another application. For instance, you use Open in Editor when you have a Motion project edited to the Final Cut Pro Timeline that you want to return to Motion to make changes.
Examples of files that you use Open in Editor for include:
• Motion projects
• Soundtrack audio projects
• Soundtrack multitrack projects
• Photoshop PSD files
• LiveType files
Here’s an easy way to think of this: The first time, you Send it; after that, you Open it.
You Don’t Need to Run Compressor to Compress
Strange, but true!
Compressor isn’t used to compress a clip. Just like Share, Compressor is used to determine the compression settings for a clip, then it hands the file over to another program to compress the file.
Note
Batch Monitor is just a monitor for the compression process. You don’t need to have it running to compress, either.
The actual compression is done by an application with no user interface called a daemon. (Daemons are Unix files that run invisibly in the background.)
So, once you submit a file for compressing, you can safely—and with a clear conscience—quit Compressor.

Extra Credit
If you want to see how hard your computer is working to compress your video, choose Utilities > Activity Monitor, choose Window > Activity Monitor, and click the CPU tab.
Exporting Freeze Frames
Final Cut Pro makes it easy to export a freeze frame.
You don’t need to create the freeze frames, also called “still frames,” first. Here are the steps:
1. Park your playhead on the frame you want to export. This can be in the Viewer, Canvas, or Timeline.
Note
Final Cut Pro version 6.0.2 had a bug with image exporting. Upgrading to a later version fixes it.
2. Choose File > Export > Using QuickTime Conversion.
3. Select Still Image from the Format menu at the bottom.
Note
Don’t deinterlace your images in Final Cut Pro before exporting. As you’ll read in a moment, Photoshop does a much better job.
4. Leave Use set to Default Settings.
5. The default export format for still images is PNG, which is an uncompressed image format. Leave this setting alone as it is a good choice for stills.
6. Give the image a name and location where you want it saved.
7. Click Save.

Exporting a Batch of Freeze Frames
Here’s a fast way to export a collection of still images.
Follow these steps:
1. Create a bin in the Browser to store your images. Call it, for example, Images.
2. Put your playhead on the frame you want to freeze, either in the Viewer or the Timeline, and select Modify > Make Freeze Frame (or press Shift+N). This creates a freeze frame and displays it in the Viewer.

3. Drag the freeze frame from the Viewer to your newly created Images bin in the Browser. In the Browser, remove the timecode reference from the end of the filename. The colons in the timecode will prevent it from exporting.
4. Continue this process until you have collected all the images you desire in this bin. Make sure all filenames are unique and all colons are removed.
5. Select all the images in the bin and choose File > Batch Export.
6. Select the Batch folder and click Settings.
7. Set Format to Still Image.
8. Set Destination to the destination of your choice.
9. The defaults for Options and Naming should be fine, so leave them alone.
10. Set Settings to Default Settings and click OK.
11. Click Export, and you’re done!
Resizing Exported Freeze Frames
Exported video freeze frames look stretched. Here’s how to fix them.
Just as we need to prep our images to look good for importing, we also need to adjust video freeze frames after exporting from Final Cut. The reason is that most video uses rectangular pixels for images while the computer uses square pixels.
Note
Once you correct for the aspect ratio, you can continue to scale the image size as much as you want.
Import your video freeze frames into Photoshop, and then follow these steps:
1. Deinterlace your image (choose Filters > Video > Deinterlace). The default deinterlace settings are fine. Photoshop does a much better job deinterlacing than Final Cut Pro does.
2. Adjust your image quality as necessary. Add any other effects you want.
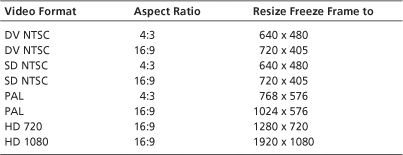
3. As the last step, correct the aspect ratio by resizing your image according to the following table. (Remember to turn off Constrain Proportions and set Resolution to 72.)
RESIZING FREEZE FRAMES

When to Deinterlace
Just because you can see the lines doesn’t mean you should get rid of them.
Interlacing was invented at the dawn of television, back in the 1930s, to solve a variety of technical issues. Since that day, all NTSC and PAL footage is interlaced. The TV you’ve been watching all your life is interlaced. There is nothing inherently wrong with interlacing. It is built into the design of the format. Even today, some HD footage is interlaced—all the formats that end with the letter i, for example. Even some of our networks transmit interlaced HD images—CBS, NBC, and PBS, to name three.
However, a problem arises as we start to watch programs designed for the TV set on our computer. TVs are interlaced. Computers are not. TVs don’t show interlace lines. Computers do.
One way to get around this problem is to shoot everything in progressive (non-interlaced) mode. However, not all cameras support this format and even some that say they do, don’t.
Before you decide to deinterlace all your footage, keep in mind that deinterlacing essentially removes every other horizontal line in your image. At best you lose detail; at worst, your image starts looking soft.
Here are some basic rules of thumb:
• If your program is going to be principally viewed on a TV, don’t deinterlace.
• If your program is going to be viewed on a computer, compress the image size to 50 percent of the original size or smaller. This retains your image quality while making interlacing disappear.
• If you are shooting an image to be projected to a large screen (i.e., theaters), shoot progressive. Nothing you do with interlacing is going to improve your image.
• Don’t deinterlace freeze frames that you plan to export, prior to exporting.
• Don’t deinterlace freeze frames that you are editing back into your sequence unless they are flickering.
• Deinterlacing has no effect on flickering lines within still images. Use the flicker filter instead.
• Triple-check that your camera actually shoots a progressive image. Don’t believe the manufacturer’s marketing blurb.
EDL vs. XML
Which should you use when moving a project between systems?
The EDL (Edit Decision List) was invented more than 25 years ago as a way to store sequence edit information. In those days, we edited between analog reels of tape using very expensive tape deck controllers, like CMX systems. Since then, EDLs have been used to simplify the process of moving video projects between systems, such as between Avid and Final Cut Pro.

The problem with EDLs is that they are very limited—they only support two tracks of video and a maximum of four tracks of audio, depending on the EDL format you select. Outputting complex sequences requires creating multiple EDLs.
Worse, when using EDLs, different editing systems treat Reel IDs differently. (Accurate Reel IDs are essential to recapturing source footage, which is mandatory with EDL transfers.) Avid allows up to 15 characters but only allows the first 8 characters to be unique. Final Cut permits Reel IDs to contain only 6 characters when using the CMX 3600 format.
Even worse, not all frame rates are supported, which means you could shoot a project that an EDL won’t export. Much more robust format exchange languages are XML (Extensible Markup Language) for Final Cut Pro and AAF (Advanced Authoring Format) for Avid.
Note
Automatic Duck is an excellent and very popular tool to move projects between editing applications; learn more at www.automaticduck.com.
In general, use an EDL to move a project when you are early in the edit process, before applying any effects or sophisticated transition effects. Otherwise, XML is a much better choice—especially when used in conjunction with Automatic Duck software.
Go Back to the Past with XML
XML solves the problem of converting a project to an earlier version.
Final Cut makes it easy to bring an older project into a newer version of the software. Just open the file and Final Cut converts it automatically.
However, how do you move a later project back to an earlier version? By using XML—here’s how:
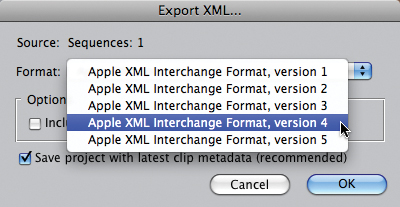
1. In the older version of Final Cut, choose File > Export > XML and make note of the highest level of XML that version supports. Final Cut Pro 6, for instance, supports XML version 4, while Final Cut Pro 5 supports XML version 3.
2. Return to the newer version of Final Cut Pro, and in the Browser, select the sequence, bins, and/or clips you want to move back to the earlier version.
Note
Features in the newer version of Final Cut that are not supported on the older system, such as filters or speed effects, will be ignored. If the media is not on the older system, you will need to transfer it manually. XML contains pointers to the media, not the media itself. If the media format is not supported by the earlier version of Final Cut Pro, you will need to recapture it in a format that is supported.
3. Choose File > Export > XML. From the Format pop-up menu, select the highest version of XML which is supported in the older version of Final Cut Pro.
4. Leave the remaining settings at their default and click OK.
Note
When converting a project from an older version, Final Cut Pro doesn’t make the conversion permanent until you save the file. So, if you don’t save the file in the newer version, you will still be able to open it with the earlier version.
5. Copy the XML file to the other, older, system.
6. In the older system, choose File > Import > XML, then select the XML file you transferred from the newer system.
Using XML to Move Favorite Effects
Here’s how to move effects between projects when Copy/Paste won’t work.
Want to move your favorite effect settings from project to project? Easy. Use Copy and Paste; or just drag and drop.
But what if those projects are on different computers thousands of miles apart? Try this XML workaround instead.
1. In the project that contains the effects you want to move, create a new sequence.
2. From the Video Generators pop-up menu in the lower-right corner of the Viewer, create a slug (a clip consisting of audio and video black). The length of the slug is not important, unless you’re using keyframes to time an effect.
3. Edit the slug into a new sequence.
4. Create a slug for every effect you want to move.
5. Select a clip with an effect setting that you want to move and press Command+C.
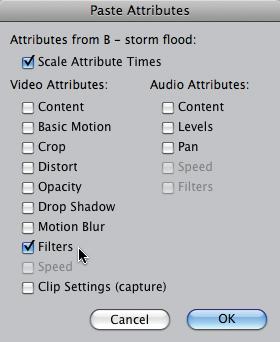
6. Select the first slug and choose Edit > Paste Attributes.
7. Drag the slug to the Browser and give it an identifying name. Repeat this process until all effects have been copied to slugs and all slugs are named and in the Browser.
8. Select all your effects slugs in the Browser and export them using XML (choose File > Export > XML).
9. Transfer the XML file to the new computer and open the project in which you want to import the effects.
10. Select File > Import > XML.
Your effects now show up as clips in the Browser. You can keep them in the Browser, drag them to your Favorites folder, or use Edit > Paste Attributes to apply them to clips in your Timeline.
Exporting Lists for Excel
Here’s an easy way to get data out of Final Cut Pro and into Excel.
If you want a quick reference of all your clip info, but you don’t want to open Final Cut Pro and wait for it to load your project every time, consider exporting your logging information into Excel. When you have hours and hours of material, this can be a great way to access and share data quickly—especially for systems that aren’t running Final Cut.
Note
Intelligent Assistance recently released several pieces of utility software that make this process a lot more flexible. Learn more at www.intelligentassistance.com.
Follow these steps:
1. Open the Final Cut Pro project that has the clips with the information you want to export.
Note
Exporting a batch list exports everything in the Browser. There is no way to restrict the export to a selection of clips or range of columns.
2. Select the Browser.
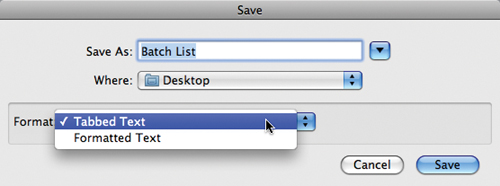
3. Choose File > Export > Batch List.
4. Name your file, choose a destination (the Desktop works well for this), and select Tabbed Text for the format.
5. Open Excel.
6. Drag the file from the Desktop onto the Excel icon in your Dock. (Double-clicking the file will open it in Final Cut Pro, which we don’t want.)
7. Excel opens it, and very cleverly puts each clip in its own row, neatly duplicating all the Browser columns in your worksheet.
Exporting Marker Lists
Exporting marker information is now a piece of cake.
With the release of Final Cut Pro 7, we can now export marker data as a tab-delimited text file. This allows us to analyze, format, search, print, and share marker data.
Note
This option is grayed out if you select multiple clips in the Browser.
Here’s how:
1. Select the sequence or clips you want to export.
2. Choose File > Export > Markers List as Text.
Note
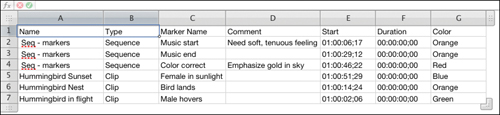
Marker fields that are exported include Sequence Name, Marker Type, Marker Name, Comment, Start Timecode, Duration, and Color.
3. In the Save dialog box, give the file a name and destination.
4. From the pop-up menu, select which types of markers you want to export.
5. Click Save.
Round-Tripping Audio to Soundtrack Pro
Faster than a speeding export, this is the best way to share audio files between Final Cut Pro and Soundtrack Pro.
A faster way to work with audio in both Final Cut Pro and Soundtrack Pro is called round-tripping. You have three ways to send files:
• Send to Audio File Project sends a single mono, or stereo pair, audio clip to Soundtrack Pro for repair. To bring it back to Final Cut Pro, simply save the file in Soundtrack Pro. Using this option, you can send only one file at a time.
• Send to Multitrack Project sends a single clip, group of clips, or entire sequence to Soundtrack Pro for mixing. Recent versions of Soundtrack also support audio repair within the mixing window. To return the audio to Final Cut Pro, select File > Export in Soundtrack.
• Send to Soundtrack Pro Script modifies the source file stored on your hard disk. This option has the potential of permanently altering your master file, so use this option cautiously.

Note
If you select Soundtrack Pro Script and the script contains keyframes, the placement of the keyframes may change, depending on the difference in duration between the keyframes in the script and the source clip on disk.
Timecode Concerns When Exporting for DVD Subtitles
DVD subtitles are keyed to video timecode—but not the timecode you expect.
Hiring a subtitle company to create subtitles, and then importing the text file they create, is often the fastest way to get subtitles into DVD Studio Pro. However, in order for this to work, the subtitles must have a timecode reference. And that timecode needs to match the timecode of the track in DVD Studio Pro.

The problem is, the timecode of your Final Cut Pro sequence is almost always changed during compression. This means that the QuickTime movie you sent the subtitle company won’t match the timecode of your compressed MPEG-2 video.
Note
In my experience, only the hours reference needs to change. Minutes, seconds, and frames are not a problem.
By default, when you export out of Final Cut, your timecode starts at hour 01. When you compress an MPEG-2 file, by default the timecode starts at hour 0. In other words, the timecodes don’t match, which breaks the import process.
Extra Credit
Most DVDs are produced using non-drop-frame timecode. Make a point to check before exporting.
To fix this, do one of the following:
• Change the timecode references in the subtitle text file.
• Change the timecode of your Final Cut Pro sequence prior to export (choose Sequence > Settings > Timeline Options).
• Change the starting timecode in Compressor before you compress the file. You can change the timecode on the Video Format tab in Compressor’s Inspector window.
You can change timecode settings at any time inside Final Cut Pro without doing damage to your project.
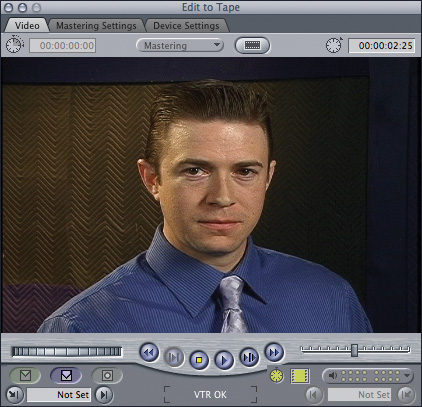
Print to Video vs. Edit to Tape
In spite of what you read, tape still exists. Here’s how to decide how to output.
There’s Export—which means to create a file—and there’s Output—which means to record to tape. You “output” when you want to lay your sequence off to tape. And there are two options that do this: Print to Video and Edit to Tape. Which do you use?
Choose File > Print to Video when you need to record to tape at high quality and you don’t care what the timecode of your sequence is on the tape. Print to Video uses what’s called a “dirty-in and dirty-out.” This means that you have image break-up at both the In and Out points. For this reason, Print to Video should only be used for entire sequences and have plenty of black at the beginning and end of the sequence. (If I don’t have bars at the beginning, I generally add 10 seconds of black at the beginning and 60 seconds of black at the end of my sequence.)
Note
While virtually all video tape decks support Assemble edits, not all decks support Insert edits.
Choose File > Edit to Tape when you need to record to tape at high quality, and you need to record at a specific timecode on the tape. Most professional organizations require programs to start at timecode 01:00:00:00. Edit to Tape can create two edit options: an Assemble edit, which does a “clean-in and dirty-out,” or an Insert edit, which does a “clean-in and clean-out.” With this option, you set an In and an Out point and edit to the tape like you edit to the Timeline. For this reason, Edit to Tape is good for recording entire programs (an Assemble edit), or just “punching in” a short segment (an Insert edit).
Note
There is no difference in quality between these two options. Edit to Tape requires timecode to be recorded on the tape prior to output (see the next Power Skill for more).
Extra Credit
Always ask if your client needs drop-frame or timecode. Most broadcast outlets say yes; others say no. Make a point to ask. Also, many HD formats also use drop-frame timecode.
Recording Timecode to Tape
Like horseshoeing, recording timecode to tape is a vanishing art.
I couldn’t resist ending a book covering the latest in technology with something from the last century—recording timecode to tape.
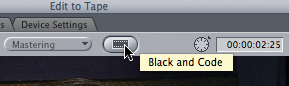
You need to record timecode to tape—a process called striping—in order to use File > Edit to Tape.
Depending on the capability of the tape deck, this can often be handled directly by the deck. But for those decks that don’t support this, Final Cut can help.
• Connect your deck, power up, and put in a fresh blank tape.
Note
Recording black and code will completely erase your tape. Be sure that you loaded a blank one. There is no undo here.
• Start Final Cut Pro (note that you do this after the deck is connected and powered up).
• Choose File > Edit to Tape.
• In the top center, click the small black button that looks like a squashed centipede—this is the Black and Code button. (Yes, it really is that tiny. No, it doesn’t appear anywhere else in the application.)
• Follow the dialog boxes that appear after you click the button.
• Recording black and code is real time. An hour tape takes an hour.