
In a virtual world, there is always a character or symbol to represent the user. This visual representation is called creating avatars. It can be a 2D image of the player or a 3D character of the player. Every avatar has different styles and colors, and thus gives personality to the players.
Avatar is very important in a virtual world because most of the features are designed around avatars. Users interact with each other via their avatars, they explore the virtual world via avatars, and they complete challenges to level up their avatars.
In this chapter, we will discuss several important techniques for creating avatars in virtual world. For example, we will discuss how to make an avatar unique by customization, and how to decide the rendering methods and reduce the graphic workload optimally.
We will also integrate avatars with the SmartFoxServer and begin building our virtual world.
An avatar is composited by graphics and animation.
The avatar graphics are its looks. It is not a static image but a collection of images to display the directions and appearance. There are different approaches of drawing the avatar graphics depending on the render methods and how many directions and animations the avatar needs.
Animations represent different actions of the avatar. The most basic animation is walking. Other animations such as hand waving and throwing objects are also common. There will be different animation sets for different virtual world designs. A fighting topic virtual world will probably contain a collection of fighting animation sets. A hunting topic virtual world will contain animations of collection items and using hunting tools.
Isometric tile is composed by diamond shapes with four-edge connection to the other tiles. It is not hard to imagine that every avatar in the isometric view may face towards four directions. They are the north east, south east, south west, and north west.
However, sometimes using only these four directions may not be enough; some game designs may require the avatar to face the user or walk to the other isometric tile a cross the diamond corner. In this case, eight directions are required.

The direction number of the avatars affects the artwork drawing directly. Just imagine that we are building a virtual world where players can fight with each other. How many animations are there for an avatar to fight? Say, five sets of animations. How many directions can the avatar faces? 4? 8? Or even 12? For example, we are now talking about five sets of animations with 8 directions of each avatar. That's already 40 animations for only one avatar. We may design the virtual world to have 12 kinds of avatars and each avatar to have different clothes for customization. The graphics workload keeps increasing when only one of these aspects increases.
That's why I often consider different approaches that reduce the graphic workload of the avatars. Take four directions as an example. In most cases, we have very similar animations when the avatar is facing south-east and south-west. And the animation of north-east and north-west are similar too. Therefore, it is a common technique that mirrors the animation of west side into east side. It can be easily done in Flash by just changing the x-axis of the scaling property to between -1 and 1. This property results in the avatar flipping from one side to another side. For a 4-directions animation set, only 2 directions need to be drawn. In an 8-directions animation set, only 5 directions need to be drawn.
Next, we will discuss the rendering methods that will conclude how the amount of directions, animations, and customization affect the graphic workload.
There are different approaches to render avatars in Flash virtual world. Each rendered method comes with both advantages and disadvantages. Some methods take more time to draw with fancy outlook while others may take more time to program.
Note
It is important to decide which rendering methods of the avatar are required in predevelopment stage. It will be much more difficult to change the rendering method after the project is in development.
We will discuss different rendering methods and the pros and cons of them.
It is convenient to use the Flash native vector drawing for avatar because every drawing can be done within the Flash. The output can be cute and cartoon style.
One advantage of using vector is that color customization is easy to implement by using the native ActionScript color transform. We can easily assign different colors to different parts of the avatar without extra graphic drawing.
Another advantage of using vector animation is that we can scale up and down the avatars whenever needed. It is useful when we need to zoom in or out of the map and the avatars in the virtual world. The following graph shows the comparison of scaling up a vector and bitmap graphic:

The disadvantage is that we need to draw the animation of every part of the avatar in every direction frame by frame. Flash tweening can help but the workload is heavier than other methods. We can prerender the animations or control them by ActionScript in methods discussed later. In vector animation, every animation is hand-drawn and thus any late modification on the avatar design can cost quite a lot of workload. There may not be too many directions of the avatars meaning the rotation of the avatars will not be very smooth.
Sprite sheet is a graphics technique that is used in almost all game platforms. Sprite sheet is a large bitmap file that contains every frame of animation. Bitmap data from each frame is masked and rendered to the screen. A Flash developer may think that there is a timeline with frame one on the top left and counting the frame from left to right in each row from top to bottom.
This technique is useful when the avatar graphic designer has experience in other game platforms. Another advantage of using bitmap data is faster rendering than vector in Flash player.
The other advantage is the sprite sheet can be rendered from 3D software. For example, we can make an avatar model in Maya (http://autodesk.com/maya) or 3Ds Max (http://autodesk.com/3dsmax) with animations set up. Then we set up eight cameras with orthographic perspective. The orthographic perspective ensures the rendered image fits the isometric world. After setting up the scene, just render the whole animation with eight different cameras and we will get all the bitmap files of the avatar. The benefit is that the rendering process is automatic so that we can reduce the workload a lot. Later if we want to modify the character, we only need to modify it in the 3D software and render it again.
One big disadvantage of using sprite sheet is the file size. The sprite sheets are in bitmap format and one set of animation can cost up to several hundred kilobytes. The file size can be very large when there are many animations and many more bitmaps for switching styles of the avatar.
The other disadvantage is that changing color is quite difficult. Unlike vector rendering where color replacement can be done by ActionScript, we need to replace another bitmap data to change the color. That means every available color doubles the file size.
We described how to use 3D software to prerender graphics of the avatars in the previous section. Instead of prerendering the graphics into 2D bitmap, we can integrate a Flash 3D engine to render the 3D model into isometric view in real time.
Real-time 3D rendering is the next trend of Flash. There are several 3D engines available in the market that support rendering complex 3D models with animations. Papervision3D (http://blog.papervision3d.org/) and Away3D (http://away3d.com/) are two examples among them.
The advantage of using 3D rendering in isometric is that the rotation of avatars can be very smooth. Also different textures can share the same model and different models can share the same animation skeleton. Thanks to this great graphic reusability, 3D rendering virtual world can create different combinations of avatar appearance and animations without adding extra graphic workload in development.
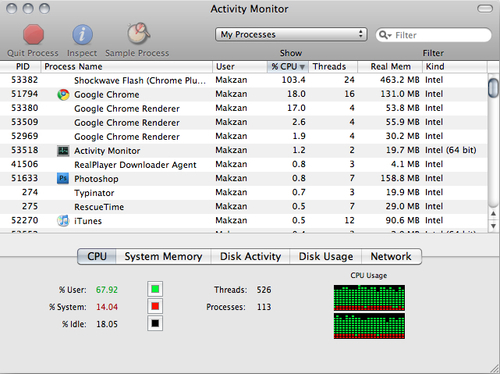
However, one disadvantage of using 3D rendering is the Flash player performance. The latest version of Flash player is 10.1 at the time of writing. The following screenshots from Cafeworld (http://apps.facebook.com/cafeworld/) show that the CPU resources usage is very high when rendering the isometric 3D environment with three avatars on screen:

Bone skeleton used to be an uncommon method to render avatar. What it does is creates an animated skeleton and then glues different parts of body together onto the skeleton. It is somehow similar to the skeleton and mesh relationship in 3-D software but in two dimensions instead. A lot of mathematics is needed to calculate the position and rotation of each part of the body and make the implementation difficult.
Thanks to the introduction of bone tool and inverse kinematics in Flash CS4, this technique is becoming more mature and easier to be used in the Flash world. Adobe has posted a tutorial about using bone tool to create a 2D character (http://www.adobe.com/devnet/flash/articles/character_animation_ik.html).
The following screenshot shows another bone skeleton example from gotoAndPlay demonstrating how to glue the parts into a walking animation. The post can be found in this link: http://www.gotoandplay.it/_articles/2007/04/skeletal_animation.php
The advantage of using 2D bone skeleton is that animations are controlled by ActionScript. The reusing of animations means this technique fits those game designs that require many animations. A dancing virtual world that requires a lot of different unique animations is one example that may need this technique.
One disadvantage is that the large amount of mathematic calculation for the animations makes it difficult to implement.
Every rendering methods has its own advantages and disadvantages and not one of the methods fits all type of games. It is the game designer's job to decide a suitable rendering method for a game or virtual world project. Therefore, it is important to know their limitations and consider thoughtfully before getting started with development.
Note
We can take a look at how other Flash virtual worlds render avatars by checking the showcase of the SmartFoxServer (http://www.smartfoxserver.com/showcase/).
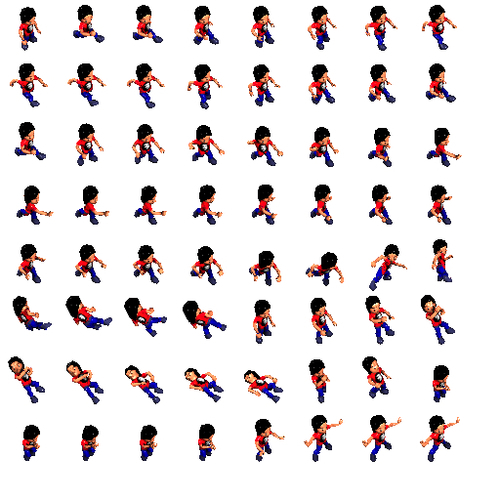
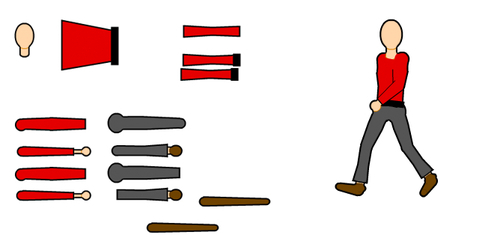
We are going to draw the avatar now. In this example, we use the vector animation as the rendering method. Our avatar graphic is divided into six parts — head, body, two hands, and two feet. We will use 4-direction representation in our virtual world.
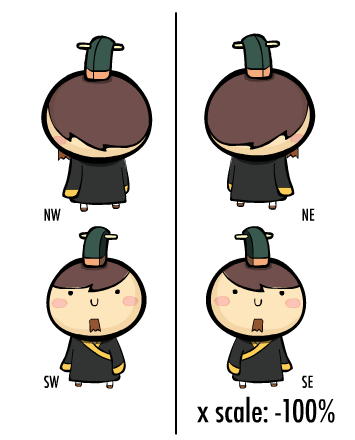
A 4-direction avatar faces four directions and therefore needs four sets of graphics and animations for each part. However, we only need to draw two directions and then mirror them along the x-axis.
In order to make the avatar graphics flexible for different directions and different animations, we need to put each part into different layers. Each layer has its own animation timeline for each part of the avatar. And each direction of the graphics is placed into one movie clip.
All four directions are placed into the same place with overlap shown in the following graph. Then we display each direction by hiding the others using ActionScript. This setup makes the direction switch as simple as turning on and off the visibility instead of replacing graphics. The following screenshot shows how the four directions of movie clip overlap together in four layers within a parent movie clip:

We need to draw the animation for all available directions. As NW and NE direction is the same movie clip and SE and SW is another same one, we need to draw the animation two times for all four directions. We have to make sure the animation length matches among all directions so that the animation is smooth when we rotate the avatar in the virtual world.
We will use the south-west direction as an example here. The walking is a two-frame animation loop. The interval of the walking animation needs some fine-tuning to make it look like really walking on the ground. Too long or too short of the interval will affect the realistic walking.
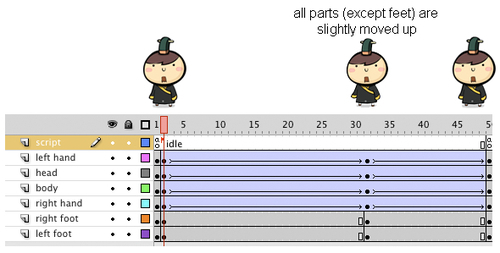
Idling an avatar does not mean putting it into static stopped frame. Users often watch avatars idling in the virtual world and this animation becomes important. The avatar gives a live and organic feeling to the player via a good idling animation. We will make the avatar breathe when idling in this example. Some other virtual worlds will play some different animations when the avatar is idle, such as looking around or sitting down.
To make the breathing effect realistic, we extend the timeline to around two seconds. We will set the frame rate per second to 30 and it takes 60 frames for two seconds. The duration is around the normal breathing time of human.
Note
Typically, we would set the frame rate at 24 or 30. Setting the frame rate too high may result in performance issue and lagging in old machines when the Flash virtual world requires intensive CPU resources.
In the first and last frame of the animation duration, we created two copies of the key frame and named the first frame as idle. In the middle point of the duration, we created one key frame for the head, body, and two hands. When a human breathes, the whole body moves slightly up and down periodically. Therefore, in this key frame we move the head, body, and two hands slightly up by several pixels.
Finish the animation by applying classic tween between the key frames and putting a gotoAndPlay('idle') script in the last frame to loop the animation.
There is one trick of making the breathing animation more organic. When we breathe, the moving up motion is slightly slower then the moving down motion. Therefore, we usually make the moving up animation last longer then the moving down animation. The following graph shows how the idle animation is composited:
We will now embed a class to the avatar graphics. This class controls the directions and other avatar helper functions.
There are two instance variables in the class. One array is used to reference the movie clips of the four directions. Another one is to reference the current direction.
private var _directionArray:Array = new Array();
private var _activeDirection:MovieClip;
The initial function sets default direction and idle animation. The dir_nw, dir_ne, dir_sw, and dir_se are the names of the four directions of movie clip set in the Flash document file. We put them into an array for easier access later.
private function init(e:Event):void {
_directionArray[0] = this.dir_nw;
_directionArray[1] = this.dir_ne;
_directionArray[2] = this.dir_sw;
_directionArray[3] = this.dir_se;
showDirection("se");
playAnimation("idle");
}
The showDirection function displays the movie clip with the new direction and hides others.
public function showDirection(dir:String = "se"):void {
for each(var avatar:MovieClip in _directionArray){
avatar.visible = false;
}
this['dir_'+dir].visible = true;
_activeDirection = this['dir_'+dir];
}
As different animations are placed in the timeline of the movie clip in each direction, we can simply tell the movie clip with current direction play that specify timeline.
public function playAnimation(animation:String = 'idle'):void {
_activeDirection.gotoAndPlay(animation);
}
We have discussed a basic SmartFoxServer connection example in Chapter 3, Getting Familiar with SmartFoxServer. We will keep applying new techniques into the SmartFoxServer during the book to create our virtual world. It is now time to try to give every user an avatar.
When users login to the virtual world, all existing users and their avatars will be drawn. We also need to draw a new avatar when another user joins the world and remove it when someone leaves.
When we integrate the avatars into SmartFoxServer, we will separate the logic into different server event handlers. It is very important to know when and which event is called during the connection so that we can place correct code in correct event handlers.
The implementation of onConnection and onRoomListUpdate event will be the same as in Chapter 3, Getting Familiar with SmartFoxServer. We now add three more events to our document class.
When we successfully join a room in the virtual world, the onJoinRoom event will be called. How about when someone logs in or leaves the room? SmartFoxServer provides the onUserEnterRoom and onUserLeaveRoom event.
We need one instance variable to keep all the avatar movie clips with existing users so that we can reference them later.
private var _avatarList:Array = new Array();
The SmartFoxServer events are registered in the constructor.
public function Ch05_02() {
_sfs = new SmartFoxClient(true);
_sfs.addEventListener(SFSEvent.onConnection,onConnection);
_sfs.addEventListener(SFSEvent.onRoomListUpdate,onRoomListUpdate);
_sfs.addEventListener(SFSEvent.onJoinRoom,onJoinRoom);
_sfs.addEventListener(SFSEvent.onUserEnterRoom,onUserEnterRoom);
_sfs.addEventListener(SFSEvent.onUserLeaveRoom,onUserLeaveRoom);
_sfs.connect("127.0.0.1",9339);
}
Before handling the events, we prepare a function to draw an avatar at a random position on the stage. This function is placed in the document class. The avatar movie clip reference is returned after executing this function for other logic to access it. The username is also passed into this function so that we can display the name later but now we just focus on the position.
private function drawAvatarAtRandomPlace(username:String):Avatar {
var avatar:Avatar = new Avatar();
addChild(avatar);
/* random position with 50 pixels margin to the border */
avatar.x = Math.random()*(stage.stageWidth-100)+50;
avatar.y = Math.random()*(stage.stageHeight-100)+50;
return avatar;
}
When the user successfully logs in and joins the default room of the virtual world, we will get a user list from the event parameters and draw avatars of all existing users. Please note that the newly joined user is already included in the user list.
Note
The SmartFoxServer event parameters are useful and handy to quickly access the target information such as user and room instance. Every event has its own set of parameters and the detail usage is listed in a document of the SmartFoxServer Flash API (http://smartfoxserver.com/docs/docPages/as3/html/index.html).
private function onJoinRoom(e:SFSEvent):void {
/* get current room data */
var room:Room = e.params.room;
/* load all users and draw, including myself */
var userList:Array = room.getUserList();
for each(var user:User in userList){
var avatar:Avatar = drawAvatarAtRandomPlace(user.getName());
/* Remember which avatar movieclip is from which user*/
_avatarList[user.getName()] = avatar;
}
}
We need to draw some new avatars when some other users join our current room.
private function onUserEnterRoom(e:SFSEvent):void {
/* get the username of the new user*/
var username:String = e.params.user.getName();
/* draw the avatar */
var avatar:Avatar = drawAvatarAtRandomPlace(username);
/* Remember which avatar movieclip is from which user*/
_avatarList[username] = avatar;
}
We have an avatar list to map all users in the room to the avatar movie clips on stage. This allows us to remove the user's avatar graphics when the user leaves the room.
private function onUserLeaveRoom(e:SFSEvent):void {
/* know which user is leaving the room */
var username:String = e.params.userName;
removeChild(_avatarList[username]);
}
We need to test the Flash movies with several instances. Open the Flash movies in several web browsers to test and we will see that the avatars are coming in and out when we are increasing or reducing the Flash movie instances.
However, the position of the avatars is not synchronized among the Flash movies. It is because we are now using random position for every user. We need to remember the position of existing avatars for others to use. The position of the avatar belongs to each user and this can be done by user variables.
User variables are some extra user information in server side. They are designed for developers to temporarily store user-specific data that shares in the same room. For example, storing the user's appearance and position.
Let's continue from our last example. We had a draw function to draw the avatar at random position; now we need another function to draw the avatar in known position.
private function drawAvatar(username:String, posX:int, posY:int):Avatar {
var avatar:Avatar = new Avatar();
addChild(avatar);
avatar.x = posX;
avatar.y = posY;
return avatar;
}
The onUserVariablesUpdate event can let us get the newly changed user variables from other users. Therefore we add the listener in the initial function.
_sfs.addEventListener(SFSEvent.onUserVariablesUpdate, onUserVariablesUpdate);
We need to save our initial position to user variables after successfully joining the default room. We handle our avatar and other existing avatars separately. We save our avatar position and get other avatar positions. We also set a flag to indicate that this is an initial position update. This flag is useful for other users to know that we are creating a new position or modifying an existing position of the avatar.
private function onJoinRoom(e:SFSEvent):void {
var myAvatar:Avatar = drawAvatarAtRandomPlace(_sfs.myUserName);
/* save position of myself into user variables */
var params:Object = new Object();
params.posX = myAvatar.x;
params.posY = myAvatar.y;
params.firstTime = true;
_sfs.setUserVariables(params);
/* get current room data */
var room:Room = e.params.room;
/* load all users and draw */
var userList:Array = room.getUserList();
for each(var user:User in userList){
/* exclude myself */
if (user.getName() != _sfs.myUserName){
/* get user's position from user variables */
var posX:int = user.getVariable('posX'),
var posY:int = user.getVariable('posY'),
var avatar:Avatar = drawAvatar(user. getName(),posX,posY);
_avatarList[user.getName()] = avatar;
}
}
We used to create new avatars for other users in the onUserEnterRoom event handler. However, we need to wait for the new user's updates about their positions before drawing them. We put the avatar drawing responsibility from onUserEnterRoom function to onUserVaraiblesUpdate function and thus the onUserEnterRoom is not needed now.
private function onUserEnterRoom(e:SFSEvent):void {}
Any changed variables will fire this event and pass the variables as parameters. There is flag validation to check if the changed variables are a modification or initialization.
private function onUserVariablesUpdate(e:SFSEvent):void {
/* getting who has updated the variable */
var user:User = e.params.user;
var username:String = user.getName();
/* this is a new user, we create a new avatar movieclip */
if (user.getVariable('firstTime') == true){
var posX:int = user.getVariable('posX'),
var posY:int = user.getVariable('posY'),
var avatar:Avatar = drawAvatar(username,posX,posY);
_avatarList[username] = avatar;
}
}
We are getting one step closer now. We have all users' position synchronized in the virtual world but it is not enough. Everyone looks the same in the virtual world and players cannot distinguish themselves from each other. We are going to name every avatar in the next section.
We logged in to SmartFoxServer using anonymous user name in all previous examples. We are going to ask the user to input the name before logging into the virtual world.

We need to add a text field to the avatar movie clip for the name. We name the text field nameInput and place it under the loginBox movie clip.
The name input procedure breaks the previous login flow into two parts. We stop and wait for the name input after connecting to server before logging.
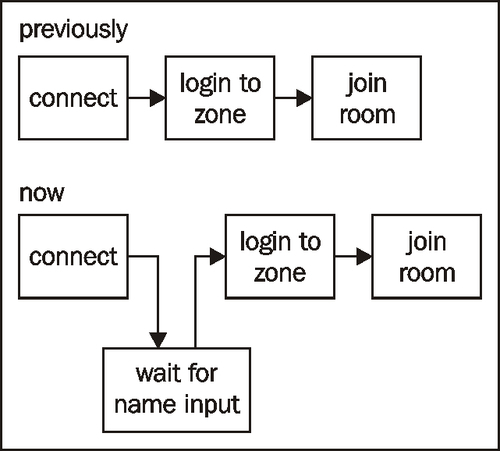
The login box appears at the beginning but we do not want the user to perform the login action before the Flash is successfully connected to the server. The login button is hidden in the initial function.
this.loginBox.btnLogin.visible = false;
The login button appears and waits for the user action after successfully connecting to the server. We also update the status textfield to display the connected state.
private function onConnection(e:SFSEvent):void {
var ok:Boolean = e.params.success;
if (ok){
this.loginBox.statusText.text = "connected to server."
this.loginBox.btnLogin.visible = true;
}
}
The user input name is passed to the server instead of anonymous login.
private function onLoginButtonClicked(e:MouseEvent):void {
_sfs.login("simpleChat",this.loginBox.nameInput.text,"");
}
After logging into a zone in SmartFoxServer, the server pushes a room list to the Flash client. The Flash client needs the list to join the default room after logging in. When the onRoomListUpdate event is called, we know that we have finished the login procedure, so we can hide the login box.
private function onRoomListUpdate(e:SFSEvent):void {
this.loginBox.visible = false;
_sfs.autoJoin();
}
In the drawAvatarAtRandomPlace and drawAvatar function, we now not only put the avatar movie clip in correct position but also display the username in the nameText textfield.
avatar.nameText.text = username;
Note
In Adobe Flash CS3, we need to import the flash.text.TextField in the document class when there is text field in timeline to prevent compiler's TextField class not found error. This is fixed after Adobe Flash CS4.
Our virtual world now shows every avatar with the player's name. Players can distinguish each other now but that's not enough. All the avatars have the same outlook and the same color. Let's add some personality to the avatars by customization.
