
A Flash virtual world is a social community in which players interact with each other and have their own identity. Virtual world usually lets a user decide the avatar's appearance by choosing the combination of different styles and colors.
Each part of the avatar will have different styles and shapes to form different combinations of the appearance of the avatar. Thanks to the timeline and movie clip features in Flash, we can put different styles of each part within the movie clip. For example, the following screenshot shows the head movie clip with different head styles placed frame by frame and we can use gotoAndStop to display the style we want.

ActionScript supports changing the color transform for a given movie clip. It supports not only color tint but also applying color filter and detailed RGB transformation. We will use the simple color tint to change the color of the avatar.
As the color transform is applying to the whole movie clip, we cannot simply tint the avatar movie clip because that will make the whole avatar tint to one solid color. In order to tint a partial part of the movie clip, we specifically create a movie clip in each part and name it color_area. We later program the ActionScript to change all movie clip names with color_area to the customized color.
We are going to change the style and color by ActionScript in avatar class. We need to import the ColorTransform class in flash.geom package to change the color with ActionScript.
import flash.geom.ColorTransform;
We need several instance variables to hold the styles and color state.
public const totalStyles:Number = 3;
public var currentColor:Number = 0x704F4C;
public var currentStyle:Number = 1;
We wrap the whole block of color transform code into one function. The color transform adds RGB color transformation to the target movie clip. We only use colorTransform to tint the color here but it also supports percentage transform that adds partial color to the target movie clip. We will apply the color transform to the color area inside the head of the avatar in 4 directions.
public function changeColor(newColor:Number = 0x000000):void {
currentColor = newColor;
for each(var avatar:MovieClip in _directionArray){
var avatarColor:ColorTransform = new ColorTransform();
avatarColor.color = newColor;
avatar.head.color_area.transform.colorTransform = avatarColor;
}
}
We modified the color by using color transform and used timeline to style the avatar style. Every frame in the head movie clip represents a style with its color tint area. We display the new style by changing the current frame of the avatar movie clip. It is also necessary to change the color again after switching the style because every style contains its own color area.
public function changeStyle(styleNumber:int):void {
for each(var avatar:MovieClip in _directionArray){
/* display the giving style in all parts of avatar*/
avatar.head.gotoAndStop(styleNumber);
avatar.body.gotoAndStop(styleNumber);
avatar.lefthand.gotoAndStop(styleNumber);
avatar.righthand.gotoAndStop(styleNumber);
/* need to apply the color again after changing the style */
var avatarColor:ColorTransform = new ColorTransform();
avatarColor.color = currentColor;
avatar.head.color_area.transform.colorTransform = avatarColor;
}
currentStyle = styleNumber;
}
The purpose of the avatar class is to control the appearance of the avatar. We just implemented the direction, color, and style switching methods and it is now ready for customization panel to use.
Avatars in virtual worlds and games often provide players with different kinds of customization. Some games allow users to customize the whole body with lots of options while some games may only provide two to three basic customizations. The layout design of the customization panel is often based on the number of options.
There are two common customization panel layouts in the market. One layout displays arrows for a user to select next and previous styles. The other one displays a thumbnail view of the options within the same category.
The arrows selection layout is suitable for an avatar that contains limited parts for customization. There may be only two to four categories and not many options in each category. Players can easily loop through different style combinations and choose their favorite one using this layout.
The following avatar customization screenshot from the 2D Online RPG called Dragon Fable uses the arrows selection layout:

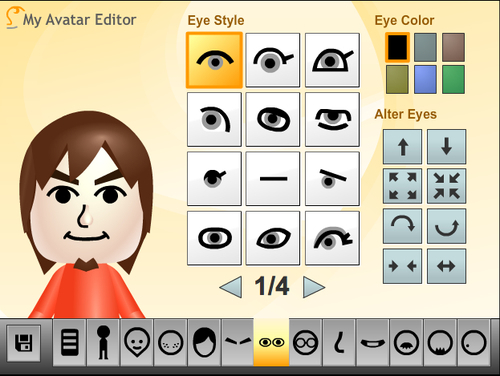
The thumbnail view layout is suitable for avatars that can be highly customized. There are often many categories to customize and each category provides a lot of options for players to choose. Some virtual worlds even provide micro modification so that players can adjust details on the chosen style such as the distance between the eyes.
Players do not need to iterate the large amount of styles and can quickly choose a style option among them with the thumbnail view.
The following screenshot is an online Mii editor. Mii is the avatar system in the Nintendo Wii console. This is an online clone of the Mii avatar customization. It allows a large amount of avatar customization by the thumbnail view layout with extended features such as scaling and moving the elements.
In our virtual world, we will use the arrows selection layout for the customization panel because we planned to let players customize the whole avatar style only. There is a color picker with four colors to pick. The color applies to the hair and beard. The following graph is the setup of our customization panel. The avatar movie clip is named avatar. The two arrows are named styleLeft and styleRight accordingly. The four boxes are named from colorBtn1 to colorBtn4. All these elements are placed into a parent movie clip called customizationPanel.

Let's start at the initial function of the CustomizationPanel class. What it does is prepare the button events and the color pickers.
private function init(e:Event):void {
/* register the 2 arrows event handler */
styleLeft.addEventListener(MouseEvent.CLICK,onHeadLeftClicked);
styleRight.addEventListener(MouseEvent.CLICK,onHeadRightClicked);
/* prepare the 4 colors for color picker */
var colors:Array = [0xE1842C, 0xcc66cc, 0xff0000, 0x3399cc];
/* set the color in the color picker*/
for(var i:int =1;i<=4;i++){
var newColor:ColorTransform = new ColorTransform();
newColor.color = colors[i-1];
this['colorBtn'+i].color_area.transform.colorTransform = newColor;
/* register the color picker click event */
this['colorBtn'+i].addEventListener(MouseEvent.CLICK,onColorBtnClicked);
}
}
When the left and right arrows are clicked, the avatar will display next styles. Usually the styles will loop back to the first one after reaching the end of the style list.
private function onStyleLeftClicked(e:MouseEvent):void {
if (avatar.currentStyle-1>0){
avatar.changeStyle(avatar.currentStyle-1);
}else{
avatar.changeStyle(avatar.totalStyles);
}
}
private function onRightClicked(e:MouseEvent):void {
if (avatar.currentStyle+1 <= avatar.totalStyles){
avatar.changeStyle(avatar.currentStyle+1);
}else{
avatar.changeStyle(1);
}
}
Thanks to our easy change color function from the avatar class, we only need one line to change the color to the picked color.
private function onColorBtnClicked(e:MouseEvent):void {
avatar.changeColor(e.currentTarget.color_area.transform. colorTransform.color);
}
The customization panel is ready now. Let's put it to our virtual world to let our players create their own avatars.
The customization panel is placed within the login box to let players choose the avatar style when inputting the name.

We expand the virtual world document class to support the avatar customization. The styles are stored in the avatar instance inside the customization panel. These styles also need to be saved to the user variables so that all users in the same room can retrieve the styles.
private function onJoinRoom(e:SFSEvent):void {
...
/* draw the customization and remember to user variables */
var myColor:Number = this.loginBox.customizationPanel.avatar. currentColor;
var myStyle:int = this.loginBox.customizationPanel.avatar. currentStyle;
myAvatar.changeColor(myColor);
myAvatar.changeStyle(myStyle);
params.avatarColor = myColor;
params.style = myStyle;
_sfs.setUserVariables(params);
var room:Room = e.params.room;
var userList:Array = room.getUserList();
for each(var user:User in userList){
/* exclude myself */
if (user.getName() != _sfs.myUserName){
...
/* draw the style */
avatar.changeColor(user.getVariable('avatarColor'));
avatar.changeStyle(user.getVariable('style'));
...
}
}
}
When someone joins the room, we not only need to place the avatar in position but also need to draw the avatar based on that user variable.
private function onUserVariablesUpdate(e:SFSEvent):void {
/* get the avatar of new joined user */
var user:User = e.params.user;
...
/* draw the style */
avatar.changeColor(user.getVariable('avatarColor'));
avatar.changestyle(user.getVariable('style'));
}
Now we added personality to our avatars. We used timeline for the avatar styles, and color array for color customization. It is not difficult to add more new styles from time to time to provide more fun for the avatars. Virtual worlds often release some holiday-specific styles for the avatars. For example, we can release a new head style with a Christmas hat or a collection of Halloween styles. Players may like to hold a virtual party in our virtual world with the new special clothes.