Chapter 8. Select, Copy, Paste, Collage

The Exercises in this chapter will provide technical lessons in photographic collage and teach you about juxtaposition. You’ll create a Dada-style photomontage (in which source materials are often made visually apparent) to create a composition that could be used to promote the 1929 Surrealist film Un Chien Andalou. You’ll explore various tools for precision selecting, copying, and pasting parts of an image. In Chapter 10, Type and Image, you’ll place this collage in Adobe Illustrator and add typography on top of the photomontage.
Precision Selecting with the Pen Tool
To make your cutout precise, you’ll need a perfectly sharp selection. In most cases, the Pen tool provides the best method for creating this type of selection. Unfortunately, I’ve found it to be one of the hardest tools in the Adobe Creative Cloud to teach to new students. Part of the problem is the name: This tool does not, despite its name, act like a pen. You won’t drag your mouse around a contour to trace it with the Pen tool. However, when the tool is used properly, the result is a perfect tracing of the contour of an image with a path comprising multiple anchor points. The Pen tool is used in Adobe Photoshop and Illustrator (and other Adobe applications). Bundled with the Pen tool are the Add Anchor Point, Delete Anchor Point, and Convert Anchor Point tools, which you used in Illustrator to complete exercises in Chapter 3. I find it more accurate to think of the Pen tool as a “drop anchors” tool rather than a pen.
The second challenge of learning the Pen tool is that you have to predict where the path is going before it gets there. People who excel at using the Pen tool are typically adept at drawing. They can intuit where the contour of the resulting path is headed, which enables them to plot anchor points in just the right places. If drawing isn’t your best talent, consider this an opportunity to learn how to see and predict the contour of a shape.
It’s important to understand the fundamentals of working with the Pen tool, as follows:
To add an anchor point, click just once. Then release pressure and move the mouse. Don’t click and drag; instead, click, release, and reposition.
Click again to add the next anchor point, which creates a path between the two points.
To create a curved path, press and hold the mouse button and drag ever so slightly while plotting the anchor point. You’ll see resulting Bezier handles, which look like tiny paths with their own anchors originating at your point.
During the contour tracing, you may need to Option-click/Alt-click an anchor point directly to access the Convert Anchor Point tool. This changes the anchor point from a place where two straight, angular lines meet to one that supports a curve with its Bezier handles. (Or the reverse—Option-click/Alt-click an anchor point to change what would be a curve to a straight line.)
Curves can be difficult to understand at first. The Pen tool will create an anchor point at the apex of the curve and two Bezier handles that you can use to determine the direction and intensity (hardness or softness) of the curve.
Of course, the advantages of the Pen tool far outweigh the growing pains of mastering it. You’ll be able to make crisp paths around image parts, which can then be converted to a selection that you’ll eventually use to create a layer mask. For some projects, there’s simply no better way to go about masking an image than to start with the Pen tool and convert its resulting path to a mask. This is the first process you’ll learn in the following exercises.
Non-destructive Editing
This section could also be called, “Why You Should Use a Mask Instead of the Eraser Tool.” I’m so adamant that you should never delete pixels that I won’t even demonstrate the Eraser tool. You should, instead, always retain your pixels. Your goal is always to preserve the original image file and edit bitmap graphics on separate masks, adjustment layers, or layer copies. It’s not too difficult to stay true to this credo with simple tonal repairs, but when juxtaposing image parts, you’ll eventually want to delete part of the image. This is where the layer mask is a necessary part of your arsenal: it is a weapon of massive non-destruction!
In addition to carefully juxtaposing images using Adobe Photoshop, you can learn to see shape relationships by using an app such as Juxtaposer (iOS) or Superimpose (Android). These apps enable you to produce photo collages using images you have taken with the camera on your smartphone.
The fundamentals of working with layer masks include the following:
A layer mask can be applied to an unlocked layer. If you want to add a mask to a digital photograph opened directly from your camera, double-click the name Background in the Layers panel to rename and unlock that layer.
When a layer mask is applied, it’s linked to the layer thumbnail (or content) by default.
If you create a selection on a layer and then add a mask, the mask will automatically show the selected area and hide everything else.
If you add a layer mask to a layer with no selection in place, the mask will show everything on the layer.
On the layer mask itself, white is used to show or reveal layer contents, while black is used to hide parts of the layer. Gray is used as a blending tool because it acts as a trigger for levels of transparency.
Edits can be made to a layer mask with the Brush tool, Pencil tool, Fill command (from the Edit menu), or Gradient tool.
When working with layer masks, you’ll need to be aware not only of which layer you’re editing, but also of whether you’re editing the layer content or the layer mask.
You can see and edit just the mask in grayscale mode. You can also disable the mask to see all of the layer content.
A layer mask can be deleted. At the time of deletion, you’ll have to choose whether to click the Apply button, which applies the mask to the layer before deleting the mask (it’s safest to do this if you’ve saved a copy of the layer with the mask intact), or the Delete button (if you want to start anew).

![]() The chapter08-workfiles.zip file which contains four photographs in the chapter08-start folder: an image of a hand I created for this exercise, a stock image of an ant, and other images from online sources.
The chapter08-workfiles.zip file which contains four photographs in the chapter08-start folder: an image of a hand I created for this exercise, a stock image of an ant, and other images from online sources.
Did I mention that the Pen tool can be hard to teach to new users? Well, this chapter contains a double-whammy. Layer masks are also difficult for those new to Photoshop. Remember, you have to start somewhere. It’s okay to mess up while working on these exercises: That’s the point of practice. When it’s time to implement these ideas in your own work, however, you’ll be ready to combine the precision of the Pen tool with the intelligence of the layer mask. I’ve included extra online video material to support this chapter, because it can be much easier to understand these processes by watching rather than reading.
Image Credits
Portrait of Salvador Dalí appears courtesy of the Library of Congress, Prints & Photographs Division, Carl Van Vechten Collection, [LC-USZ62-116608]. The photograph of the garden ant is courtesy of Henrik Larsson. Shutterstock. Earth’s Moon captured by the Apollo 16 metric camera in 1972 is in the public domain.
 Set up the Collage Workspace
The final collage will fit a workspace of 5.5 by 7 inches at 300 dots per inch (DPI), so keep this final target in mind while viewing the largest image component. Coincidentally, the first image you’ll place in the document, the photograph of Salvador Dalí, is the largest. You’ll use a cutout around his bust as a visual anchor for other juxtaposed images.
Open Photoshop, and create a new document (File > New) with the following settings: Select the Print category tab, then set up the document to be 5.5 inches wide by 7 inches in height, 300 pixels/inch, RGB color mode. Choose White in the Background Contents area, and click Create.
You can download the portrait of Dalí from www.loc.gov/pictures/item/2004662765.
Download the large TIFF image of Salvador Dalí from the Library of Congress (LOC) website (FIGURE 8.4), or open it from the chapter08-start folder. If you’re working with the original download from the LOC website, rename the file dali.tif and place it in a folder on your Desktop named chapter08 before opening it in Photoshop.

Figure 8.4 Download the largest available file from the Library of Congress website. Reminder
Did you forget how to use the Crop tool? See Chapter 4, Exercise 5.
Crop the photo so that only Dalí’s head is in the frame (FIGURE 8.5). This will give you a more accurate understanding of the size of the part of the file that you’ll use in the collage.
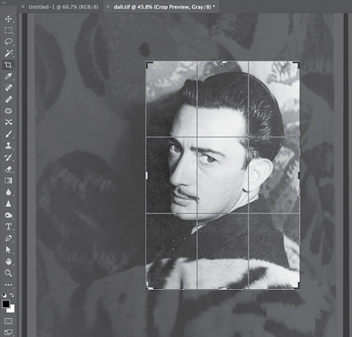
Figure 8.5 The Dalí image is cropped to include only his head. View the document’s resolution by choosing Image > Image Size to open the Image Size dialog box. Notice that the image was saved at 400 DPI. Safely (meaning, do not add pixels to the document) change the resolution to 300 DPI. Make sure that the Resample Image box is not checked before you make this change (FIGURE 8.6).
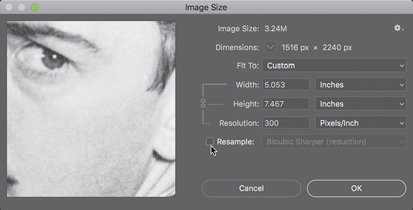
Figure 8.6 Turn off the Resample Image option (clear its checkbox) in the Image Size dialog box to redistribute pixels. Dalí’s head is nearly as large as the new document, so you now can be assured that the image will be large enough to meet your specifications. Click OK to exit the Image Size dialog box if you haven’t done so already. Press Command-A/Ctrl-A to select all of the image on the active layer. Press Command-C/Ctrl-C to copy the selection. Click the tab of the untitled (new) document (FIGURE 8.7). Press Command-V/Ctrl-V to paste the image of Dalí into the empty document. Rename the layer dali. Choose File > Save As and save the working collage document as chapter08.psd.
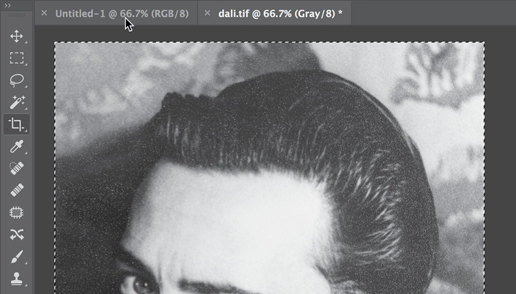
Figure 8.7 You’ll see selection edges around the Dalí image as a result of choosing Select > All. When the image is selected, copy it before clicking the tab of the new document where you’ll paste the selection. Close dali.tif. You don’t need to save changes you made to the document.
 Trace an Image Contour with the Pen Tool
In this exercise, you’ll trace the contour of Dalí’s head and shoulders with the Pen tool by placing anchor points in key locations on the perimeter of the shape. The anchor points should be set in places where the path of the line changes or is about to change. The Pen tool will make a path, not a selection. Your goal is to create a closed path outlining Dalí’s bust. In this exercise, you will make a loose outline, which you will modify and refine in Exercise 3. A closed path is a complete shape—the starting and ending anchor points are the same. Ultimately, you’ll save the path in the Paths panel.
Continue to work in the Photography Workspace. (Choose Window > Workspace > Photography if another workspace is active.) Select the Pen tool from the Tools panel (FIGURE 8.8).
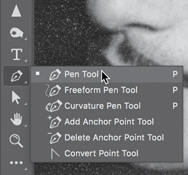
Figure 8.8 The Pen tool grouped with other related tools. Zoom In
When you’re creating a path or a selection or making any type of image manipulation, you really want to see what you’re doing in a close view.
You can start anywhere to begin creating your path. I clicked the Pen tool once on the dent in Dalí’s hair to begin my path (FIGURE 8.9).

Figure 8.9 Begin a path with the Pen tool, and notice the anchor points that are created on the image. Reminder
You must start and end the path on the same anchor point to close the path.
Release the mouse. My second anchor point is just over the first curve of his hair. If you click once past that curve, you’ll notice that the path created by two clicks is a straight line (FIGURE 8.10). Because you want the path to curve at this point, press Command-Z/Ctrl-Z to undo the last step. Instead of a single click, position the mouse in the same location, but this time press and hold the mouse button while dragging mostly to the right but also slightly downward (FIGURE 8.11). You’ll see the curve begin to form. Drag until the curve traces the contour of his hairline.

Figure 8.10 A straight path is created by two clicks with the Pen tool. 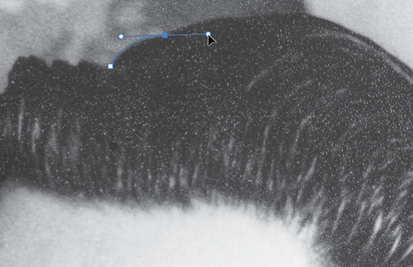
Figure 8.11 Notice the resulting Bezier handles on either side of the anchor point. These let you control the curve. While drawing the path, you can ignore the handles. After the path has been made, you may want to use the Direct Selection tool to modify anchor point positions or Bezier handles. The next place you want to click is toward the top back of Dalí’s head. I’ve purposefully pressed the mouse button and dragged to try to make the path fit my contour in the way that I watch new students do this (FIGURE 8.12). Notice that the last part of the path starts to meet my needs, while the first part deviates from my intentions. When you create a curve, the next anchor point will be drawn in the direction of the previous curve. In this case, the direction of the previous curve is essentially the opposite of the direction that my path should be taking. Again, press Command-Z/Ctrl-Z to undo this error. You need to make one crucial move before drawing this path in the next step.
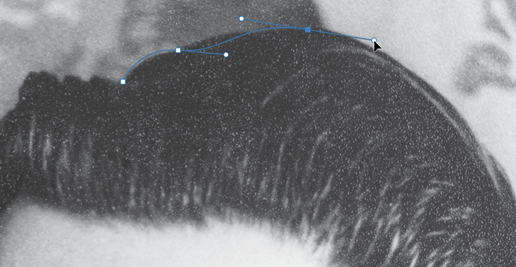
Figure 8.12 Drag the Bezier handle to alter the shape of the curve. Because the curve changes the direction of the path, and because the contour does not follow what the Pen tool is set to do, tell the anchor point to remove the Bezier handle directing the curve. Accomplish this by pressing the Option/Alt key while clicking the anchor point (FIGURE 8.13). Now one of the handles is missing, but as you plot your next anchor point, you’ll notice that you can control the curve to fit the needs of your path.
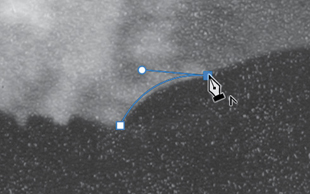
Figure 8.13 Option-click/Alt-click an anchor to delete a Bezier handle. This enables you to change the direction of the path. Now plot the point you tried in Step 4 at the top of Dalí’s head. Drag slightly downward so the path matches the contour of his head (FIGURE 8.14). The curve of the path aligns beautifully with the shape of his head.
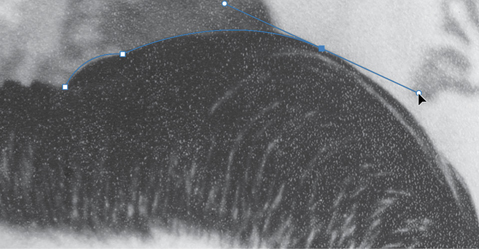
Figure 8.14 Drag the Bezier handle to match the path to the contour of the image. Zoom out slightly, if necessary, and plot the next anchor. I placed the cursor and dragged downward near the lower-bottom of Dalí’s head to fit my path around the shape (FIGURE 8.15). My anchor point is purposefully above the area where the curve changes again to move back inward.

Figure 8.15 Fit anchor points to modify the path. It should match the contour of the image. Option-click/Alt-click the anchor point, again, to remove one of the Bezier handles and allow the path to change directions (FIGURE 8.16).

Figure 8.16 Remove a Bezier handle to change the direction of the path. Your next click will be just above his ear. Keep working in this fashion around the perimeter of Dalí’s head. If you’re not sure when to Option-click/Alt-click the anchor point, you can always try to make the next move and see if the path is following the contour. If it doesn’t, press Command-Z/Ctrl-Z (Undo) and delete a Bezier handle. It’s okay to work in a way that includes an element of experimentation and best-guessing until you understand the tools. When you get to the bottom part of the bust, you can make a large, sweeping curve that excludes the furry element near his jacket (FIGURE 8.17).

Figure 8.17 A large curve at the bottom of the image excludes the furry element. Pen Tool
If the path is not closed, you won’t be able to convert the path to a selection (which is, in this case, the purpose of creating the path).
You must complete or “close” the path by making your last click meet up with your first anchor point. Notice that the Pen tool displays a circle icon near the bottom of the tool to indicate that the click you’re about to make will close the path (FIGURE 8.18).

Figure 8.18 A small circle near the Pen tool indicates that the path is about to be closed. The Paths Panel
The Paths panel is grouped with the Layers panel. Click the tab of the Paths panel to open it, then save the path in the Paths panel by double-clicking the Work Path. Name the path dali-head, and then save the file by pressing Command-S/Ctrl-S (FIGURE 8.19). Now the path is saved with the file.

 Modify Paths
The path that you create with the Pen tool doesn’t need to be perfect after your first effort at tracing the contour. You’ll almost always have to make modifications to the path once it’s closed. In this exercise, you’ll modify the path so it fits the contour of Dalí’s bust. I deliberately run into pitfalls in the next several steps to demonstrate how to make modifications to a path. Your process may not follow these steps exactly, but you should be able to learn how to modify your path by viewing this series of steps.
If you use the Direct Selection tool to move the path in one area, be mindful of how the rest of the path may change. Sometimes this isn’t the best solution, because the change in one location disrupts the path everywhere else. Keep reading: One of the next steps might be a better solution for your situation.
Zoom in to about 200% by pressing Command-+/Ctrl-+. Inspect your path; you can start anywhere. I’ll begin in the same area where I started plotting my anchor points. I’m looking for any place where the path doesn’t fit the contour of my shape.
Choose the Direct Selection tool from the Tools panel (FIGURE 8.20). This is the same tool you used in Illustrator to modify the paths created in Chapter 3. The first modification I’ll make is in a place on the back of Dalí’s head where the path includes a little bit of the background. I’ll simply drag the path and move it inward so the contour of the path is on the outline of his dark hair (FIGURE 8.21).

Figure 8.20 You can use the Direct Selection tool to modify paths and anchor points. 
Figure 8.21 Drag the path with the Direct Selection tool to move it closer to the contour of the image. I’ve noticed that my path is also slightly askew near Dalí’s ear. In this situation, the curve doesn’t match the contour. I can control this by modifying the Bezier handle. First, I’ll click the anchor point with the Direct Selection tool to show its Bezier handles. Then, I’ll drag one of the handles to see how that modifies the curve (FIGURE 8.22). Click anywhere outside the path to deactivate it when the modification is complete.
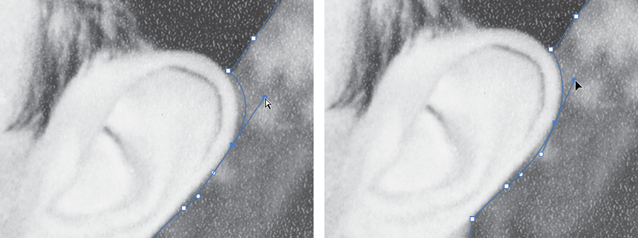
Figure 8.22 Drag Bezier handles to modify curves for the best fit around image edges. In some cases, you may need to move the anchor point and modify the Bezier handle (FIGURE 8.23).

Figure 8.23 Move anchor points and modify Bezier handles around the contour of the image. You also might need to add an anchor point and then modify it. To add an anchor point, click the path directly with the Add Anchor Point tool (FIGURE 8.24). Then, use the Direct Selection tool to make modifications (FIGURE 8.25).
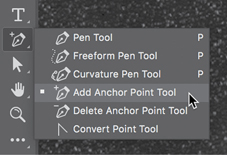
Figure 8.24 Use the Add Anchor Point tool to create new anchor points on a path. 
Figure 8.25 I added an additional anchor point near the curve of Dalí’s nose, then I used the Direct Selection tool to modify the anchor point and its Bezier handles, changing the shape of the path to fit the curve beneath the nose. Finally, you may need to convert an anchor point from one that indicates a straight, angular connection of lines to one that supports a curve. The Convert Point tool (FIGURE 8.26) is used for this purpose. With it, you can click any anchor point to change it from anchoring a straight line to anchoring a curve. In my path, there is a section of hair waves that are repeatedly drawn with curves. Somehow, one of my last dips took on a hard angle. I used the Convert Anchor Point tool to change that anchor point from straight to curvy and to modify the end of my path (FIGURE 8.27). You may need to adjust it so it is closer to the contour of the hairline with the Direct Selection tool.
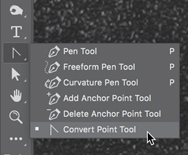
Figure 8.26 Use the Convert Point tool to change an anchor from a curve to a straight edge (or vice versa). 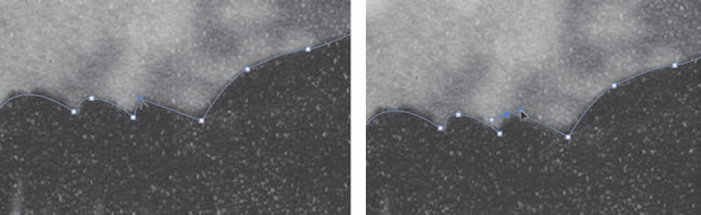
Figure 8.27 Convert anchor points to support a hard angle, rather than a curve. I’m still not happy with that last hair area. I noticed an extra anchor point. Too many anchor points will make your path bumpy or inconsistent. When using the Pen tool, the dictum “less is more” couldn’t be more appropriate. I used the Delete Anchor Point tool (FIGURE 8.28) to eliminate one of the anchor points and then the Direct Selection tool to reposition the path (FIGURE 8.29).
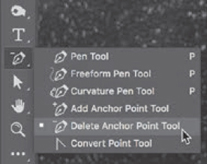
Figure 8.28 Use the Delete Anchor Point tool to simplify a path by eliminating anchors. 
Figure 8.29 Clockwise from top left: A. Click an unwanted anchor point with the Delete Anchor Point tool. B. The resulting path has one less anchor point. C. Drag a Bezier handle to modify a curve. D. The resulting path outlines the contour of the image. Press Command-S/Ctrl-S to save your work.
 Convert a Path to a Selection to a Layer Mask
This exercise may seem short, but it can be extremely helpful. You’ll need to memorize these steps to convert a path to a pixel-based mask. Now that the path is saved in the Paths panel (Exercise 2, Step 11) and you’ve modified it to best reflect the contour of your image (Exercise 3), it can easily be transformed into a selection. You’ll use the selection to create a layer mask, hiding the background imagery surrounding Dalí’s bust.
In the Paths panel, activate the path by clicking it once (the path will appear blue); then click the Load Path As A Selection icon (FIGURE 8.30).

Figure 8.30 Load a path as a selection from the Paths panel, and notice the marching ants around the selection edges in your document. Look at the Layers panel. Only one layer, dali, should be active. (Click it once if it somehow became inactive.) Click the Add Layer Mask icon at the bottom of the Layers panel (FIGURE 8.31). The marching ants surrounding your selection are translated on the layer mask as a black-and-white representation of the areas hidden (not selected) and shown (selected). Press Command-S/Ctrl-S to save your work.

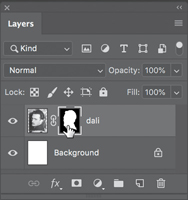
Figure 8.31 When you add a layer mask, the mask icon appears on that layer in the Layers panel. The black parts of the mask indicate areas that are invisible (or masked), while the white parts of the mask indicate visible areas. Inspect the dali layer. The layer has two icons. On the far left is the layer thumbnail. I like to think of this as the “content icon” because you can see the actual content of the layer represented by its icon. Click once on this to make it active; you’ll see four white corners surrounding the layer thumbnail (FIGURE 8.32). When the layer thumbnail is active, any action will modify the layer itself. For instance, painting with black paint on the image while the layer thumbnail is active literally adds black paint to the image (FIGURE 8.33). (If you followed my drawing activity in Figure 8.33, press Command-Z/Ctrl-Z to undo the brushwork.)
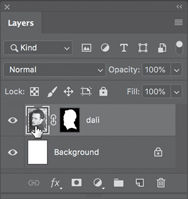
Figure 8.32 The layer thumbnail of the dali layer is active. 
Figure 8.33 The active part of the layer will be modified. In this case, black paint is applied to the content of the layer, not the mask. So a black line is drawn on the layer. Notice how the line is visible only in sections of the image where the mask is white. Continue to inspect the dali layer. To the right of the layer thumbnail is the layer mask thumbnail. The icon is a black-and-white representation showing which parts of the layer are hidden (the black background areas) and which parts are on display (the white bust). Click once on this icon to activate it. Again, you’ll see four white corners surrounding the layer mask thumbnail (FIGURE 8.34). When the layer mask thumbnail is active, you’ll be modifying the mask, not the content. This is typically achieved with white, black, or shades of gray using the Brush, Pencil, or Gradient tools. You can also select an area and fill it with white, black, or gray on the mask. If I painted with black paint on the image while the layer mask thumbnail was active, I would be adding black paint to the mask. This is different than adding color to the pixels of the bitmap image. Here, I’m telling the mask where to hide pixels. Black indicates hidden pixels, so my same mustache-inspired swoop of black renders part of Dalí’s face transparent as I add it to the layer mask (FIGURE 8.35). (If you followed my drawing activity in Figure 8.35, press Command-Z/Ctrl-Z to undo the brushwork.)

Scale, Adjust, and Organize
By default, a layer mask is linked to its layer thumbnail. This means that when you move or scale the contents of the layer, the mask will reposition or scale accordingly. In this exercise, you’ll make minor modifications to the layer content. Be sure that the layer thumbnail is active before you begin.
You can see a video demonstrating how to use the Rectangular Marquee selection tool to measure the space precisely when numbers aren’t your best friend on the Foundations of Digital Art and Design Vimeo playlist (linked from the companion website).
Click the dali layer content thumbnail.
Press Command-R/Ctrl-R to show the rulers; then drag a guide from the left ruler to about one-third of the distance across the document space.
Press Command-T/Ctrl-T (or choose Edit > Free Transform) to decrease the scale of Dalí’s bust. Drag the top-left transformation box downward and to the right until Dalí’s nose is in line with the guide you created (FIGURE 8.36). Press the Return key to commit the transformation. Select the Move tool and hold down the Shift key to constrain the movement to a 90-degree angle while you adjust the vertical position of the dali layer so that the top of his hair is about an inch from the top of the document.
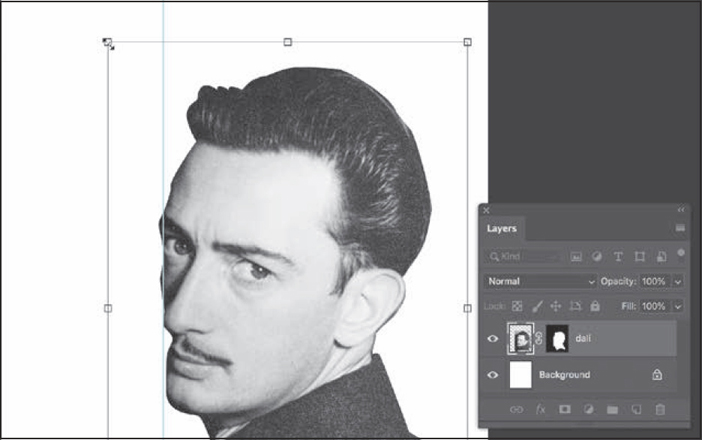
Figure 8.36 When the Layer Content and Mask icons are linked in the Layers panel, they will be transformed together. In this image, Dalí’s torso and the mask used to control its hidden parts are scaled down and repositioned. Watch Out!
In prior versions of Adobe Photoshop, the rule was to always press the Shift key while scaling an image to prevent it from resizing disproportionally. New to Adobe Photoshop 2019 is a Free Transform command that automatically scales proportionally. This is great for new learners, but throws experienced users for a curve. If you press Shift while scaling or transforming an image the proportions will not be constrained.
Add a Hue/Saturation adjustment layer, then select Colorize to create a monotone wash on the bust of Dalí. Adjust the Hue to set the color in the range of cyan (FIGURE 8.37).

Figure 8.37 Add a Hue/Saturation adjustment to apply a cyan wash of color over the portrait of Dalí. Finally, organize the Layers panel by grouping the two top layers. The adjustment layer should already be active, so Shift-click the dali layer to add it to your layer selection. Click the hard-to-see and unlabeled panel menu icon at the top right of the Layers panel to see a list of Layers panel commands. Choose New Group From Layers (FIGURE 8.38). Name the group dali, and click OK. The two layers are now organized into a single group. You can click the sideways arrow to expand or collapse layers contained in the dali group. Collapse the dali group before proceeding to Exercise 6. Press Command-S/Ctrl-S to save your work.

Figure 8.38 Select layers to organize, and then choose New Group From Layers from the Layers panel menu.
 Copy a Layer to an Open Document
Starting with the release of Photoshop CS4 (2008), new documents open in tabs rather than in separate windows. Copying a layer from one open document to another is not terribly intuitive with this feature. You’ll accomplish that task in this exercise.
Open hand.psd, an image I created for use in this collage. (It’s saved in the chapter08-start folder on the companion website.) Notice that the document contains a layer group named hand. In it is a layer containing a photo of a hand and a Levels adjustment layer.
Collapse the layer group, and click the folder so the entire group is active. Select the Move tool from the Tools panel. Press and hold anywhere within the image of the hand in the application window (not in the Layers panel), and drag the pointer over the tab of our composite document, chapter08.psd (FIGURE 8.39). The chapter08.psd file will come to the foreground of the open documents.
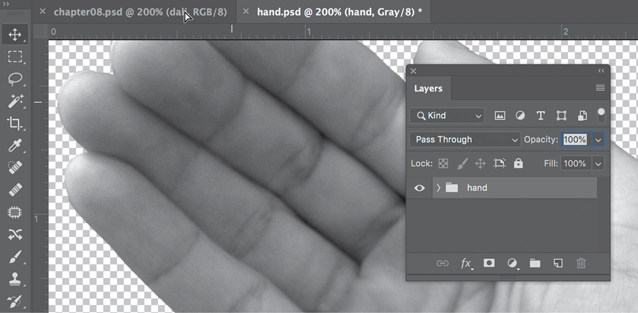
Figure 8.39 Copy a layer or layer group to an open file: Activate the layer or layer group, position the Move tool in the application window (anywhere on the image), and then drag the image to the tab of the opened document. Keep the mouse button depressed as you move on to the second step (Figure 8.40). Continue to hold the mouse button down and drag down from the tab into the Dalí image document (FIGURE 8.40). Release the mouse. If it didn’t work for you on the first attempt, try it again. (It took me three or four tries the first time I learned to do this with tabbed documents.)
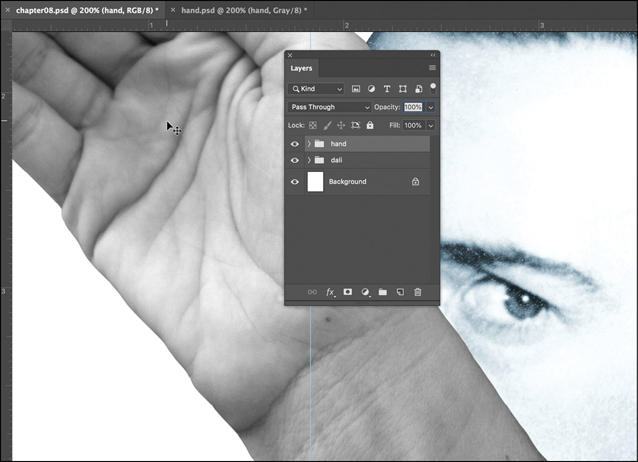
Figure 8.40 Move the pointer from the open tab down into the application window and release the mouse. View the Layers panel—the layer or layer group will join the stacking order. Accessing Free Transform
You can access Free Transform without using keyboard shortcuts or the Edit menu by selecting Show Transform Tools in the Options bar for the Move tool. I do not activate Show Transform Tools because the tools get in the way of my ability to see details throughout my work process. For me it’s easier to press Command-T/Ctrl-T when I need to access Free Transform. Everybody develops their own working processes. You should experiment—maybe you will like seeing the Transform Tools as you work.
Free Transform
You can rotate and scale an image with the Free Transform command. To rotate, position your pointer just outside one of the four corner points and then drag.
With the entire hand group active, use the Move tool to position the hand in the composite so the thumb is near Dalí’s chin. Then, press Command-T/Ctrl-T to access Free Transform. Rotate the hand by dragging just outside one of the four corner points to about –38° (the rotation value is displayed in the Options bar), and press the Return/Enter key to commit to the transformation. Set the hand in place so the thumb barely touches Dalí’s chin (FIGURE 8.41). Save your work. You can close the hand.psd document now that it’s part of the composite image, chapter08.psd.

Figure 8.41 The hand juxtaposed in front of Dalí’s face. Notice how the hand is on top of the face in the stacking order of the layers.
 The Magic Wand
Once in a while, the Magic Wand tool can produce desired results nearly effortlessly. When you click part of an image with the Magic Wand tool, it selects pixels near the location you clicked as determined by color. It attempts to select like-colored pixels. From experience, I know that it’s not always successful. You’ll soon understand when you’ll be able to work magically with the wand and when you’ll have to spend time with the Pen tool. You can adjust this tool like all others using the Options bar.
Image Credit
Earth’s Moon captured by the Apollo 16 metric camera in 1972 is available at nssdc.gsfc.nasa.gov/imgcat/html/object_page/a16_m_3021.html.
Download the moon image from the companion site or the National Space Science Data Center. (Use the high-resolution TIFF, and rename the file moon.tif.) Open the moon.tif document in Photoshop.
With the moon.tif document open in Photoshop, press Command-A/Ctrl-A to select the entire image area and then press Command-C/Ctrl-C to copy the image. Click the chapter08.psd tab to activate the collage composition. Press Command-V/Ctrl-V to paste the moon from its home document to the collage. You can close moon.tif when you see the moon pasted into the Dalí collage image.
It’s very common to go through the Command-A/Ctrl-A, Command-C/Ctrl-C, tab, Command-V/Ctrl-V steps and see nothing pasted into a new document. If this happens to you, check which layer was active in the starting document. Usually, the problem is that you started on an empty layer or an adjustment layer and, therefore, copied no pixel data.
Rename the new layer moon. Select the Magic Wand tool from the Tools panel (FIGURE 8.42). In the Options bar, set the Tolerance level to 18 (meaning, select like-colored pixels within a range of 18 levels brighter or darker). Select the Anti-Alias and Contiguous options to make the edges of the pixel selection crisp and to create a selection based on image areas that touch one another. Make sure that the Sample All Layers box is not checked, as you want to sample and select only pixels on the moon layer. Click once anywhere in the black image space surrounding the moon. You’ll see a selection around the contour of the moon and into its crevices on the right side (FIGURE 8.43).

Figure 8.42 The Magic Wand tool is used to select like pixels in a bitmap image. 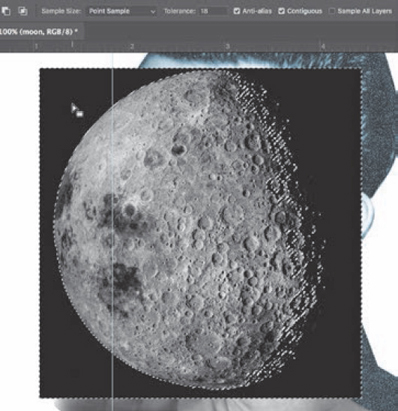
Figure 8.43 The selection edges around the moon’s contour and a view of the Magic Wand options. Watch Out!
Did the Magic Wand tool select something entirely different than what you expected? Make sure that the moon layer is active before selecting the moon image! You’ll always have to watch out for activating the layer that you intend to work on.
Add a layer mask to the moon layer (FIGURE 8.44). Surprise! The result is the opposite of what you wanted. If you selected the area that you wanted to remove and then added a mask, don’t worry. The good news is that it’s simple to invert your layer mask. Make sure the layer mask is active, and then choose Image > Adjustments > Invert. Or press Command-I/Ctrl-I, a good keyboard shortcut to know if you, like me, will repeatedly find yourself flip-flopping the selected area (FIGURE 8.45).

Figure 8.44 When you add a layer mask, the selected pixels will be visible. In this case, the selected pixels are the parts that you intend to hide. 
Figure 8.45 When the colors on the layer mask are inverted, the hidden pixels become visible, and the visible pixels become hidden. Click the layer thumbnail to make the content of the layer active. Position, scale, and rotate the moon so it seems to be popping out of where Dalí’s eye should be. Use the Move tool followed by Edit > Free Transform again, as you did in Exercise 6. Press Return/Enter to confirm the transformation.
Clean the layer mask (see the sidebar).
Click the moon layer mask thumbnail to activate it.
Select the Brush tool from the Tools panel. In the Options bar, make sure that the Opacity and Flow are set at 100% and the Mode is Normal.
Make sure that black is loaded into the Foreground color chip. (You’ll use black paint to hide this part of the layer.)
Swap Colors
Press the letter X on the keyboard to swap the foreground and background colors (black and white) as you are working on the mask.
Reduce or increase the size of the brush so it just covers the width of the line by tapping the Left Bracket ([) or Right Bracket (]) key, respectively.
Click just one time at one of the four corners of the black line (the starting point for one of the lines if you think of them as four separate lines). Don’t drag (FIGURE 8.46).
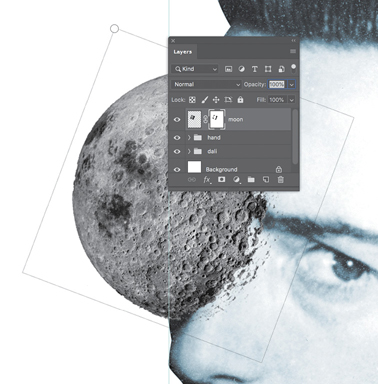
Figure 8.46 Click once on the beginning of a line with black paint on the layer mask. Reposition the mouse to the end of the first line. Press the Shift key and click once (FIGURE 8.47). The drawing and painting tools will create a straight line if you click once; then move the mouse, press Shift, and click again (as in most Adobe applications).

Figure 8.47 Reposition the mouse and Shift-click to draw a straight line on the mask, eliminating unwanted visible lines on the layer. Repeat steps 5 and 6 to hide the remaining three black lines.
 Select, Copy, Paste, Repeat
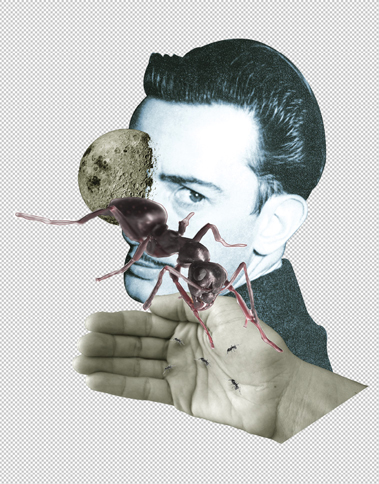
Repetition is the best way to learn new techniques in Photoshop. Most of the steps in this exercise will be similar to those you’ve experienced in previous exercises. When images are juxtaposed to create a collage, repetition and contrast are two forces that help the viewer understand the visual message. In the final collage file (mine is saved as chapter08-results.psd), the large, dominant ant contrasts in size with the repeated smaller ants crawling on the palm of the hand (a memorable scene in Un Chien Andalou, a Surrealist film directed by Dalí and Luis Buñuel). The large ant also makes contrast in direction with the vertical plane anchored by Dalí’s bust. Another way of stating this is that the large ant is a dynamic visual force, while the bust of Dalí is static. The yellow color wash that you will add to the images of the hand and moon in the course of this exercise will add a recurring color element to the composition.
In Photoshop, open the ant image from the chapter08-start folder.
Choose Select > All, then copy and paste the ant image to the chapter08.psd collage file (see Exercise 7, Step 2). Close ant.jpg.
Name the new layer ant, and attempt to select the white background surrounding the ant with the Quick Selection tool. This tool is grouped with the Magic Wand. It behaves similarly but allows you to draw on the areas you want to select, similar to holding Shift with the Magic Wand tool to add to its selection. You’ll find that increasing the Brush size to about 32 will be helpful. Drag around the negative space surrounding the ant. You will make a selection that fits the contour of the ant and includes parts of its legs (FIGURE 8.48).
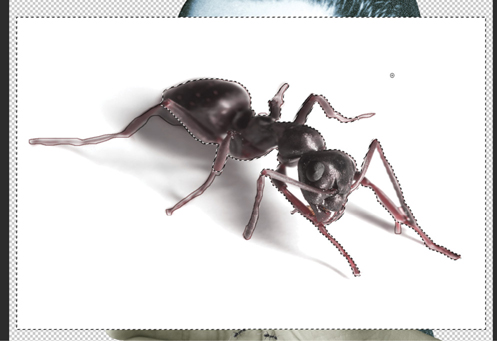
Figure 8.48 Draw a “quick” selection with the Quick Selection tool. The options for this tool include a brush size and a choice about what is sampled (the current layer or all layers). You can see my selection includes what I desired (the background) and parts I did not want to select (the legs). Click the Add Layer Mask icon on the ant layer. Invert the mask (Command-I/Ctrl-I). Clean the layer mask on the ant layer. You may need to brush in a leg or parts of legs using white paint. (Remember that white paint will make those layer parts visible.) For this portion of the exercise, I used white paint on a small brush in the layer mask while the mask was deactivated. I pressed the Shift key while I clicked the mask to deactivate and activate it while editing. I also hid the other layers by clicking the eyeball icon next to them for a clear view of those tiny ant legs (FIGURE 8.49).

Figure 8.49 Paint the legs back into the mask while viewing them with the mask deactivated (left). On the right side you can see the results of the mask. Make the layer thumbnail active. Consult the final resulting image (Figure 8.3), then move, scale, and rotate the ant using the Free Transform command (Command-T/Ctrl-T).
Add a yellow color wash to the hand and moon images, starting with the hand. You can use a Hue/Saturation adjustment layer, or you can do this in the Blue channel of a Levels adjustment layer (because blue is the complement of yellow). Because the hand layer group already includes a Levels adjustment, I modified the midtone blue levels (FIGURE 8.50).

Figure 8.50 Adjust the blue levels to add a monotone yellow hue. Add an adjustment of your choice to apply a yellow color wash to the moon image. I repeated a Levels adjustment and modified the midtones in the blue channel.
Did you notice that as you add adjustments above each layer, they affect the whole document? The image of Dalí became much less cyan because these adjustments for yellow (or away from blue) were made to the hand and moon layers. Coincidentally, those two layers appear above the dali layer in the stacking order of the Layers panel. In this step, you’ll clip the adjustment layer to the one layer it should affect. Press the Option/Alt key while clicking between the adjustment layer and the image layer beneath it; then repeat this on the second pair of adjustment and image layers (FIGURE 8.51).
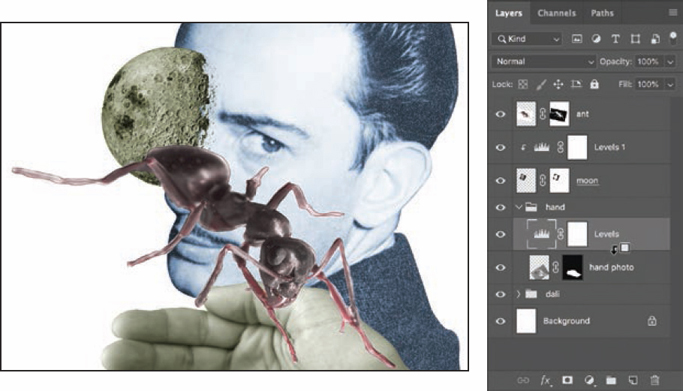
Figure 8.51 Create a clipping layer between the Levels and hand photo layers. Organize your Layers panel with a new layer group, moon, to contain the moon and its adjustment layer.
Finally, duplicate the ant layer, scale and rotate it, and then duplicate the smaller ant and repeat to create the ants in the palm of the hand. I made the copies of the small ant by Command-Option-dragging/Ctrl-Alt-dragging it.
Create a copy of the hand photo layer and name it hand w shadows. Add a small shadow beneath each ant using the Burn tool (set to Midtones, 10%) to make them appear more connected to the hand (FIGURE 8.52). “Floating” images are often easily grounded with a small shadow. When you’re done, organize the duplicate ant layers into their own layer group. Clip a Black & White adjustment layer to the group. Save your results in PSD format. You can view my process in the Screencast 8-2: Duplicate, Transform, Burn, Organize, and Adjust—Ants in the Hand video.

 Lab Challenge
Create a Dada-style collage in which the edges of the contours are visible to suggest the conceptual tension between the juxtaposition of visual elements. This requires a tension between at least two separate ideas. Use layer masks, selection tools, and adjustment layers when necessary—and don’t forget to organize the Layers panel as you work.