
10
Unit Testing
CONTENTS
The purpose of this chapter is to introduce tools and techniques used in unit testing. This phase of testing is often considered as the key to high quality software. There exist a variety of tools that aid the unit test process. Two such tools, namely, JUnit and Easy Mock, are introduced. JUnit is a widely used tool for partially automating the unit test process. Easy Mock allows mocking of objects that are not available while testing a unit. The technique of object mocking and its advantages are described using Easy Mock.
10.1 Introduction
Unit testing is an early phase of software testing. The goal in this phase is to ensure that each program unit functions as desired. A unit could be a class or a collection of classes in an Object-Oriented (OO) language such as Java or C#, or a function or a collection of functions in a procedural language such as C.
A program unit is a well defined piece of software that is combined with several others to create a software subsystem or a subsystem. As an example, a class or a collection of classes aimed to provide some utility or feature, is considered a unit.
Units are generally coded by a single programmer in an effort to create a component specified in the design. A component itself might be a single unit or a collection of these. Together one or more components form a system. Thus, in unit testing the programmer who designed and coded the unit is likely to be responsible for creating test cases for the unit under test.
A unit is generally created by a programmer who also creates tests for it. In pair programming these tasks could be performed by two programmers.
Test cases for testing a unit could be created using a myriad of techniques described earlier in this book. For example, one could create tests using equivalence partitioning or from a finite state model of the unit’s behavior. Further, the adequacy of unit tests can be assessed using any of the test adequacy techniques introduced in this book.
10.2 Context
Unit testing could occur in a variety of contexts. Figure 10.1 shows one possible context. It is assumed that the development process begins with an analysis of the requirements. The analysis provides information that is used in creating a design for the system under development. The design generally consists of one or more components that interact with each other to support system functionality. A high level design will generally correspond to the system architecture from which a more detailed design is derived.
Unit testing could occur at almost any stage in a software development process. It generally occurs whenever a unit is created.
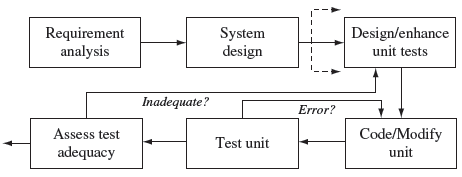
Figure 10.1 One possible context in which unit testing may occur. The process will likely lead to multiple units and their tests though only one unit is shown here. Dotted links indicate continuation of the process for additional units.
Components in a large system will likely be developed by different development teams. The design of each component leads to the creation of distinct units of code such as a set of one or more classes or functions. The programmer may decide to begin coding the unit and then design the tests. However, when using the test-driven development methodology, one might first design the tests, as shown in Figure 10.1, and then code the corresponding unit. Note that given the requirements, it is possible to design the tests prior to coding a unit.
Large software systems are often designed by several people and consist of multiple units. Each programmer is responsible for the unit designed by her/him.
Once the unit has been coded, it is tested against the tests derived. In the event the unit under test is complex, one might use incremental development. In that case, testing will proceed in a loop where the unit developed so far is tested until deemed correct and then enhanced and tested again. Thus, the three steps, namely, test design, coding, and testing will likely be performed several times in a loop as shown.
Test adequacy assessment is done after the unit has passed all tests. Adequacy assessment may be an internally imposed requirement or imposed by the client. Code coverage measures such as decision coverage or MC/DC coverage are often used as satisfactory adequacy criteria. If tests are found inadequate with respect to the adequacy criteria considered, new tests need to be designed and the unit retested. The unit test process is considered completed when the unit has passed all tests that meet the required adequacy criteria.
Adequacy of unit tests is best done when the unit has passed all tests. Lack of adequacy may lead to the addition of new tests.
It is important to note that the above description is one of the several ways in which unit testing could be embedded in the development process. For example, as an alternative to the above mentioned process, one might design tests after having coded a portion of the unit. The development and test process could then continue in an incremental manner until some test completion criteria are satisfied.
10.3 Test Design
A test case is a set or a sequence of inputs to a unit under test together with the expected response. As mentioned earlier, one could derive test cases using one or more test generation or enhancement methods. When test cases are generated prior to coding the unit, one needs to use a black-box method, e.g. equivalence partitioning. The W-method could be used when the expected behavior of the unit can be modeled as a finite state machine.
A test case can often be coded as a program. Upon execution this program supplies inputs to the program under test. Coded test cases also allow easy re-execution of the program against a test.
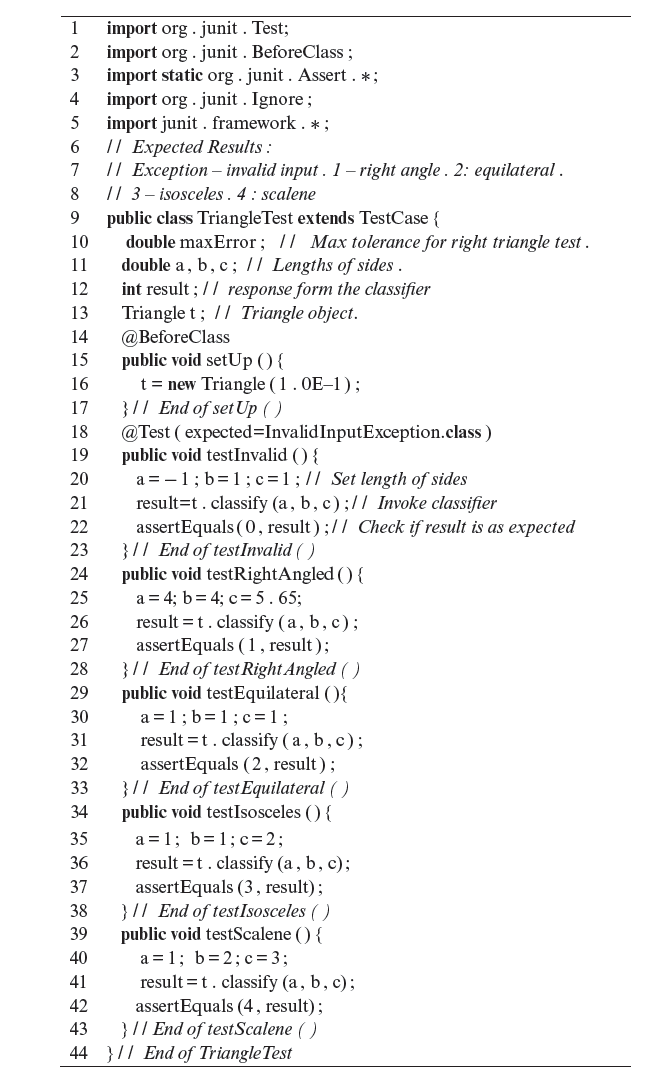
In some situations, the input data in a test case derived from the requirements could be input to the unit manually. However, it is often more efficient to write a program that encapsulates the test case, both the inputs and outputs, invokes the unit with the input data, and checks if the response is as expected. Such coding could be simple or complex depending on the complexity of the unit under test. In any case, coded test cases allow for ease of re-execution when there is a change in the unit. Tools such as JUnit allow for coding multiple test cases and automatically execute the unit against these. The next example demonstrates generation of tests for a unit using equivalence partitioning of the output domain. Coding of these tests in JUnit is the topic of the next section.
A unit testing tool, such as JUnit, allows coding of tests and automated execution of a program against these tests.
Example 10.1 One well-known testing problem considers testing a program that classifies a triangle. The problem is to generate an adequate set of test cases passing which will ensure that the classification program is correct.
The classifier is assumed to be coded to meet the following requirements. The triangle classifier program takes three inputs, a, b, and c, representing lengths of the three sides of a triangle. It must first check whether or not the sides make a triangle. If they do not then an exception is raised, else the correct triangle type is returned. Let us assume that the following types of triangles are considered: right angle (1), equilateral (2), isosceles (3), and scalene (4).
Let us derive test cases based on partitioning the output domain, i.e. the range, of the classifier based on the above requirements. Thus, five test cases are needed. The exact values of the lengths may differ but one sample follows.
Test cases can be derived by partitioning the output domain.
Test 1: To test if an exception is raised when the input is invalid.
Input: <a = −1, b = 1, c = 1>
Expected response: Exception “Invalid input” must be raised.
Test 2: To test for a right-angled triangle.
Input: <a = 4, b = 4, c = 5.65>
Expected response: 1
Test 3: To test for an equilateral triangle.
Input: <a = 1, b = 1, c = 1>
Expected response: 2
Test 4: To test for an isosceles triangle.
Input: <a = 1, b = 1, c = 2>
Expected response: 3
Test 5: To test for a scalene triangle.
Input: <a = 1, b = 2, c = 3>
Expected response: 4
In test-driven development, the above tests would be coded using a tool, for example JUnit, and executed against a classifier that simply returns, say 0, regardless of the input. Thus, the classifier will fail all test cases. One may now incrementally develop the classifier and test each increment. Gradually more and more tests will pass until all tests are executed (see Exercise 10.4).
10.4 Using JUnit
Several tools are available for automating the unit test process. JUnit is a popular tool for unit testing of Java programs. Once the tests have been created as, for example, described in the previous section, they can be coded in Java as JUnit tests. JUnit can automatically execute the unit under test against all tests. For each test it informs the tester whether the test passed or failed. There are several ways to create a JUnit test or a collection of JUnit tests. Below we describe one possible way to test a class using JUnit. Note that this section is intended to expose you to JUnit and is not a full length tutorial. Details of JUnit can be found by following the link mentioned in Section 10.6.
Execution of unit tests can be automated through tools such as JUnit for Java and NUnit for all .Net languages such as C#.
A JUnit test case is a class that extends TestCase. Within a JUnit test case there are several tests each named testX, where X denotes the specific feature to be tested. For example, testEquilateral denotes a test for equilateral triangle. JUnit does not care what X is, but it is useful to give mnemonics to each test.
JUnit allows grouping of multiple test into a class.
When executing the test case, JUnit first calls method setUp(). This method is optional and if included in the test case it sets up the test. For example, the setUp() method might create an object from the class under test and pass some initialization parameters. JUnit can be made to call setUp() after each test, or once for all tests are executed in a test case.
Next, JUnit runs all tests, as mentioned earlier each test is coded as a method named testX. Finally, the tearDown() method is called. This method is intended to perform activities needed to clean up any changes that the tests might have made in, for example, a database. Essentially, when needed, tearDown() restores the state of the system that exists prior to the execution of a test or after the execution of all tests. The next example illustrates the use of JUnit to test the triangle classifier program using test cases derived in the previous section.
Example 10.2 Let us code the test cases derived in the previous section as a JUnit test case. Clearly, we need five tests. The following class contains these five tests named testInvalid, testRightAngled, testEquilateral, testIsosceles, and testScalene. In addition there is a setUp() method that creates a Triangle object and passes to it the acceptable error bound when checking for a right-angled triangle.
Listing 10.1 A JUnit test case for the triangle classification program. (TriangleTest . Java)
The TriangleTest class extends TestCase indicating that this class contains a collection of JUnit tests. Each test defines the three lengths created as test cases in the previous section. It then calls the classify() method with the lengths as the parameters and captures the response in result. The assertEquals() method compares the value of result with the expected value. For example, assertEquals(1, result) checks if result is equal to 1.
While unit tests can be coded using JUnit, they need to be designed using some other process. For example, tests could be constructed manually and then coded and grouped using JUnit for automated execution.
When run, JUnit executes each test and displays the outcome using color coded names of the tests. For example, following is the output (not in color) from JUnit after applying the five tests above to a sample triangle classification program.
Stubbing and mocking are two techniques for use in testing OO programs.
1 warning found:
TriangleTest
testInvalid
testRightAngled
testEquilateral
testIsosceles
testScalene
File:/Users/apm/Desktop/SecondEdition/Chapters/Part-II-TestGeneration/req-chapter/Programs/mockObjects/TriangleExample/TriangleTest.java [line: 21]
Error: InvalidlnputException: Invalid input.
All tests except testInvalid are displayed in green indicating that they passed. The warning generated by testInvalid is displayed after a listing of all the tests. (Also see Exercises 10.4 and L10.6.)
JUnit offers several annotations to manage the tests. @Before placed before setUp indicates that the set up is to be executed after each test. @BeforeClass indicates that setUp() is to be executed only once and prior to the execution of any test. @Test indicates that the following method is a test. Several other annotations are available and can be found in the JUnit reference guide.
Management of test execution is done in JUnit using annotations such as @Before and @Test.
10.5 Stubs and Mocks
A mock object can be used in place of a stub. Consider the case where unit A needs to be tested. Unit A needs unit B as a server. Also assume that unit B is not yet available. In such a situation, one can replace B by a stub or by a mock object. Figure 10.2 is a visual description of how mock objects are used.
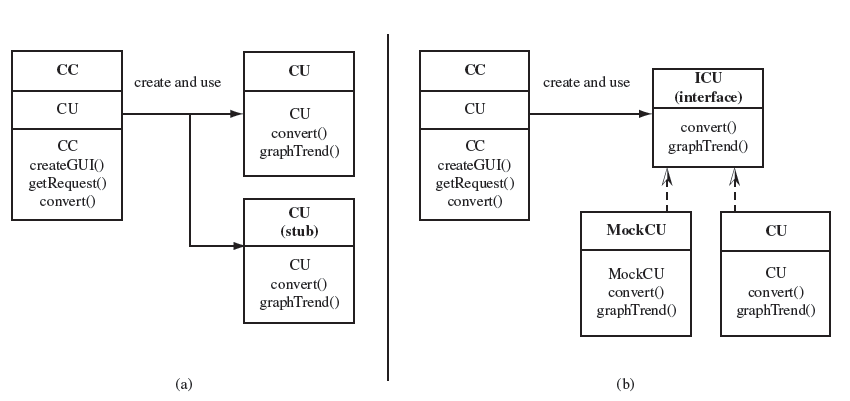
Figure 10.2 Class CC is to be tested. CC uses class CU. (a) Stubbing CU when CC is not available. (b) Mocking CU using the inversion control pattern when CU is not available.
A stub or a mock replace an object that is not available during a test. A stub is generally used for state verification while a mock for behavior verification.
There are some key differences between what is expected of a stub and of a mock object. A stub serves as a simplistic replacement of an unavailable unit. Thus, a stub generally provides simplistic implementation of the unavailable object. When a request is sent to a stub, it might return a predefined value instead of computing it or connecting to a database. The values returned from a stub are then checked for correctness and used in further testing. This is also known as state verification.
Another form of verification is known as behavior verification. In this case the unit is tested to check that its interaction with the server is as expected. Thus, for example, in addition to testing whether or not B returns the correct value, it is also checked whether or not A calls the methods in the server in the correct order. Mock objects are useful where behavior verification is needed.
When using tools such as JUnit, the test for a unit uses an assert statement to check whether or not a value returned by the client is correct. This is an example of state verification. However, an assert statement does not verify whether or not the unit under test has called the correct methods in the client and in the correct order. This form of checking is an example of behavior verification and can be done using mock objects.
For state verification JUnit offers the “assert” statement to check whether or not a value returned by by a unit under test is correct.
10.5.1 Using mock objects
To understand how mock objects and EasyMock can be used, suppose that class A (client) is under test. The class testing A is named TestA. Suppose also that A uses class B (server) but that B is not available at the time of testing A. Let IB be an interface to which B is to be implemented. Let compute() be an abstract method in IB that takes an integer as input and returns an integer.
There are several tools to help automate the process of creation and use of mock objects. EasyMock is one such tool. The following steps, also shown in Figure 10.3, lead to a test using a mock object instead of using a stub or directly using B. Here it is assumed that the client needs only one server that is not available at the time of testing. The steps below can be extended to create multiple mock objects if needed.
EasyMock is an open source tool used to automate testing using mock objects. It can be used to create mock objects that simulate the behavior of the object mocked.
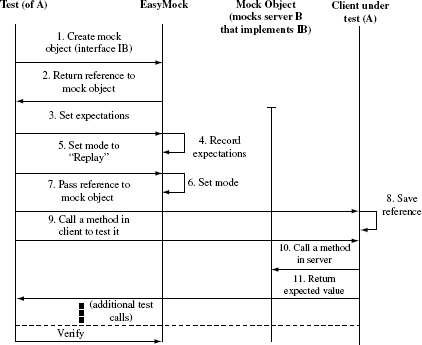
Figure 10.3 Sequence of actions when using the EasyMock tool for unit testing. A sample sequence of actions for one test is shown. A is a client class under test that uses server class B that implements interface IB. The mock object mocks B and allows A to be tested without B.
- TestA requests EasyMock to create a mock object. It supplies the name of the interface class (IB in this example) to EasyMock.
- EasyMock creates a mock object capable of simulating the behavior of an object created from a class that conforms to the interface (IB).
- TestA requests EasyMock to set the behavior expected of the mock object. For example, when method compute() is invoked on B with input 4, then the return value must be 5.
- EasyMock makes a note of all expectations of B. Note that while the expectations are of B, the mock object is intended to simulate B and hence needs to know the expectations.
- TestA sets the mode of EasyMock to replay. In this mode EasyMock is waiting to receive calls from the client and respond to them as expected.
- EasyMock enters the replay mode.
- TestA passes a reference to the mock object to the client under test (A).
- The client saves the reference to the mock object.
- TestA makes a call to the client to test a feature.
- While processing the call from TestA, the client invoked a method in B. However, this call is processed by the mock object using the expectations provided earlier.
- The client returns from the call. The return data depends on the method under test in the client. It also likely depends on the value returned by the mock object in response to the call from the client in the previous step. The previous and this step can be repeated as many times as needed to perform the test.
- Finally, TestA makes a call to EasyMock to verify if the client behavior is as expected.
In its “replay” mode, EasyMock waits to receive calls from clients and responds to these as expected.
There are several variations of the sequence explained above. The following example illustrates the above steps in the context of JUnit and a tool named EasyMock.
Testing using mock objects is facilitated by tools such as JUnit and EasyMock.
Example 10.3 Suppose that class Compute performs computations on an integer. However, due to the complexity of the computation and the possibility that the algorithm may change, Compute makes use of class Expert. Methods calc() and save() are provided by Expert; calc() performs the desired computation on x and returns the results while save() saves x and the result in a database.
Compute takes two inputs: request and x. If request=1, it invokes calc() and returns the result to the user. If request=2, it invokes calc() followed by save(). An exception is raised if the request is invalid.
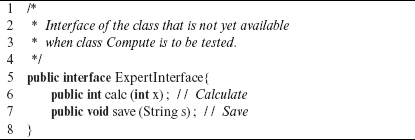
It is desired to test Compute when Expert is not available. The test can be performed using a stub in place of Expert. However, for reasons described earlier, a mock object can be used in place of Expert. Let us follow the steps described earlier to create a few tests using the following interface to which the Expert as well as the mock object are created. ExpertInterface given below is the class to which Expert is written.
Expert interface The code for the interface to which Expert is written follows. The signatures of the two methods provided by Expert are at lines 6 and 7.
Listing 10.2 Expert interface. (ExpertInterface . Java)
Class under test
The class under test, namely Compute, uses an object designed to ExpertInterface to actually perform the calculations and save the results. The code follows.
Listing 10.3 Class to compute and save. (Compute . java)
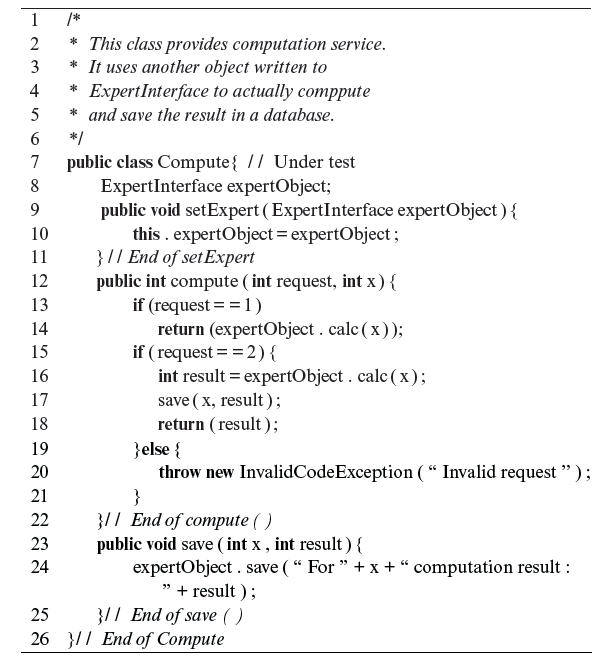
At line 10, the setExpert method saves the reference to the expert object for future use. Note that when the actual expert object is not available, this would be a reference to the mock object. Method Compute takes in request and x as inputs and invokes the appropriate sequence of methods to perform the computation and, if request=2, then saves the result. Note that the calc method is invoked at lines 14 and 16 on the expert object, a reference to which was saved earlier in setExpert. Thus, compute does not really know whether the requested computation is being performed by the real expert or by its mock.
JUnit tests
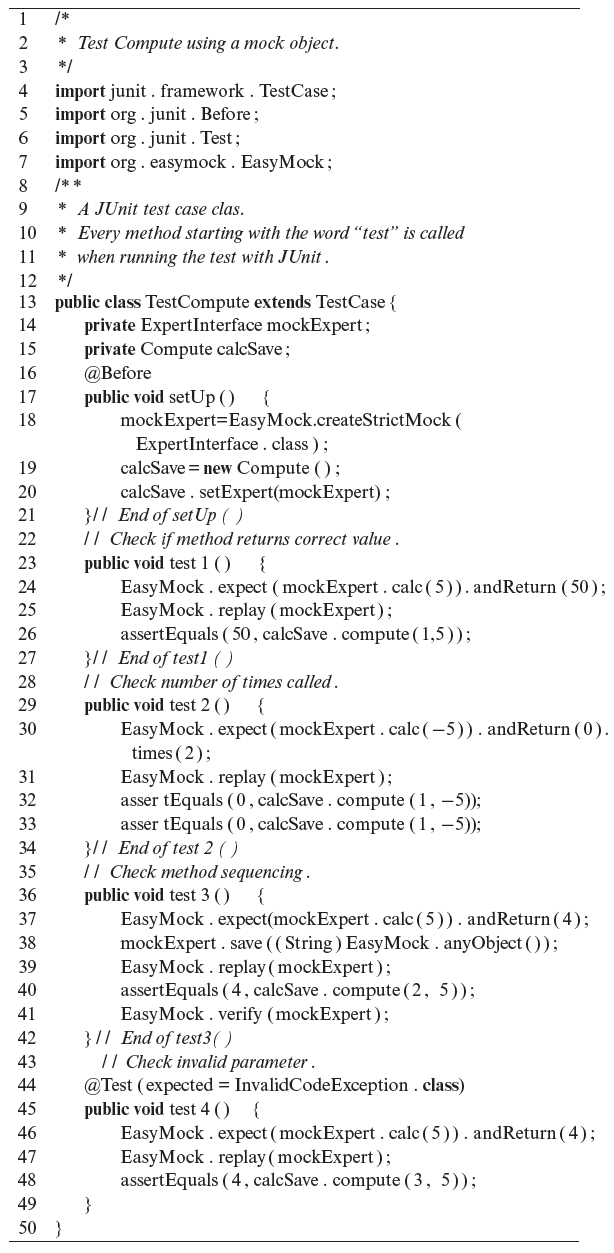
One could create a variety of JUnit tests to test the methods in Compute. Below are four tests to show a few capabilities of EasyMock.
Many tests can be created in JUnit to test methods inside an object. The adequacy of such tests can be assessed using a variety of coverage criteria.
Listing 10.4 A set of four JUnit tests for Compute. (TestCompute . java)
The JUnit test contains five methods. Method setUp is invoked prior to the start of a test. It creates a mock object using easyMock at line 18. Note that a strict mock object is created using the createStrictMock() method. One could also create a non-strict as well as a nice mock object. The type of mock object to create depends on what aspects of the class under test are to be tested. Strict mock is used in this example as we wish to test the order of method calls.
Mock objects could be “nice” or “strict.”
After creating a mock object, the setUp method creates a Compute object at line 19 and passes it at line 20 to the mock object just created. This is necessary so that during testing, calls to Expert are routed to the mock object.
The four tests are named test1 through test4. The overall structure of each test is nearly the same. First, the expectations from the mock object are defined. This is done using the static expect method in EasyMock. For example, at line 24 in test1, EasyMock is informed that when called with 5 as a parameter, calc should return 50. In test2 at line 30, we inform EasyMock that when calc is invoked with -5 as a parameter it should return 0. This line also specifies that calc must be invoked twice before any other method is invoked. Note that the expectations of a mock object are derived from the specifications of the class that is being mocked.
After having set the expectations, EasyMock is switched to replay mode using the replay method at line 25. In the replay mode easyMock simply “watches” the test process and makes a note of the events. At line 26 the compute method is invoked with request=1 and x=5. The expected return value is 50 as indicated at line 24. The JUnit assert command is used to check whether or not the return value is correct.
In test2 it is assumed that compute must be invoked twice with -5 as the value of x. The test will fail if this does not happen. At line 26 test3 checks if compute and save are invoked in a sequence. The sequence expected is set at lines 37 and 38. Recall that when called with request=2, compute must invoke calc and save on the Expert object. At the end of the calls the verify method in EasyMock checks whether or not the expected sequence did occur during the test.
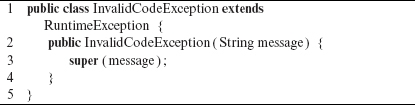
EasyMock can be used to check if an exception is raised when expected. This is illustrated in test4. The expectation in terms of parameters and the return value is set at line 46. The expectation that an exception is to be raised is set using annotation @Test provided by JUnit. The test occurs at line 48. As written in this example, all tests pass except test4. The code for InvalidCodeException follows. Also, see Exercises 10.9 through 10.11.
Listing 10.5 Exception raised when request is not recognized. (InvalidCodeException . java)
10.6 Tools
Several tools are available for generating tests using techniques introduced in this chapter or similar ones. Some of these tools are listed below with links to where they could be found.
A number of tools are available for unit testing, and for a variety of programming languages. Many of these tools also offer some form of code coverage measurement.
Tool: JUnit
Link: http://pyunit.sourceforge.net/
Tool: PyUnit
Link: http://pyunit.sourceforge.net/
Tool: SpartanUnit
Link: http://openhopla.codeplex.com
Description
The above three tools are intended for use during unit testing. JUnit is for testing Java programs, PyUnit for Python programs, and SpartanUnit for C# programs. These are not test generation tools. Instead, they allow a tester to code their tests. The program under test is then executed automatically against all the coded tests. Thus, these tools aid in reducing the time to set up tests and execute them each time a change is made in the program under test. At the time of this writing, SpartanUnit, developed by John Spurgeon, is a framework for constructing new testing tools rather than a full fledged tool such as JUnit.
This chapter describes some aspects of unit testing. The context of unit testing is explained. An example is used to illustrate how the myriad of test generation techniques can be used to generate tests during unit testing. How to code and automate the execution of units tests is explained using JUnit which is a popular test automation tool for programs written in Java. The test-driven development technique is also explained with an example.
Testing a unit often requires the availability of other collaborating units. However, when a collaborator is not available, one could either replace it with a stub or instead use a mock object. While both approaches are used in practice, OO developers sometimes use tools such as EasyMock to automatically generate mock objects. The use of mock objects in unit testing is explained with a detailed example.
Exercises
10.1 What would you consider as a “unit” in a software system? Is it necessary for a unit to be a relatively small piece of code, or a relatively large component could also be considered as a unit?
10.2 Why is it important to perform unit testing? How is unit testing different from integration testing? [You may return to this question after having read Chapter 11.]
10.3 There are two loops in Figure 10.1. Explain why the steps in these loops might be executed more than once.
10.4 Example 10.2 does not list the triangle classifier program for which the TriangleTest class is designed. Write a class named Triangle that meets the requirements in Example 10.1. Then run the JUnit tests in TriangleTest. Develop the code incrementally. Run TriangleTest against each increment. Continue the process until all tests have passed.
10.5 Figure 10.1 shows unit testing as an activity following system design. In what other contexts might one need to test one or more units in a system?
10.6 Use a code coverage tool to assess the adequacy of tests derived in the previous exercise. EMMA is one easy-to-use coverage analyzer for Java. It computes class, method, block, and statement coverage. Enhance your tests if not found adequate with respect to each of the four coverage values reported by EMMA.
10.7 Give an example of a scenario where the setUp() method should be called only once before all the tests are executed and not each time before a test is executed.
10.8 Give one example of a scenario where the tearDown() method be called after all tests have been executed.
10.9 (a) List a few advantages of using a mock object in place of a stub. (b) Is it necessary for the mock object to be created using an interface? (c) Mention the differences between createMock(), createStrictMock(), and createNiceMock().
10.10 To be able to complete the exercises related to EasyMock, you will need to download its library and make sure that it is in JUnit’s path.
Let us now play with the code given in Example 10.3. (a) Select any passing test and try to make it fail. (b) Modify the ExpertInterface to add the following method.
public double enhancedCompute(double x)
Now modify compute() in class Compute so that when request=3, enhancedCompute must be called followed by save. (c) Assume that when request=4, enhancedCompute() is called twice. In the first call the parameter x is input. In the following call the value returned from the first call is input. These two calls are followed by a call to save the final result. Now create a test to check if this call sequence was exercised. (d) Suppose that when x<0, enhancedCompute() raises the InputOutOfRangeException exception. Create a test to check this requirement.
10.11 Class CurrConvert contains three methods: getCountries(), getAmount(), and convert(). Method getCountries() asks the user to select countries C1 and C2, where the currency of C1 is to be converted to that of C2. Method getAmount() gets the amount in the currency of C1. Method convert() converts the given amount into the equivalent currency of C2. For conversion it uses another class named CurrData that contains a method getRate() to obtain the latest conversion rate between the currencies of C1 and C2.
Code CurrConvert in a language of your choice. Assume that CurrData is not available when testing CurrConvert. Write an interface CurrConvertInterface. Using JUnit, or any other unit testing tool available for the language of your choice, create and run tests for CurrConvert using a mock object for CurrData. Try using equivalence partitioning and boundary value analysis techniques to generate the tests.