
CHAPTER 1
Introduction to Fritzing
For many makers and electronics hobbyists, the idea of using computer-aided design (CAD) software conjures up images of obscure and difficult-to-use programs that might need a week’s training course before you can do anything useful with them. Fritzing is not like that. Fritzing has been designed and has developed for makers, hobbyists, and inventors, not for professional electronic engineers.
This high-speed tour of Fritzing will give you an idea of the breadth of this tool. It is useful just to know what features are available, even if you are not going to use them right away. Many of the things mentioned in the following short summary will be dealt with in considerably greater detail later in the book, so please don’t feel cheated.
Fritzing
Fritzing is so easy to use that many people use it to sketch out breadboard layouts or draw schematic diagrams, as this can be accomplished almost as easily as with pen and paper. This ease of use does not mean that Fritzing is only of use for simple example projects. It is perfectly possible to design quite complex projects with Fritzing, without having to compromise on the design. The key advantages of Fritzing over other CAD tools are as follows:
• It is free to use (although a donation is appreciated).
• It is simple and intuitive.
• Fritzing includes many libraries of components from popular suppliers such as Adafruit, Sparkfun, and Snootlabs.
• It is suitable for Arduino, Raspberry Pi, Beaglebone, and Spark Core projects.
• Fritzing is an integrated printed circuit board (PCB) production service. Or export the files and use another service.
Figure 1-1 shows one of the example projects supplied with Fritzing.

FIGURE 1-1 A Fritzing example project (Breadboard view).
The first thing that may come as a surprise, if you have used other CAD systems, is that the first view of the project is a Breadboard view. Fritzing assumes that you will want to make a prototype of your project on solderless breadboard to get all the wrinkles out of it before you move on to making a PCB. Most CAD systems completely ignore the concept of prototyping on breadboard, but in Fritzing, it is a fundamental part of the design process.
For many people, it can be simpler to visualize the project from the point of view of actual components and wires rather than from the more abstract schematic diagram. You don’t have to start your Fritzing design with a breadboard layout. If you prefer, start with the schematic, but at least the option is there.
Although this example uses solderless breadboard, there are other prototyping options that you can use. Many people like to use stripboard or other types of premade prototyping PCB to construct soldered prototypes that are a little more robust than the solderless breadboard. If you want to take this approach, then from within the Breadboard view, you just delete the breadboard and add the type of prototyping board you want. Other sizes and styles of breadboard are also available in the parts library.
If you click on the Schematic tab in this project, you will see the schematic diagram in Figure 1-2.

FIGURE 1-2 A Fritzing example project (Schematic view).
This represents the same design as the Breadboard view, but as a schematic diagram. If we were to add a new component here or delete one or connect the components differently, those changes would also be applied to the Breadboard tab, were we to switch over to that view.
In other words, the Breadboard and Schematic views are both views of the same underlying design. Each of these views has its own information, such as where the components appear on the screen, but fundamentally they are views of the same design that will always stay consistent with each other.
If we were to switch to the PCB tab, we would see that this design is actually for a plug-in shield for an Arduino microcontroller board, designed to control a pair of motors (Figure 1-3).

FIGURE 1-3 A Fritzing example project (PCB view).
The PCB view is linked to the underlying design in just the same way as the Breadboard and Schematic views.
In all three views, there are two areas on the right-hand side of the screen. The top area lists a lot of components and modules that you can add to your design. Below that is an information area that tells you about the currently selected component.
History
The Fritzing project has been developed by researchers at the University of Applied Sciences at Potsdam. The software is open-source and cross-platform. It is available for Windows, Mac, and Linux. This is a substantial project that has helped many makers get started designing and documenting their electronic projects. When you come to download the project, there is an option to donate a small sum of money to this very worthwhile project and help ensure its future development.
You can find out more about Fritzing at the project’s website: http://fritzing.org.
Installing Fritzing
To install Fritzing, you will need a computer running Windows, Mac, or Linux. Windows users will need Windows XP or newer; Mac users, 10.7 and up; Linux users, any fairly recent distribution.
First download Fritzing from http://fritzing.org/download. Don’t forget to donate! You will then be offered a download in a choice of formats, as shown in Figure 1-4.

FIGURE 1-4 Fritzing download options.
Identifying your operating system is easy enough, but then you have to choose between 32-bit and 64-bit. These days, unless you have a computer that is more than three years old, you will almost certainly want the 64-bit version. If you have a Mac, you are very unlikely to have one old enough to require 32-bit while still running OSX 10.7 or later, so go for the 64-bit version.
If you pick the wrong version, you can always just download the other version. Fritzing does not use an installer program; it just downloads a zip file containing an executable program, which you can place wherever you like on your computer’s file system. Typically, that will mean moving it to “Program files” on Windows or “Applications” on Mac.
Whatever your platform, all you have to do is double-click on the application program file to run it.
Examples
The Fritzing installation includes a lot of example designs that you can open in Fritzing and either learn from them or save copies of them (use Save As…) to modify to make your own designs. These are accessible from the File | Open Example menu item. Some of the more interesting examples to peruse are as follows:
• H-bridge, the example used in Figures 1-1 to 1-3
• LED-Matrix, another Arduino design using a 5 × 7 LED matrix
• VoltageRegulator_7800series, which is a simple voltage regulator project
Documents and Designs
Editing a design in Fritzing is rather like working with a Word document. Everything relating to your design is held in a single file with the extension .fzz. Once Fritzing is installed, you can simply open a design by double-clicking on it. You can also keep the design anywhere that is convenient on your computer’s filing system. Note that Fritzing uses the term sketch to mean a design.
Just as with most document-based systems, you can also use the File menu of Fritzing to Open, Save, or Save As… designs (sketches). You can also export various aspects of the design from the Export submenu on the File menu. This includes
• Saving the different design drawings to different image formats
• Generating industry standard files for PCB production
• Generating a list of parts used in the design, called a Bill of Materials, usually abbreviated BOM
• Exporting files to allow your design to be simulated in a circuit simulator that will read files in SPICE format
Going All the Way
Although this book will take you right from the initial schematic or breadboard prototype to the soldered PCB, there is still considerable benefit to using Fritzing without going any further than the breadboard layout. Although you can move things around on a real breadboard, you can’t drag and drop a big selection of components from one area of the board to another in the way you can with the virtual board in Fritzing. Fritzing is also a great way of documenting your design and producing nice-looking pictures of your breadboard layout if you are going to write up and share your project on your blog or as an Instructable.
If you want to build a permanent one-off project using stripboard or some other kind of prototyping board, then Fritzing is an easy way to plan out where things will go on the prototyping board.
Using Views
The default appearance of the editor windows is pretty clean and easy on the eyes. However, if you wish, you can change background colors, turn the grid visibility on and off, and do various other things to get the views exactly as you like them.
When it comes to controlling what you can see in the window, you will need to use the zoom commands, either from the menu (View | Fit In Window is very useful) or from the slider on the bottom right of the editor area of the window.
The canvas where you add parts will automatically expand in any direction. So do not worry about leaving room for things; you can add them above or to the left of the existing extent of the diagram, and the size of the canvas will automatically expand to make room for them.
As far as moving things around, you can just click and drag parts, as you would expect. You can also click and drag or shift-click to select multiple items.
The Programming Window
One really interesting feature of Fritzing, that at the time of this writing is not quite ready yet, allows you to associate programs with a project. For example, if your design is creating an add-on board for an Arduino, such as the example we saw earlier, you might want to have an Arduino test program that will demonstrate how the shield should be used.
This feature would be even more useful if you were creating a project based on an Arduino for which the Arduino code was an essential part. By keeping it with the Fritzing design, you avoid many of the version management pitfalls where you might end up installing mismatched software on your hardware design.
Figure 1-5 shows this programming window in version 0.8.7 of Fritzing.
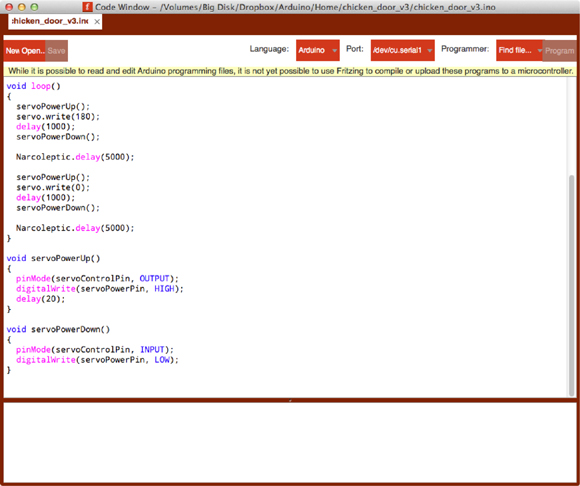
FIGURE 1-5 The Fritzing programming window.
Currently, this version allows you to edit code for Arduino and PicAxe, but the feature to upload onto the device is currently available for only PicAxe.
Autorouting
When you are in the PCB view, the Routing menu will offer up all sorts of options relating to the layout of a PCB. Fritzing includes an autorouter. This will attempt to route the copper tracks on the PCB from the leg of one component to another without the copper tracks crossing or getting too close to one another.
Generally, in a design you might use a combination of autorouting with a bit of manual tweaking to get the design just as you want it. Also, it can be quite fun trying to route the tracks by hand.
Autorouting and manual routing have a chapter of this book (Chapter 5) all to themselves.
Summary
I hope this chapter has whetted your appetite to get started with some Fritzing! If so, then the next chapter will appeal to you, as it is a quick-start chapter leading you through a whole miniproject from end to end.