
Chapter 8. Workflow
At the heart of the process pillar is the workflow. The workflow is how ideas are turned into reality; or less altruistically, how bugs are squashed and features added. The frontend workflow does not exist in a vacuum, though, so it is always important to look at it in context of the whole team, and then to break it down from there.
The Old Development Workflow
I’m sure I’ve already complained about this a few times, but it bears repeating. Don’t use the diagram shown in Figure 8-1 for your web development workflow. The days of taking a bunch of markup and making it match a PSD file are done, over, dead, and hopefully buried where no one will ever find them again. Frontend development can no longer be putting a nice coat of paint on a mess of HTML; we aren’t here to simply pretty things up.
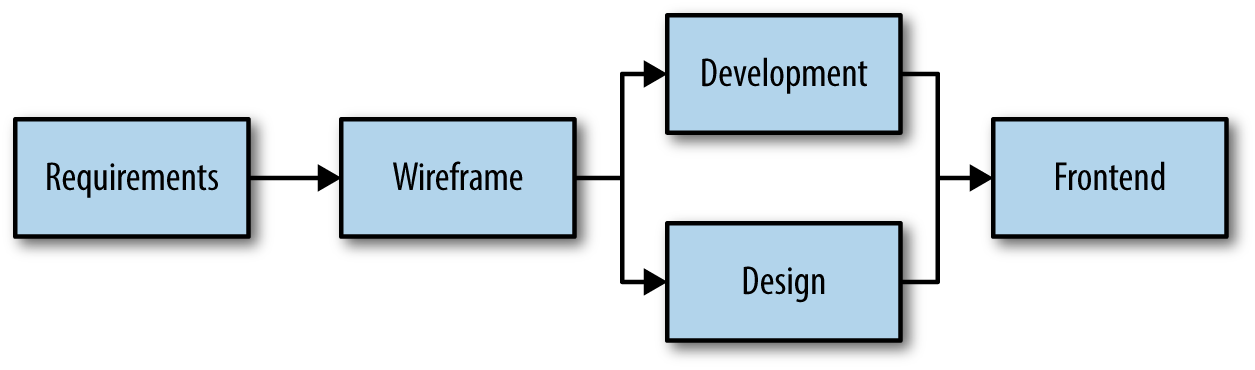
Figure 8-1. The old development workflow
The New Development Workflow
In stark contrast to the previous workflow, which focused on waterfall handoffs from product owner to UX to development and design to frontend developer, our modern workflow is something completely different. In order to create performant, responsive, accessible websites, we will have to turn this old workflow model on its head. When we do, we get something like the workflow depicted in Figure 8-2.

Figure 8-2. The new development workflow
Requirements
We always need to start with gathering requirements. It’s how we define our need and quantify our success. The key difference in our new workflow is the audience of those requirements: UX, design, development, and frontend development. This group of mixed disciplines means that our new requirements will be focused on creating an entire in-browser solution, rather than a wireframe approximation or a static comp.
By having all four disciplines interacting with requirement gathering, we are able to spot holes or incongruities in requirements much sooner. Too often, problems with source order, performance-crippling designs, or broken user experience aren’t discovered until development is done and deadlines are fast approaching.
Prototyping
Instead of passing large artifacts from person to person, our new workflow focuses on iterating through user experience models, visual designs, and frontend solutions.
Prototypes provide a common space for discussion and feedback. They put fully fleshed-out ideas into both desktop and mobile browsers. This is the place where ideas can be formed, tossed out, revived, polished. Once developers and product owners are satisfied with the work, they can also be accepted.
It’s not until this point of acceptance that we move our prototype (which has the advantage of being cheap to make and highly flexible) into development (which is costly to produce and inherently inflexible).
Development
At this point, our feature is in an amazing position to succeed. Not only are we staring off with a thoroughly tested design, but we have all of the markup necessary to achieve it as well. The developer’s job becomes collecting and processing data from the database, and then passing it through to the specified markup. Developers will rarely need to go back and add an extra class, remove a container div, or change the source order, because all of that iteration and testing has already occurred.
If you are building your product in a way that the prototype and website share CSS and JS, developers should finish their work with a fully functional, fully styled, interactive, responsive, vetted, and approved product. This not only helps the developers, but it is also a boon to the quality assurance team. Instead of referencing old, possibly out-of-date, requirement documents and trying to determine if the developer’s work is correct, QA is able to compare their work line by line with the gold standard: the prototype.
Frontend Workflow
Moving from the macro to the micro, let’s look at the importance of a good prototyping process and ensuring that your team’s frontend developers are all set up to succeed. Many of these topics are cross discipline, but all of them have a profound impact on the productivity and happiness of your frontend developers.
Now, we can’t make any assumptions about what our developers know or are already equipped with, so our frontend workflow starts as soon as a new developer is hired. It is important to understand all of the steps required for a new developer, sitting down in front of code for the first time, with a new laptop, to write their first line of quality code.
Provisioning
The first step for any new developer is to install the necessary software and create the required setup for your code environment. This typically involves installing and setting up your favorite code editors, installing a few Adobe products, and downloading your favorite browsers. Once software is up and running, there are usually several steps to setting up Git and server access. Lastly, your new developers will be trying to sort out the hundreds of various web services and passwords.
Yes, this might seem a bit mundane, but the more streamlined this process can be, the quicker they can move on to actually working on your code.
Spinning Up Local
Interacting with version control will usually be the first thing a developer does when they start the day, and the last thing they’ll do when they’re done. It is the tool that gives them access to your website’s code and allows them to push new code once they are done. At this point, they’ll probably be cloning your code to their local environment and setting it up to run on their own machine. This can be as simple as:
git clone <repo> && cd <repo-name> && make website
or it can be a long process of pulling down multiple repos, setting up a local database, configuring various server settings, or even modifying computer networking or VPN setup. Whatever your process is, make sure it is spelled out clearly in the README.md file and gives resources and people to contact if they have questions about specific steps.
Don’t underestimate the time this process can take! I’ve been on projects where this setup only takes a few minutes, and I’ve heard war stories where it took several weeks before a new developer could actually get the site running locally.
So now our developer has a code editor, a browser, and a local site that they can edit. What else could they ever need before they start working? How about something to work on? Let’s talk about that next.
Story Writing
Whether you call them tasks, tickets, stories, or jobs, there is a communicational need to distill a human’s thoughts and desires into a focused, actionable, and testable request. It’d be great if we could just read everyone’s minds, but short of that we are writing user stories that describe in great detail the problem, the proposed solution, and the requirements that must be met before that story is complete.
This need to define everything into bite-sized requests is no different in frontend development. As we move away from building pages and into building design systems, we need to make sure that the way we slice up our work reflects our new approach. What this means is that we need to stop writing stories such as “update the ‘about us’ page.” These requests typically involve dozens of small typographical and layout changes, and might include a request like “double the padding on the call to action (CTA) button.” Here are the many reasons why this story is so bad:
-
Are we being asked to change the padding on all of the CTAs or just the one on the “about us” page?
-
If we aren’t updating all of the CTAs, are there other pages other than “about us” that need to use this larger button?
-
Is the person who wrote this task even allowed to make site-wide changes? What happens if we change all of the CTAs and the person writing tasks for the homepage doesn’t want this new button?
-
What happens if one person is updating the CTA on the “about us” page, and someone else has a task directing them to change the CTA on the “contact us” page?
-
Why is a simple change to the global CTA button being grouped together with dozens of other local and global changes?
Instead of stories to make several changes to a single page, we should be focusing our frontend development stories on what changes we are actually making to our system. Rather than a large story with dozens of changes, we should have a story that looks like this: “Create a new CTA button that has 16px of padding instead of 8px of padding for use on any internal page.”
This story makes it obvious that we are not updating the original CTA, but rather creating a variation. We know that this change is 100% opt-in, and will have no effect on the website until we go back to the “about us” page (a separate story) and update the HTML to use this variation.
By focusing on the components, rather than focusing on the work for a single page, we ensure that we’re always thinking design system first, and how our changes will affect it. This creates a more resilient system, and helps to avoid conflicting work on multiple pages.
Development
Now that we have a story that is focused on updating the system, rather than updating a page, we can proceed in making this contrived, and arguably minimal, change to the design system. We’ve got a button that typically has 8px of padding, and we need to make a variation that has 16px of padding. Let’s take a look at the code we’ll be making changes to:
.cta{background:blue;color:white;padding:8px;}
Before our new developer dives into writing some new CSS, let’s have them follow a common and well-accepted practice of creating a feature branch. A feature branch is a Git branch that forks off of your main development branch, and lets you develop and commit code with the intent of eventually merging the feature back into the main branch. The advantage of this approach is that you don’t commit incomplete code to the master branch. You are committing the code in a place where others can check it out and test it before merging it back into your main branch.
With a new feature branch created, it’s now time for the developer to write some CSS! There’s only one problem: there are a ton of ways that our developer could write this CSS.
They could create a completely new button to replace the old one:
.cta-large{background:blue;color:white;padding:16px;}
If they are using Sass, they might end up creating a mixin to handle this work and refactor both buttons:
@mixinbutton($size){background:blue;color:white;padding:$size;}.cta{@includebutton(8px);}.cta-large{@includebutton(8px);}
They could opt to create a button modifier so our button would include both .cta and .cta-large:
.cta-large{padding:16px;}/* Example HTML would be <a class="cta cta-large">
Or they could use data attributes instead of classes and write:
.cta[data-size="large"]{padding:16px;}/* Example HTML would be <a class="cta" data-size="large">
It should be pretty apparent that even something as simple as creating a new button variation could be accomplished through a number of different approaches. And even though all four of these approaches accomplish the same goal, they each have significantly different effects on the design system that we’re trying to create and maintain.
This is exactly why we spent so much time during the code pillar stage defining the way that we write our selectors, write our CSS, and create element variations. With documentation available to describe our coding practices, the developer will have a guide to creating the correct code and push that new code up to their feature branch.
At this point, the dev’s feature branch is ready for review and they can create a merge request (or pull request) that is equivalent to saying “I’ve got some code that I feel is complete. Can you please review it, then merge it into the main branch?” This takes a bit more time than just merging the code directly into master, but this pull request creates an opportunity for review and feedback to the developer before the code is accepted.
Sometimes this review process discovers a major flaw in the code, or determines that it is not in line with design system expectations. Sometimes the review just provides an opportunity to suggest better ways to write the CSS, optimizations to the Sass functions, or improved clarity to the documentation. Even if the merge just gets a big :thumbsup:, having a second eye on a change to the design system helps to ensure that the code contribution is the best contribution that it could be.
So, now that our developer’s code has been merged into the main branch, it’s time to get this code into production.
Distribution
Our developer has done it! They have written a patch to our current codebase that solved our CTA problem, and after some code review and quality assurance, we are ready to get these changes out to our users. In this case, let’s assume that we chose to create a Sass mixin to create both a .cta button and a .cta-large button. These changes to our Sass files are now committed to master, but that does not guarantee the new CSS has found its way to the live website where users can use it. Before you fire up your FTP client, let’s consider some of the pros and cons of various distribution methods.
Committing Compiled Assets
It is best practice in any version control system to commit only the bare essentials of your code. This means, for example, we tell Git to ignore our temporary files, or any assets that need to download to compile our code (we’ll talk much more about this next chapter). The rationale behind this is that our website doesn’t need those temp files or node modules to perform properly. These files also significantly add to the file size of our project, and they will end up being a constant source of conflicts, as your local temp files might not match up with the ones last committed.
Unfortunately, there is one file type that sits right between “essential to the functionality of the website” and “source of bloat and constant conflicts”: our compiled assets. Any time we compile Sass, CoffeeScript, or LESS; add vendor prefixes with post processors; concatenate some JavaScript files; create an icon font; or process our images to reduce file size, we are creating compiled assets. What are we supposed to do with all of these files? What happens if we commit them? Is it possible to avoid committing them and still have a functioning website?
In many cases, you will find yourself forced to commit these assets. It’s not ideal, but unless you want to ditch your preprocessor and write that CSS file by hand, you might just need to add it to the repo. The advantage of this approach is that your repo always has all of the files required to render properly. If your servers are set up to fetch files directly from the GitHub master branch, you’ll have everything you need to display your website. Another benefit is that if nontechnical users pull down a copy of the site, they can view it without having to go through the lengthy process of setting up the compile tools.
Of course, for this small advantage, we also get to deal with a host of other problems, the greatest of them being merge conflicts. If you’ve ever tried to perform a Git rebase on a project that has compiled assets committed, you’ll know what I’m talking about. Even beyond rebasing, whenever you merge two branches with compiled code, you most likely will be dealing with merge conflicts in those compiled assets. Now, resolving those conflicts is easy (compile everything again and commit that), but this means that you’ll never have a merge request where your frontend devs aren’t pulled in to resolve some merge conflict in the outputted CSS.
If you are hoping to avoid these problems and keep compiled assets out of your codebase, you’ve got a few possible options. Let’s take a look.
Continuous Integration Server
Using a service like Jenkins or Travis CI will provide benefits far beyond the scope of this book, but one of their many uses is to perform operations on our codebase before pushing the code to our production server. What this means is that we can omit our compiled assets from Git and our CI server will perform our compiling tasks for us between checking out our code and pushing that code to production.
This approach offers more than just the convenience of keeping our repository clean—it also helps to protect us from unexpected regressions. If we are committing compiled assets, whenever my feature branch is merged into master, the compiled assets in master are 100% the product of how my machine compiled those assets. Once another developer’s feature branch gets merged in, my feature is going to be rendered with the assets compiled on that developer’s computer.
Sure, other developers will be compiling using my new Sass code and JavaScript files, but there’s always a possibility that differences in our operating systems or system setup or installed software could cause a difference in the compiled code. On the other hand, if we are testing our feature branches using the CI compiled code, and the CI server is compiling the assets pushed to production, we can be confident that those assets will be compiled the same way, every time.
Tagged Releases
One of the powers of Git is its ability to create tagged releases. A tag is a snapshot in a project’s history, based off the code at a single commit. Tags are a convenient way to distribute your code whether you are pushing to a production server or pushing to a distribution channel (which we’ll talk about next). One of the powers of a tag is that the code can be based off of any branch, not just your production branch.
Why Would You Ever Want to Do This?
One method for creating new releases of your software is to create a release branch for every version of your software. If v1.1 is coming out, you’ll create a branch called v1.1-dev off of master, and you will work in that branch until the release is ready. Usually if there are bugs in the v1.1-dev branch, you’ll address them in that branch, and then have the option to merge those fixes back into master. Sometimes the code fix that is required to get v1.1 out the door isn’t the same code that you’d want to put back into the master branch. You might just be looking at a temporary fix and filing a ticket in the backlog to fix it properly.
One other way to take advantage of tagged releases is to only commit your compiled assets inside of those tags. Remember, tags always refer to a single commit, and persist even after the branch that created that commit is deleted. There’s nothing saying that this single commit has to even get merged back into master. I’ll talk about the process we use at Red Hat in Chapter 10. For now, let’s finish by looking at how we can use distribution channels to get our code pushed out to not just a single server, but many servers.
Distribution Channels
If all of your production code is inside of a single repo, you’re probably not worrying too much about distribution channels. But if you are creating a theme or a library or a module that is used by dozens, if not hundreds, of websites, you’ve probably looked into the various distribution channels available to you outside of simple version control. There are more than you might think, and you often have more than one option. Here’s a short, inevitably incomplete list to at least get you started:
-
NPM (Node Package Manager)
-
Bower
-
Ruby Gems
-
Composer
-
Yeoman Generators
-
Drupal Contrib Modules and Drush
-
WordPress Plug-ins
-
Homebrew
-
Sublime Text Package Control
-
RPM
-
PEAR
Regardless of which type of code you write (PHP, Node, Ruby, CMS module, Mac software, Unix software, VIM plug-in, IDE plug-in), you’ll find that someone has written a package manager for distributing it. Considering that Bower is actually a node module, there are even package managers to manager your package managers! There are several benefits to using a package manager to distribute your code, so having more than we could ever need certainly is better than the alternative.
Package managers provide the following benefits:
- Push out versioned releases
- This means users of your code won’t automatically be upgraded to the newest release, but instead they can evaluate any new code before upgrading.
- Easy for users to know when new releases are available
- Most package managers have built-in notifications and internal upgrade systems that make it easy to find upgraded modules and pull down the new code.
- Distribute only the files required for the user
- You’ll often have a large build system creating your distributed code, and using a package manager allows you to distribute only the files that matter.
- Publish code from within a private repository
- Sometimes it is not possible to give everyone access to your Git repo. Private version control and firewalls often keep source code under lock and key, even if the end product is meant for general consumption. Package managers allow you to get that distributed code into a public space.
Take some time and look at the various options you have for your project. You’re never locked into a single system (many projects are on Bower and NPM), but you’ll want to be confident in whatever system you decide on, as your users will be creating build systems that depend on this code. So then let’s talk about the build system you’ll be using to create this shareable code, and the systems that rely on code published by others.