
Chapter 10. Red Hat Process
At Red Hat, our frontend development team has the incredible advantage of working multiple sprints ahead of our backend development. We set long-term goals for the features we want to build or update, and once we have a signed-off prototype, we pass it over to our development team to implement.
In past projects, we might have said, “OK, here is the markup we want you to try to output. Please get as close as you can.” We would create markup in a siloed set of Mustache or Twig templates, and then ask our development team to create PHP, Ruby, Angular, React, or Ember templates that output the same markup. The problem with this approach is that half of the battle of implementation is trying to get the markup spit out by the backend anywhere close to our prototypes. We’d constantly be tackling bugs that were nothing more than “the markup coming from our CMS does not match our prototype.”
Even if we did get the markup to match our prototype, there was always the fear that either the prototype or the CMS code would get out of sync. Changes would be made to one system that were not made in the other, and eventually there was such a crevasse of technical debt that our prototypes couldn’t be trusted. We could never be sure that they represented what was actually in production, and any further work on that feature would have to be done directly to the CMS code. The problem was that the CMS and the prototyping tool were not sharing HTML templates, even if they were sharing CSS and JavaScript. In the refactoring of the Red Hat theme, we had an opportunity to tackle this “last mile” issue once and for all.
Conquering the Last Mile
Our problem was that Drupal had a very opinionated rendering engine, and it was very difficult to prototype the markup that Drupal would render without actually running Drupal itself. So we decided to upend the Drupal rendering pipeline and insert our own solution. We wanted a solution that could be shared between our prototyping tool, Drupal, WordPress, or any other platform that wanted to use our design system. We started with the Twig templating language, as it was mature and robust, and had both PHP and Node compiling engines.
Now that we had a universal rendering engine that allowed us to use the same template files in our prototyping tool as we did in production, we never again had to worry about translating our templates from one system to another. Once we created a pattern in our style guide, we could document the data set required to produce that design, and pass that off to our backend developers to implement. In a way, we had created a design system API, or a theme as a service, where our users had a simple, defined interface that accepted data input and returned identical HTML regardless of the platform.
A Standard Set of Deliverables
This relationship between data and template quickly turned into a very important part of our design system. Our developers started asking to have a list of template variables, the variable content types, and which of them were required. These were important requests, and we wanted to provide our developers with the most complete information possible. This all led to the standard set of deliverable files that we now ship with all of our components and layouts.
The standard set of component deliverable files is:
- JSON schema
- The schema defines the various attributes (variables) of the component, their content types, and which of them are required.
- Template file
- This Twig file accepts a set of data defined by the JSON schema. Optional data is gated behind
ifstatements, and data arrays are looped through. - Sass partial
- All of the component styles originate from this single Sass partial. It gets compiled into the primary style.css file, or can be loaded in as an individual CSS file.
- Visual regression tests
- This file describes all of the browser widths and component states that will be tested each time our visual regression tests are run. These tests must pass before any new code is merged into the design system.
- Testing data
- This file allows us to create test-specific data to get complete test coverage and test edge cases.
- Documentation
- The documentation file is a Markdown file that will be fed into our documentation tool, Hologram. It provides a description and list of capabilities for the component. The documentation page also provides a visual representation of the component and includes a live editor that allows us to test various content and create direct links to share that content combination with others.
- Documentation data
- The documentation data is the starting data that will be ingested by the documentation page to create the initial view.
All of these files are valuable deliverables for feature creation, but one of them serves as the cornerstone of this entire process, and is often the first file to be created: the JSON schema. No other file in this set of deliverables offers a better description of the needs and capabilities of this feature as the JSON schema. Whenever there is a change made to the functionality of a component, that change originates in the schema and is then spread out to the other files within the component. It is because of the importance of this single file that we call this process a schema-driven design system.
Schema-Driven Design System
By now, test-driven design is a pretty common and accepted practice in software development. Before writing a line of code, we write a suite of tests that describe what the code is supposed to accomplish. Then, when we start our feature we have failing tests, but as we write our code we eventually get all of the tests passing.
The idea of a schema-driven design system is very similar, but instead of tests written in NodeUnit or PHPUnit that describe the proper functionality of an application, we create schemas in JSON. These files describe the correct data structure for a component in our design system. In employing a schema-driven design system, we focus first on content and the user’s interface with our design, instead of the markup and CSS. Let’s look at a simplified version of a schema we might use on the Red Hat website and see how this information helps us make better decisions for our design system.
The following JSON schema describes a display that contains a headline and two or three logo images:
{"type":"object","properties":{"headline":{"type":"string","format":"text"},"body":{"type":"object","oneOf":[{"title":"Two Up","required":["logos","layout"],"properties":{"layout":{"type":"string","enum":["2up"],"options":{"hidden":true}},"logos":{"type":"array","format":"tabs","minItems":2,"maxItems":2,"items":{"$ref":"#/definitions/logo"}}}},{"title":"Three Up","properties":{"layout":{"type":"string","enum":["3up"],"options":{"hidden":true}},"logos":{"format":"tabs","type":"array","minItems":3,"maxItems":3,"items":{"$ref":"#/definitions/logo"}}},"required":["logos","layout"]}]}},"required":["body"],"definitions":{"logo":{"title":"Logo","type":"object","oneOf":[{"title":"Upload File","properties":{"file":{"title":"Logo File","description":"Upload your logo","type":"string","format":"file"}},"required":["file"]},{"title":"Paste URL","properties":{"url":{"title":"Logo URL","description":"Paste a URL to your logo","type":"string","format":"url"}},"required":["url"]}]}}}
At 91 lines long, this might seem quite verbose for such a simple component, but let’s walk through each section and discuss how each piece helps to drive not just the data structure, but the editor UI and the outputted HTML.
Line 2:
"type":"object","required":["body"],"properties"{"headline":{...
Every schema we create is a description of the data that needs to be collected and eventually passed on to a template or view. Each property of a schema represents either a single piece of data, or a group of data that will be described in a subschema. So after stating that this schema will describe an object of key/value pairs, we state that only the body field is required.
Line 5:
"headline":{"type":"string","format":"text"},
Our first property, the headline, is optional since it is not listed in the required array above. We know that it is a string, which tells us how this value will be stored in a database.
We also know that the format is simply text, which describes the form element used to gather the headline. The format could also be textarea, url, color, range, or any other valid HTML5 input types. In the end, the value saved is still a string, but we are able to hint to the editor how to display the input.
Line 9:
"body":{"type":"object",
The body, our second property, is of the type object and therefore it’s not just a single value, but a group of values, which have their own schema. In this case, though, there are two possible schemas that could be used here. Let me explain why.
For this logo design, we were asked to create a layout that could accept either two or three logos. Figure 10-1 shows the mockup we were given.

Figure 10-1. The “three up” mockup
Anyone who’s seen this design before will quickly realize that there is an important piece of information missing. What happens to the layout when there are only two logos? Does the layout remain the same, with simply a blank space where the logo was? Or do we switch to a different layout, giving each logo more space? These two options are illustrated in Figures 10-2 and 10-3, respectively.

Figure 10-2. Same layout, one less element

Figure 10-3. Use up all available space
The power of our schemas is that we don’t have to leave this question up in the air. We can define what happens when we have two logos, or when we have three. The way we do that is by defining the two different schemas that are possible, one with two logos, and the other with three. We’ll do that starting on line 11, where we define the options for our body schema:
Line 11:
"oneOf":[{...},{...}]
JSON schema has a few keywords that allow us to be a bit more flexible with our schemas. They include oneOf, anyOf, and allOf. We’ll be using oneOf here, which means that our data needs to conform to “one of” the following schemas, not “all of” them or “any of” them.
As you can see, oneOf takes an array of objects. Our body data needs to validate against one, and only one, of the contained schemas.
Line 13:
"title":"Two Up","required":["logos","layout"],"properties":{"layout":{"type":"string","enum":["2up"],"options":{"hidden":true}},"logos":{...}
The first schema is a “two up” schema. It has a title of Two Up, which we can use in the UI when switching from one schema to the other. The required field simply tells this subschema which of the listed properties are required to satisfy the schema. Here we’re stating that both are required.
The first property layout is unique in that it is not something we expect the user to set, but it is a value that still needs to be stored and passed to our template. Because this value is required, the only way to satisfy the schema is to pass the string 2up as the layout value.
If the specifications required us to allow the user to choose which layout they wanted to use, we could update this enum value to ["2up", "3up"] instead. Because we’ve decided to not let the user select the layout, we added a "hidden": true to our property options. This is a cue to hide this value from the UI, but still pass a value to our template.
Now that the layout for this schema is set, we turn to the logos that we’d like our user to upload.
Line 23:
"logos":{"type":"array","minItems":2,"maxItems":2,"format":"tabs","items":{"$ref":"#/definitions/logo"}}
The logos property is another unique property in that the data it’ll be storing is neither a string nor an object, but an array. Because it’s an array, there are several things we need to know about it. For instance, we need to determine the minimum and maximum items in the array, how we should format this data in our UI, and the schema for each of the items in that array.
For our logos, we set minItems and maxItems to 2. This means that the only option we have is to pass in two items, which is great because our layout is expecting two.
In the same way that we hinted that our headline property should be displayed as a text input, here we’ve specified that the format should be a tabbed layout. Now, “tabbed” layout means nothing to the JSON schema. These are merely hints that we can pass on to the UI ingesting our schemas. It is up to each implementation to determine what “tabs” mean, so if the format is completely ignored, the schema and data produced are no less valid.
Lastly, we define our items, which is a keyword that allows us to define what schema our array items will adhere to. In this instance, $ref signifies that we’re using a JSON pointer. This allows us to point to an external definition rather than define one here. The value #/definitions/logo instructs the pointer to look at the local schema root #, and then return the object at definitions/logo, which we can find down on line 60.
The reason that we use a reference here is that both our “two up” schema and our “three up” schema use the exact same definition for a logo. This means that we can create our two schemas, and only specify the values that change.
We aren’t limited to internal references either, as the $ref value can reference other schema files too. This allows you to create commonly used schemas in separate files and access them from other schemas. In this case, we opted to use a local reference, so let’s jump down and see what this reference is referring to.
Line 60:
"logo":{"title":"Logo","type":"object","oneOf":[...]
Here, we start to define the logo object. Again, we give our object a more human-readable title, even if it is just capitalization, and then we state that the rest of this object conforms to oneOf the following schemas. You see, we want to allow for two different methods for inputting our logos, and they each require their own schema values.
The first is in case the user wants to upload a file, and the second is if the user opts to paste in a URL.
line 64:
{"title":"Upload File","properties":{"file":{"title":"Logo File","description":"Upload your logo","type":"string","format":"file"}},"required":["file"]},{"title":"Paste URL","properties":{"url":{"title":"Logo URL","description":"Paste a URL to your logo","type":"string","format":"url"}},"required":["url"]}
At this point, we get a chance to set the title of this oneOf selection, as well as the title of the property we’ll call file. The important value here is the format value of file, which will tell our UI to provide a “choose file” dialog box. But if the user would prefer to paste in a URL, then they can switch to the second schema, which provides a URL field, including the necessary help text.
Moving to the Twig File
The last step of this process is to move all this information into the template file. Let’s first take a look at what some valid data will look like:
{"headline":"This is my headline","body":{"layout":"2up","logos":[{"url":"http://www.fea.pub/my-logo.png"},{"file":"path/to/my-other-logo.png"}]}}
This is what our Twig template might look like:
<div class="logo-wall">{%ifheadline%}<h1 class="logo-wall-headline">{{headline}}</h1>{%endif%}<div class="logo-wall-logos" data-layout="{{body.layout}}">{%forlogoinbody.logos%}<img class="logo-wall-logo"src="{{logo.file?:logo.url}}" />{%endfor%}</div></div>
The first thing we are able to glean from the schema is about the headline. Not only do we know the key for that value, headline, but we also know that the value is not required. So we first create a test in Twig to see if headline is set, and if it is, we print it inside of an H1 tag.
Moving into the body of our schema, we use the layout value to set our data-layout attribute. We’ll handle what this actually does within our CSS, but for now we can be confident that if the data source has three images, this body.layout will equal 3up, and if there are only two, it’ll be 2up.
Lastly, we know that logos is an array of objects with either a URL or a file string. Twig gives us a simple method to check if logo.file exists, and then use that value if it does exist, or use logo.url if it does not exist.
So in the end, this single schema provides us with the following:
-
A definition of the content model with all possible fields, their data type, prefered input type, and which of them are required.
-
A method for validating the data before it’s passed along to the template.
-
A set of definitions needed to create a template file that accounts for every possible variation in the data.
-
A description of the UI we’d prefer our users encounter when entering this data. Figure 10-4 shows an example of our schema rendered with the JSON-editor library.
This is a powerful combination of benefits to be gained from 91 lines of JSON. For the design system that we are creating, it is the perfect vehicle for communicating concepts and ideas that would otherwise take paragraphs of text to convey properly.
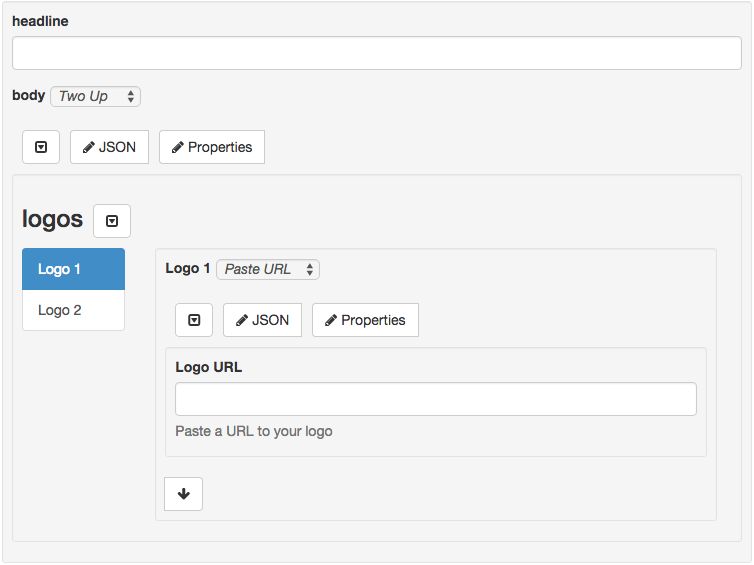
Figure 10-4. Jeremy Dorn’s JSON editor
Every day that I work within this system I am amazed at how well these schemas allow us to convey changes or additions to a template and the methods that developers should use to interface with them. These schemas have removed a majority of the guesswork that accompanied previous asset handoffs.
By following a public standard, we are constantly finding third-party tools that add value and functionality to our design system. Our strict adherence to a schema system has paid off in so many areas that I am confident I will never create another design system without them again. This is a schema-driven design system.