
2.5 WHITE BALANCE, JPEG PARAMETERS, AND RAW CONVERSION
A great feature of all X series cameras is their ability to set white balance [80] and JPEG parameters before and after you take a shot, thanks to the built-in RAW converter. This gives you full control over the JPEGs that are generated in your camera.
It’s not necessary to anticipate and set the perfect settings for each shot in advance because you can always generate different JPEG versions of a shot with the internal RAW converter. For example, you could create a version with bold Velvia colors, or a black-and-white version with strong contrast and minimal noise reduction. As long as you have access to the RAW file, you can change all JPEG parameters after the fact and use it to create as many different-looking JPEGs as you want.
Using the built-in RAW converter in the playback menu is quite easy because it offers the same functions that are available in shooting mode.

Please be advised that GRAIN EFFECT, COLOR CHROME EFFECT, D RANGE PRIORITY, B&W ADJUSTMENT, LENS MODULATION OPTIMIZER, and COLOR SPACE settings aren’t available in every X camera model.
Notable differences between shooting mode and after-the-fact RAW conversion in playback mode affect the first two items in this list:
- Exposure corrections made before you take a picture can affect aperture, shutter speed, and ISO. Push/pull processing applied after you have taken a picture only affects the ISO amplification. Effectively changing the ISO via push/pull processing also doesn’t change the nominal ISO value in the EXIF data [81] of the JPEGs. Instead, Push/Pull processing in the internal RAW converter has the same effect as moving the exposure slider in external RAW conversion software, such as Adobe Lightroom, Silkypix, or Capture One.
- Before you take an image, you can select four different dynamic range options: AUTO, DR100%, DR200%, or DR400%. DR200% exposes the RAW file one ISO stop darker than indicated; DR400% exposes it two ISO stops darker. DR-Auto automatically selects either DR100% or DR200% (or DR400% in first-generation X cameras). After you have taken an image, you can still select different DR settings in the internal RAW converter. However, you can only reduce the DR after the fact, not increase it. If you are working on a RAW file that was recorded with DR400%, you can reprocess it to create JPEGs with DR400%, DR200%, or DR100%. A DR200% RAW file can be reprocessed with DR200% or DR100%, but not DR400%. And a DR100% RAW file can only be reprocessed with DR100%. The same restrictions apply to the D RANGE PRIOITY settings STRONG, WEAK, and OFF.
The correct white balance ensures that neutral (white or gray) areas of an image appear without color tints, regardless of the light conditions. At the same time, the results are usually not supposed to look clinically neutral. Your X camera masters this task quite well, so you can rely on the Auto white balance setting to get it right most of the time.
However, “most of the time” is not “all the time.” There are instances when the white balance is off, or when you want it to be off. For example, you may want to emphasize a sunset with a warmer white balance. In such cases, it makes perfect sense to manually set the white balance in advance or after the fact.
X series cameras offer a variety of options to manually set the white balance:
- Several white balance presets for typical situations, such as sunny weather (Fine), cloudy skies (Shade), and tungsten light (Incandescent).
- A Kelvin option to manually set the color temperature.

Fig. 162: AUTO white balance isn’t always right. However, you can always adjust white balance later with the built-in or an external RAW converter. In this case, a simple white balance preset change from AUTO (left) to FLUORESCENT LIGHT-1 (right) did the job.
- Custom white balance that meters a white or neutral surface (like a white wall) under the current light conditions. This way, the camera can adjust the white balance to make the surface appear neutral.

Fig. 163: Two versions of the same shot processed with different white balance settings. The image above shows the WB Auto setting without further corrections; the image below shows the same shot after a manual white balance adjustment in Adobe Lightroom. While white balance can also be adjusted with the camera’s built-in RAW converter, extensive changes like this one are easier to accomplish with external RAW conversion software.
This useful function is only available before you take a shot, because you are metering the white balance of the actual scene. Custom white balance allows you to calibrate the camera’s white balance toward a part of your scene that you want to appear neutral in the final image.
Here we go:
- Select SHOOTING MENU > (IMAGE QUALITY SETTING >) WHITE BALANCE > CUSTOM.
- Point the camera toward a surface that you want to use as a neutral reference—for example a white wall or a gray card [82]. Make sure that the surface is large enough to be fully covered by the white balance metering frame in the viewfinder. Come closer to your subject or zoom in if you need to.
- Fully press the shutter button to meter and set the new custom white balance. The live view will change accordingly and simulate the adjusted color temperature. If you are happy with the result, confirm it by pressing the OK button.
You can use the same procedure with a firing flash unit. In this case, the custom white balance will meter the mix of flash-light and surrounding light that hits your neutral reference surface.
Don’t worry! You are under no obligation to use the custom white balance later during RAW conversion. It’s simply one of many options, and you can always adjust it later as you please. For example, you can use the built-in RAW converter with a manual KELVIN setting or select one of the white balance presets (usually FINE, SHADE, FLUORESCENT LIGHT 1–3, INCANDESCENT, and UNDERWATER). You can even apply AUTO white balance anytime later because the camera will always save its automatic white balance reading for later use by the internal RAW converter.

Fig. 164: A custom white balance setting was used to take this shot. The wall behind the sofa served as a neutral reference.
Infrared photography |
Since X series cameras are known for their weak IR-blocking filters in front of their sensors, they are deemed quite suitable for infrared photography. You’ll need an infrared filter in front of your lens, typically of the R72 kind, which is available from most filter vendors. This filter blocks all light wavelengths except infrared, making sure only infrared light reaches the sensor.
To minimize the resulting red tint in the live view (and JPEGs), set the color temperature to the minimum of 2500 Kelvin. You can also select one of the various black-and-white film simulation modes to eliminate colors in the viewfinder (and JPEGs).
Since the R72 filter blocks a large percentage of light, it’s useful to shoot with a tripod.
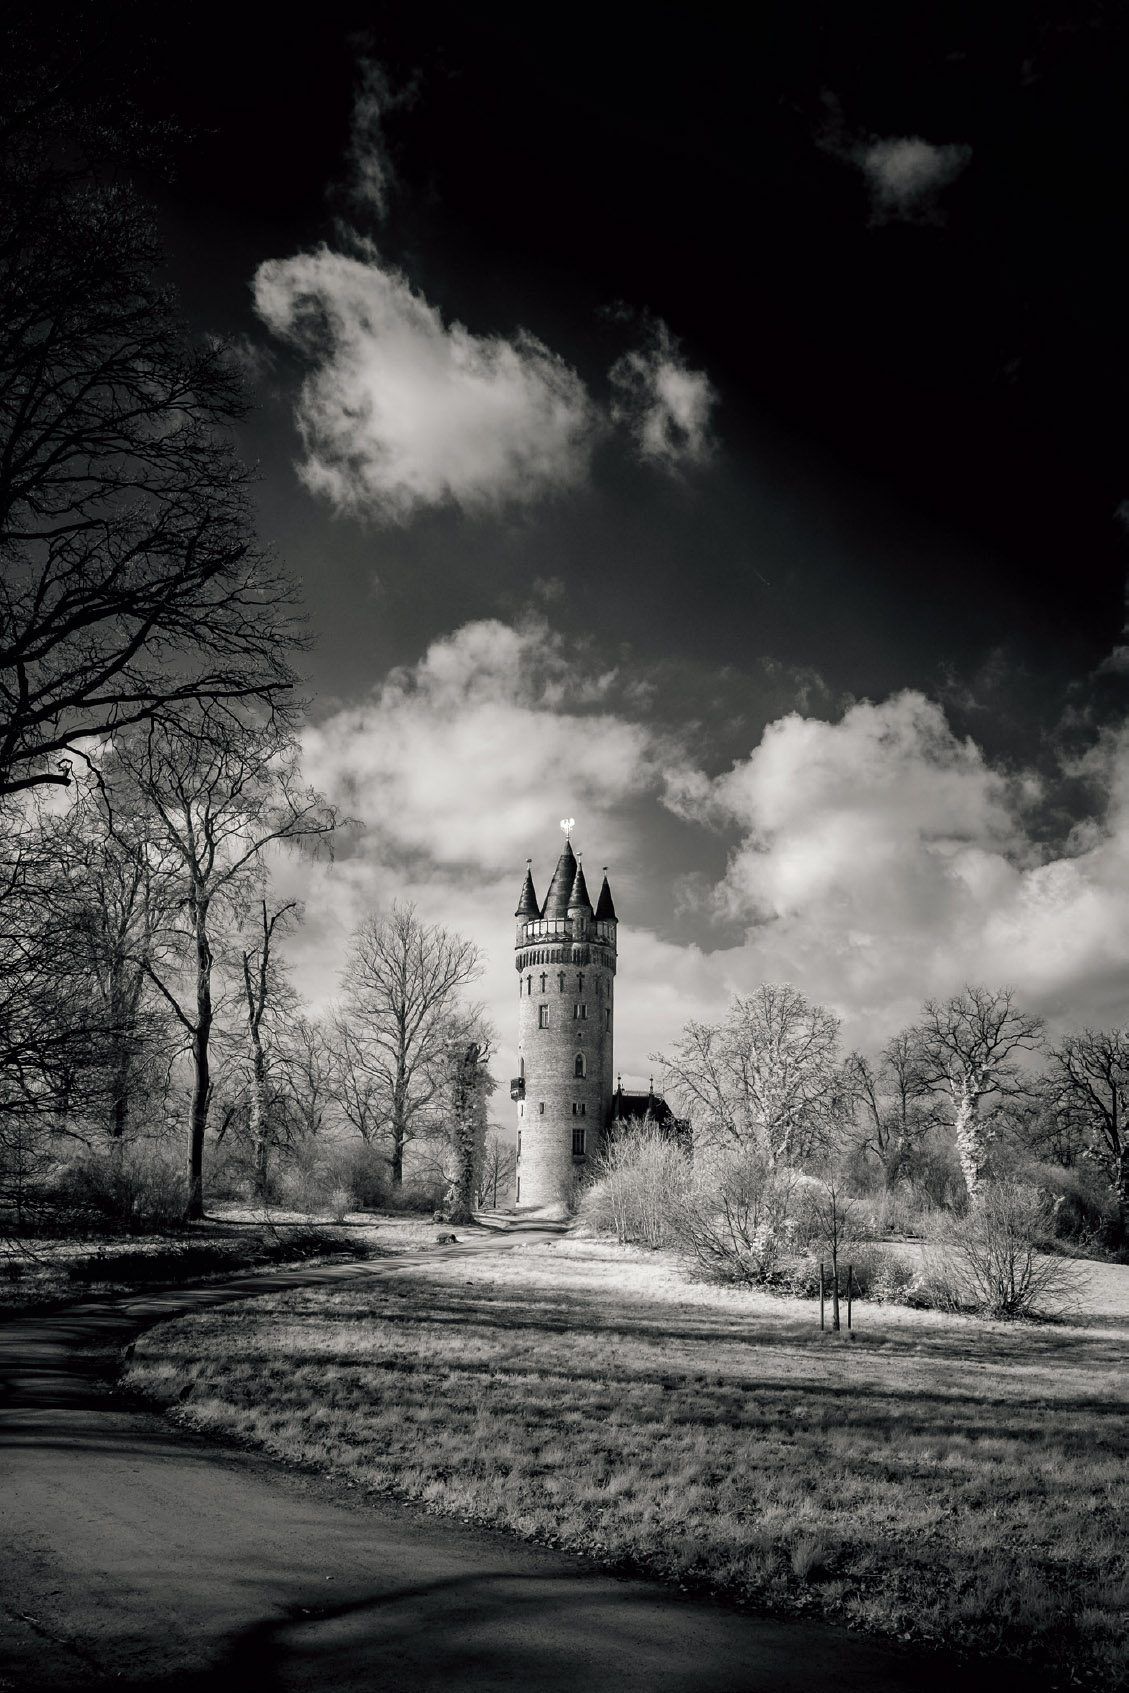
Fig. 165: This infrared image (left) by X Photographer Mehrdad Abedi was processed in Adobe Lightroom and shot with a R72 filter (Credit: www.qimago.de).
WB SHIFT offers the opportunity to correct (or introduce) a color tint in any shot. You can adjust the color tint as an addition to any white balance setting—either before you take a shot or in the built-in RAW converter.
You can individually set a different white balance shift for each of the camera’s white balance options (Auto, Kelvin, WB presets, and Custom white balance settings). You can do this by changing the tint between green and red on the X-axis and between yellow and blue on the Y-axis of the display that automatically appears when you select one of the white balance options.
I recommend a neutral setting here to avoid confusion. As mentioned before, there’s a different white balance shift setting for each of the white balance options, meaning the camera can store up to a dozen different white balance shift settings at once. This makes it easy to forget a previously set correction, which is why I recommend introducing white balance shift only during RAW conversion. You can see, for example, that the skin tones in a portrait may require an adjustment.

Fig. 166: WB SHIFT in action: The example above shows a straight-out-of-camera image (SOOC JPEG) with the AUTO white balance settings. Below, you can see the same image, again straight out of camera and with AUTO white balance, but with an additional WB SHIFT of BLUE +3 and RED −3 to make it look cooler than the original.
Important: WB Shift is only available for in-camera JPEGs from the built-in RAW converter. When you process a RAW file externally with Adobe Lightroom or similar software, any WB Shift settings that were active when you took the image will be disregarded.
You may think that white balance adjustments don’t affect black-and-white images, because monochrome shots only consist of neutral shades of gray. In reality, your white balance settings still affect the underlying color information that your monochrome conversion is based on.
Black-and-white photography is color photography with an additional dimension of difficulty. This added dimension is determining how different grayscale levels are assigned to different colors. Since your white balance settings affect the colors of the underlying shot, they also affect the grayscales of the color-to-monochrome conversion.
Black-and-white images can be created either in-camera (with the MONOCHROME and ACROS film simulations) or externally with RAW conversion software such as Adobe Lightroom, Capture One, or Silkypix. When you set your X series camera to ACROS or MONOCHROME, it is still recoding RAW color images, which are then converted into black-and-white JPEGs.
Knowing this, you can manipulate the look of your black-and-white conversions by changing the white balance during RAW conversion—either in-camera or externally in software like Lightroom. In-camera with the built-in RAW converter, you can use one of the white balance presets, or select a manual Kelvin setting between 2500K and 10000K.
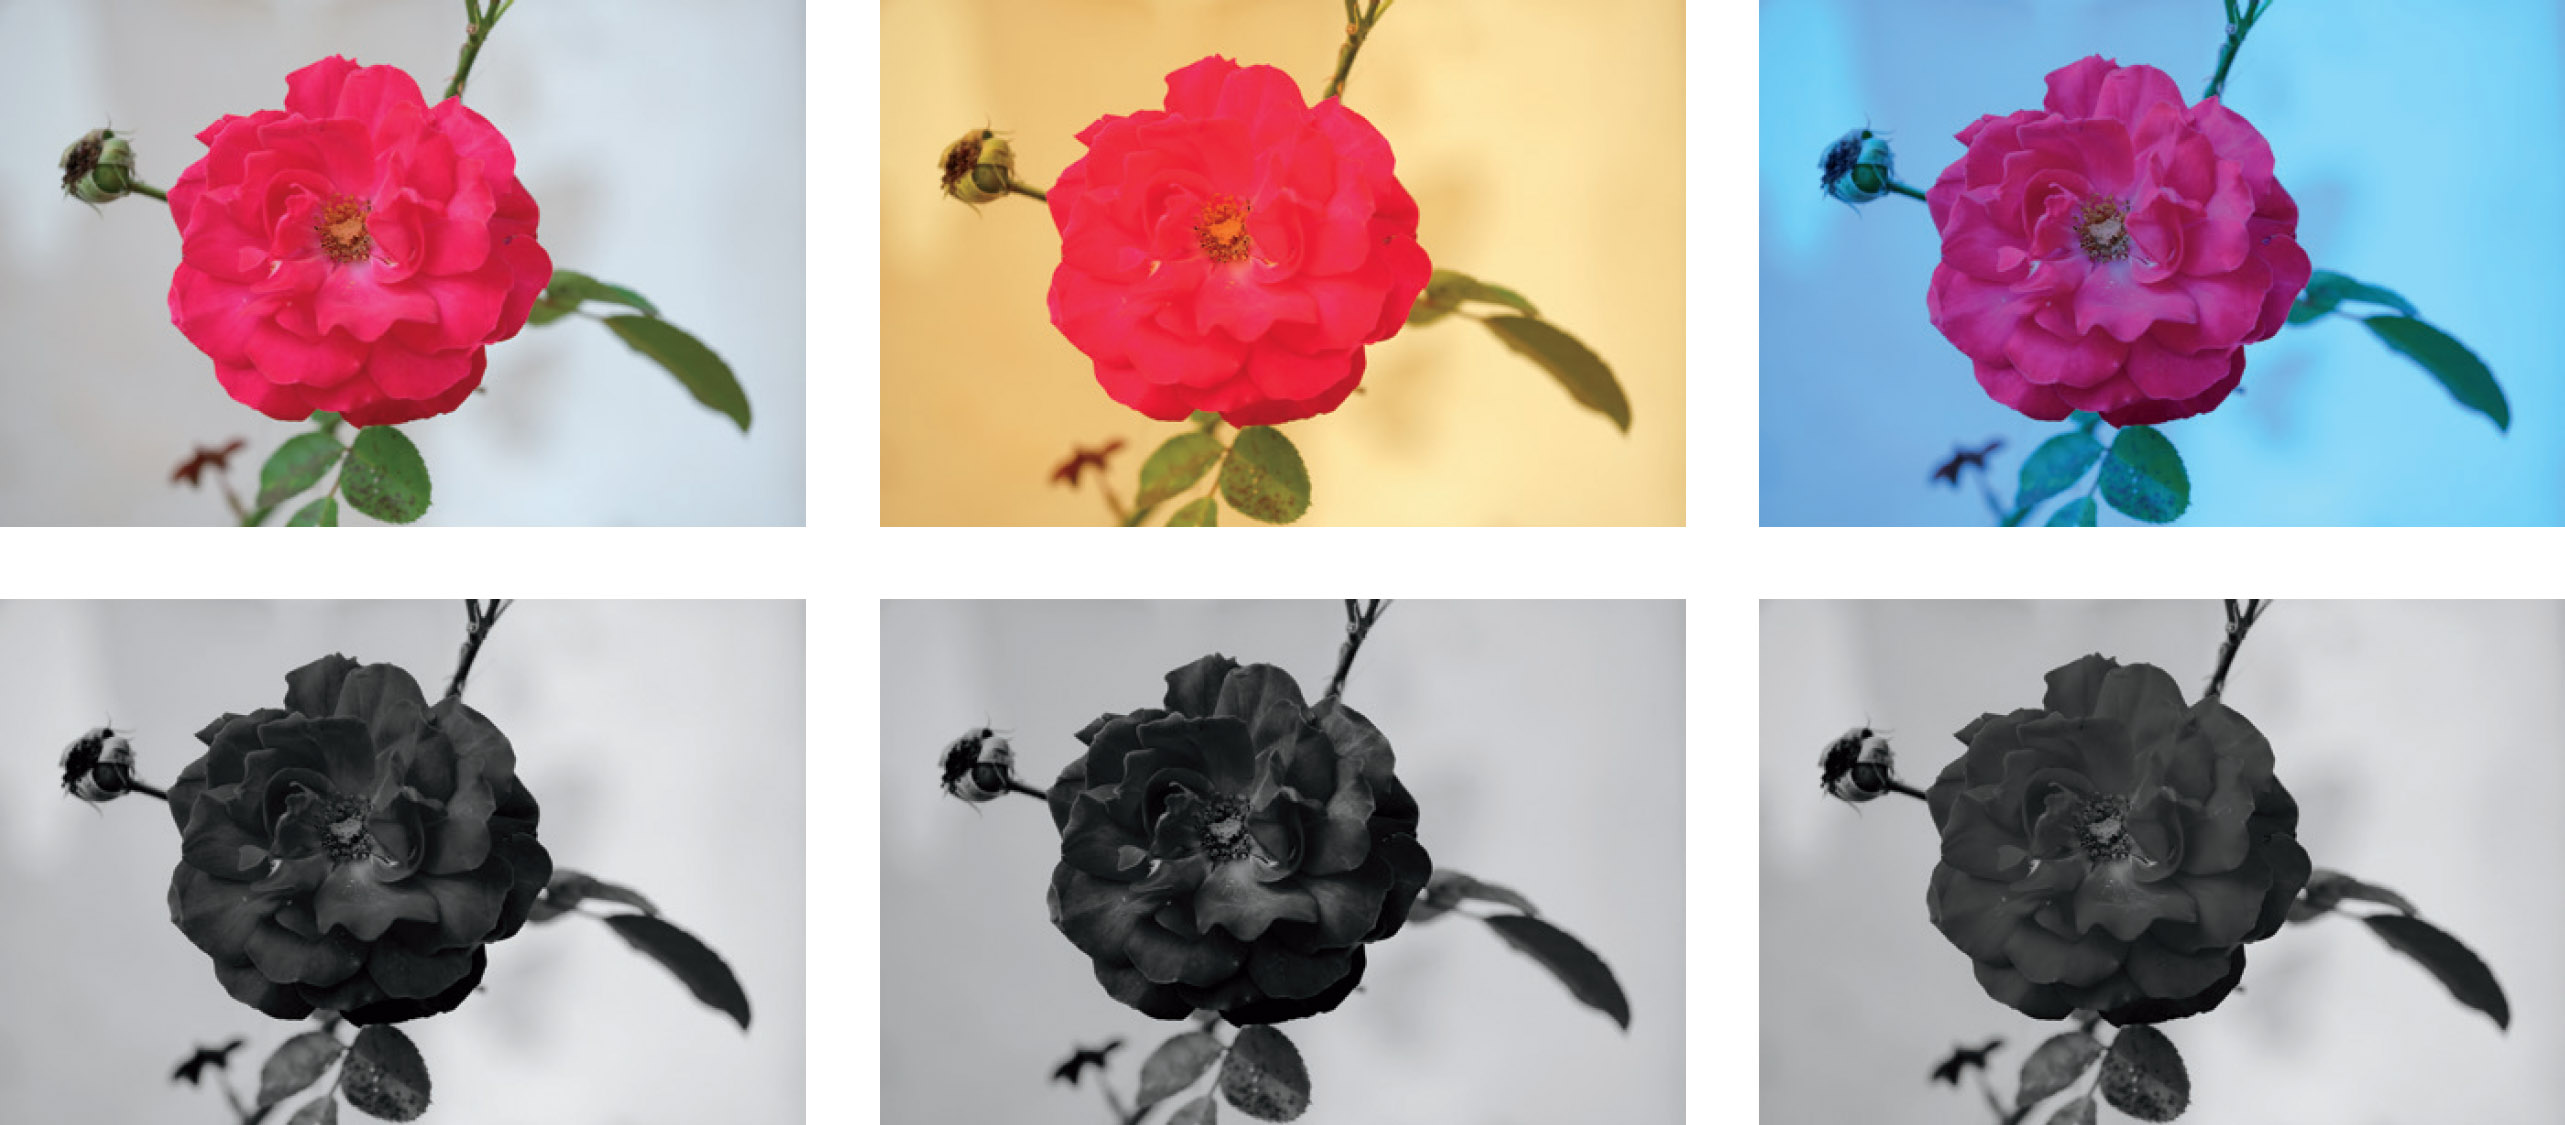
Fig. 167: White balance and monochrome: In the upper row, this illustration shows the same color image with Auto white balance (left), a 2500K setting (center) and a 10000K setting (right). The lower row exhibits monochrome conversions of the above images, all three made with a MONOCHROME+G FILTER film simulation and a SHADOW TONE +4 setting. The different underlying white balance settings have a visible impact on the appearance of the monochrome conversions.
Using film simulations |
The importance of film simulations for the overall look of a JPEG is often underestimated. Film simulations influence color grading, color saturation, dynamic range, and contrast in the resulting JPEGs. Picking a film simulation should always be the first step when adjusting JPEG parameters. As with all JPEG settings, film simulations have no effect on the actual RAW file (the digital negative). They only affect the JPEGs that are generated in the camera (the digital prints). Most current X camera models offer six or seven different color film simulations, eight black-and-white modes, and one sepia option:
- PROVIA is the standard, all-purpose setting. The name reminds us of Fuji’s popular Provia slide film.
- ASTIA is another color slide film derivate with softer highlights and pleasing skin tones. It’s often used for portraits but can also work with landscape shots that feature vegetation and blue sky.
- VELVIA is a very contrast-heavy, color-saturated derivate of the legendary Fuji Velvia slide film. It’s mostly used for landscape and nature shots and is rather unsuitable for portrait work.
- CLASSIC CHROME reminds us of the golden era of LIFE magazine color photography. The distinctive look of Classic Chrome is equally suitable for landscapes and portraits.

Fig. 168: The distinctive look of CLASSIC CHROME has earned it much popularity in a very short time.
- PRO NEG. HI is derived from a professional color negative film that was specifically made for portraits. It delivers accurate and pleasing skin tones with nice contrast, adding some punch to the image without adding too much color to faces.
- PRO NEG. STD is a rather neutral film simulation. Featuring flat contrast, subdued colors, and high dynamic range, it can look dull at first, but the JPEGs are usable for further post-processing. Fuji recommends this film simulation for studio portraits in a flash setup.

Fig. 169: Antagonists: PRO NEG. STD and VELVIA illustrate the spectrum of Fuji’s different film simulation modes. On the left you can see the PRO NEG. STD version of a shot, and on the right its VELVIA cousin.
- ETERNA is the most neutral film simulation in the X series. As of December 2018, it was only available in the X-H1 and X-T3. Though Eterna was designed as a flat and desaturated film simulation for video production, it’s also our preferred low-contrast, high dynamic range profile for RAW photography.

Fig. 170: ETERNA is a flat film simulation profile with a cinematic look. It is named after Fujifilm’s discontinued Eterna motion picture film. With low contrast, high dynamic range and desaturated colors, it’s ideal for video production work. That said, it can also be used as a flat RAW shooter profile (along with Highlight Tone −2 and Shadow Tone −2 settings) or for neutral, cinematic JPEGs like this sample image.
- MONOCHROME is Fuji’s standard black-and-white conversion. Black-and-white photography is based on assigning different gray levels to different colors of a scene. To increase the contrast, many photographers combine MONOCHROME with increased SHADOW TONE and HIGHLIGHT TONE settings. Additionally, noise reduction is often decreased to reveal more detail and display more noise, which gives the appearance of film grain.
- MONOCHROME+Ye FILTER adds a digital yellow filter to the black-and-white conversion. This typically results in a slight increase of contrast because yellow parts of the scene will be represented by brighter gray tones.
- MONOCHROME+R FILTER adds a red filter to the black-and-white conversion. This means that skin tones will become brighter, which will camouflage reddish skin impurities. Conversely, blue skies will be darkened, adding contrast between clouds and the sky.
- MONOCHROME+G FILTER adds a green filter to the black-and-white conversion. This filter will add texture to skin tones and can potentially emphasize impurities.
- SEPIA results in a sepia-toned monochrome JPEG for an antique touch.

Fig. 171: Comparing B&W options: From left to right, top row: unfiltered B&W, yellow filter, and red filter. Bottom row: green filter, sepia, and the original shot in color.
- ACROS is a more sophisticated alternative to the regular MONOCHROME settings. It’s also available in four versions: no filter, or with either a yellow, red, or green filter. It reminds us of Fujifilm’s analog Acros film and offers a quite cinematic look. This is partly because ACROS includes a noise-dependent analog film grain simulation that transforms regular image noise into analog-looking grain. In cameras with X-Processor Pro, the grain even fills areas with blown highlights and blocked shadows, creating a smooth transition between textured and blocked/blown image areas. Sadly, X-Processor 4 in the X-T3 doesn’t offer this particular “soft clipping” quality and can consequently be considered a step backward in the image-quality department.
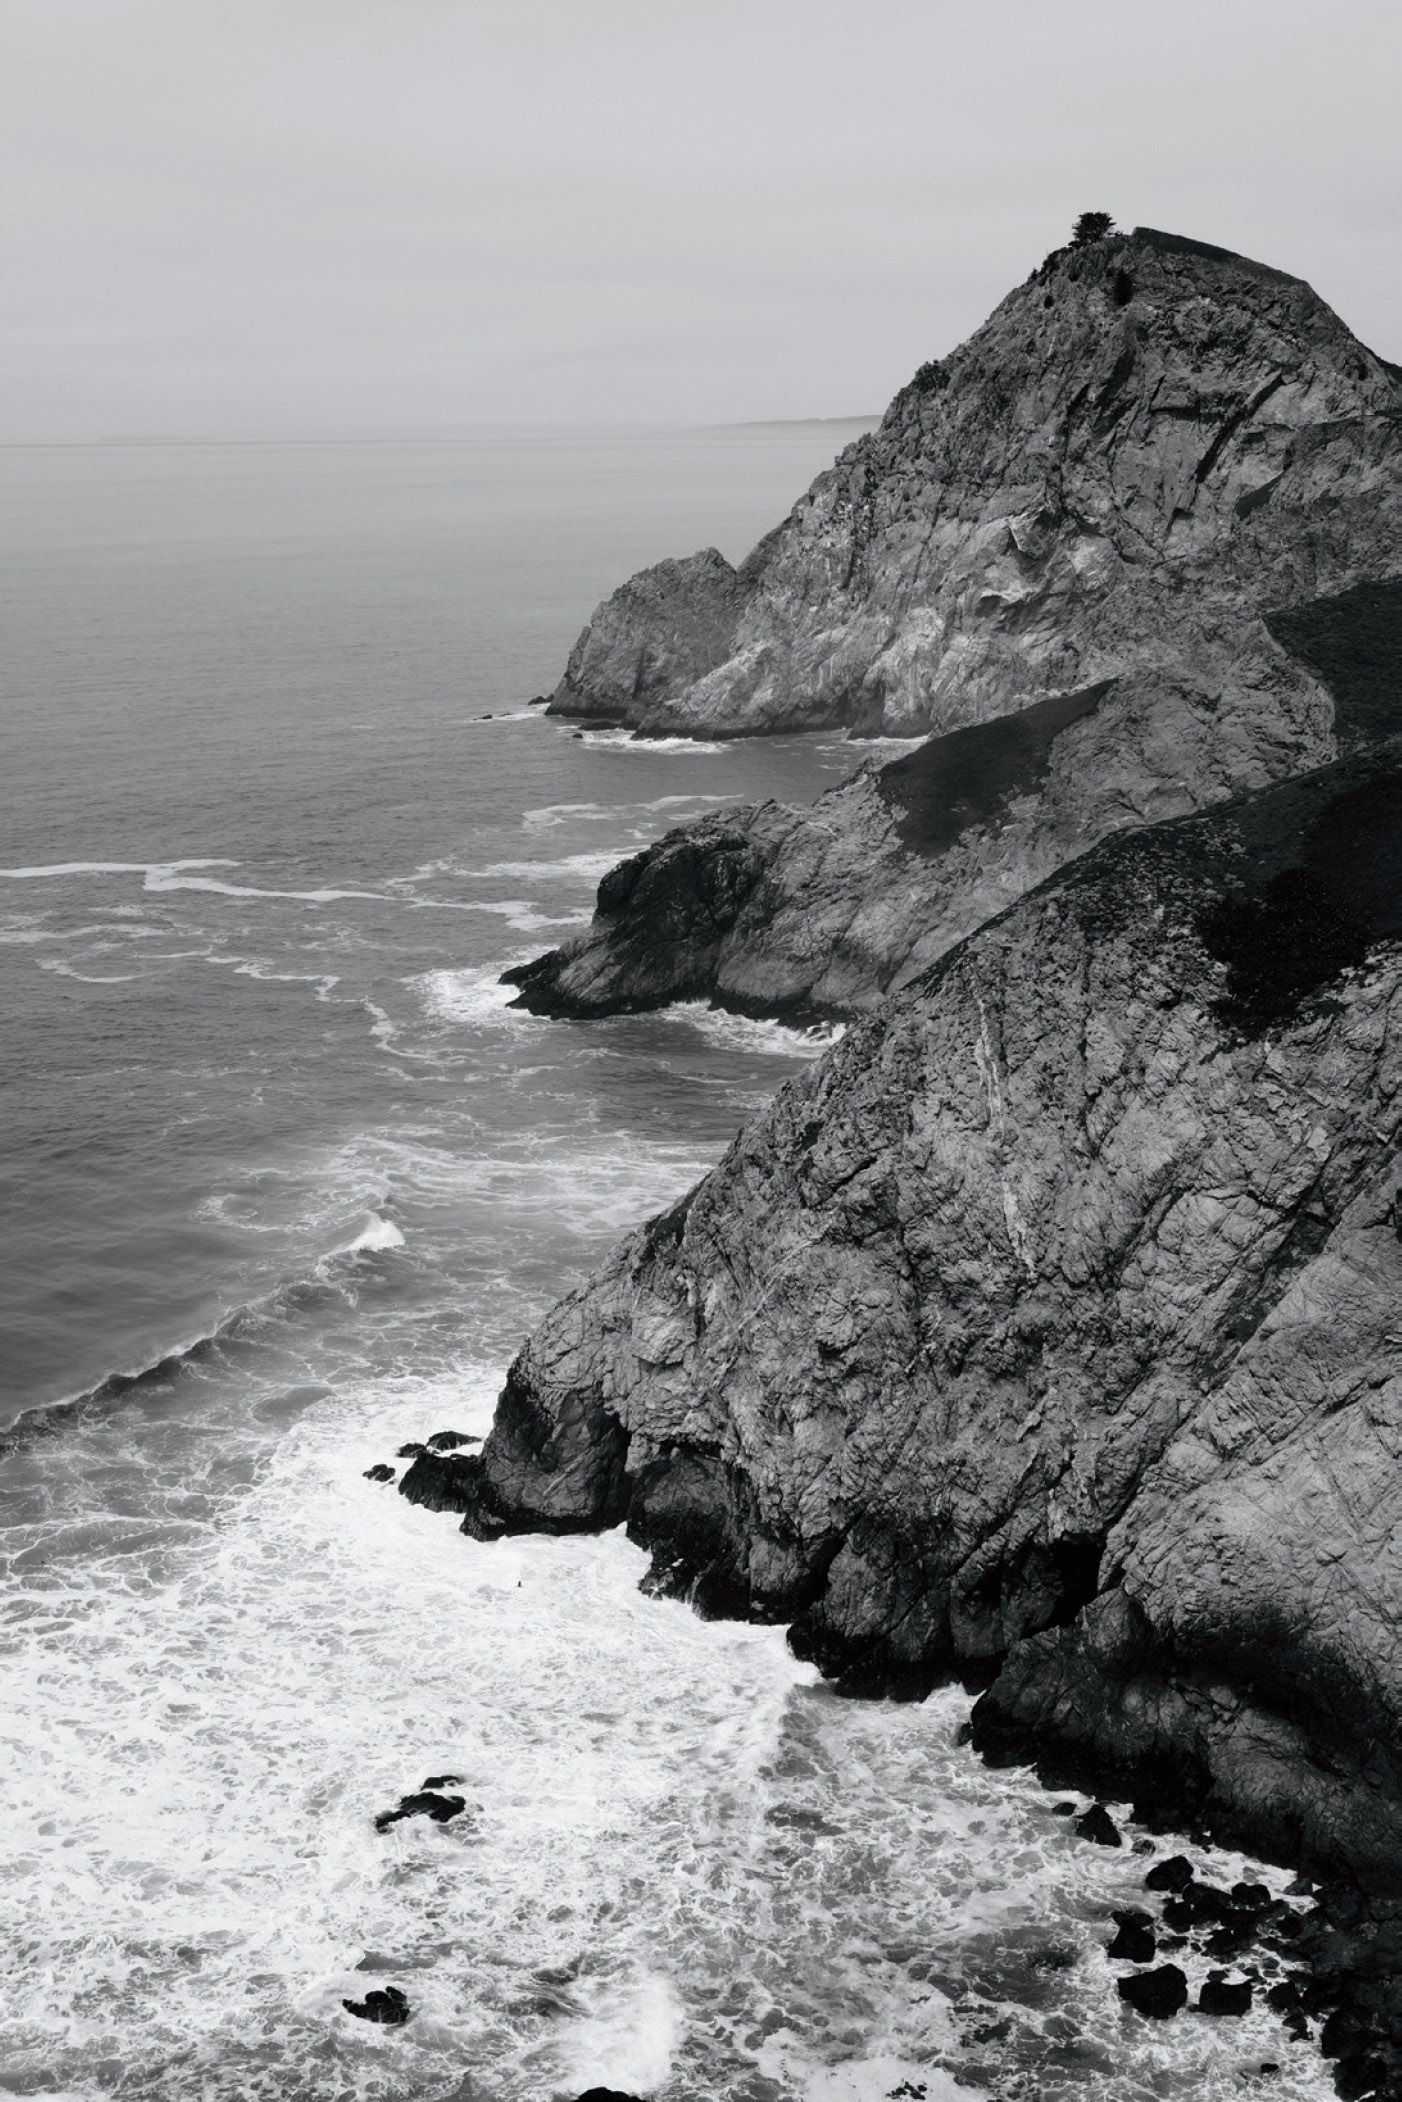
Fig. 172: ACROS has quickly become a favorite among X series users. Due to its high processing requirements, this sophisticated monochrome film simulation is currently only available in cameras that are equipped with X-Processor Pro or X-Processor 4.
The noise-dependent analog film grain simulation of ACROS is based on innovative noise shaping. To make it visible, your image must contain some noise, so it’s best to set in-camera noise reduction to a minimum. Even at base ISO, there’s already a subtle difference between ACROS and the regular MONOCHROME film simulation—as long as you set noise reduction to –4 in order to give the noise-shaping algorithm something to work with.

Fig. 173: Even at ISO 25600, the noise shaping of the ACROS film simulation delivers a natural-looking result with high resolution and fine details.
The best way to learn about film simulations is to try and compare the different options for yourself. The easiest way to do so is with the camera’s internal RAW converter. Take one RAW file and process it with all available film simulations, then import the JPEGs into your computer and compare them on your monitor.
In cameras with X-Processor Pro and X-Processor 4, you can also use X RAW STUDIO [83] to conveniently remote control your camera’s built-in RAW converter from your Mac or your Windows PC.
Fujifilm is all about great film simulations with an organic look. For example, adding “analog film grain” to a digital image can be useful to achieve a more natural look with enhanced micro contrast.
GRAIN EFFECT is available in cameras with X-Processor Pro and X-Processor 4 and offers three settings: OFF, WEAK, and STRONG. GRAIN EFFECT adds a layer of randomized, simulated film grain to the image. It can be used with all film simulations. Like ACROS, it fills blown highlights and blocked shadows with smoothly transitioning grain—as long as you use a camera with X-Processor Pro. Sadly, in the X-T3 with X-Processor 4, this benefit is lost.
Please note that I do not recommend using GRAIN EFFECT in concert with the ACROS film simulation—it would mix two different grain effects. After all, ACROS already brings its own noise-dependent grain to the table.

Fig. 174: Even at base ISO, using the ACROS film simulation in concert with minimal noise reduction (–4) already results in a subtle grain effect that adds organic texture to the image. This sample was shot with an X-H1 at ISO 200.

Fig. 175: GRAIN EFFECT adds natural-looking analog grain to all film simulations, providing extra texture and micro contrast for an organic look. These zoomed-in samples show the same image as before in four variations, all processed in-camera with minimal noise reduction: MONOCHROME with GRAIN EFFECT OFF (top left), ACROS with GRAIN EFFECT OFF (top right), MONOCHROME with GRAIN EFFECT WEAK (bottom left), and MONOCHROME with GRAIN EFFECT set to STRONG (bottom right). As you can see, the built-in noise shaping of ACROS holds its own without adding another layer of artificial grain via the GRAIN EFFECT setting.
Adding artificial grain may not be necessary for shots that were taken with ISO settings of 800 or higher. Instead, you can reduce the NOISE REDUCTION setting to –4 to preserve as much noise (and detail) as possible and allow the camera to do its magic.

Fig. 176: Grain effects are also available in some external RAW converters and post-processing software. This sample shows a Lightroom-processed image with a subtle grain effect. Artificial grain is primarily about adding texture and micro contrast to an image. In most cases, the grain itself will be invisible at normal viewing distances. Subtle extra grain can also be used to trick hosting services and websites into applying less JPEG compression to out-of-focus areas when you upload images to share online. Less compression means larger files and smoother tonal transitions with less artifacts.
Contrast settings: adjusting highlights and shadows |
A useful feature of the X series is its ability to independently set the contrast [84] for dark and bright parts of a JPEG image using the HIGHLIGHT TONE and SHADOW TONE settings. These settings can also be used to extend or reduce a JPEG’s dynamic range by lifting dark shadows or lowering bright highlights. To increase the overall contrast of a shot, you can increase both parameters in tandem by choosing a setting on the plus side. To reduce the overall contrast, pick a negative setting for both parameters.

Fig. 177: Comparing Shadow Tone settings: The image on the left shows a SHADOW TONE +2 version; the image on the right shows the same RAW file processed with SHADOW TONE −2. Shadows and dark midtones are lifted by the reduction of the JPEG’s shadow contrast, while the highlights remain untouched.
It’s worth mentioning that increased contrast also enhances the impression of image sharpness and color saturation. This demonstrates that JPEG parameters always work in concert with each other.

Fig. 178: Comparing Highlight Tone settings: The image on the left shows the HIGHLIGHT TONE −2 version of a shot; the image on the right shows the same RAW file processed with HIGHLIGHT TONE +2. Increasing the highlight contrast leaves the shadows and darker midtones untouched.
The smoothness of surfaces (such as skin tones) at higher ISO settings is best controlled by reducing the NOISE REDUCTION setting. To reveal more detail and achieve less skin smoothening with in-camera JPEGs, you can decrease the noise reduction to −2 or lower.
If this still doesn’t meet your demands, you can switch to an external RAW converter to turn RAW files into JPEGs or TIFFs. Current versions of RAW File Converter EX, Silkypix, Adobe Lightroom and Capture One offer copies of the camera’s internal film simulation modes. This means you can replicate the famous Fuji Colors and enjoy more control over many processing parameters.
Please note that RAW files recorded with extended DR settings (DR200%, DR400%) may require additional manual processing in external RAW converters if you want them to match the look of your camera’s built-in film simulations. You’ll have to tone-map the image and manually recover blown highlights. In Lightroom and Adobe Camera Raw, you can combine the sliders for exposure, highlights, shadows, whites, and blacks to get the job done.

Fig. 179: In models with X-Processor Pro and X-Processor 4, the built-in film simulations and their copies in Adobe Lightroom look almost identical. This example shows a Provia JPEG from an X-Pro2 (left) and its Lightroom counterpart (right).
After picking a suitable film simulation mode, you still might want to change the color saturation [85] of an image. You can do so with the COLOR setting.
Too much color saturation can obscure texture and details. For example, VELVIA is a very saturated film mode that may sometimes require a reduction in color saturation.

Fig. 180: Color saturation: The left image shows a PROVIA version with COLOR −4; the right image shows the same RAW file processed with COLOR +4.
The COLOR CHROME EFFECT |
As of December 2018, the Color Chrome effect was only available in the GFX and X-T3. It is a calculation-heavy process that adds depth to saturated colors in an image. This is why I don’t recommend using this setting in shooting mode. Instead, apply it as needed after the fact with your X camera’s built-in RAW converter.
COLOR CHROME EFFECT offers three settings: OFF, WEAK and STRONG. It can be applied in concert with any film simulation, but it obviously has little or no effect when used with ACROS or MONOCHROME.

Fig. 181: This example illustrates how a regular Provia image (left) is changed by adding a COLOR CHROME EFFECT STRONG setting (right).
B&W ADJ.: adding color tints to monochrome images |
In many cases, printed black-and-white photos aren’t just black and white, but have a warm or cool color tint. Even in photographic books, it’s common practice to add at least one color to monochrome pictures in order to increase the number of tones that can be realized during the printing process.
The X-T3 is Fujifilm’s first X camera that allows adding a warm or cold color tint to ACROS and MONOCHROME images. With the B&W ADJ. setting, you can change the neutral look of black-and-white images with a Warm/Cool adjustment in ±9 steps.

Fig. 182: This example illustrates the effect of the B&W ADJ. setting on monochromatic JPEGs: The left sample shows an ACROS image with a neutral Warm/Cool setting of 0. The center sample is the same shot, but with Warm/Cool set to +4. On the right, we have the image with a Warm/Cool −4 setting.
Color space: sRGB or Adobe RGB? |
A color space [86] is a way of organizing available colors. Most X series cameras offer two options: sRGB [87] and Adobe RGB [88]. Both color spaces contain the same number of colors, but not the same colors—their gamuts [89] are different.
Adobe RGB covers a larger gamut than sRGB because its colors are optimized for CMYK printing. On the other hand, sRGB is optimized for computer monitors and all kinds of high-resolution displays, such as HD and UHD TVs, smartphones, and tablets. Since Adobe RGB encompasses a wider gamut than sRGB, the gaps between neighboring colors and tones are wider because both color spaces contain the same number of colors. Adobe RGB must spread this number over its larger gamut. This larger gamut (compared to standard sRGB) is why Adobe RGB is also known as an extended color space.
Users often misunderstand and assume that “extended” means “better.” It does not. The additional colors in Adobe RGB are only useful if you intend to print your JPEGs or TIFF files with a commercial CMYK printer. This requires a calibrated workflow and a wide-gamut monitor that can display the Adobe RGB gamut. However, most computer monitors are only capable of displaying the sRGB gamut. Using Adobe RGB on such a monitor would be like working with closed eyes because you wouldn’t be able to see many of the colors you are using.
For most users (including me), sRGB is the best choice of color space. Images rendered in this color space can be viewed, processed, and printed on a wide variety of devices without unpleasant surprises. In any case, you should calibrate your computer monitor with hardware like Spyder. Uncalibrated screens will not give you an accurate representation of the colors in your images.

Fig. 183: Always set your camera’s internal color space to sRGB. The color space setting in this menu only applies to JPEGs from your camera, including the live view image on the LCD and EVF (the camera displays only support sRGB). Since RAW files don’t have an assigned color space, you can always create new JPEGs with a different color space either with your camera’s built-in RAW converter or with external RAW conversion software.
Most X series cameras offer up to seven custom settings (C1 to C7) that can hold sets of camera settings for quick access. The available settings are:
- ISO (including Auto-ISO)
- Dynamic range
- D-Range priority
- Film simulation
- B&W adjustment
- Grain effect
- White balance
- Highlight tone
- Shadow tone
- Color
- Color chrome effect
- Sharpness
- Noise reduction
Please note that not all of these parameters are available in all X camera models.
Basically, custom settings comprise your camera’s JPEG parameters with the addition of ISO (for cameras without a dedicated ISO dial) and dynamic range settings.
Custom settings or usage profiles aren’t camera modes. They are storage spaces for sets of settings than can be quickly retrieved (usually via the Quick menu) to replace the currently active camera settings with new ones. Custom settings are mere shortcuts—time-savers that allow you to quickly change several of your camera’s current settings at once instead of changing parameters one by one.
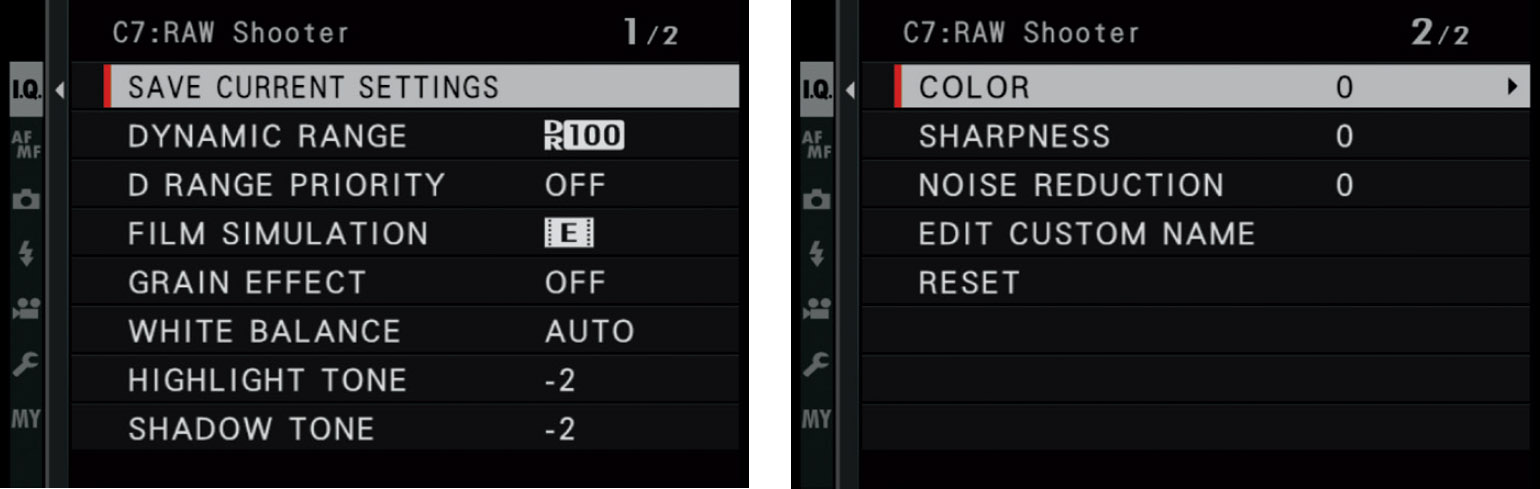
Fig. 184: Most X cameras offer three or seven custom settings. These usage profiles are shortcuts that allow you to quickly change or replace some of your current camera settings. Sadly, custom settings are limited to JPEG parameters, DR settings, and ISO.
The best way to select a custom setting is via the Quick menu:
- Pull up the Quick menu by pressing the Q button and select one of the available custom settings (C1 to C7).
- At this point, you can make changes to individual items of the retrieved parameter set using the Quick menu. Once you change a parameter, it is marked with a red dot.
- When you are happy with your settings and changes, you can make them your new current settings by pressing the OK button or by half-pressing the shutter button. In the upper-left section of the Quick menu, the currently active settings are always marked with the word BASE. It also displays the custom setting that was last retrieved; for example, C1.
What kind of custom settings may be useful? Here are a few suggestions:
- Make sure to save your favorite all-purpose default settings in one of the user profiles (such as C1). This enables you to quickly revert to your default settings.
- RAW shooters can use a RAW shooter profile with dynamic range set to DR100%, HIGHLIGHT TONE −2, SHADOW TONE −2, and ETERNA or PRO NEG. STD film simulation.
- You could create profiles for black-and-white or infrared shooting. For example, a black-and-white profile could contain one of the eight B&W film simulations, minimal noise reduction, and additional highlight and shadow contrast.
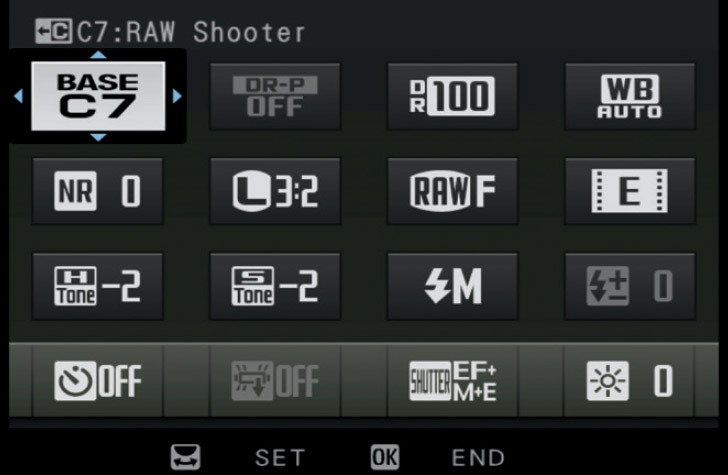
Fig. 185: Selecting C7 in the Quick menu of my X-H1. The C7 custom setting is traditionally the spot where I keep my “RAW Shooter” settings. To help you remember what each of the (up to) seven custom settings does, you can assign them memorable labels such as “RAW Shooter.”
Working with the built-in RAW converter |
The RAW converter in your X series camera serves two main purposes:
- You can create different versions of a shot; for example, a colorful Velvia version and a gritty black-and-white version of the same image. Not sure what’s best or what you want? Quickly create multiple versions with different film simulations and varying JPEG parameters, then sort them out later at home on your calibrated computer screen.
- You can improve your JPEGs after the fact. Since it’s hard (if not impossible) to guess and set the perfect JPEG settings for each shot in advance, it’s more convenient to adjust these parameters later when you have time to look at your results. You can easily change parameters like white balance, color saturation, contrast settings, sharpness, or noise reduction. You can also adjust the exposure and try different film simulations.

Fig. 186: Using the built-in RAW converter to change the look of a shot: The left image shows the scene as it was recorded with the camera’s default settings. On the right, you can see the same shot processed with ACROS+Red Filter and maximum contrast (SHADOW TONE +4 and HIGHLIGHT TONE +4).
Here are a few things you can accomplish with the built-in RAW converter:
- Use PUSH/PULL processing to brighten (push) underexposed shots or darken (pull) overexposed images.
- Use the contrast settings (SHADOW TONE and HIGHLIGHT TONE) to selectively adjust the contrast of dark or bright parts of your image. It’s perfectly adequate to combine these functions with PUSH/PULL processing. To generate JPEGs with maximum dynamic range for further post-processing on your computer, it may be useful to set both contrast parameters (shadows and highlights) to −2 and use a neutral film simulation like PRO NEG. STD or ETERNA.
- Adjust the color saturation of your JPEGs with the COLOR parameter. Reducing the color saturation can recover texture when one or more of the color channels appear oversaturated.
- Use SHARPNESS and NOISE REDUCTION in opposition with each other: increase sharpness while diminishing noise reduction to obtain more texture in high-ISO shots.
- Adjust the white balance using one of the presets or a Kelvin value to make your shot look warmer or cooler. Use WB SHIFT to correct or introduce a color tint.
- Want to know what the Lens Modulation Optimizer (LMO) is doing? Take a RAW sample and process JPEGs with and without LMO in the internal RAW converter. Then, compare the results on a computer screen. Happy pixel peeping!
- Picked the wrong color space? No problem! Just reprocess the shot with the correct color space.
To process RAW files that have already been transferred to a computer, you can use the free X RAW STUDIO application as a remote control interface for your camera’s built-in RAW converter.
By the way: Your specific X camera cannot process RAW files from X series models other than your own. For example, the built-in RAW converter of an X-T2 cannot process RAW files that were taken with an X-T20. However, you can process RAW files that were shot with a different copy of the same model.

Fig. 187: You can also use the built-in RAW converter to correct a shot: The left image shows an overexposed sample shot that was recorded with my X-Pro2’s default settings and DR400%. In the middle, you can see the same shot processed in-camera with a PULL of –2 EV, maximized shadow contrast (SHADOW TONE +4), and the VELVIA film simulation. To complete the comparison, the version on the right was created with Adobe Lightroom.
Working with X RAW STUDIO |
The built-in RAW converter of X series cameras is a practical tool for on-the-fly RAW conversions in the field. You can use your camera’s LCD or EVF display (I recommend the latter) to create new and improved JPEGs from RAW files that are saved on the SD card in your camera.
But what if your RAW files have already been transferred from the SD card to a computer? Instead of copying them back to a card and processing them in-camera, there’s a better and more comfortable way: FUJIFILM X RAW STUDIO.
X RAW STUDIO is a free download for Windows and macOS [90]. Don’t confuse it with a stand-alone RAW converter, though. Basically, X RAW STUDIO is a PC/Mac-based remote control and user interface for the built-in RAW converter of your X series camera. This means that X RAW STUDIO doesn’t work without your camera, which has to be tethered to your Mac or PC via USB.
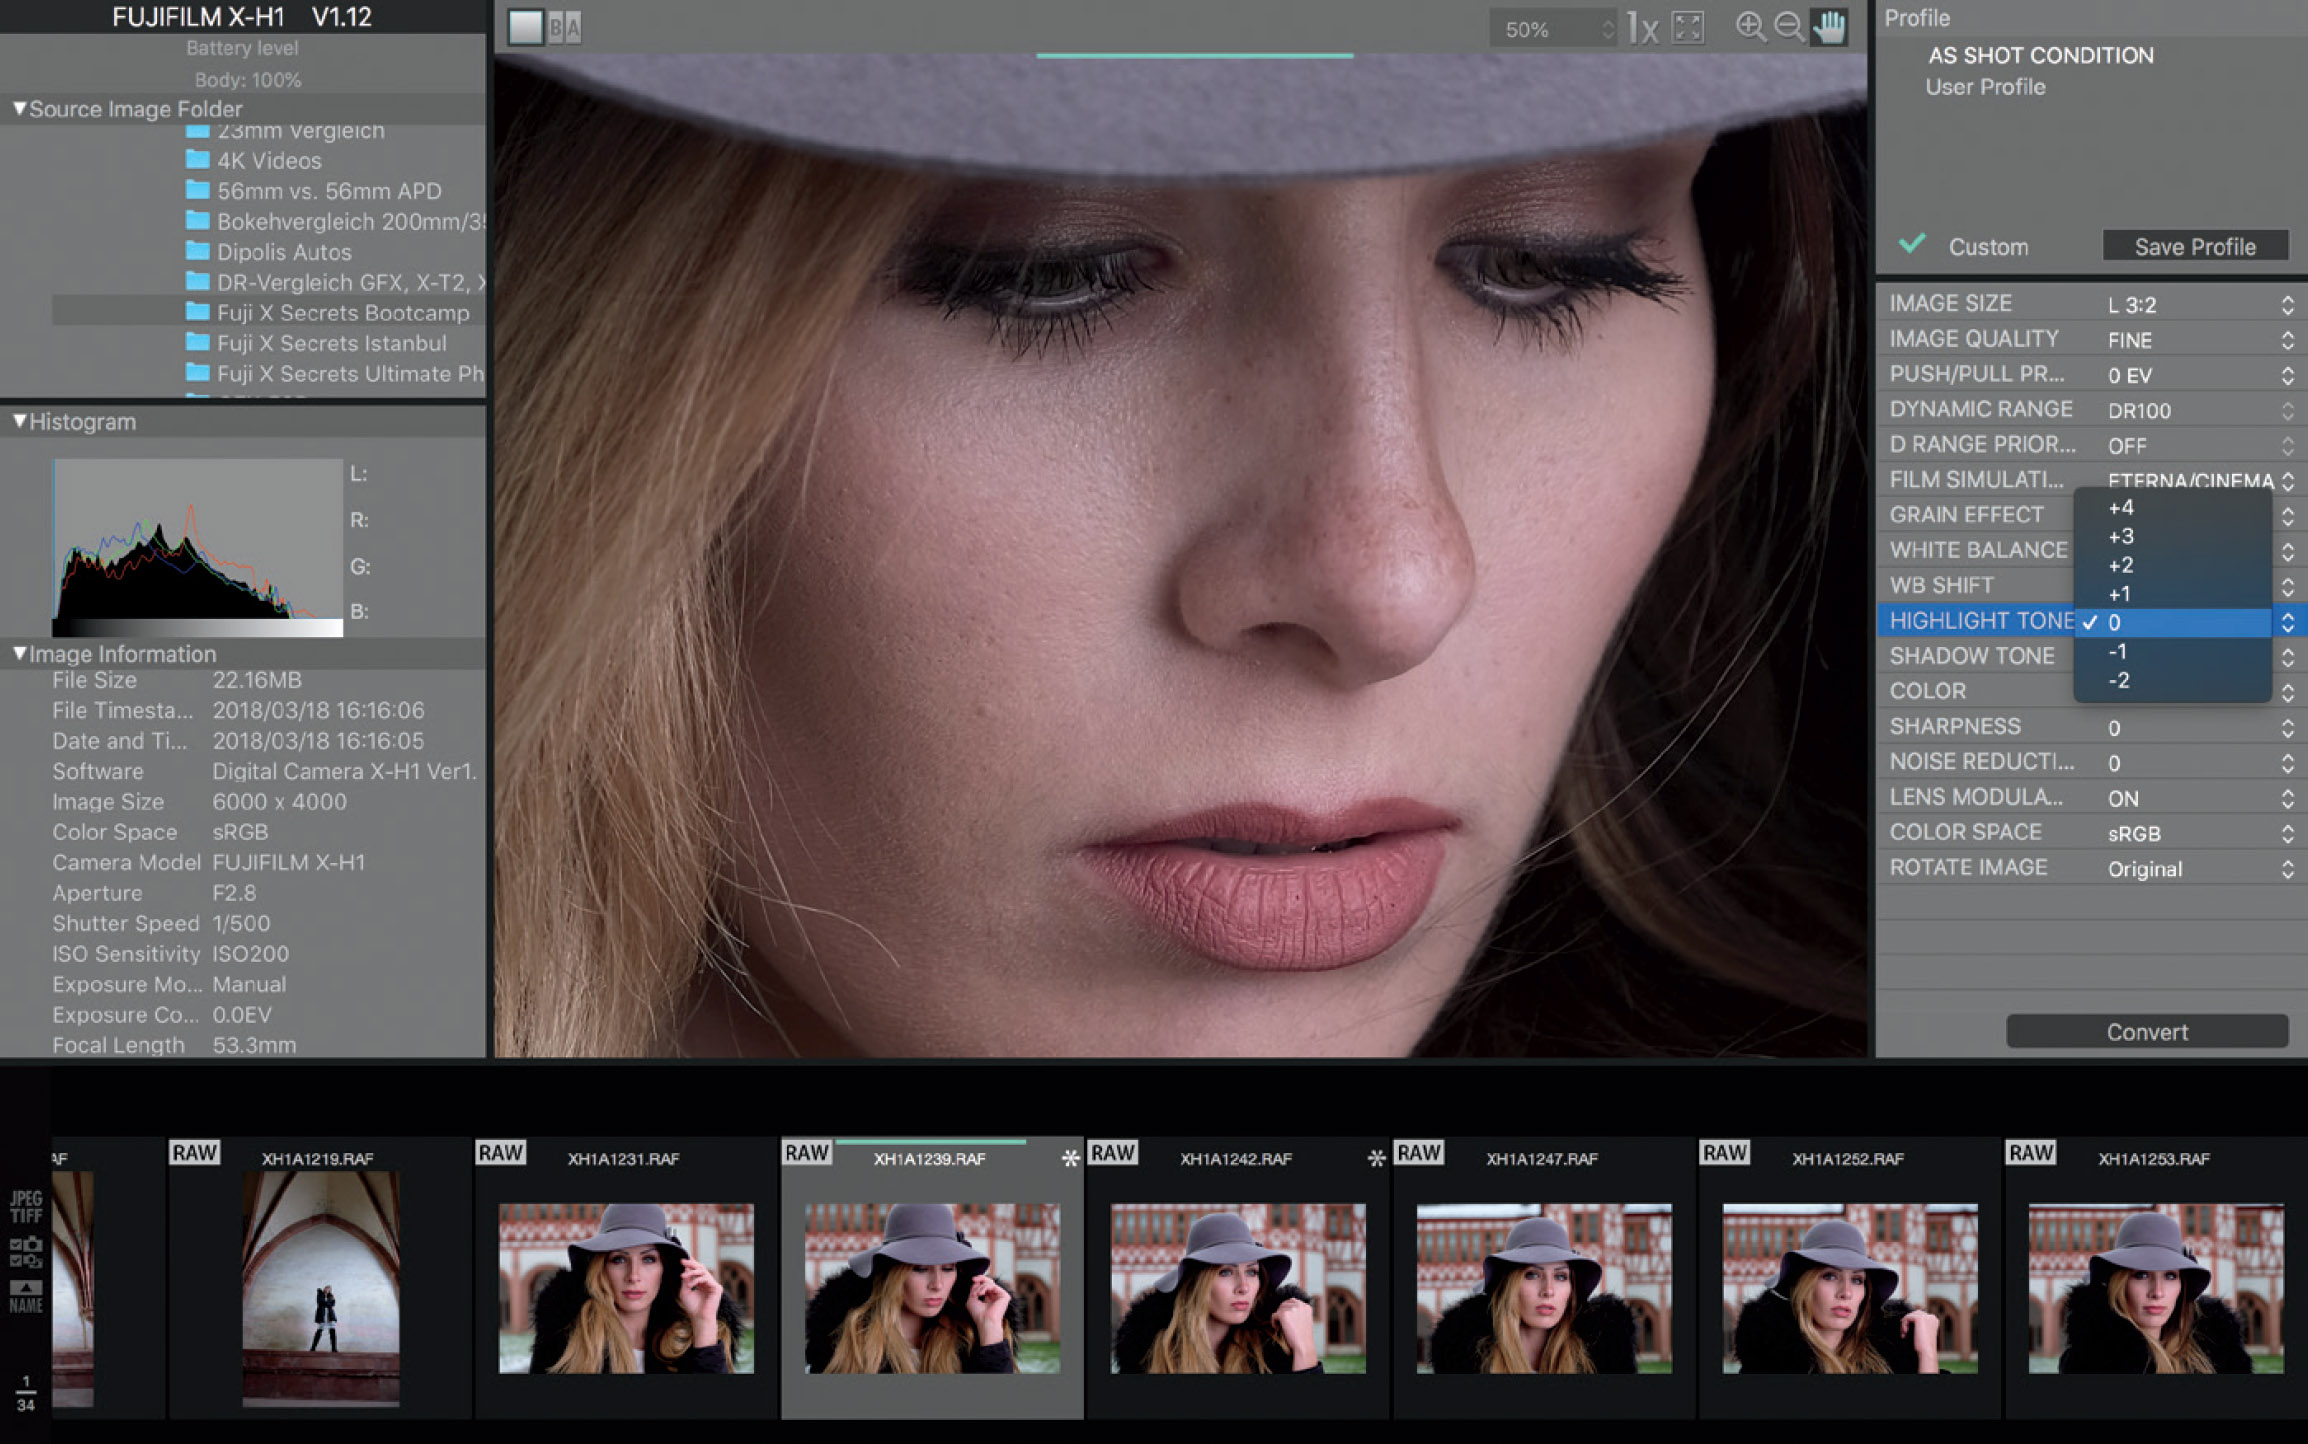
Fig. 188: FUJIFILM X RAW STUDIO is a simple way to remotely control the built-in RAW converter of your camera and use it to process RAW files that are stored on your Windows PC or Mac. The free app sends RAW files from your computer to the camera via an USB connection, where they are remotely processed to “in-camera JPEGs” that are immediately returned to your PC. You get the best of both worlds: The ease of use of a computer interface (with a large display and convenient storage for all your images) is combined with the processing power and image quality of your camera’s internal RAW converter.
X RAW STUDIO works with X-Processor Pro and X-Processor 4. As of December 2018, compatible cameras included the X100F, X-Pro2, X-T2, X-T20, X-E3, X-H1, X-T3, GFX 50S, and GFX 50R. The X100F, X-Pro2, X-T20, and X-E3 connect with a USB 2.0 Micro cable, while the X-T2, X-H1, and GFX 50S can be tethered with either a USB 2.0 Micro or a faster USB 3.0 Micro connection. The X-T3 and GFX 50R work with a modern USB-C connection.
Set-up your camera to work with X RAW STUDIO by selecting SET UP > CONNECTION SETTING > PC CONNECTION MODE > USB RAW CONV./BACKUP RESTORE, then connect it to your Mac or PC via USB while X RAW STUDIO is running. Operating the software is mostly self-explanatory, but feel free to consult Fuji’s online manual [91].
Since it runs on a computer, X RAW STUDIO offers a more comprehensive user interface than the stand-alone converter in your camera. You can copy and paste development settings from one image to others, and you can set-up and save development presets for later use. Batch-processing of multiple RAW images is also no problem.

Fig. 189: X RAW STUDIO offers a straight-forward workflow. You begin with selecting a RAW image from your computer’s hard drive. In this case, I chose a shot of the Taj Mahal that I took with my X-T2 and an XF18–55mm kit zoom. The image is automatically processed and displayed with the camera settings that were active when I took the shot (top image). In this case, I used the camera’s factory defaults with PROVIA.
The center image is the same RAW file after processing it with different settings. After changing the film simulation to CLASSIC CHROME, I lowered the exposure by applying a PULL of −1.33 EV, raised HIGHLIGHT TONE to +4 for brighter highlights, reduced NOISE REDUCTION to −4 to reveal maximum detail, and applied SHARPENING +3, because I was unlucky enough to bring a soft XF18–55mm lens copy with me to India. After clicking on the Convert button, the app saved the new and improved JPEG on my Mac, using the same directory as the underlying RAW file.
The image below is a second processing variant of the same shot, this time using MONOCHROME+R FILTER, PULL –1.33 EV, HIGHLIGHT TONE +4, SHADOW TONE +1, NOISE REDUCTION −4, and SHARPENING +3. I also changed the white balance to 4500K and applied a WB shift of R: −5 and B: +7 for a little bit more drama.
Comparing external RAW converters |
So far, we have talked a lot about the built-in RAW converter. It’s a great tool to create JPEGs. It’s also easy to use, because it utilizes the same functions and parameters that are available in the shooting menu. But what about diehard RAW shooters who don’t care much about in-camera JPEGs, Fuji colors, or the built-in RAW converter? Those guys (I tend to be one of them from time to time) require an external RAW converter to process their RAW files.
In this tip, I’ll compare how popular external RAW processors handle specific features of your X series camera:
- RAW File Converter EX comes free with your camera. This software is currently based on version 8 of the Japanese Silkypix [92] RAW processor that is also commercially available in version 9. If you want to use all the features of this software, you might want to upgrade to the latest “real” version of Silkypix. As a Fujifilm camera user, you are eligible for an upgrade discount in many territories. Please note that the current RAW File Converter EX version 3 also supports Fujifilm’s film simulation modes. This software is available as a free download [93].

Fig. 190: RAW File Converter EX is a free download on the Fujifilm website. It’s available in versions for Windows and macOS, and it only works with RAWs from Fujifilm cameras. The current RAW File Converter EX version 3 is based on the Japanese Silkypix 8 converter and therefore lacks the new shadow and highlight recovery functions of Silkypix 9.
- The most popular RAW converter is Adobe Lightroom [94]. Its processing module is also available in Photoshop as Adobe Camera Raw (ACR). There are now actually two versions of Lightroom: Lightroom CC and Lightroom Classic CC. Whenever I mention “Lightroom” or “Lightroom CC” in this book, I actually refer to “Adobe Lightroom Classic CC,” which is Adobe’s new name for the PC/Mac-based desktop version of the app.

Fig. 191: Adobe Lightroom Classic CC, Lightroom CC, and Adobe Camera RAW are just different names for the world’s most popular RAW conversion engine. The software is considered an industry standard. Subscribers use it on Windows and macOS as well as on Android and iOS devices, where it offers cloud-based workflow synchronization across all platforms. Current versions of Lightroom are only available via a subscription-based payment model, mostly in a bundle with Adobe Photoshop.
- Capture One Pro is similar to Lightroom and deeply rooted in the professional community. It’s made by PhaseOne [95], the same folks who are building medium-format cameras and digital camera backs. At Photokina 2018, Fujifilm and PhaseOne entered into a 5-year agreement that ensures that Capture One fully supports existing and upcoming X series models, including the GFX. There is now also a special version of Capture One Pro for Fujifilm [96] as well as a free Capture One Express software for the Fujifilm X series. Please note that all Capture One versions are the same download file, with different feature sets being activated depending on what license you pick on the activation screen.
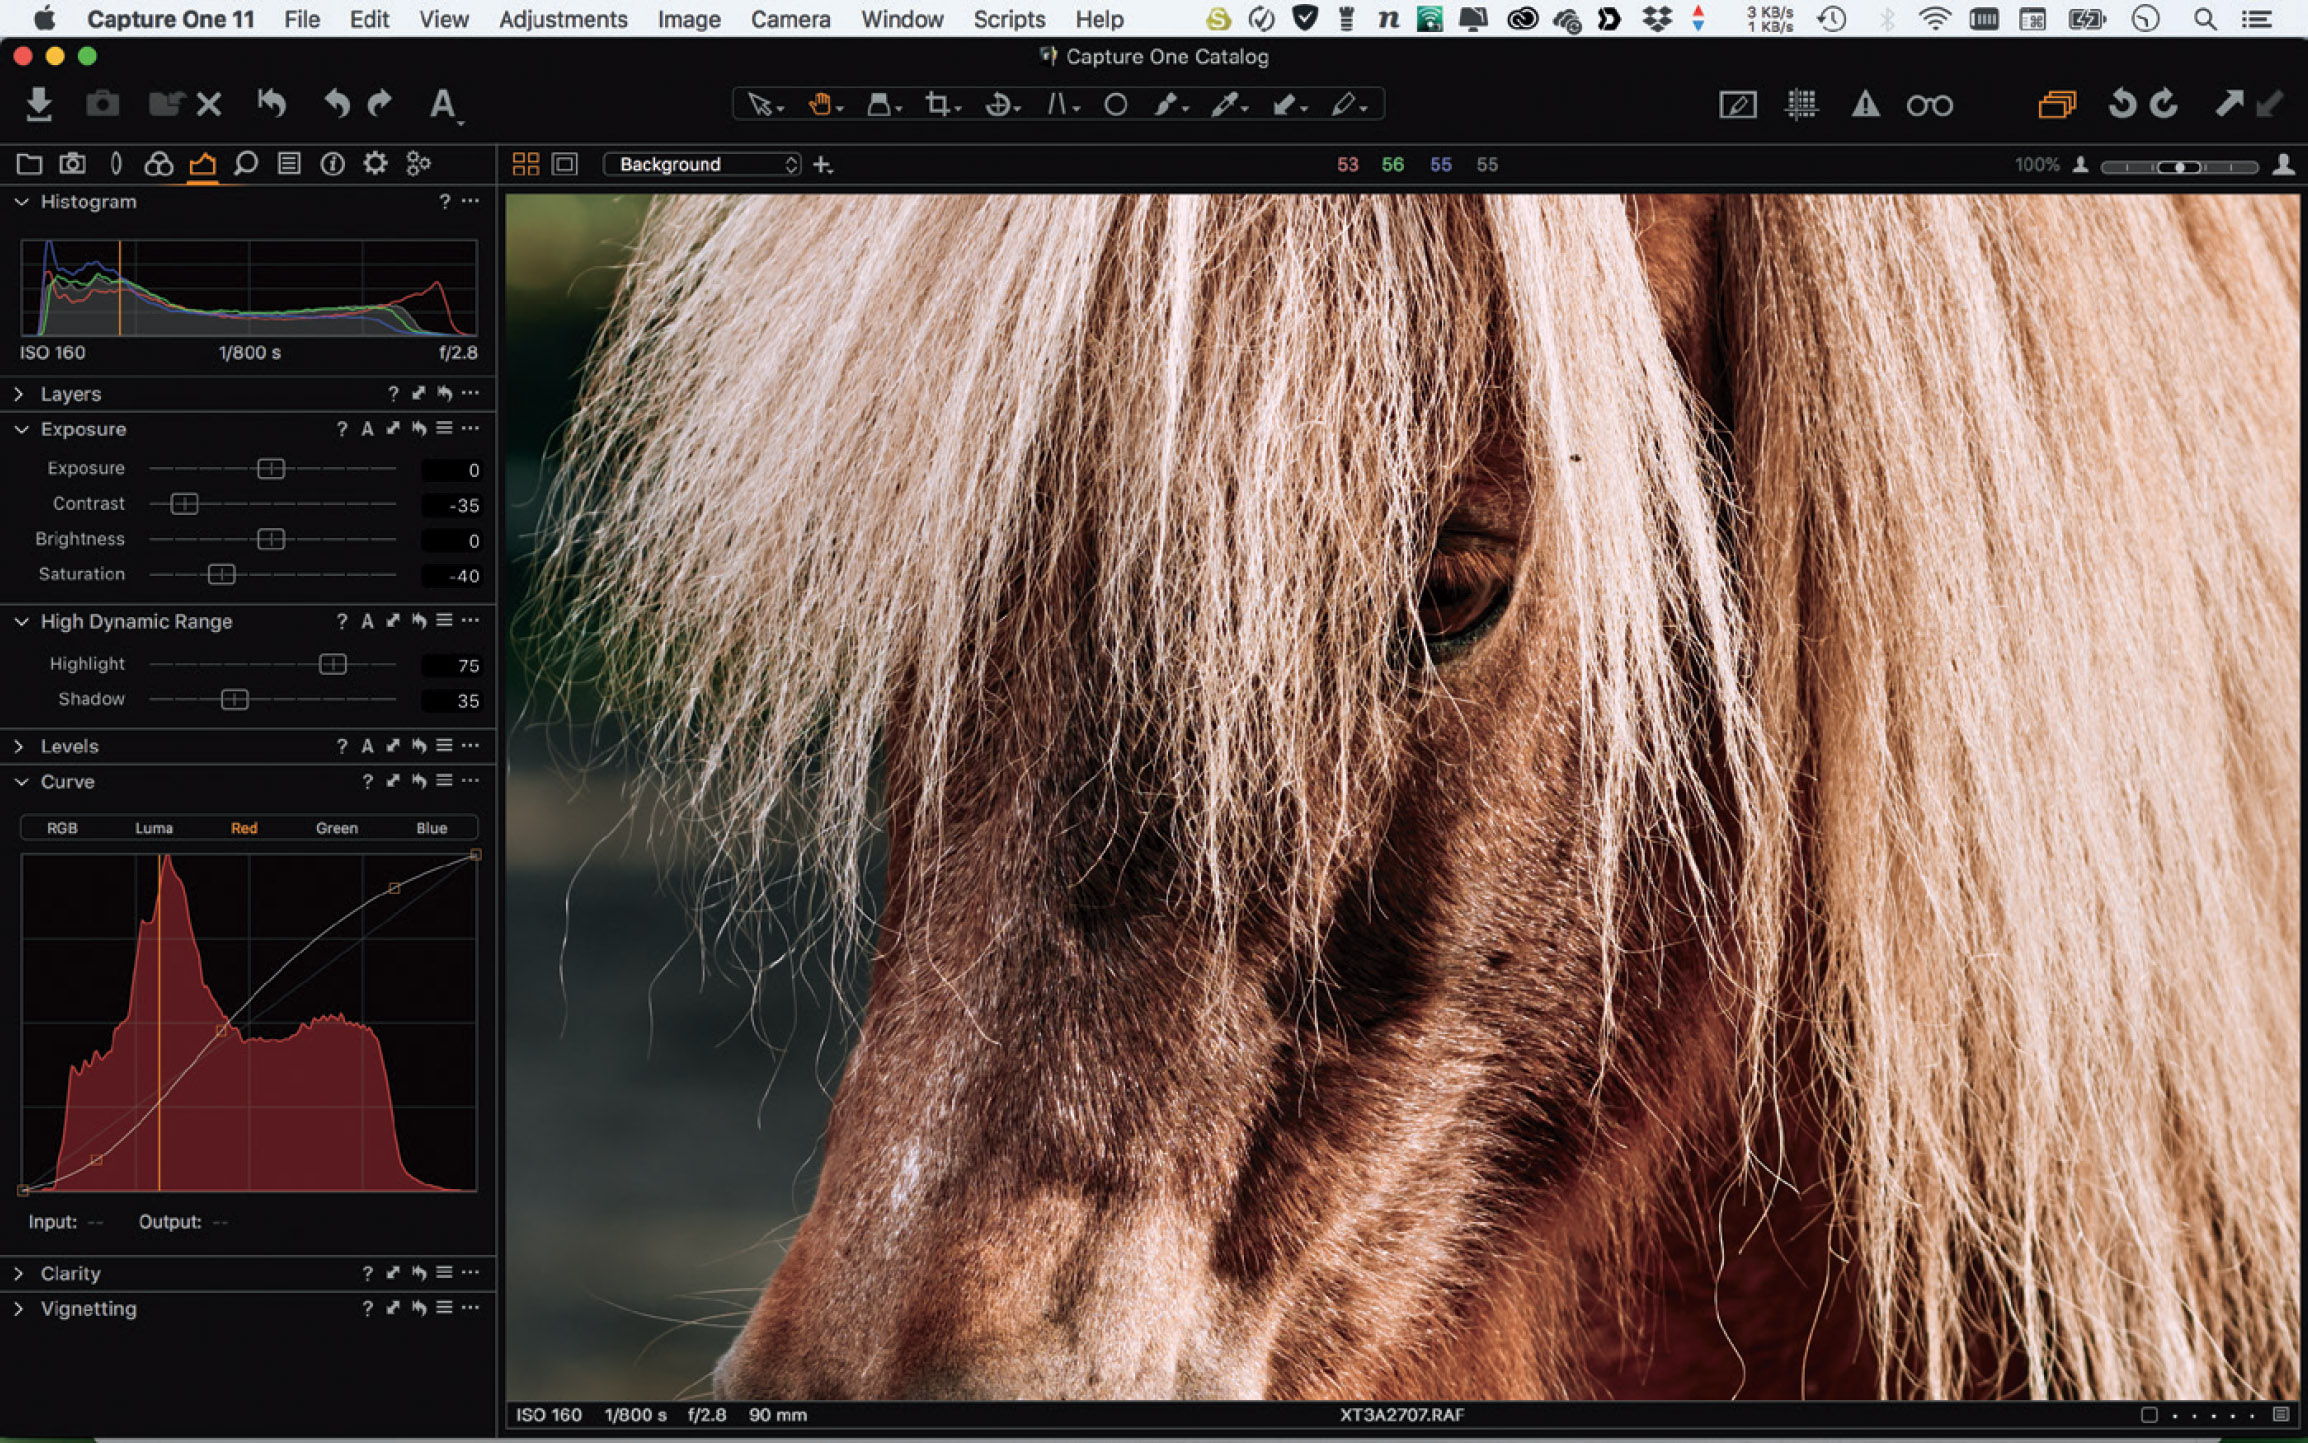
Fig. 192: Capture One Pro is a comprehensive RAW converter particularly popular among professionals and PhaseOne medium-format photographers. You can activate the software as a free Capture One Express for Fujifilm version, as Capture One Pro for Fujifilm, or as the regular Capture One Pro version that works with RAW files from 500+ cameras, including Fujifilm. You can also choose between subscriptions and perpetual licenses [97].
- A great RAW processor for macOS users is Iridient Developer from Iridient Digital [98]. Even more popular among Fujifilm users is Iridient X-Transformer for macOS and Windows, which can be launched from a plug-in in Adobe Lightroom. It converts Fujifilm RAF files into pre-demosaiced DNG files that can be perfectly processed in Lightroom, thus combining the strengths and benefits of Iridident Developer and Lightroom.
- Photo Ninja from PictureCode [99] is another interesting option. Like Iridient Developer, it can extract a great amount of sharpness and detail from Fuji’s X-Trans RAWs. It also contains a module for adaptive tone-mapping, offers competent noise reduction, and features a special algorithm to restore blown highlights.
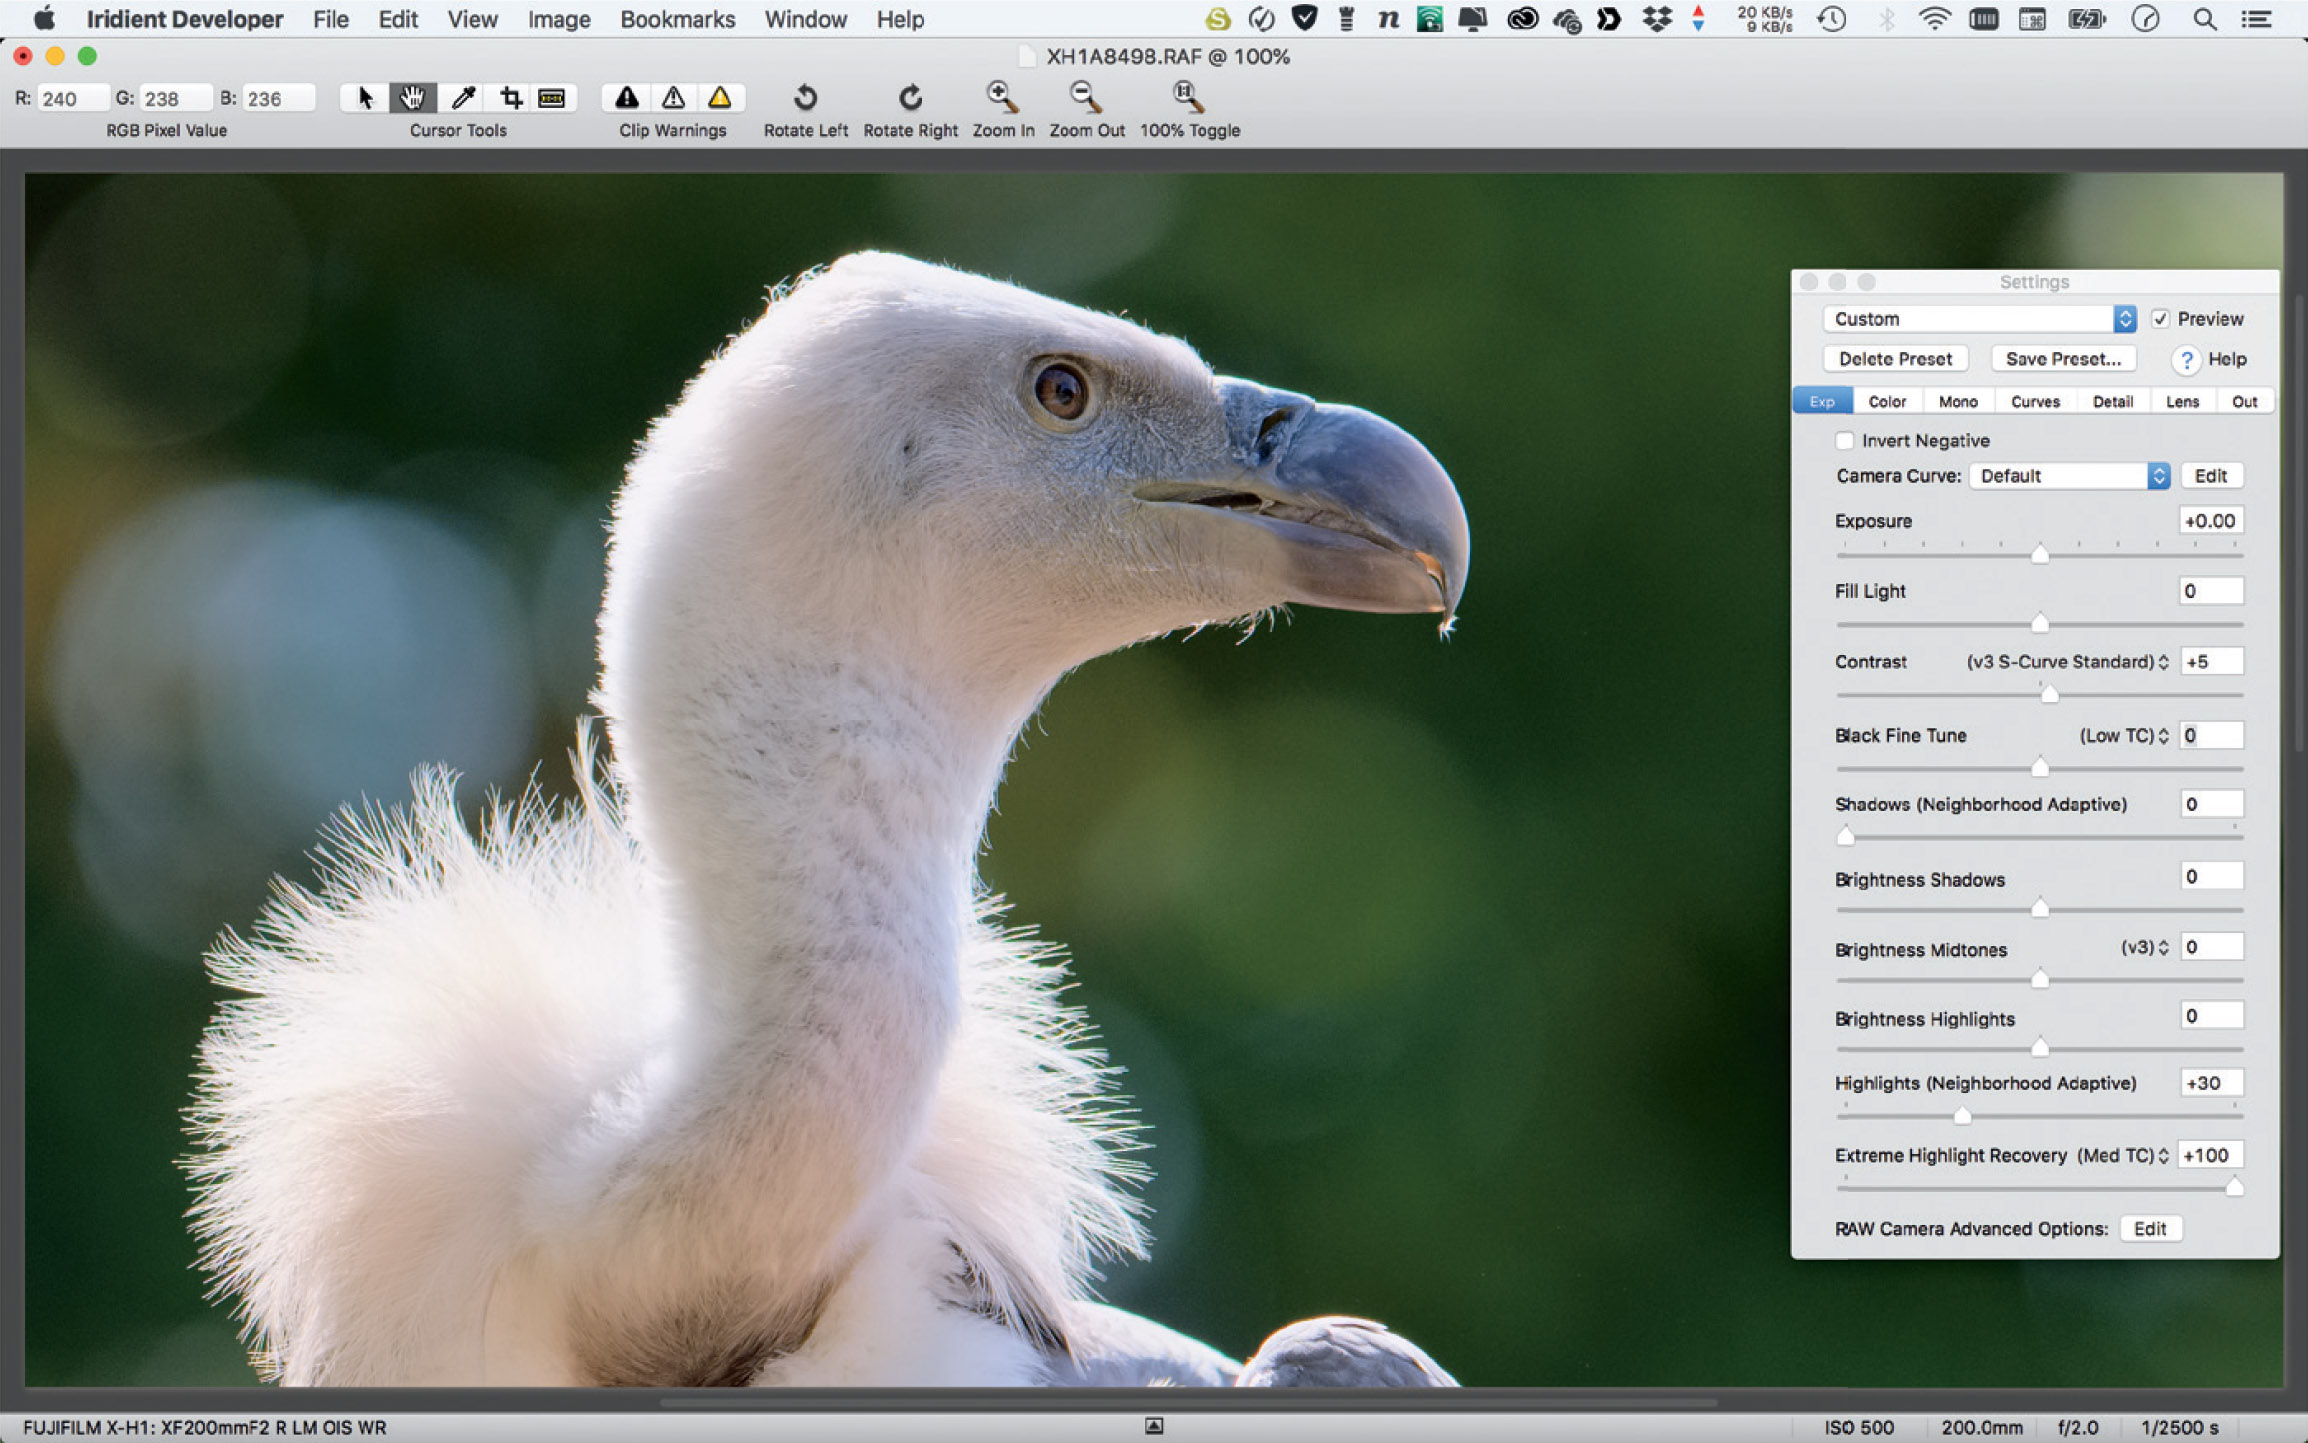
Fig. 193: Iridient Developer is a macOS-based RAW converter that is known for delivering great results with X-Trans RAWs. This led to a spin-off converter named Iridient X-Transformer for Windows and macOS, which works particularly well as a companion software to Adobe Lightroom.

Fig. 194: Photo Ninja is a no-nonsense RAW converter for macOS and Windows that works well with X-Trans files. While its graphical user interface is hopelessly outdated, the modules for tone-mapping, highlight recovery, and noise reduction (Noise Ninja) are very powerful.
Which RAW converter is right for you? That’s up to you! Luckily, you can download free trial versions of all mentioned programs to find out for yourself. That said, it can be helpful to make a quick comparison that tells you how well some important Fuji-specific features are supported by each alternative.
Those features are:
- Original Fujifilm film simulations
- Shots taken with extended DR settings (DR200%, DR400%)
- Digital lens corrections (distortion, vignetting, etc.)
Let’s have a look . . .
FUJIFILM FILM SIMULATIONS
Provia, Astia, Velvia, Classic Chrome, Eterna, Pro Neg. Hi, and Pro Neg. Std make up the color backbone of the X series. Together, they constitute the Fuji Colors. However, the makers of external third-party RAW converters often have their own ideas about the look of processed Fuji RAWs.
- The built-in RAW converter is the benchmark reference for external RAW converters when it comes to emulating Fuji Colors.
- In their current iterations, RAW File Converter EX and Silkypix fully support Fuji’s own film simulation modes.
- Adobe Lightroom and Adobe Camera Raw also feature camera profiles that closely emulate Fuji’s film simulation modes—as long as you are shooting in DR100% mode.
- Capture One Pro now officially supports Fuji’s film modes for X cameras with X-Processor Pro and X-Processor 4, thanks to their new collaboration with Fujifilm.
- Iridient Developer offers support for Fuji’s film simulation modes but hasn’t provided updated profiles that are optimized for the GFX and cameras with X-Processor Pro and X-Processor 4. The reason is simple: If you use the popular Iridient X-Transformer as a Lightroom plug-in, you have full access to Lightroom’s own Fujifilm profiles, which closely match the film simulations in cameras with X-Processor Pro and X-Processor 4.
- Photo Ninja doesn’t support Fuji’s film simulations.
EXTENDED DYNAMIC RANGE (DR200%, DR400%)
Using the DR function results in RAW files that are exposed with an ISO setting that is 1 EV (DR200%) or 2 EV (DR400%) lower than indicated in order to protect critical highlights. The darker ISO exposure of the RAW data is compensated during RAW conversion by a digital ISO push of the same amount that only affects shadows and midtones.
- The built-in RAW converter is the benchmark here, since it fully automates the tone-mapping process of partially pushing the shadows and midtones back to where they belong.
- Silkypix and RAW File Converter EX are smart citizens, too: they recognize RAW files with DR200% and DR400%, and they push them up by 1 or 2 EV, then automatically recover the blown highlights by adjusting the highlight recovery slider accordingly. That said, the results don’t necessarily look exactly like the JPEGs from the camera.

Fig. 195: The unique pastel highlights’ look of a straight-out-of-camera DR400% JPEG (top) isn’t easy to replicate with external RAW converters. With RAW File Converter EX and Silkypix, you can get close (bottom) by tweaking the highlight control’s default settings (right).
- Lightroom and Adobe Camera Raw are also smart enough to recognize RAWs with extended DR settings, and they automatically push the exposure up 1 or 2 EVs when the RAWs are opened in the software. However, recovering the highlights isn’t an automated process; it’s the user’s job. This can become challenging because Lightroom’s exposure-related sliders work in a different way than Fuji’s internal tone-mapping.
- Capture One Pro works like Lightroom and applies a push of 1 or 2 EV to RAWs that were recorded with a DR200% or DR400% setting. There’s also a slider to recover highlights that may have disappeared during this push, but the results look different from Fuji’s own DR tone-mapping. However, DR200% and DR400% settings in RAW files from cameras with X-Processor Pro or X-Processor 4 are fully emulated if you are using one of the official Fujifilm film simulation profiles in Capture One. The results look similar to the original DR200% and DR400% JPEGs from the camera.
- Iridient Developer operates like Lightroom and Capture One, automatically pushing RAW files that were recorded with a DR200% or DR400% setting. There’s also a Highlight Recovery slider to restore highlights that may have vanished, and here’s the good news: the results very much resemble the look from the camera’s internal RAW converter. Well done! Iridient X-Transformer doesn’t create JPEGs and relies on Lightroom to recover highlights. Lightroom treats DR200% and DR400% X-Transformer DNGs just like DR200% and DR400% RAF files.
- Photo Ninja uses its own powerful adaptive tone-mapping module, and hence doesn’t really bother emulating Fuji’s simple tone-mapping. There are several sliders to adjust a RAW file’s exposure during processing.
DIGITAL LENS CORRECTIONS
Digital lens corrections affect three areas: devignetting, distortion correction, and the removal of chromatic aberrations (CAs). The information to perform such corrections is stored in the metadata of each RAW file. Every RAW converter can potentially read and use this metadata to apply appropriate image corrections. However, not all converters are able to do so.
- The built-in RAW converter supports all types of lens correction, including the camera’s Lens Modulation Optimizer (LMO), which isn’t available in external RAW converters.
- Silkypix and RAW File Converter EX can read and process the RAW metadata for distortion correction, devignetting, and CAs. All corrections are automatically applied and can’t be controlled by the user.
- Lightroom and Adobe Camera Raw can also process lens-correction metadata and automatically apply the respective corrections in the background. It’s currently not possible to control or stop the application of these lens corrections. That said, Lightroom offers additional correction profiles for the lenses of X100 series cameras on top of the metadata-based digital lens corrections. With these additional profiles, distortion and vignetting can be further corrected or even over-corrected.
- Capture One Pro can also process lens-correction metadata. Unlike Lightroom and Silkypix, it allows users to control the intensity of the corrections or switch them off altogether. There’s also an option to reduce diffraction blur.
- Iridient Developer can use lens-correction metadata, too. Like Capture One, it also provides control over the extent of the corrections. In a similar fashion, Iridient X-Transformer offers checkboxes to switch off any of the three metadata-based lens-correction parameters. This means that X-Transformer, when used as a Lightroom plug-in, can serve as a way around Lightroom’s current inability to disregard RAW metadata-based lens corrections.
- Photo Ninja ignores all lens-correction metadata. Instead, the software asks the user to provide suitable profiles or to manually correct distortion, vignetting, and CAs.
Automatic lens metadata corrections can look a bit different depending on the RAW converter because each converter tends to interpret the data differently.

Fig. 196: Digital lens correction: This shot was taken with a Zeiss Touit 1.8/32 lens. The left image shows the shot without digital distortion correction. On the right, you can see how Capture One Pro applied the digital distortion correction to straighten the lines.
Sharpening RAWs with Adobe Lightroom |
Sharpening X-Trans RAW files in Adobe Lightroom is a controversial topic on the internet, especially when it comes to landscape shots with grass and foliage.
As a general rule, you should always sharpen an image near the end of your editing process. Clarity, contrast, and color settings all impact how crisp or soft an image looks, so make sure that those parameters are set before you finalize the sharpening.

Fig. 197: X-Trans sensor shots of vegetation and foliage are considered difficult to sharpen with Adobe Lightroom and Adobe Camera RAW (ACR). This 16 MP example from Bali was taken with an X-Pro1 and XF60mmF2.4 R Macro lens at f/8 and 1/250s. The full image is printed on the left. On the right, you can see a zoomed-in crop of the shot.
Lightroom’s Sharpening panel consists of four sliders:
- Amount
- Radius
- Detail
- Masking
I recommend beginning with the Masking slider. This parameter defines what parts of your image are affected by the sharpening settings. This is essential: If you apply sharpening to areas that don’t require sharpening (like out-of-focus areas, the sky, or subjects with smooth surfaces), all you get are unpleasant artifacts and false detail. This applies equally to images from Bayer and X-Trans sensors, the only difference being that Bayer artifacts tend to look “nicer” and are often confused with actual detail, not the false detail that they really are.
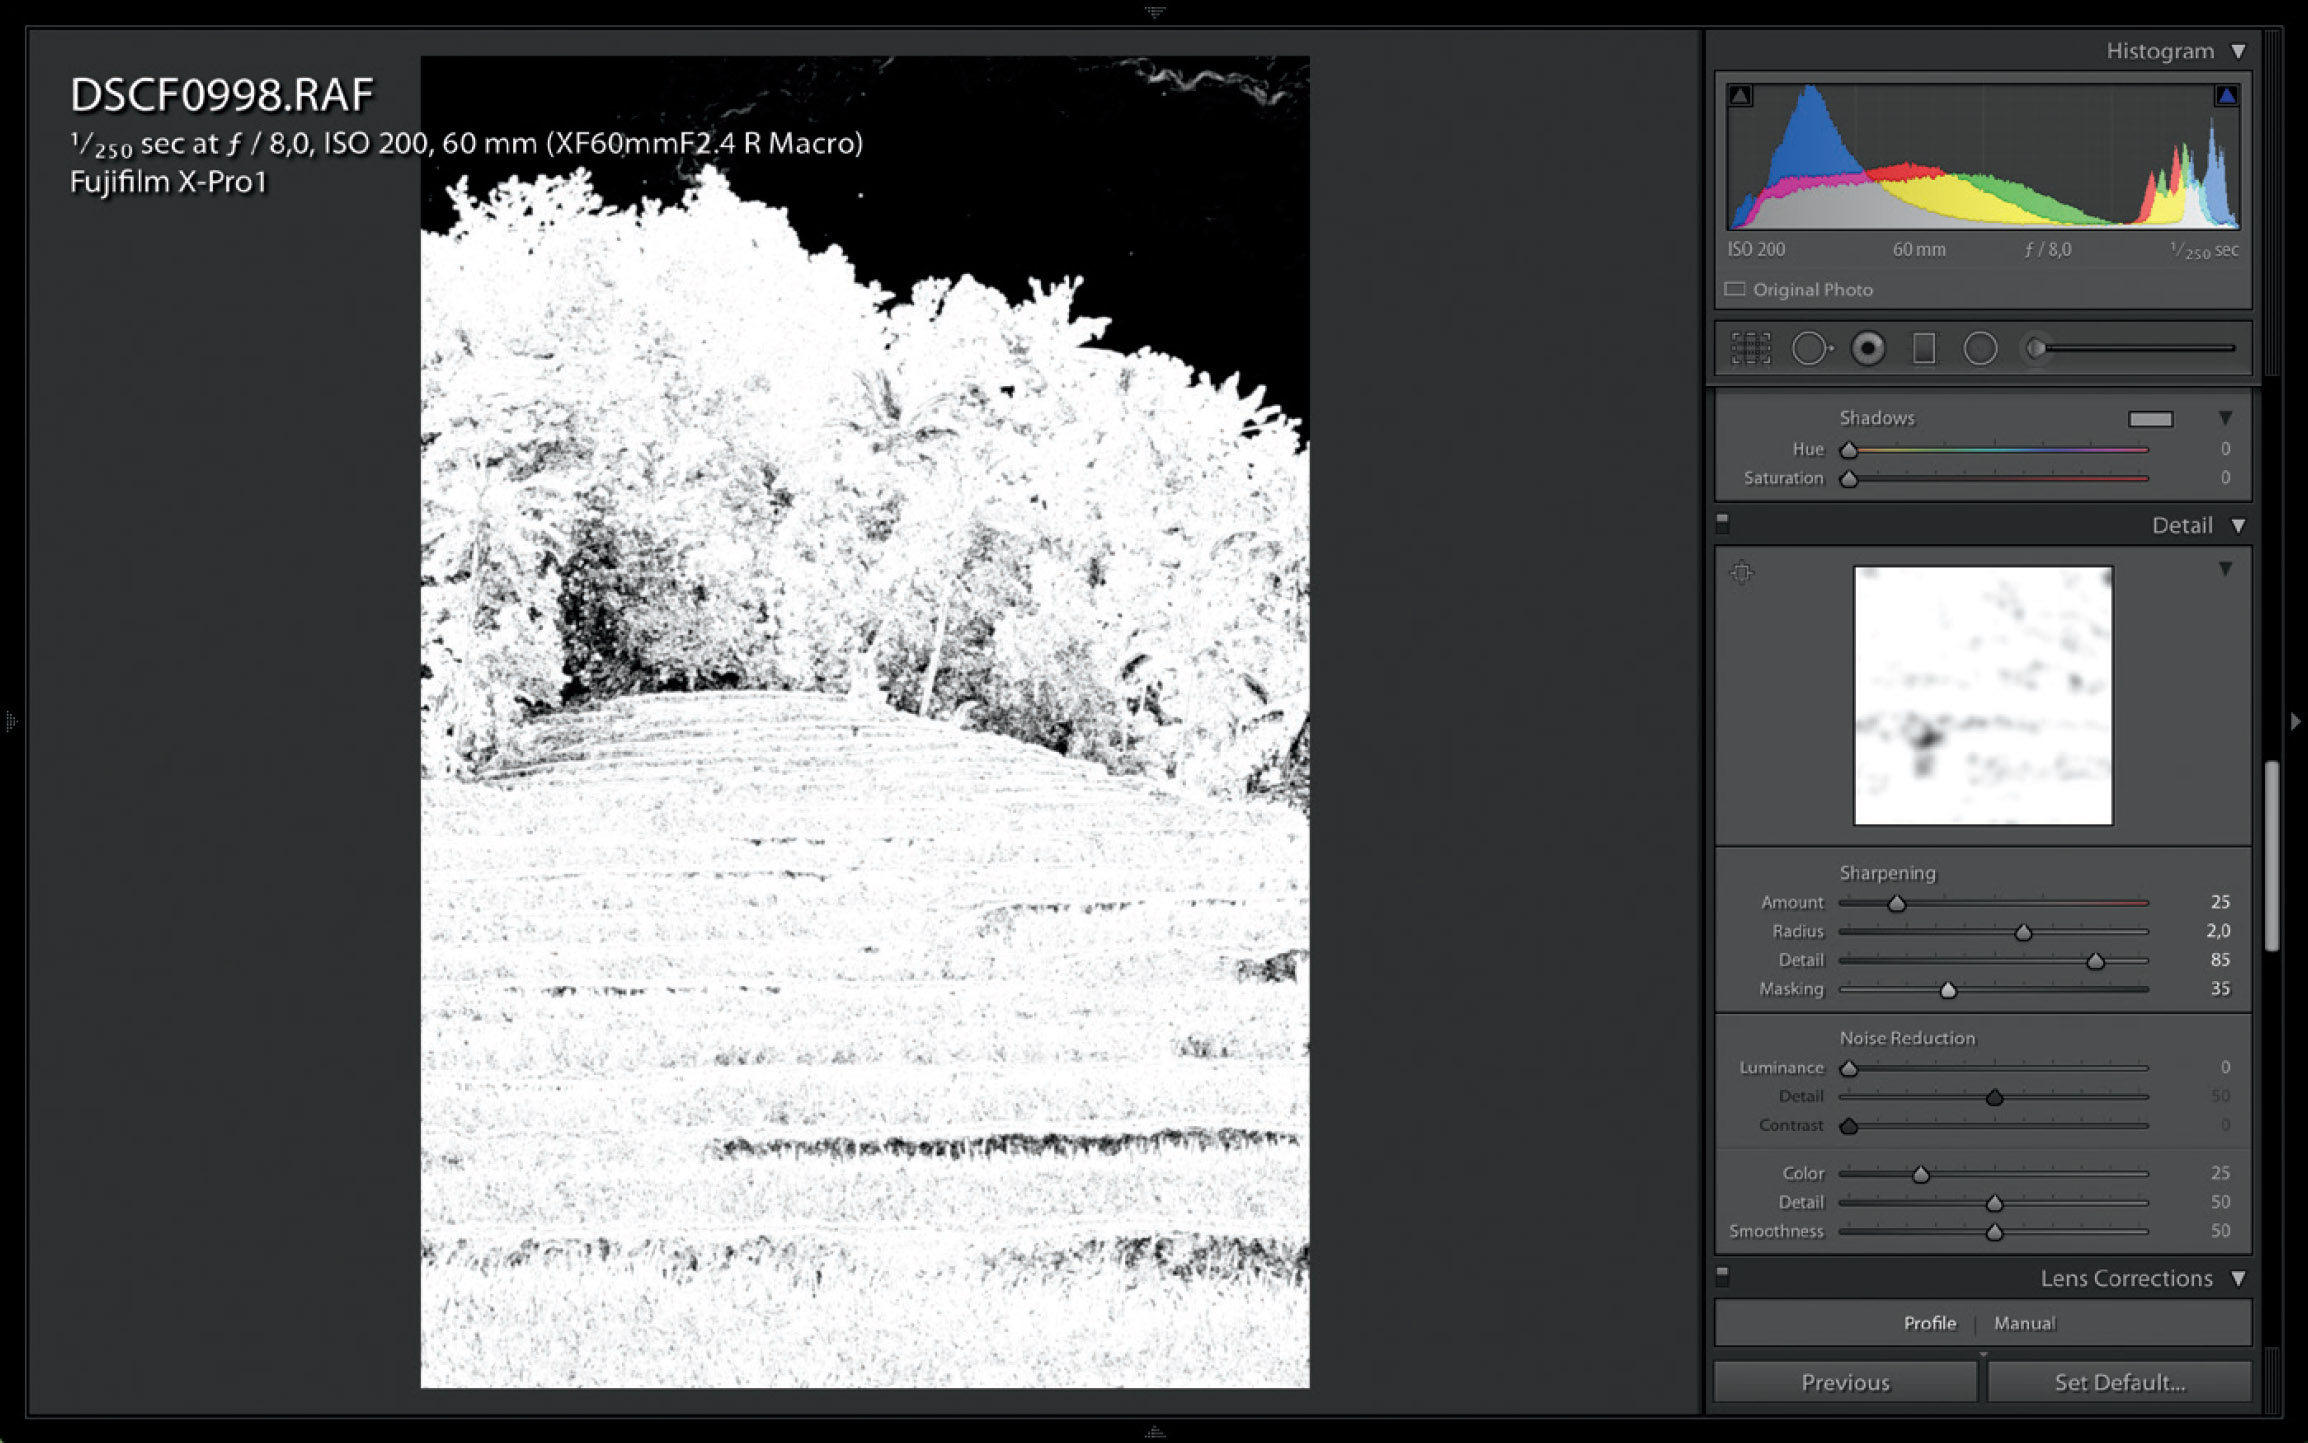
Fig. 198: Masking the image is usually the first step of any Lightroom sharpening protocol. To select a fitting mask, hold down the Option (Alt) key while you move the Masking slider. The black-and-white mask tells you what areas of the images will be affected by your sharpening settings: bright areas will be sharpened; dark areas won’t. In this case, I opted for a Masking setting of 35 to make sure that I sharpened the entire landscape, but not the sky.
Over-sharpening an image in Lightroom/ACR leads to worm-like artifacts that are particularly unpleasant to look at when they occur in areas that don’t require sharpening in the first place.
The Amount, Radius, and Detail sliders are responsible for sharpening the areas that haven’t been masked out via the Masking slider. To avoid sharpening artifacts, you can move either the Amount or the Detail slider further (or even far) to the right—but you shouldn’t move them very far in tandem. You can select high settings for Amount as long as you keep Detail in the single-digits. In the same fashion, you can move Detail up even to its maximum settings of 100 as long as you keep the Amount slider well below 30.
The Radius slider defines the thickness of the sharpening outlines. A higher Radius value (typically 1.5–2.0) results in a bolder or thicker sharpening at the cost of obscured detail. As a basic rule, you should use lower Radius settings if your image contains plenty of actual fine detail. Use higher Radius settings with images that are less detailed—for example due to camera shake, motion blur, subpar focusing, or a soft lens. A higher Radius setting can also be useful with difficult subjects such as foliage and vegetation, because it helps obscure false detail that can occur as part of the demosaicing process.

Fig. 199: High settings for Amount or Detail are only tolerable when you don’t overly increase both parameters together. The zoomed-in example on the left was processed with an Amount/Radius/Detail/Masking setting of 100/2/10/35; the one in the middle was processed with 30/2/100/35; the example on the right was sharpened with 75/2/75/35 and is clearly overdone with artifacts.
In many cases, soft RAW images can already be sharpened just by increasing the Radius setting.
Using Iridient X-Transformer |
X-Transformer [100] is the perfect companion tool for the Adobe Lightroom users among us. It’s a neatly integrated app that offers enhancements in three important categories:
- Better dynamic range
- Improved demosaicing
- Finer sharpening
Since X-Transformer works as a plug-in app for Lightroom, you get these improvements without sacrificing any Lightroom functionality. X-Transformer transforms Fujifilm RAF files into pre-demosaiced RGB DNG files that can be processed in Lightroom just like any other RAW file. You can still apply all film simulations, profiles, settings and presets, and adjust the white balance as needed.
To install the Lightroom plug-in, open the X-Transformer app and select HELP > INSTALL LIGHTROOM PLUG-IN. To transform a Fujifilm X series RAW film into a pre-demosaiced X-Transformer DNG, all you have to do is highlight the RAW files(s) in Lightroom’s Library or Development module and select FILE > PLUG-IN EXTRAS > PROCESS SELECTED RAF(S) TO DNG. It’s a fully automated process.
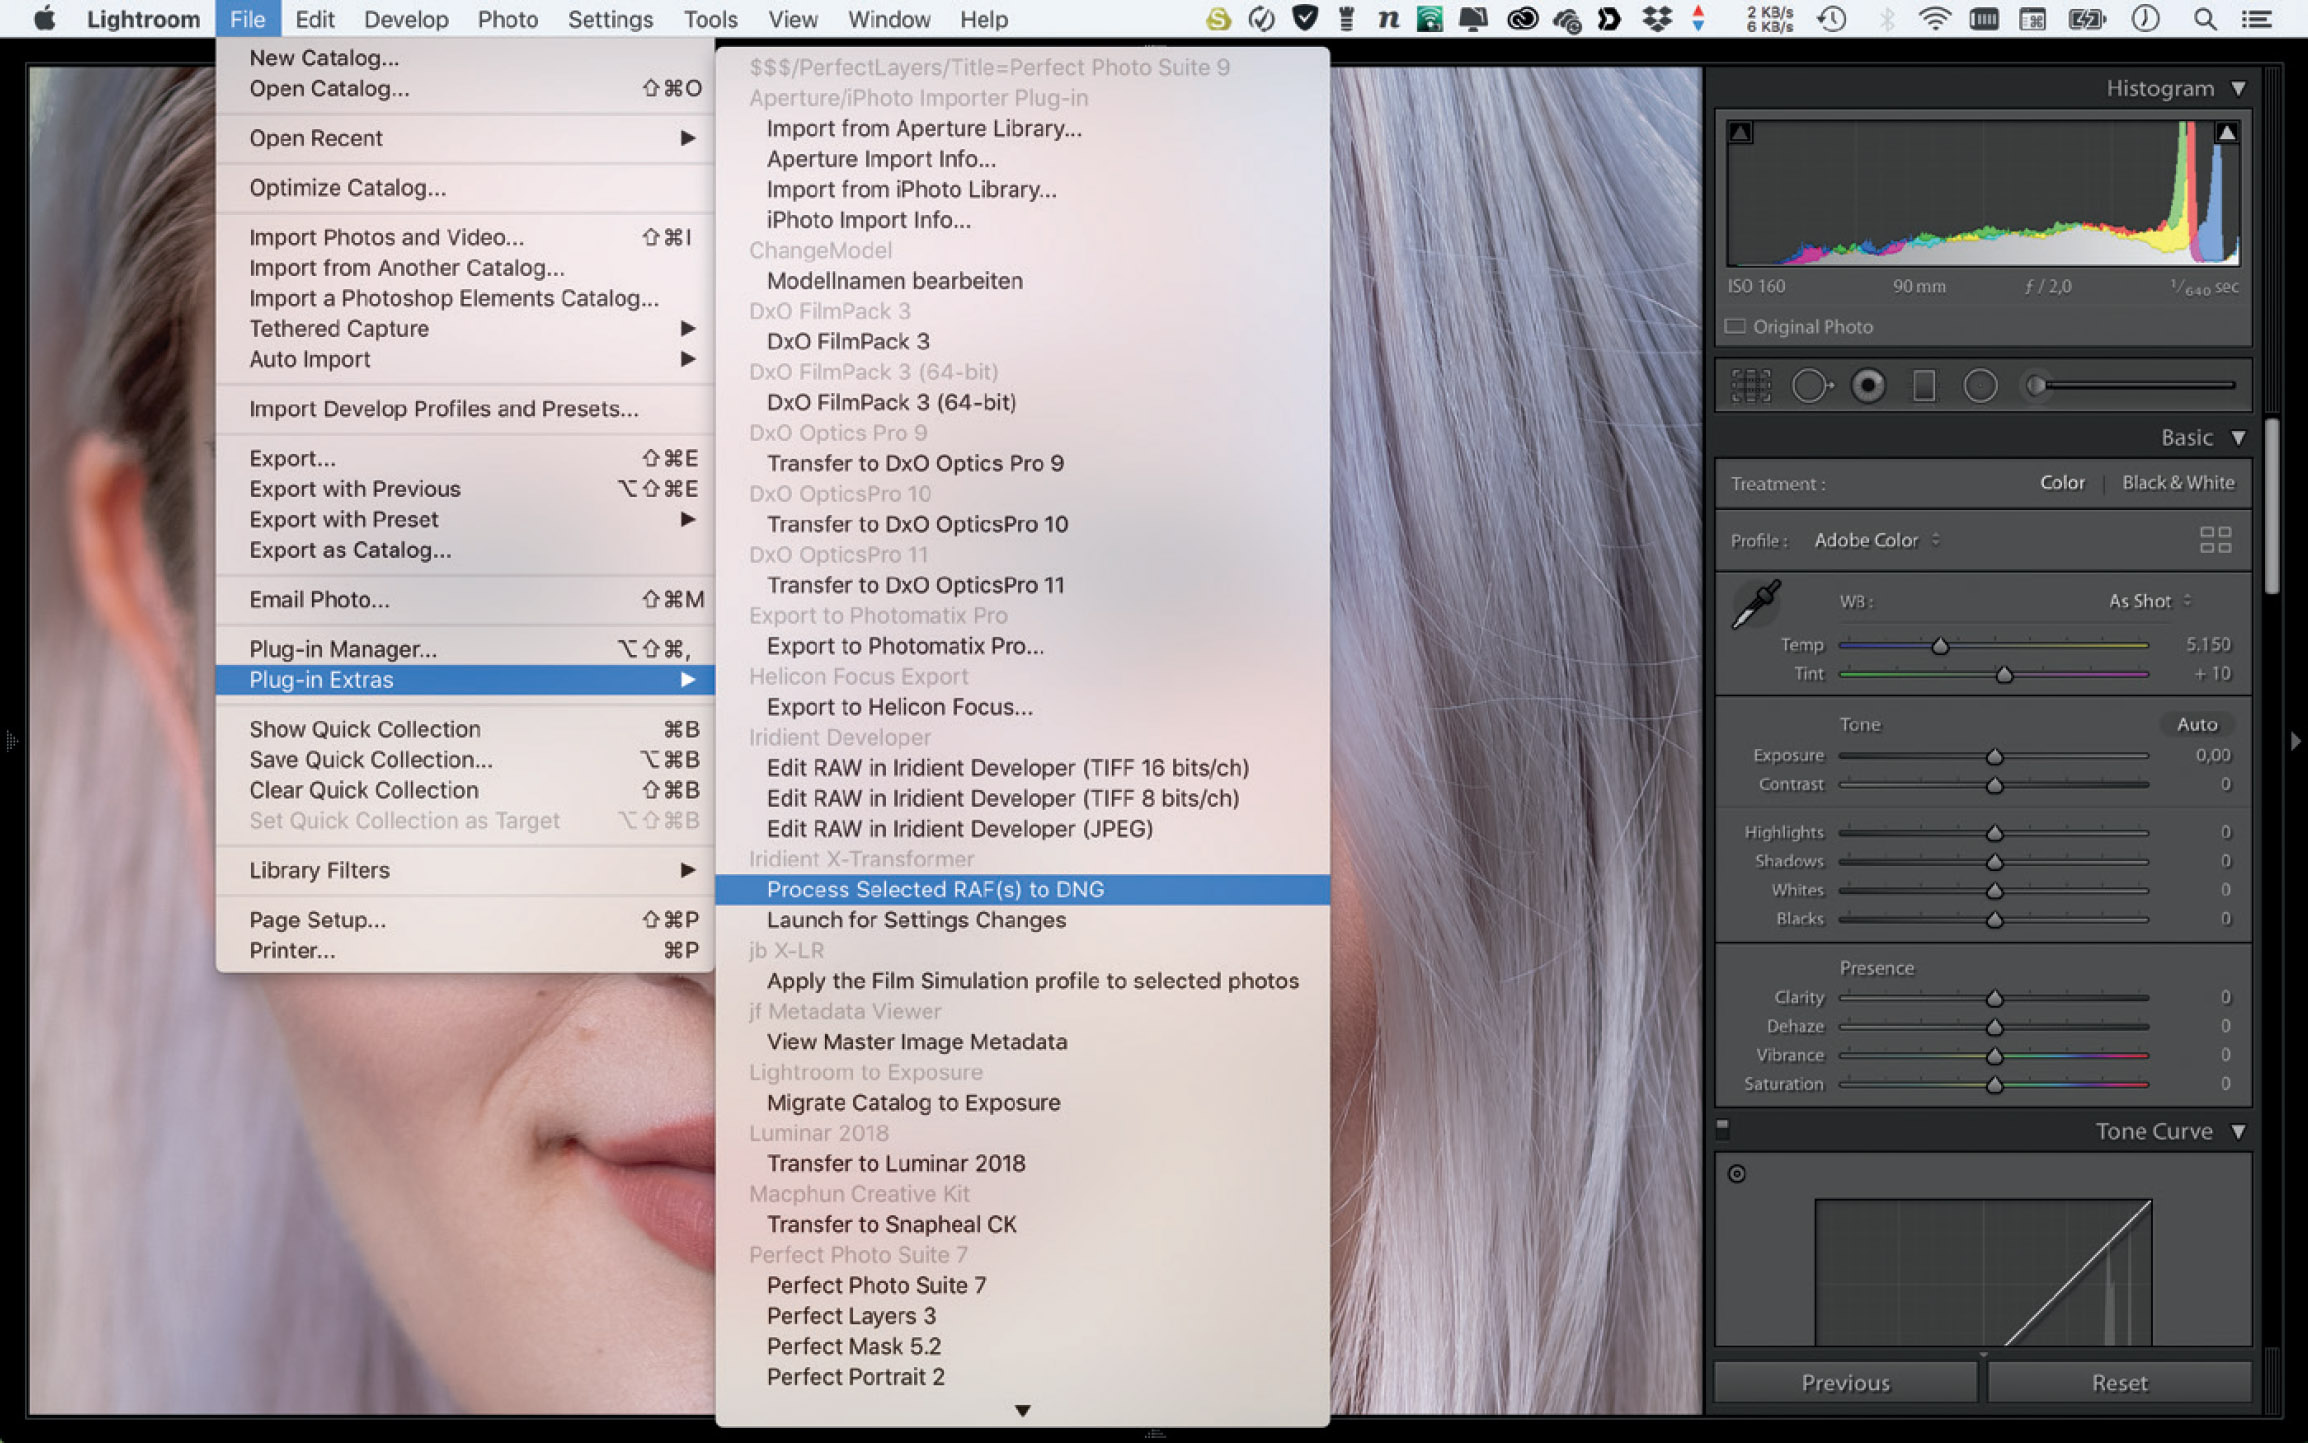
Fig. 200: Transforming RAFs to X-Transformer DNGs is easy, thanks to the plug-in structure of the app. After selecting the RAF files that you want to transform, all you have to do is execute PROCESS SELECTED RAF(S) TO DNG. Lightroom will then pass the selected RAF(s) to X-Transformer, which turns them into pre-demosaiced DNGs and hands the results back to Lightroom where they are automatically linked to the original RAF files.
Using X-Transformer as a pre-processing stage can be helpful in situations where you want to maximize your camera’s dynamic range by pulling up shadows and midtones by several(!) stops. X-Transformer’s benefits in this regard are most visible with RAWs from older 12-bit cameras like the X-E1 and X-Pro1, and with shots that were taken with the electronic shutter (ES).
To maximize dynamic range, your camera’s sensor needs to be ISOless. But that’s just half of the story. It’s also important to use a RAW converter that correctly handles pushing up RAW files by several stops. As we now know, Lightroom delivers better results when it is pushing X-Transformer DNGs than original RAFs.
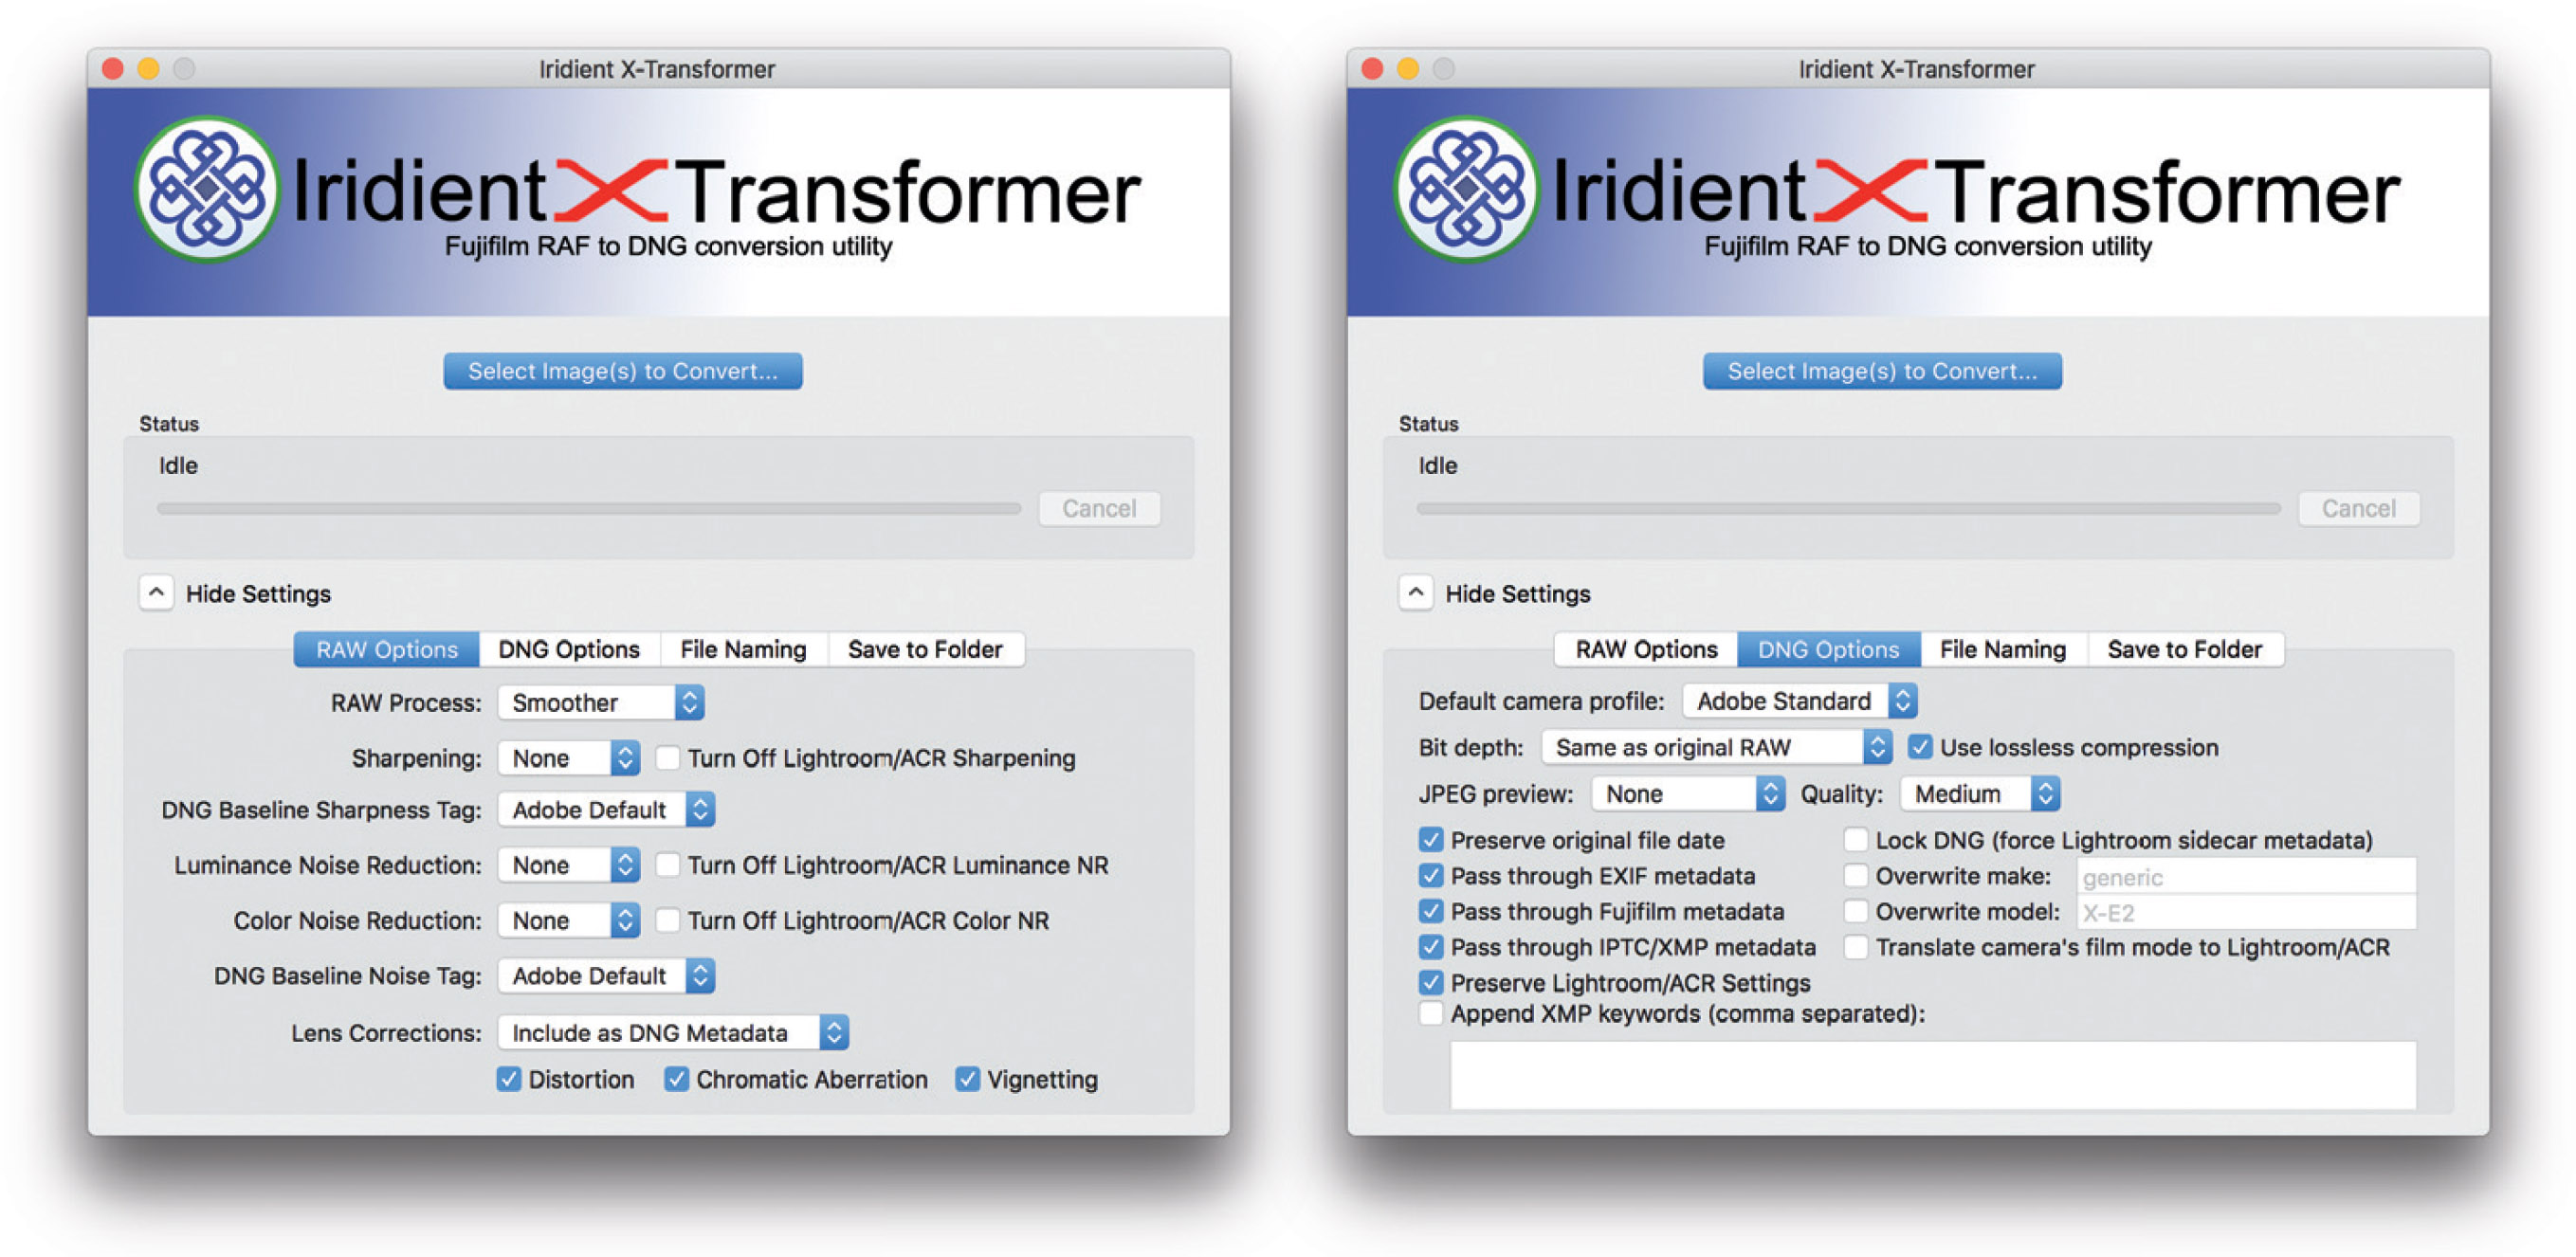
Fig. 201: To make sure that X-Transformer DNGs can be processed in Lightroom with the same settings of their original RAF versions, it’s essential to configure X-Transformer appropriately. The screenshot on the left shows my suggested RAW Options settings. On the right, you can see my preferred DNG Options. With these settings, all adjustments that you have already applied to the original RAF in Lightroom will be copied and applied to the X-Transformer DNG.

Fig. 202: This X-E1 example illustrates how X-Transformer helps improve Lightroom’s dynamic range capability. On the left is the original exposure to the highlights at base ISO 200. In the middle, you can see the Lightroom-processed RAF with a strong push of the shadows and midtones. The image on the right shows the same Lightroom processing, but now of the DNG from X-Transformer. The green tint and blocked shadows of the RAF version have disappeared.
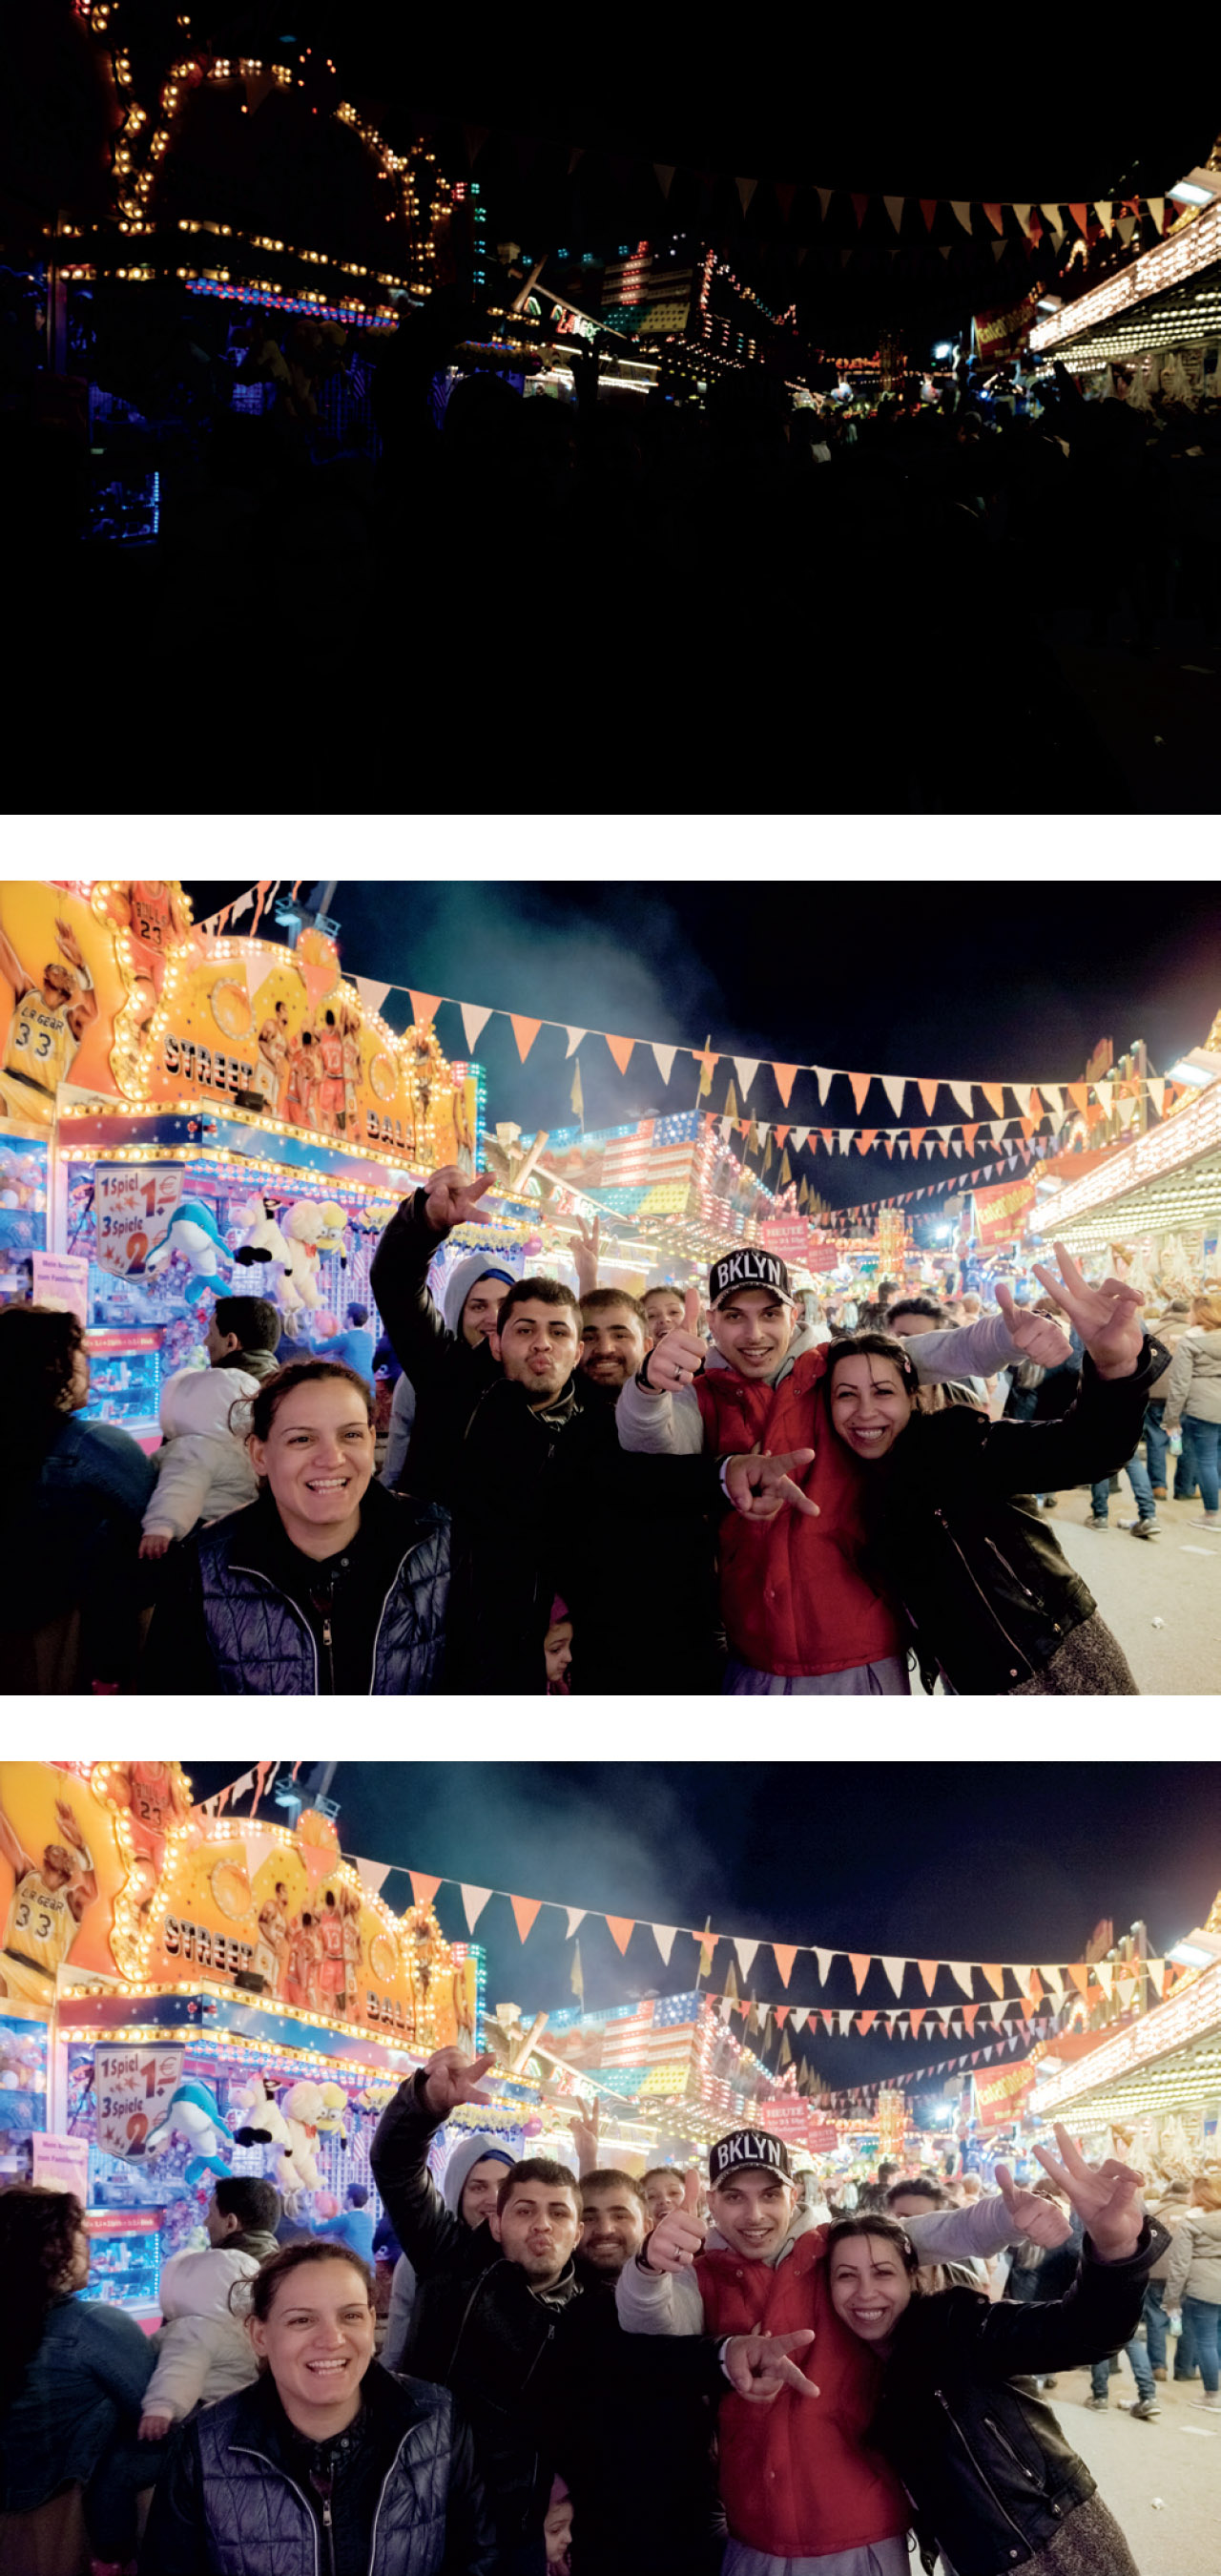
Fig. 203: (Left) Here’s another pretty extreme dynamic range example, this time from an X-T1 (14-bit sensor) and with a push of approximately +5 EV. The top image shows the original exposure at base ISO 200. The image in the middle is the Lightroom-processed version of the RAF, and at the bottom you can see the X-Transformer DNG with the same Lightroom development settings. Again, the DNG from X-Transformer delivers better tonality in the dark areas.
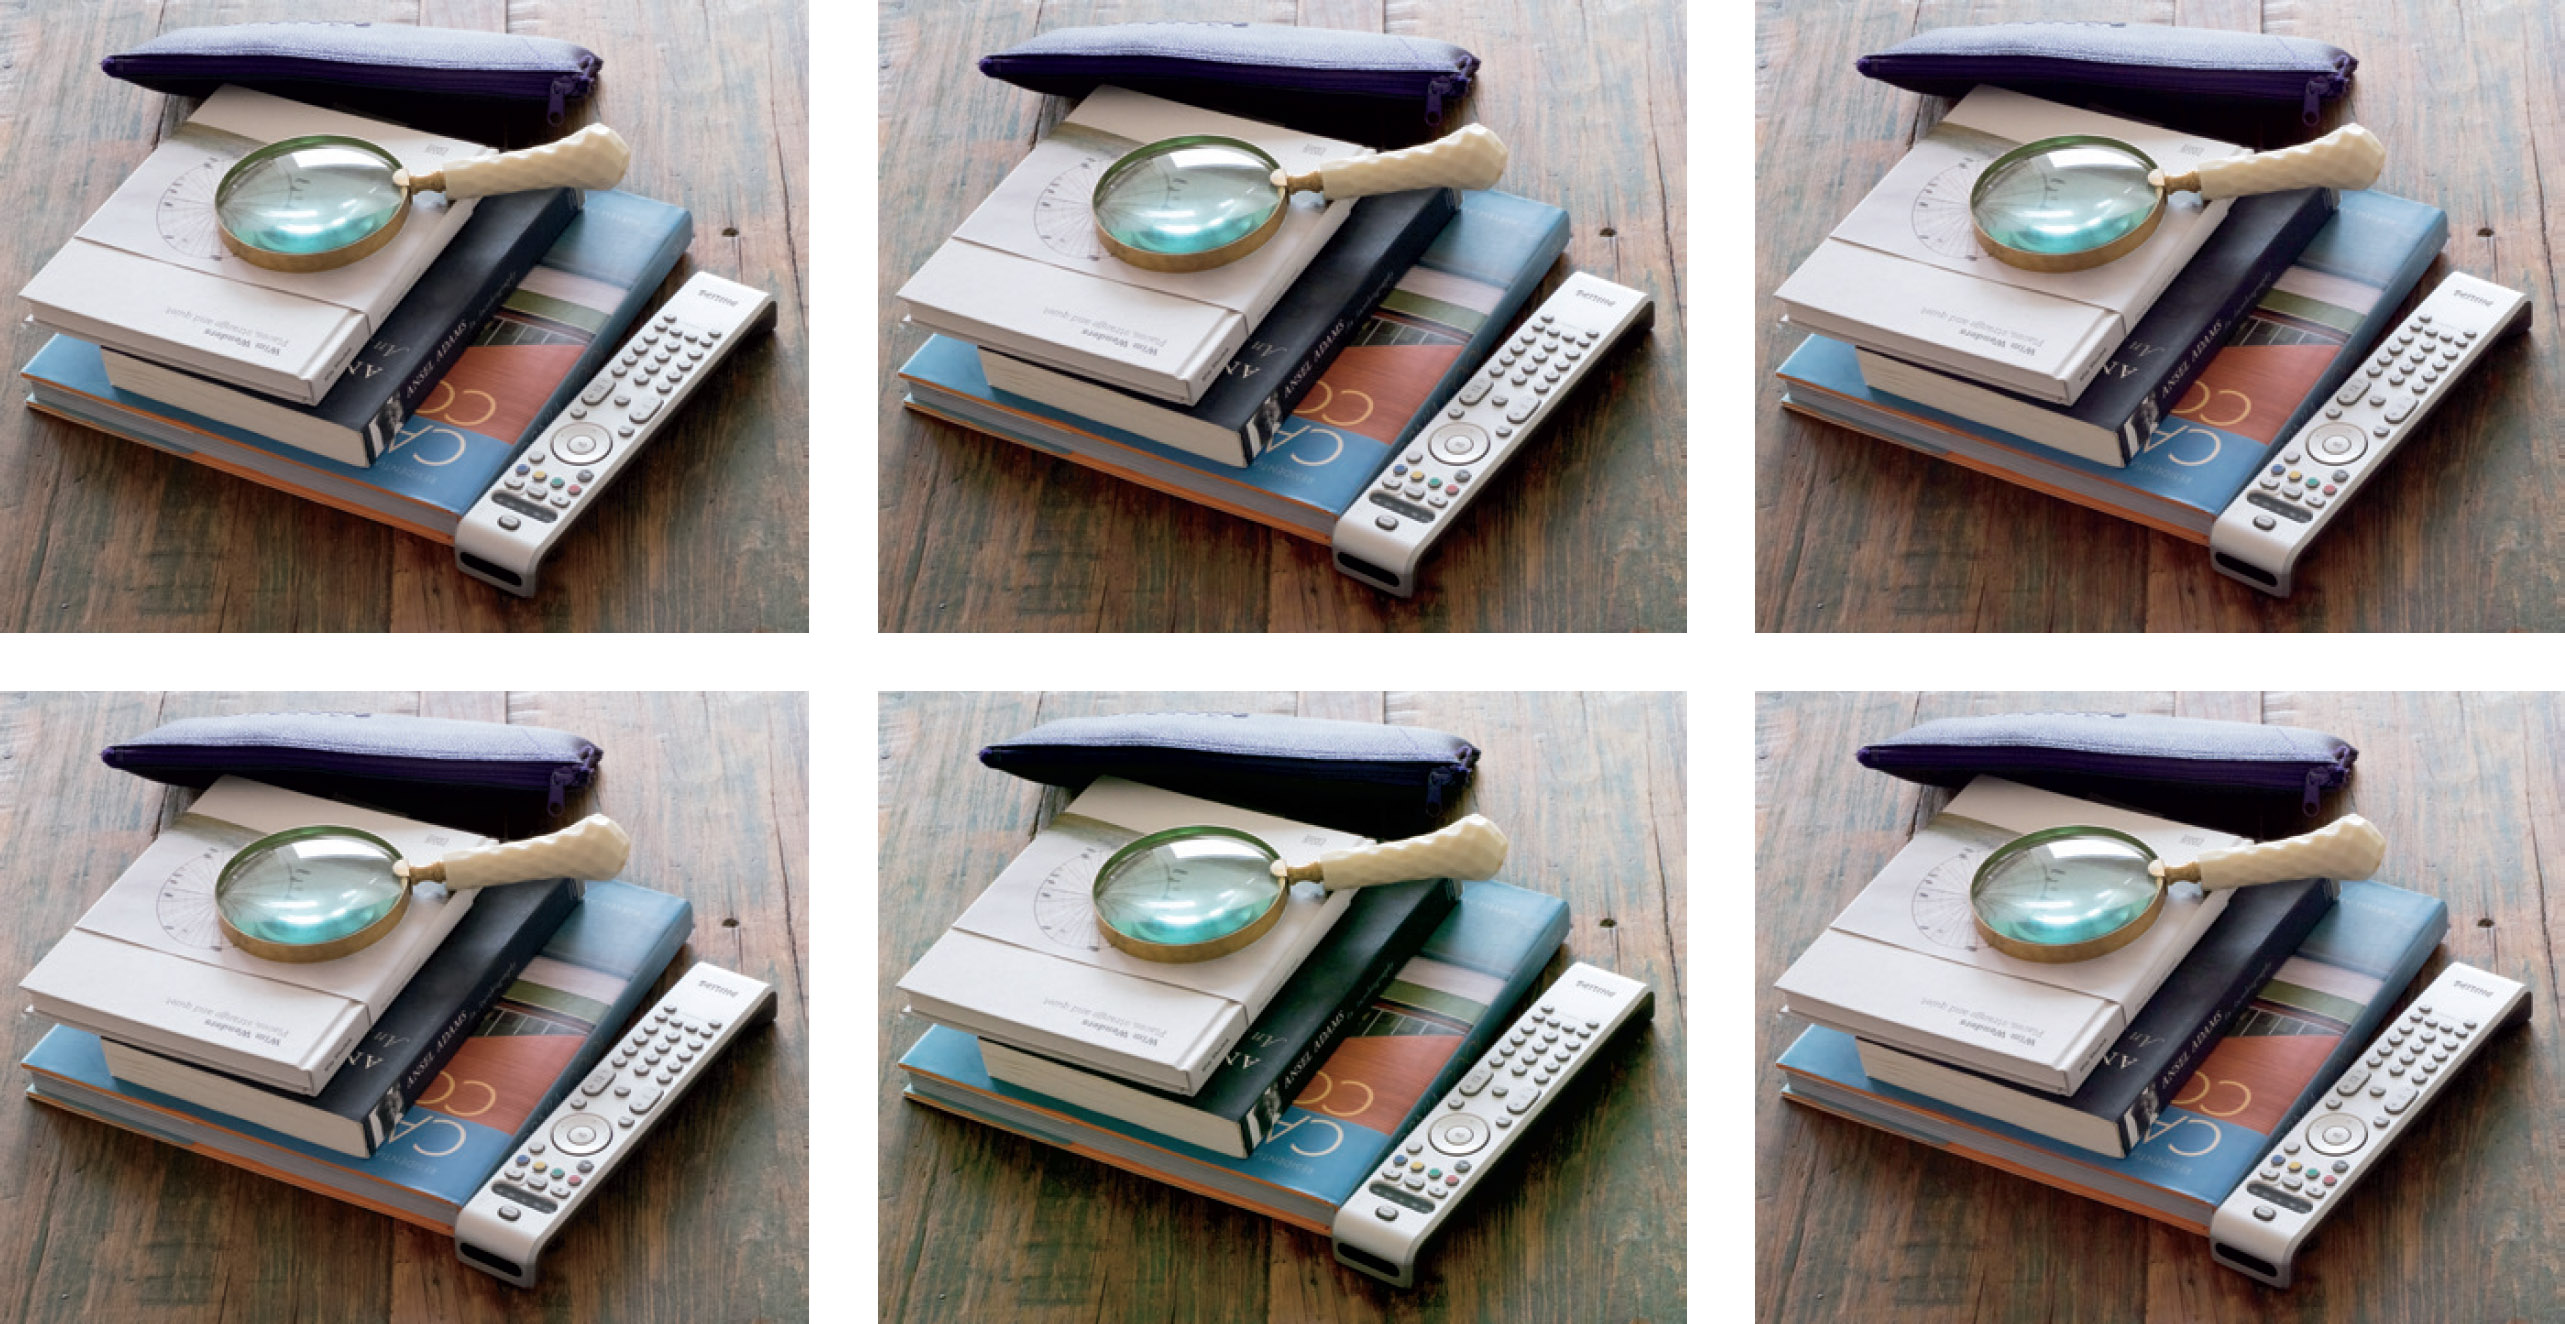
Fig. 204: X-Transformer DNGs are also beneficial for pushing RAW files that were taken with the electronic shutter. This example was shot with an X-T10, and the RAWs were processed in Lightroom.
Top left: mechanical shutter ISO 6400 RAF file; top center: mechanical shutter ISO 200 RAF file pushed 5 EV; top right: mechanical shutter ISO 200 X-Transformer DNG file pushed 5 EV.
Bottom left: electronic shutter ISO 6400 RAF file; bottom center: electronic shutter ISO 200 RAF file pushed 5 EV; bottom right: electronic shutter ISO 200 X-Transformer DNG file pushed 5 EV.
The pushed RAF that was taken with the electronic shutter (bottom center) clearly can’t match its pushed X-Transformer DNG cousin (bottom right). It’s also inferior to Lightroom’s version of the pushed mechanical shutter RAF (top center). So, let’s not blame the camera or the electronic shutter; It’s the RAW converter! In this case, it’s Lightroom’s inability to competently push the original RAF up 5 EV. Take the detour via X-Transformer and your results will very much improve.
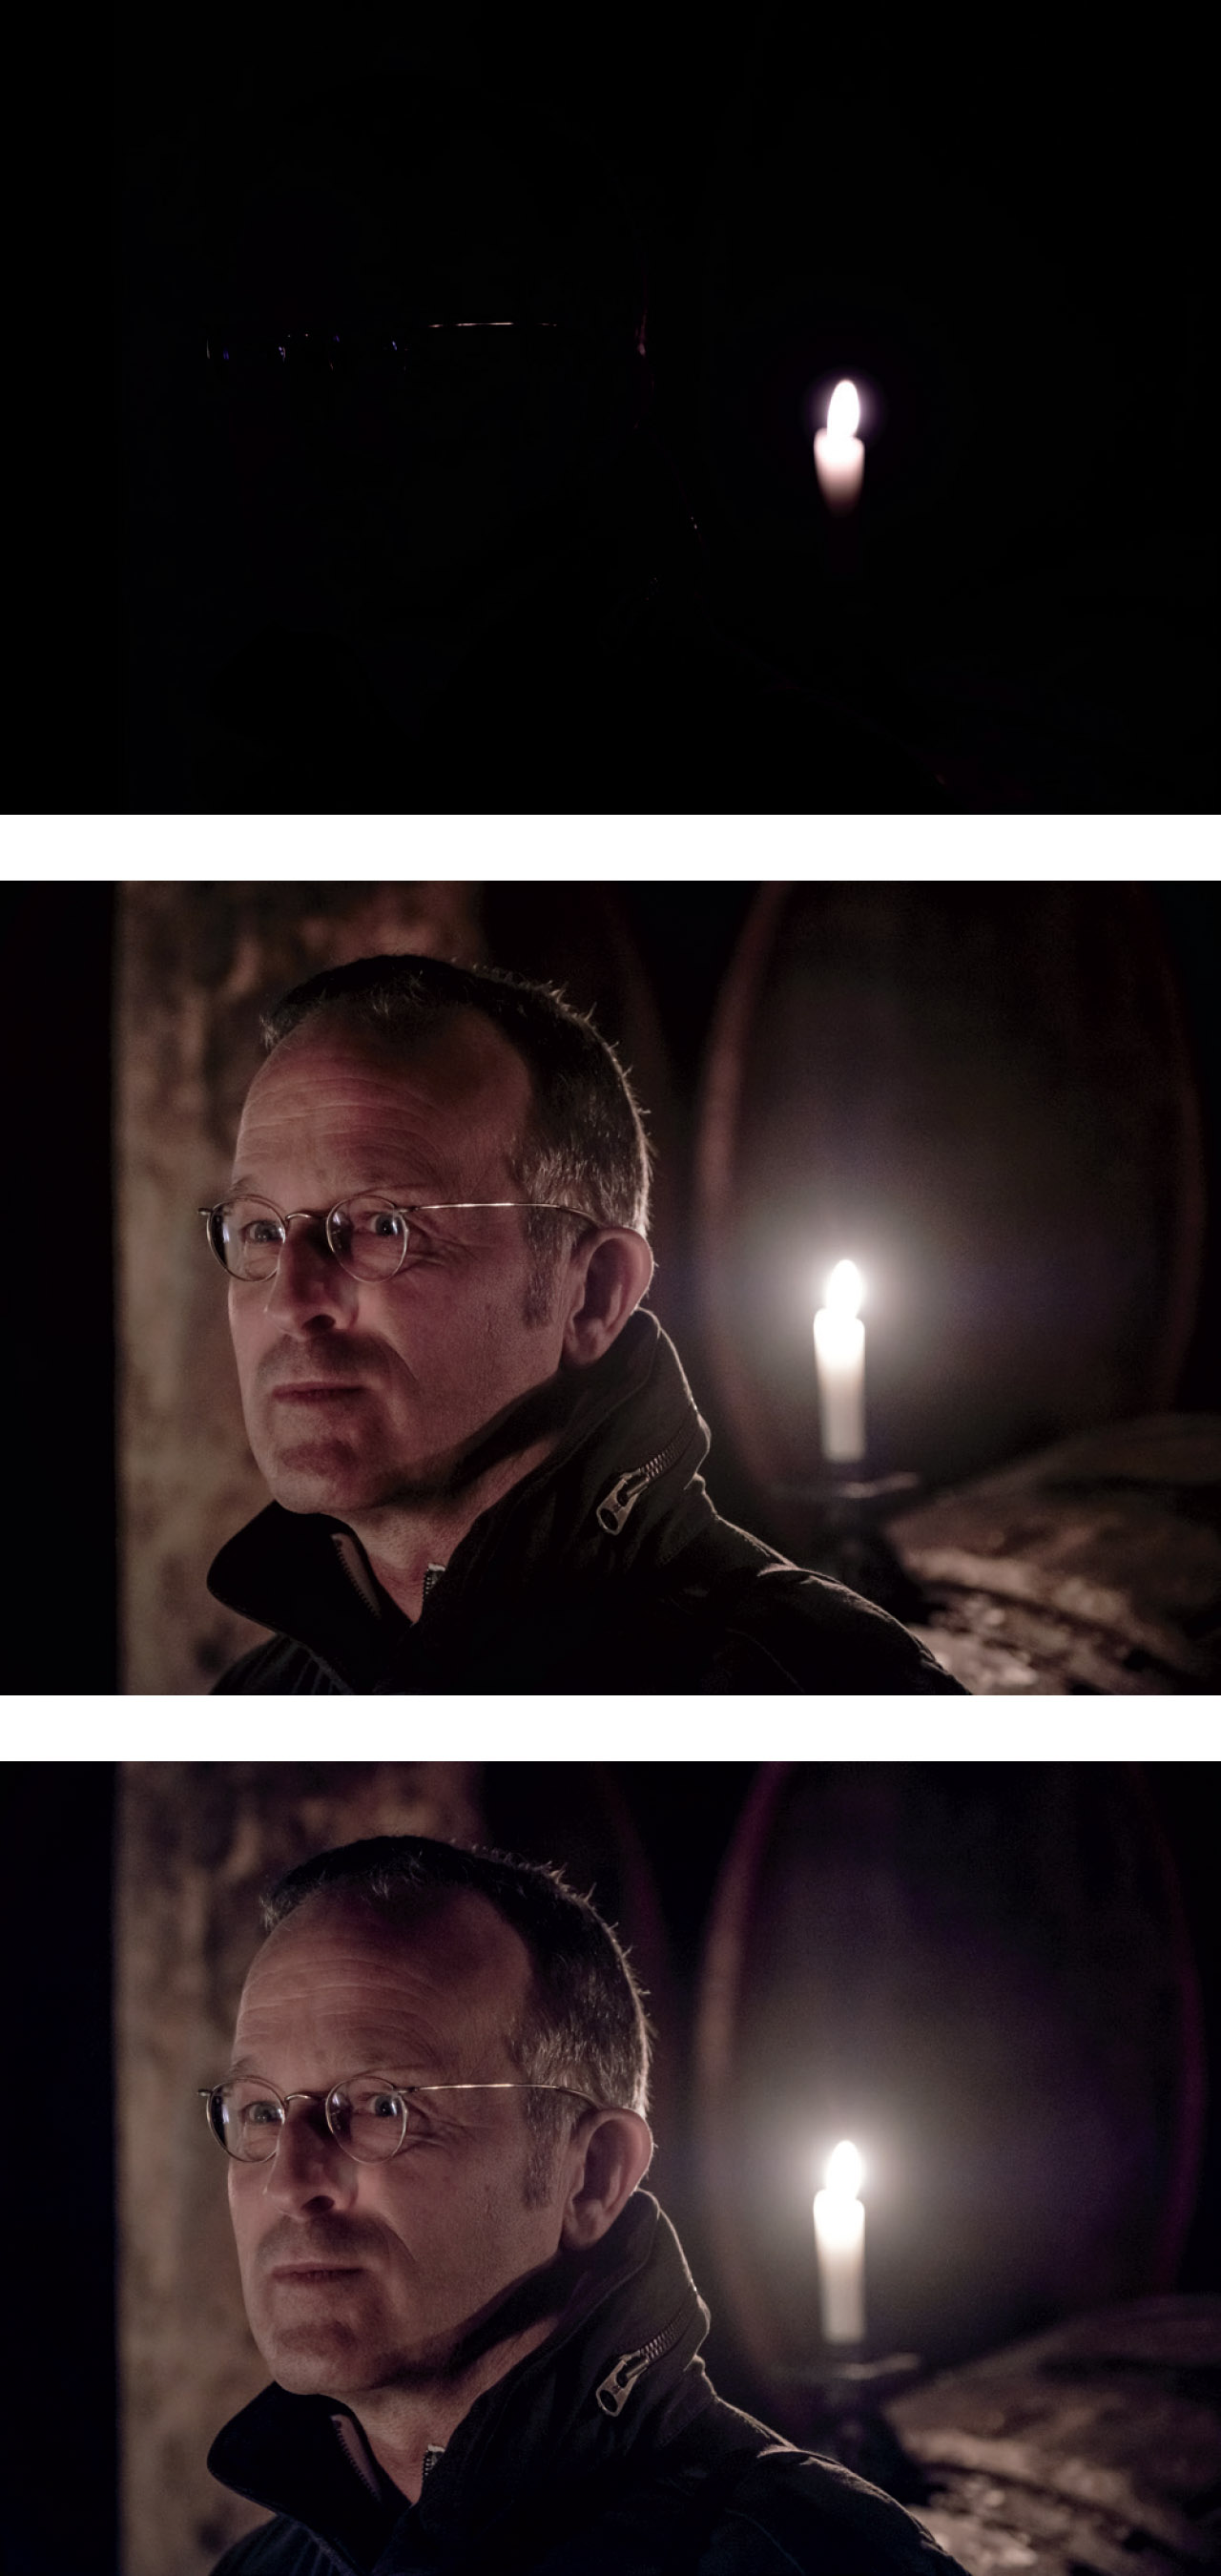
Fig. 205: In this final example we examine a mechanical shutter shot taken with an X-H1—another 14-bit camera, but with a more current X-Trans CMOS III sensor. As usual, the top image shows the original exposure, this time at ISO 800, which is the camera’s dual conversion gain level. In the middle, we see the ISO 800 RAF file after being pushed approximately +4 EV in Lightroom. The image below is the same shot with our usual X-Transformer detour, pushing the X-Transformer DNG file with exactly the same Lightroom settings as the original RAF file. Once again, we can see a slight improvement in coloration and shadow rendering.
Please note that the detour via X-Transformer isn’t recommended as a general rule for all your images. Instead, it’s meant as a better alternative for those rare occasions when you literally have to push your X series camera to its dynamic range limits—especially with shots that were taken with the electronic shutter or with older 12-bit cameras.
Another aspect of using X-Transformer is its demosaicing algorithm, which is considered superior to Lightroom’s own processing. By feeding Lightroom with a pre-processed DNG from X-Transformer, you can combine Lightroom’s feature set with X-Transformer’s demosaicing and get the best of both worlds. I’m always using X-Transformer’s Smoother demosaicing option to avoid artifacts.
Iridient X-Transformer also offers its own sharpening algorithm that is supposed to deliver more details results with less artifacts. Here’s the catch: You can’t apply Masking to X-Transformer’s sharpening, so the process will always apply to the entire image, including areas that don’t require any sharpening. To replace Lightroom’s sharpening with X-Transformer’s alternative, you have to use a different set-up:
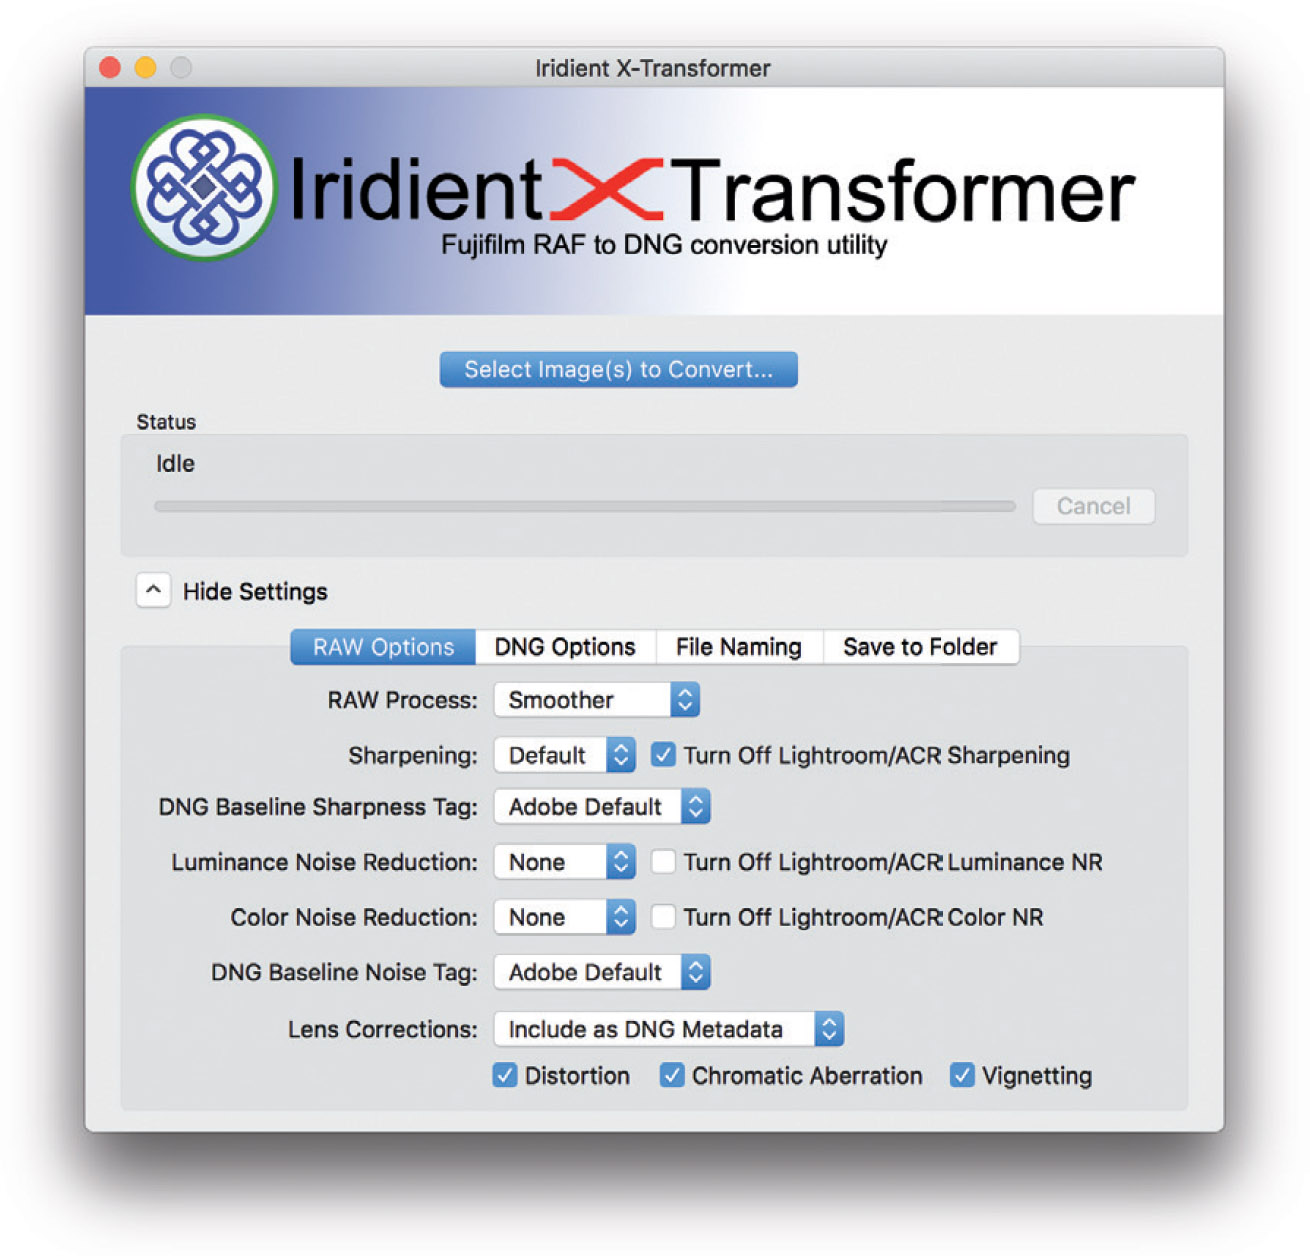
Fig. 206: To use X-Transformer’s own sharpening, set the Sharpening pop-up menu to Default (or any other value except None) and check the “Turn off Lightroom/ACR sharpening” box. This will apply X-Transformer’s own sharpening algorithm to the image during its DNG transformation. At the same time, Lightroom’s sharpening will be set to zero.
Is it worth it? Yes and no. Indeed, X-Transformer’s own sharpening can deliver finer details. But at the same time, the lack of masking means that smooth areas like the sky get unnecessary artifacts. (Fig. 207)
Important: Don’t confuse X-Transformer’s DNG files with regular DNG files (like those from Adobe’s own DNG converter). X-Transformer DNGs are pre-demosaiced DNGs that you should only use as add-ons to your original Fuji RAF files. Never delete your RAFs, because you will need them again for reprocessing when new versions of X-Transformer become available, for different RAW converters, or for future versions of Lightroom with improved process engines. The same applies to Adobe’s own DNG converter: If you use it to convert RAFs to DNGs, always keep the RAFs after the conversion! Adobe’s DNGs contain less metadata information than the original RAFs, and they basically marry you to Adobe products, because opening DNGs in RAW converters other than Adobe’s may be impossible or lead to inferior results. Only keeping the RAFs ensures that you your RAW processing is future-proof.
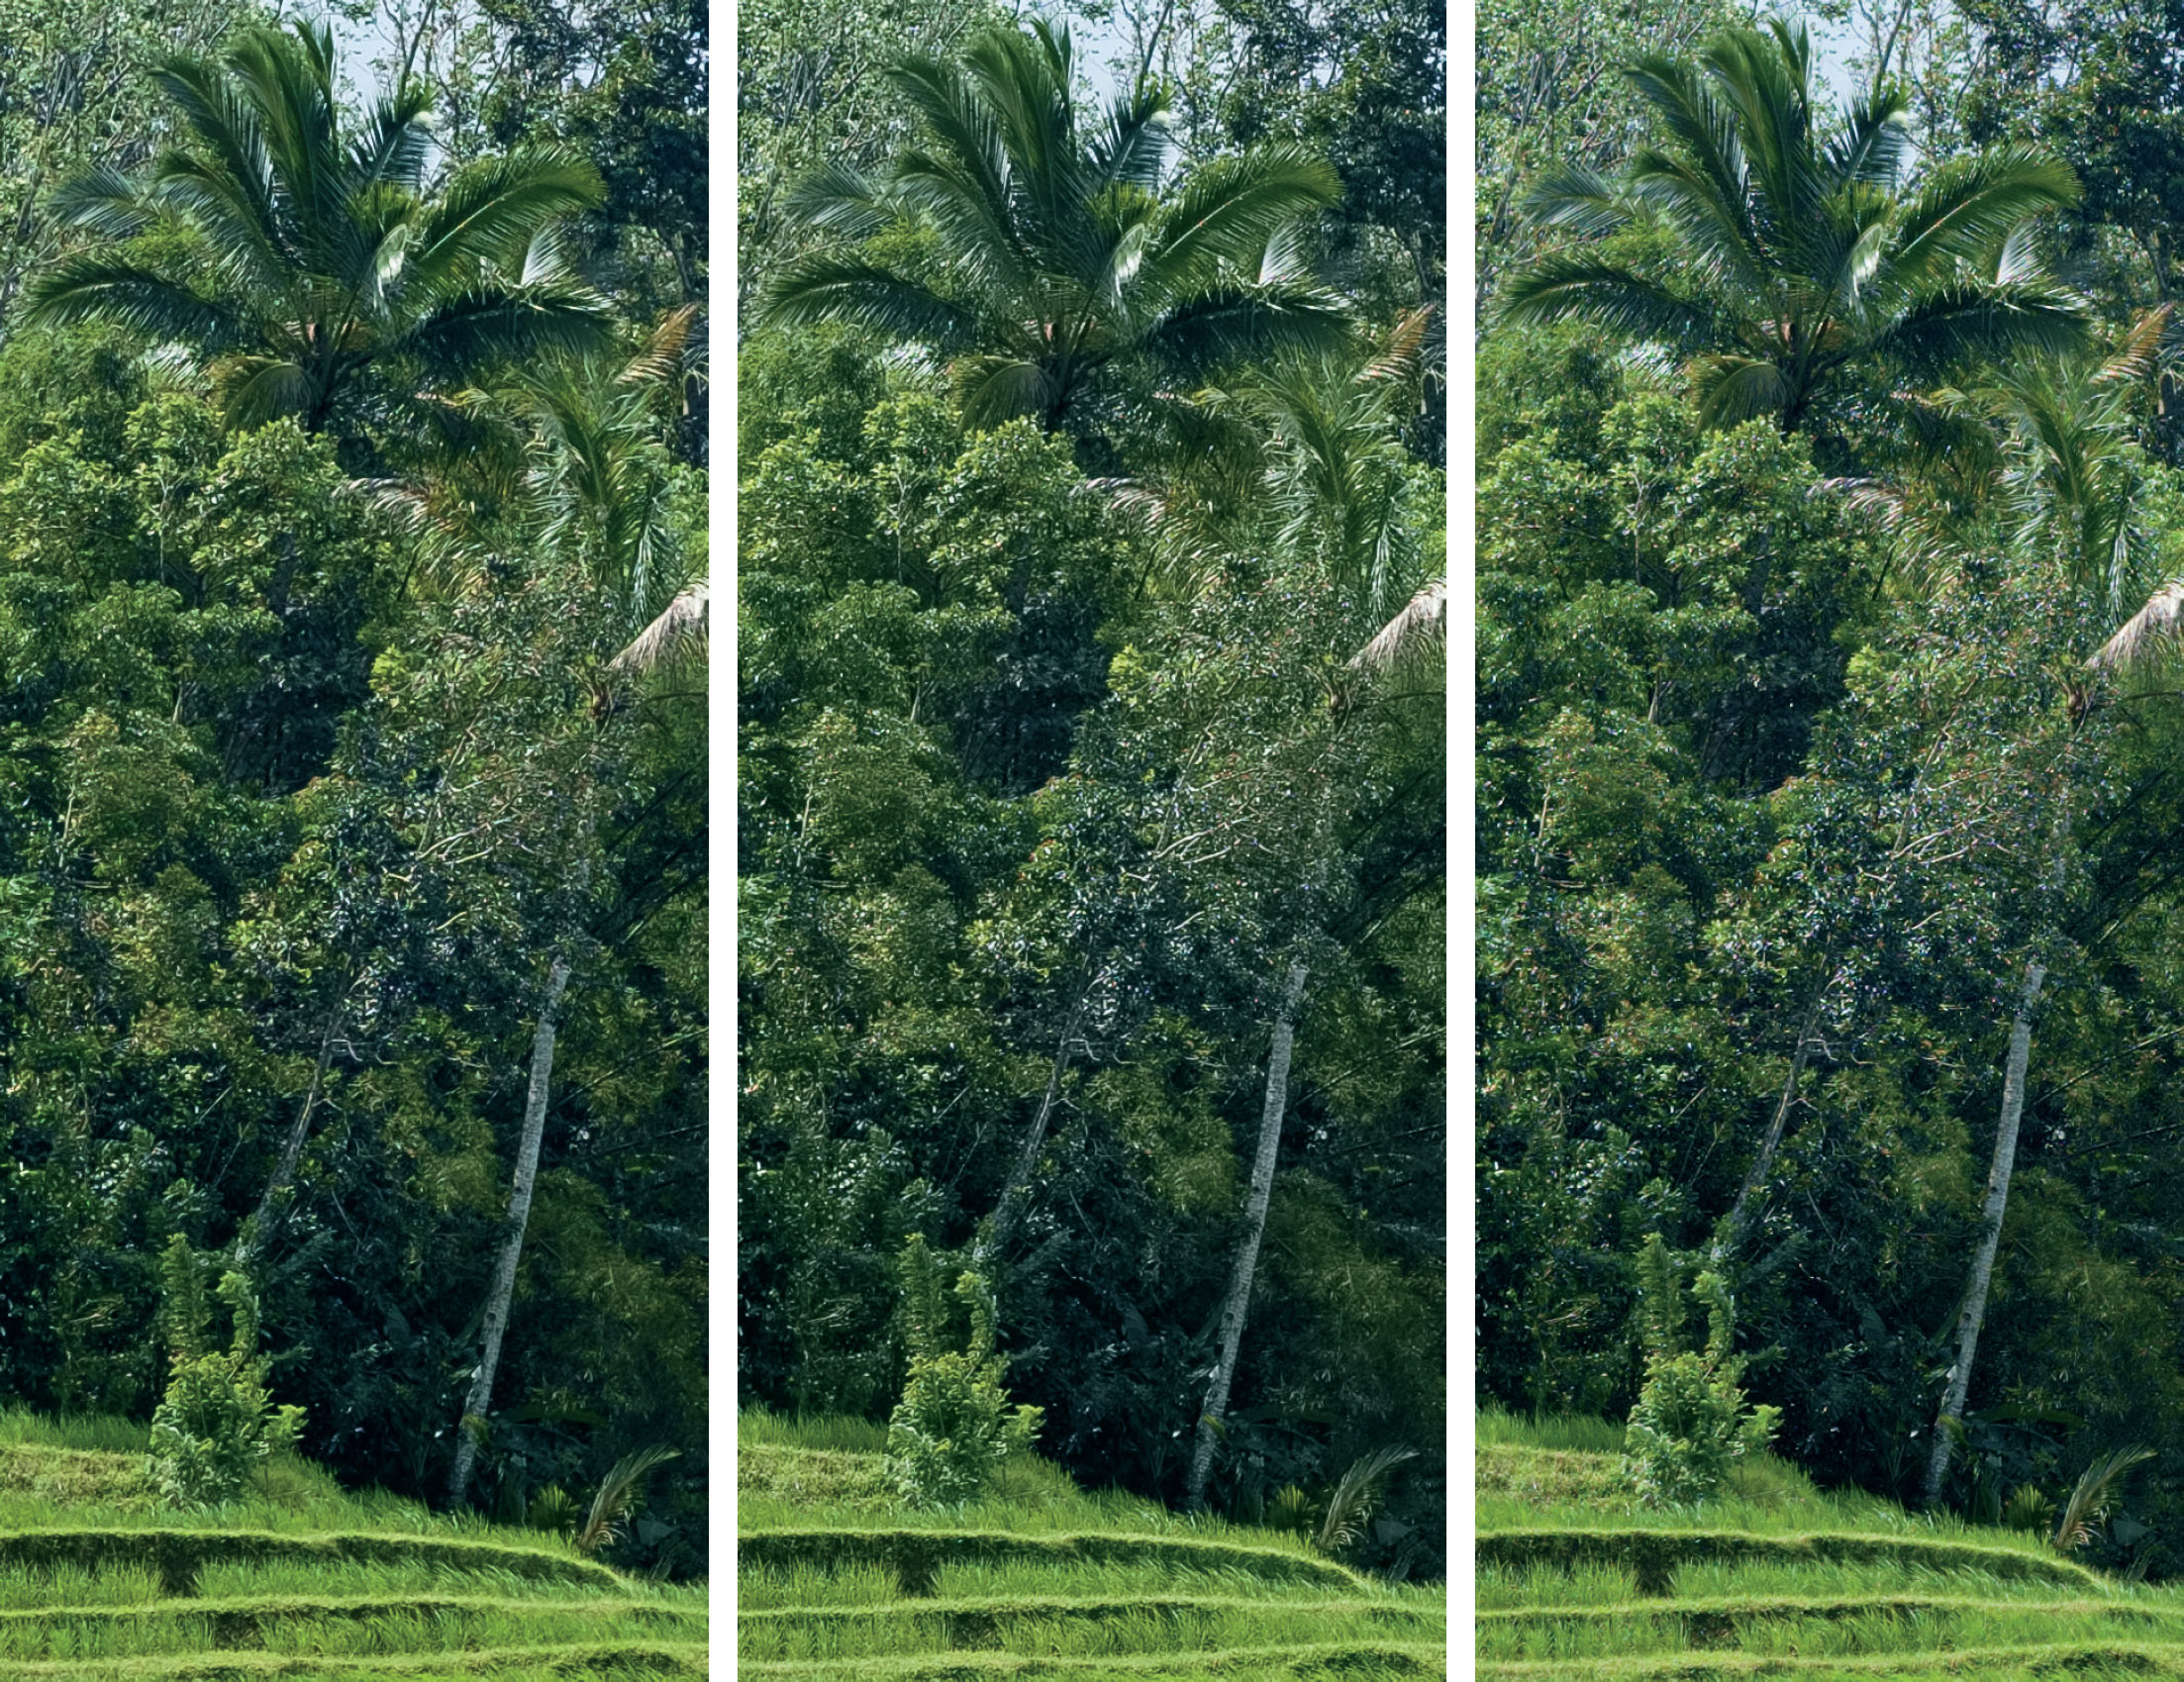
Fig. 207: In this illustration, we compare all three demosaicing/sharpening options that are available when you are using Lightroom and X-Transformer: The image on the left is a crop of the Lightroom-processed RAF file with a 25/2/85/35 sharpening setting and no X-Transformer involvement. In the middle, we have the X-Transformer DNG processed with Lightroom sharpening 25/1.4/85/35 and no X-Transformer sharpening. The image on the right shows the X-Transformer DNG with X-Transformer’s default sharpening and no Lightroom sharpening at all. Again, you can decide whether any differences are worth the detour via X-Transformer.
Digital cameras save information about every recorded image in the EXIF [101] data of each RAW or JPEG file. This data can be useful to RAW converters and cataloging software, but it can also be useful to you to help you understand how an image was exposed.
EXIF data consists of information about exposure parameters, camera settings, date and time, focal length, AF settings, white balance, JPEG parameters, DR mode, digital lens-correction data, serial numbers of cameras and lenses, etc. Many of these data points are saved in an area called “maker notes,” which contains information on camera features that are specific to a certain brand (like Fujifilm).
ExifTool can read the EXIF data and is also able to make sense of maker notes. ExifTool is rarely stand-alone. Instead, you can get it as part of other image utilities, such as ExifTool GUI for Windows or GraphicConverter for macOS users.
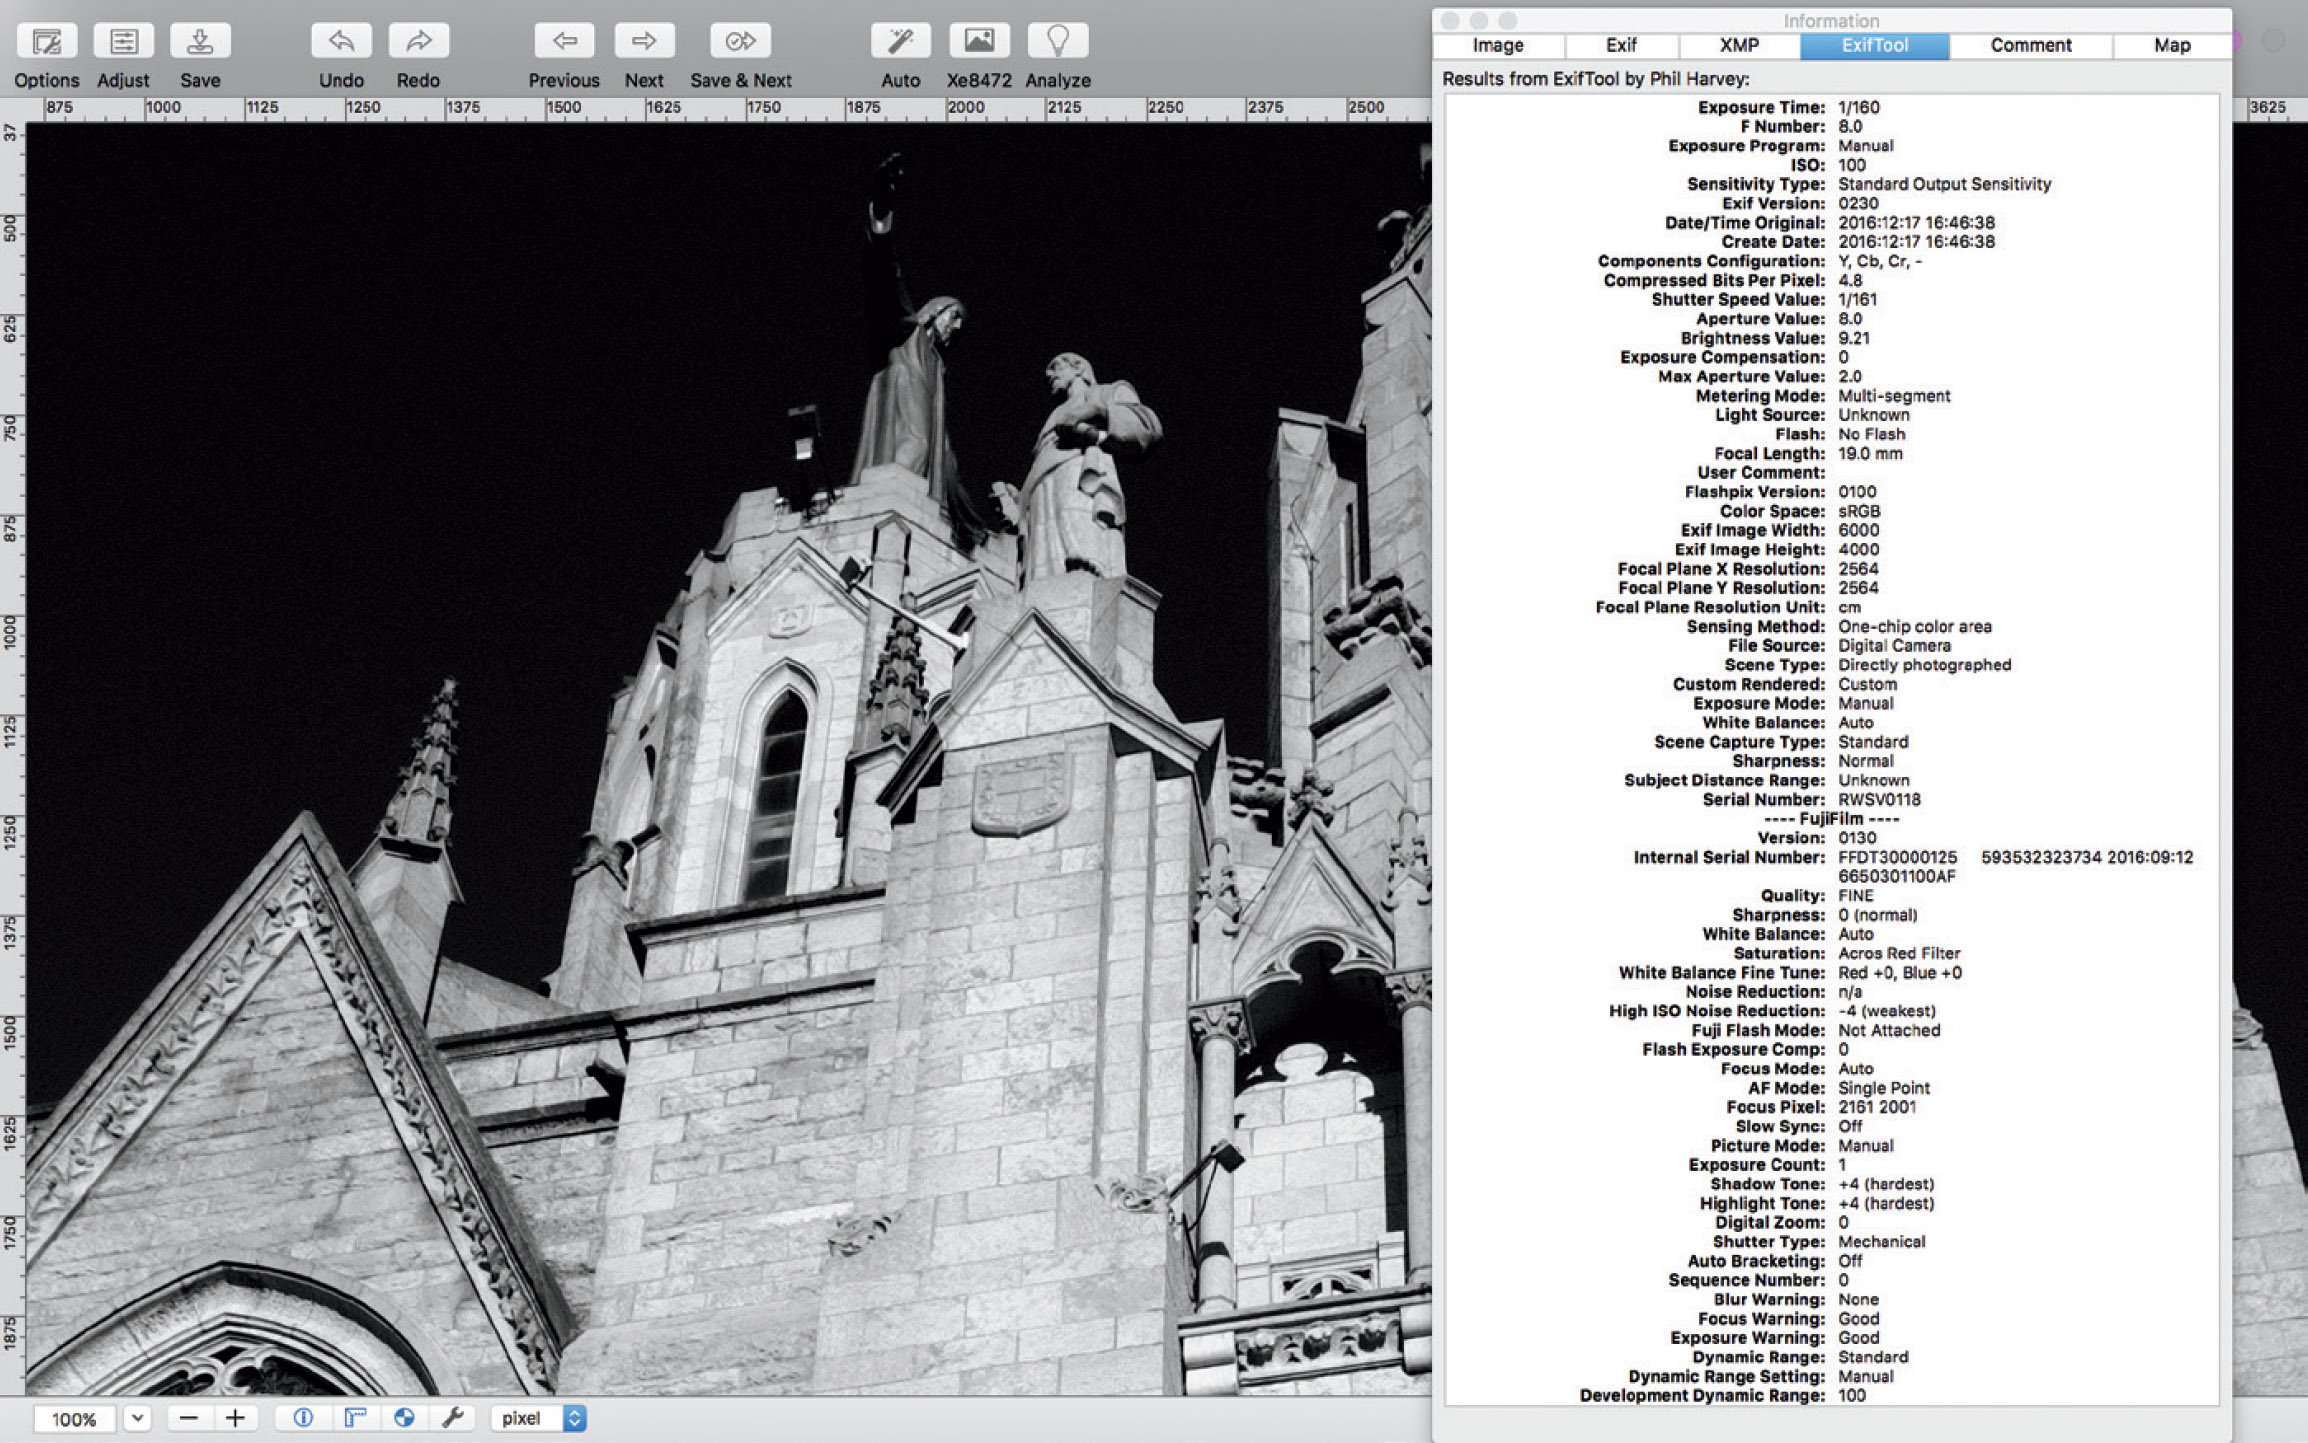
Fig. 208: EXIF data of an X100F shot in GraphicConverter: There’s a vast amount of information about every image, including brand-specific Fujifilm maker notes.