
1.2 THE BASICS (2): THINGS YOU SHOULD KNOW ABOUT YOUR LENSES
Your camera is compatible with the following native X-mount (APS-C) or G-mount (44×33mm medium format) lenses:
- Fujinon XF lenses (X-mount prime and zoom lenses)
- Fujinon XC lenses (compact, affordable X-mount lenses)
- Zeiss Touit X-mount lenses (prime lenses)
- Fujinon GF lenses (G-mount medium format prime and zoom lenses)
In addition to native X-mount and G-mount lenses, you can also attach a host of current and older lenses from other manufacturers via suitable adapters. Remember that by using a “dumb” mechanical adapter, adapted lenses will always operate at the set working aperture. Autofocus, program AE, and shutter priority AE will not be available, either. Third-party smart adapters (which are mostly available to adapt Canon EF lenses to the X-mount or G-mount) are more expensive and can overcome these limitations.
X-mount compatible Samyang lenses are just like adapted lenses! |
Manual focus lenses from Samyang/Rokinon/Walimex and similar brands aren’t native X-mount lenses. They simply come with a compatible mechanical mount, so you don’t have to buy an additional adapter. These lenses behave like other adapted third-party lenses: they don’t communicate with the camera (there’s no data transmission because there aren’t any electronic contacts), there’s no autofocus, the live view [12] operates with the currently set working aperture, and you can only use AE modes A and M.

Fig. 32: The affordable Samyang 8mmF2.8 Fisheye II manual focus lens for Fujifilm X-mount is a popular choice to record images with extreme angles.
Zeiss Touit lenses |
Even though Touit lenses with native X-mount compatibility offer great image quality and work like Fujinon XF lenses, Zeiss tends to be hesitant to support new camera features with lens firmware updates. It took Zeiss about half a year longer than Fuji to offer PDAF support, and there is still no LMO support. There’s also no indication that Zeiss wants to continue with the Touit line of lenses.

Fig. 33: Zeiss Touit 1.8/32mm and 2.8/12mm are autofocus lenses with native X-mount compatibility (above). The wide field of view of the Touit 2.8/12mm lens makes it ideal for landscape or interior shots (below).
This tip is of the “what you always wanted to know but never dared to ask” variety:
- XF: “X” means X-mount or X series; “F” means Fine, designating Fuji’s premium line of lenses. There’s also the smaller, more affordable XC line (“C” stands for Compact or Casual). And let’s not forget GF lenses for GFX medium format cameras (G-mount).
- 18–135mm: This is the focal length range of the zoom lens. To translate the numbers to their full-frame equivalents, you must multiply them by the APS-C crop factor [13] of 1.5. Hence, the field of view (FOV) of an 18–135mm zoom on your X-mount camera is identical to the FOV of a 27–202mm zoom lens on a full-frame (35mm format) camera. GF lenses have a crop factor of 0.79. Mounted on a GFX camera, a GF63mmF2.8 R lens offers the same FOV as a 50mm lens on a “full-frame” (a.k.a. 35mm format) camera.
- F3.5–5.6: This range describes the maximum aperture opening at the low and high end of the focal length range. In this case, the lens offers a maximum aperture of f/3.5 at 18mm and f/5.6 at 135mm.
- R: This stands for Ring and means that the lens features an aperture ring. This is a standard feature of all Fujinon XF lenses except the XF27mmF2.8 pancake lens. XC zooms don’t offer an aperture ring, either. With ringless lenses, the aperture setting is controlled with the command dial when you are using exposure modes A or M.
- LM: This stands for Linear Motor, which ensures quick and silent autofocus operation.
- OIS: This is the Optical Image Stabilizer [14]. This feature allows you to perform handheld shots at up to five stops slower of a shutter speed than you would usually need to eliminate camera shake. For example, in situations that would normally require a shutter speed of 1/160s to ensure a clear image, you could shoot with 1/8s and still get usable results. It’s important to remember that motion blur often plays a role at slower shutter speeds since many subjects tend to move. Obviously the OIS cannot reduce motion blur [15]—only blurring that occurs due to camera shake (i.e., the shaky hands of the photographer).
- WR denotes weather resistant lenses.
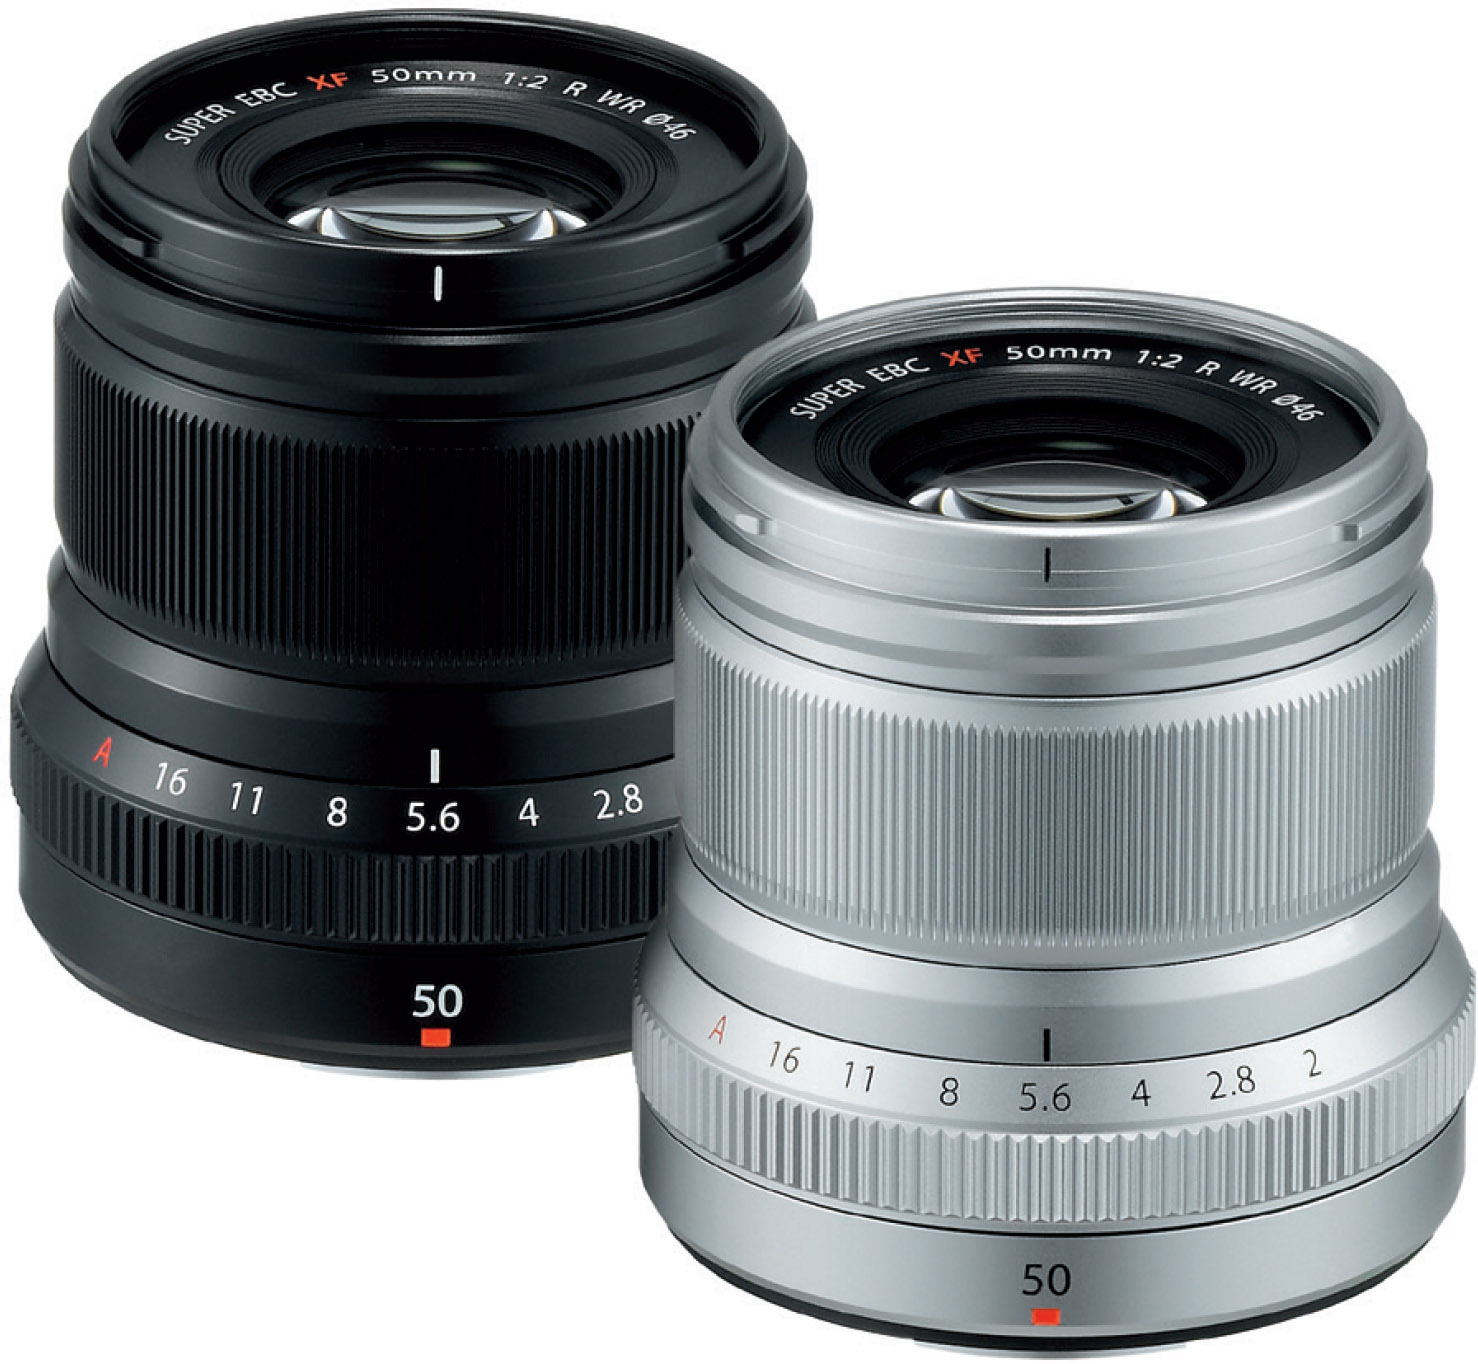
Fig. 34: Along with the XF35mmF2 R WR and XF23mmF2 R WR, the affordable XF50mmF2 R WR is one of Fujifilm’s popular compact prime lenses for the X series. These lenses are weather resistant, and their lean design doesn’t obscure the optical viewfinder of the X-Pro1 and X-Pro2. Due to their compact size, terrific performance, and excellent image quality, they are my favorite prime lenses for smaller X cameras like the X-T20, X-E3, or X-T100. You can get these lenses in two different colors, and a new XF16mmF2.8 R WR has already been placed on Fujifilm’s lens roadmap for 2019.
Many XF, XC, and GF lenses feature built-in Optical Image Stabilization (OIS). In addition to that, the X-H1 and the upcoming GFX 100 offer In Body Image Stabilization (IBIS), which works with all lenses, even manually adapted third-party lenses.
OIS and IBIS perform the same task: they prevent camera shake and blurry images in situations that require you to take handheld shots at a slower-than-usual shutter speed.
To control the OIS/IBIS, XF and GF lenses offer a dedicated OIS on/off switch on the lens barrel. The OIS in XC lenses is controlled through the camera menu. The same applies to the IBIS of the X-H1 with lenses (native or adapted) that don’t have built-in OIS.
For handheld shots, an old rule of thumb recommends using shutter speeds that are at least as fast as the reciprocal of the full-frame-equivalent focal length that is in use. For example, with a 50mm lens and an APS-C crop factor of 1.5, the minimum safe shutter speed for handheld shooting would be [1/(50 × 1.5)] s = 1/75s. In other words, when you are shooting handheld with a 50mm lens and don’t want shaky images, you should use shutter speeds at least as fast as 1/75s. Or you can use the OIS to add a few more stops.
Of course, rules of thumb don’t apply to everybody. Some users have quite steady hands, while others have a shaky grip. The settings and equipment that work for me may not work for you. However, the OIS will always give you a few extra stops of shutter-speed headroom.
In SHOOTING MENU > (SHOOTING SETTING >) IS MODE, you can choose between two basic OIS modes:
- OIS mode 1 (CONTINUOUS) is the default setting. It’s always stabilizing the image, even when you are just looking through the viewfinder before you press the shutter button.
- OIS mode 2 (SHOOTING ONLY) engages only when you fully depress the shutter button to take an image (or half-press it in AF-C mode).
Please note that the OIS can also introduce camera shake, especially at faster shutter speeds. This adverse effect is more likely to occur in OIS mode 1 than in mode 2. However, OIS mode 1 is more effective when used at very slow shutter speeds, such as 1/15s, 1/8s, or even 1/4s.

Fig. 35: The optical image stabilizer of the XF50–140mm in action: Thanks to a slow shutter speed of 1/6s, I could still use ISO 800 for this handheld night shot. Even at a full-frame equivalent of 210mm, the OIS could successfully compensate for any camera shake.
These are my recommendations for using OIS and IBIS:
- Only use (switch on) OIS/IBIS when necessary. When you are using fast shutter speeds that don’t require image stabilization, you can safely turn the OIS off to eliminate it as a potential interference. That said, I found the OIS useful even at shutter speed of 1/2000s and 1/4000s when I was shooting with an XF18–55mm lens from a small helicopter with extreme high-frequency vibration.
- I generally prefer to use the OIS in mode 2 (“shooting only”). However, mode 1 is more useful at very slow shutter speeds and when you are using telephoto lenses, because in mode 1, the OIS and IBIS will also stabilize the live view image, making it easier to compose and focus a shot.
- Consider turning off the OIS/IBIS when you are working from a good tripod or with shutter speeds that are slower than a second. Of course, this decision very much depends on the sturdiness of the tripod, prevailing wind conditions, and vibrations caused by traffic. Shooting in “vibrant” cities, one encounters many situations where leaving OIS/IBIS on is a good idea even with the sturdiest of tripods.
- Depending on the lens, you might also want to switch OIS/IBIS off for panning [16] shots in case you find it difficult to smoothly track your subject with the OIS turned on.
By the way, OIS and IBIS both emit a soft humming sound, even when the function is turned off. Don’t worry about the noise—it’s perfectly normal.
Important: If you are using manually adapted third-party lenses on an X-H1, its IBIS can only perform correctly if you have entered and selected the focal length of the attached lens in SHOOTING MENU > SHOOTING SETTING > MOUNT ADAPTOR SETTING.
OIS and motion detection: what’s going on? |
When Auto-ISO is active, and you are shooting in either aperture priority A or program AE P, most entry and enthusiast level models (e.g. X-E3, X-E2S, X-T20, X-T10, X-T100, X-M1, X-A series, etc.) offer another OIS option: motion detection. When the camera detects subject movement at the time of shooting, this feature increases the shutter speed by one or two stops to reduce unwanted motion blur. To compensate for the reduced exposure time, the camera will increase the ISO value of the shot accordingly.
Motion detection reacts on either subject movement or camera movement, both of which can’t be compensated by the OIS. This makes it possible to select a slower minimum shutter speed in the Auto-ISO settings (which would be suitable for static subjects). However, when the motion detection registers subject or camera movement while the shutter button is half or fully depressed, it will temporarily increase the minimum shutter speed by one or two stops. It’s a smart way of adapting to a quickly changing scene.
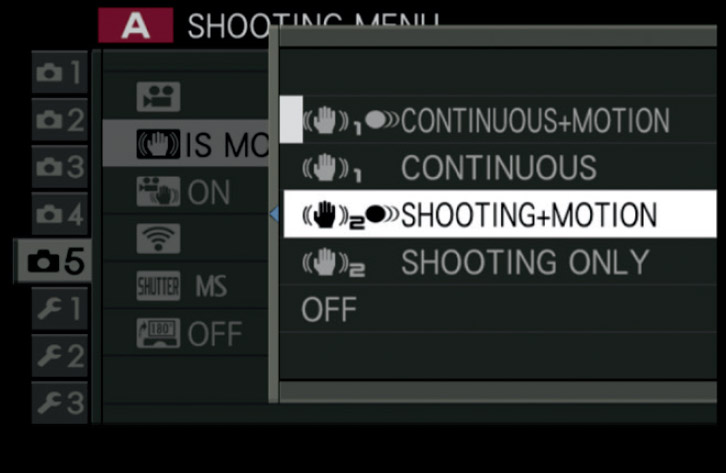
Fig. 36: OIS motion detection automatically increases the shutter speed by one or two stops when the camera detects movement while the shutter button is half or fully depressed. This feature is only available in aperture priority or program AE mode, and it also requires Auto-ISO. When all these prerequisites are met, the IS MODE menu (here from the X-T100) displays two additional “+MOTION” options that are otherwise invisible.
Motion detection can be combined with both OIS modes (1 and 2). You can find these options in the OIS menu as CONTINUOUS+MOTION (OIS mode 1 with motion detection) and SHOOTING+MOTION (OIS mode 2 with motion detection).
Don’t forget that these two additional OIS options are only available when Auto-ISO is active, and the camera is set to either aperture priority A or program AE P. To grant motion detection sufficient operating room, the Auto-ISO ceiling (MAX. SENSITIVITY) should be set to a reasonably high value, such as 6400 or 12800 (if available).
Important: Higher-end models like the X-Pro2, X-T1, X-T2, X-T3, X-H1, and GFX 50 don’t offer motion detection OIS options because these cameras are lacking automatic scene recognition (SR+) functionality, which is a prerequisite of motion detection.
How the XF23mmF1.4 R, XF16mmF1.4 R WR, and XF14mmF2.8 R are different |
Unlike standard X-mount lenses, the wide-angle primes XF14mmF2.8 R, XF16mmF1.4 R WR, and XF23mmF1.4 R feature a more traditional manual focus ring with a clutch mechanism.
- Pull the focus ring towards the camera to set the lens to manual focus.
- Push the focus ring away from the camera to set the lens to autofocus.
- Alternatively, you can use the camera’s own focus mode selector to set it to manual focus mode. In this case, the lens remains in autofocus mode, and you can only use Instant AF (usually assigned to the AF-L button) to change the focus. This also means that you cannot manually adjust focus on the lens after focusing with Instant AF.
- You cannot use Instant AF (AF-L button) to focus when the focus ring of the lens is set to manual focus. In this case, you can only use the manual focus ring to change or adjust focus.
- The analog depth-of-field (DOF) markers on the lens barrel are less conservative (and in my opinion less useful) than the camera’s pixel-based scale. This is because the pixel-based scale is using a much smaller circle of confusion [17] to display DOF ranges for pixel-sharp results at 100% magnification, whereas the engraved scale on the lens uses a value that’s based on looking at typically sized prints from a typical distance with typical eyesight. Some photographers regard the engraved scale (which equals the electronic film format-based scale in cameras with X-Processor Pro and 4) as more practical. Personally, I prefer the pixel-based scale. In any case, the actual difference between the two scales is about 3.5 aperture stops.
- It’s not possible to reverse the focusing direction of the manual focus ring with the 14mm, 16mm, or 23mm lenses.
- If you set your camera to AF+MF mode (SHOOTING MENU > AF/MF SETTING > AF+MF > ON), you can only use this feature when the lens clutch is set to MF and the camera is set to AF-S. In this configuration, you can autofocus by half-pressing the shutter button, and then manually adjusting the focus with the focus ring (while keeping the shutter button half-pressed).

Fig. 37: Fujinon XF23mmF1.4 R with engraved distance and DOF markers. It’s a nice retro touch, but you lose some state-of-the-art digital functionality.
Fujifilm offers two versions of the XF56mmF1.2 R portrait lens: a regular version and an APD version. Please note that the newer and more expensive APD version is not replacing or succeeding the classic XF56mmF1.2 R lens. It’s not even per se considered an overall improvement. It’s just different. APD presents itself as another option for photographers who shoot portraits at a wide-open aperture and want very smooth bokeh.

Fig. 38: The XF56mmF1.2 R lens is available in a regular (left) and in a special APD version (right).
Let’s first establish what the APD (apodization) filter is actually doing. This non-removable filter sits in the same optical plane as the aperture, and its effect is actually quite similar: It reduces the amount of light that reaches the sensor.

Fig. 39: The regular XF56mmF1.2 R lens is a popular choice for smooth portraits with pleasant bokeh and great subject separation.
Here’s the difference from regular aperture blades: Normal blades feature hard edges, whereas the APD filter works with a smooth gradient (like a radial neutral density filter) that gets increasingly translucent from edge to center of the image circle.

Fig. 40: The XF56mmF1.2 R APD is a specialty lens that can further smoothen already blurry backgrounds by filing off the edges of blur discs.
The gradient of the APD filter has an additional softening effect on out-of-focus areas: the hard and defined edges of blur discs are literally filed off. The effect decreases as the lens is stopped down, and at apertures of f/5.6 and smaller, the APD filter has no effect at all. That’s why Fujifilm recommends using the XF56mmF1.2 R APD between f/1.2 and f/2.

Fig. 41: To understand the difference between a regular 56mm lens and one with a built-in apodization filter, it’s best to take a picture that consists of nothing else but blur discs. The example on the left shows how such a scenario looks with a regular 56mm lens at f/1.2. The example on the right shows the same subject shot using the APD version. It clearly illustrates how the apodization filter is shaving the hard edges off blur discs.

Fig. 42: Here’s a more life-like example that demonstrates the effect of the APD filter: The image on the left was taken with a regular XF56mmF1.2 R lens, while the image on the right displays the APD version.
So why not dump the regular XF56mm lens and replace it with the APD version? It’s because the APD filter introduces shortcomings of its own:
- The brightness of the APD lens is reduced between f/1.2 and f/5.6. For example, setting the APD lens to f/1.2 results in an effective lens speed of f/1.7. Since the APD lens is slower, shooting wide-open in poor light requires slower shutter speeds and/or higher ISO settings. At least you don’t have to guess, because the effective aperture is shown by red markings on the aperture ring.
- The APD filter has a negative impact on autofocus performance. Fast PDAF (phase detection AF) is not available at all, and CDAF (contrast detection AF) performance is reduced in poor light along with the decreased lens brightness.
The APD version is significantly more expensive than the regular version, so you basically have to pay more for less performance. For the APD version to be a reasonable choice, you really have to love its softened, out-of-focus blur when shooting wide-open.
Using the Lens Modulation Optimizer (LMO) |
Most enthusiast and pro-level camera models support the Lens Modulation Optimizer or LMO. This feature premiered in the X100S and X20 fixed-lens cameras (where it can’t be switched off). It counteracts common optical phenomena (like diffraction [18] and corner softness) when the camera converts the RAW data into JPEG images. To make it work, the firmware of the attached lens sends its LMO correction data to the camera as hidden metadata with every image.
- Neither Fujinon XC lenses nor Zeiss Touit lenses support the LMO.
- LMO data is proprietary and not available to external RAW converters.
If your lens supports the LMO (all Fujinon XF and GF lenses do), you should enable the function by selecting SHOOTING MENU > (IMAGE QUALITY SETTING >) LENS MODULATION OPTIMIZER > ON.
You can also use the built-in RAW converter of your camera (PLAYBACK MENU > RAW CONVERSION) to enable or disable the LMO for a specific JPEG result. With this method, it’s easy to create and compare versions of a shot with and without LMO enhancements.
The LMO takes care of the following optical effects:
- Diffraction softness: This effect increasingly occurs when the lens is stopped down beyond a certain point. APS-C cameras with 24 MP typically exhibit diffraction at apertures of 10 and smaller. While stopping down increases the overall depth of field (DOF), it also reduces the maximum resolution of the lens/camera combination. The LMO counteracts this effect and reconstructs some of the lost detail.
- Corner softness: Even the best lenses aren’t as sharp in the corners as they are in the center. The LMO can digitally compensate for that loss of quality.
LMO corrections are based on complex deconvolution [19] algorithms. Currently, this is only supported in-camera with the built-in RAW converter. External converters such as Adobe Lightroom, Adobe Camera Raw, Capture One Pro, Silkypix, Iridient Developer, or Photo Ninja can’t process LMO data. This means that LMO corrections are only visible in JPEGs that have been generated by the camera.

Fig. 43: This example illustrates how the Lens Modulation Optimizer (LMO) improves the edge and corner sharpness of Fujifilm’s native XF and GF lenses. It was shot with an X-E2 and an XF23mmF1.4 R WR lens at f/8. Let’s have a closer look at the lantern situated near the left edge of the scene: The two crops in the center row show the lantern with LMO OFF (left crop) and LMO ON (right crop). There’s a small visible improvement in the version with the active LMO. However, if you compare crops of the sign taken from the center of the scene (bottom row), there’s no visible difference between the versions with and without LMO. That’s no surprise: Lenses achieve their maximum resolution around the image center, so the LMO’s job is to only compensate the inevitable loss of resolution near the edges of the frame.
Things you should know about digital lens corrections: |
Most modern lenses achieve their optimal image quality through a combination of optical and digital corrections. Corrections are mostly applied to the three following phenomena:
- Vignetting: This effect results in a loss of brightness from center to corner. Vignetting [20] is more pronounced at large (open) apertures.
- Distortion: There are pincushion- and barrel-type distortions [21], both of which make straight lines seem curved. Several premium primes like the XF14mm, XF23mm (F1.4 and F2), XF35mmF1.4, XF56mm, and XF90mm are fully optically corrected for distortion. Others (such as the Zeiss Touit range, compact pancake lenses, the XF35mmF2, or zoom lenses) require a combination of optical and digital distortion correction.
- Chromatic aberration: Chromatic aberration [22] results in color fringing. This effect can be corrected (or mitigated) with apochromatic lenses, or digitally corrected during RAW conversion.
Some camera makers rely on dedicated correction profiles that must be provided by each RAW converter maker. Fujifilm isn’t one of these companies: all current Fujifilm cameras save digital corrections as metadata in the RAW file. RAW converters can access this lens-specific metadata and use it to apply appropriate corrections. This way, the built-in RAW converter and external RAW conversion software, such as Adobe Lightroom, Silkypix, Iridient Developer, or Capture One, can use the metadata in the RAW file to correct or mitigate vignetting, distortion, and chromatic aberration.
A major benefit of this method is that many RAW converters automatically support new lenses since Fujifilm delivers the correction data via the RAW metadata. However, there’s also a drawback: some RAW converters (such as Lightroom, Adobe Camera Raw, and Silkypix) don’t give you the option to switch off metadata-based digital lens corrections, even if you’re convinced they aren’t necessary. Since digital distortion correction always results in some loss of image sharpness and detail due to the required stretching and interpolation of pixels, this can be a headache for some users. Obviously, not all subjects or images require the same amount of digital correction (it can also be a simple matter of taste), so full user control over the application of digital lens corrections is a very nice feature.
Luckily, software like Iridient Developer and Capture One offer control over how much digital metadata distortion (or vignetting) correction should be applied. Other programs (like Photo Ninja and AccuRaw) simply ignore lens-correction metadata. With such programs, all corrections must be applied either manually or by using a dedicated profile.

Fig. 44: This example was taken with an X100F and WCL-X100 conversion lens. In the image on the left, digital lens-correction metadata was ignored. As a result, there’s visible barrel distortion caused by the WCL. The image on the right shows the same shot, but this time with digital lens-correction metadata, which is automatically applied by compatible RAW converters such as Adobe Lightroom.
Important: Adobe Lightroom and Adobe Camera RAW offer additional lens-correction profiles for X100 series cameras that (if you choose to activate them) are applied on top of any correction that is already applied based on the RAW metadata. The combination of metadata-based and profile-based correction is designed to render perfectly corrected X100/S/T/F results. However, in the real world, “clinically perfect” is often too much, so it will depend on the subject and your personal preference if (or to what degree) you want to apply these additional correction profiles.
X100 series and X70: Using wide-angle and tele conversion lenses |
The X100 series is famous for its built-in 23mmF2 lens. Many things changed and improved during the journey from the X100 Classic to the X100F, but the lens (which corresponds to a 35mm field of view in full-frame terms) remained mostly the same.
For added flexibility, you can attach wide (WCL-X100 & WCL-X100II) or tele conversion lenses (TCL-X100 & TCL-X100II) to your X100/S/T/F. The WCLs convert the focal length of the camera’s built-in lens to 19mm, and the TCLs turn it into a 33mm outfit. In full-frame equivalency terms, this corresponds to 28mm and 50mm lenses. Adding a WCL or TCL doesn’t impact the speed of the resulting lens, so the aperture numbers on your camera remain valid.
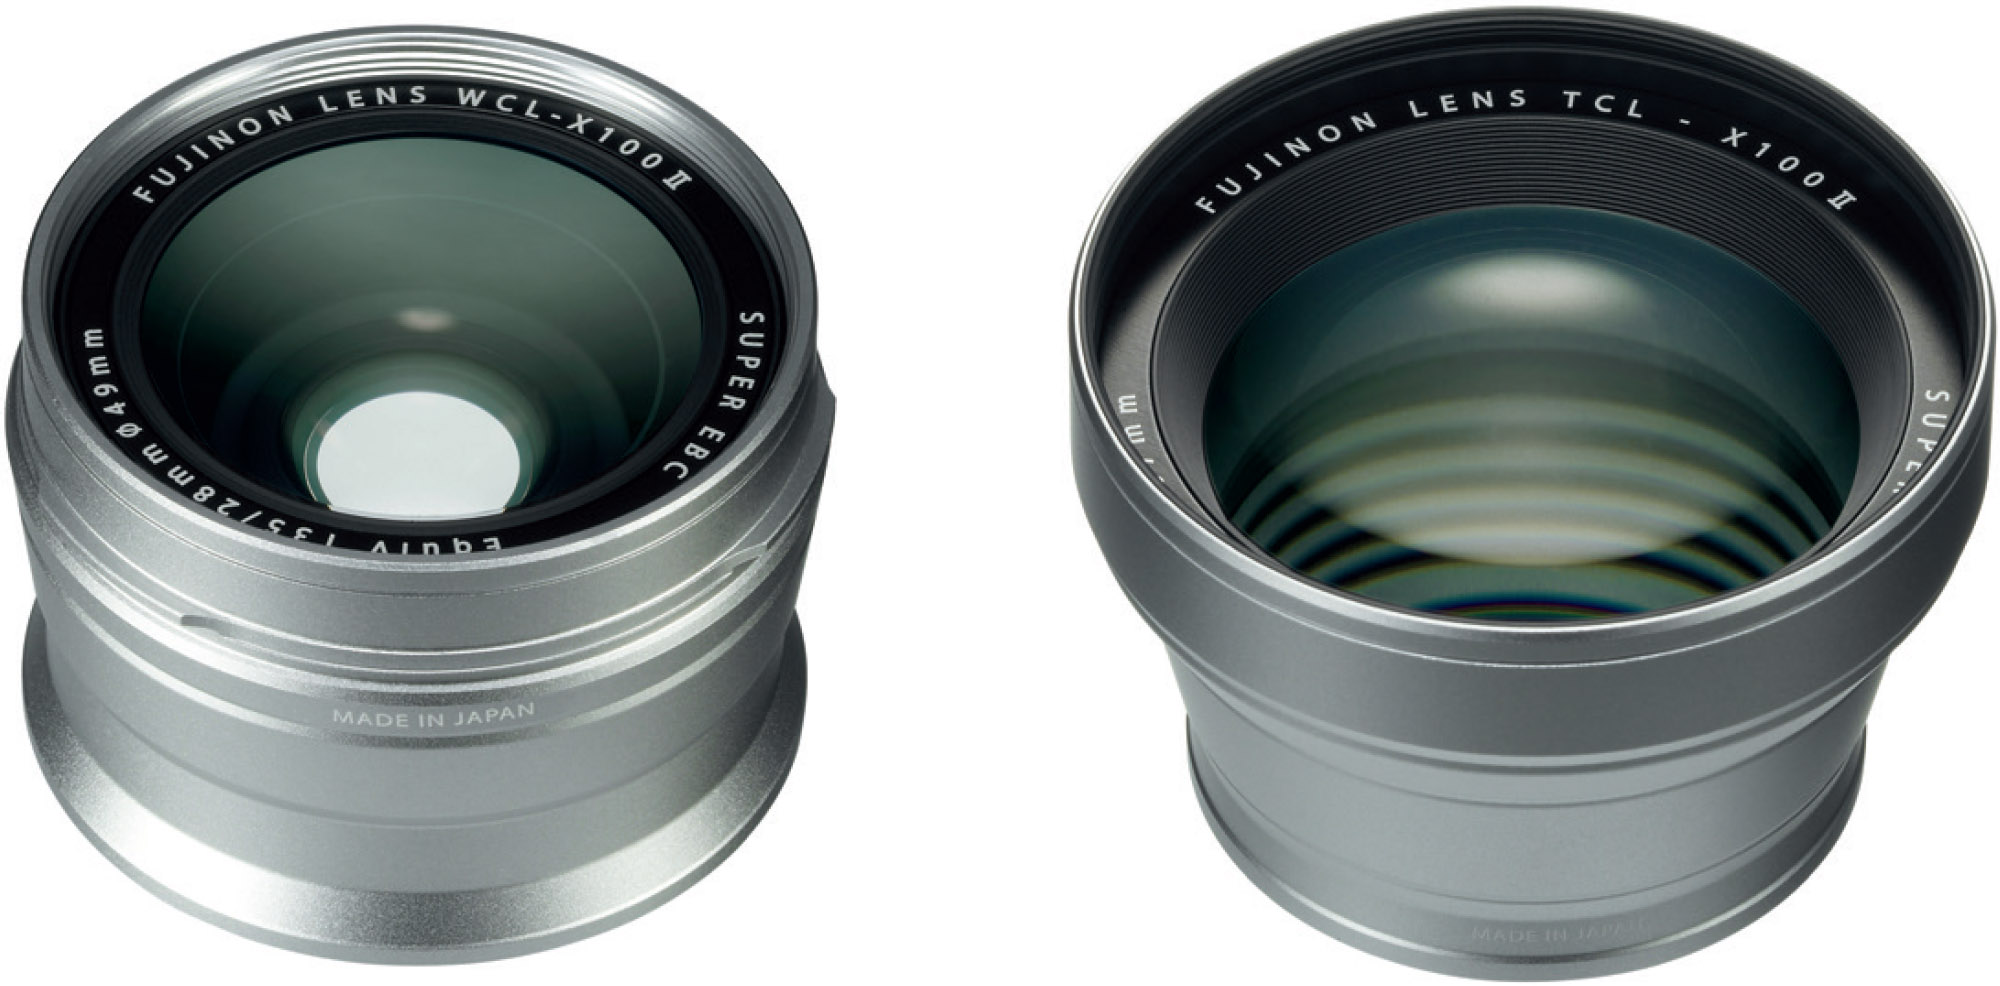
Fig. 45: The WCL-X100(II) and TCL-X100(II) conversion lenses are screw-mount adapters that connect directly to the built-in 23mmF2 lens of your X100 series camera.
Optically, there is no difference between the older and the newer “type II” versions of the wide and tele conversion adapters. It’s just a matter of convenience—the newer versions are automatically recognized by the X100F when you attach and remove them from the camera’s lens, but the older are not. Instead, you have to go to the SHOOTING MENU > (SHOOTING SETTING >) CONVERSION LENS menu and tell the camera when you attach or remove an older conversion lens (WIDE, TELE, or OFF).

Fig. 46: The WCL-X100(II) turns the fixed 23mmF2 lens of your X100 series camera into a 19mmF2 wide-angle lens with an expanded field of view.
If you already own a legacy WCL-X100 or TCL-X100 converter from a previous X100, X100S, or X100T camera, you can keep using it on your X100F. Just don’t forget to tell the camera when a conversion lens has been attached or removed. Here’s why:
- The WCL and TCL conversion lenses require custom digital lens correction for distortion, vignetting, and chromatic aberration. These corrections can only be properly applied (or stored in the RAW metadata) if the camera knows that a WCL or TCL has been attached.
- When you attach a first-generation WCL or TCL and forget to tell the camera, it will apply the wrong correction data, and image quality will suffer.
- The same happens when you remove a first-generation WCL and TCL and forget to tell the camera. The camera still believes that a conversion lens is attached and acts accordingly; the wrong lens-correction data will be used, and image quality will suffer.
- Telling the camera about a WCL or TCL corrects the size and position of the bright frame and AF frames in the optical viewfinder (OVF). It also adjusts the electronic distance and depth-of-field scales in the viewfinder or LCD monitor.
The newer type-II conversion lenses can save you from forgetting to tell the X100F about attaching or removing WCLs and TCLs. If you are a frequent user of a first-generation WCL or TCL, I recommend adding the CONVERSION LENS menu option to the MY MENU of the X100F for quick and easy access. You can edit the MY MENU with SET UP > USER SETTING > MY MENU SETTING.
Important: Since the X100, X100S, and X100T do not feature automatic WCL or TCL recognition, it doesn’t matter if you attach older type-I or newer type-II conversion lenses to any of these cameras. You always have to manually tell these cameras when you are use a conversion lens.
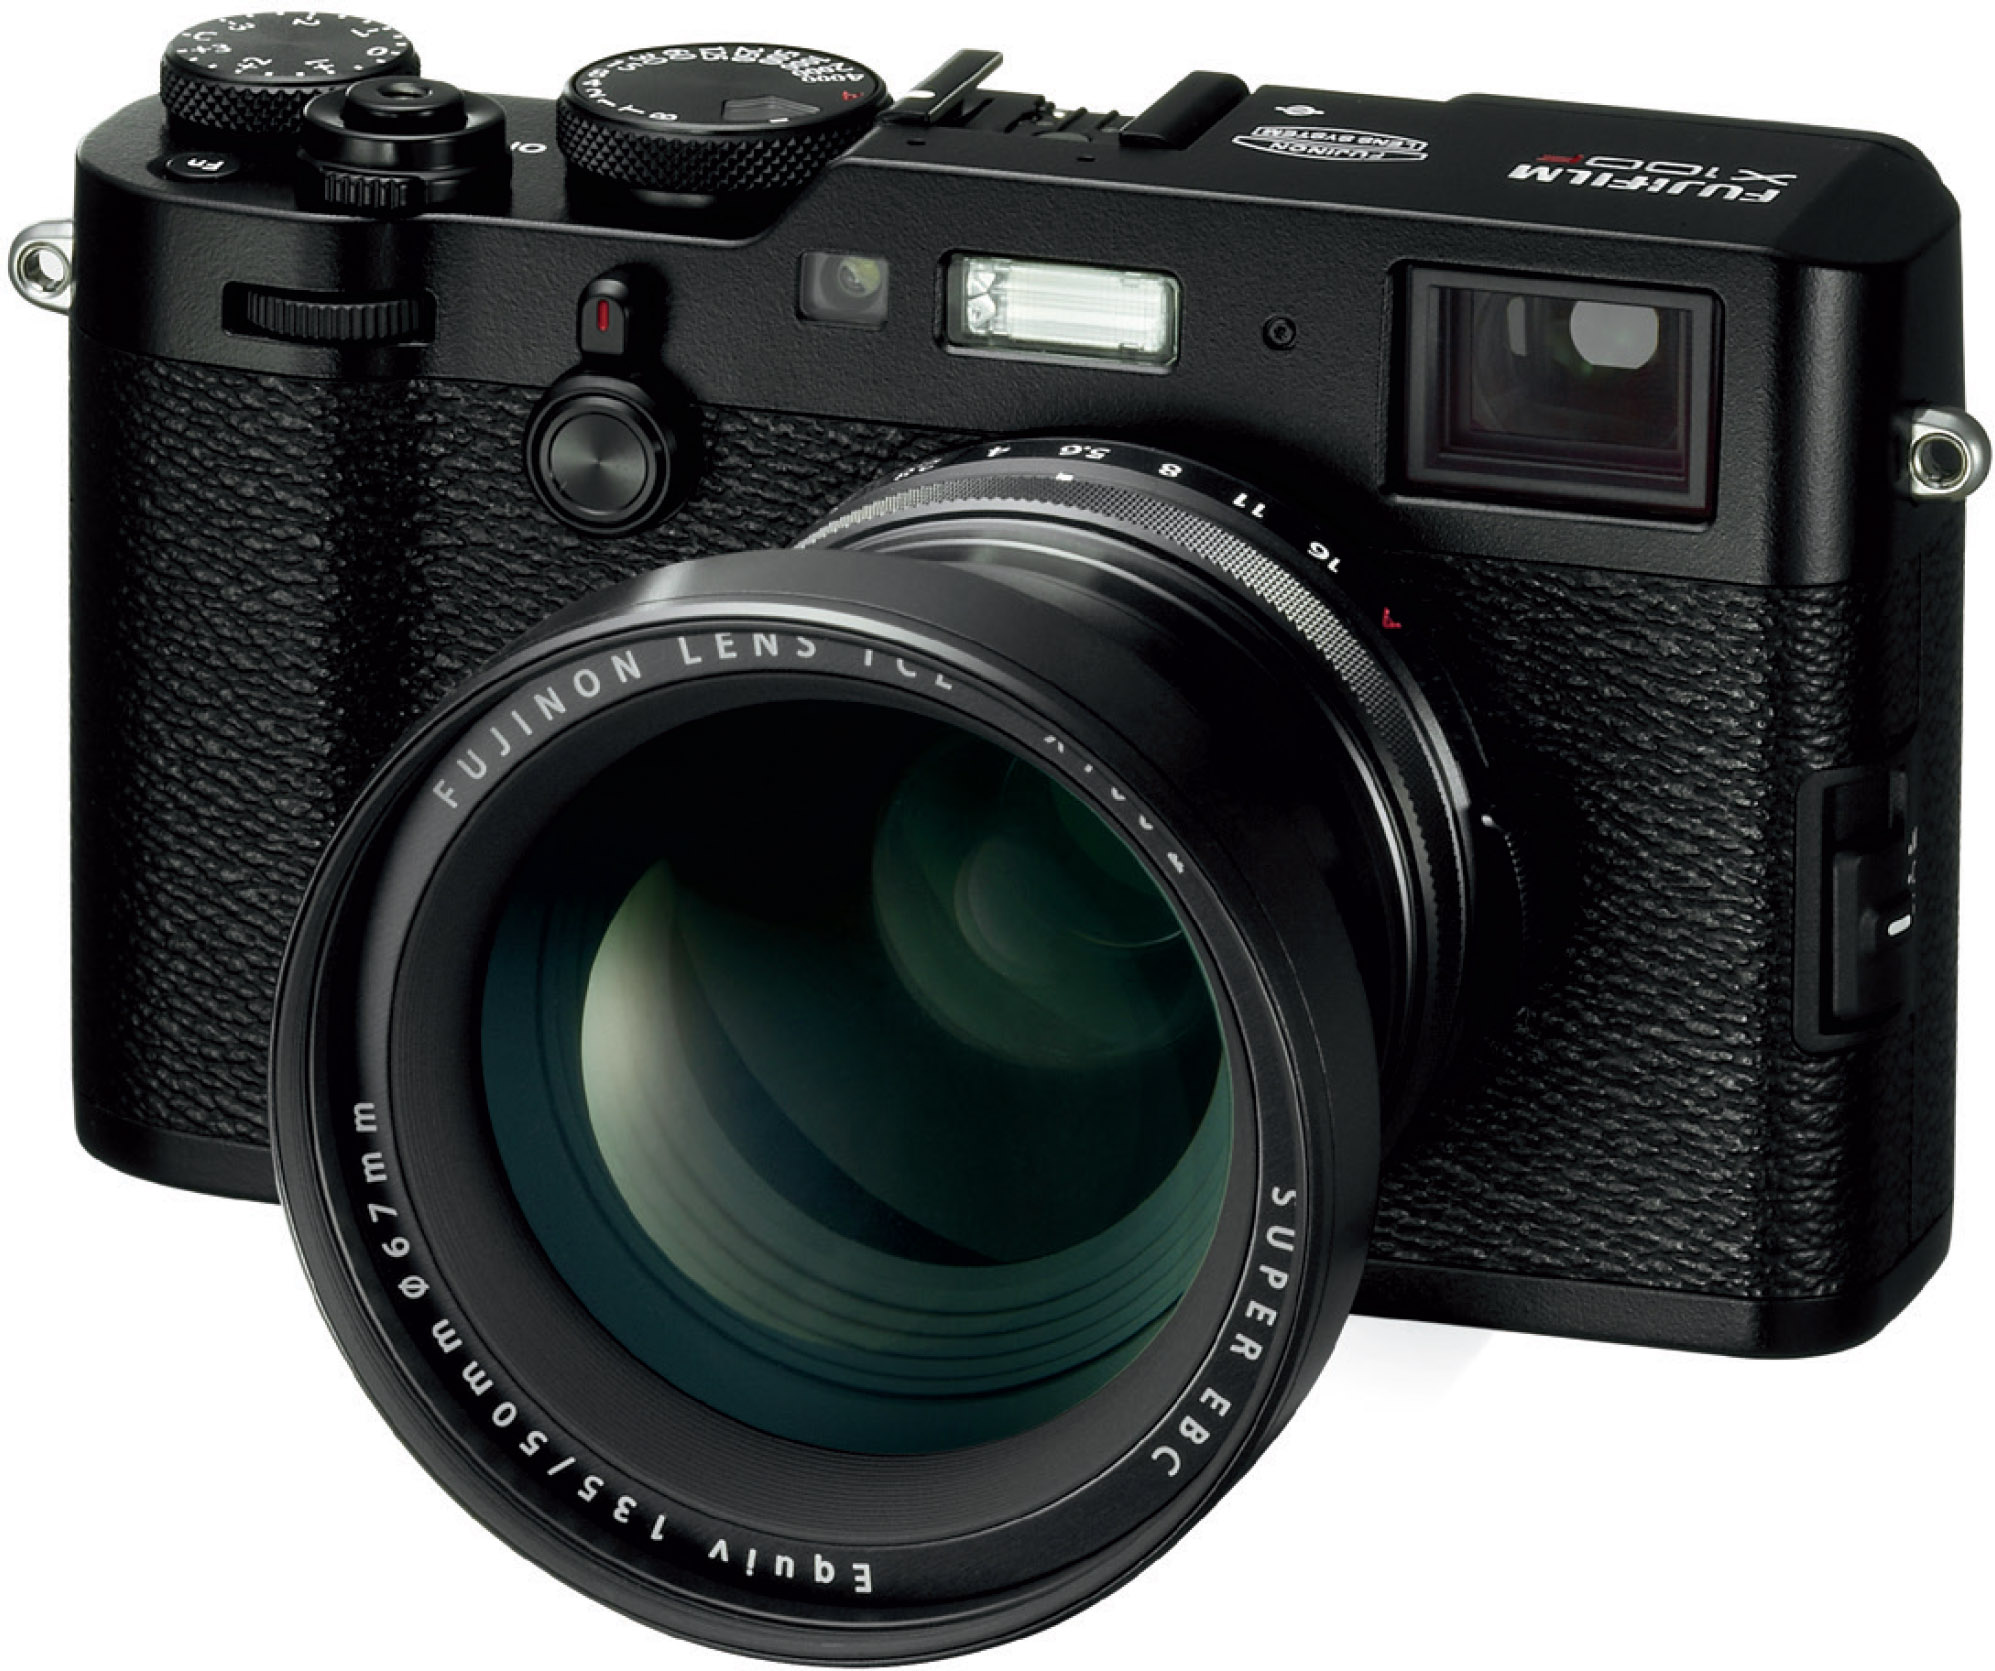
Fig. 47: A black X100F with a corresponding TCL-X100II tele conversion lens.
Analog to the X100 series, you can turn the 18.5mmF2.8 lens of the compact X70 into a 14mmF2.8 lens by attaching the WCL-X70 wide-angle conversion lens, resulting in a 21mm “full-frame” equivalent. Again, you have to manually inform the camera (SHOOTING MENU > WIDE CONVERSION LENS > ON) in order to avoid unwanted distortion and vignetting. Don’t forget to switch this option off again when you remove the conversion lens.
Using teleconverters |
Teleconverters are installed between the camera body and an XF or GF lens, where they extend the effective focal length of the lens by a factor of either 1.4 or 2. This leads to losing either one or two aperture stops of brightness, and it puts a (small) toll on image resolution. Hence, teleconverters should be used in concert with premium lenses that offer a resolution reserve that’s big enough to render the inevitable toll on image quality practically invisible.
As of December 2018, there are four teleconverters available from Fujifilm:
- The XF1.4x TC WR and XF2x TC WR for X-mount are mechanically compatible with the XF50–140mmF2.8 R LM OIS WR, the XF100–400mmF4.5–5.6 R LM OIS WR, and the XF80mmF2.8 R LM OIS WR Macro. It is not recommended to use them with the XF200mmF2 R LM OIS WR.
- The XF1.4x TC F2 WR is compatible and included with the XF200mmF2 R LM OIS WR high-end telephoto prime. After applying lens firmware updates that were released in late December of 2018, it can also be used with the XF50–140mmF2.8 R LM OIS WR, XF100–400mmF4.5–5.6 R LM OIS WR, and XF80mmF2.8 R LM OIS WR Macro lenses.

Fig. 48: The XF1.4x TC F2 WR turns the XF200mmF2 R LM OIS WR telephoto prime effectively into an XF280mmF2.8 R LM OIS WR.
- The GF1.4x TC WR for G-mount is mechanically compatible with the GF250mmF4 R LM OIS WR, effectively turning it into a GF350mmF5.6 R LM OIS WR. Additional compatible lenses will follow in the future.
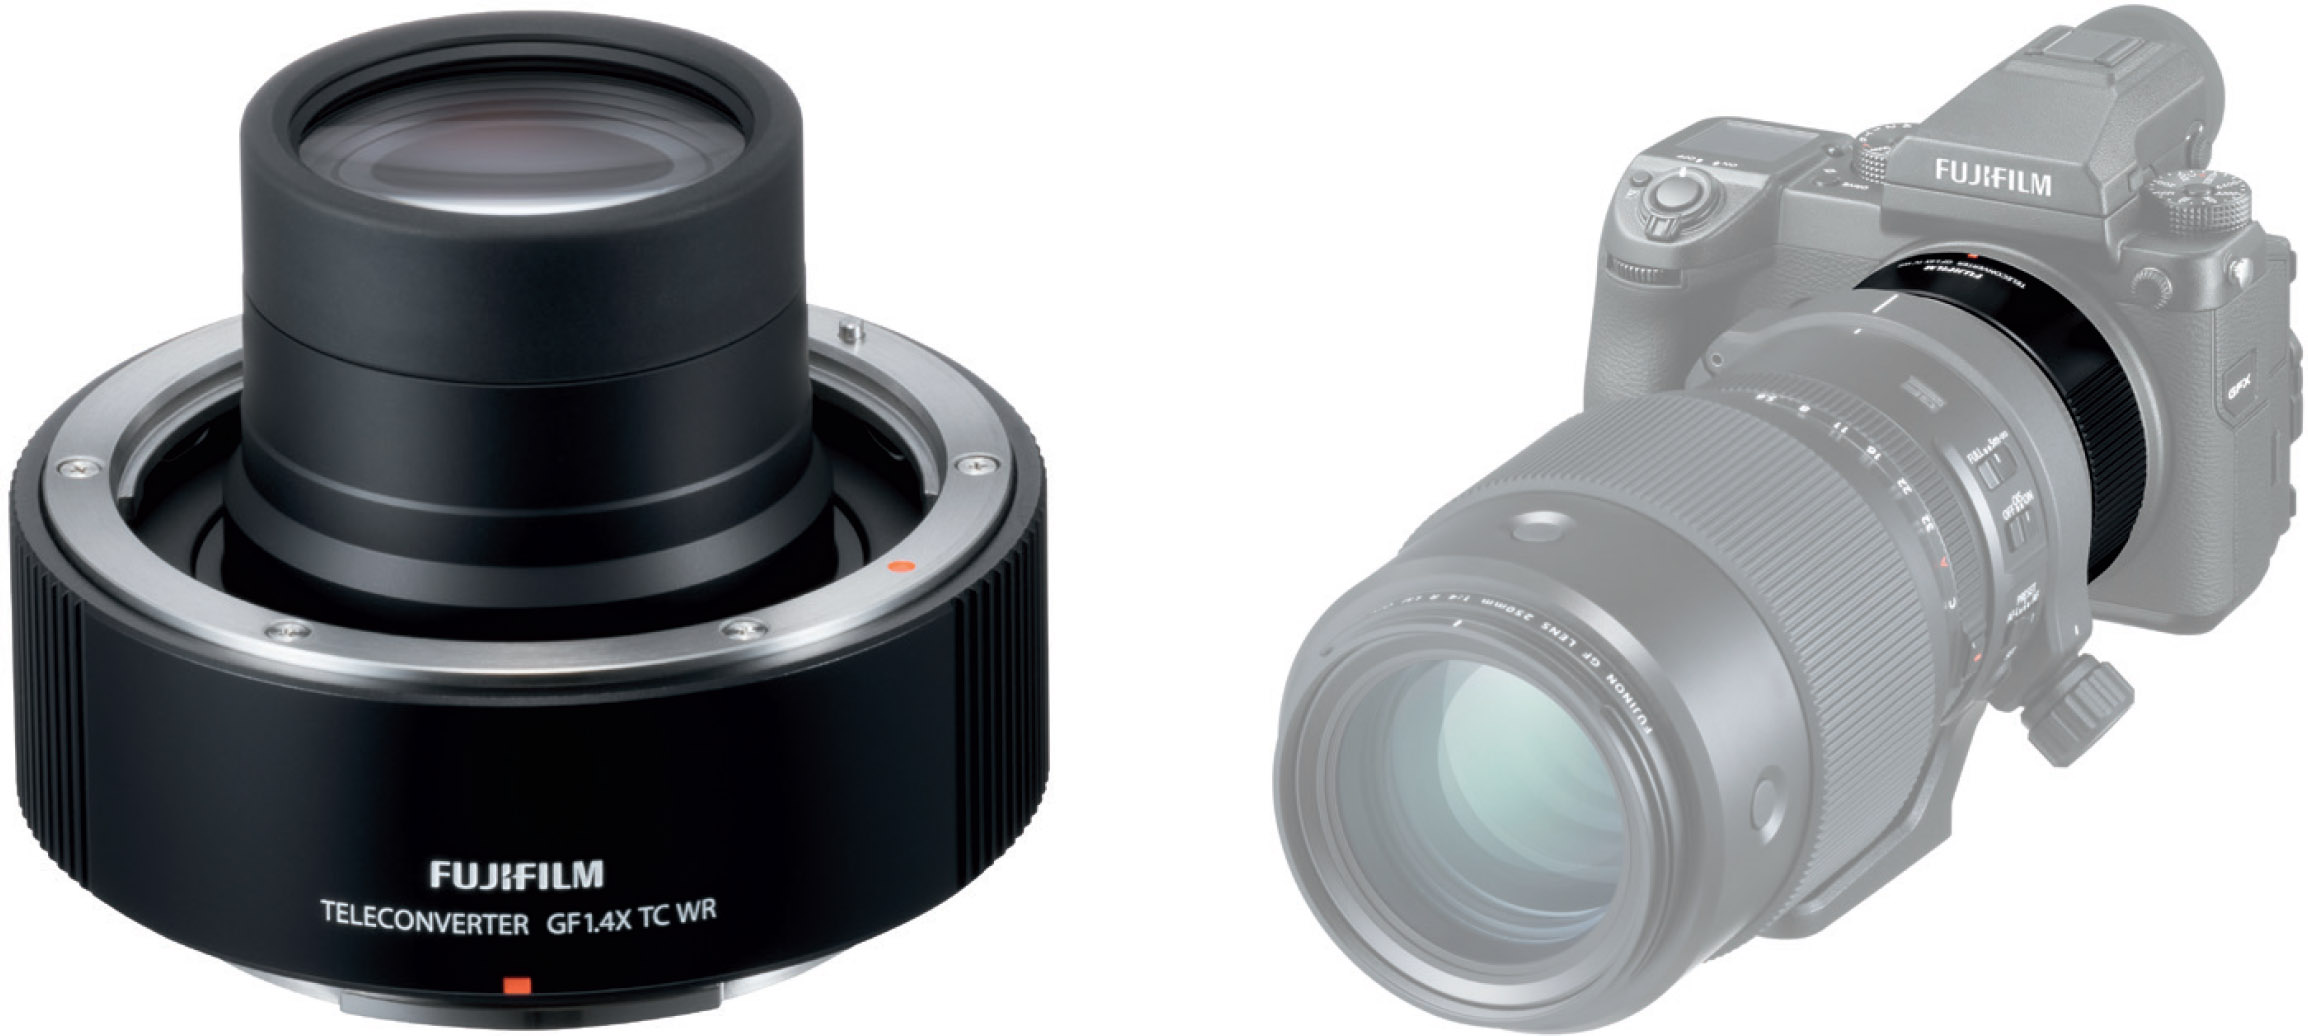
Fig. 49: Like its smaller X-mount siblings, the GF1.4x TC WR (left) protrudes deeply into the rear barrel of the host lens, disguising much of its actual size when it’s sandwiched between the camera and lens (right).
Unlike screw-on conversion lenses for the X70 and X100 series, XF and GF teleconverters have an impact on the speed (maximum brightness) of the resulting lens package.
To give you an example, the XF2x TC WR effectively turns the ultra-sharp XF80mmF2.8 R LM OIS WR Macro lens into an XF160mmF5.6 R LM OIS WR Macro. Setting the aperture of this combo to f/2.8 actually means setting an effective aperture of f/5.6. Using a 2x teleconverter, the light loss comprises two stops, whereas 1.4x converters take away one stop of light.
Luckily, all this is recognized and handled by the camera and lens firmware (as long as you have kept them up to date). The firmware will automatically adjust the on-screen displays and the EXIF [23] data to reflect the effective aperture values. It will also change the lens-correction metadata (factoring in updated values for distortion, vignetting, and chromatic aberration) and include the presence of the teleconverter in the EXIF lens description. For example, a GF250mmF4 R LM OIS WR becomes a GF250mmF4 R LM OIS WR +1.4x.

Fig. 50: The GF1.4x TC WR in action. It was attached to a GF250mmF4 R LM OIS WR, effectively turning it into a GF350mmF5.6 R LM OIS WR lens.
Depending on the quality of your individual lens copy, using the XF100–400mmF4.5–5.6 R LM OIS WR in concert with an XF2x TC WR tends to stretch things thin with regards to performance and image quality, particularly at the long end of the lens. At effectively an 800mm focal length (that’s a full-frame equivalent of 1200mm), the wide-open aperture of this combo is f/11, which can make it hard for your camera’s autofocus to gather enough light to operate quickly and precisely. There’s also some loss of resolution—not only because of the optics involved, but also often due to atmospheric effects when you are capturing far-away subjects.

Fig. 51: XF100–400mmF4.5–5.6 R LM OIS WR & XF2x TC WR: Shooting the moon with effectively 800mm (or 1200mm in full-frame terms) during a warm summer night resulted in some unwelcome atmospheric effects. That’s why astronomic telescopes are usually placed on mountains or in space. This example is based on a square 5 MP crop.
Macro extension tubes |
You can add macro capability to many of your GF, XF, and XC lenses by using Fujifilm’s electronic macro extension tubes: MCEX-11 or MCEX-16 for X-mount, and MCEX-18G WR or MCEX-45G WR for G-mount.
You can download PDF files ([24] and [25]) from Fujifilm’s website that show how the different extension tubes enhance the magnification factor of each X-mount or G-mount lens. Please note that the camera’s electronic depth-of-field/distance scale doesn’t reflect the use of macro extension tubes.
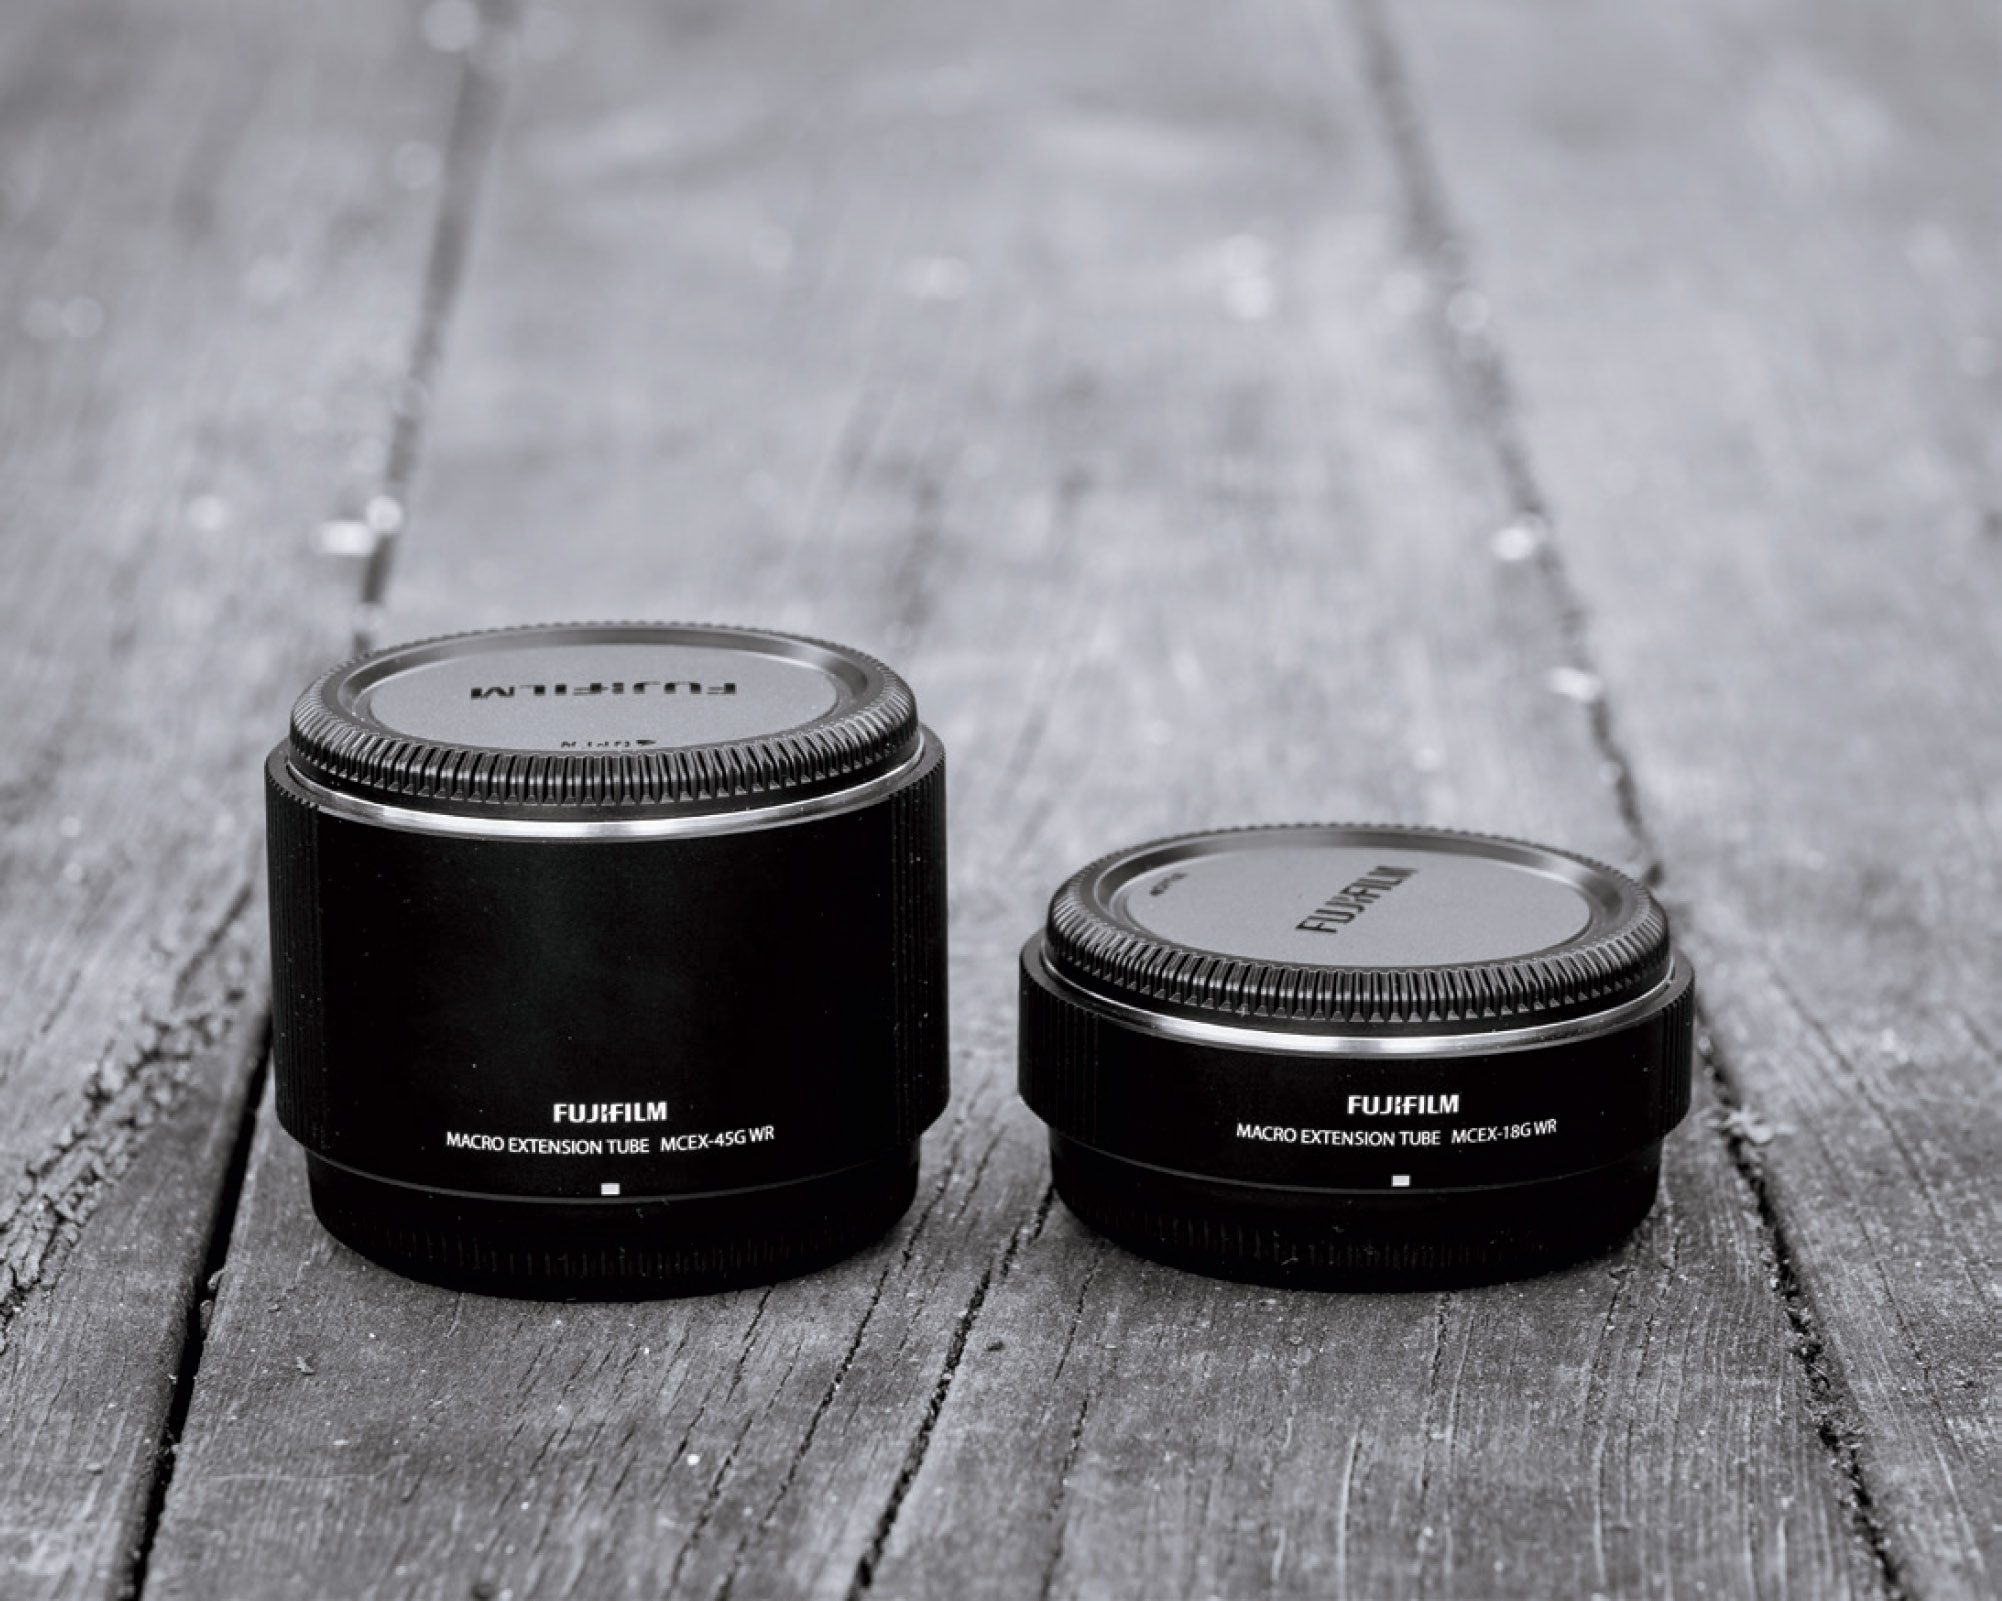
Fig. 52: The MCEX-18G WR and MCEX-45G WR macro extension tubes for the GFX can be combined with most GF lenses. According to Fujifilm, the 18mm version is the smallest possible size that meets the structural requirements, while the 45mm tube was designed to add 1:1 magnification to the GF120mmF4 R LM OIS WR Macro lens.
A word of caution: Stay away from cheap third-party macro extension tubes with electronic contacts. Some of them turned out to be a bad fit, damaging cameras and lenses.
It’s also not recommended to stack more than one macro extension tube on your camera.
Use the included lens hood! |
Most Fujifilm XC, XF, and GF lenses come with a fitted lens hood, which should be used whenever possible. Apart from its optical benefits, the hood protects the lens and the front glass element from damage.
Lens hoods can pose problems, too: they make the lens appear bigger than it is, and they can shade the in-camera/on-camera flash or the autofocus assist light. They also use up extra space in your bag, although most hoods can be reverse-mounted on the lens for transport purposes.
When you shoot with a small shoe-mounted flash, or when you depend on using the AF assist lamp, it’s best to remove the lens hood.

Fig. 53: Lens hoods like this large attachment for the XF200mmF2 R LM OIS WR offer optical benefits and robust lens protection in one package.
Sadly, X100 series cameras don’t come with an included lens hood. However, there are offerings from Fujifilm and aftermarket manufacturers. My personal choice is the original Fujifilm LH-X100. This hood comes with an AR-X100 adapter ring and is compatible with the WCL-X100 and WCL-X100II wide-angle conversion lenses.

Fig. 54: My X100F with an installed LH-X100 lens hood.
The 23mmF2 lens in the X100F is susceptible to lens flare, especially when you shoot against a bright light source like the sun. This can result in a decrease of contrast, which can add a “dreamy” look to a scene. If you don’t like that, try to shade the lens from the light source with your hand, or add contrast during post-processing.

Fig. 55: Shooting against the sun with an attached WCL-X100 can cause the image to lack contrast (left). To compensate, you can add contrast and darken shadow tones in RAW post-processing (right).

Fig. 56: You can also add shadow contrast in-camera by increasing the SHADOW TONE setting in the IMAGE QUALITY SETTING menu before shooting—or later during playback in the RAW CONVERSION menu.
Important: Don’t use screw-in lens hoods with lenses that feature a retractable inner tube, such as the XF27mmF2.8, XF60mmF2.4 R Macro, or XF35mmF1.4 R. The inner tube doesn’t respond well to shocks and pressure. By using a screw-in hood, you’d directly transfer pressure or shocks from the lens hood to the delicate inner lens tube. It’s a recipe for disaster.
Lens protection filters—yes or no? |
Digital cameras don’t require the UV or skylight filters that used to be very popular in the days of analog film photography. This means that a permanently affixed filter has no optical purpose, and only serves as protective glass. This additional glass can have a negative effect on image quality, especially at night or when you shoot against a bright light source. Filters increase the chance of ghosting, unwanted reflections, or a loss of contrast.
I recommend using protective filters only in situations that require this additional protective layer. In most situations, the lens hood should provide sufficient protection. If you still decide to use a filter, make sure to choose a high-quality product. For example, Fujifilm offers protective filters that feature the same Super EBC coating used on their GF/XF/XC lenses. Be prepared to pay a premium, though.
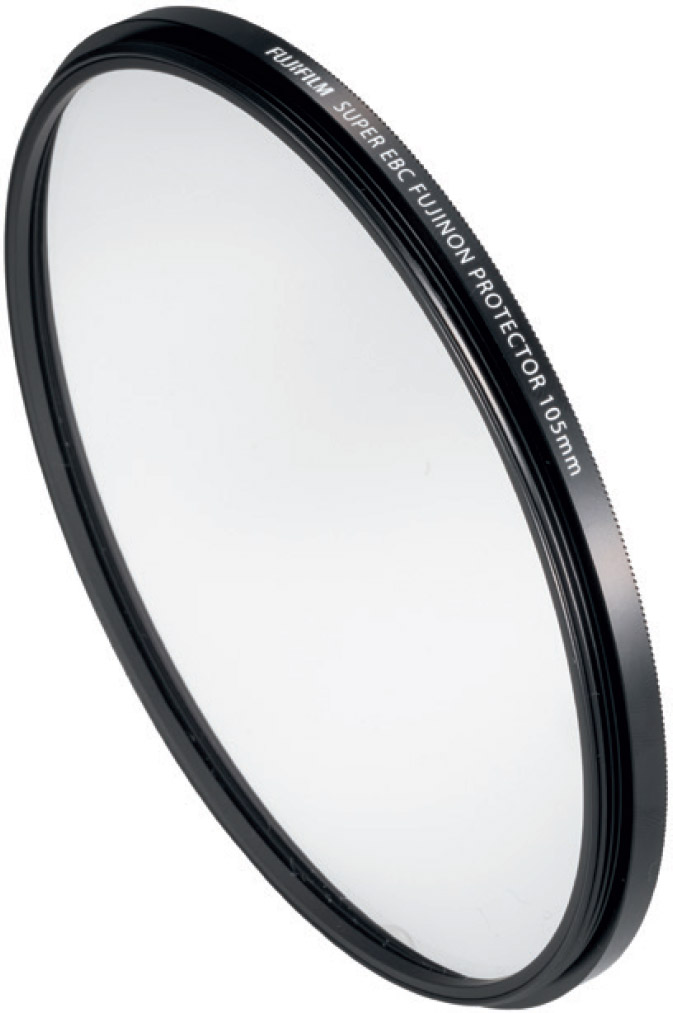
Fig. 57: With a diameter of 105mm, the PRF-105 for the XF200mmF2 is (so far) the largest lens protection filter for the X series.
39mm filters can be tricky! |
The XF60mmF2.4 R and XF27mmF2.8 lenses require filters with a 39mm thread. Those filters are designed to allow the inner lens barrel freely retract into the outer barrel while the filter is attached. If this isn’t possible (for example, because a thin step-up ring is directly attached to the lens or because the filter’s overall diameter is too large), the lens can be damaged when the filter or step-up ring collides with the outer barrel of the lens.
A typical indicator for this and other mechanical lens problems is a message alerting you that the camera needs to be switched off and on again. A possible solution is putting a spacer (a suitable 39mm filter, for example) between the lens and the step-up ring. You should remove the glass from the spacer. You can refit a cheap, old, or unused 39mm filter to do the job as long as it doesn’t interfere with the outer lens barrel when the inner barrel is retracting.

Fig. 58: A 39mm protection filter by Fujifilm. A filter like this can also be used as a spacer between the lens (XF60mm or XF27mm) and a step-up ring.
Don’t forget that screw-in lens hoods are an absolute no-go for a lens with retractable inner barrels like the XF27mmF2.8.
Switch off the camera when exchanging lenses! |
The user manual of your system camera asks you to switch off the camera before exchanging lenses. Then again, who cares, right? In the heat of the moment, many of us forget (or simply don’t have the time) to follow this advice, and so far, nothing terrible has happened.
However, instead of making a bad habit out of this, we should consider why Fujifilm is actually asking us to exchange lenses only when the camera is turned off:
- Several lenses (like the XF60mmF2.4 R Macro or the XF27mmF2.8) have moving inner barrels. During focusing, the inner barrel can protrude way outside the protective edge of the outer barrel. The secure storage and transport state for these lenses is always with a fully retracted inner barrel, and this secure state is automatically entered when you turn off the camera before you remove the lens.
- The same applies to lenses like the new XC15-45mm F3.5–5.6 OIS PZ power zoom: Switch off the camera while the lens is still attached, and the power zoom will safely retract to its compact transport and storage position. On the other hand, if you remove the lens before turning off the camera, your lens may end up in a less compact and more vulnerable state.
- When the camera/lens is powering off, a lock mechanism holds the linear motor driven inner-focusing element of the GF250mmF4 R LM OIS WR and XF200mmF2 R LM OIS WR in place. This suppresses “clacking” noises (caused by the loose lens group) when you carry the lens around off-camera. If you remove the lens while the camera power is still on, this lock mechanism isn’t activated. By the way: “Clacking” is perfectly normal for other lenses with inner-focusing mechanisms, such as the XF90mmF2 R LM or XF50–140mmF2.8 R LM OIS WR, so don’t worry: nothing is broken. Off-camera, there’s simply no camera-powered magnetic field to hold the rear element in place, so it is loosely moving in the barrel when you shake the lens.

Fig. 59: The GF250mmF4 R LM OIS WR (left) and the XF200mmF2 R LM OIS WR (right) are lenses with a lock mechanism to hold the inner focusing element in place when the lens is off-camera. However, this mechanical lock is only activated when you switch off the camera before you remove the lens.
Lens sample variation and how to deal with it |
It’s true: Not all copies of a specific lens type are the same. Some copies are better than others, often also depending on what you shoot, what settings you use and what you look at in the end result. This applies to all lenses from all well-known manufacturers, so it’s not Fujifilm-specific.
That said, most of us are using Fujinon lenses, and as somebody who has tested, owns or has owned at least one copy of every GF, XF, XC, and Zeiss Touit lens model, I am happy to report that quality issues with individual samples are quite rare. Yes, each lens copy is unique, but the differences in image quality are usually negligible in practical use. You could measure them, but you can’t see them in a normal shot.
Thanks to their less complex construction, prime lenses rarely exhibit sample variation issues. Real problems are more common with complex zoom lenses, and they are typically related to decentered lens elements, which results in visible corner softness affecting one or several image quadrants. In my experience, the most likely candidates for this issue are the XF10–24mmF4 R OIS and the XF18–135mmF3.5–5-6 R LM OIS WR.
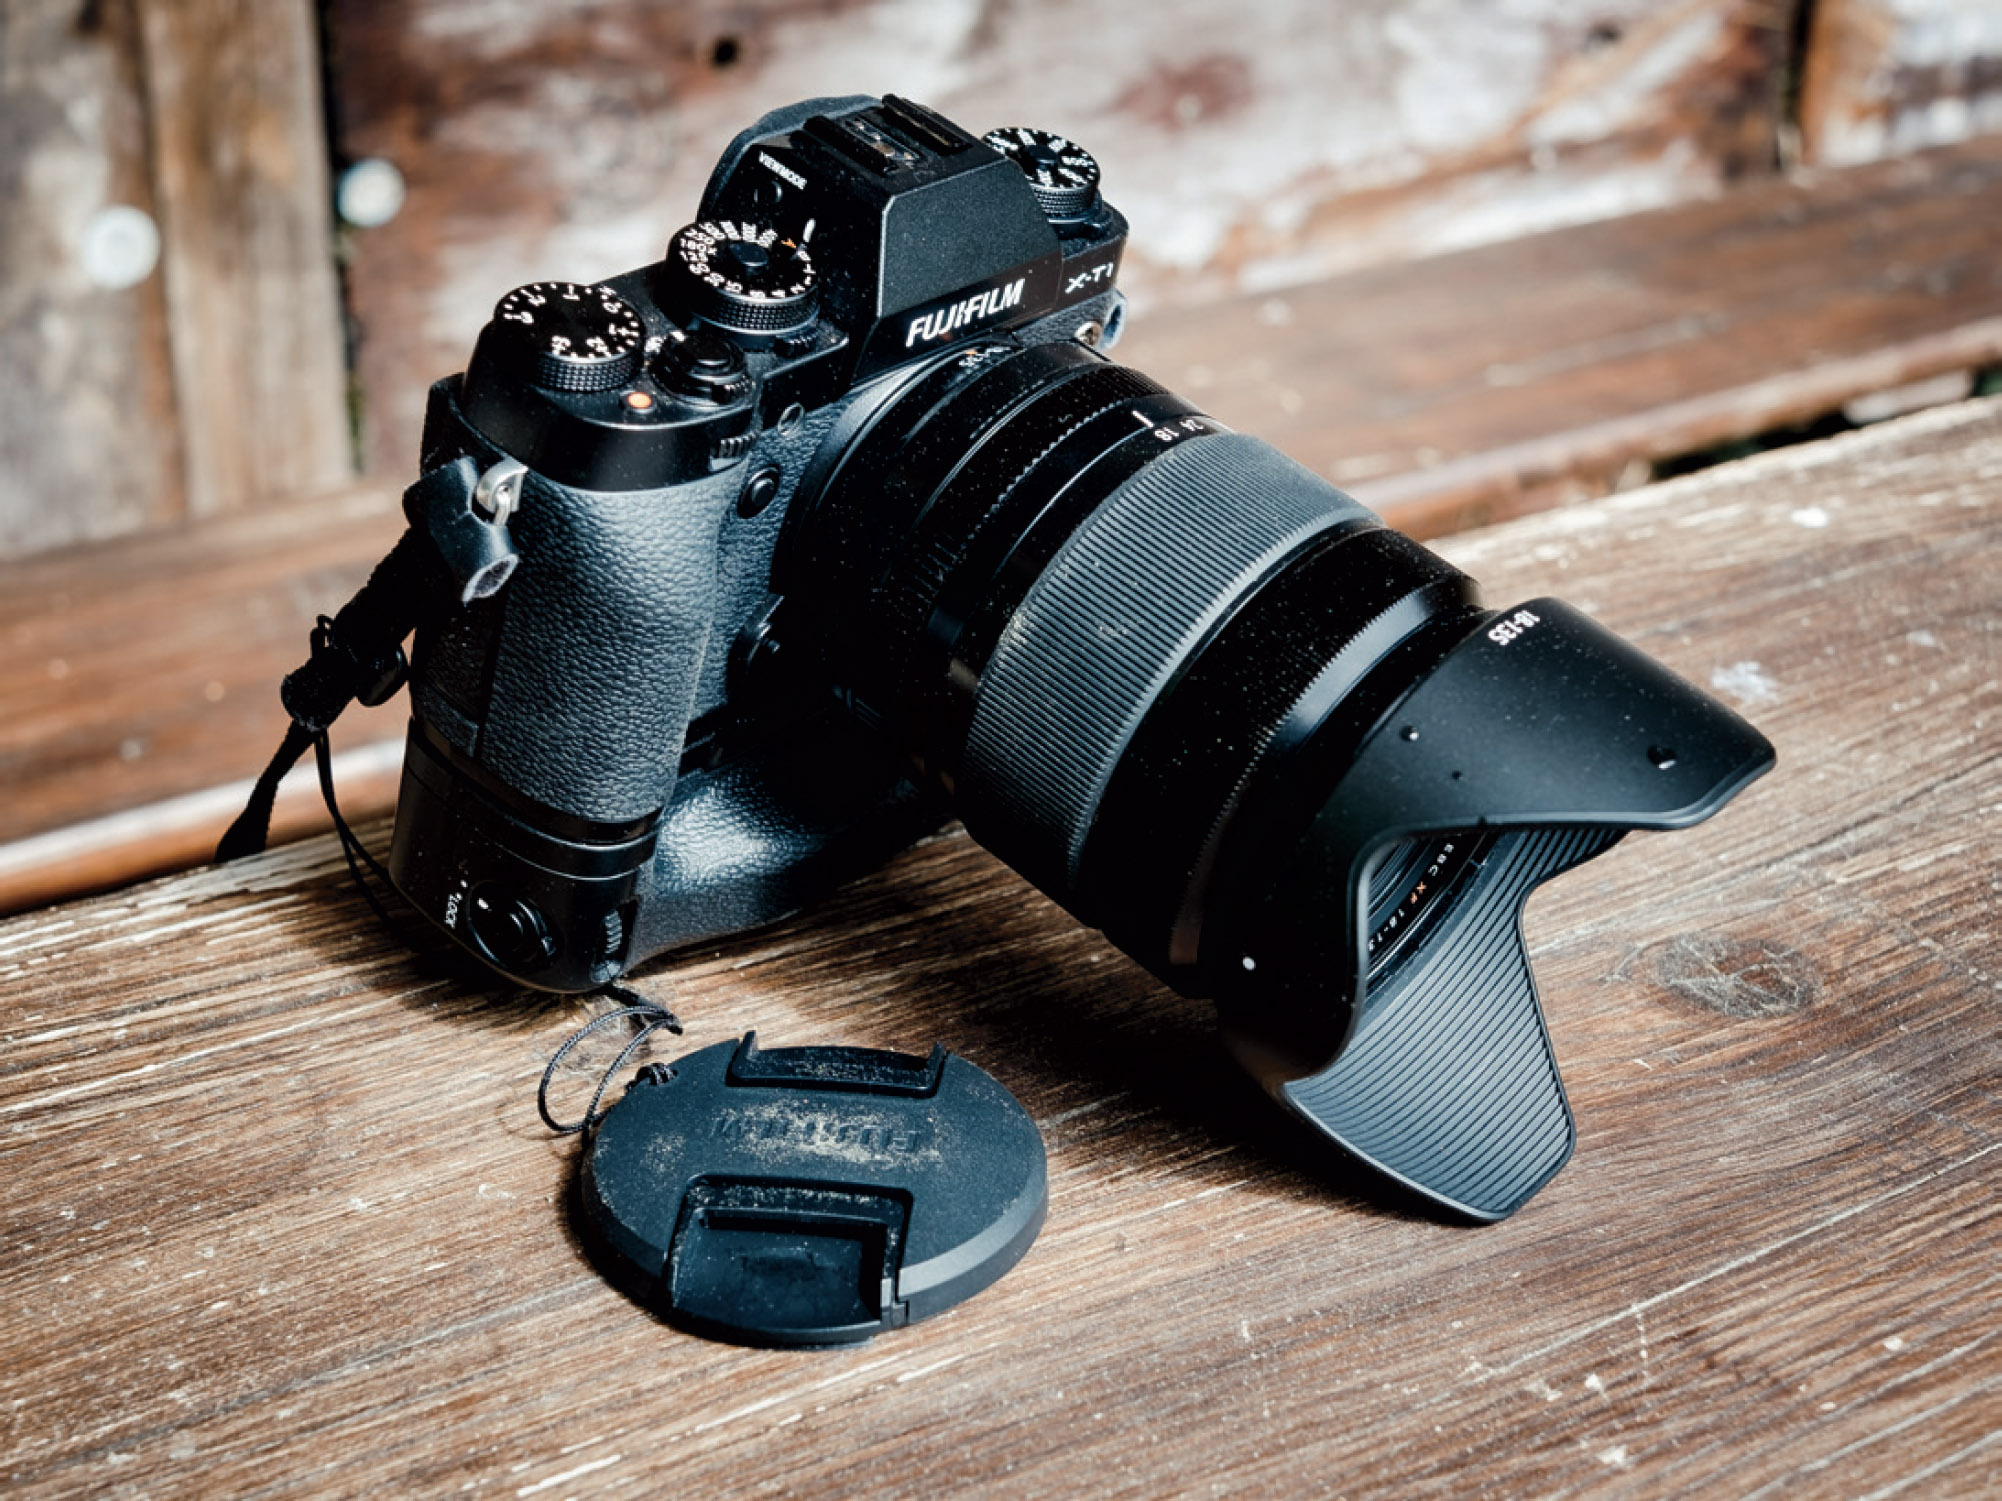
Fig. 60: The highly versatile XF18–135mmF3.5–5-6 R LM OIS WR appears to be more vulnerable for sample variation than other lenses of the GF/XF/XC lineup. On the bright side, the recently announced XF16–80mmF4 R OIS WR promises to be a more consistent alternative. It is supposed to be available in 2019.
Decentered lenses can be realigned and calibrated by Fujifilm (this service should be free within the warranty period), and I recommend that you document the problem for the service technician if you are confident that one exists. Testing for a decentered lens can be performed at home in several ways. One simple but effective method is suggested by Lensrentals [26], another one by the German website Onzesi [27] (English Google translation here: [28]).