
Chapter 7. Consuming a REST API: Using an API from inside Express
This chapter covers
- Calling an API from an Express application
- Handling and using data returned by the API
- Working with API response codes
- Submitting data from the browser back to the API
- Validation and error traps
This chapter is an exciting one! Here’s where we tie the front end to the back end for the first time. We’ll remove the hard-coded data from the controllers, and end up showing data from the database in the browser instead. On top of this we’ll push data back from the browser into the database via the API, creating new subdocuments.
The technology focus for this chapter is on Node and Express. Figure 7.1 shows where this chapter fits into the overall architecture and our grand plan.
Figure 7.1. This chapter will focus on updating the Express application from chapter 4 to interact with the REST API developed in chapter 6.

In this chapter we’ll discuss how to call an API from within Express, and how to deal with the responses. We’ll make calls to the API to read from the database and write to the database. Along the way we’ll look at handling errors, processing data, and creating reusable code by separating concerns. Toward the end we’ll cover the various layers of the architecture to which we can add validation, and why these different layers are useful.
We’ll start off by looking at how to call an API from the Express application.
7.1. How to call an API from Express
The first part we need to cover is how to call an API from Express. This isn’t actually limited to our API; the approach can be used to call any API.
Our Express application needs to be able to call the API URLs that we set up in chapter 6—sending the correct request method, of course—and then be able to interpret the response. To help with doing this we’ll use a module called request.
7.1.1. Adding the request module to our project
The request module is just like any of the other packages we’ve used so far, and can be added to our project using npm. To install the latest version and add it to the package.json file, head to terminal and type the following command:
$ npm install --save request
When npm has finished doing its thing, we can include request into the files that will use it. In Loc8r we only have one file that needs to make API calls, and that’s the file with all of the controllers for the main server-side application. So right at the top of locations.js in app_server/controllers add the following line to require request:
var request = require('request');
Now we’re good to go!
7.1.2. Setting up default options
Every API call with request must have a fully qualified URL, meaning that it must include the full address and not be a relative link. But this URL will be different for development and live environments.
To avoid having to make this check in every controller that makes an API call, we can set a default configuration option once at the top of the controllers file. To use the correct URL depending on the environment we can use our old friend the NODE_ENV environment variable.
Putting this into practice, the top of the controllers file should now look something like the following listing.
Listing 7.1. Adding request and default API options to the locations.js controllers file

With this in place every call we make to the API can reference apiOptions.server and will use the correct base URL.
7.1.3. Using the request module
The basic construct for making a request is really simple, being just a single command taking parameters for options and a callback like this:

The options specify everything for the request, including the URL, request method, request body, and query string parameters. These indeed are the options we’ll be using in this chapter and they’re detailed in table 7.1.
Table 7.1. Four common request options for defining a call to an API
|
Option |
Description |
Required |
|---|---|---|
| url | Full URL of the request to be made, including protocol, domain, path, and URL parameters | Yes |
| method | The method of the request, such as GET, POST, PUT, or DELETE | No—defaults to GET if not specified |
| json | The body of the request as a JavaScript object; an empty object should be sent if no body data is needed | Yes—ensures that the response body is also parsed as JSON |
| qs | A JavaScript object representing any query string parameters | No |
The following code snippet shows an example of how you might put these together for a GET request. A GET request shouldn’t have a body to send, but might have query string parameters.

There are many more options that you could specify, but these are the common four, and the ones we’ll be using in this chapter. For more information on other possible options, take a look at the reference in the GitHub repository: https://github.com/mikeal/request.
The callback function runs when a response comes back from the API, and has three parameters: an error object, the full response, and the parsed body of the response. The error object will be null unless an error has been caught. Three pieces of data are going to be most useful in our code: the status code of the response, the body of the response, and any error thrown. The following code snippet shows an example of how you might structure a callback for the request function:

The full response object contains a huge amount of information, so we won’t go into it here. You can always check it out yourself in a console.log statement when we start adding the API calls into our application.
Putting the parts together, the skeleton for making API calls looks like the following:

Let’s move on and put this theory into practice, and start building the Loc8r controllers to use the API we’ve already built.
7.2. Using lists of data from an API: The Loc8r homepage
By now the controllers file that will be doing the work should already have the request module required in, and some default values set. So now comes the fun part—let’s update the controllers to call the API and pull the data for the pages from the database.
We’ve got two main pages that pull data: the homepage showing a list of locations, and a Details page giving more information about a specific location. Let’s start at the beginning and get the data for the homepage from the database.
The current homepage controller contains just a res.render statement sending hard-coded data to the view. But the way we want it to work is to render the homepage after the API has returned some data. The homepage controller is going to have quite a lot to do anyway, so let’s move this rendering into its own function.
7.2.1. Separating concerns: Moving the rendering into a named function
There are a couple of reasons for moving the rendering into its own named function. First, we decouple the rendering from the application logic. The process of rendering doesn’t care where or how it got the data; if it’s given data in the right format it will use it. Using a separate function helps us get closer to the testable ideal that each function should do just one thing. An additional bonus related to this is that it becomes reusable, so we can call it from multiple places.
The second reason for creating a new function for the homepage rendering is that the rendering process occurs inside the callback of the API request. As well as making the code hard to test, it also makes it hard to read. The level of nesting required makes for a rather large, heavily indented controller function. As a point of best practice you should try to avoid these, as they’re hard to read and understand when you come back to them.
The first step is to make a new function called renderHomepage in the locations.js file in the app_server/controllers folder, and move the contents of the homelist controller into it. Remember to ensure it accepts the req and res parameters too. Listing 7.2 shows a very snipped down version of what we’re doing here. You can now call this from the homelist controller, as also shown in the listing, and things will still work as before.
Listing 7.2. Moving the contents of the homelist controller into an external function

This is a start, but we’re not there yet—we want data!
7.2.2. Building the API request
We’ll get the data we want by asking the API for it, and to do this we need to build the request. To build the request we need to know the URL, method, JSON body, and query string to send. Looking back at chapter 6, or indeed the API code itself, we can see that we need to supply the information shown in table 7.2.
Table 7.2. Information needed to make a request to the API for a list of locations
|
Parameter |
Value |
|---|---|
| URL | SERVER:PORT/api/locations |
| Method | GET |
| JSON body | null |
| Query string | lng, lat, maxDistance |
Mapping this information into a request is quite straightforward. As we saw earlier in the chapter the options for a request are just a JavaScript object. For the time being we’ll hard-code values for longitude and latitude into the options, as it’s quicker and easier for testing. Later in the book we’ll make the application location-aware. For now we’ll choose coordinates close to where the test data is stored. The maximum distance is set to be 20 kilometers.
When we make the request we’ll pass through a simple callback function to call the renderHomepage function so that we don’t leave the browser hanging.
Putting this into code, into the homelist controller, looks like the following listing.
Listing 7.3. Update the homelist controller to call the API before rendering the page

If you save this and run the application again, the homepage should display exactly as before. We might now be making a request to the API, but we’re ignoring the response.
7.2.3. Using the API response data
Seeing as we’re going to the effort of calling the API, the least we can do is use the data it’s sending back. We can make this more robust later, but we’ll start with making it work. In making it work we’re going to assume that a response body is returned to the callback, and we can just pass this straight into the renderHomepage function, as highlighted in the following listing.
Listing 7.4. Update the contents of the homelist controller to use the API response

Seeing as we coded the API, we know that the response body returned by the API should be an array of locations. The renderHomepage function needs an array of locations to send to the view, so let’s try just passing it straight through, making the changes highlighted in bold in the following listing.
Listing 7.5. Update the renderHomepage function to use the data from the API

Can it really be that easy? Try it out in the browser and see what happens. Hopefully you’ll get something like figure 7.2.
Figure 7.2. The first look at using data from the database in the browser—it’s pretty close!

That looks pretty good, right? We need to do something about how the distance is displayed, but other than that all of the data is coming through as we wanted. Plugging in the data was quick and easy because of the work we did upfront designing the views, building controllers based on the views, and developing the model based on the controllers.
We’ve made it work. Now we need to make it better. There’s no error trapping yet, and the distances need some work.
7.2.4. Modifying data before displaying it: Fixing the distances
At the moment the distances in the list are displaying 15 decimal places and no unit of measurement, so they’re extremely accurate and totally useless! We want to say whether each distance is in meters or kilometers, and round the numbers off to the nearest meter or to one decimal place of a kilometer. This should be done before sending the data to the renderHomepage function, as that function should just be reserved for handling the actual rendering, not sorting out the data.
To do this we need to loop through the array of returned locations, formatting the distance value of each one. Rather than doing this inline we’ll create an external function (in the same file) called _formatDistance that accepts a distance value and returns it nicely formatted.
Putting this all together looks like the following listing. Note that the framework of the homelist controller has been left out in this code snippet to keep things short, and the request statement still sits inside the controller.
Listing 7.6. Adding and using a function to format the distance returned by the API

If you make these changes and refresh the page you should see that the distances are now tidied up a bit and are actually useful, as shown in figure 7.3.
Figure 7.3. The homepage is looking better again after formatting the distances returned by the API.

That’s better; the homepage is now looking more like we want it. For extra credit you can add some error trapping to the _formatDistance function to make sure that a distance parameter has been passed, and that it’s a number.
7.2.5. Catching errors returned by the API
So far we’ve assumed that the API is always going to return an array of data along with a 200 success code. But this isn’t necessarily the case. We coded the API to return a 200 status even if no locations are found nearby. As things stand, when this happens the homepage will display without any content in the central area. A far better user experience will be to output a message to the user that there are no places nearby.
We also know that our API can give 404 errors, so we’ll need to make sure we handle these appropriately. We don’t really want to show a 404 to the user in this case, because the error will not be due to the homepage itself being missing. The better option again here is to send a message to the browser in the context of the homepage.
Handling these scenarios shouldn’t be too difficult; let’s see how to do it, starting with the controller.
Making the request callback more robust
One of the main reasons for catching errors is to make sure that they don’t cause code to fail. The first point of weakness is going to be in the request callback where we’re manipulating the response before sending the data off to be rendered. This is fine if the data is always going to be consistent, but we don’t have that luxury.
The request callback currently runs a for loop to format the distances no matter what data is returned by the API. We should really only run this when the API returns a 200 code and some results.
The following listing shows how we can easily achieve this by adding in a simple if statement, checking the status code and the length of the returned data.
Listing 7.7. Validate that the API has returned some data before trying to use it

Updating this piece of code should prevent this callback from falling over and throwing an error if the API responds with a status code other than 200. The next link in the chain is the renderHomepage function.
Defining output messages based on the resonse data
Just like the request callback, our original focus for the renderHomepage function is to make it work when passed an array of locations to display. Now that this might be sent different data types we need to make it handle the possibilities appropriately.
The response body could be one of three things:
- An array of locations
- An empty array, when no locations are found
- A string containing a message when the API returns an error
We already have the code in place to deal with an array of locations, so we need to address the other two possibilities. When catching these errors we also want to set a message that can be sent to the view.
To do this we need to update the renderHomepage function to also do the following:
- Set a variable container for a message.
- Check to see whether the response body is an array; if not, set an appropriate message.
- If the response is an array, set a different message if it’s empty (that is, no locations are returned).
- Send the message to the view.
The following listing shows how this looks in code.
Listing 7.8. Outputting messages if the API doesn’t return location data

The only surprise in there is when we set the responseBody to be an empty array if it was originally passed through as a string. We’ve done this to prevent the view from throwing an error. The view expects an array to be sent in the locations variable; it effectively ignores it if an empty array is sent, but will throw an error if a string is sent.
The last link in this chain is to update the view to display a message when one is sent.
Updating the view to display the error messages
So we’re catching the errors from the API, and we’re now also working with them to pass something back to the user. The final step is to let the user see the message by adding a placeholder into the view template.
We don’t need to do anything fancy here—a simple div with a class of error to contain any messages will suffice. The following listing shows the block content section of the homepage view locations-list.jade in app_server/views.
Listing 7.9. Update the view to display an error message when needed

That’s pretty easy—basic, but easy. It will certainly do for now. All that’s left is to test it.
Testing the API error trapping
As with any new code, we now need to make sure that it works. A really easy way to test this is by changing the query string values that we’re sending in the requestOptions.
To test the “no places found nearby” trap we can either set the maxDistance to a very small number (remembering that it’s specified in kilometers), or set the lng and lat to a point where there are no locations. For example

Did you try testing the API error trapping by setting lng or lat to 0? You should have been expecting to see the “No places found nearby” message, but instead saw “API lookup error.” This is due to a bug in the error trapping in our API code.
In the locationsListByDistance controller, check to see whether the lng and lat query string parameters have been omitted by using a generic “falsey” JavaScript test. Our code simply has this: if (!lng || !lat).
In falsey tests like this, JavaScript looks for any of the values that it considers to be false, such as an empty string, undefined, null, and, importantly for us, 0. This introduces an unexpected bug into our code. If someone happened to be on the equator or on the Prime Meridian (that’s the Greenwich Mean Time line) they’d receive an API error.
This can be fixed by verifying the falsey test to say, “If it’s false but not zero.” In code this looks like this: if ((!lng && lng!==0) || (!lat && lat!==0)).
Updating your controller in the API will remove this bug.
You can use a similar tactic to test the 404 error. The API expects all of the query string parameters to be sent, and will return a 404 if one of them is missing. So to quickly test the code you can just comment one of them out as shown in the following code snippet:

Do these two things one at a time and refresh the homepage to see the different messages coming through. These are shown in figure 7.4.
Figure 7.4. Showing the error message in the views after trapping the errors being returned by the API

That shows the homepage set up nicely. Our Express application is querying the API we built, which pulls data from the MongoDB database and passes it back to the application. When the application gets a response from the API, it works out what to do with it and either shows the data or an error message in the browser.
Now let’s do the same thing for the Details page, this time working with single instances of data.
7.3. Getting single documents from an API: The Loc8r Details page
The Details page should display all of the information we have about a specific location, from the name and address, to ratings, reviews, facilities, and a location map. At the moment this is using data hard-coded into the controller, and looks like figure 7.5.
Figure 7.5. The Details page as it is now, using data hard-coded into the controller

In this section we’ll update the application to allow us to specify which location we want the details for, get the details from the API, and output them to the browser. We’ll also add in some error trapping, of course.
7.3.1. Setting URLs and routes to access specific MongoDB documents
The current path we have to the Details page is just /location. This doesn’t offer a way to specify which location we want to look at. To address this we can borrow the approach from the API routes, where we specify the ID of the location document as a URL parameter.
The API route for a single location is /api/locations/:locationid. We can do the same thing for the main Express application and update the route to contain the locationid parameter. The main application routes for locations are in locations.js in the /routes folder. The following code snippet shows the simple change needed to update the location detail route to accept the locationid URL parameter:

Okay, great ... but where do we get the IDs of the locations from? Thinking about the application as a whole, the homepage is the best place to start, as that’s where the links for the Details page come from.
When the API for the homepage returns an array of locations, each location object contains its unique ID. This entire object is already passed to the view, so it shouldn’t be too difficult to update the homepage view to add this ID as a URL parameter.
It’s not difficult at all in fact! The following listing shows the little change that needs to be made in the locations-list.jade file to append the unique ID of each location to the link through to the Details page.
Listing 7.10. Update the list view to add the location ID to the relevant links


If only everything in life was that easy. The homepage now contains unique links for each of the locations, and they all click through to the Details page. Now we just need to make them show the correct data.
7.3.2. Separating concerns: Moving the rendering into a named function
Just like we did for the homepage, we’ll move the rendering of the Details page into its own named function. Again, this is to keep the rendering functionality separate from the API call and data processing.
The following listing shows a trimmed-down version of the new renderDetailPage function, and how it’s called from the locationInfo controller.
Listing 7.11. Move the contents of the locationInfo controller into an external function

Now we’re set up with a nice, clear controller, ready to query the API.
7.3.3. Querying the API using a unique ID from a URL parameter
The URL for the API call needs to contain the ID of the location. Our Details page now has this ID as the URL parameter locationid, so we can get the value of this using req.params and add it to the path in the request options. The request is a GET request, and as such the json value will be an empty object.
Knowing all of this we can use the pattern we created in the homepage controller to build and make the request to the API. We’ll call the renderDetailPage function when the API responds. All of this is shown together in the following listing.
Listing 7.12. Update the locationInfo controller to call the API

If you run this now you’ll see the same static data as before, as we’re not yet passing the data returned from the API into the view. You can add some console log statements into the request callback if you want to have a quick look at what’s being returned.
If you’re happy that all is working as it should, it’s time for us to pass the data into the view.
7.3.4. Passing the data from the API to the view
We’re currently assuming that the API is returning the correct data—we’ll get around to error trapping soon. This data only needs a small amount of preprocessing: the coordinates are returned from the API as an array, but the view needs them to be named key-value pairs in an object.
The following listing shows how we can do this in the context of the request statement, transforming the data from the API before sending it to the renderDetailPage function.
Listing 7.13. Preprocessing data in the controller

The next logical step is to update the renderDetailPage function to use this data rather than the hard-coded data. To make this work we need to make sure that the function accepts the data as a parameter, and then update the values passed through to the view as required. The following listing highlights the changes needed in bold.
Listing 7.14. Update renderDetailPage to accept and use data from the API

We’re able to take the approach of sending the full object through like this, because we originally based the data model on what was needed by the view and the controller. If you run the application now you should see that the page loads with the data pulled from the database. A screenshot of this is shown in figure 7.6.
Figure 7.6. Details page pulling in data from MongoDB via the API

The eagle-eyed reader will have noticed a problem with the screenshot in figure 7.6. The review doesn’t have a date associated with it.
7.3.5. Debugging and fixing the view errors
So, we have a problem with the view. It’s not outputting the review date correctly. Perhaps we shouldn’t have gotten overconfident about the fact that our data model was based on the view and controller? Let’s take a look at what’s going on.
Starting with a look at the Jade file location—info.jade in app_server/views—we can isolate the line that outputs this section:
small.reviewTimestamp #{review.timestamp}
Now we need to check the schema to see if we changed something when defining the model. The schema for reviews is in locations.js in app_api/models, and looks like the following code snippet:
var reviewSchema = new mongoose.Schema({
  author: String,
  rating: {type: Number, required: true, min: 0, max: 5},
  reviewText: String,
  createdOn: {type: Date, "default": Date.now}
});
Ah yes, here we can see that we changed the timestamp to be called createdOn, which is a more accurate name for the path.
Updating the Jade file using these values looks like the following:
small.reviewTimestamp #{review.createdOn}
Making these changes and refreshing the page gives us figure 7.7.
Figure 7.7. Pulling the name and date directly from the returned data; the format of the date isn’t very user friendly

Success! Of sorts. The date is now showing, but not quite in the user-readable format that we’d like to see. We should be able to fix this using Jade.
Formatting dates using a Jade mixin
Back when we were setting up the views we used a Jade mixin to output the rating stars based on the rating number provided. In Jade, mixins are like functions—you can send parameters when you call them, run some JavaScript code if you wish, and have them generate some output.
Formatting dates is something that could be useful in a number of places, so let’s create a mixin to do it. Our outputRating mixin is in the sharedHTMLfunctions.jade file in app_server/views/_includes. Let’s add a new mixin called formatDate to that file.
In this mixin we’ll largely use JavaScript to convert the date from the long ISO format into the more readable format of Day Month Year, for example 24 June 2014. The ISO date object actually arrives here as a string, so the first thing to do is convert it into a JavaScript date object. When that’s done we’ll be able to use various JavaScript date methods to access the various parts of the date.
The following listing shows how this is done in a mixin—remember that lines of JavaScript in a Jade file must be prefixed with a dash.
Listing 7.15. Create a Jade mixin to format the dates

That mixin will now take a date and process it to output in the format that we want. As the mixin will render the output, we simply need to call it from the correct place in the code. The following code demonstrates this, again based on the same two isolated lines from the whole template:
![]()
The call to the mixin should be placed on a new line, so you’ll need to remember to take care with the indentation—the date should be nested inside the <small> tag.
Now the Details page is complete and looking like it should, as shown in figure 7.8.
Figure 7.8. The complete Details page. The ID of the location is passed from the URL to the API, and the API retrieves the data and passes it back to the page to be formatted and rendered correctly.

Excellent; that’s exactly what we wanted. If the URL contains an ID that’s found in the database then the page displays nicely. But what happens if the ID is wrong, or isn’t found in the database?
7.3.6. Creating status-specific error pages
If the ID from the URL isn’t found in the database, the API will return a 404 error. This error originates from the URL in the browser, so the browser should also return a 404—the data for the ID wasn’t found, so in essence the page cannot be found.
Using techniques we’ve already seen in this chapter we can quite easily catch when the API returns a 404 status, using response.statusCode in the request callback. We don’t really want to deal with it inside the callback, so we’ll just pass the flow into a new function that we can call, _showError.
Catching all error codes
Even better than just trapping for a 404 response, we can flip it over and look for any response from the API that isn’t a 200 success response. We can pass the status code to the _showError function and let it figure out what to do. To enable the _showError function to keep control we’ll also pass through the req and res objects.
The following listing shows how to update the request callback to render the Details page for successful API calls, and route all other errors to the catch-all function _showError.
Listing 7.16. Trap any errors caused by the API not returning a 200 status
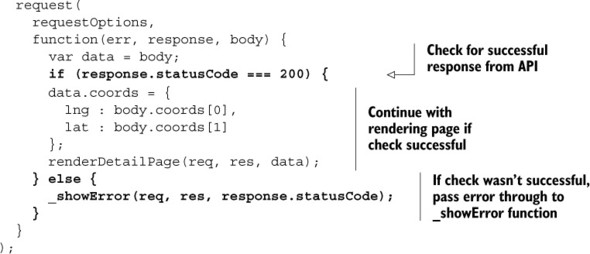
Great, so now we’ll only try to render the Details page if we have something from the API to display. So what shall we do with the errors? Well, for now we just want to send a message to the users letting them know that there’s a problem.
Displaying error messages
We don’t want to do anything fancy here, just let the user know that something is going on and give them some indication of what it is. We have a generic Jade template already that’s suitable for this; in fact, it’s called generic-text.jade and expects just a title and some content. That will do us.
If you wanted to you could create a unique page and layout for each type of error, but for now we’re good with just catching it and letting the user know. As well as letting the user know, we should also let the browser know by returning the appropriate status code when the page is displayed.
Listing 7.17 shows what the _showError function looks like, accepting a status parameter that, as well as being passed through as the response status code, is also used to define the title and content of the page. Here we have a specific message for a 404 page and a generic message for any other errors that are passed.
Listing 7.17. Create an error-handling function for API status codes that aren’t 200

This function can be reused from any of the controllers where we might find it useful. It’s also built in such a way that we can easily add new, specific error messages for particular codes if we want to.
You can test the 404 error page by just slightly changing the location ID in the URL, and you should see something like figure 7.9.
Figure 7.9. The 404 error page displayed when the location ID in the URL isn’t found in the database by the API

That brings us to the end of the Details page. We can successfully display all of the information from the database for a given location, and also display a 404 message to the visitor if the location can’t be found.
Following through the user journey, our next and final task is to add the ability to add reviews.
7.4. Adding data to the database via the API: Add Loc8r reviews
In this section we’ll see how to take form data submitted by a user, process it, and post it to the API. Reviews are added to Loc8r by clicking the Add Review button on a location’s Details page, filling in a form, and submitting it. At least that’s the plan anyway. We currently have the screens to do this, but not the underlying functionality to make it happen. We’re going to change that right now.
Here’s a quick list of the things we’re going to need to do:
- Make the review form aware of which location the review will be for.
- Create a route for the form to POST to.
- Send the new review data to the API.
- Show the new review in place on the Details page.
Note that at this stage in the development we don’t have an authentication method in place, so we have no concept of user accounts.
7.4.1. Setting up the routing and views
The first item on our list is really about getting the ID of the location to the Add Review page in a way that we can use it when the form is submitted. After all, this is the unique identifier that the API will need to add a review.
The best approach for getting the ID to the page will be to contain it in the URL, like we did for the Details page itself.
Defining the two review routes
Getting the location ID into the URL will mean changing the route of the Add Review page to add a locationid parameter. While we’re at it, we can deal with the second item on the list and create a route for the form to POST to. Ideally, this should have the same path as the review form, and be associated with a different request method and different controller.
The following code snippet shows how we can update the routes in index.js in the /routes folder:

Those are all of the routes we’ll need for this section, but restarting the application will fail because the POST route references a controller that doesn’t exist. We can fix this by adding a placeholder function into the controller file. Add the following code snippet into locations.js in app_server/controllers and the application will fire up successfully once again:
module.exports.doAddReview = function(req, res){
};
Now the application will start again, but if you click through to the Add Review page you’ll get an error. Oh yes, we need to update the link to the Add Review page from the Details page.
Fixing the location detail view
We need to add the location ID to the href specified in the Add Review button on the Details page. The controller for this page passes through the full data object as returned from the API, which, along with the rest of the data, will contain the _id field. This data object is called location when passed to the view.
The following code snippet shows a single line from the location-info.jade template in the app_server/views folder. This shows how to add the location ID to the link for the Add Review button.
a.btn.btn-default.pull-right(href="/location/#{location._id}/reviews/new")
| Add review
With that updated and saved, we can now click through to a review form for each individual location. There are just a couple of issues here: the form still doesn’t post anywhere, and the name of the location is currently hard-coded into the controller.
Updating the review form view
Next we want to make sure that the form posts to the correct URL. When the form is submitted now, it just makes a GET request to the /location URL as shown in the following code snippet:
form.form-horizontal(action="/location", method="get", role="form")
This line is taken from the location-review-form.jade file in app_server/views. The /location path is no longer valid in our application, and we also want to use a POST request instead of a GET request. The URL we want to post the form to is actually the same as the URL for the Add Review: /location/:locationid/reviews/new.
A really easy way to achieve this is to set the action of the form to be an empty string, and set the method to be post, as shown in the following code snippet:
form.form-horizontal(action="", method="post", role="form")
Now when the form is submitted it will make a POST request to the URL of the current page.
Creating a named function for rendering the Add Review page
As with the other pages, we’ll move the rendering of the page into a separate named function. This allows us the separation of concerns we’re looking for when coding, and prepares us for the next steps.
The following listing shows how this should look in the code.
Listing 7.18. Create an external function to hold the contents of the addReview controller

This might look a little odd, creating a named function and then having the call to that function be the only thing in the controller, but it will be very useful in just a moment.
Getting the location detail
On the Add Review page we want to display the name of the location in order to retain a sense of context for the user. This means we want to hit the API again, give it the ID of the location, and get the information back to the controller and into the view. We’ve just done this for the Details page, albeit with a different controller. If we approach this right we shouldn’t have to write much new code.
Rather than duplicating the code and having to maintain two pieces, we’ll go for a DRY (don’t repeat yourself) approach. The Details page and the Add Review page both want to call the API to get the location information and then do something with it. So why not create a new function that does just this? We’ve already got most of the code in the locationInfo controller, we just need to change how it calls the final function. Instead of calling the renderDetailPage explicitly, we’ll make it a callback.
So we’ll have a new function called getLocationInfo that will make the API request. Following a successful request, this should then invoke whatever callback function was passed. The locationInfo controller will now call this function, passing a callback function that simply calls the renderDetailPage function. Similarly, the addReview controller can also call this new function, passing it the renderReviewForm function in the callback.
This gives us one function making the API calls that will have different outcomes depending on the callback function sent through. The following listing shows this all in place.
Listing 7.19. Create a new reusable function to get location information


Tip
If this approach of creating your own callback handlers is new or confusing to you, take a look online at appendix D, particularly section D.4, “Understanding JavaScript callbacks.”
And there we have a nice DRY approach to the problem. It would have been very easy to just copy and paste the API code from one controller to another, which, if we’re being honest, is absolutely fine if you’re figuring out your code and what you need to make it work. But when you see two pieces of code doing pretty much exactly the same thing, always ask yourself how you can make it DRY—it makes your code cleaner and easier to maintain.
Displaying the location detail
We’re forgetting one thing here. The function for rendering the form still contains hard-coded data instead of using the data from the API. A quick tweak to the function will change that, as is illustrated in the following listing.
Listing 7.20. Removing hard-coded data from the renderReviewForm function

And with that the Add Review page is looking good once again, displaying the correct name based on the ID found in the URL, as shown in figure 7.10.
Figure 7.10. Add Review page pulling in the location name via the API, based on the ID contained in the URL

7.4.2. POSTing the review data to the API
By now we have the Add Review page set up and ready to go, including the posting destination. We’ve even got the route and controller for the POST action in place. The controller, doAddReview, is just an empty placeholder, though.
The plan for this controller is as follows:
- Get the location ID from the URL to construct the API request URL.
- Get the data posted in the form and package it up for the API.
- Make the API call.
- Show the new review in place if successful.
- Display an error page if not successful.
The only part of this that we haven’t seen yet is passing the data to the API; so far we’ve just passed an empty JSON object to ensure that the response is formatted as JSON. Now we’re going to take the form data and pass it to the API in the format it expects. We have three fields on the form, and three references that the API expects. All we need to do is map one to the other. The form fields and model paths are shown in table 7.3.
Table 7.3. Mapping the names of the form fields to the model paths expected by the API
|
Form field |
API references |
|---|---|
| name | author |
| rating | rating |
| review | reviewText |
Turning this mapping into a JavaScript object is pretty straightforward. We just need to create a new object containing the variable names that the API expects, and use req.body to get the values from the posted form. The following code snippet shows this in isolation, and we’ll put it into the controller in just a moment:
var postdata = {
  author: req.body.name,
  rating: parseInt(req.body.rating, 10),
  reviewText: req.body.review
};
Now that we’ve seen how that works, we can add it into the standard pattern we’ve been using for these API controllers and build out the doAddReview controller. Remember that the status code the API returns for a successful POST operation is 201, not the 200 we’ve been using so far with the GET requests. The following listing shows the doAddReview controller using everything we’ve learned so far.
Listing 7.21. doAddReview controller used to post review data to the API


Now we can create a review and submit it, and then see it on the Details page, as shown in figure 7.11.
Figure 7.11. After filling in and submitting the review form, the review is shown in situ on the Details page.

Now that it all works, let’s take a quick look at adding form validation.
7.5. Protecting data integrity with data validation
Whenever an application accepts external input and adds it to a database you need to make sure that the data is complete and accurate—as much as you can, or as much as it makes sense to. For example, if someone is adding an email address you should check that it’s a valid email format, but you can’t programmatically validate that it’s a real email address.
In this section we’re going to look at the ways we can add validation to our application, to prevent people from submitting empty reviews. There are three places that we can add validation:
- At the schema level, using Mongoose, before the data is saved
- At the application level, before the data is posted to the API
- At the client side, before the form is submitted
We’ll look at each of these in turn, and add some validation at every step.
7.5.1. Validating at the schema level with Mongoose
Validating the data before saving it is arguably the most important stage. This is the final step, the one last chance to make sure that everything is as correct as it can be. This stage is particularly important when the data is exposed through an API; if we don’t have control over all of the applications using the API we can’t guarantee the quality of the data that we’re going to get. So it’s important to ensure that the data is valid before saving it.
Updating the schema
When we first set up the schema in chapter 5, we looked at adding some validation in Mongoose. We set the rating path to be required, but we also want the author displayName and reviewText to be required. If any of these fields are missing, a review won’t make sense. Adding this to the schema is simple enough, and looks like the following listing (the schema is in locations.js in the app_api/model folder).
Listing 7.22. Adding validation to reviews at the schema level

Once this is saved we can no longer save a review without any review text. We can try, but we’ll see the error page shown in figure 7.12.
Figure 7.12. Error message shown when trying to save a review without any review text, now that the schema says it’s required

On the one hand it’s good that we’re protecting the database, but it’s not a great user experience. We should try to catch that error and let the visitor try again.
Catching Mongoose validation errors
If you try to save a document with one or more required paths missing or empty, Mongoose will return an error. It does this without having to make a call to the database, as it’s Mongoose itself that holds the schema and knows what is and isn’t required. The following code snippet shows an example of such an error message:
{
  message: 'Validation failed',
  name: 'ValidationError',
  errors: {
    'reviews.1.reviewText': {
      message: 'Path `reviewText` is required.',
      name: 'ValidatorError',
      path: 'reviewText',
      type: 'required',
      value: ''
    }
  }
}
In the flow of the application this happens inside the callback from the save function. If we take a look at the save command inside the doAddReview function (in locations.js in app_api/controllers) we can see where the error bubbles up and where we set the 400 status. The following code snippet shows this, including a temporary console log statement to show the output of the error to terminal:

Our API uses the sendJSONresponse function to return this message as the response body, alongside the 400 status. So we can look for this information in our application by looking at the response body when the API returns a 400 status.
The place to do this is in the app_server, in the doAddReview function in controllers/locations.js, to be precise. When we’ve caught a validation error we want to let the user try again by redirecting to the Add Review page. So that the page knows that an attempt has been made, we can pass a flag in the query string.
The following listing shows this code in place, inside the request statement callback for the doAddReview function.
Listing 7.23. Trapping validation errors returned by the API

So now when the API returns a validation error we can catch it and send the user back to the form to try again. Passing a value in the query string means that we can look for this in the controller that displays the review form, and send a message to the view to alert the user to the problem.
Display an error message in the browser
To display an error message in the view, we need to send a variable to the view if we see the err parameter passed in the query string. The renderReviewForm function is responsible for passing the variables into the view. When it’s called it’s also passed the req object, which contains the query object, making it quite easy to pass the err parameter when it exists. The following listing highlights the simple change required to make this happen.
Listing 7.24. Update the controller to pass a query string error string to the view

The query object is always part of the req object, regardless of whether it has any content. This is why we don’t need to error trap this and check that it exists—if the err parameter isn’t found it will just return undefined.
All that remains is to do something with this information in the view, letting the user know what the problem is. We’ll show a message to the user at the top of the form, if a validation error was bubbled up. To give this some style and presence on the page we’ll use a Bootstrap alert component; this is just a div with some relevant classes and attributes. The following code snippet shows the two lines needed added in place in the location-review-form view:
form.form-horizontal(action="", method="post", role="form")
  - if (error == "val")
    .alert.alert-danger(role="alert") All fields required, please try again
So now when the API returns a validation error we catch this and display a message to the user. Figure 7.13 shows how this looks.
Figure 7.13. The validation error message showing in the browser, the end result of a process kicked off by Mongoose catching the error and returning it

This type of validation at the API level is important, and is generally a great place to start because it always protects a database against inconsistent or incomplete data, no matter the origin. But the experience for end users isn’t always the best—they have to submit the form, and it makes a roundtrip to the API before the page reloads with an error. There’s clearly room for improvement here, and the first step is to perform some validation at the application level before the data is passed to the API.
7.5.2. Validating at the application level with Node and Express
Validation at the schema level is the backstop, the final line of defense in front of a database. An application shouldn’t rely solely on this, and you should try to prevent unnecessary calls to the API, reducing overhead and speeding things up for the user. One way to do this is to add validation at the application level, checking the submitted data before sending it to the API.
In our application, the validation required for a review is pretty simple; we can add some simple checks to ensure that each of the fields has a value. If this fails then we redirect the user back to the form, adding the same query string error flag as before. If the validation checks are successful then we allow the controller to continue into the request method. The listing on the next page shows the additions needed in the doAddReview controller in locations.js in the app_server/controllers folder.
Listing 7.25. Adding some simple validation to an Express controller


The outcome for this will be the same as before—if the review text is missing then the user gets shown the error message on the Add Review page. The user doesn’t know that we’re no longer posting data to the API, but it’s one less roundtrip and so it should be a faster experience. But we can make it even faster with the third tier of validation: browser-based validation.
7.5.3. Validating in the browser with jQuery
Just like application-level validation speeds things up by not requiring a call to the API, client-side validation in the browser can speed things up by catching an error before the form is submitted to the application, by removing yet another call. Catching an error at this point will keep the user on the same page.
To get JavaScript running in the browser, we need to place it in the public folder in the application. Express treats the contents of this folder as static files to be downloaded to the browser instead of being run on the server. If you don’t have a folder called javascripts in your public folder already, create one now. Inside this new folder create a new file called validation.js.
Writing the jQuery validation
Inside this new validation.js file we’ll put a jQuery function that will do the following:
- Listen for the submit event of the review form.
- Check to see that all of the required fields have a value.
- If one is empty, show an error message like we’ve used in the other types of validation, and prevent the form from submitting.
We won’t dive into the semantics of jQuery here, assuming you have some familiarity with it or a similar library. The following listing shows the code to do this.
Listing 7.26. Creating a jQuery form validation function

For this to work we need to ensure that the form has an ID of addReview set so that the jQuery can listen for the correct event. We also need to add this script to the page so that the browser can run it.
Adding the jQuery to the page
We’ll include this jQuery file at the end of the body, along with the other client-side JavaScript files. These are set in the layout.jade view in app_server/views, right at the very bottom. Add a new line below the others pointing to the new file, as shown in the following code snippet:
script(src='/bootstrap/js/bootstrap.min.js')
script(src='/javascripts/validation.js')
That’s all there’s to it. The form will now validate in the browser without the data being submitted anywhere, removing a page reload and any associated calls to the server.
Tip
Client-side validation can seem like it’s all that you need, but the other types are vital to the robustness of an application. JavaScript can be turned off in the browser, removing the ability to run this validation, or the validation could be bypassed and have data posted directly to either the form action URL or the API endpoint.
7.6. Summary
In this chapter we’ve covered
- Using the request module to make API calls from Express
- Making POST and GET requests to API endpoints
- Separating concerns by keeping rendering functions away from the API request logic
- Applying a simple pattern to the API logic in each controller
- Using the status code of the API response to check for success or failure
- Applying data validation in three places in the architecture, and when and why to use each
Coming up next in chapter 8 we’re going to introduce Angular into the mix, and start playing with some interactive front-end components on top of the Express application.